

Getting Started with NVIDIA Personal AI Router
NVIDIA Personal AI Router (PAIR) connects compatible systems on the same local network and routes independent inference requests to a node that can serve them. Install PAIR on each participating system, pair the systems, enable an inference engine, and then point compatible applications at PAIR’s local endpoint.
PAIR routes each request to one node. It does not pool GPU memory, combine GPUs into a larger logical GPU, or split one model or request across systems.
If a step does not go as described stop and check Troubleshooting. For example, nothing starts, no nodes appear, pairing stalls, or an application cannot connect. It is organized by symptom, so you can go straight to the one you are seeing.
Setting PAIR up on a system with no desktop? The desktop application needs a graphical session, so a headless system is driven from PAIR’s terminal interface instead. Follow Using the PAIR terminal interface, which covers starting PAIR, pairing, engines, models, and monitoring from a terminal. The rest of this guide describes the desktop application.
Before You Begin
All you need is a machine to install PAIR on. One machine is enough to run local inference; two or more on the same local network let you try pairing and routing.
Nothing else has to be in place first:
- Engines. PAIR installs and starts Ollama or LM Studio for you in step 4. If an engine is already installed, PAIR detects and uses it instead.
- Models. PAIR downloads models for you in step 4. A request needs only one eligible node, so a single node holding the model is enough. Prepare the same model on additional nodes when you want any of them to be able to serve it.
- Firewall. The Windows installer adds the rules PAIR needs, and typical Linux desktop configurations do not block local traffic. If you run a restrictive firewall, allow the ports listed in step 7 so nodes can discover and reach each other.
1. Install PAIR
Download the appropriate asset from the PAIR releases page.
Choose from:
-
Windows installer: Download and run the Windows installer, then launch NVIDIA Personal AI Router from the Start menu.
-
Debian package: Download the package, then run this from the directory you downloaded it into:
Then launch NVIDIA Personal AI Router from the desktop application menu. If you have kept more than one PAIR package in that directory, install the one you want by its full filename instead.
-
macOS disk image: Open the
.dmgand drag NVIDIA Personal AI Router to Applications, then launch it from there.
The releases page also carries an archive of the background services and the terminal interface for each platform. It contains no desktop application, so it is the headless option rather than another way to install this one. Refer to Using the PAIR terminal interface.
Quick Start From Source
If you prefer to compile PAIR, install the prerequisites listed under Prerequisites, then:
npm start builds the Go services from sibling ../services, prepares the
desktop assets, and launches the desktop application. No separate services build
is required.
Install or start PAIR on every system that will participate. Refer to Building and running PAIR from source for standalone service builds and for running the services directly.
2. Complete First-Run Setup
On first launch, PAIR opens a setup window that can install available inference engines on the local system. PAIR selects Ollama by default when it is available for your platform.
- Review the available engines.
- Select the engines to install, or skip installation if they are already managed separately.
- Finish the setup and wait for the selected engine to report that it is running.
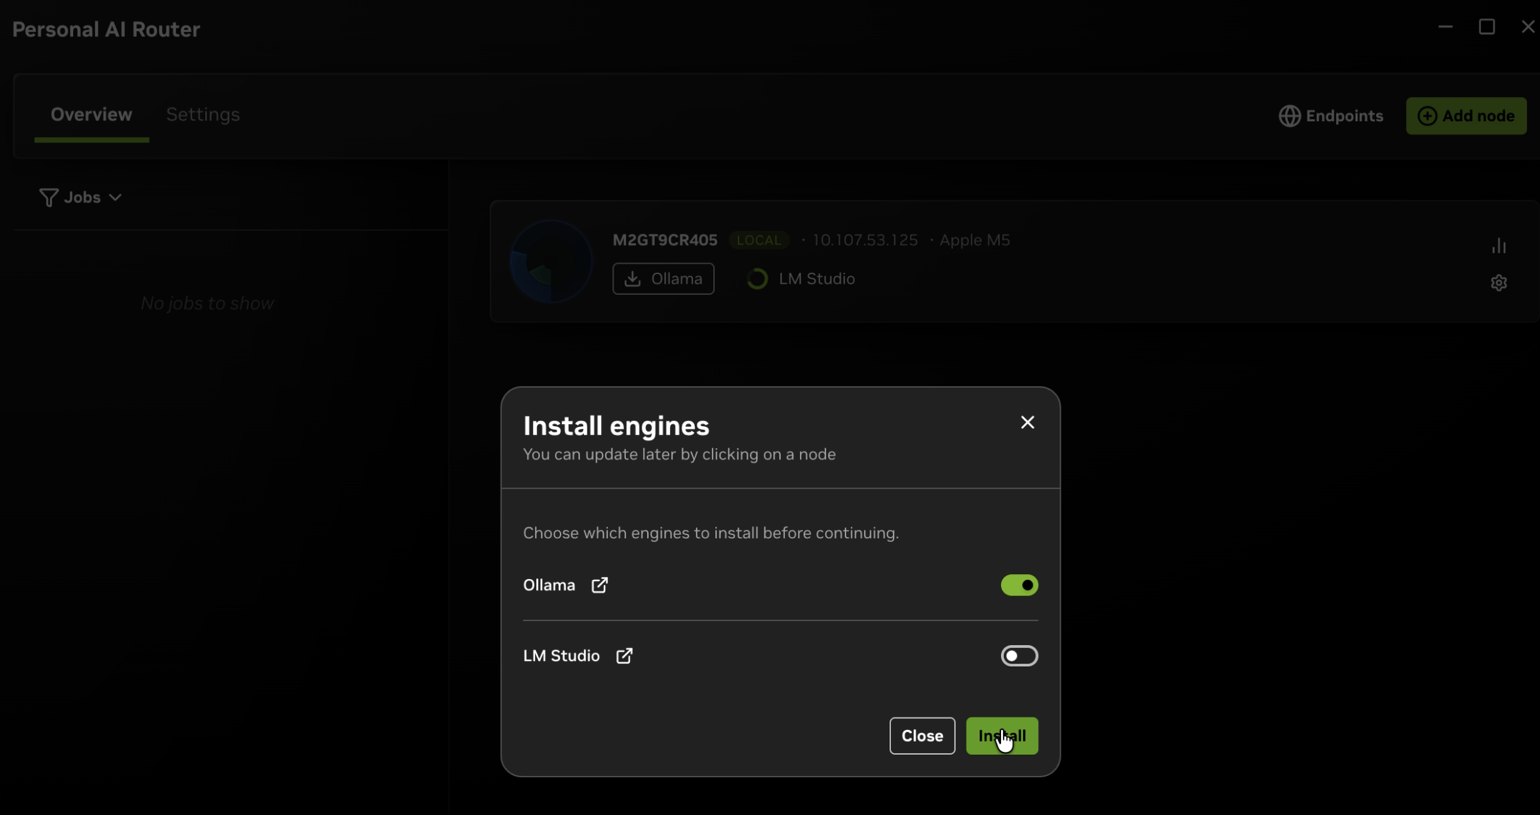
The first start takes a little longer than later ones, because PAIR is starting its background services for the first time. If Overview is still showing Loading… after a minute or two, something did not come up. Refer to PAIR Does Not Become Ready.
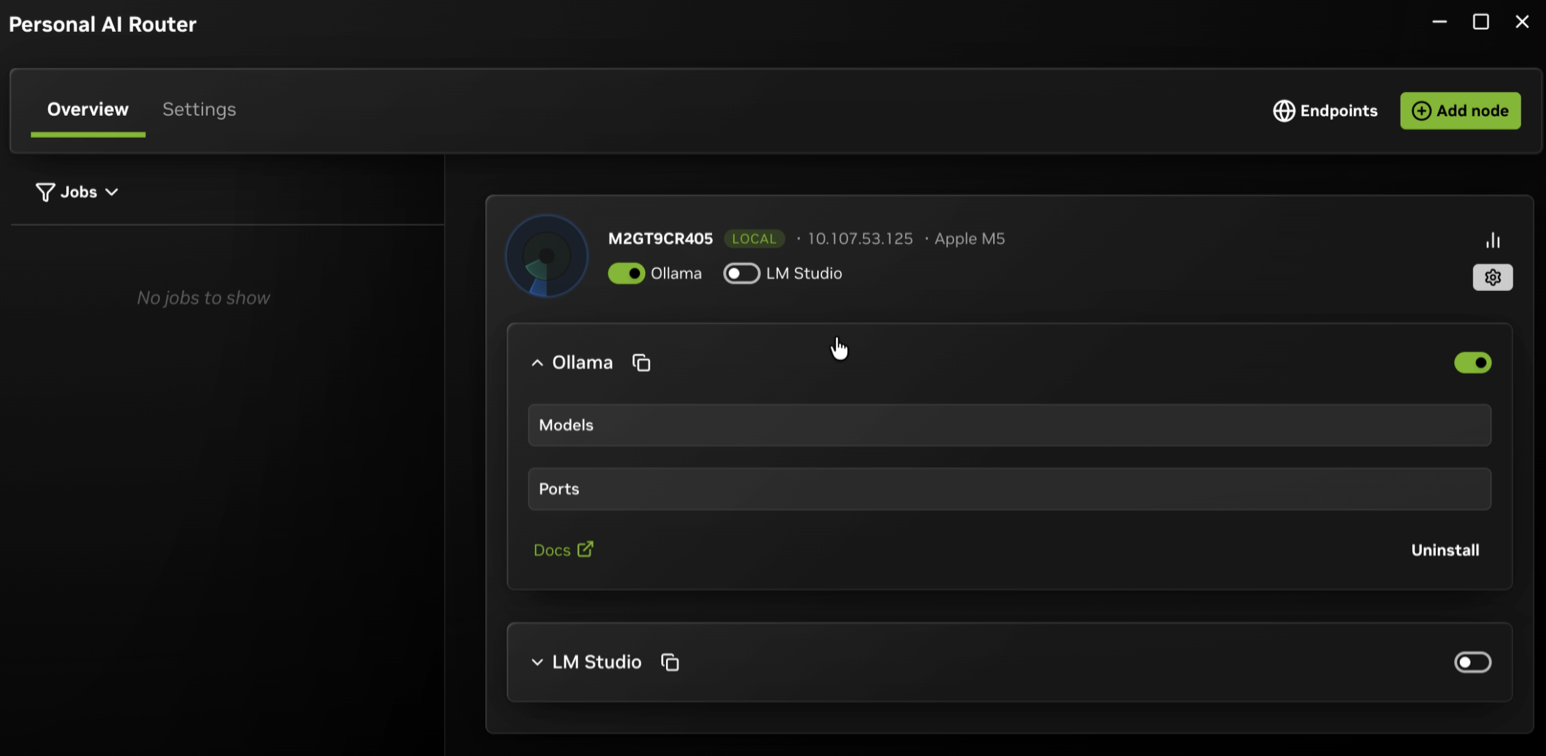
You can revisit engine settings later by selecting a node in Overview. PAIR’s first-run window also points to Settings > Cluster, where systems can be paired at any time.
3. Form a Cluster by Pairing Systems
Start PAIR on each system and confirm they are on the same local network.
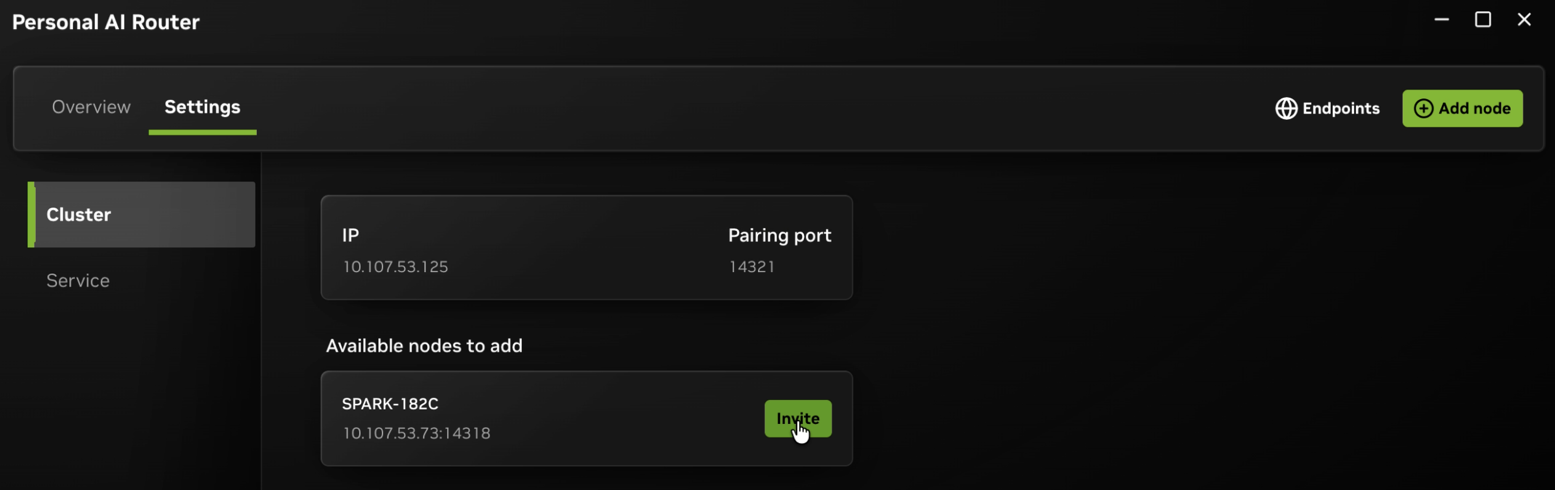
- On the first system, select Add node in the top-right toolbar. You can also open Settings > Cluster and use Available nodes to add.
- Choose a discovered system. If discovery does not find it, add the system by IP address.
- On the inviting system, PAIR displays a six-digit PIN and sends an invitation.
- On the invited system, accept the Cluster invitation modal and enter the PIN shown on the inviting system.
- On either system, open Settings > Cluster and confirm that the peer appears under Connected nodes, or check the node list on Overview.
- Repeat the process from any cluster member to add more systems.
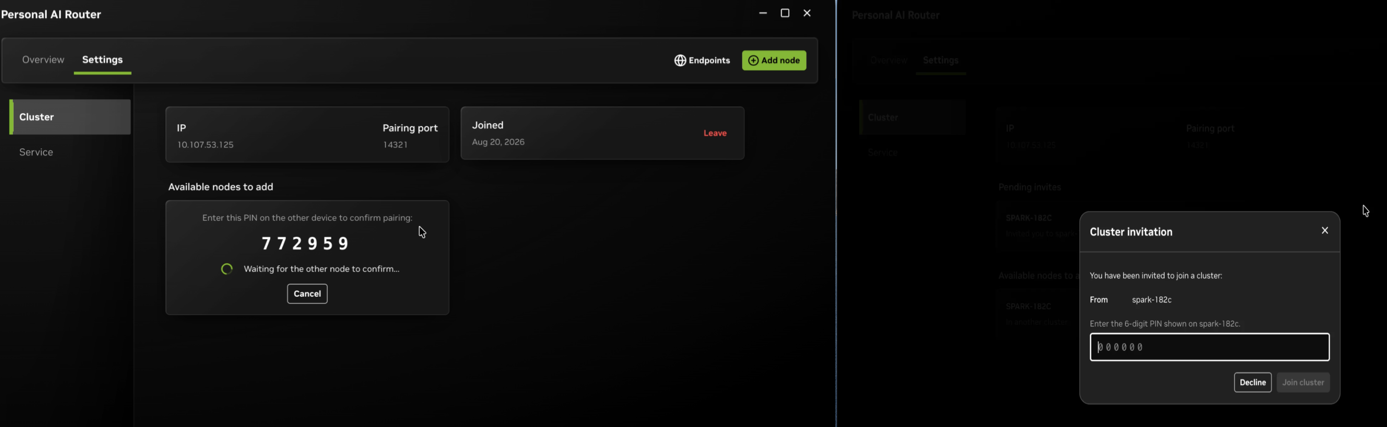
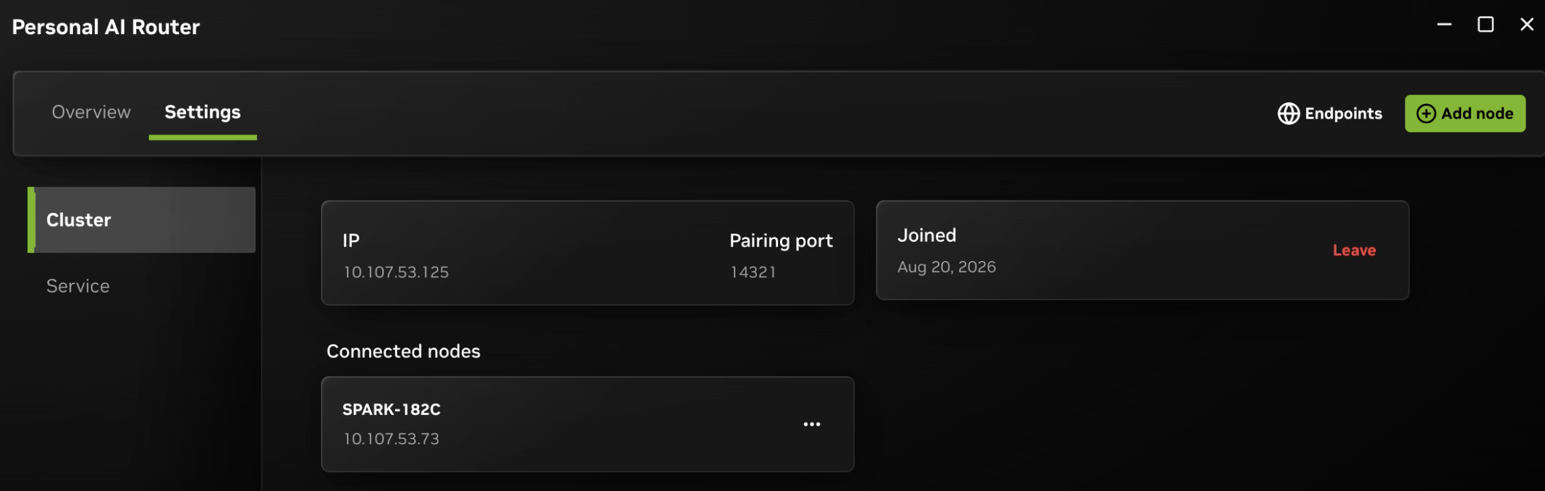
Only pair systems while both devices and the local network are trusted. The PIN is a temporary bootstrap code, not a durable high-entropy credential. Review the security policy before using PAIR on a shared or untrusted network.
4. Prepare an Engine and Model
For each node that should serve a model:
- Select the node in Overview to open its engine settings.
- Install the engine if needed, then use its switch to start it.
- Expand the engine and select Add model.
- Download a model and wait for the operation to complete.
- Load the model when the engine requires an explicit load step.
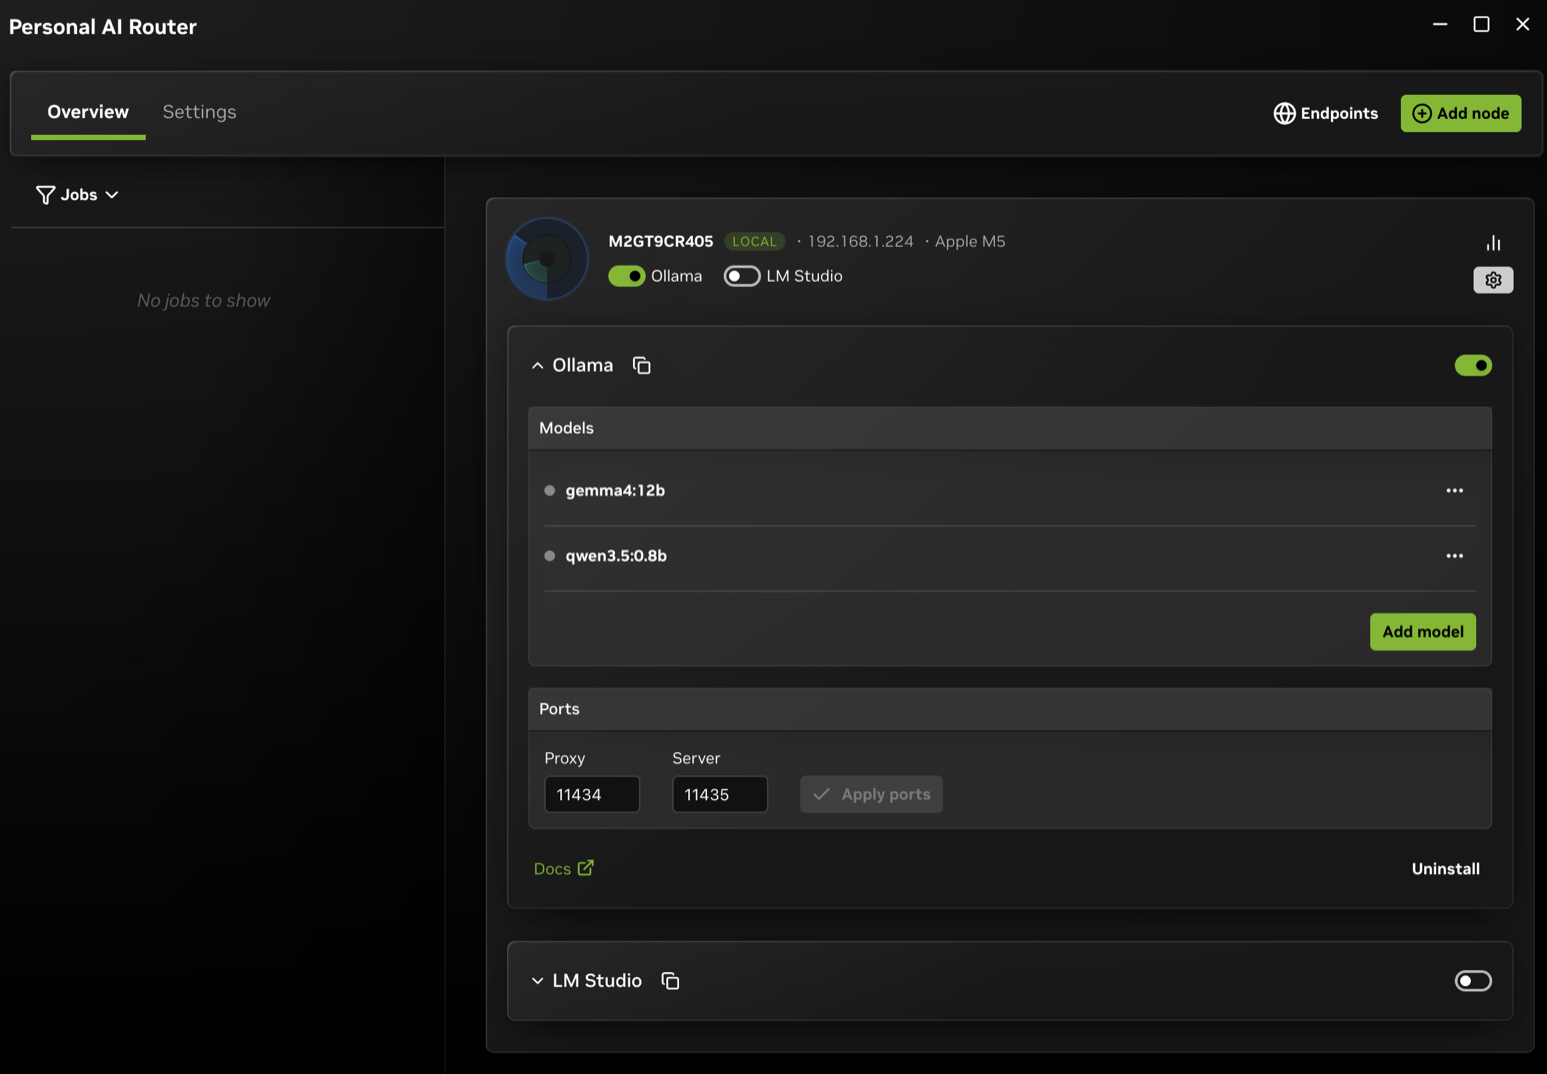
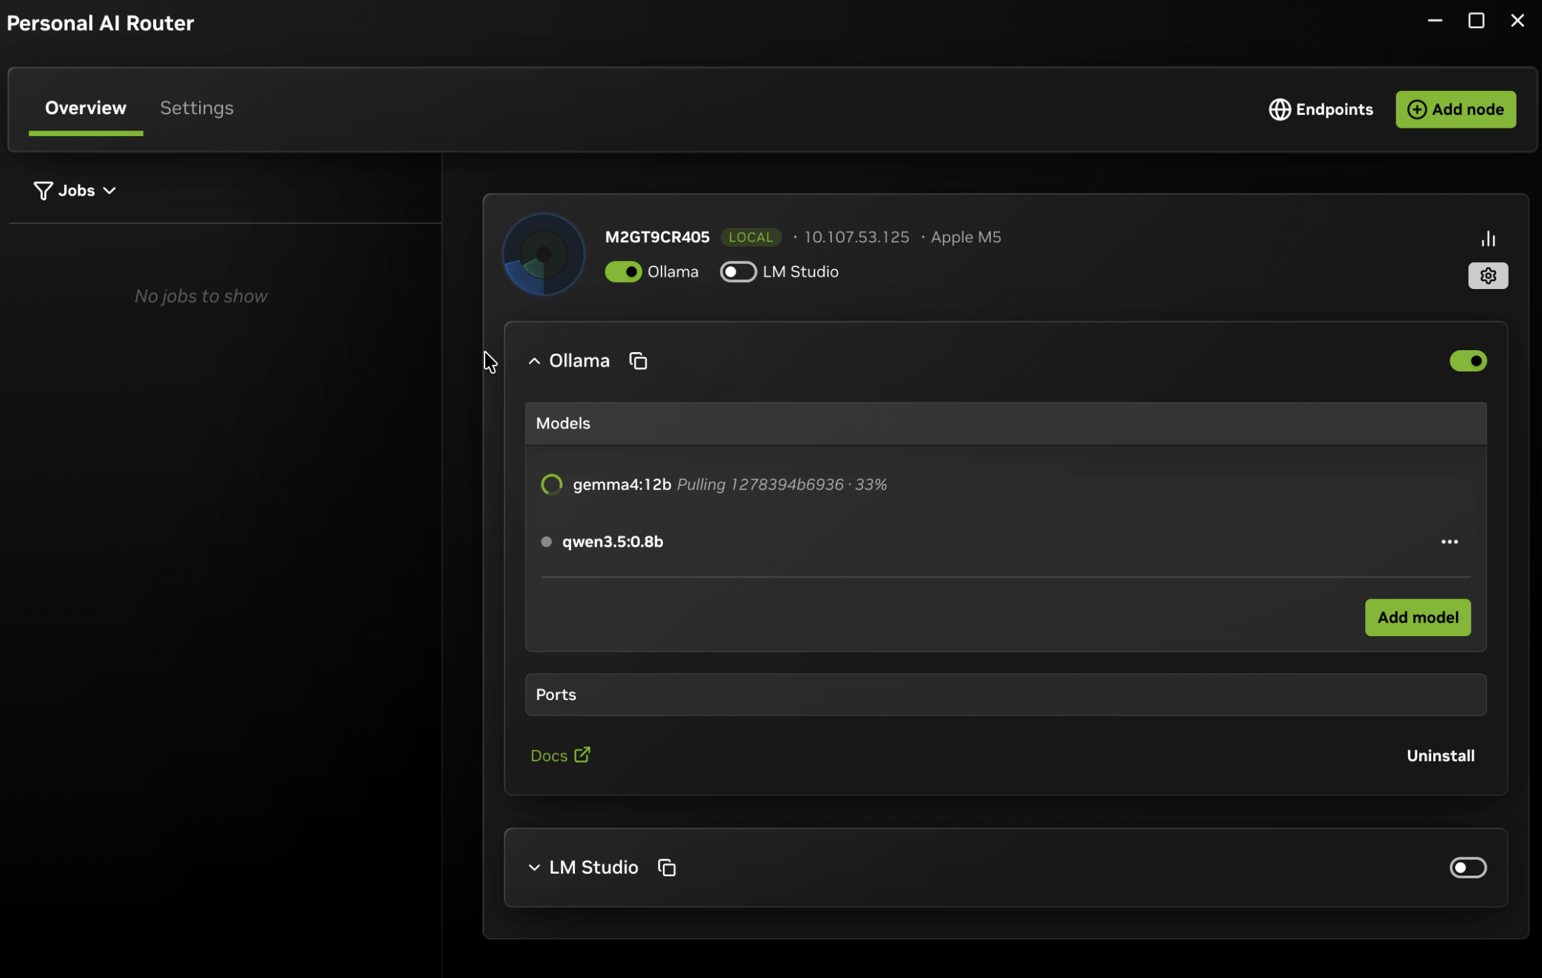
A node is eligible for a request only when it is online, a compatible engine is running, and the requested model is available there. To test routing across multiple nodes, prepare the same model on each of those nodes.
Refer to Managing engines for details about:
- Installing, starting, stopping, updating, and uninstalling engines.
- Managing engines in a cluster.
- Quitting or relaunching PAIR.
5. Find Your Endpoint
Your applications connect to PAIR on the local machine, not directly to an inference engine or the node that serves the request. PAIR calls that local address an endpoint.
Select Endpoints in the top toolbar to open the API endpoints window. It
lists one copyable http://127.0.0.1:<port> URL per engine. Copy the one for the
engine you prepared. If it says No engines are running, return to step 4 and
start an engine.
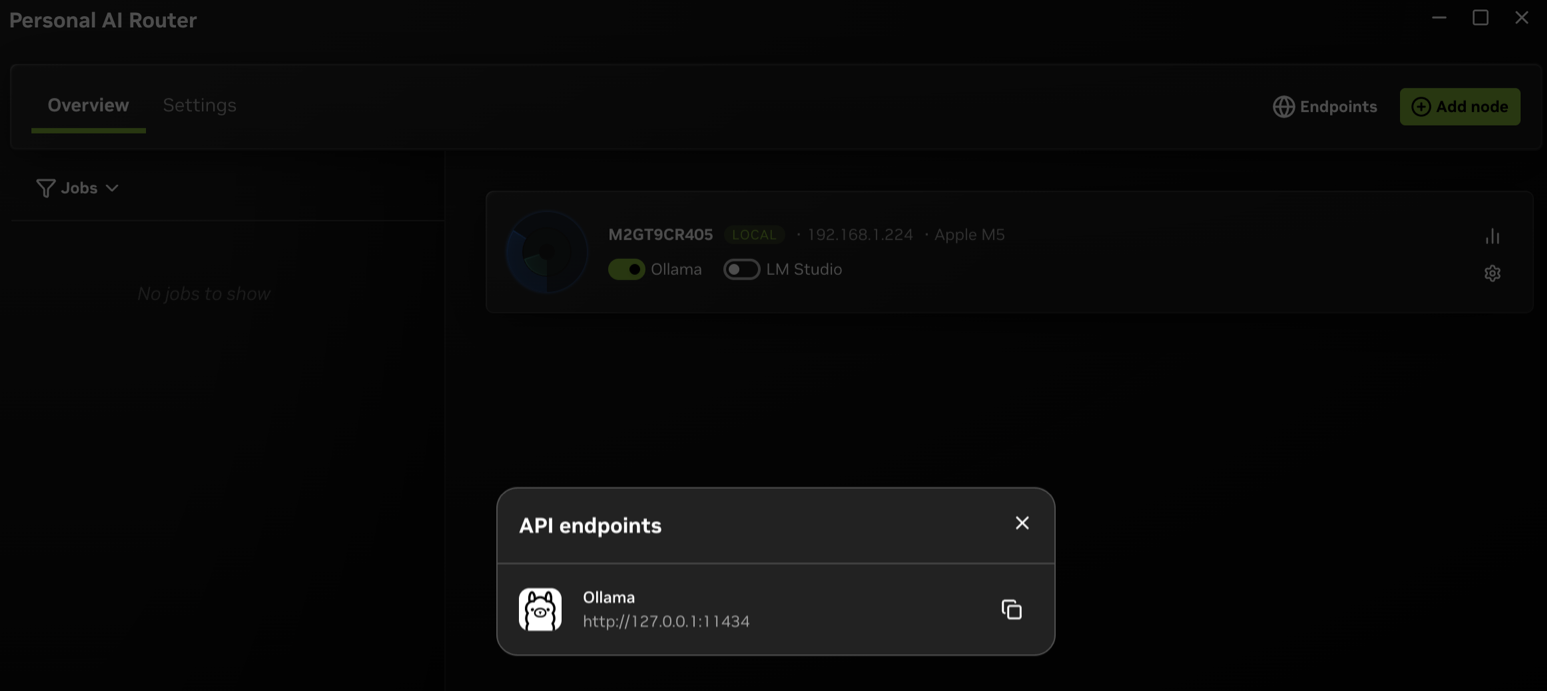
An endpoint is listed as soon as that engine is running on any node in your cluster, including a node that is not the machine in front of you. This is the point of a router: the address your application uses does not change depending on which machine ends up doing the work.
Why the Port May Not Be the One You Expect
PAIR places a proxy in front of each engine. The proxy uses the port that the engine would normally listen on:
11434for Ollama.1234for LM Studio.
Tools already pointed at those ports keep working without reconfiguration, and the engine moves to the next free port.
Your application connects to PAIR’s proxy, not directly to the engine. A port from a standalone engine installation may now lead somewhere else. Copy the URL from Endpoints instead of typing a port from memory. Step 7 lists the defaults and how to change them.
6. Run Your First Inference
Send a request to the endpoint you copied. Replace <PAIR_BASE_URL> with that
value and <MODEL_NAME> with a model you prepared in step 4.
The prompt below uses a familiar topic that any model can answer. A sensible reply confirms that the full path is working.
Choose a Request Style
There are two request styles because there are two different chat APIs in common use. PAIR passes your request through to the engine rather than rewriting it. The engine therefore has to understand the style you send.
If you are unsure, send the OpenAI-style request. It works with either engine,
and most tools and SDKs use it. Use the Ollama style
only when something you already have is written against Ollama’s /api/... API.
The choice does not affect routing. Both styles are routed across your cluster the same way, and neither one changes which node serves the request.
OpenAI-Style Request (Works With Either Engine)
Ollama-Style Request (Ollama Endpoint Only)
Sending this to the LM Studio endpoint fails, because LM Studio does not
implement Ollama’s API. The -N flag tells curl not to buffer, so it displays
the response stream as it is generated.
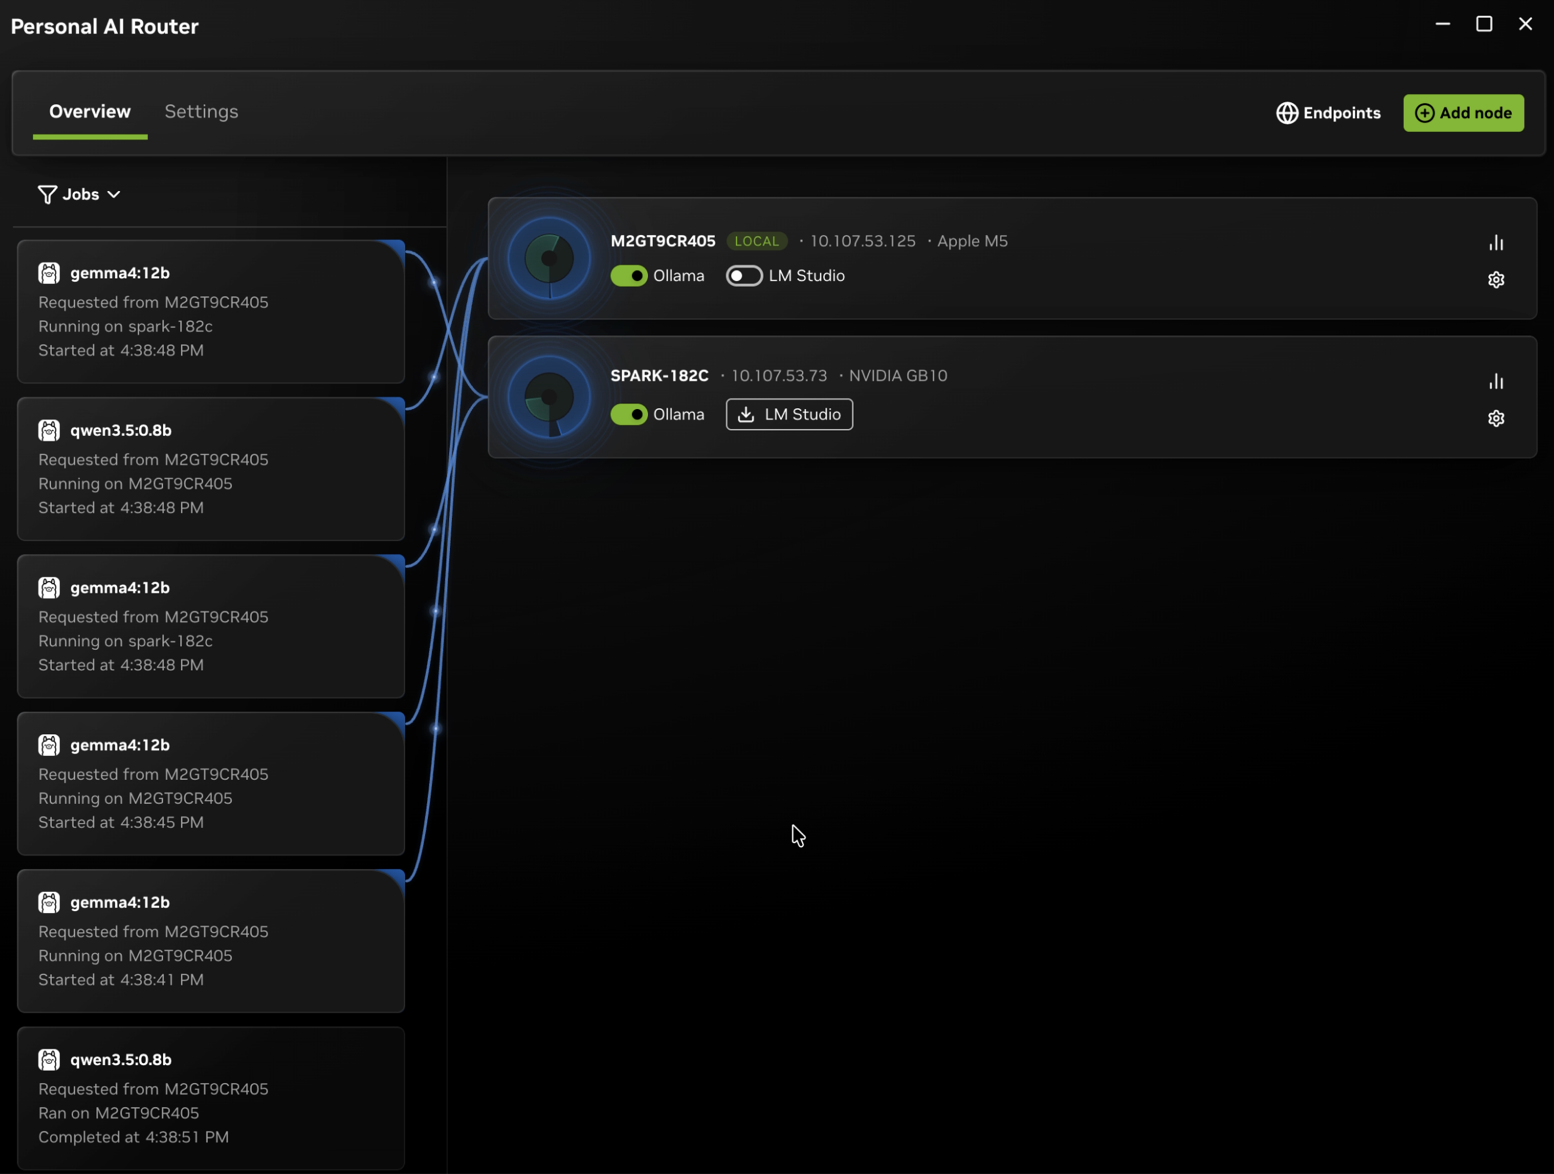
Then confirm the request was routed: open Overview, use the Jobs filter in the left column, and read Ran on or Running on on the job card to identify the serving node.
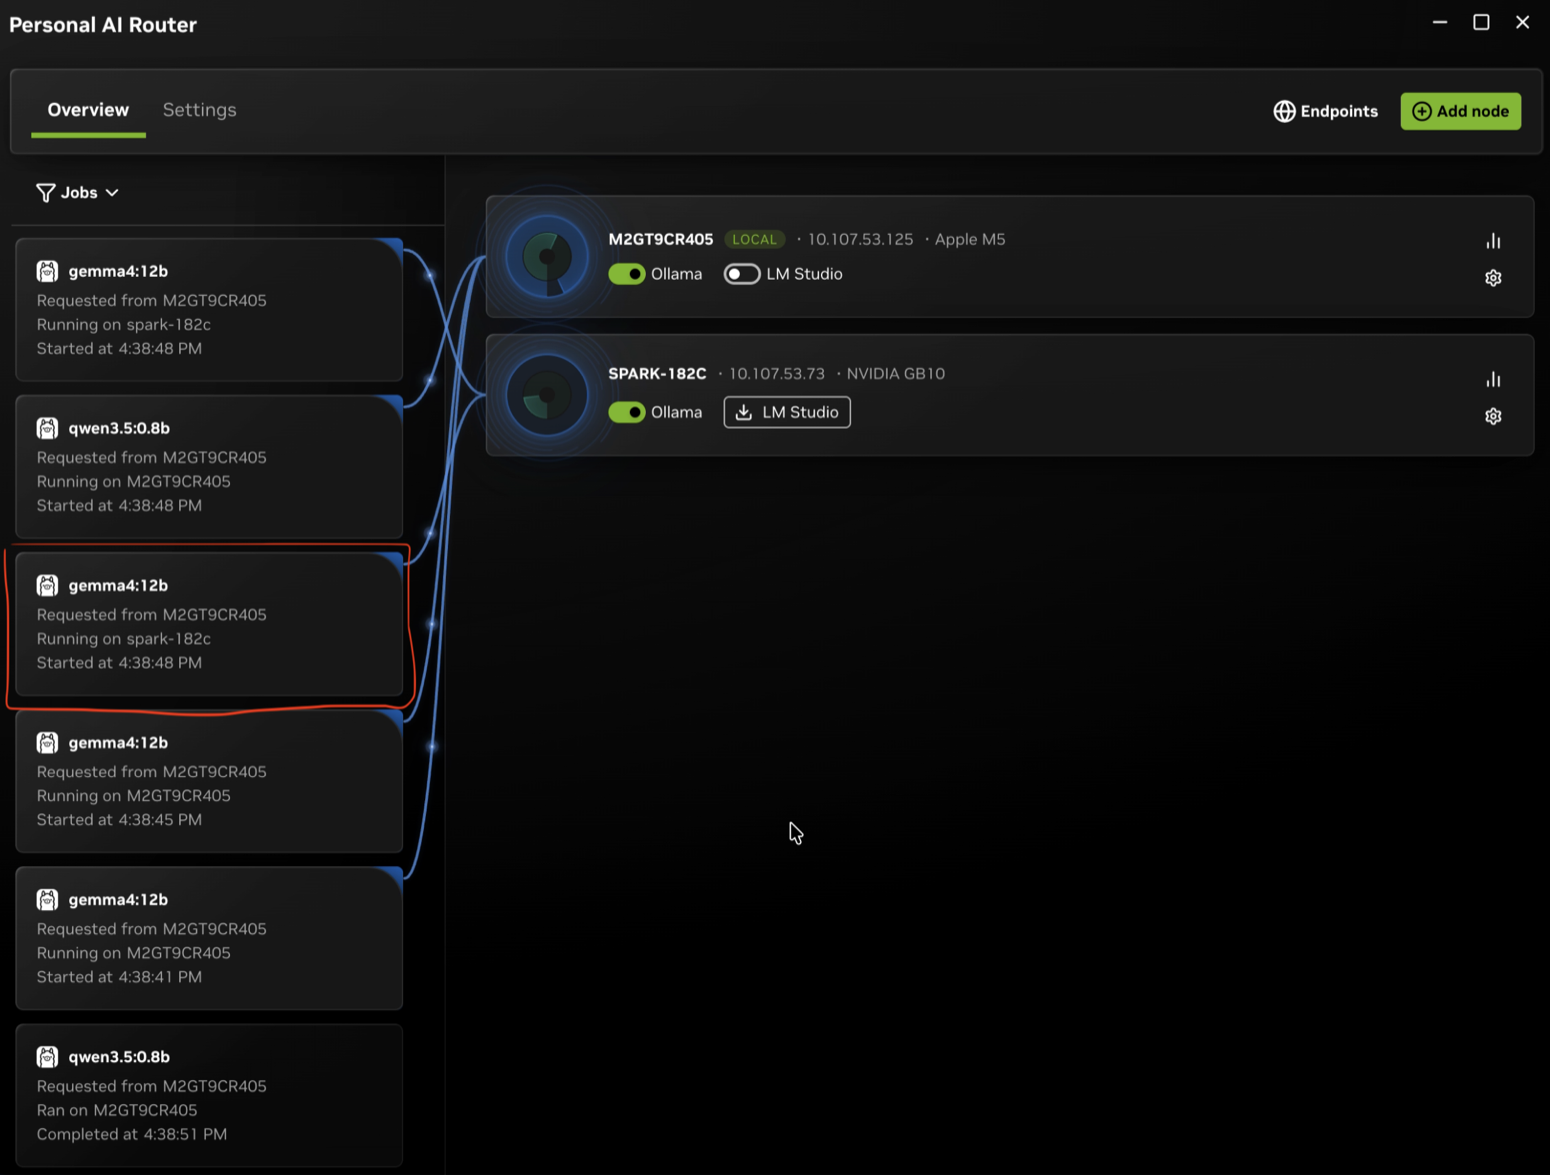
Send several independent requests to observe multi-node routing. One request always runs on one selected node. PAIR does not split an in-flight request between systems.
If you would rather not assemble requests yourself, PAIR can send them for you: Test on Settings → Service runs a burst of inference through the same path and shows the resulting jobs. It is the quickest way to see routing work across several nodes at once. Refer to Generate Traffic Without an Application.
7. Connecting Your Agents and Port Information
An application talks to PAIR’s compatible proxy, not directly to an engine. The proxy takes the port the engine would normally use, so existing clients keep working without reconfiguration, and PAIR moves the engine itself to the next free port.
When PAIR takes one of those ports, the engine behind it moves:
- Ollama moves to
11435or higher. - LM Studio moves to
1235or higher.
Endpoints is the authoritative source for the URL to use.
If you already have OLLAMA_HOST set to a different local address, PAIR serves
that address too when the port is free, so tools configured through the variable
reach the router unchanged. This applies to loopback addresses only. PAIR leaves
a remote or HTTPS OLLAMA_HOST alone.
PAIR also uses these ports for node-to-node communication. You do not connect to them yourself, but they must be reachable between systems in a cluster. The Windows installer adds the corresponding firewall rules. On Linux, allow them manually if you run a restrictive firewall.
Changing a Port
Both the proxy port and the engine port are editable in PAIR:
- Open Overview and expand Engine settings on the node’s card.
- Expand Ports under the engine you want to change.
- Edit Proxy, Server, or both, then select Apply ports.
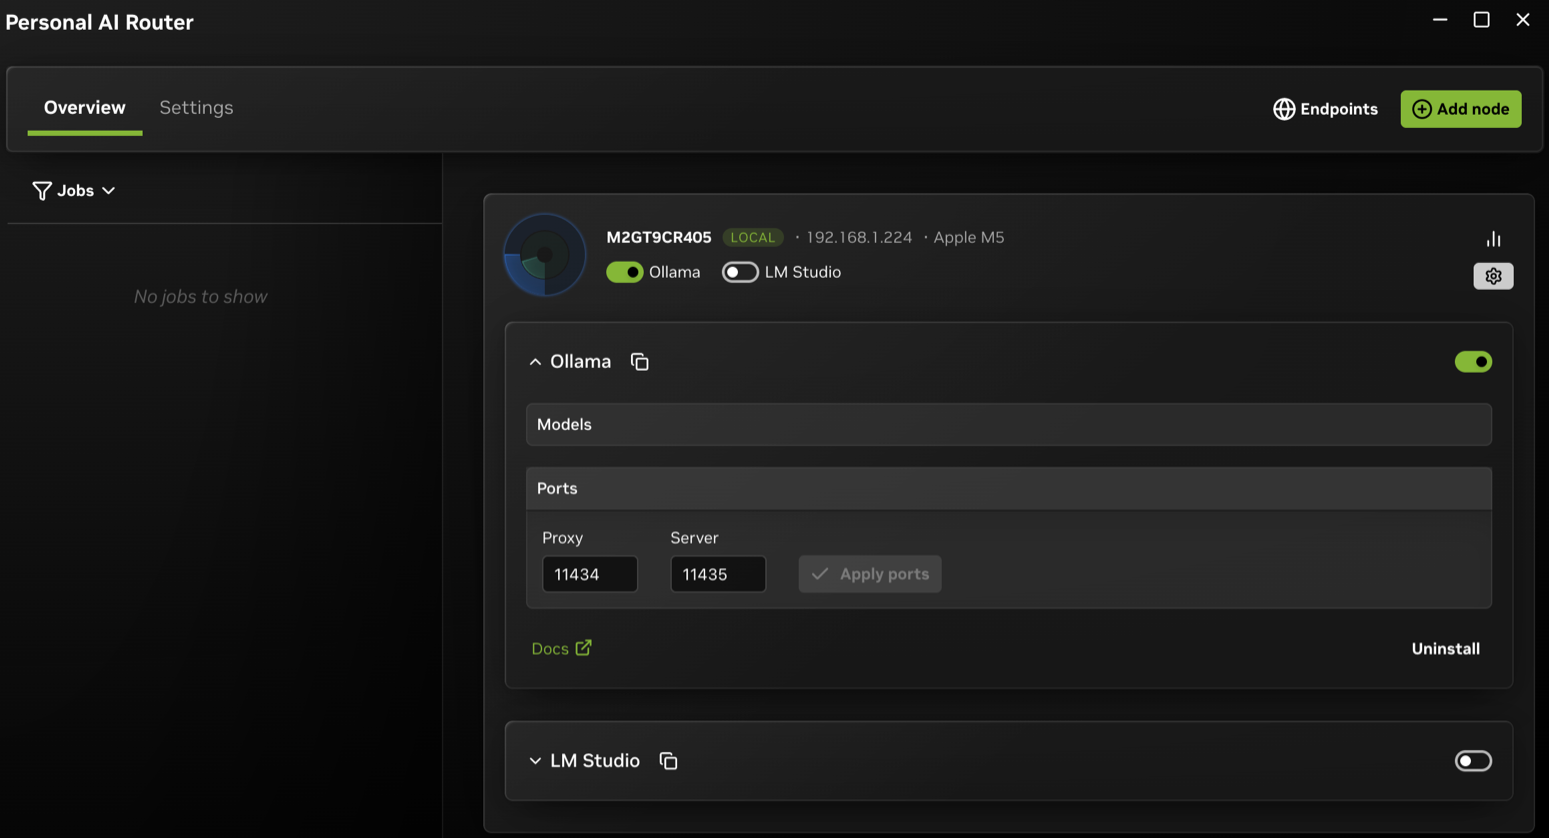
PAIR applies the change as one operation, so you do not have to update the two fields in a particular order, even when you are swapping their values. The new ports are remembered and restored the next time PAIR starts.
Ports are editable on the machine you are using. On a node’s card viewed from another system the values are shown read-only, so change a node’s ports from that node.
If something PAIR does not manage is already using a port you want, you have two options, and Settings > Service reports the conflict either way:
- Move PAIR to a different port using the steps above. This is usually the easier choice, and nothing else on the machine has to change.
- Free the port by stopping the other application, then restart the service from Settings > Service.
Remember that applications connect to the proxy port, so if you change it, update the base URL in whatever you have pointed at PAIR. Endpoints always shows the current URL.
Using an Engine’s Own Command Line
An engine PAIR installed for you is a normal installation, and you can drive it with its own command-line interface (CLI). Two things make that less obvious:
- The binaries are not on your
PATHyet. - The engine is not on the port its CLI expects by default.
Ollama is installed inside PAIR’s own data directory:
On Linux it needs its bundled libraries on the library path:
LM Studio installs to its own standard location instead, because PAIR runs its
official installer: ~/.lmstudio/bin/lms, or
%USERPROFILE%\.lmstudio\bin\lms.exe on Windows.
Set the port explicitly. Set OLLAMA_HOST to the engine’s own port.
Otherwise, the CLI connects to 11434, which is PAIR’s proxy, and ollama list
returns the cluster’s view instead of the local machine’s. Use the Server
value under Engine settings > Ports to address the local engine directly.
It defaults to 11435 for Ollama and 1235 for LM Studio.
Use the proxy port to check what your cluster can serve. Use the engine port to check what is installed on the local machine.
PAIR does not put these binaries on PATH yet. Until then, use the full path or
add an alias yourself.
Use PAIR with Existing Applications
Any client that lets you set a base URL and a model name can use PAIR — Hermes, for example. Point the base URL at the endpoint you copied in step 5, and use a model you prepared in step 4.
What that base URL serves depends on the engine behind it:
The distinction matters when you fill in an application’s settings. A client
written against the OpenAI API usually wants the /v1 included, as in
http://127.0.0.1:11434/v1, and appends the rest of the path itself. A client
written against Ollama wants the host on its own,
http://127.0.0.1:11434. Either way, copy the current value from Endpoints
rather than typing a port from memory, because a port you changed moves the
endpoint with it.
For what PAIR supports, operating systems, engines, and client applications, refer to What is supported in the README.
Review the terms for any third-party engine, model, or application you use with PAIR.
The Endpoint Is Local to the Machine Running PAIR
This is the part that surprises people, so it is worth stating directly.
An endpoint only accepts requests from the machine it is on. A PAIR proxy
serves plaintext HTTP to loopback only. PAIR refuses a request arriving from
anywhere else on the network with 403, and the message says so. You cannot
point an application on a fourth machine at http://some-node:11434 and have it
work.
Run PAIR where you work. The intended pattern is to install PAIR on the machine you use, pair it into the cluster, and point your applications at its local endpoint. That machine does not need a GPU or an engine of its own. It only needs to be a cluster member, and its proxy routes your requests to whichever node can serve them.
PAIR makes the routing decision where you make the request. When a cluster peer reaches a node over its authenticated channel, that node’s own engine serves the request and does not forward it onward.
If you need a network-reachable inference endpoint, that is outside what PAIR does. You would configure an engine to listen on your network yourself and take on the exposure that implies. PAIR does not offer it by default and there is no plan to add it as an option, because it would turn any node into an open relay for anything on the network.
Verify It Is Working
Work through these in order. Each one isolates a different layer, so the first thing that fails tells you where the problem is.
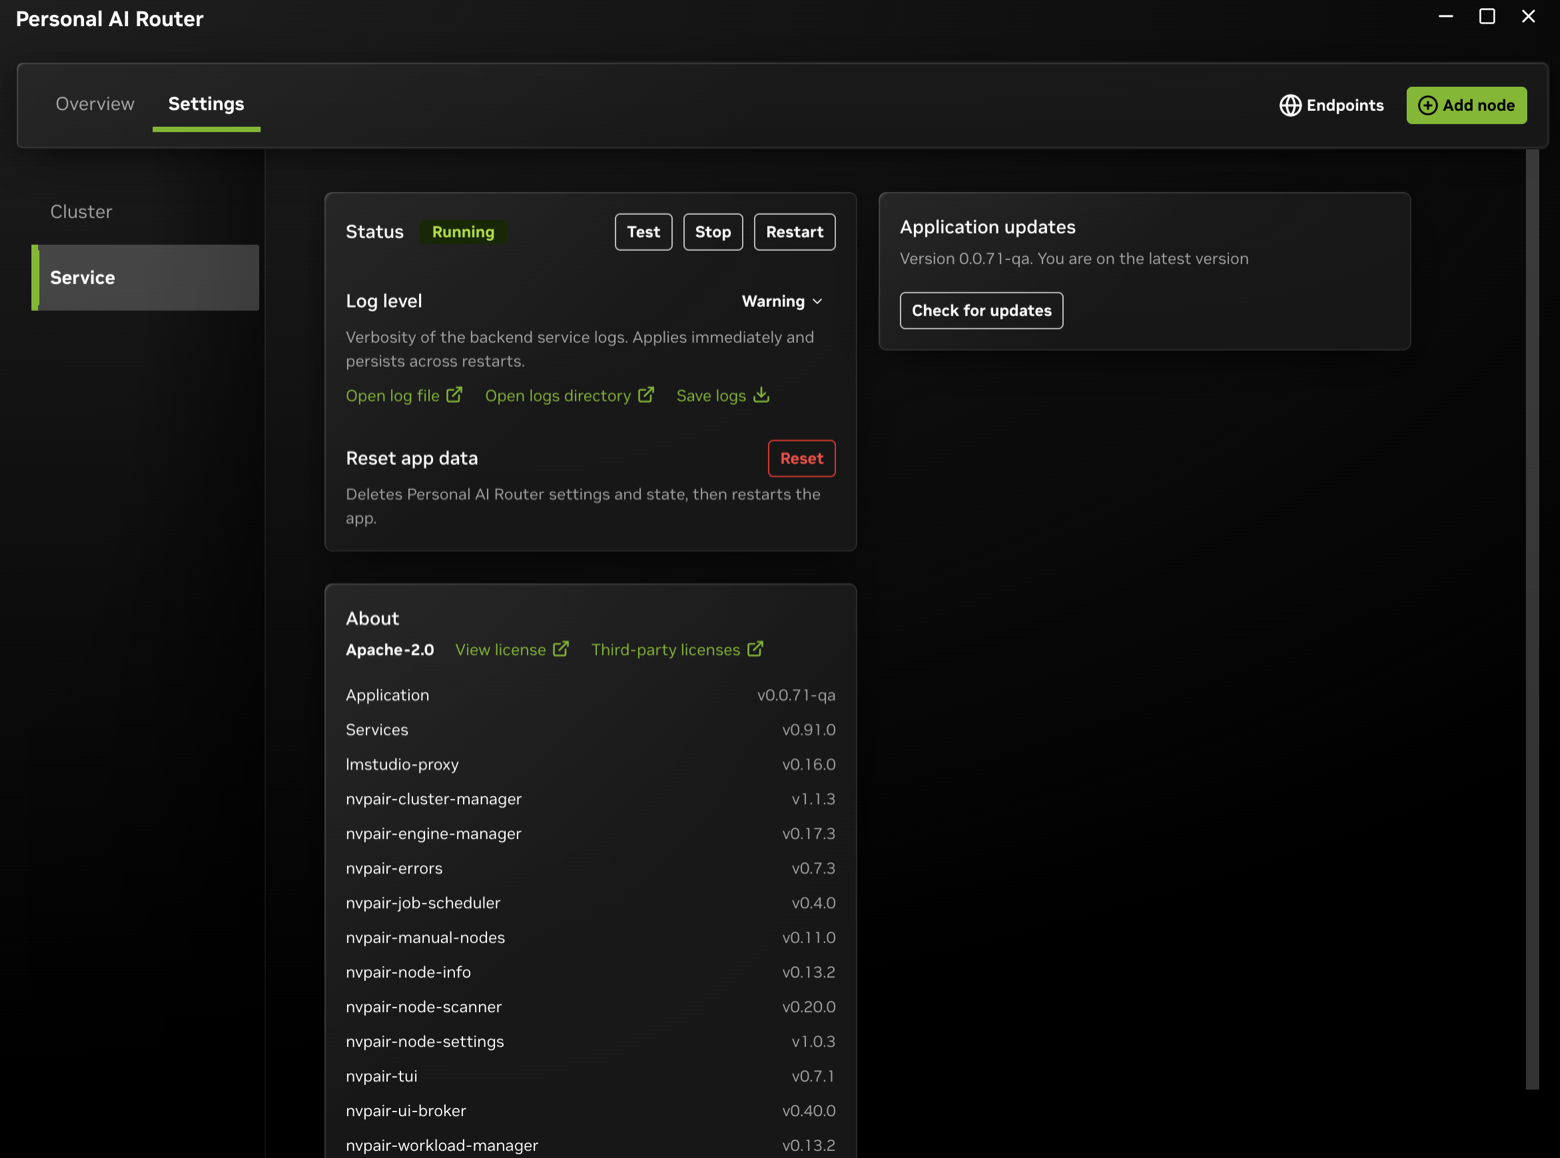
1. Check Service Health
Open Settings → Service. It reports the service connection, the nodes it knows about, and engine state without involving inference at all. If this is unhealthy, nothing below will work. Refer to PAIR does not become ready.
2. Confirm Endpoint Response
Ask the endpoint what it can serve. This proves the proxy is listening and routing without depending on any particular model working:
The reply is the cluster’s inventory, not only this machine’s, which is also a quick way to confirm a peer’s models are visible from here.
3. Confirm Inference Works
Send the request from step 6. A sensible reply confirms that the client, proxy, routing, engine, and streaming path work.
4. Identify the Serving Node
A reply alone does not prove routing. To identify the serving node:
- Open Overview.
- Use the Jobs filter in the left column.
- Read Ran on or Running on on the job card.
5. Verify Cluster Routing
This test verifies cluster routing because the earlier checks also pass on a single machine.
- Prepare a model on one other node only, not on the machine you are sending from.
- Request that model from your local endpoint.
- Check Jobs. It should name the other node.
If that works, routing across the cluster works. Send several requests at once to observe how PAIR routes them across eligible nodes.
Generate Traffic Without an Application
If you would rather watch routing work than assemble requests yourself, select Test on Settings → Service. It runs a sixty-second burst of synthetic inference and takes you to Overview, where it appears as ordinary job activity you can filter and inspect like any other. A toast tracks the run and is where you stop it early.
It needs what any request needs: an engine running with a text-generation model available. If nothing local qualifies, PAIR tells you to start an engine and try again rather than starting a run that cannot go anywhere.
It is a traffic generator, not a benchmark. It does not produce a score, show prompts or responses, or log prompts or responses. The run is local to the machine that started it. In a cluster, start it from the node whose routing you want to observe.
Read a Failure
When a status is not specific enough, the services’ own reporting is behind Open log file on Settings → Service.
Keeping PAIR Up to Date
An installed PAIR looks for a newer release shortly after it starts, and every six hours while it keeps running. Checking is all it does on its own: PAIR never downloads or installs an update without you asking it to. What it offers is a shorter path than fetching an installer yourself, not an automatic upgrade.
When a release is available, Overview shows an Update available message, and Settings → Service → Application updates offers Download update beside the version you are running. Once the download finishes, that card offers Restart & install, which stops PAIR’s background services before handing over to the installer. Check for updates on the same card checks whenever you want, rather than waiting for the next scheduled check.
A finished download you have not installed yet is remembered, so Restart & install is waiting for you the next time you start PAIR instead of downloading again.
Updating keeps your settings, logs, cluster identity, and cluster membership, so a node stays paired across an update. Model weights are untouched as well, because they belong to the engine rather than to PAIR. Updating PAIR does not update Ollama or LM Studio — engines are updated separately from Engine settings, described in Managing engines.
You update each machine from that machine. PAIR never updates a peer for you, and it cannot be driven remotely, so a cluster is updated one node at a time.
Update every node in a cluster to the same version. A cluster whose nodes run different PAIR versions is untested and can misbehave, so treat one as unsupported rather than a configuration to run on purpose. Plan an update as a pass over every node instead of doing one now and the rest later.
To install a release by hand instead, apply the newer download over the old one:
run the Windows installer, run sudo apt install ./NVPAIR-Setup-*.deb from the
directory you downloaded it into, or drag the application from the macOS disk
image into Applications again. Your data is kept in each case.
A PAIR you run from a source build does not check for updates, and neither does
a package you built and installed yourself. Update a source checkout with
git pull and rebuild.
If Setup Does Not Work
Refer to Troubleshooting for discovery, pairing, engine, endpoint, routing, and service-startup issues.
Learn More
Refer to these resources for related information: