

Using the PAIR terminal interface
nvpair-tui is a full-screen keyboard-driven interface for operating one PAIR
host.
This is the headless option, not a second UI. Use it on a machine with no desktop environment, or over SSH, where the desktop application cannot run. If a desktop is available, use the desktop application.
It has known limitations. It is an operations tool, not a full replacement. It cannot send an inference request for you, and it stops when your connection drops unless you run it under a terminal multiplexer. The full list is in What the Terminal Interface Cannot Do, and it is worth reading before you depend on it.
Never run the terminal interface and the desktop application on the same machine at the same time. This is not a preference. Each one starts its own broker and full worker tree, so two sets of services would fight over the same proxy ports, try to manage the same engines, and write the same settings files. Expect port conflicts, engines that refuse to start, and confusing state on both sides. Quit one before starting the other.
Within its scope it is self-contained. It starts its own service process tree, so you do not run anything else first.
nvpair and nvpair-tui Both Start It
An installed PAIR puts nvpair on your PATH as a small wrapper that runs
nvpair-tui, so either command opens this interface.
Do not count on nvpair existing on a headless machine. Only the Debian
package writes the wrapper at install time. On Windows and macOS the desktop
application writes it when it starts, so on a machine where you never open the
desktop application — the case this interface exists for — it may never appear.
On macOS it is also skipped when /usr/local/bin is not writable. Run
nvpair-tui directly when nvpair is not found, and do the same for a source
build, which has no wrapper at all. Refer to
Building PAIR.
Start It
Before you start it, confirm the desktop application is not running on this machine, including minimized to the tray or menu bar. Quit it first.
From the release archive, extract it and run nvpair-tui from the directory the
binaries are in. It looks for nvpair-ui-broker beside itself, so keep the
extracted files together:
While the interface is running, its own log lines appear on the Logs tab beside the service logs, so nothing is written over the display. Before it starts and after it exits, they go to stderr.
If the Colours Are Hard to Read
PAIR picks its colours from your terminal’s background. It detects that by asking the terminal and reading the reply, which works in most terminals, including over SSH — the question and the answer travel the connection like anything else.
Two cases cannot be detected. Inside tmux or screen the question is not
asked at all, because one session can be attached to several terminals at once
and there is no single background to report. A terminal that does not implement
the query simply never answers. Both fall back to assuming a dark background,
which on a light theme gives washed-out text.
Tell it instead:
dark forces the other way, and auto is the default.
A terminal that never answers also makes PAIR wait up to five seconds for the
reply before the interface appears. PAIR asks while its background services are
starting, so much of that wait overlaps with startup. Passing
--appearance light or --appearance dark skips the question, and the wait
with it.
Press q to quit. Quitting shuts the services down cleanly rather than leaving
them running.
Keep It Running After You Disconnect
Quitting stops the services, and losing an SSH connection ends the program the same way. A node you reach over SSH therefore stops serving requests when your session drops. Start it inside a terminal multiplexer so the session survives independently of your connection:
Detach with Ctrl-b d, and reattach later with tmux attach -t pair. The
services keep running in between.
tmux and
GNU Screen both work. With Screen, start
with screen -S pair, detach with Ctrl-a d, and reattach with
screen -r pair. Neither ships with PAIR. Install whichever your distribution
provides.
The Screen
The top line shows NVPAIR and the service state on the right:
starting service..., service ready v<version>, or service disconnected.
The second line is the numbered tab bar; when anything has gone wrong, the count
appears on the Errors tab’s own label. The footer shows the keys available
where you are, starting with the ones that always work. When a newer release of
PAIR exists, a notice sits between the tab bar and the content on every tab
until you dismiss it — see Update Notices.
If you see starting..., the interface is waiting for the terminal size. If the
header stays on starting service..., the service tree did not come up, and the
Logs tab says why.
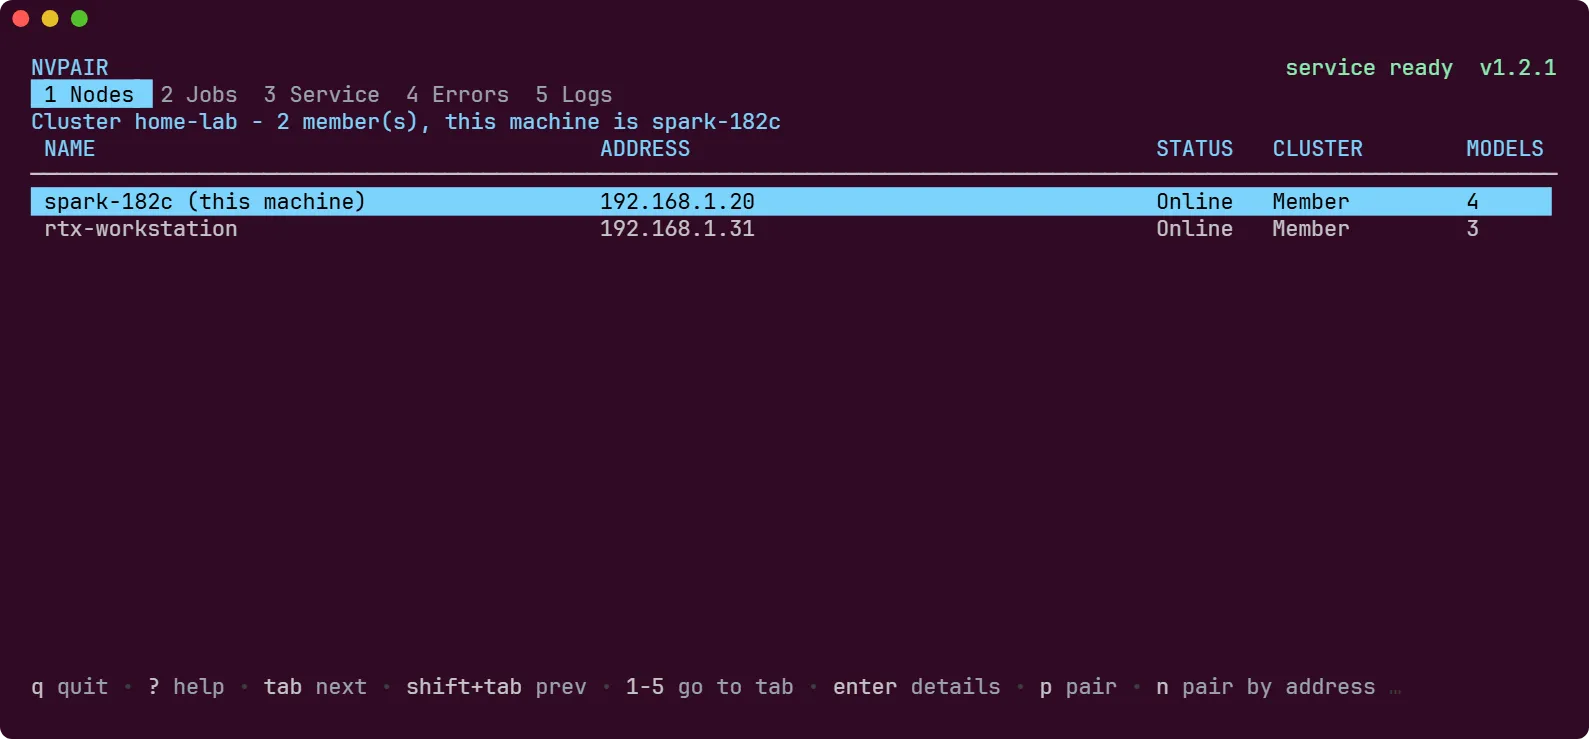
Moving Around
Within a table, j / k (or ↓ / ↑) move the selection, f / b page, and
home / end jump to the first and last row. h / l and ← / → move between
panes rather than between tabs. Where a tab binds one of those letters to its own
verb — on the Nodes list d declines a pending pairing request and f finds a
machine by address, and on a node’s detail screen d deletes a model in the
Models pane while u uninstalls an engine in the Engines pane — that verb wins
where it applies, and the paging key works elsewhere. The
Service tab’s settings list is not a table; it moves with j / k or the
arrows. On the Nodes list l leaves the cluster rather than moving right, so
it is armed and asks you to confirm.
While you are typing into a field, such as a PIN, an address, a port, or a model
name, every key goes to that field. Press enter to submit or esc to cancel.
Tab switching and q do not work until you do. The footer shows only those two
keys while a field is open, so it always reflects what actually works.
Anything that destroys something asks first. Removing a machine from the
cluster, leaving the cluster, deleting a model, uninstalling an engine, and
resetting all data each arm on the first press and act only when you then press
y; any other key cancels. The prompt names what will happen and stays on
screen until you answer it. Forgetting a machine you added with f does not
ask, because nothing is lost: you can find it again.
The terminal needs to be at least 40 by 12. Below that PAIR says so and waits
for you to resize rather than drawing something unreadable. Near that minimum
the tab bar names the tab you are on and numbers the rest, the footer keeps q
and ? in view, and full help spreads across columns to fit the rows there
are.
Tabs
The Errors tab shows its own count in the tab bar — Errors (2) — so you can
see there is something to look at from any other tab.
Pair This Machine with Another
Pairing is the same six-digit PIN exchange the desktop application uses.
You do not create a cluster first. Inviting your first machine forms one automatically, and if that invite fails the empty cluster is discarded.
Everything below is on the Nodes tab (1).
To pair with a machine you can already see:
- Select it with
j/k. - Press
p. The status line shows the PIN. - Read that PIN to whoever is at the other machine.
This is the easier path, because there is no address to type. Prefer it whenever PAIR has already discovered the machine you want.
The PIN stays on screen until the pairing is answered, then tells you the outcome — joined, declined, or expired. A machine that is already a member, or that belongs to another cluster, cannot be invited: PAIR says so instead of sending an invite that would be refused.
To pair with a machine by address, press n, type the other machine’s
host — or host:port if it is not on the default pairing port — and press
enter. Use this when discovery has not found the machine, for example on a
network that filters multicast.
To accept a pairing request from another machine:
- Wait for the prompt reading
pairing request from <name>. - Press
a. - Type the PIN displayed on the other machine and press
enter.
Press d instead to decline. After pairing, the peer’s CLUSTER column reads
Member. If the PIN was wrong, the status line says so and you will need a
fresh invite — a PIN can only be used once.
If more than one request arrives, they wait their turn and the prompt says how many are waiting. A machine can only be in one cluster, so once you accept one, the rest are declined and their senders are told.
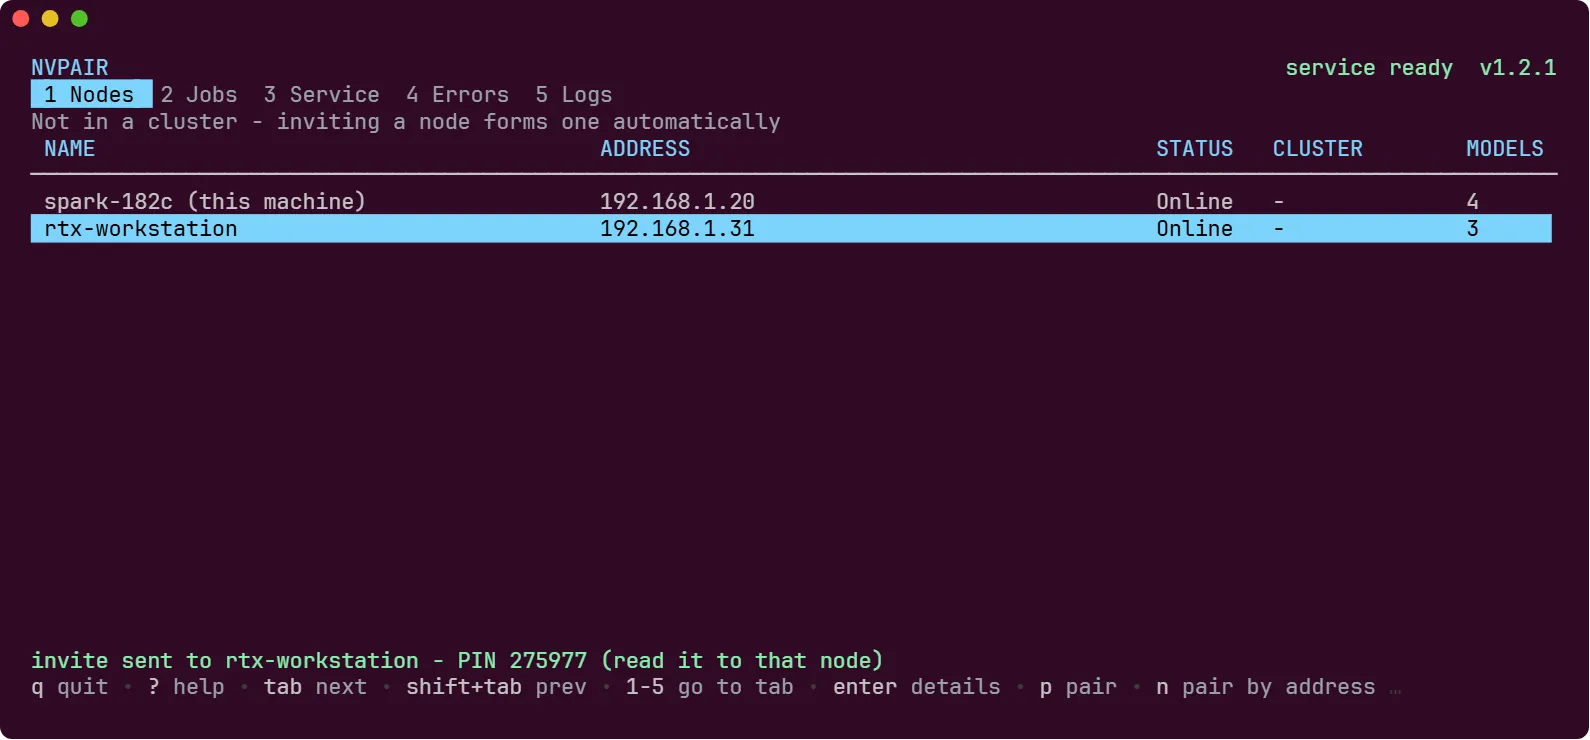
Cancel an invite with c if you read the PIN to the wrong person, or simply
change your mind. That invalidates the PIN straight away, so it can no longer be
used to join, and tells the other machine to drop its prompt. An invite you
leave alone expires on its own, but until it does it stays answerable.
Only pair when you trust both machines and the network. The PIN is a short-lived bootstrap code, not a durable credential. Refer to the security policy.
Look at One Machine
Press enter on any row of the Nodes tab. This works for your own machine
and for any cluster peer.
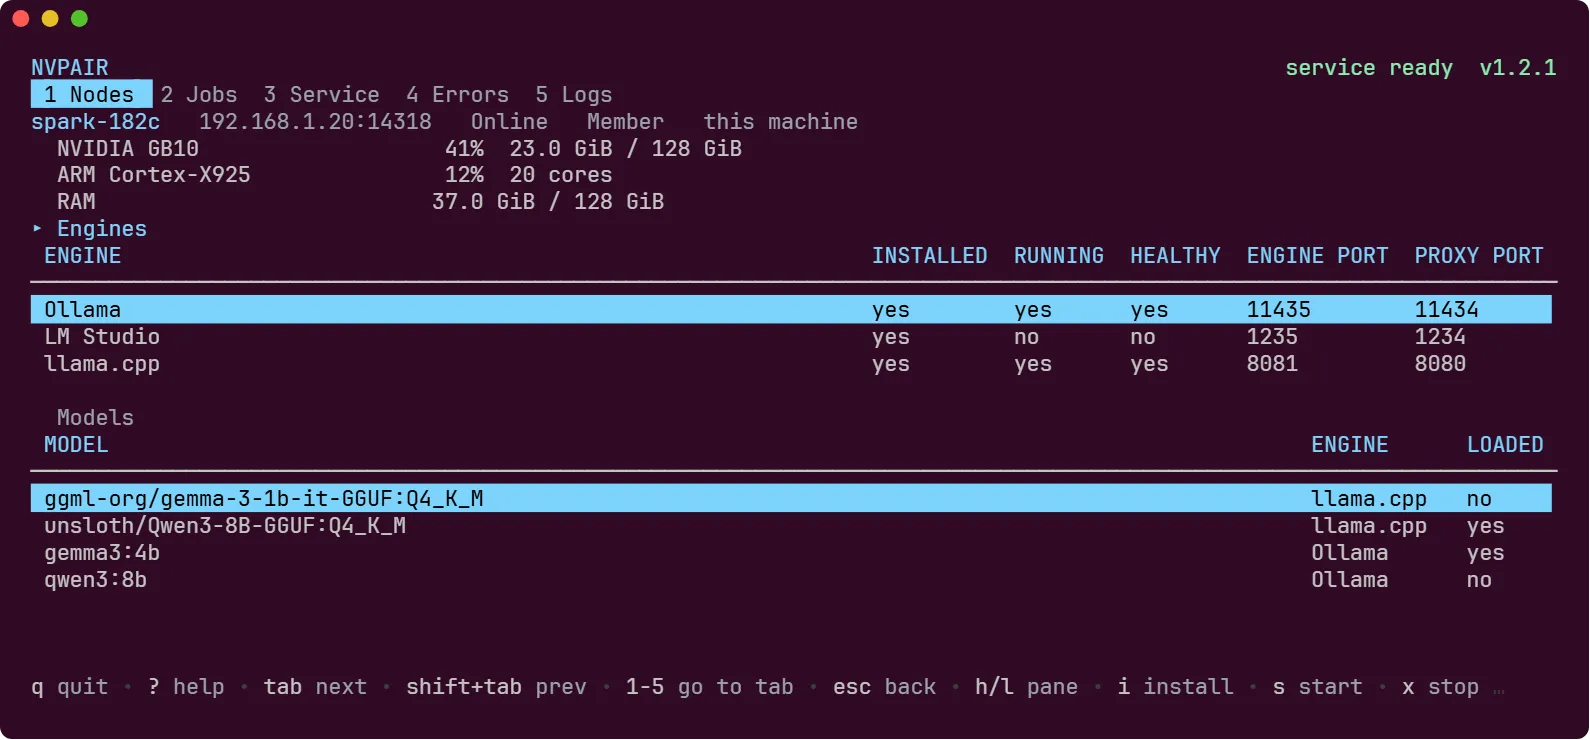
The screen opens on that machine’s GPU, CPU, and memory, then two panes you move
between with h / l:
Engines — select one with j / k:
Each engine has two ports, and they are easy to confuse:
- ENGINE PORT is where the engine itself listens. PAIR talks to it there.
- PROXY PORT is where your clients connect, served by the proxy that fronts that engine. This is the port you put in a tool’s configuration.
On this machine both are listed side by side, and both are changed here, on the
engine they belong to. A peer’s screen lists only its engine port, though p
still changes that peer’s proxy port.
A port is a request rather than a promise. If a running engine already holds the port you asked for, PAIR binds elsewhere and tells you which port it ended up on — so a change you did not get is never reported as one you did.
Startup Arguments
a opens the arguments and environment variables the engine is started with,
as one line:
Environment assignments come first, then arguments. Quoting works the way it
does in a shell for single and double quotes, but nothing is expanded: $HOME,
~ and %USERPROFILE% are passed through as text, and pipes, redirects and
command substitution are rejected rather than interpreted. The engine’s own
executable and its start subcommand are not editable.
Press enter to check and save. PAIR validates before it saves anything, so a
mistake comes back as a message rather than an engine that will not start. If
the change requires restarting the engine, it says so and waits for y.
The port fields and the arguments are saved together, so a port written into the arguments and the port in the field cannot drift apart. Editing the field rewrites the argument; editing the argument moves the field. If the two disagree in a way PAIR cannot settle, it names both numbers and asks you to make them agree.
This works on a peer as well as on this machine. Whether a particular engine accepts the change is the engine’s own answer: one PAIR did not start — one that was already running when PAIR found it — reports that it cannot be configured, and says why.
Models — the models each engine holds, and which are loaded into memory:
The LOADED column reads ? for an engine that cannot report which models are
in memory.
Pressing p opens the catalog of models this engine can download. Press / to
filter by name, family, parameter size, or tag, so both llama and 8b narrow
the list. Press c to clear the filter, o to change the sort between
popularity, name, and size, enter to download the highlighted model, and esc
to back out. The footer shows how many models match and when the catalog was
compiled. If the catalog cannot be loaded,
press r to try again.
llama.cpp’s catalog opens on popular GGUF models from a few well-known
publishers, but it can download any GGUF model on Hugging Face, so there /
searches all of Hugging Face instead of filtering the list. Press c to go back
to the starting list.
Press n instead if you already know exactly what you want and would rather type
it. Each engine names models its own way: an Ollama tag such as llama3.2, a
Hugging Face repository for LM Studio, and a repository with its quantization
for llama.cpp, such as ggml-org/gemma-3-1b-it-GGUF:Q4_K_M. Either way,
downloading needs a running engine, and progress appears on the status line.
Restart and uninstall need PAIR to own the engine process, so they only apply to the machine you are sitting on. They are hidden on a peer rather than offered and then refused.
Press esc to go back to the list. Switching to another tab also leaves it, so
returning to Nodes always lands on the list rather than back inside the
machine you were last looking at.
A node can serve a request only when it is online, a compatible engine is
running, and the requested model is present on that node. To route across several
machines, download the same model on each — the Nodes tab’s MODELS column, and
each machine’s model list, are how you check.
Check Routing and Health
The Jobs tab (2) leads with the endpoints your clients connect to, then lists
inference work as it runs. Press a to include finished jobs.
FROM is the machine the request arrived at and RAN ON is the machine that
served it. They differ whenever work is routed to a peer, which is how you can
see routing actually happening. An active job that has not been placed yet reads
choosing.
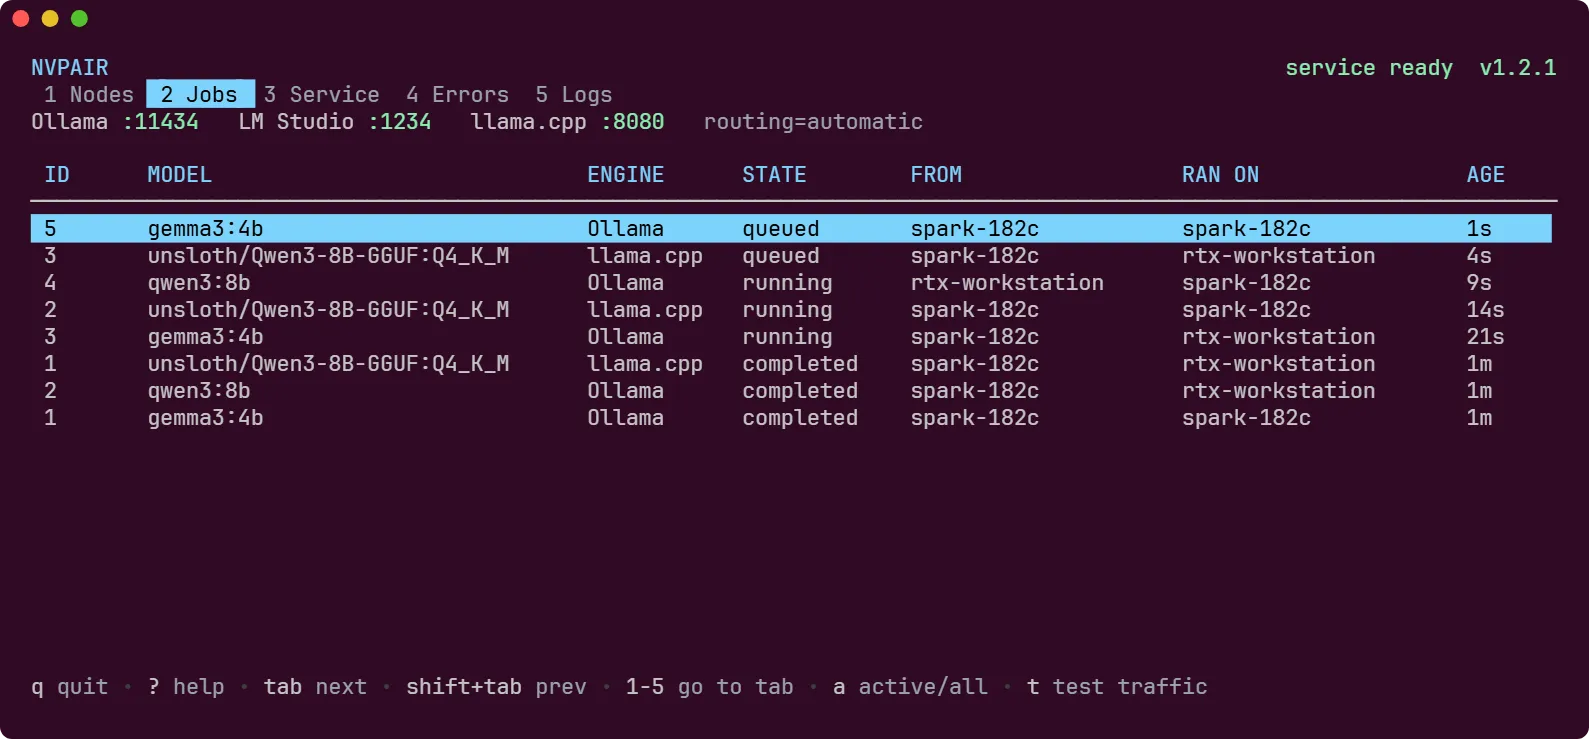
Routing is not something you set. PAIR chooses a node per request from pending work and GPU pressure, so the proxies always run in automatic mode.
Generate Some Traffic
If you have no client sending work yet, press t on the Jobs tab to run the
same sixty-second test the desktop application’s Test button runs. It sends
synthetic requests to your local endpoints, and the jobs appear in the table
below as they are placed — including on peers, if the cluster has any.
A progress line shows how many requests have gone out and how long is left.
Press t again to stop early; requests already sent still finish. Nothing is
sent after sixty seconds.
It needs at least one engine running with a model installed. If nothing is available, the tab says so rather than starting.
The test is local to the machine you run it on. Running it here does not start one anywhere else, and a peer running one does not show up as progress here — only as jobs.
The Service tab (3) reports whether each worker is up. Worker status is
best-effort: DOWN means a worker reported a crash. The error reporting worker
is the one that collects those reports, so it cannot report its own — its row
says so. If the service itself is not answering, every row reads ? rather than
ok: a worker is only known good because the crash stream said nothing about
it, and that stream comes through the service.
Update Notices
When a newer release of PAIR has been published, a line appears under the tab bar naming the new version, the one you are running, and where to get it. It checks shortly after startup and every six hours, the same cadence the desktop application uses.
The notice is on every tab, not just Service, and stays until you press
ctrl+x to dismiss it. Dismissing it clears it everywhere. A release newer than
the one you dismissed brings it back, since that is not the version you
acknowledged. On a narrow terminal the line shortens rather than pushing the
dismiss key off the screen.
It only tells you. It does not download or install anything, because the terminal interface is not a single program — it runs a broker and ten workers from the directory beside it, and swapping some of them for a newer set while they are serving inference is how you get a client talking to workers that no longer understand it. Install the release the way you installed this one.
If you installed PAIR as the desktop application, you do not need to: the
terminal interface ships inside the application and its updater replaces this
binary along with everything else, so nvpair picks up the new version the next
time you run it.
Nothing is reported when the check cannot reach the network — an unreachable
feed is not news. To stop it checking at all, set NVPAIR_NO_UPDATE_CHECK=1
before starting nvpair. A copy you build yourself with go build never
checks. One built with services/build.sh or services/build.bat does, because
those scripts record the release number in it.
Look at Errors and Logs
On Errors (4), press c to clear the selected entry. The tab label carries
the count, so you do not have to go looking. The line under the table describes
whichever entry you have selected — which engine and operation it came from, the
model if there was one, and what the service suggests doing about it.
Errors are shared across the cluster, but clearing one only works on the machine
that reported it — the NODE column tells you which that is. Select an entry
from another machine and c is withdrawn from the footer, with a line naming the
node to clear it from. Clearing there removes it everywhere.
On Logs (5), scroll with j / k and the page keys. Press / to filter to
lines containing a string, c to clear the filter, and t to toggle tailing
the newest line — scrolling up releases follow on its own. This is the first place
to look when something has not started.
Press s to write the log buffer to a timestamped file in your home directory.
The whole buffer is saved, not just what the filter shows.
Set how much detail the services log on the Service tab, not here.
Change Settings
On Service (3), move with j / k and press enter. The cluster name opens
as a text field, with enter to save and esc to cancel. Ports are not changed
here — they belong to a machine, so they live on its detail screen.
Cluster name is a label for your own benefit and is stored on the machine you set it on. It is not shared with the rest of the cluster, so setting it here does not rename anything on your peers — set it on each machine you want it to show on. Nothing operational depends on it; the cluster’s real identity is an id you never have to type.
Service log level opens a picker showing all four levels — debug, info,
warn, and error — with the one currently in force highlighted. Move with ← /
→ (or h / l), press enter to apply, and esc to leave it alone. The
level applies to every service, not just one.
Ports and startup arguments are not changed here. They live on the engine they
belong to, on that machine’s node detail screen — press enter on a machine on
the Nodes tab. Refer to
Ports
for how PAIR arranges ports.
Reset all data and quit deletes this machine’s settings, cluster identity, and pairing, and uninstalls the engines PAIR installed, then exits. It asks for confirmation first, and cannot be undone. Your downloaded models are kept, and so is any engine you installed yourself. The engines are removed while the services are still running, and the services are then stopped before the files are deleted, so nothing rewrites them on the way out. If an engine PAIR installed cannot be removed, the reset stops before deleting anything, names the engine on the status line, and leaves you in the interface to try again. You will need to pair again afterwards.
What the Terminal Interface Cannot Do
It is an operations tool, not a full replacement for the desktop application:
- It has no built-in way to send an inference request of your own. Use
curlor another client against the endpoint port, as in Getting Started. The synthetic test traffic on the Jobs tab is not a substitute: you do not choose the prompt and you never see the reply. - It cannot install PAIR updates. It tells you when a release is available; installing one is the same job it was before.
- It does not survive losing your connection. Use a terminal multiplexer, as above.
See Also
These documents cover related topics:
- Getting Started — first-run setup and endpoints
- Ports — which ports to use and how to change them
- Troubleshooting
nvpair-tuicomponent reference — internals and build instructions