Frequently Asked Questions
DeepStream General topics
How do I uninstall DeepStream?
For dGPU:
To remove all previous DeepStream 3.0 or prior installations, enter the command:
$ sudo rm -rf /usr/local/deepstream /usr/lib/x86_64-linux-gnu/gstreamer-1.0/libgstnv* /usr/bin/deepstream* /usr/lib/x86_64-linux-gnu/gstreamer-1.0/libnvdsgst*
/usr/lib/x86_64-linux-gnu/gstreamer-1.0/deepstream*
/opt/nvidia/deepstream/deepstream*
$ sudo rm -rf /usr/lib/x86_64-linux-gnu/libv41/plugins/libcuvidv4l2_plugin.so
To remove DeepStream 4.0 or later installations:
Open the uninstall.sh file in
/opt/nvidia/deepstream/deepstream/Set
PREV_DS_VERas4.0Run the script as sudo:
./uninstall.sh
For Jetson: Flash the target device with the latest release of JetPack.
What types of input streams does DeepStream 6.0.1 support?
It supports H.264, H.265, JPEG, and MJPEG streams.
What’s the throughput of H.264 and H.265 decode on dGPU (Tesla)?
See https://developer.nvidia.com/nvidia-video-codec-sdk for information.
How can I run the DeepStream sample application in debug mode?
Enter this command:
$ deepstream-app -c <config> --gst-debug=<debug#>
Where:
<config>is the pathname of the configuration file
<debug#>is a number specifying the amount of detail in the debugging output
For information about debugging tools, see: https://gstreamer.freedesktop.org/documentation/tutorials/basic/debugging-tools.html
Where can I find the DeepStream sample applications?
The DeepStream sample applications are located at:
<DeepStream installation dir>/sources/apps/sample_apps/
The configuration files for the sample applications are located at:
<DeepStream installation dir>/samples/configs/deepstream-app
For more information, see the NVIDIA DeepStream Development Guide.
How can I interpret frames per second (FPS) display information on console?
The FPS number shown on the console when deepstream-app runs is an average of the most recent five seconds. The number in brackets is average FPS over the entire run. The numbers are displayed per stream. The performance measurement interval is set by the perf-measurement-interval-sec setting in the configuration file.
My DeepStream performance is lower than expected. How can I determine the reason?
See the Troubleshooting chapter in the NVIDIA DeepStream Development Guide.
How can I specify RTSP streaming of DeepStream output?
You can enable remote display by adding an RTSP sink in the application configuration file. The sample configuration file source30_1080p_dec_infer-resnet_tiled_display_int8.txt has an example of this in the [sink2] section. You must set the enable flag to 1.
Once you enable remote display, the application prints the RTSP URL, which you can open in any media player like VLC.
What is the official DeepStream Docker image and where do I get it?
You can download the official DeepStream Docker image from DeepStream docker image. For dGPU, see: https://ngc.nvidia.com/containers/nvidia:deepstream. For Jetson, see: https://ngc.nvidia.com/containers/nvidia:deepstream-l4t
What is the recipe for creating my own Docker image?
Use the DeepStream container as the base image. Add your own custom layers on top of it using standard technique in Docker.
How can I display graphical output remotely over VNC? How can I determine whether X11 is running?
If the host machine is running X, starting VNC is trivial. Otherwise you must start X, then start VNC. To determine whether X is running, check the DISPLAY environment variable. If X is not running you must start it first, then run DeepStream with GUI, or set type to 1 or 3 under sink groups to select fakesink or save to a file. If you are using an NVIDIA® Tesla® V100 or P100 GPU Accelerator (both compute-only cards without a display), you must set type to 4 for DeepStream output RTSP streaming. See the NVIDIA DeepStream SDK Development Guide for sink settings.
Why does the deepstream-nvof-test application show the error message “Device Does NOT support Optical Flow Functionality” if run with NVIDIA Tesla P4 or NVIDIA Jetson Nano, Jetson TX2, or Jetson TX1?
Optical flow functionality is supported only on NVIDIA® Jetson AGX Xavier™, NVIDIA® Jetson NX™ and on GPUs with Turing architecture (NVIDIA® T4, NVIDIA® GeForce® RTX 2080 etc.).
Why is the Gst-nvstreammux plugin required in DeepStream 4.0+?
Multiple source components like decoder, camera, etc. are connected to the Gst-nvstreammux plugin to form a batch. This plugin is responsible for creating batch metadata, which is stored in the structure NvDsBatchMeta. This is the primary form of metadata in DeepStream 4.0.1. All plugins downstream from Gst-nvstreammux work on NvDsBatchMeta to access metadata and fill in the metadata they generate.
Why is a Gst-nvegltransform plugin required on a Jetson platform upstream from Gst-nveglglessink?
On a Jetson platform Gst-nveglglessink works on EGLImage structures. Gst-nvegltranform is required to convert incoming data (wrapped in an NVMM structure) to an EGLImage instance. On a dGPU platform, Gst-nveglglessink works directly on data wrapped in an NVMM structure.
How do I profile DeepStream pipeline?
You can use NVIDIA® Nsight™ Systems, a system-wide performance analysis tool. See https://developer.nvidia.com/nsight-systems for more details.
How can I check GPU and memory utilization on a dGPU system?
Enter nvidia-smi or nvidia-settings on the console.
What is the approximate memory utilization for 1080p streams on dGPU?
Use the table below as a guide to memory utilization in this case.
Note
Width and height in Gst-nvstreammux are set to the input stream resolution specified in the configuration file. The pipeline is: decoder → nvstreammux → nvinfer → fakesink.
Batch size (Number of streams) |
Decode memory |
Gst-nvinfer memory |
Gst-nvstreammux memory |
|---|---|---|---|
1 |
32 MB |
333 MB |
0 MB |
2 |
64 MB |
341 MB |
0 MB |
4 |
128 MB |
359 MB |
0 MB |
8 |
256 MB |
391 MB |
0 MB |
16 |
512 MB |
457 MB |
0 MB |
If input stream resolution and Gst-nvstreammux resolution (set in the configuration file) are the same, no additional GPU memory is allocated in Gst-nvstreammux. If input stream resolution is not same as Gst-nvstreammux resolution, Gst-nvstreammux allocates memory of size:
buffers*(1.5*width*height)*mismatches
Where:
buffersis the number of Gst-nvstreammux output buffers (set to 4).widthandheightare the mux output width and height.mismatchesis the number of sources with resolution mismatch.
This table shows some examples:
Example |
Gst-nvstreammux |
Gst-nvstreammux GPU memory size |
|---|---|---|
16 sources at |
|
|
15 sources at |
|
|
When deepstream-app is run in loop on Jetson AGX Xavier using “while true; do deepstream-app -c <config_file>; done;”, after a few iterations I see low FPS for certain iterations. Why is that?
This may happen when you are running thirty 1080p streams at 30 frames/second. The issue is caused by initial load. I/O operations bog down the CPU, and with qos=1 as a default property of the [sink0] group, decodebin starts dropping frames. To avoid this, set qos=0 in the [sink0] group in the configuration file.
Why do I get the error Makefile:13: *** "CUDA_VER is not set". Stop when I compile DeepStream sample applications?
Export this environment variable:
For dGPU:
CUDA_VER=11.4For Jetson:
CUDA_VER=10.2
Then compile again.
How can I construct the DeepStream GStreamer pipeline?
Here are few examples of how to construct the pipeline. To run these example pipelines as-is, run the applications from the samples directory:
V4l2 decoder → nvinfer → nvtracker → nvinfer (secondary) → nvmultistreamtiler → nvdsosd → nveglglessink
For multistream (4x1080p) operation on dGPU:
$ gst-launch-1.0 filesrc location= streams/sample_1080p_h264.mp4 ! qtdemux ! h264parse ! nvv4l2decoder \
 ! m.sink_0 nvstreammux name=m batch-size=4 width=1920 height=1080 ! nvinfer config-file-path= configs/deepstream-app/config_infer_primary.txt \
 batch-size=4 unique-id=1 ! nvtracker ll-lib-file=/opt/nvidia/deepstream/deepstream-6.0/lib/libnvds_nvmultiobjecttracker.so \
 ! nvinfer config-file-path= configs/deepstream-app/config_infer_secondary_carcolor.txt batch-size=16 unique-id=2 infer-on-gie-id=1 infer-on-class-ids=0 \
 ! nvmultistreamtiler rows=2 columns=2 width=1280 height=720 ! nvvideoconvert ! nvdsosd ! nveglglessink filesrc location= streams/sample_1080p_h264.mp4 \
 ! qtdemux ! h264parse ! nvv4l2decoder ! m.sink_1 filesrc location= streams/sample_1080p_h264.mp4 ! qtdemux ! h264parse ! nvv4l2decoder \
 ! m.sink_2 filesrc location= streams/sample_1080p_h264.mp4 ! qtdemux ! h264parse ! nvv4l2decoder ! m.sink_3
For multistream (4x1080p) operation on Jetson:
$ gst-launch-1.0 filesrc location= streams/sample_1080p_h264.mp4 ! qtdemux ! h264parse ! nvv4l2decoder \
 ! m.sink_0 nvstreammux name=m batch-size=4 width=1920 height=1080 ! nvinfer config-file-path= configs/deepstream-app/config_infer_primary.txt \
 batch-size=4 unique-id=1 ! nvtracker ll-lib-file=/opt/nvidia/deepstream/deepstream-6.0/lib/libnvds_nvmultiobjecttracker.so \
 ! nvinfer config-file-path= configs/deepstream-app/config_infer_secondary_carcolor.txt batch-size=16 unique-id=2 infer-on-gie-id=1 infer-on-class-ids=0 \
 ! nvmultistreamtiler rows=2 columns=2 width=1280 height=720 ! nvvideoconvert ! nvdsosd ! nvegltransform \
 ! nveglglessink filesrc location= streams/sample_1080p_h264.mp4 ! qtdemux ! h264parse ! nvv4l2decoder \
 ! m.sink_1 filesrc location= streams/sample_1080p_h264.mp4 ! qtdemux ! h264parse ! nvv4l2decoder \
 ! m.sink_2 filesrc location= streams/sample_1080p_h264.mp4 ! qtdemux ! h264parse ! nvv4l2decoder ! m.sink_3
For single stream (1080p) operation on dGPU:
$ gst-launch-1.0 filesrc location= streams/sample_1080p_h264.mp4 ! qtdemux ! h264parse ! nvv4l2decoder \
! m.sink_0 nvstreammux name=m batch-size=1 width=1920 height=1080 ! nvinfer config-file-path= configs/deepstream-app/config_infer_primary.txt \
batch-size=1 unique-id=1 ! nvtracker ll-lib-file=/opt/nvidia/deepstream/deepstream-6.0/lib/libnvds_nvmultiobjecttracker.so \
! nvinfer config-file-path= configs/deepstream-app/config_infer_secondary_carcolor.txt batch-size=16 unique-id=2 infer-on-gie-id=1 infer-on-class-ids=0 \
! nvmultistreamtiler rows=1 columns=1 width=1280 height=720 ! nvvideoconvert ! nvdsosd ! nveglglessink
For single stream (1080p) operation on Jetson:
$ gst-launch-1.0 filesrc location= streams/sample_1080p_h264.mp4 ! qtdemux ! h264parse ! nvv4l2decoder \
! m.sink_0 nvstreammux name=m batch-size=1 width=1920 height=1080 ! nvinfer config-file-path= configs/deepstream-app/config_infer_primary.txt \
batch-size=1 unique-id=1 ! nvtracker ll-lib-file=/opt/nvidia/deepstream/deepstream-6.0/lib/libnvds_nvmultiobjecttracker.so \
! nvinfer config-file-path= configs/deepstream-app/config_infer_secondary_carcolor.txt batch-size=16 unique-id=2 infer-on-gie-id=1 infer-on-class-ids=0 \
! nvmultistreamtiler rows=1 columns=1 width=1280 height=720 ! nvvideoconvert ! nvdsosd ! nvegltransform ! nveglglessink
JPEG decode
Using nvv4l2decoder on Jetson:
$ gst-launch-1.0 filesrc location= ./streams/sample_720p.jpg ! jpegparse ! nvv4l2decoder ! nvegltransform ! nveglglessink
Using nvv4l2decoder on dGPU:
$ gst-launch-1.0 filesrc location= ./streams/sample_720p.jpg ! jpegparse ! nvv4l2decoder ! nveglglessink
Using nvjpegdec on Jetson:
$ gst-launch-1.0 filesrc location= ./streams/sample_720p.jpg ! nvjpegdec ! nvegltransform ! nveglglessink
Using nvjpegdec on dGPU:
$ gst-launch-1.0 filesrc location= ./streams/sample_720p.jpg ! nvjpegdec ! nveglglessink
Dewarper
On dGPU:
$ gst-launch-1.0 uridecodebin uri= file://`pwd`/../../../../samples/streams/sample_cam6.mp4 ! nvvideoconvert \
! nvdewarper source-id=6 num-output-buffers=4 config-file=config_dewarper.txt ! m.sink_0 nvstreammux name=m width=1280 height=720 batch-size=4 \
batched-push-timeout=100000 num-surfaces-per-frame=4 ! nvmultistreamtiler rows=1 columns=1 width=720 height=576 ! nvvideoconvert ! nveglglessink
On Jetson:
$ gst-launch-1.0 uridecodebin uri= file://`pwd`/../../../../samples/streams/sample_cam6.mp4 ! nvvideoconvert ! nvdewarper source-id=6 num-output-buffers=4 \
config-file=config_dewarper.txt ! m.sink_0 nvstreammux name=m width=1280 height=720 batch-size=4 batched-push-timeout=100000 \
num-surfaces-per-frame=4 ! nvmultistreamtiler rows=1 columns=1 width=720 height=576 ! nvvideoconvert ! nvegltransform ! nveglglessink
Note
This Gst pipeline must be run from the dewarper test application directory,
sources/apps/sample_apps/deepstream-dewarper-test. This pipeline runs only for four surfaces. To run for one, two, or three surfaces, use the dewarper test application.Dsexample
On dGPU:
$ gst-launch-1.0 filesrc location = ./streams/sample_1080p_h264.mp4 ! qtdemux ! h264parse ! nvv4l2decoder \
! m.sink_0 nvstreammux name=m width=1280 height=720 batch-size=1  ! nvinfer config-file-path= ./configs/deepstream-app/config_infer_primary.txt \
! dsexample full-frame=1 ! nvvideoconvert ! nvdsosd ! nveglglessink sync=0
On Jetson:
$ gst-launch-1.0 filesrc location = ./streams/sample_1080p_h264.mp4 ! qtdemux ! h264parse ! nvv4l2decoder \
! m.sink_0 nvstreammux name=m width=1280 height=720 batch-size=1  ! nvinfer config-file-path= ./configs/deepstream-app/config_infer_primary.txt \
! dsexample full-frame=1 ! nvvideoconvert ! nvdsosd ! nvegltransform !  nveglglessink sync=0
The property bufapi-version is missing from nvv4l2decoder, what to do?
The bufapi-version property is not required if used with DeepStream directly, but you may not get NvBufSurface as output if you use pipeline with no core DeepStream component. For example:
$ gst-launch-1.0 filesrc location= /opt/nvidia/deepstream/deepstream/samples/streams/sample_720p.h264 ! h264parse ! nvv4l2decoder bufapi-version=1 ! nvegltransform ! nveglglessink
In such cases set $export DS_NEW_BUFAPI=1 and use the above pipeline. This will guarantee that output buffer type of nvv4l2decoder is NvBufsurface. For example:
$ DS_NEW_BUFAPI=1 gst-launch-1.0 filesrc location= /opt/nvidia/deepstream/deepstream/samples/streams/sample_720p.h264 ! h264parse ! nvv4l2decoder ! nvegltransform ! nveglglessink
Or use nvvideoconvert in the pipeline directly without setting the environment variable:
$ gst-launch-1.0 filesrc location= /opt/nvidia/deepstream/deepstream/samples/streams/sample_720p.h264 ! h264parse ! nvv4l2decoder ! nvvideoconvert ! nvegltransform ! nveglglessink
Why am I getting “ImportError: No module named google.protobuf.internal when running convert_to_uff.py on Jetson AGX Xavier”?
If you set up Tensorflow using https://elinux.org/Jetson_Zoo#TensorFlow, please use Python 3 for running convert_to_uff.py:
$ python3 /usr/lib/python3.6/dist-packages/uff/bin/convert_to_uff.py
Does DeepStream Support 10 Bit Video streams?
10-bit decode (P010_10LE) is Supported, although most of the components work on 8-bit input. It is suggested to use nvvideoconvert to transform stream from 10-bit to 8-bit, and then add the relevant components.
Sometimes, RTSP output from DeepStream is not observed remotely
Try running following pipeline to see if there is issue in network. With this you’ll be able to see output.
gst-launch-1.0 uridecodebin uri=rtsp://<rtsp link> ! nveglglessink sync=0 on remote machine.
What is the difference between batch-size of nvstreammux and nvinfer? What are the recommended values for nvstreammux batch-size?
nvstreammux’s batch-size is the number of buffers(frames) it will batch together in one muxed buffer. nvinfer’s batch-size is the number of frame(primary-mode)/objects(secondary-mode) it will infer together. We recommend that the nvstreammux’s batch-size be set to either number of sources linked to it or the primary nvinfer’s batch-size.
Why do some caffemodels fail to build after upgrading to DeepStream 6.0.1?
DeepStream 6.0.1 uses explicit batch dimension for caffemodels. Some caffemodels use TensorRT plugins/layers which have not been updated for explicit batch dimensions. Add force-implicit-batch-dim=1 in the nvinfer config file for such models to build the models using implicit batch dimension networks.
How do I configure the pipeline to get NTP timestamps?
To get NTP timestamps, set attach-sys-ts property to FALSE on nvstreammux component.
Why is the NTP timestamp value 0?
NTP timestamp 0 suggests that you are not receiving NTP timestamp from RTCP sender report. You can verify this using a tool like Wireshark.
How to handle operations not supported by Triton Inference Server?
For details on handling unsupported operations, see: https://docs.nvidia.com/deeplearning/sdk/triton-inference-server-guide/docs/custom_operation.html.
The custom library mentioned in the document can be loaded in the DeepStream application by one of the following methods:
Running the application as
LD_PRELOAD=./libcustomOp.so deepstream-app -c <app-config>
Add the custom-lib path in “nvinferserver” config file as
infer_config {
 ...
custom_lib { path: "./libcustomOp.so" }
}
Why do I see confidence value as -0.1.?
If “Group Rectangles” mode of clustering is chosen then confidence value is set to -0.1 because the algorithm does not preserve confidence value.
Also, for the objects being tracked by the tracker but not detected by the inference component, confidence value is set to -0.1.
How to use the OSS version of the TensorRT plugins in DeepStream?
If TensorRT OSS plugins library is not already available, please follow instructions from https://github.com/NVIDIA/TensorRT to build the library. To use the library in DeepStream, export LD_PRELOAD=/path/to/oss/libnvinfer_plugin.so before running any DeepStream app.
Why do I see the below Error while processing H265 RTSP stream?
Error: gstrtph265depay.c:1196:gst_rtp_h265_finish_fragmentation_unit: assertion failed:(outsize >= 4)
This issue is observed from h265depay gstreamer plugin component when size of rtp payload is less than 4. The component throws assertion.
This invalid packet size could be because of packet corruption. To overcome this issue, you should ignore assertion and handle such errors.
Required modification in the code is present at https://forums.developer.nvidia.com/t/deepstream-sdk-faq/80236. You’ll need to compile the code and place the lib at the appropriate location.
Why do I observe a lot of buffers being dropped when running deepstream-nvdsanalytics-test application on Jetson Nano ?
By default nvdsanalytics test application uses primary detector every frame as well as NvDCF tracker and nveglglessink, all the above component consume GPU resources, due to which application is not executing in real-time. To overcome this, do the following:
Change the tracker setting to a more perf-oriented setting (e.g., config_tracker_NvDCF_perf.yml or config_tracke1r_NvDCF_max_perf.yml) in
deepstream_nvdsanalytics_test.cppChange video renderer from
nveglglessinktonvoverlaysink, and also changenvegltransformelement toidentitywhile doing so.If above two steps don’t help, user can increase
intervalproperty to value greater than 0 innvdsanalytics_pgie_config.txt
Why do I observe: A lot of buffers are being dropped. When running live camera streams even for few or single stream, also output looks jittery?
For live streams, nvstreammux element live-source property should be set as 1. Also, sink/renderer element’s sync and qos property should be set as 0 or FALSE.
Why does the RTSP source used in gst-launch pipeline through uridecodebin show blank screen followed by the error - WARNING: from element /GstPipeline:pipeline0/GstNvStreamMux:m: No Sources found at the input of muxer. Waiting for sources?
At times the requested muxer pad gets deleted before linking happens, as streams might contain both video and audio. If queue element is added between nvstreammux and the uridecodebin then the above pipeline will work. As uridecodebin will link to queue pad and not nvstreammux pad. This problem is not observed programmatically as the linking takes place new pad callback of decoder on video stream.
What if I do not get expected 30 FPS from camera using v4l2src plugin in pipeline but instead get 15 FPS or less than 30 FPS?
This could be possible due to exposure or lighting conditions around camera however this can be fixed by changing camera settings through below reference commands to change the exposure settings.
v4l2-ctl -d /dev/video0 --list-ctrls
v4l2-ctl --set-ctrl=exposure_auto=1
v4l2-ctl --set-ctrl=exposure_absolute=300
On Jetson platform, I get same output when multiple Jpeg images are fed to nvv4l2decoder using multifilesrc plugin. Why is that?
For example
multifilesrc location = frame%d.jpeg ! jpegparse ! nvv4l2decoder ! nvegltransform ! nveglglessink
On Jetson platfroms nvv4l2decoder needs to set property mjpeg=1 in order to work with multifilesrc.
How do I obtain individual sources after batched inferencing/processing? What are the sample pipelines for nvstreamdemux?
Some sample nvstreamdemux pipelines:
    gst-launch-1.0 filesrc location = sample_1080p_h264.mp4 ! decodebin ! m.sink_0 \
    filesrc location = sample_1080p_h264.mp4 ! decodebin ! m.sink_1 \
    filesrc location = sample_1080p_h264.mp4 ! decodebin ! m.sink_2 \
    filesrc location = sample_1080p_h264.mp4 ! decodebin ! m.sink_3 \
    nvstreammux name=m width=1920 height=1080 batch-size=4 batched-push-timeout=40000 ! \
    queue ! nvinfer config-file-path=<config> batch-size=4 ! \
    queue ! nvtracker ll-lib-file=<lib-file> ! \
    nvstreamdemux name=d \
    d.src_0 ! queue ! nvvideoconvert ! nvdsosd ! nveglglessink \
    d.src_1 ! queue ! nvvideoconvert ! nvdsosd ! nveglglessink \
    d.src_2 ! queue ! nvvideoconvert ! nvdsosd ! nveglglessink \
    d.src_3 ! queue ! nvvideoconvert ! nvdsosd ! nveglglessink

.. note::
   Queue element should be inserted after every ``nvstreamdemux src`` pad.
It is not required to demux all sources / create all nvstreamdemux src pad. Also, the downstream pipeline for every source may be different. Sample pipeline:
gst-launch-1.0 filesrc location = sample_1080p_h264.mp4 ! decodebin ! m.sink_0 \
filesrc location = sample_1080p_h264.mp4 ! decodebin ! m.sink_1 \
filesrc location = sample_1080p_h264.mp4 ! decodebin ! m.sink_2 \
filesrc location = sample_1080p_h264.mp4 ! decodebin ! m.sink_3 \
nvstreammux name=m width=1920 height=1080 batch-size=4 batched-push-timeout=40000 ! \
queue ! nvinfer config-file-path=<config> batch-size=4 ! \
queue ! nvtracker ll-lib-file=<lib-file> ! \
vstreamdemux name=d \
d.src_1 ! queue ! nvvideoconvert ! nvdsosd ! nvvideoconvert ! nvv4l2h264enc ! h264parse ! qtmux ! filesink location=out.mp4 \
d.src_2 ! queue ! nvvideoconvert ! nvdsosd ! nveglglessink
Why do I encounter such error while running Deepstream pipeline memory type configured and i/p buffer mismatch ip_surf 0 muxer 3?
This error is observed on dGPU, when NvStreamMux is configured for memory type 3, i.e., NVBUF_MEM_CUDA_UNIFIED and the input surface to the nvstreammux has the memory type 0 i.e., NVBUF_MEM_CUDA_DEFAULT (Cuda device for dGPU). The resolution of input surface is same as nvstreammux configured resolution, in such scenario the nvstreammux ``tries to send the original buffer on its sinkpad to downstream muxed with buffers from other sources, but due to different configured memory type of ``nvstreammux it can’t do the same. To get around this ensure that all the sources connected to nvstreammux are generating same type of memory and configure the nvstreammux memory to the same type. Alternatively, if there is scaling in nvstreammux this error won’t be encountered.
How does secondary GIE crop and resize objects?
SGIE will crop the object from NvStreamMux buffer using the object’s bbox detected by the Primary GIE. The crop is then scaled/converted to the network resolution/color format. For example, if the NvStreamMux resolution is 1920x1080, SGIE will crop using object bbox co-ordinates (e.g. x=1000, y=20, w=400, y=500) from the 1920x1080 image and then scale it to the SGIE network resolution (say 224x224). In practice, the object crop + scaling + color conversion happens in one go.
How to save frames from GstBuffer?
To save frames from gst buffer you need to Map gst buffer using gst_buffer_map () API.
Here is the pseudo code:
GstMapInfo in_map_info;
NvBufSurface *surface = NULL;

memset (&in_map_info, 0, sizeof (in_map_info));
if (!gst_buffer_map (inbuf, &in_map_info, GST_MAP_READ)) {
g_print ("Error: Failed to map gst buffer\n");
}
surface = (NvBufSurface *) in_map_info.data;
Now that you have access to NvBufSurface structure, you can access actual frame memory and save it. At the end you need to unmap gst buffer using gst_buffer_unmap (inbuf, &in_map_info)
For more details, see gst_dsexample_transform_ip() in gst-dsexample plugin source code.
What are different Memory types supported on Jetson and dGPU?
Memory Type |
Jetson |
dGPU or X86_64 |
|---|---|---|
|
Memory of type Surface Array which is 2D pitched allocated by default: Used by all hardware accelerator on the platform. Accessible by CPU using |
Memory of type Cuda Device is allocated by default, accessible only by GPU. User might need to have custom Cuda kernels to access or modify memory. Or |
|
Page Locked Memory allocated using |
Page Locked Memory allocated using |
|
Memory of type Cuda Device is allocated, accessible only by GPU. User might need to have custom Cuda kernels to access or modify memory. |
Memory of type Cuda Device is allocated, accessible only by GPU. User might need to have custom Cuda kernels to access or modify memory. Or |
|
Unsupported |
Unified Virtual Memory allocated using |
|
Memory of type Surface Array which is 2D pitched allocated by default; used by all hardware accelerator on the platform; accessible by CPU using |
Unsupported |
|
Used internally for Jetson |
Unsupported |
|
Allocated using |
Allocated using |
What are different Memory transformations supported on Jetson and dGPU?
dGPU: User can use NvBufSurfaceCopy() to copy from one memory type to another. If transformation is required, nvvideoconvert plugin support nvbuf-memory-type property to allow different type of memory. NvBufSurfTransform() can also be used to do the transformation between various CUDA types of memories. CUDA to NVBUF_MEM_SYSTEM transformation is not supported by NvBufSurfTransform directly, user can use NvBufSurfaceCopy() to copy into CUDA memory and perform transformation on that memory.
Jetson: User can use NvBufSurfaceCopy() to copy from one memory type to another, although CUDA memory copies are not supported directly. User can perform NvBufSurfTransform() for transformation from NVBUF_MEM_SURFACE_ARRAY/NVBUF_MEM_DEFAULT to Cuda Memory, but user need to use GPU as compute device for doing the transformation, as VIC doesn’t support transformation to CUDA memory or NVBUF_MEM_SYTEM. See NvBufSurfTransform APIs for more information.
Why does my image look distorted if I wrap my cudaMalloc’ed memory into NvBufSurface and provide to NvBufSurfTransform?
If you are not using NvBufSurfaceCreate for allocation, ensure the pitch of the allocated memory is multiple of 32. Also ensure that the starting address of each plane of the input is 128-byte aligned.
Why am I getting following waring when running deepstream app for first time?
"GStreamer-WARNING: Failed to load plugin '...libnvdsgst_inferserver.so': libtrtserver.so: cannot open shared object file: No such file or directory"
This is a harmless warning indicating that the DeepStream’s nvinferserver plugin cannot be used since “Triton Inference Server” is not installed. If DeepStream-Triton is required, try to pull DeepStream’s Triton docker image on dGPU following instructions at https://ngc.nvidia.com/catalog/containers/nvidia:deepstream and run the test apps inside container. Triton Inference Server is automatically installed on Jetson along with DeepStream package. No extra instructions are needed.
How to find out the maximum number of streams supported on given platform?
DeepStream can support as many streams as possible as long as application under run is not limited by memory/decode/compute capability.
How to find the performance bottleneck in DeepStream?
On dGPU (X86): Run following command to check GPU, decoder, encoder, memory utilization:
$nvidia-smi dmon
You need to check the temperature and power usage as well.
Performance is limited by the temperature and power numbers beyond the allowed limits for a given platform.
To check if CPU is the bottleneck, run htop command on the console to see if any of the CPU core utilizations is ~100%
On Jetson: Run following command to check CPU, GPU, and memory utilization:
sudo./tegrastats
For more details, see the link: https://docs.nvidia.com/jetson/l4t/index.html#page/Tegra%2520Linux%2520Driver%2520Package%2520Development%2520Guide%2FAppendixTegraStats.html%23wwpID0E0SB0HA
How to fix “cannot allocate memory in static TLS block” error?
On Jetson, sometimes the following error might occur:
(gst-plugin-scanner:21845): GStreamer-WARNING **: 04:34:02.887: Failed to load plugin '/usr/lib/aarch64-linux-gnu/gstreamer-1.0/libgstlibav.so': /usr/lib/aarch64-linux-gnu/libgomp.so.1: cannot allocate memory in static TLS block
This error can be fixed by running the following:
export LD_PRELOAD=/usr/lib/aarch64-linux-gnu/libgomp.so.1
Smart Record
Does smart record module work with local video streams?
Yes. Smart record module expects encoded frames which can be from either local video or RTSP stream. But deepstream-test5-app only supports RTSP sources for smart record.
Are multiple parallel records on same source supported?
No. Only single record at a time on the same source is supported. You need to stop the ongoing record to start the new recording again.
What if I forgot to stop the recording?
There is default duration setting and if record is not stopped by stop event it would be stopped automatically as per default duration value.
I started the record with a set duration. Can I stop it before that duration ends?
Yes, running recording instance can be stopped any time.
What if I don’t set default duration for smart record?
Default value of record duration is 10 seconds.
What if I don’t set video cache size for smart record?
Default value of video cache size is 30 seconds.
What is maximum duration of data I can cache as history for smart record?
As such, there is no limit on cache size. It is limited by available system memory.
Can I record the video with bounding boxes and other information overlaid?
To have better performance and optimization, smart record avoids transcoding and caches only encoded frames. To that extent recording the video with overlaid bounding boxes is not possible. But you can implement that use case in two ways:
Run the inference pipeline on recorded video and save the output in a file using sink (
type = filesink)Add encoding components in the pipeline after OSD and then add smart record module.
Triton
Can Jetson platform support the same features as dGPU for Triton plugin?
Not exactly. dGPU can support most models such as TensorRT, Tensorflow (and TF-TRT), ONNX(and with TRT optimization), Pytorch. Jetson can support TensorRT, Tensorflow (and TF-TRT). Support for other models are coming in future releases. For more details, see Deepstream Plugin Guide section.
Can Gst-nvinfereserver (DeepSream Triton plugin) run on Nano platform?
Yes. But due to Nano’s memory limitation, performance of certain models is slow and even run into OOM (out of memory) issues, specifically on heavy Tensorflow models. There is an option to run CPU instance for certain models on Nano.
For more details, see samples/configs/deepstream-app-triton/README
How to enable TensorRT optimization for Tensorflow and ONNX models?
To learn details TensorRT optimization setting in Triton models, see:
https://github.com/triton-inference-server/server/blob/r20.11/README.md
TF-TRT is supported on both dGPU and Jetson platforms.
1. Open the model’s Triton config.pbtxt file
2. Make sure GPU instance enabled
3. Append tensorrt accelerator.(e.g. triton_model_repo/ssd_mobilenet_v1_coco_2018_01_28/config.pbtxt)
optimization { execution_accelerators {
gpu_execution_accelerator : [ {
name : "tensorrt"
parameters { key: "precision_mode" value: "FP16" }
}] }}
For more on TF-TRT parameters, see TF-TRT API in Tensorflow 1.x. is_dynamic_op is set to True natively in Triton.
Additionally, you can generate offline TF-TRT models by their own script running with tensorflow environment.
Read TF-TRT User guide to generate offline(static) models. Once the original online model is replaced by offline model, remove optimization block in case TF-TRT online runs again to overwrite offline TF-TRT caches.
ONNX is supported on dGPU only. TensorRT optimization can be enabled by
 optimization { execution_accelerators {
gpu_execution_accelerator : [ { name : "tensorrt" } ]
}}
The TensorRT engine caches will be generated at run time. It is getting started during initialization or first frame come. This might take from several seconds even to minutes depends on how heavy the model is and how good platform it is.
How to tune GPU memory for Tensorflow models?
When running TensorFlow models using Triton Inference Server, the GPU device memory may fall short. The allowed GPU device memory allocation for TensorFlow models can be tuned using the tf_gpu_memory_fraction parameter in the nvdsinferserver’s config files (config_infer_*). For more details, see samples/configs/deepstream-app-triton/README.
This parameter is same as tensorflow config’s per_process_gpu_memory_fraction. For more details, see:
Tensorflow 1.x gpu-guide
TF-TRT user guide
Can Gst-nvinferserver support models cross processes or containers?
No. The plugin is based on Triton Server CAPIs instead of client APIs. It doesn’t support client/server architecture. But the single process could run a standalone Triton model repo no matter how many models running together.
Can users set different model repos when running multiple Triton models in single process?
No. All config files for a same deepstream-app process must have same model_repo. Otherwise GSt-nvinferserver may report error or use random config on model_repo.
infer_config { triton { model_repo {
    root: “path/to/model_repo”
    strict_model_config: true
    tf_gpu_memory_fraction: 0.35
    ...
} } }
What is the difference between DeepStream classification and Triton classification?
Gst-nvinferserver plugin support 2 classification methods:
Use DeepStream plugin to parse classification output and select labels. Configure the plugin’s postprocess block with
labelfile_path, and classification options.infer_config { postprocess { labelfile_path: “path/to/classification_labels.txt” classification { threshold: 0.5 } } }
Example:
samples/ configs/deepstream-app-triton/config_infer_primary_classifier_inception_graphdef_postprocessInDS.txt
Use Triton native classification method. The label file configured in Triton model’s
config.pbtxt(e.g.samples/triton_model_repo/inception_graphdef/config.pbtxt)output [ { name: "InceptionV3/Predictions/Softmax" data_type: TYPE_FP32 dims: [ 1001 ] label_filename: "inception_labels.txt" } ]
To enable it, need update Gst-nvinferserver’s config file with:
infer_config { postprocess {
    triton_classification { topk:1 threshold: 0.5 }
} }
Example: samples/configs/deepstream-app-triton/config_infer_primary_classifier_inception_graphdef_postprocessIntriton.txt
Why is max_batch_size: 0 used in some Triton model config files (samples/triton_model_repo/*/config.pbtxt)?
This is the parameter settings for Triton runtime. Some models do not support batching according to Triton docs (https://github.com/triton-inference-server/server/blob/master/docs/model_configuration.md#maximum-batch-size).
Gst-nvinferserver plugin supports these models in the non-batching mode, and tensor input/output shapes usually exist with full dimensions (1st dim is a batch-size).
For example in triton_model_repo/densenet_onnx/config.pbtxt with:
max_batch_size : 0
input {
 ...
 dims: [1, 3, 224, 224 ]
}
The 1st dim 1 is a batch-size in full-dims.
In addition to some specific cases, if a model can support dynamic-shape with:
max_batch_size : 0
input {
 ...
 dims: [-1, 3, 224, 224 ]
}
The 1st dim -1 means a dynamic batching size. In this case, to control the maximum batching size for pre-allocated buffer pool, user need
to configure Gst-nvinferserver plugin configs/deepstream-app-triton/config_infer_**.txt with a valid maximum batch-size:
infer_config {
unique_id: 1
gpu_ids: [0]
max_batch_size: 30
...
}
The example above limits the final input batch-size to <= 30.
Gst-nvinferserver can also support Triton models reshape in config files. Read more details here: https://github.com/triton-inference-server/server/blob/master/docs/model_configuration.md#reshape
How to support Triton ensemble model?
See details in Triton Ensemble Models in :doc: DS_plugin_gst_nvinferserver section.
Why am I getting error Could not get EGL display connection while running deepstream sample application?
Before running the application, if display device is connected, use command: $export DISPLAY=:0
If display device is not connected, use command: $unset DISPLAY
Does Gst-nvinferserver support Triton multiple instance groups?
Yes, you can configure Triton model config.pbtxt with multiple instances on single GPU or CPU to make them run in parallel. If multiple instances are configured on different settings (e.g. run an instance on GPU, and another instance on GPU), warmup of the instances is recommended. This is to avoid timeout or other live streaming errors in case the specific instance takes too long to initialize on the first frame.
To enable multiple instances, see:
https://docs.nvidia.com/deeplearning/triton-inference-server/user-guide/docs/model_configuration.html#instance-groups
To enable warmup, see:
https://docs.nvidia.com/deeplearning/triton-inference-server/user-guide/docs/model_configuration.html#model-warmup
Can Gst-nvinferserver support inference on multiple GPUs?
Not yet. When running on multiple-gpu platform, you’ll need a specific single gpu-id for GPU instances. If no gpu-id is specified, all GPU instances would be running together by default. This could cause unexpected behaviors. Update config.pbtxt and specify single gpu-id explicitly.
instance_group {
count: 1
gpus: 0
kind: KIND_GPU
}
Or specify single GPU in docker cmdline:
docker run -it --rm --gpus '"'device=0'"' ...
What is batch-size differences for a single model in different config files (gie group in source, config_inferserver.., and Triton model’s config.pbtxt)?
Take TensorRT Primary_Detector for example:
Gst-nvinferserver Plugin’s config file
configs/deepstream-app-triton/config_infer_plan_engine_primary.txt, definesinfer_config { max_batch_size: 30 }
This indicates the Gst plugin would pre-allocate 30 input buffers for preprocessing and pass at most 30 batched preprocessed buffers into Triton Runtime each time. This value must be > 0
Deepstream-app’s config file
configs/deepstream-app-triton/source4_1080p_dec_infer-resnet_tracker_sgie_tiled_display_int8.txt, defines[primary-gie] batch-size=4 config-file=config_infer_plan_engine_primary.txt
This config-file has top-priority and would overwrite
configs/deepstream-app-triton/config_infer_plan_engine_primary.txtwithmax_batch_sizeto4at run time.
Triton Runtime has its own config file format following https://github.com/triton-inference-server/server/blob/master/docs/model_configuration.md. Inside
triton_model_repo/Primary_Detector/config.pbtxt, it definesname: "Primary_Detector" platform: "tensorrt_plan" max_batch_size: 30
This indicates Triton Runtime can batch at most 30 input buffers for model inference. In this example, plan engine model
resnet10.caffemodel_b30_gpu0_int8.enginein Triton backend can support maximumbatch-size: 30. If Triton model is not non-batching configured withmax_batch_size: >0, you’ll need to make sure batch-size in config-file of Gst-nvinferserver and deepstream-app must less than or equal to this Triton model’smax_batch_sizeintriton_model_repo/${model}/config.pbtxt. If Triton model is non-batching configured withmax_batch_size: 0, see the non-batching support questions above.
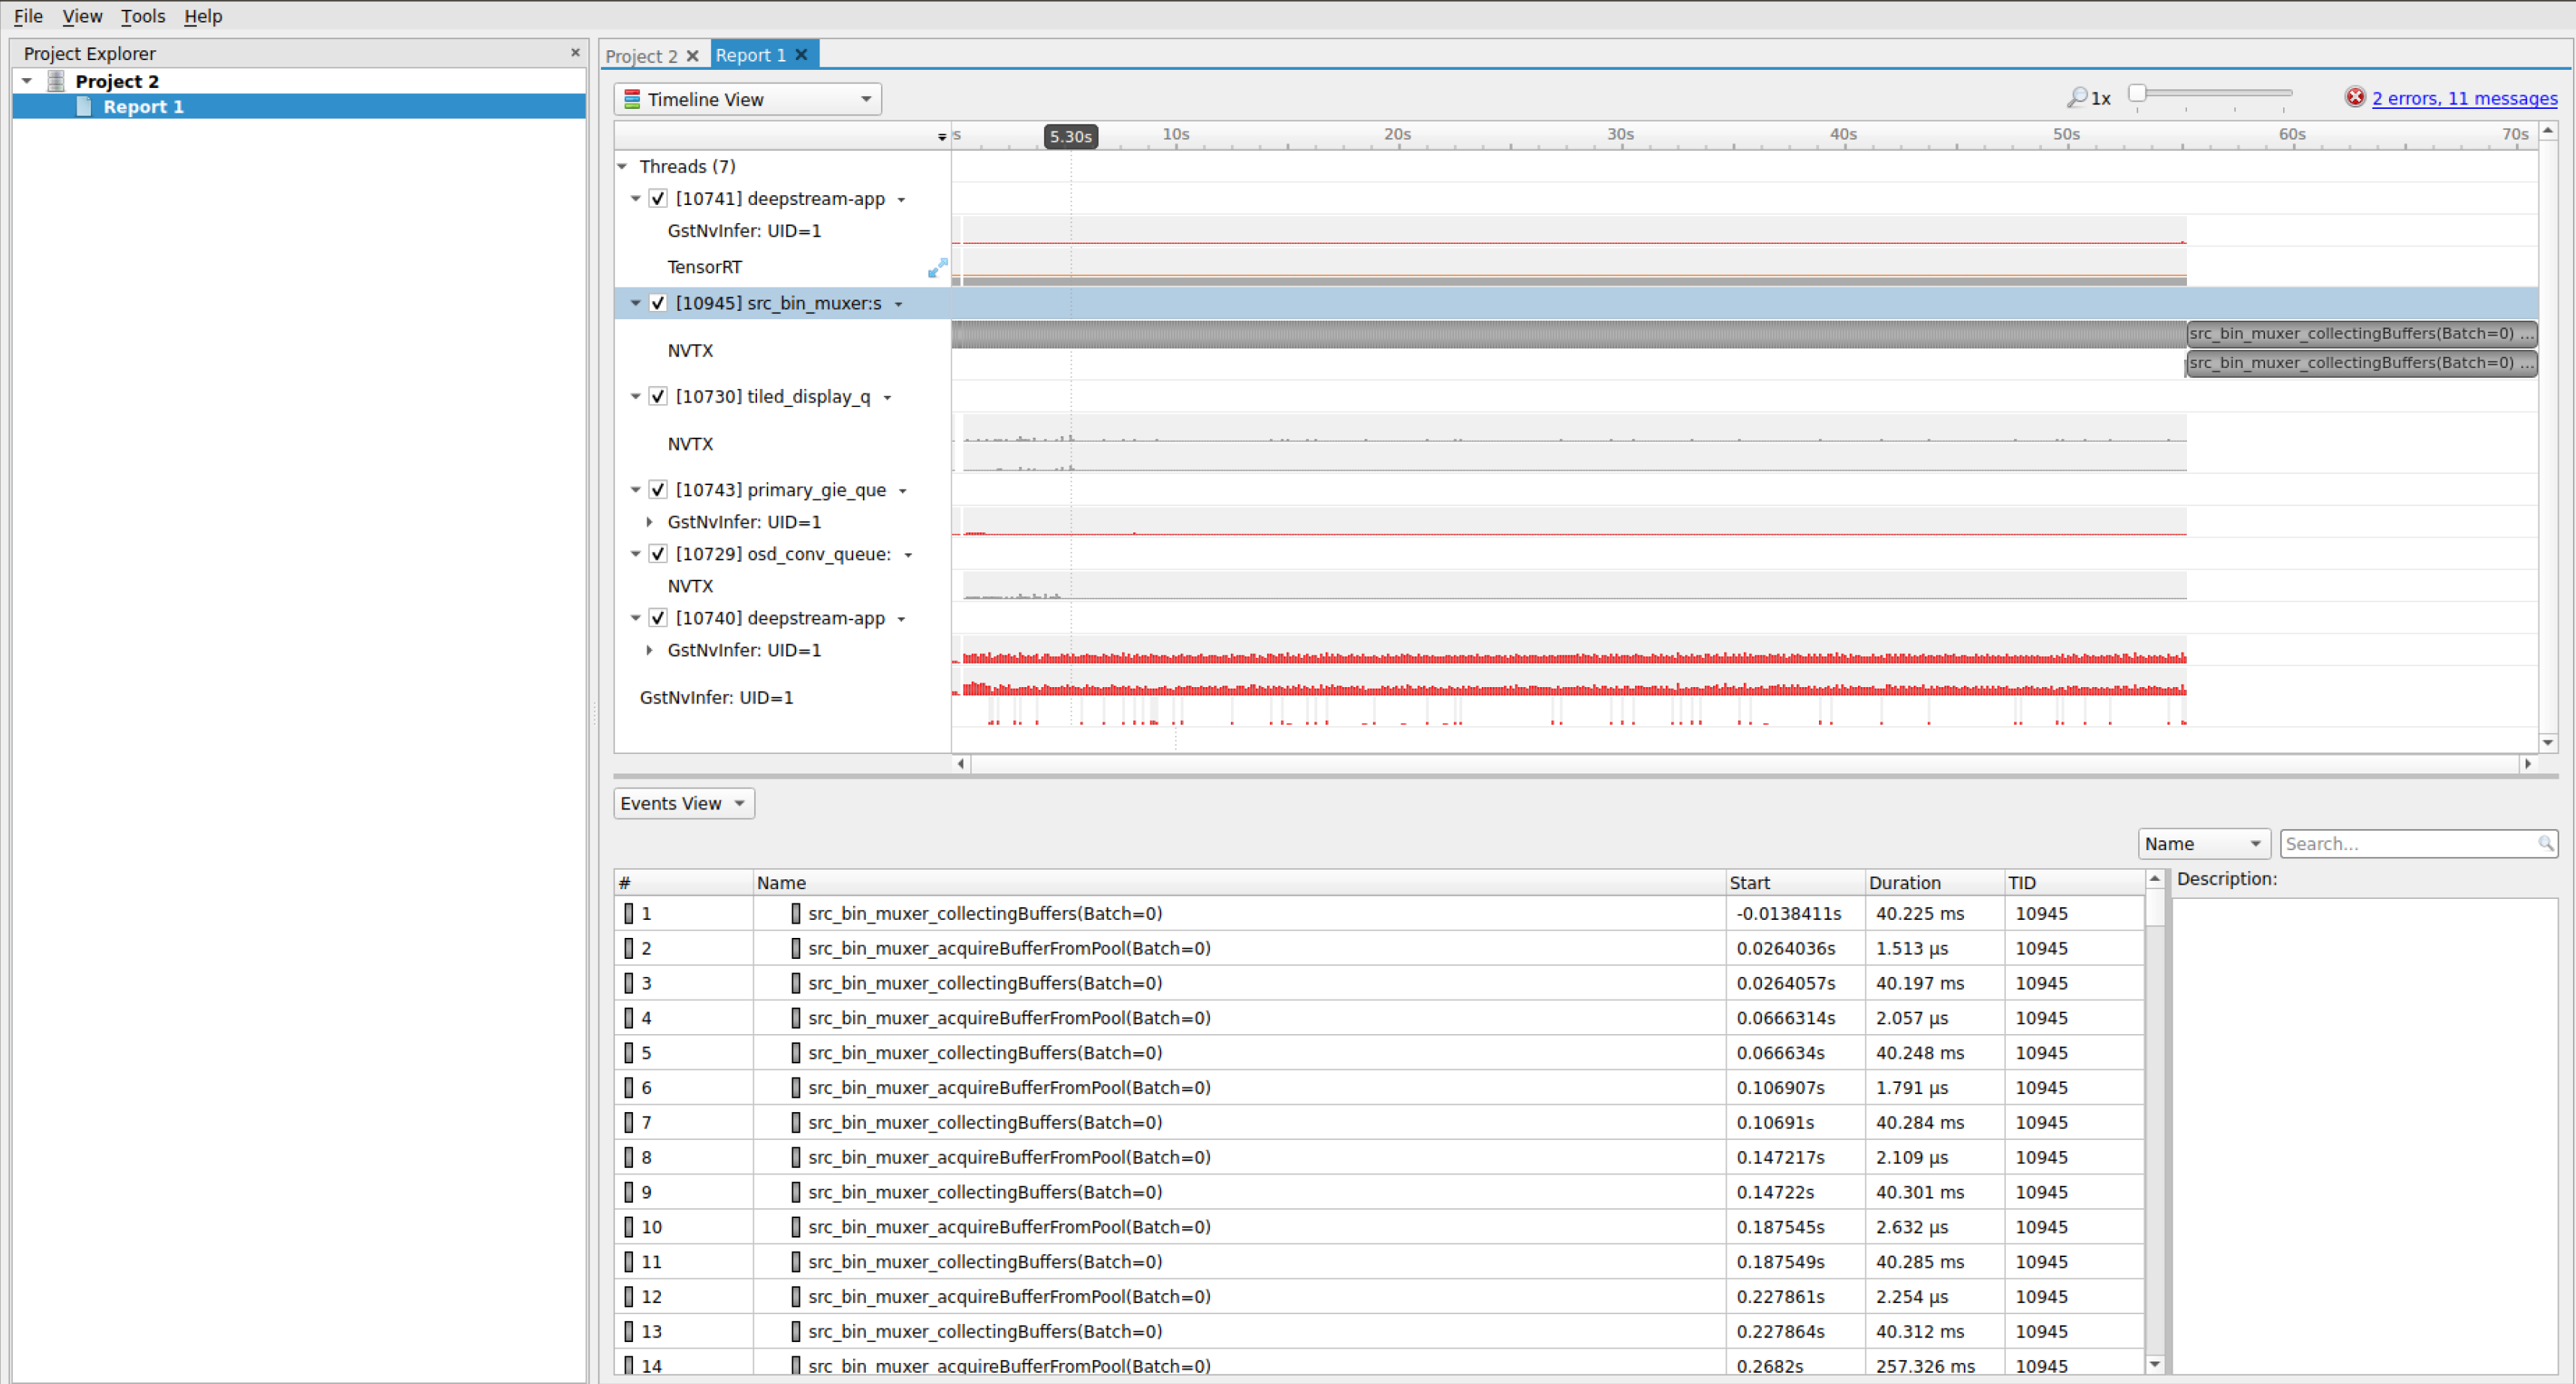
How to use NVTX for profiling?
NVIDIA® Tools Extension SDK (NVTX) provides APIs for annotating events, code ranges, and resources in an application. The core GStreamer plugins in DeepStreamSDK have integrated NVTX and the events and ranges can be captured and visualized using NVIDIA Nsight tool, Tegra System Profiler, and Visual Profiler to capture and visualize these events and ranges. For more information on NVTX, visit https://docs.nvidia.com/gameworks/content/gameworkslibrary/nvtx/nvidia_tools_extension_library_nvtx.htm. Following are the instructions on how to capture and visualize these events using deepstream-app with NVIDIA Nsight tool:
Download and install Nsight tool from https://developer.nvidia.com/nsight-systems. Installation can be done using any file (.deb, .run or .rpm).
Run the following command on terminal:
$ nsys-ui
Click on File -> New Project
Select target system as “Target for profiling”.
Now the deepstream-app process needs to be launched by Nsight tool for profiling. In order to do that, add the following command in “Command line with arguments”:
deepstream-app -c /opt/nvidia/deepstream/deepstream/samples/configs/deepstream-app/source30_1080p_dec_infer-resnet_tiled_display_int8.txt
In the tick box options, enable “Collect NVTX trace”. User can select other custom options as per requirement on the tool.
To begin profiling, click on “Start”.
Manually stop collection of traces once application run is completed.
Once collection is stopped, in analytics view, the framewise analysis of each plugin will be shown, which gives an idea of time taken by each plugin.
Note
For more FAQs and troubleshooting information, see https://forums.developer.nvidia.com/t/deepstream-sdk-faq/.