Appendix#
Additional Information
Understanding Netnames#
Example: Head node hard drive/network resources.
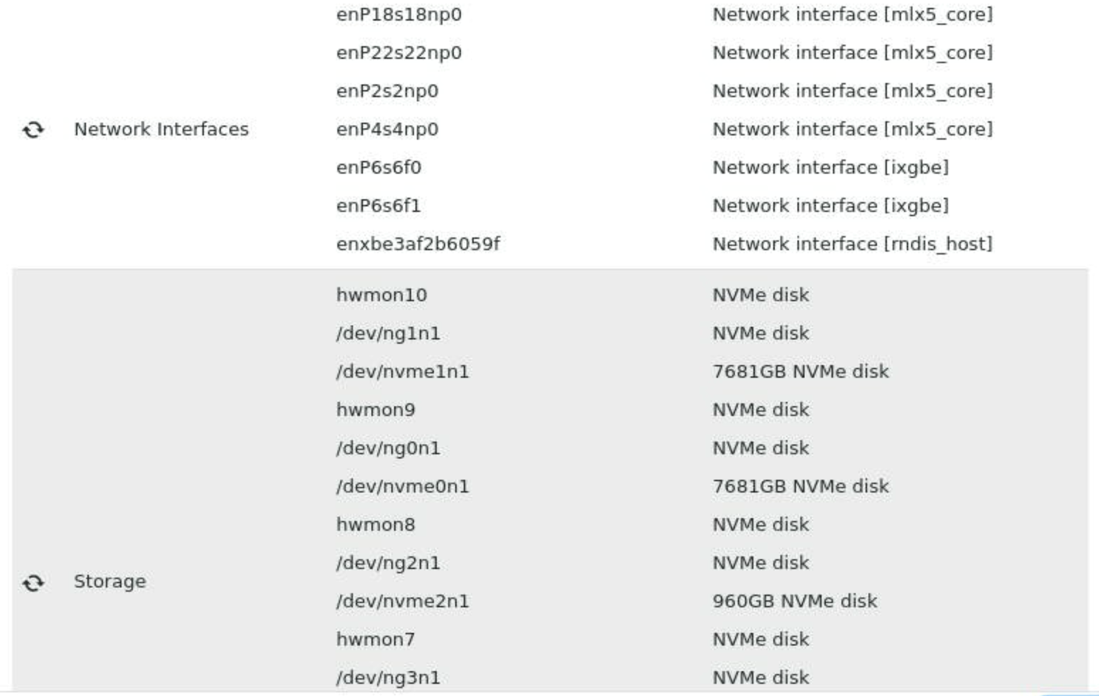
During the initial BCM software installation, the following netnames for the network interfaces were seen, and the following disks were seen in the graphical UI.
Tips:
Generally, any network card that only has a p0 is a single port card.
If the netname has the same beginning but ends in something like f0 and f1, this is a two port NIC.
Look at the driver’s name to get a sense of what kind of card it is, in general anything mlx5_core is likely a CX-7 or Bluefield 3 card. If it is ixgbe, that is generally a GbE card.
When installing the BCM license later, it will ask for a MAC address (in the case of an HA setup, it will ask for the main head node and the backup). Assuming the Head node pairs are the same hardware configuration/make and model, choose a LOM port or one that is not likely to be removed or changed.
Reference: netname summary
eno (Onboard): When eno is in a network interface name, it means the network card is integrated onto the motherboard and its identifier is assigned by the system BIOS or firmware. Example: eno1. |
enp (Position): enp signifies that the network interface name is based on the physical PCI slot where the network card is installed. Example: enp2s0 (where 2s0 indicates the specific PCI slot). |
enx (MAC address): enx is used when the network interface name is directly derived from the unique MAC address of the network card. Example: enxbe3af2b6059 |
np0 (suffix): np0 or np1 indicates network port 0 and network port 1. For this example:
|
Hardware Information Gathering#
For the control plane nodes, once an OS has been provisioned to the nodes, to fine tune their setup some reconnaissance needs to be performed to do things like writing disk setup configurations, determine PCIe device to socket mappings, and network interface card NIC mappings. The following example is what was done to determine the hardware configuration of servers used to enable an internal development team.
Networking (NIC) Information#
Use the lshw command to find the associated netname to NIC adapter type. In this case, the adapters that are connected to the internalnet network use ConnectX-7.
root@a03-p1-nmxm-x86-01:~# lshw -c network -businfo

Bus info         Device        Class    Description
------------------------------------------------

pci@0000:17:00.0 ens1np0       network  MT2910 Family [ConnectX-7]

pci@0000:2a:00.0 enp42s0np0    network  MT2910 Family [ConnectX-7]

pci@0000:63:00.0 enp99s0f0     network  Ethernet Controller X550

pci@0000:63:00.1 enp99s0f1     network  Ethernet Controller X550

pci@0000:ab:00.0 enp171s0np0   network  MT2910 Family [ConnectX-7]

pci@0000:bd:00.0 enp189s0np0   network  MT2910 Family [ConnectX-7]

root@a03-p1-nmxm-x86-01:~# ip -br a

lo UNKNOWN 127.0.0.1/8 ::1/128

ens1np0 DOWN

enp99s0f0 DOWN

enxbe3af2b6059f DOWN

enp42s0np0 UP

enp171s0np0 DOWN

enp99s0f1 DOWN

enp189s0np0 DOWN

bond0 UP 7.241.16.20/24 fe80::9c47:68ff:fe47:89e6/64
Finding Out More About Local NVIDIA Networking Cards#
If there are Mellanox/NVIDIA networking cards present:
Download and install MFT tools.
#x86 link
$ wget
https://www.mellanox.com/downloads/MFT/mft-4.30.1-8-x86_64-deb.tgz

#aarch64 link

$ wget https://www.mellanox.com/downloads/MFT/mft-4.30.1-8-arm64-deb.tgz
$ tar -xzvf <DOWNLOADED_ARCHIVE.tar.gz>
$ dpkg -i <DOWNLOADED_DEB.deb>
Run
mstto get node card information.$ mst start $ mst status -v #To look at specific settings $ mlxconfig -d /dev/mst/mtxxxx_pciconfx q
How to Find Physical Port Mapping to netname#
This step is manual and requires you or a coworker to be physically present behind the server. When the command is executed for the netname in question, confirm the physical slot/port location and note it in a picture of the rear I/O plane of the server.
$ sudo ethtool -p <NETNAME> <SECONDS>

\* \`-p <netname>\`: Tells \`ethtool\` to perform a "physical
identification" operation on the specified interface.

\* \`<seconds>\`: Specifies how long the port's LED should blink (e.g.,
10 seconds).

\**This is the best way to be 100% sure.*\* When you run this command,
the link LED on the \*physical\* network port associated with that
\`netname\` will start blinking.
Disk Information#
Use the following guidance on how to determine which drives are which M.2 for OS installation vs drives for a large RAID array (U.2, E1.s, etc.). Typically, the smaller sized drives are M.2.
Figure out NVME configuration.
Which drives are M.2 vs U.2/E1.x.
Example: Hard Drive Recon:
root@a03-p1-nmxm-x86-01:~# lshw -c disk -businfo

Bus info        Device        Class     Description
-------------------------------------------------------------
               hwmon1        disk      NVMe disk
               /dev/ng1n1    disk      NVMe disk
nvme@1:1        /dev/nvme1n1  disk      960GB NVMe disk
               hwmon0        disk      NVMe disk
               /dev/ng0n1    disk      NVMe disk
nvme@0:1        /dev/nvme0n1  disk      960GB NVMe disk
               hwmon3        disk      NVMe disk
               /dev/ng2n1    disk      NVMe disk
nvme@2:1        /dev/nvme2n1  disk      7681GB NVMe disk
               hwmon2        disk      NVMe disk
               /dev/ng3n1    disk      NVMe disk
nvme@3:1        /dev/nvme3n1  disk      7681GB NVMe disk
For a more comprehensive output:
Reference Output: lshw -c disk -c storage -businfo
root@a03-p1-nmxm-x86-01:~# lshw -c disk -c storage -businfo

Bus info Device Class Description

=============================================================

pci@0000:03:00.0 /dev/nvme0 storage SAMSUNG MZ1L2960HCJR-00A07

hwmon0 disk NVMe disk

/dev/ng0n1 disk NVMe disk

nvme@0:1 /dev/nvme0n1 disk 960GB NVMe disk

pci@0000:04:00.0 /dev/nvme1 storage SAMSUNG MZ1L2960HCJR-00A07

hwmon1 disk NVMe disk

/dev/ng1n1 disk NVMe disk

nvme@1:1 /dev/nvme1n1 disk 960GB NVMe disk

pci@0000:00:17.0 storage Intel Corporation

pci@0000:3d:00.0 /dev/nvme2 storage SAMSUNG MZTL27T6HBLA-00A07

hwmon2 disk NVMe disk

/dev/ng2n1 disk NVMe disk

nvme@2:1 /dev/nvme2n1 disk 7681GB NVMe disk

pci@0000:3e:00.0 /dev/nvme3 storage SAMSUNG MZTL27T6HBLA-00A07

hwmon3 disk NVMe disk

/dev/ng3n1 disk NVMe disk

nvme@3:1 /dev/nvme3n1 disk 7681GB NVMe disk
Use
nvmelist as an alternative.Example: Find hard drive model numbers
root@a03-p1-nmxm-x86-01:~# nvme list

Node                  Generic    SN             Model   Namespace          Usage  Format                FW Rev
--------------------- ------------------------- ------  ------------------------- --------              --------------------

/dev/nvme0n1          /dev/ng0n1 S665NS0X800057 SAMSUNG MZ1L2960HCJR-00A07 0x1    21.15 GB / 960.20 GB  512 B + 0 B GDC7502Q
/dev/nvme1n1          /dev/ng1n1 S665NS0X800061 SAMSUNG MZ1L2960HCJR-00A07 0x1    86.42 GB / 960.20 GB  512 B + 0 B GDC7502Q
/dev/nvme2n1          /dev/ng2n1 S791NC0XA08620 SAMSUNG MZTL27T6HBLA-00A07 0x1    230.92 GB / 7.68 TB   512 B + 0 B GDC6602Q
/dev/nvme3n1          /dev/ng3n1 S791NC0XA08624 SAMSUNG MZTL27T6HBLA-00A07 0x1    231.80 GB / 7.68 TB   512 B + 0 B GDC6602Q
Find PCIe IDs to figure out how to assign the drives by-disk-id in a disksetup.xml file.
Example: Finding HDD PCIe IDs
# To find the PCIe IDs of the Drives search for lspci -nnv | grep 'Non-Volatile memory controller' or "samsung"

root@a03-p1-nmxm-x86-01:~# lspci -nnv | grep 'Non-Volatile memory controller'

03:00.0 Non-Volatile memory controller [0108]: Samsung Electronics Co
Ltd NVMe SSD Controller PM9A1/PM9A3/980PRO [144d:a80a] (prog-if 02 [NVM
Express])

04:00.0 Non-Volatile memory controller [0108]: Samsung Electronics Co
Ltd NVMe SSD Controller PM9A1/PM9A3/980PRO [144d:a80a] (prog-if 02 [NVM
Express])

3d:00.0 Non-Volatile memory controller [0108]: Samsung Electronics Co
Ltd NVMe SSD Controller PM9A1/PM9A3/980PRO [144d:a80a] (prog-if 02 [NVM
Express])

3e:00.0 Non-Volatile memory controller [0108]: Samsung Electronics Co
Ltd NVMe SSD Controller PM9A1/PM9A3/980PRO [144d:a80a] (prog-if 02 [NVM
Express])
Note
Typically, lower PCIe Bus Numbers are closer to the CPU socket(s) and this is where the M.2s are usually located. A web search will reveal the model and form factor of the drive.
Perform a web search using the model number listed in the namespace to figure out drive specs and if it is M.2 or U.2/E1.x.
In the example above, it was not clear which NVMe by dev name was associated with a particular PCIe address since there were two of each drive. Sometimes the admin will have to make an educated guess to determine the right one. For DGX GB200 systems, it is straightforward as there is only one M.2 drive, and the rest are U.2/E1.x.
Other Tips and Tricks#
Check the DGX OS packages to meet current SBOM#
Sometimes the latest DGX OS image may not have the latest software packages for some critical components. To ensure that the GB200/GB300 compute trays are running on the correct prescribed SW/FW recipe, the software may have to be updated.
The cm-chroot-sw-image tool can be used to update the image or one provisioned node can be used to do the update.
Once the updates have been verified on that node, a grabimage -w -i <image_name> to update the specified image on the headnode and then an imageupdate can be used to push the changes live to the rest of the cluster using that image.
For best practice, the current working image should be cloned to preserve a working image.
The following components may need updates:
DOCA stack
DCGM
NVSM
NVIDIA driver
NVIDIA Fabric Manager
NVIDIA-IMEX
DGX OS Image Clone and Software Component Updates#
Clone the known good image before updating the packages:
$ cmsh;softwareimage;clone <LAST_KNOWN_GOOD_IMAGE_NAME> <BACKUP_IMAGE_NAME>;commit
Example:
[bcm11-headnode->softwareimage]% ls
Name (key)                                       Path (key)                                                  Kernel version         Nodes
------------------------------------------------ ----------------------------------------------------------- ---------------------- --------
default-image                                    /cm/images/default-image                                    6.8.0-51-generic       0
default-image-ubuntu2404-aarch64                 /cm/images/default-image-ubuntu2404-aarch64                 6.8.0-51-generic-64k   0
dgx-baseos7.2-image-arm64                        /cm/images/dgx-baseos7.2-image-arm64                        6.8.0-1025-nvidia-64k  18
dgx-baseos7.2-image-arm64-Before-Drivers-Update  /cm/images/dgx-baseos7.2-image-arm64-Before-Drivers-Update  6.8.0-1025-nvidia-64k  0
k8s-system-admin-image                           /cm/images/k8s-system-admin-image                           6.8.0-51-generic       0
k8s-system-user-image                            /cm/images/k8s-system-user-image                            6.8.0-51-generic       0
slogin-image                                     /cm/images/slogin-image                                     6.8.0-51-generic       0

[bcm11-headnode->softwareimage]% clone dgx-baseos7.2-image-arm64 dgx-baseos7.2-image-arm64-Before-grab-image
[bcm11-headnode->softwareimage*[dgx-baseos7.2-image-arm64-Before-grab-image*]]% commit
Wait until completion of the process:
[bcm11-headnode->softwareimage[dgx-baseos7.1-image-arm64-Before-grab-iamge]]% task list
UUID                                  Node            Entity                                       Name                                                                                                                       Start                End                  Status     Updates
------------------------------------- --------------- -------------------------------------------- -------------------------------------------------------------------------------------------------------------------------- -------------------- -------------------- ---------- ------------------------------------------------------------------------------------------------
e63d38f4-3e3a-441c-84de-9592fb7bfae8  bcm11-headnode  dgx-baseos7.1-image-arm64-Before-grab-iamge  Create ramdisk                                                                                                             2025/08/01 19:29:01  -                    running    Executing: /cm/node-installer-ubuntu2404-aarch64/scripts/mkinitrd_cm
2b2eb2bb-de98-4323-89f0-b49813c9e99d  bcm11-headnode  dgx-baseos7.1-image-arm64-Before-grab-iamge  Software image clone: from /cm/images/dgx-baseos7.1-image-arm64 to /cm/images/dgx-baseos7.1-image-arm64-Before-grab-iamge  2025/08/01 19:28:30  2025/08/01 19:29:01  done       Copied: /cm/images/dgx-baseos7.1-image-arm64 -> /cm/images/dgx-baseos7.1-image-arm64-Before-gra+
[bcm11-headnode->softwareimage[dgx-baseos7.1-image-arm64-Before-grab-iamge]]%
Chroot and Update Software#
Chroot to the image and perform the software updates:
$ cm-chroot-sw-img /cm/images/<IMAGE_NAME>
DOCA Installation#
Note
DOCA 3.x is require for ConnectX-8 network adapters.
Follow these steps to install DOCA:
Download the latest package and extract the file:
$ tar -xvzf <PACKAGE_NAME>.tar.gz
Example:
root@node017:/tmp# tar -xvzf GB300NVL72_CX8_BF3_DOCA_MFT_0.8.00_07292025.tgz
metadata.json
CX8_BF3_DOCA_MFT/
CX8_BF3_DOCA_MFT/BlueField-3/
CX8_BF3_DOCA_MFT/BlueField-3/DOCA%20Release%20Notes_3.0.0.pdf
CX8_BF3_DOCA_MFT/BlueField-3/bf-bundle-3.0.0-142_25.04_ubuntu-22.04_prod.bfb
CX8_BF3_DOCA_MFT/BlueField-3/bf-fwbundle-3.0.0-142_25.04-prod.bfb
CX8_BF3_DOCA_MFT/BlueField-3/fw-BlueField-3-rel-32_45_1600-900-9D3B6-00CN-P_Ax-NVME-20.4.1-UEFI-21.4.13-UEFI-22.4.14-UEFI-14.38.16-FlexBoot-3.7.500.signed.bin
CX8_BF3_DOCA_MFT/BlueField-3/fw-BlueField-3-rel-32_45_1600-900-9D3B6-00CN-P_Ax-NVME-20.4.1-UEFI-21.4.13-UEFI-22.4.14-UEFI-14.38.16-FlexBoot-3.7.500.signed.cbo

<<OUTPUT OMMITTED>>
Remove the older packages (if DOCA is already installed):
$ apt remove --purge python3-doca-openvswitch doca*
Example:
root@node017:~# apt remove --purge doca* python3-doca-openvswitch
Reading package lists... Done
Building dependency tree... Done
Reading state information... Done
Note, selecting 'doca-sosreport' for glob 'doca*'
Note, selecting 'doca-libopenvswitch' for glob 'doca*'
Note, selecting 'doca-apps-dev' for glob 'doca*'
<<OUTPUT OMMITTED>>
Navigate to the DOCA_Host directory and proceed with the package installation:
$ cd CX8_BF3_DOCA_MFT/DOCA_Host
$ dpkg -i <PACKAGE_NAME>.deb
$ apt install doca-all
Example:
root@node017:/tmp/CX8_BF3_DOCA_MFT/DOCA_Host# dpkg -i doca-host_3.0.0-058609-25.04-ubuntu2404_arm64.deb
Selecting previously unselected package doca-host.
(Reading database ... 298153 files and directories currently installed.)
Preparing to unpack doca-host_3.0.0-058609-25.04-ubuntu2404_arm64.deb ...
Unpacking doca-host (3.0.0-058609-25.04-ubuntu2404) ...
Setting up doca-host (3.0.0-058609-25.04-ubuntu2404) ...
root@node017:/tmp/CX8_BF3_DOCA_MFT/DOCA_Host# apt update
Get:1 file:/usr/share/doca-host-3.0.0-058609-25.04-ubuntu2404/repo ./ InRelease [1888 B]
<<OUTPUT OMMITTED>>

root@node017:/home/gb300-firmware/CX8_BF3_DOCA_MFT/DOCA_Host# apt install doca-all
Reading package lists... Done
Building dependency tree... Done
Reading state information... Done
The following packages were automatically installed and are no longer required:
mlnx-fw-updater mlnx-nvme-dkms nvidia-firmware-570-570.133.20 nvidia-ib-umad-loader
Use 'apt autoremove' to remove them.
The following additional packages will be installed:
collectx-clxapi collectx-clxapidev doca-apsh-config doca-bench doca-caps doca-comm-channel-admin doca-devel doca-dms doca-flow-tune doca-ofed doca-openvswitch-common doca-openvswitch-switch doca-pcc-counters doca-perftest doca-runtime doca-samples doca-sdk-aes-gcm doca-sdk-apsh doca-sdk-argp doca-sdk-comch doca-sdk-common doca-sdk-compress doca-sdk-devemu doca-sdk-dma doca-sdk-dpa doca-sdk-dpdk-bridge doca-sdk-erasure-coding doca-sdk-eth doca-sdk-flow doca-sdk-pcc doca-sdk-rdma
<<OUTPUT OMMITTED>>
Validate the installed packages:
root@r1-p1-gb300-n08:/home/gb300-firmware/CX8_BF3_DOCA_MFT/DOCA_Host# dpkg --list|grep doca
ii  doca-all                                      3.0.0-058609                                  arm64        doca-all meta-package
ii  doca-apsh-config                              3.0.0058-1                                    arm64        Data Center on a Chip Architecture (DOCA) Tool
ii  doca-bench                                    3.0.0058-1                                    arm64        Data Center on a Chip Architecture (DOCA) Tool
ii  doca-caps                                     3.0.0058-1                                    arm64        Data Center on a Chip Architecture (DOCA) Tool
ii  doca-comm-channel-admin                       3.0.0058-1                                    arm64        Data Center on a Chip Architecture (DOCA) Tool
ii  doca-devel                                    3.0.0-058609                                  arm64        doca-devel meta-package
ii  doca-dms                                      3.0.0058-1                                    arm64        Data Center on a Chip Architecture (DOCA) Service
ii  doca-flow-tune                                3.0.0058-1                                    arm64        Data Center on a Chip Architecture (DOCA) Tool
ii  doca-host                                     3.0.0-058609-25.04-ubuntu2404                 arm64        Doca repo bundle package
ii  doca-ofed                                     3.0.0-058609                                  arm64        doca-ofed meta-package
ii  doca-openvswitch-common                       3.0.0-0056-25.04-based-3.3.5                  arm64        Open vSwitch common components
ii  doca-openvswitch-switch                       3.0.0-0056-25.04-based-3.3.5                  arm64        Open vSwitch switch implementations
ii  doca-pcc-counters                             3.0.0058-1                                    arm64        Data Center on a Chip Architecture (DOCA) Tool
ii  doca-perftest                                 1.0.1                                         arm64        RDMA benchmark application
ii  doca-runtime                                  3.0.0-058609                                  arm64        doca-runtime meta-package
<<OUTPUT OMMITTED>>
CUDA & NVIDIA GPU Drivers Installation#
Download the latest package and remove older versions on the node:
$ dpkg -l |grep <VERSION>|cut -d ' ' -f3|xargs apt purge -y
Example:
$ dpkg -l |grep <VERSION>|cut -d ' ' -f3|xargs apt purge -y
Install the latest version of cuda-toolkit and NVIDIA GPU drivers:
$ dpkg -i <PACKAGE_NAME>.deb
$ cp /var/cuda-repo-ubuntu2404-<ver>-0-local/cuda-*-keyring.gpg /usr/share/keyrings/
$ apt-get update
$ apt-get -y install cuda-toolkit-<VERSION>-0
$ apt-get --install nvidia-open
Example:
root@node017:/tmp# dpkg -i cuda-repo-ubuntu2404-13-0-local_13.0.0-580.67-1_arm64.deb
Selecting previously unselected package cuda-repo-ubuntu2404-13-0-local.
(Reading database ... 302881 files and directories currently installed.)
Preparing to unpack cuda-repo-ubuntu2404-13-0-local_13.0.0-580.67-1_arm64.deb ...
Unpacking cuda-repo-ubuntu2404-13-0-local (13.0.0-580.67-1) ...
Setting up cuda-repo-ubuntu2404-13-0-local (13.0.0-580.67-1) ...

The public cuda-repo-ubuntu2404-13-0-local GPG key does not appear to be installed.
To install the key, run this command:
sudo cp /var/cuda-repo-ubuntu2404-13-0-local/cuda-9DA9AF78-keyring.gpg /usr/share/keyrings/

root@node017:/tmp# cp /var/cuda-repo-ubuntu2404-13-0-local/cuda-9DA9AF78-keyring.gpg /usr/share/keyrings/
root@node017:/tmp# apt-get update
Get:1 file:/var/cuda-repo-ubuntu2404-13-0-local  InRelease [1572 B]
Get:2 file:/usr/share/doca-host-3.0.0-058609-25.04-ubuntu2404/repo ./ InRelease [1888 B]
Get:1 file:/var/cuda-repo-ubuntu2404-13-0-local  InRelease [1572 B]
Get:2 file:/usr/share/doca-host-3.0.0-058609-25.04-ubuntu2404/repo ./ InRelease [1888 B]
Ign:3 https://linux.mellanox.com/public/repo/doca/DGX_GBxx_latest_DOCA/ubuntu24.04/arm64-sbsa  InRelease
<<OUTPUT OMMITTED>>

root@node017:/tmp# apt-get install cuda-toolkit-13-0
Reading package lists... Done
Building dependency tree... Done
Reading state information... Done
The following additional packages will be installed:
<<OUTPUT OMMITTED>>

root@node017:/tmp# apt-get install nvidia-open
Reading package lists... Done
Building dependency tree... Done
Reading state information... Done
The following package was automatically installed and is no longer required:
<<OUTPUT OMMITTED>>
Validate and install any missing packages:
$ dpkg -l nvidia-fabricmanager libnvidia-nscq nvidia-modprobe nvidia-imex datacenter-gpu-manager-4-cuda12 nv-persistence-mode nvidia-driver-580-open
Example:
root@r1-p1-gb300-n02:~# dpkg -l nvidia-fabricmanager libnvidia-nscq nvidia-modprobe nvidia-imex datacenter-gpu-manager-4-cuda12 nv-persistence-mode nvidia-driver-580-open
Desired=Unknown/Install/Remove/Purge/Hold
| Status=Not/Inst/Conf-files/Unpacked/halF-conf/Half-inst/trig-aWait/Trig-pend
|/ Err?=(none)/Reinst-required (Status,Err: uppercase=bad)
||/ Name                            Version         Architecture Description
+++-===============================-===============-============-==========================================================================
ii  datacenter-gpu-manager-4-cuda12 1:4.2.3-2       arm64        NVIDIA® Datacenter GPU Management binaries supporting CUDA12 environments
ii  libnvidia-nscq                  580.63-1        arm64        NVSwitch Configuration and Query library
ii  nv-persistence-mode             24.12-1         all          Enable persistence mode
ii  nvidia-driver-580-open          580.67-0ubuntu1 arm64        NVIDIA driver (open kernel) metapackage
ii  nvidia-fabricmanager            580.67-1        arm64        Fabric Manager for NVSwitch based systems
ii  nvidia-imex                     580.67-1        arm64        IMEX Manager for NVIDIA based systems
ii  nvidia-modprobe                 580.67-0ubuntu1 arm64        Load the NVIDIA kernel driver and create device files
Validate that the kernel is loaded with the latest installed CUDA version:
root@node017:~# modinfo nvidia
filename:       /lib/modules/6.8.0-1025-nvidia-64k/updates/dkms/nvidia.ko.zst
import_ns:      DMA_BUF
alias:          char-major-195-*
version:        580.67
supported:      external
license:        Dual MIT/GPL
firmware:       nvidia/580.67/gsp_tu10x.bin
firmware:       nvidia/580.67/gsp_ga10x.bin
softdep:        pre: ecdh_generic,ecdsa_generic
srcversion:     648190564CF9591E281F8D6
alias:          of:N*T*Cnvidia,tegra264-displayC*
alias:          of:N*T*Cnvidia,tegra264-display
alias:          of:N*T*Cnvidia,tegra234-displayC*
alias:          of:N*T*Cnvidia,tegra234-display
alias:          pci:v000010DEd*sv*sd*bc06sc80i00*
alias:          pci:v000010DEd*sv*sd*bc03sc02i00*
alias:          pci:v000010DEd*sv*sd*bc03sc00i00*
Ensure that the required services are running and enabled:
$ systemctl is-active nvidia-persistenced nvidia-dcgm nvidia-imex
$ systemctl is-enabled nvidia-persistenced nvidia-dcgm nvidia-imex
Example:
systemctl is-active nvidia-persistenced nvidia-dcgm nvidia-imexactive active active
systemctl is-enabled nvidia-persistenced nvidia-dcgm nvidia-imexenabled enabled enabled
Ensure that nvidia-smi is running with the latest version:
root@node017:/tmp# nvidia-smi
Fri Aug  1 04:07:14 2025
+-----------------------------------------------------------------------------------------+
| NVIDIA-SMI 580.67                 Driver Version: 580.67         CUDA Version: 13.0     |
+-----------------------------------------+------------------------+----------------------+
| GPU  Name                 Persistence-M | Bus-Id          Disp.A | Volatile Uncorr. ECC |
| Fan  Temp   Perf          Pwr:Usage/Cap |           Memory-Usage | GPU-Util  Compute M. |
|                                         |                        |               MIG M. |
|=========================================+========================+======================|
|   0  NVIDIA Graphics Device         Off |   00000008:06:00.0 Off |                    0 |
| N/A   37C    P0            246W / 1400W |       0MiB / 284208MiB |      0%      Default |
|                                         |                        |             Disabled |
+-----------------------------------------+------------------------+----------------------+
|   1  NVIDIA Graphics Device         Off |   00000009:06:00.0 Off |                    0 |
| N/A   38C    P0            242W / 1400W |       0MiB / 284208MiB |      0%      Default |
|                                         |                        |             Disabled |
+-----------------------------------------+------------------------+----------------------+
|   2  NVIDIA Graphics Device         Off |   00000018:06:00.0 Off |                    0 |
| N/A   38C    P0            238W / 1400W |       0MiB / 284208MiB |      0%      Default |
|                                         |                        |             Disabled |
+-----------------------------------------+------------------------+----------------------+
|   3  NVIDIA Graphics Device         Off |   00000019:06:00.0 Off |                    0 |
| N/A   38C    P0            238W / 1400W |       0MiB / 284208MiB |      0%      Default |
|                                         |                        |             Disabled |
+-----------------------------------------+------------------------+----------------------+

+-----------------------------------------------------------------------------------------+
| Processes:                                                                              |
|  GPU   GI   CI              PID   Type   Process name                        GPU Memory |
|        ID   ID                                                               Usage      |
|=========================================================================================|
|  No running processes found                                                             |
+-----------------------------------------------------------------------------------------+
MFT Tool Installation#
Issue: For newer network adapters like the ConnectX-8MST is not able to detect the ConnectX cards. This can indicate that MFT tools need to be updated.
root@node016:/tmp# mst status -vv
MST modules:
------------
    MST PCI module loaded
    MST PCI configuration module loaded
PCI devices:
------------
DEVICE_TYPE             MST                           PCI             RDMA            NET                                     NUMA
NA                      /dev/mst/mt4131_pciconf0      0000:03:00.0    mlx5_0          net-ibp3s0                              0

NA                      /dev/mst/mt4131_pciconf1      0002:03:00.0    mlx5_1          net-ibP2p3s0                            0

NA                      /dev/mst/mt4131_pciconf2      0010:03:00.0    mlx5_2          net-ibP16p3s0                           1

NA                      /dev/mst/mt4131_pciconf3      0012:03:00.0    mlx5_3          net-ibP18p3s0                           1

BlueField3(rev:1)       /dev/mst/mt41692_pciconf0     0016:03:00.0    mlx5_4          net-enP22p3s0f0np0                      1

BlueField3(rev:1)       /dev/mst/mt41692_pciconf0.1   0016:03:00.1    mlx5_5          net-enP22p3s0f1np1                      1
Download the latest version of MST tools and extract:
$ tar -xvzf <PACKAGE_NAME>.tar.gz
Example:
$ root@node016:/t tar -xvzf GB300NVL72_CX8_BF3_DOCA_MFT_0.8.00_07292025.tgz
metadata.json
CX8_BF3_DOCA_MFT/
CX8_BF3_DOCA_MFT/BlueField-3/
CX8_BF3_DOCA_MFT/BlueField-3/DOCA%20Release%20Notes_3.0.0.pdf
CX8_BF3_DOCA_MFT/BlueField-3/bf-bundle-3.0.0-142_25.04_ubuntu-22.04_prod.bfb
CX8_BF3_DOCA_MFT/BlueField-3/bf-fwbundle-3.0.0-142_25.04-prod.bfb
<<OUTPUT OMMITTED>>
Navigate to the MFT directory and extract the package:
$ cd <DIR>
$ tar -xvzf <PACKAGE>
Example:
$ root@node016:/tmp/CX8_BF3_DOCA_MFT/MFT# tar -xvzf mft-4.32.0-6017-linux-arm64-deb.tgz
mft-4.32.0-6017-arm64-deb/DEBS/
mft-4.32.0-6017-arm64-deb/DEBS/mft-autocomplete_4.32.0-6017_arm64.deb
mft-4.32.0-6017-arm64-deb/DEBS/mft-oem_4.32.0-6017_arm64.deb
mft-4.32.0-6017-arm64-deb/DEBS/mft-pcap_4.32.0-6017_arm64.deb
<<OUTPUT OMMITTED>>
Remove the older version of MST:
$ dpkg --purge nvidia-mlnx-config mlnx-pxe-setup nvidia-system-mlnx-drivers doca-all doca-ofed
Example:
root@node016:/tmp/CX8_BF3_DOCA_MFT/MFT/mft-4.32.0-6017-arm64-deb# dpkg --purge nvidia-mlnx-config mlnx-pxe-setup nvidia-system-mlnx-drivers doca-all doca-ofed
(Reading database ... 298152 files and directories currently installed.)
Removing nvidia-system-mlnx-drivers (2404.25.03-1) ...
dpkg: warning: ignoring request to remove doca-all which isn't installed
Removing doca-ofed (2.10.0-093509) ...
Removing nvidia-mlnx-config (25.01.1) ...
Purging configuration files for nvidia-mlnx-config (25.01.1) ...
Removing mlnx-pxe-setup (22.10-1) ...
<<OUTPUT OMMITTED>>
Install the latest version of MST:
$ ./install.shExample:
root@node016:/tmp/CX8_BF3_DOCA_MFT/MFT/mft-4.32.0-6017-arm64-deb# ./install.sh
-I- Removing all installed mft packages: mft  kernel-mft-dkms
-I- Installing package: /tmp/CX8_BF3_DOCA_MFT/MFT/mft-4.32.0-6017-arm64-deb/SDEBS/kernel-mft-dkms_4.32.0-6017_all.deb
-I- Installing package: /tmp/CX8_BF3_DOCA_MFT/MFT/mft-4.32.0-6017-arm64-deb/DEBS/mft_4.32.0-6017_arm64.deb
-I- Installing package: /tmp/CX8_BF3_DOCA_MFT/MFT/mft-4.32.0-6017-arm64-deb/DEBS/mft-autocomplete_4.32.0-6017_arm64.deb
-I- In order to start mst, please run "mst start".

root@node016:/tmp/CX8_BF3_DOCA_MFT/MFT/mft-4.32.0-6017-arm64-deb# mst start
Starting MST (Mellanox Software Tools) driver set
Loading MST PCI module - Success
Loading MST PCI configuration module - Success
Create devices
Ensure that all the ConnectX cards are detected from MST:
root@node016:/tmp/CX8_BF3_DOCA_MFT/MFT/mft-4.32.0-6017-arm64-deb# mst status -vv
MST modules:
------------
   MST PCI module loaded
   MST PCI configuration module loaded
PCI devices:
------------
DEVICE_TYPE             MST                           PCI             RDMA            NET                                     NUMA
ConnectX8(rev:0)        /dev/mst/mt4131_pciconf0      0000:03:00.0    mlx5_0          net-ibp3s0                              0

ConnectX8(rev:0)        /dev/mst/mt4131_pciconf1      0002:03:00.0    mlx5_1          net-ibP2p3s0                            0

ConnectX8(rev:0)        /dev/mst/mt4131_pciconf2      0010:03:00.0    mlx5_2          net-ibP16p3s0                           1

ConnectX8(rev:0)        /dev/mst/mt4131_pciconf3      0012:03:00.0    mlx5_3          net-ibP18p3s0                           1

BlueField3(rev:1)       /dev/mst/mt41692_pciconf0     0016:03:00.0    mlx5_4          net-enP22p3s0f0np0                      1

BlueField3(rev:1)       /dev/mst/mt41692_pciconf0.1   0016:03:00.1    mlx5_5          net-enP22p3s0f1np1                      1
Creating a RAID 1 Software Partition#
If there are spare drives on a node that need to be configured outside of BCM (for example on the headnode), use the following example. Here, two spare 7 TB drives are available for use on the headnode. To create the raid array, mount the drive, and have it persist through a reboot, use the following steps:
Prepare the drives.
Identify the drives: Use
lsblkto list available drives (e.g., /dev/sda, /dev/sdb). Ensure they are the same size and model for optimal RAID 1 performance. For this example, these are:root@maple:~# lsblk NAME MAJ:MIN RM SIZE RO TYPE MOUNTPOINTS nvme0n1 259:0 0 7T 0 disk nvme1n1 259:1 0 7T 0 disk nvme2n1 259:2 0 894.3G 0 disk ├─nvme2n1p1 259:3 0 100M 0 part ├─nvme2n1p2 259:4 0 1G 0 part │ └─md0 9:0 0 1023.9M 0 raid1 /boot ├─nvme2n1p3 259:5 0 16G 0 part │ └─md1 9:1 0 16G 0 raid1 [SWAP] ├─nvme2n1p4 259:6 0 20G 0 part │ └─md2 9:2 0 20G 0 raid1 /tmp ├─nvme2n1p5 259:7 0 180G 0 part │ └─md3 9:3 0 179.9G 0 raid1 /var └─nvme2n1p6 259:8 0 677.1G 0 part └─md4 9:4 0 677G 0 raid1 / nvme3n1 259:9 0 894.3G 0 disk ├─nvme3n1p1 259:10 0 100M 0 part /boot/efi ├─nvme3n1p2 259:11 0 1G 0 part │ └─md0 9:0 0 1023.9M 0 raid1 /boot ├─nvme3n1p3 259:12 0 16G 0 part │ └─md1 9:1 0 16G 0 raid1 [SWAP] ├─nvme3n1p4 259:13 0 20G 0 part │ └─md2 9:2 0 20G 0 raid1 /tmp ├─nvme3n1p5 259:14 0 180G 0 part │ └─md3 9:3 0 179.9G 0 raid1 /var └─nvme3n1p6 259:15 0 677.1G 0 part └─md4 9:4 0 677G 0 raid1 /
Partition with parted:
Launch parted:
sudo parted /dev/nvme0n1(repeated for/dev/nvme1n1).Create a partition table:
mklabel gpt(recommended for modern systems).Create a primary partition:
mkpart primary 1MiB 100%(use all available space).Set the partition type:
set 1 raid on(this flags the partition for RAID).Exit parted:
quit.
Create the RAID 1 array.
$ sudo mdadm --create /dev/md0 --level=1 --raid-devices=2 /dev/nvme0n1
/dev/nvme1n1

/dev/md0: The name of the RAID device that will be created.

--level=1: Specifies RAID 1 (mirroring).

--raid-devices=2: Indicates the number of drives in the array.

/dev/nvme0n1 /dev/nvme1n1: The partitions created in step 1.
Create a filesystem.
$ sudo mkfs.xfs /dev/md0
Note
You can use other filesystems like ex4 or Btrfs if desired. Xfs was used on these drives as it was anticipated that large files would be predominantly used on this drive which XFS provides better performance.
Create a mount point.
$ sudo mkdir /mnt/scratch
Mount the RAID array.
$ sudo mount /dev/md0 /mnt/scratch
# or
$ mount -a #this will test to see if mdadm.conf was setup correctly
Save the RAID configuration.
$ sudo mdadm --detail --scan --verbose >> /etc/mdadm/mdadmscratch.conf
Add to /etc/fstab: While the admin can edit /etc/fstab and add a line like this to automatically mount the RAID array at boot.
Note
This case is for mounting more disk space on the head node, not if a dedicated NFS is being created from scratch. fsmounts on the headnode within BCM was used to get this mount to persist through a reboot:
$ cmsh; device use master; fsmounts; add scratch; set mountpoint
$ /mnt/scratch; set filesystem xfs; set mountoptions
$ defaults,noatime,nodiratime;commit
After a restart of CMDaemon (
systemctl restart cmd), the changes should appear in /etc/fstab.
root@maple:/mnt/scratch# cat /etc/fstab

UUID=5cd8b928-86ce-42c8-a7dd-cd8488315816 / xfs
defaults,noatime,nodiratime 0 1

UUID=f7f2ba2a-c6c3-4f32-ba47-29ec84716770 /boot ext2
defaults,noatime,nodiratime 0 2

UUID=E308-5859 /boot/efi vfat defaults,noatime,nodiratime 0 2

UUID=2b1d2389-311d-46bc-a3e8-563eca06340a /tmp xfs
defaults,noatime,nodiratime,nosuid,nodev 0 2

UUID=ecc7c087-bcde-4bf0-b1e3-70deaba91231 /var xfs
defaults,noatime,nodiratime 0 2

UUID=a1ae472a-262d-4e11-8c43-a901f0f3bd50 swap swap defaults 0 0

proc /proc proc defaults,nosuid 0 0

sysfs /sys sysfs noauto 0 0

devpts /dev/pts devpts mode=0620,gid=5 0 0

tmpfs /dev/shm tmpfs defaults 0 0

# This section of this file was automatically generated by cmd. Do not
edit manually!

# BEGIN AUTOGENERATED SECTION -- DO NOT REMOVE

scratch /mnt/scratch/ xfs defaults,noatime,nodiratime 0 0

# END AUTOGENERATED SECTION -- DO NOT REMOVE
Reboot the NFS to ensure the mount points and raid configuration persist through a reboot before mounting the drive to the head node (in the case of using this NFS setup for BCM HA).
Note
Data loss: This process will erase any existing data on the drives. Back up data before proceeding.
Drive failure: If one drive fails in a RAID 1 setup, the data is still available on the other drive. Replace the failed drive and rebuild the array with
mdadm.Monitoring: Use
cat /proc/mdstatto monitor the RAID array status, especially during the initial synchronization after creation or when rebuilding.
Switching the Network Mode for CX-7/BF3 Cards#
If the BMCs have been assigned IPs, the SOL console can be used to access a GB200 tray’s OS that was installed at the factory. Its credentials are nvidia/nvidia.
$ ipmitool -I lanplus -C 17 -H 10.78.194.115 -U root -P 0penBmc sol activate
From here, login and follow these steps:
Upon initial installation of the new CX-7 and Bluefield 3 cards, they are typically in Infiniband mode. To switch the mode to Ethernet if that is their intended use:
Installation Commands for Bluefield 3
# Install MFT

mst start

#Bluefield3

mlxconfig -d /dev/mst/mt41692_pciconf0 -y set
INTERNAL_CPU_OFFLOAD_ENGINE=1

mlxconfig -d /dev/mst/mt41692_pciconf1 -y set
INTERNAL_CPU_OFFLOAD_ENGINE=1

mlxconfig -d /dev/mst/mt41692_pciconf0 -y set LINK_TYPE_P1=2
LINK_TYPE_P2=2

mlxconfig -d /dev/mst/mt41692_pciconf1 -y set LINK_TYPE_P1=2
LINK_TYPE_P2=2

#CX-7 (if needed, these should be IB)

mlxconfig -d /dev/mst/mt4129_pciconf0 -y set LINK_TYPE_P1=2

mlxconfig -d /dev/mst/mt4129_pciconf1 -y set LINK_TYPE_P1=2

mlxconfig -d /dev/mst/mt4129_pciconf2 -y set LINK_TYPE_P1=2

mlxconfig -d /dev/mst/mt4129_pciconf3 -y set LINK_TYPE_P1=2

# Then power cycle with ipmitool
# ipmitool power cycle

# to change CX-7

mst start && mlxconfig -d /dev/mst/mt4129_pciconf0 -y set LINK_TYPE_P1=1
&& mlxconfig -d /dev/mst/mt4129_pciconf1 -y set LINK_TYPE_P1=1 &&
mlxconfig -d /dev/mst/mt4129_pciconf2 -y set LINK_TYPE_P1=1 && mlxconfig
-d /dev/mst/mt4129_pciconf3 -y set LINK_TYPE_P1=1

# oneshot

sudo su

# then

sudo su

mst start && mlxconfig -d /dev/mst/mt41692_pciconf0 -y set
INTERNAL_CPU_OFFLOAD_ENGINE=1 && mlxconfig -d /dev/mst/mt41692_pciconf1
-y set INTERNAL_CPU_OFFLOAD_ENGINE=1 && mlxconfig -d
/dev/mst/mt41692_pciconf0 -y set LINK_TYPE_P1=2 LINK_TYPE_P2=2 &&
mlxconfig -d /dev/mst/mt41692_pciconf1 -y set LINK_TYPE_P1=2
LINK_TYPE_P2=2 && ipmitool power cycle

#After reboot, check if the mode successfully changed

nvidia@localhost:~$ ip -br a

lo UNKNOWN 127.0.0.1/8 ::1/128

enP5p9s0 DOWN

enx6ea1017e4b5e UNKNOWN fe80::6ca1:1ff:fe7e:4b5e/64

enP6p3s0f0np0 UP 10.78.202.44/25 metric 100 fe80::e29d:73ff:fee8:9d00/64

enP6p3s0f1np1 UP fe80::e29d:73ff:fee8:9d01/64

enP22p3s0f0np0 UP 10.78.202.44/25 metric 100
fe80::e29d:73ff:fee8:9cda/64

enP22p3s0f1np1 UP fe80::e29d:73ff:fee8:9cdb/64

ibp3s0 DOWN

ibP2p3s0 DOWN

ibP16p3s0 DOWN

ibP18p3s0 DOWN

virbr0 DOWN 192.168.122.1/24

tmfifo_net0 UNKNOWN fe80::21a:caff:feff:ff02/64

tmfifo_net1 UNKNOWN fe80::21a:caff:feff:ff04/64

# then
sudo systemctl reboot --firmware
If the cards are initially in infiniband mode, some SBIOSs will allow the installer/admin switch, the mode under the Network Card entry of that SBIOS.
Note
It is not necessary to hover over the keyboard when waiting to reboot into the SBIOS to change the Option ROM and boot order, the installer can login and do
sudo systemctl reboot --firmwareto automatically boot into BIOS settings.
Accessing GB200 Compute Tray using Minicom (USB to Micro-USB Connection)#
If the mini-display port is not operable or a KVM is unavailable, there is a USB-A to micro-USB connection on the front panel that can be used to access the SOL on the nodes.
Have a Linux or Mac laptop with a USB to micro-USB cable. Windows laptops will not work as a driver has to be used to use this interface.
Install minicom. The Minicom Setup is located at: Minicom Setup.
On macOS, install macports. Once installed, do
sudo port install minicom.
As
sudo, dominicom -s.hit f to disable hardware flow control if it is available.
Save Setup as dfl.
Command to list serial devices connected to USB ports.
/dev/ttyUSB*.

To connect to the correct device, use the dmesg command after reseating the USB.
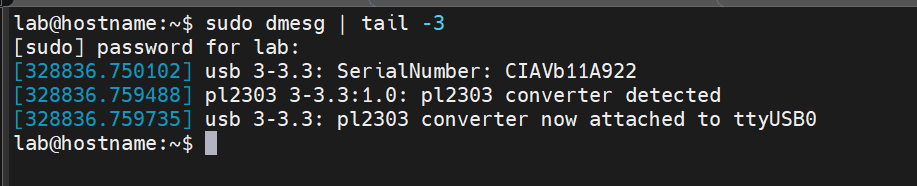
To connect to ttyUSB0 device type: sudo minicom -D /dev/ttyUSB0.
To Exit minicom press CTRL+A, Q, and select YES.
Set Jump host using Firefox and Foxy Proxy#
To access the iDRAC or any webGUI using the head node as jump box:
Install Firefox and install the FoxyProxy extension. This extension also exists in Chrome but it is easier to just have two separate browsers as in this example Firefox will be dedicated to listening to the port forwarded.
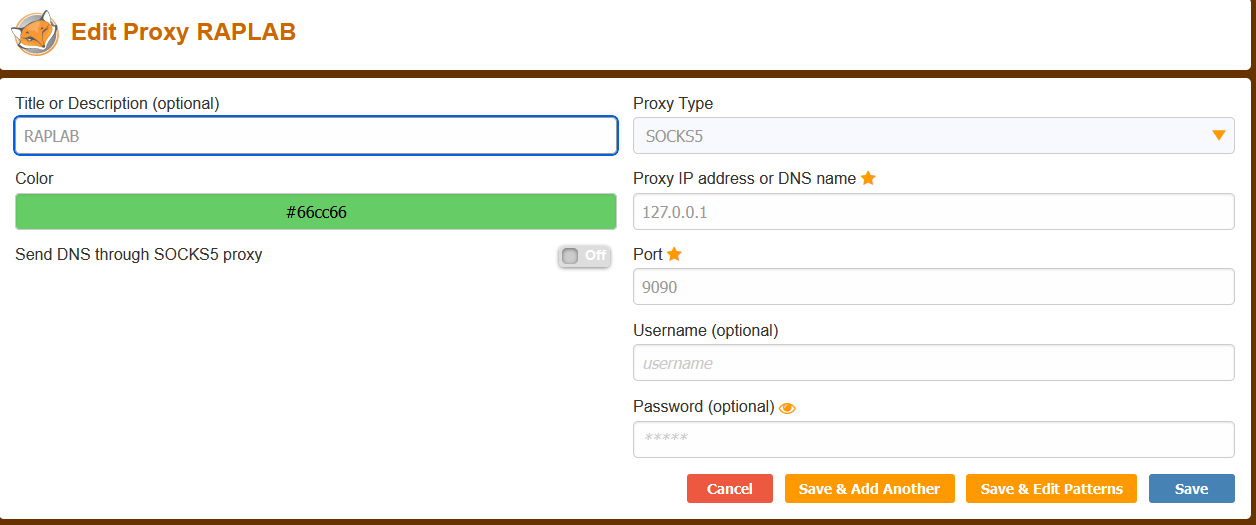
In Foxy Proxy, add a new profile with these settings.
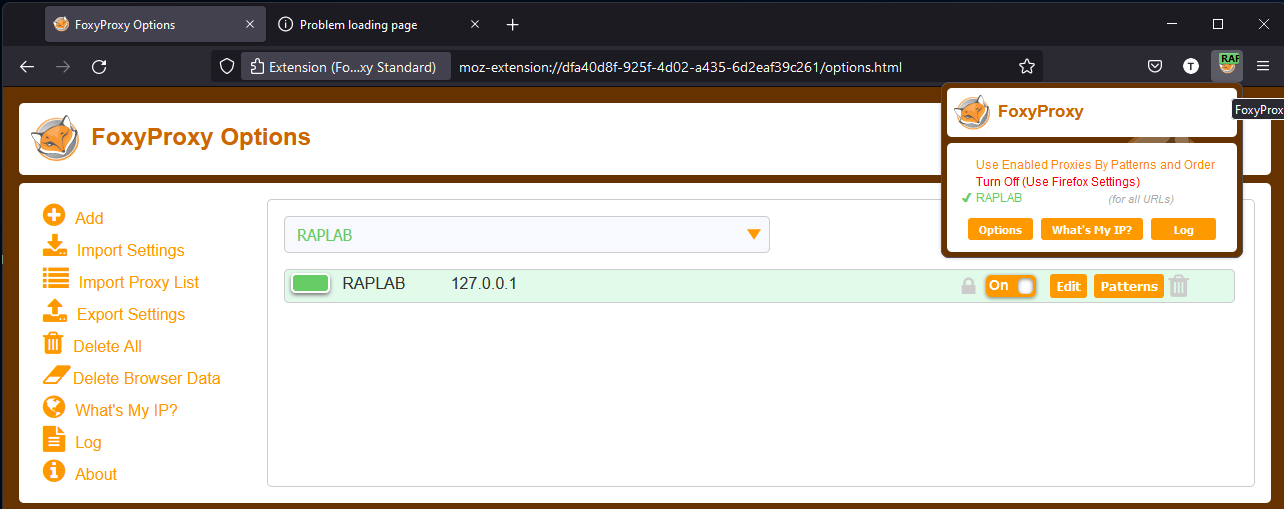
Make sure the proxy profile is active.
Open a separate terminal, and run:
$ ssh -N -D 9090 root@10.114.87.21
Leave this open.
Jailbreak a UFM Appliance#
For UFM appliances, the need to access their iDRAC arises from time to time. Also, at times the default password is hard to find. The following documents show how to do this through the use of the racadm tool. This tool can create a new user with admin privileges with a password set by the administrator to access the iDRAC. UFM is a Dell R660.
Download
racadm.$ wget https://dl.dell.com/FOLDER12236395M/1/Dell-iDRACTools-Web-LX-11.3.0.0-609_A00.tar.gz https://www.dell.com/support/home/en-us/product-support/servicetag/0-czkrVUtJRGNYSkFvTkVkU0ZPV0dzQT090/drivers
Download the libargtable2-0 package.
ajames@willow-head:~$ apt download libargtable2-0
Unpack and do chmod +x to all debs. Then install the .debs.
root@localhost:~/racadm/UBUNTU22/x86_64# chmod +x \*.deb
root@localhost:~/racadm/UBUNTU22/x86_64# ls -al

total 736

drwxr-xr-x 2 root root 4096   Jan 22 05:28 .
drwxr-xr-x 3 root root 4096   Oct 21 08:01 ..

-rwxr-xr-x 1 root root 14622  Jan 22 05:28   libargtable2-0_13-2_amd64.deb
-rwxr-xr-x 1 root root 331784 Oct 21 08:01   srvadmin-hapi_11.3.0.0_amd64.deb
-rwxr-xr-x 1 root root 388084 Oct 21 08:01   srvadmin-idracadm7_11.3.0.0_all.deb
-rwxr-xr-x 1 root root 1462   Oct 21 08:01   srvadmin-idracadm8_11.3.0.0_amd64.deb

dpkg -i \*
Setup iDRAC.
racadm getsysinfo -4
racadm getniccfg
racadm set iDRAC.Nic.Enable 1
racadm getsysinfo -4
racadm getniccfg
racadm set iDRAC.Nic.Enable 1
racadm set iDRAC.IPv4.DHCPEnable 0
racadm set iDRAC.IPv4.DNSFromDHCP 0 (left this as 1 unless you know the DNS)
racadm set iDRAC.IPv4.Address 10.112.8.71
racadm set iDRAC.IPv4.Netmask 255.255.255.0
racadm set iDRAC.IPv4.Gateway 10.112.8.1
racadm set iDRAC.IPv4.DNS1 171.64.1.234
racadm set iDRAC.IPv4.DNS2 171.67.1.234
Setting up the user and pass and admin rights with racadm only (Default is user id 2 with username root. Used id 3).
racadm get iDRAC.Users
racadm set iDRAC.Users.<index>.UserName "adminuser"
racadm set iDRAC.Users.<index>.Password UFMappliance
racadm set iDRAC.Users.<index>.Enable 1
racadm set iDRAC.Users.<index>.privilege 0x000001ff
Check settings.
racadm get iDRAC.Users.3

[Key=iDRAC.Embedded.1#Users.3]
AuthenticationProtocol=SHA
EmailAddress=
Enable=Enabled
EnableSNMPv3Passphrase=Disabled
IPMIKey=7548B8710B03E41CE84A74B0B1415EE7D72355A53F08320521AC6922F7111847
IpmiLanPrivilege=15
IpmiSerialPrivilege=15
MD5v3Key=380E6A7BA12C895CCAF5CF9D0231B270
!!Password=*******\* (Write-Only)
PrivacyProtocol=AES
Privilege=0x1ff
ProtocolEnable=Disabled
RSASecurID2FA=Disabled
SHA1v3Key=D8C995D71C36186787E80DDD4EF20F4CB6E70A9C
SHA256Password=1586AA0919C536F7E68632D65DF2F845C46AF08A502114E8587AC2DE45FD94B8
SHA256PasswordSalt=121B21709873E32D289E23328CE46783
Simple2FA=Disabled
SMSNumber=
!!SNMPv3AuthenticationPassphrase=*******\* (Write-Only)
!!SNMPv3PrivacyPassphrase=*******\* (Write-Only)
SolEnable=Disabled
SourceIPTimeout=0
UseEmail=Disabled
UserName=nvidia
UseSMS=Disabled
If for some reason the BIOS lockdown is in effect like some older UFMs.
Use the following command to disable it.
$ racadm set idrac.lockdown.SystemLockdownMode 0
To find the MAC of the iDRAC using racadm.
root@ufm1:~# racadm get iDRAC.NIC.MACAddress
[Key=iDRAC.Embedded.1#NIC.1]
MACAddress=c4:cb:e1:ce:e3:32
This differs from what is reported in ip a for the iDRAC MAC.
6: idrac: <BROADCAST,MULTICAST,UP,LOWER_UP> mtu 1500 qdisc fq_codel
state UNKNOWN group default qlen 1000

link/ether c4:cb:e1:ce:e3:35 brd ff:ff:ff:ff:ff:ff

inet 169.254.1.2/24 brd 169.254.1.255 scope link idrac

valid_lft forever preferred_lft forever
Updating the GB200/GB300 compute tray Bluefield 3 Option ROM#
On a GB200/GB300 compute tray, if the Bluefield 3 cards fail to show up as a PXE option, it is likely that the BF3 option ROM is disabled. For reference architecture/OEM designs, this may be the default setting. Enabling the option ROM will allow the BF3s to be selected as a PXE boot option.
Using Redfish#
Run the following two commands to enable BF3 PXE boot.
socket 0 BF3
curl -k -u root:0penBmc -H "Content-Type: application/json" -X PATCH -d '{"Attributes": {"Socket0Pcie6DisableOptionROM": false}}'https://$BMC/redfish/v1/Systems/System_0/Bios/Settingssocket 1 BF3
curl -k -u root:0penBmc -H "Content-Type: application/json" -X PATCH -d
'{"Attributes": {"Socket1Pcie6DisableOptionROM": false}}'
https://$BMC/redfish/v1/Systems/System_0/Bios/Settings
or more generically:
BMC IPs and Credentials
USER="root"
PASS=”<COMPUTE_TRAY_BMC_PASSWORD>"
BMC_IP="<BMC_IP>"
BIOS Settings List
$ curl -k -u $USER:$PASS https://$BMC_IP/redfish/v1/Systems/System_0/Bios/
Adjust BF3 Option ROM to Enable in the SMC BIOS
Socket0 PCI6
$ curl -k -u $USER:$PASS -H "Content-Type: application/json" -X PATCH -d
'{"Attributes": {"Socket0Pcie6DisableOptionROM": false}}'
https://$BMC_IP/redfish/v1/Systems/System_0/Bios/Settings
Socket1 PCI6
$ curl -k -u $USER:$PASS -H "Content-Type: application/json" -X PATCH -d
'{"Attributes": {"Socket1Pcie6DisableOptionROM": false}}'
https://$BMC_IP/redfish/v1/Systems/System_0/Bios/Settings
Check pending change:
$ curl -k -u $USER:$PASS
https://$BMC_IP/redfish/v1/Systems/System_0/Bios/Settings
Reboot the system - Force Restart
$ curl -k -u $USER:$PASS -H "Content-Type: application/json" -X POST -d'{"ResetType": "ForceRestart"}'https://$BMC_IP/redfish/v1/Systems/System_0/Actions/ComputerSystem.Reset
Manually Updating the GB200/GB300 compute tray BF3 Option ROM#
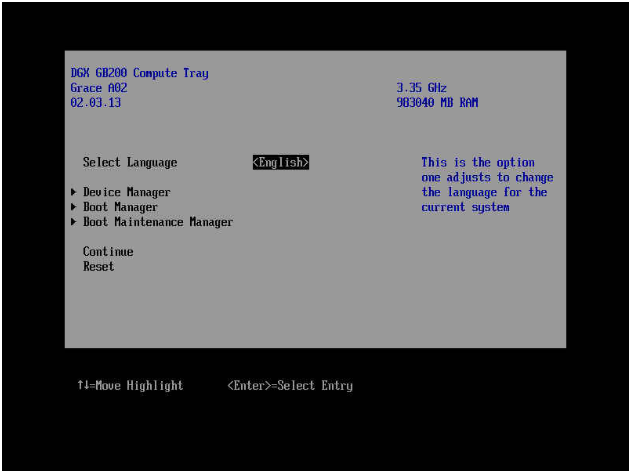
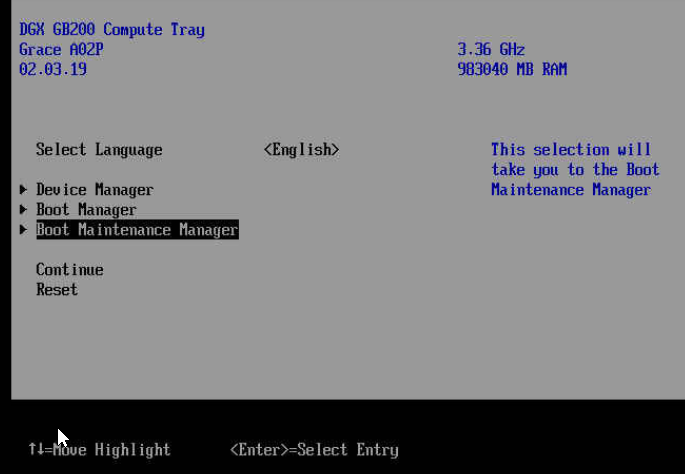
To change the Option ROM and boot order, the installer can login and run to automatically boot into BIOS settings:
sudo systemctl reboot --firmware
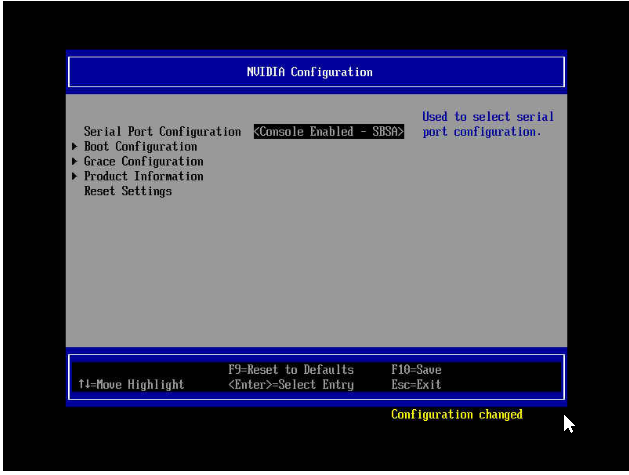
Under device manager and NVIDIA configuration, select Grace configuration.
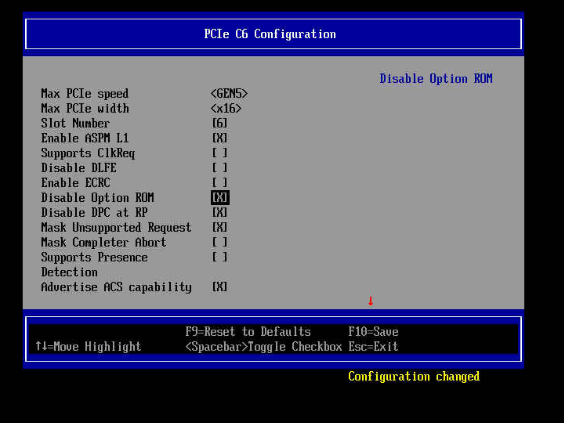
On socket 0 and socket 1 uncheck the disable the option ROM at PCIe C6.
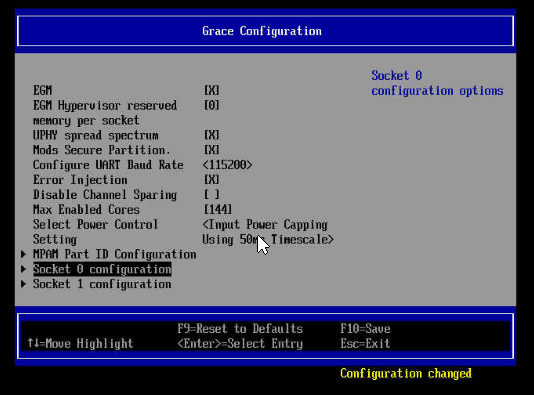
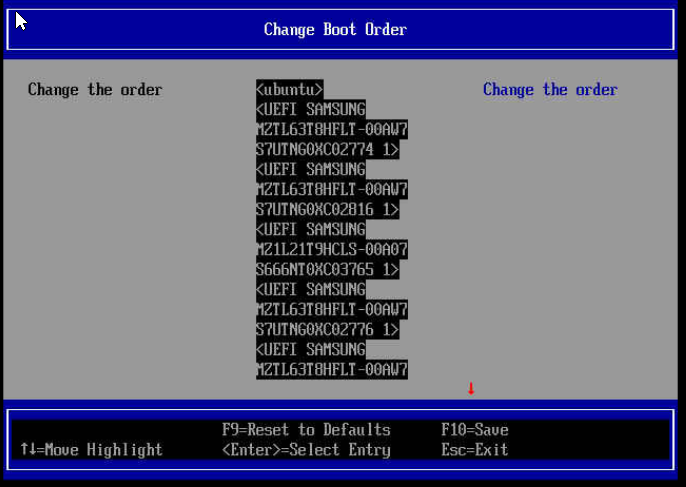
Do this for each CPU Socket. Hit fn+F10 to save the changes and reboot. Change the boot order:
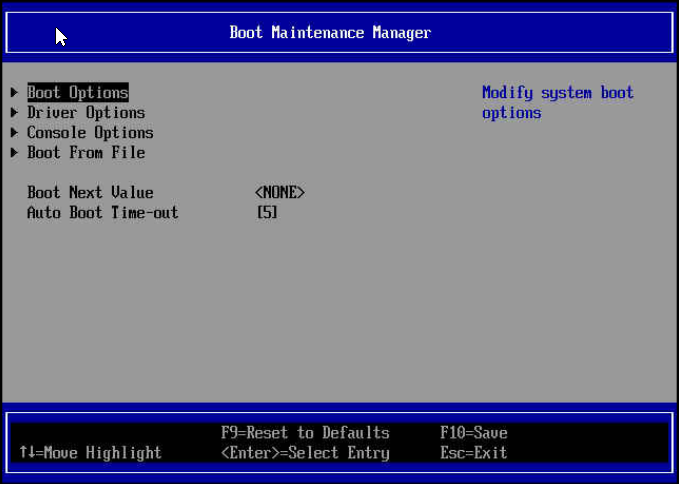
Select the Boot Maintenance Manager
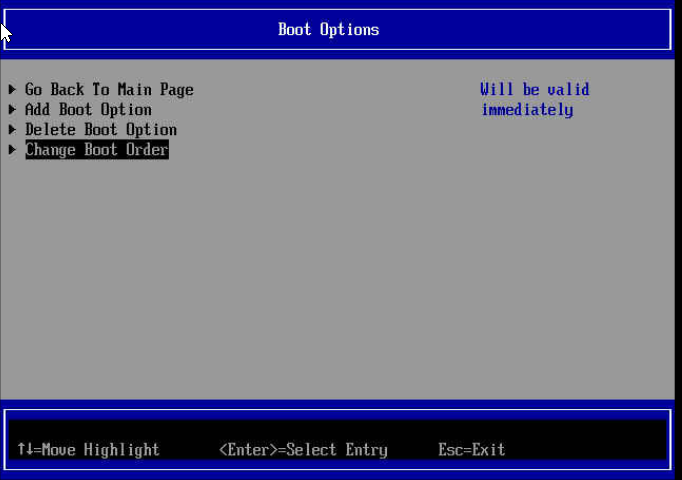
Select Boot Options
Select Change Boot Order
Note
Choose the Delete Boot Option to remove the other NIC choices like HTTPv4/HTTPv6 to make it easier to change the boot order. The installer or admin can add the other options back in if needed.
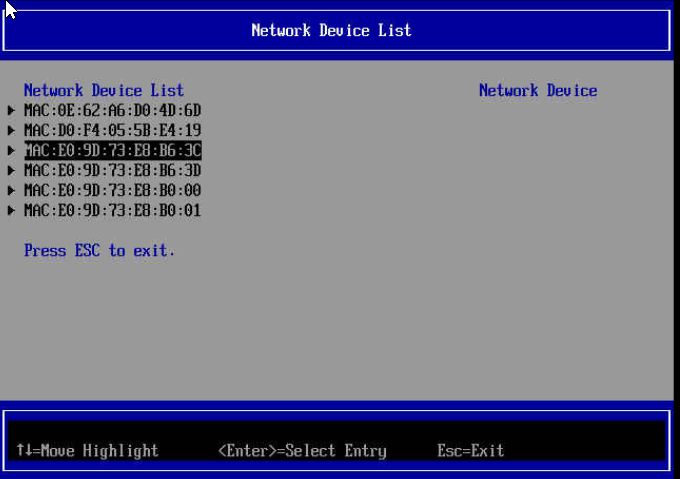
Move all BF3 Macs under UEFI PXEv4 to the top. If the MACs are not remembered confirm in the Device Manager > Network Device List.
Hit Enter to change
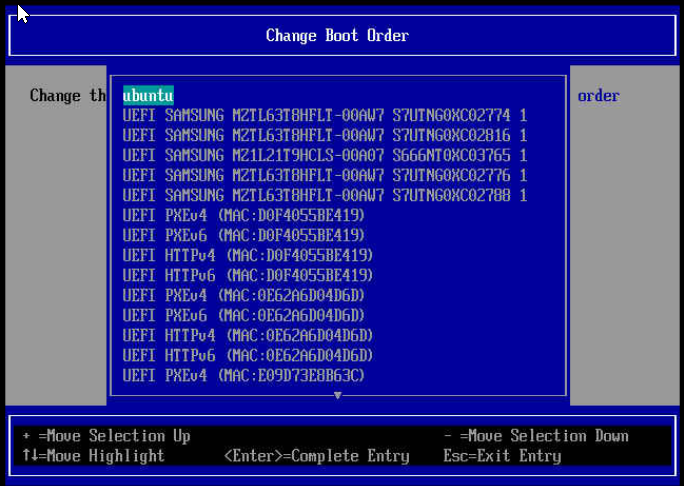
Find the PXEv4 MAC entries for BF3 cards and hit shift + repeatedly to move the entry to the top. Ensure the top two entries are the lower value of the MAC pair. Those are M1 and M2. The other two are S1 and S2.
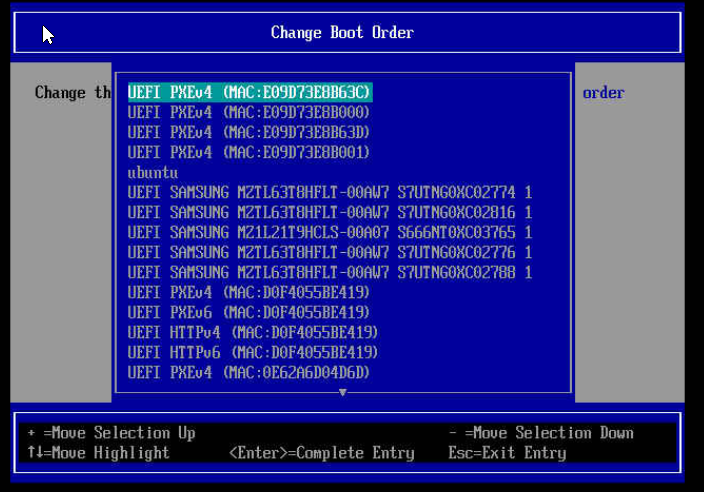
HIT ENTER TO complete the entry. Make sure to do this or the settings will not be saved.
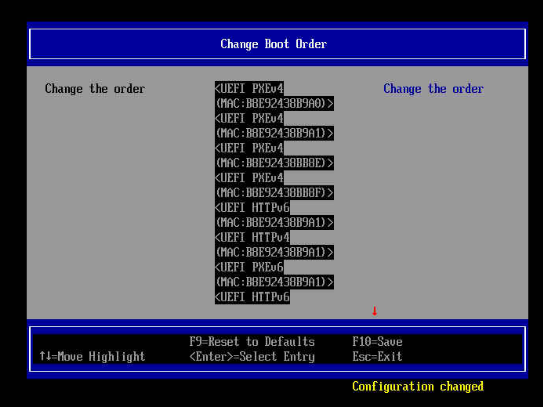
Scroll down and hit Commit Changes and Exit.
KVM Setup on Ubuntu#
This section provides instructions to create and manage Kernel Virtual Machines (KVM) on Ubuntu hypervisor systems.
Prerequisites#
Ubuntu server installed on hypervisor (installation not covered in this document)
Install required KVM packages:
sudo apt update
sudo apt install -y qemu-kvm libvirt-daemon-system libvirt-clients bridge-utils virt-manager
Network Bridge Setup#
Configure Network Bridge#
Create and configure the network bridge:
# brctl show
# brctl addbr br-mgmt
# ip link set dev br-mgmt up
Example output:
# brctl show
bridge name  bridge id               STP enabled     interfaces
br-mgmt              8000.e6c00dc5349d       no
virbr0               8000.525400bc0a2a       yes
Assign Bridge Interface IP Address#
Take a backup of the network configuration file and modify as needed:
Update the configuration file as per your environment:
root@hypervisor-01:~# cat /etc/netplan/10-static.yaml
network:
  version: 2
  renderer: networkd
  bonds:
    bond0:
      dhcp4: no
      mtu: 1500
      parameters:
        mode: active-backup
        mii-monitor-interval: 100
      interfaces:
        - ens10f0
  ethernets:
    ens10f0:
      dhcp4: no
      mtu: 1500
  bridges:
    br-mgmt:
      interfaces:
        - bond0
      dhcp4: no
      addresses:
        - 10.102.119.245/26
      routes:
        - to: 0.0.0.0/0
          via: 10.102.119.193
      nameservers:
        addresses:
          - 10.61.13.53
          - 10.117.49.179
      parameters:
        forward-delay: 0
        stp: false
      mtu: 1500
Apply Configuration#
Validate and apply the configuration:
# netplan try
# netplan apply
Verify the bridge interface is properly configured with the correct IP address and is operational:
# brctl show
# ip addr show br-mgmt
Example output:
# brctl show
bridge name  bridge id               STP enabled     interfaces
br-mgmt              8000.e6c00dc5349d       no              bond0
virbr0               8000.525400bc0a2a       yes

# ip addr show br-mgmt
7: br-mgmt: <BROADCAST,MULTICAST,UP,LOWER_UP> mtu 1500 qdisc noqueue state UP group default qlen 1000
    link/ether e6:c0:0d:c5:34:9d brd ff:ff:ff:ff:ff:ff
    inet 10.102.119.245/26 brd 10.102.119.255 scope global br-mgmt
       valid_lft forever preferred_lft forever
    inet6 fe80::e4c0:dff:fec5:349d/64 scope link
       valid_lft forever preferred_lft forever
Guest KVM Creation#
Create Virtual Disk#
Create a virtual disk for the VM with the required disk size:
qemu-img create -f qcow2 <path where the space is available> <size>
Example:
qemu-img create -f qcow2 /qemu/head-node.qcow2 2000G
Create VM with Bridge Network#
Create the VM with bridge network configuration:
virt-install --name <hostname> --memory 16192 --vcpus 24 --disk path=<disk path> --cdrom <iso path> --network bridge=<bridge name> --os-variant ubuntu24.04 --graphics vnc,listen=127.0.0.1 --noautoconsole
Note
If the BCM license is tied to a specific MAC address, use the following command to assign the same MAC to the guest KVM.
Example with MAC address:
virt-install --name head-node --memory 16192 --vcpus 24 --disk path=/qemu/head-node.qcow2 --cdrom /qemu/ISOs/bcm_x86/bcm-11.0-ubuntu2404.iso --network bridge=br-mgmt,mac=<mac_address> --os-variant ubuntu24.04 --graphics vnc,listen=127.0.0.1 --noautoconsole
Find MAC Address of Existing Guest KVM#
To find the MAC address of an already existing guest KVM:
root@hypervisor-01:~# virsh list --all
 Id   Name         State
-----------------------------
 -    BCM-11-x86   shut off

root@hypervisor-01:~# virsh domiflist BCM-11-x86
 Interface   Type     Source    Model    MAC
------------------------------------------------------------
 -           direct   ens10f1   virtio   52:54:00:07:34:a7
Console Access#
VNC Display Setup#
Get the VNC display information for console access:
# virsh vncdisplay --domain <hostname>
Example:
root@hypervisor-01:~# virsh vncdisplay --domain BCM-11-x86
:0
Port Forward to Localhost#
Set up port forwarding to access the console:
ssh -L 5900:localhost:5900 <user>@<hypervisor ip>
VNC Viewer Access#
Use VNC Viewer to access the console:
Open VNC viewer → localhost:5900
Clean Up Guest KVM#
Shutdown and Delete KVM#
Shutdown and delete the KVM instance:
virsh list --all
virsh shutdown <hostname>
virsh destroy <hostname>
virsh undefine <hostname>
virsh list --all
Remove Disk Manually#
Remove the virtual disk file:
rm /path/to/vm/disk.qcow2