

Model Training on Databricks
Databricks is a widely used platform for managing data, models, applications, and compute on the cloud. This guide shows how to use AutoModel for scalable, performant model training on Databricks.
The specific example here fine-tunes a Llama-3.2-1B model using the SQuAD dataset from Hugging Face, but any AutoModel functionality (for example, model pre-training, VLMs, other supported models) can also be run on Databricks.
Provision Compute
Start by provisioning a Databricks classic compute cluster with the following setup:
- Databricks runtime: 18.0 LTS (Machine Learning version)
- Worker instance type:
g6e.12xlargeon AWS (4x L40S GPUs per node) - Number of workers: 2
- Global environment variable:
GLOO_SOCKET_IFNAME=eth0(see this for details) - Cluster-scoped init script:
This provisions three compute nodes: one driver node that you can attach a notebook to, and two worker nodes to use for multi-node training.
Note that this guide uses a small number of instances for demonstration purposes, but you can adjust the specific instance type and number of workers for your use case.
Train the Model
With the provisioned compute resources, you are ready to fine-tune a model using AutoModel.
AutoModel uses YAML file recipes to configure various settings for the training process, such as the model, dataset, loss function, and optimizer. This guide uses this preconfigured recipe for fine-tuning a Llama-3.2-1B model using the SQuAD dataset from Hugging Face. In a notebook connected to the compute resource, download the configuration file:
The model, dataset, and optimizer portions of the configuration file are shown below:
Refer to the full file for complete details (!cat llama3_2_1b_squad.yaml).
Finally, authenticate the VM running the notebook with Hugging Face to download the model and dataset:
Single-Node
Because AutoModel is installed through the init script, the automodel CLI is available on all nodes.
To run training on a single GPU, use this command:
In addition to specifying the configuration file, the command accepts the following options:
--step_scheduler.max_steps: Limits the number of training steps taken. This limit is for demonstration purposes. Adapt it for your use case.--checkpoint.checkpoint_dir: Tells AutoModel where to save model checkpoints from training. Save the model checkpoints in a Databricks Unity Catalog volume.--checkpoint.staging_dir: Optional. Specifies a temporary local staging location for checkpoint consolidation before completed files are copied to the finalcheckpoint_dirlocation.--checkpoint.is_async: Uses asynchronous checkpointing.
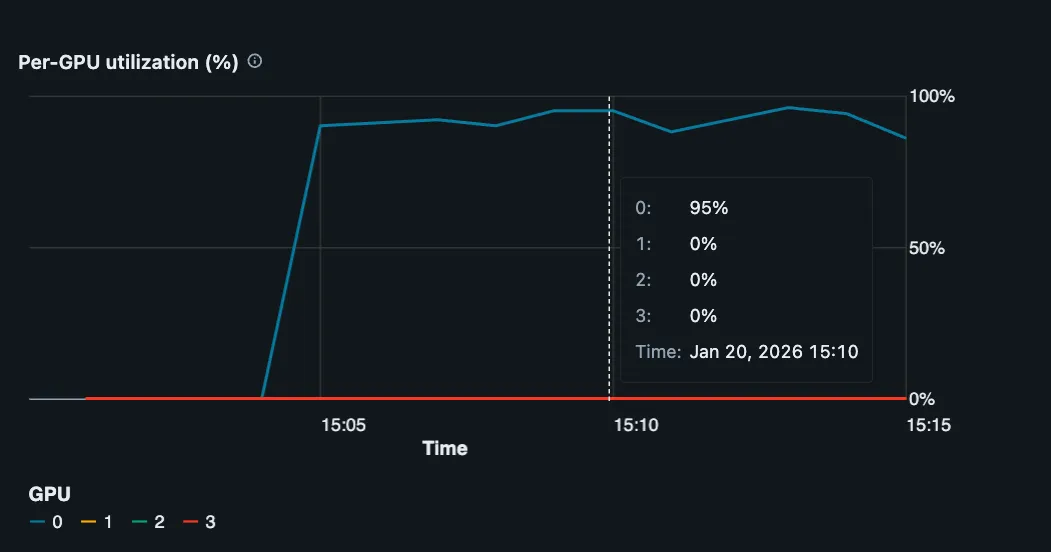
The GPU metrics in Databricks show that the single GPU has approximately 95% utilization.
To use all four GPUs on this g6e.12xlarge instance, add --nproc-per-node=4 to the command:
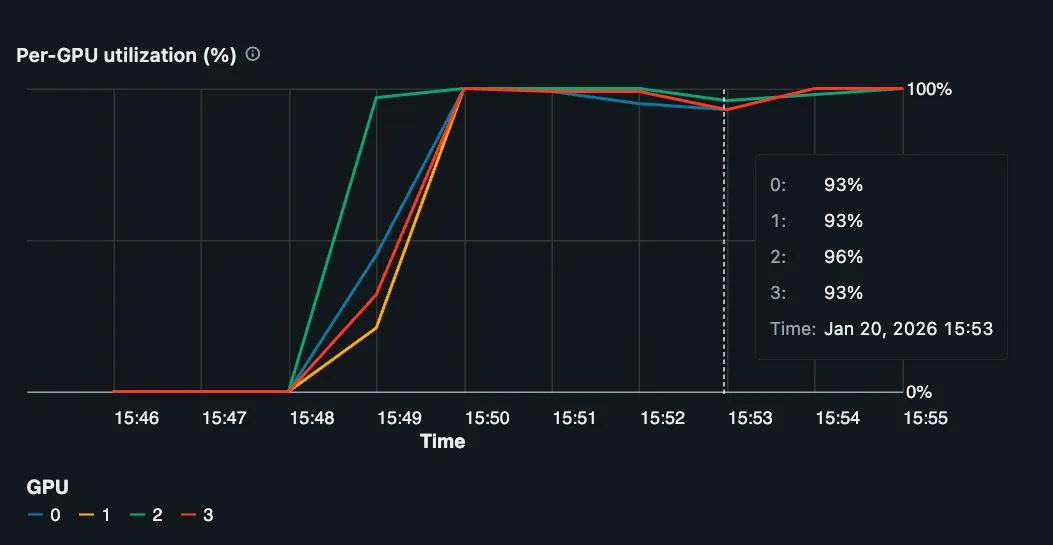
The automodel CLI uses PyTorch’s Elastic Launch internally to spawn and coordinate multiple training processes on the VM. Each training process runs on a separate GPU, and all four GPUs show approximately 95% utilization.
Multi-Node
To scale further to multi-node training, submit training jobs to all instances in the Databricks cluster.
First, each instance needs to be authenticated with Hugging Face to download the model and dataset:
Next, use PySpark’s TorchDistributor to run the training job across multiple instances:
TorchDistributor uses torchrun internally. Point the distributor at the recipe module directly, rather than the automodel CLI, which also wraps torchrun.
During training, GPU utilization is approximately 95% across all eight GPUs on the worker nodes.
Track Experiments with MLflow
Databricks includes built-in MLflow integration for tracking experiments, logging metrics, and storing artifacts. To use MLflow with AutoModel on Databricks, add the MLflow configuration to your YAML file.
Configure MLflow
Edit your configuration file (e.g., llama3_2_1b_squad.yaml) to include the mlflow section:
For Databricks, the key configuration parameters are:
tracking_uri: Set to"databricks"to use Databricks’ managed MLflow tracking serverexperiment_name: The name of your experiment, which appears in the Databricks workspaceartifact_location: Leave asnullto use default Databricks artifact storage, or specify a Unity Catalog volume path like/Volumes/<catalog>/<schema>/<volume>/mlflow-artifactstags: Add custom tags to organize and filter your runs
Databricks automatically handles authentication when tracking_uri is set to "databricks". No additional credentials are needed.
Run Training with MLflow
Run training with MLflow tracking enabled using the same commands as before. AutoModel reads the MLflow configuration from the YAML file:
Single-node:
Multi-GPU:
Multi-node with TorchDistributor:
View Results
During training, you’ll see MLflow logging messages in your output:
To view your experiments and metrics:
- Navigate to the Experiments page in your Databricks workspace
- Find your experiment by name (e.g.,
automodel-databricks-llama3-squad) - Click on a run to view metrics, parameters, and artifacts
The Databricks MLflow UI displays:
- Training and validation metrics over time
- Model parameters and hyperparameters
- Custom tags for filtering and comparison
- Artifacts and model checkpoints
- System metrics (GPU utilization, memory usage)
Store Artifacts in Unity Catalog
To store MLflow artifacts in Unity Catalog volumes, specify the artifact_location:
This ensures your artifacts are stored in a governed, versioned location within Unity Catalog.
Additional Configuration
You can override MLflow settings from the command line:
For more details on MLflow configuration options and best practices, see the MLflow logging guide.
Conclusion
This guide showed how to use AutoModel for model training on Databricks-managed compute, scaling from a single GPU to multi-GPU and multi-node training.
Although this guide fine-tunes a Llama-3.2-1B model using the SQuAD dataset, any supported AutoModel functionality, such as model pre-training and vision-language models (VLMs), can run and scale on Databricks. Check additional recipes and end-to-end examples to learn more.