Bring-Up and Driver Installation
It is recommended to upgrade your BlueField product to the latest software and firmware versions in order to enjoy the latest features and bug fixes.
NVIDIA provides software that enables users to fully utilize the BlueField® DPU and enjoy the rich feature-set it provides. Using BlueField software packages, users are able to:
Quickly and easily boot an initial Linux image on your development board
Port existing applications to and develop new applications for BlueField
Patch, configure, rebuild, update or otherwise customize your image
Debug, profile, and tune their development system using open source development tools taking advantage of the diverse and vibrant Arm ecosystem.
The BlueField family of DPU devices combines an array of 64-bit Arm v8 A72 cores coupled with the ConnectX® interconnect. Standard Linux distributions run on the Arm cores allowing common open source development tools to be used. Developers should find the programming environment familiar and intuitive which in turn allows them to quickly and efficiently design, implement and verify their control-plane and data-plane applications.
BlueField SW ships with the NVIDIA BlueField Controller Cards. BlueField SW is a reference Linux distribution based on the Yocto Poky distribution and extended to include the NVIDIA OFED stack for Arm and a Linux kernel which supports NVMe-oF. This SW distribution is capable of running all customer-based Linux applications seamlessly. Yocto also provides an SDK that contains an extremely flexible cross-build environment allowing software targeted for the BlueField DPU to build on virtually any x86 server running any Linux distribution.
The following are other software elements delivered with BlueField DPU:
Arm Trusted Firmware (ATF) for BlueField
UEFI for BlueField
Hardware Diagnostics
NVIDIA OFED stack
NVIDIA MFT
For the BlueField software and software user manual, please contact your local support.
Before installing the preferred OS on the BlueField Controller Card, make sure you install the card only in a JBOF system. Installing it in a host system may damage the card.
The BlueField Controller Card boots off eMMC upon power-up. The image flashed on the eMMC from the factory is the Yocto Linux.
Run the following command to discover the BlueField Software version:
cat /etc/bluefield_version
Yocto Distribution Installation
The BlueField tarball comes with pre-built Yocto images that can be installed. Please refer to The BlueField Software User Manual for the basic Yocto Installation.The core-image-full image is a full root filesystem image that is appropriate for imaging on the rootfs partition of the eMMC. Refer to the BlueField Software User Manual for instructions on how to build it yourself, or contact your local support to get the image.
Prepare the host environment. For more information, refer to Preparing the Host-Side Environment.
Boot the BlueField Controller Card over USB using the samples/install.bfb image.
Refer to samples/README.install for instructions.
To boot the BlueField Controller Card over USB from the server host, run:
cat install.bfb > /dev/rshim0/boot
To prepare the eMMC for Yocto installation from the Arm, run:
/opt/mlnx/scripts/bfinst --fullfs /tmp/core-image-full-bluefield.tar.xz
After the installation is done, execute lowercase reboot on the Arm.
shutdown -r now
Verify the version via:
cat /etc/bluefield_version
Before installing CentOS 7 on the BlueField Controller Card, you need to configure the PXE server on the host side (x86) to allow the deployment of the CentOS image over the BlueField Controller Card.
Download the CentOS installation iso file from the following link:
            # Download the centos installation iso file from http://mirror.centos.org/altarch/7/isos/aarch64/CentOS-7-aarch64-Everything.iso
# cd <BF_INST_DIR>/distro/rhel/pxeboot
# ./setup.sh -d <BF_INST_DIR> -i <centos-installation.iso> [-c <ttyAMA0 >]
UART0 (ttyAMA0) is used by default, or you can use "-c ttyAMA0" to manually specify UART0.
This section demonstrates CentOS 7.4 installation on the BlueField Controller Card. Other OSs work similarly with the PXE boot installation process.
Before installing the preferred OS on the BlueField Controller Card, make sure you install the BlueField Controller Card in a JBOF System. Installing it in a host system may damage the card.
Software Requirements
CentOS 7.4 Linux OS. To get CentOS 7.4 image, run:
wget http://archive.kernel.org/centos-vault/altarch/7.4.1708/isos/aarch64/CentOS-7- aarch64-Everything.iso
WarningSome required drivers do not compile and load if running CentOS 5.x or earlier.
WarningPlease note that CentOS 7.5 is not supported.
Access to the latest BlueField Controller Card SW bundle:
NVIDIA uses box.com to distribute BlueField software. Contact your sales/support representative for a custom link to download BlueField software releases.
In this document, we assume the tarball BlueField-1.0.alphaX.XXXXX.tar.gz is extracted at / root, to do this, run the following command:
tar -xvf BlueField-1.0.alphaX.XXXXX.tar.xz -C /root
Preparing Host-Side Environment
Before installing the preferred OS on the BlueField Controller Card, the host must be set up for it to be capable of provisioning the BlueField Controller Card. The RShim USB driver is installed on the host to communicate with the RShim device on the BlueField DPU. The RShim USB driver must be installed so that it can push the initial bootloader and supply the OS image for PXE boot through the USB connection.
This process only needs to be done on the host machine which is provisioning the BlueField Controller Card, it is not required on the end machine.
Setup Procedure With Installation Script
If the host is running CentOS 7 (or equivalent) on the host, you may run a script to complete all the steps detailed in Preparing the Host-Side Environment.
            /root/BlueField-1.0.alphaX.XXXXX/distro/rhel/pxeboot/setup.sh    \
-d /root/BlueField-1.0.alphaX.XXXXX/ \
-i /root/CentOS-7-aarch64-Everything.iso \
-o /root/dd-rhel7.4-mlnx-ofed-4.2-1.4.10.0-aarch64.iso \
-c ttyAMA0\
-k
Note that there should be no firewall blocking the IP communication between the BlueField Controller Card and the server host machine. If a firewall exists, disable it with the following commands:
            iptables -F
iptables -t
nat -F
The “-d” flag points to where the tar file has been extracted from, the script uses this directory to find all the source code it needs.
The “-i” flag points to the OS installation disk. This is the image that is accessed via PXE boot to install the OS on the BlueField Controller Card.
The “-o” flag points to the NVIDIA OFED driver disk for Arm. Download and extract it from http://www.mellanox.com/page/products_dyn?product_family=34.
The “-c” flag specifies the default UART port for the OS to use since the BlueField DPU has two Arm UARTs. For the BlueField Controller Card, “ttyAMA0” is used, which is UART0.
The “-t” flag is optional and needed for nonpxe boot. When specified and given the argument of what Controller card is set (BlueField Controller Card in this case), it generates a “nonpxe.bfb” file which contains the install kernel and rootfs. If this file is pushed to the RShim boot device, it automatically runs the installation process and skips the initial UEFI PXE boot operations. (the -t flag). Please refer to distro/rhel/pxe/README.
The optional “-k” flag kickstarts auto-installation based on a default kickstart file which is installed as /var/pxe/ks/ks.cfg (optional).
Setup Procedure Without Installation Script
If the host is running CentOS 7 or equivalent, please refer to Preparing the Host-Side Environment for a simpler way to perform the installation using an installation script.
The following sections demonstrate CentOS 7 installation, however, installation in other environments should be relatively similar.
Step 1: Set up RShim Interface
The RShim driver communicates with the RShim device on the BlueField DPU. The RShim is in charge of many miscellaneous functions of the DPU, including resetting the Arm cores, providing the initial bootstream, and using the TMFIFO and the RShim network, to exchange network and console data with the host.
The RShim device can be reached by the host via the USB connector.
Step 2: Install RShim Drivers
To install the kernel modules, please follow the instruction in section RShim Host Driver.
To install the kernel modules, please follow the instruction in NVIDIA BlueField DPU Family Software Documentation under BlueField Software Overview > Installation and Initialization > RShim Host Driver.
Step 3: Configure TFTP Server
The host should be configured to act as a TFTP server to the BlueField Controller Card via the USB RShim network. This server provides the required files by the BlueField Controller Card to perform the PXE boot for installing the preferred OS.
Configuring the TFTP server requires a TFTP package. If it is not installed, install it via “yum install tftp” or “apt-get tftp”, depending on your Linux distribution.
Note: On some versions, the TFTP package cannot be found. In such cases, install “xinetd”.
- Extract the OS image and copy the required PXE boot components: null
- Patch the initrd with the eMMC driver and TMFIFO (RShim network) driver: null 0000018a-8573-de49-affb-9f7fdc920003
- Change the grub configuration to PXE boot over the right location: null
Start the TFTP server:
systemctl restart tftp
WarningBased on the system, the user may need to use “system TFTP restart” instead. Also, if required, the user might need to switch use “xinetd” instead of “TFTP”.
Step 4: Set Up the DHCP Server
DHCP server set up on the host is required for BlueField Controller Card to get a private IP from the host for PXE boot process completion. Configure the correct server names and domain names so that the BlueField Controller Card can connect to the network via the host later on.
Get the server/domain names on the host:
            bash-4.2$ cat /etc/resolv.conf
# Generated by NetworkManager search internal.mlnx.com labs.mlnx
nameserver 10.15.2.29
nameserver 10.15.2.16
This example shows that the domains are internal.mlnx.com and labs.mlnx, and the names of the servers are 10.15.2.29 and 10.15.2.16.
Set up the DHCP config file accordingly:
            cat >/etc/dhcp/dhcpd.conf <<EOF
allow booting;
allow bootp;
subnet 192.168.100.0 netmask 255.255.255.0 {
range 192.168.100.10 192.168.100.20;
option broadcast-address 192.168.100.255;
option routers 192.168.100.1;
option domain-name-servers 10.15.2.29 10.15.2.16;
# Set the domain search according to the network configuration option domain-search "internal.tilera.com" "mtbu.labs.mlnx"; next-server 192.168.100.1;
filename "/BOOTAA64.EFI";
}
# Specify
the IP address for
this client. host pxe_client {
hardware ethernet 00:1a:ca:ff:ff:01; fixed-address 192.168.100.2;
} EOF
WarningIt is recommended to back up the previous dhcpd.conf file before overwriting it.
Step 5: Set Up the HTTP Server
The TFTP server allows the PXE boot to load the initrd and kernel. The BlueField Controller Card obtains all the other required sources through the network, thus, making it necessary to set up an HTTP.
Setting up the HTTP server requires the HTTP package. If it is not installed, please install it via “yum install httpd” or “apt-get httpd”, depending on your Linux distribution.
To configure the http server to serve the contents of the installation disk, run the following command:
            cat >/etc/httpd/conf.d/pxeboot.conf <<EOF Alias /centos7
/mnt
<Directory /mnt>
	Options Indexes FollowSymLinks Require ip 127.0.0.1
	192.168.100.0/24
</Directory>
EOF
systemctl enable httpd systemctl restart
httpd
Flashing BlueField Controller Card Bootloader Code
Before installing an OS, flash the bootloader code first. The BlueField Controller Card is shipped with an initial bootloader code, and should be updated with the following instructions.
Opening Terminal Connection to BlueField Controller Card
To open a console window to the BlueField Controller Card, a terminal application is required. The application “minicom” is used for the flow, however, any standard terminal application can work, e.g. “screen”.
Install minicom by running “yum install minicom” or “apt-get install minicom”.
On the host, type “minicom” to open minicom on the current terminal, use “minicom -s” to set it up.
Go to the settings menu by pressing “Ctrl-a + o” (the setting menu opens by default when launching with the “-s” option). Navigate to the “Serial port setup” submenu and set the “Serial Device” to the one connected (should be one of the /dev/ttyUSBx if using the serial- UART cable).
Change the baud rate to 115200 8N1, and ensure that the hardware and software flow control are set to “No”.
Minicom Settings - Example
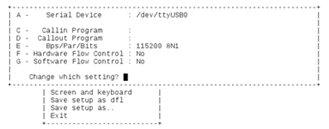
Select “Save setup as dfl” in order not to have to set it again in the future.
Using Initial Install Bootstream
On the host side, ensure that the RShim driver is running:
$ systemctl status rshim
An RShim device is located under the /dev directory, if you only have one, it should be “rshim0”:
            [root@bu-lab02 ~]# ls /dev/rshim0/
boot      console net       rshim
The boot device is used to push the bootstream to the BlueField Controller Card. Upon writing to it, it automatically resets the Arm cores so that it is booted using the pushed bootstream.
WarningThe console device can be used as a console instead of the serial-USB console. The primary bootloader does not support this device, however, UEFI and Linux support it. In cases where the special UART adapter board is unavailable, this can be used instead.
Push the initial install bootstream to the BlueField Controller Card:
            cat /root/BlueField-1.0.alphaX.XXXXX/sample/install.bfb > \
/dev/rshim0/boot
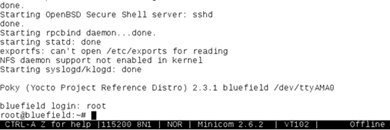
On the terminal, various boot messages appear until Linux is loaded. This is the Yocto embedded Linux running off the kernel initramfs pushed in the bootstream.
When prompted, type in “root” to get to the command prompt without any password.
Yocto Log
After Linux is loaded, in the terminal, run the /opt/mlnx/scripts/bfrec script to update the bootloader.
Installing CentOS 7.4 on BlueField Controller Card
If the error “no root is found” appears in the installation process, check or disable the firewall as needed on the server host machine.
Full PXE Boot Installation
- Get to the UEFI boot menu. Reboot the BlueField Controller Card by typing “reboot” on the console. A “UEFI firmware…” message should appear and the screen clears. Press ESC several times until you enter the UEFI boot menu. UEFI Boot Menu images/networking/download/attachments/19813595/image2019-12-19_13-28-35.png On the host, restart the DHCP and TFTP service: null Navigate to the Boot Manager. UEFI Boot Manager images/networking/download/attachments/19813595/image2019-12-19_13-29-50.png Select EFI Network, it will then use the TFTP service on the host to discover all available PXE boot options. Shortly after, a “..Fetching Netboot Image” message will appear enabling CentOS installation. Option to Install CentOS images/networking/download/attachments/19813595/image2019-12-19_13-30-27.png Select CentOS download. 0000018a-8573-de49-affb-9f7fdcaf0001 Follow the installation instructions in the configuration menu. Recommended settings are included. 0000018a-8573-de49-affb-9f7fdcb00000 null Enter “b” and press “enter” to initiate the installation process. Press “Enter” to reboot into CentOS. CentOS Installation Completion Screen images/networking/download/attachments/19813595/image2019-12-19_13-33-54.png
Non-PXE Boot Installation
When the setup script is run with the “-t” option, it generates a nonpxe.bfb file at the directory where the script is run. The directory contains the install kernel and rootfs which are usually loaded by UEFI during the initial PXE boot stage. Thus, if pushing this file, the host TFTP server no longer needs to be used and UEFI would automatically load the install kernel and rootfs from the boot FIFO. Together with the “-k” kickstart option, the host can be configured to initiate non-PXE boot and automatic CentOS installation, as long as the host HTTP and DHCP servers are working. To kick off the installation process, run the following command on the host:
cat nonpxe.bfb > /dev/rshim0/boot; sleep 2; systemctl restart dhcpd
This section is relevant to non-Yocto Operating Systems only.
Installing MLNX_OFED on Arm Cores
Prerequisite Packages for Installing MLNX_OFED
MLNX_OFED installation requires some prerequisite packages to be installed on the system.
Currently, CentOS installed on the BlueField Controller Card has a private network to the host via the USB connection, and it can be used to Secure Copy Protocol (SCP) all the required packages. However, it is recommended for the BlueField Controller Card to have a direct access to the network to use “yum install” to install all the required packages. For direct access to the network, set up the routing on the host via:iptables -t nat -o eth0 -A POSTROUTING -j MASQUERADE echo 1 > /proc/sys/net/ipv4/ip_forward systemctl restart dhcpd
Warning“eth0” is the outgoing network interface on the host. Change this according to your system requirements.
WarningThese commands are not saved in Linux startup script, and might be needed to be applied again after host machine reboots.
Reset the BlueField Controller Card network for Internet connection (access to the web) as long as the host is connected:
            [root@localhost
~]# ifdown eth0;
ifup eth0 [root@localhost
~]# ping google.com
PING google.com (172.217.10.142) 56(84)
bytes of data.
64 bytes from lga34s16-in-f14.1e100.net (172.217.10.142): icmp_seq=1 ttl=53 time=19.2 ms
64 bytes from lga34s16-in-f14.1e100.net (172.217.10.142): icmp_seq=2 ttl=53 time=17.7 ms
64 bytes from
lga34s16-in-f14.1e100.net (172.217.10.142): icmp_seq=3 ttl=53 time=15.8 ms
Run “yum install” to install all the required MLNX_OFED packages:
            yum install rpm-build
yum group install "Development Tools" yum install kernel-devel-`uname -r`
yum install valgrind-devel libnl3-devel python-devel yum install tcl tk
Note that this is not needed if you installed CentOS 7 with the kickstart (“-k”) option.
/auto/sw_mc_soc_project/distro/rhel/kernel-devel-4.11.0-22.el7a.aarch64.rpm
Removing Pre-installed Kernel Module
There are cases where the kernel is shipped with an earlier version of the mlx5_core driver taken from the upstream Linux code. This version does not support the BlueField Arm, but is loaded before the MLNX_OFED driver, and therefore, needs to be removed.
To remove the kernel module from the initramfs, run the following command:
            mkdir /boot/tmp
cd /boot/tmp
gunzip < ../initramfs-4*64.img | cpio -i
rm -f lib/modules/4*/updates/mlx5_core.ko
rm -f lib/modules/4*/updates/tmfifo*.ko
cp ../initramfs-4*64.img ../initramfs-4.11.0-22.el7a.aarch64.img-bak
find | cpio -H newc -o | gzip -9 > ../initramfs-4*64.img
rpm -e mlx5_core
depmod -a
Installing MLNX_OFED on the BlueField Controller Card
Copy the MLNX_OFED image to the BlueField Controller Card via the USB network. The MLNX_OFED images should be provided in the software drop:
            scp MLNX_OFED_LINUX-4.2-1.4.8.0-rhel7.4alternate-aarch64.iso \
root@192.168.100.2:/root
Mount the image on the BlueField Controller Card:
mount /root/MLNX_OFED_LINUX-4.2-1.4.8.0-rhel7.4alternate-aarch64.iso /mnt
Install MLNX_OFED.
If the kernel on the BlueField is 4.11.0-22.el7a.aarch64, run:cd /mnt # ./mlnxofedinstall --bluefield
If the kernel is different than 4.11.0-22.el7a.aarch64, run:
            cd /mnt
# ./mlnxofedinstall --add-kernel-support --skip-repo
WarningFor OFED to support DPDK, use the arguments “--upstream-libs” and “--dpdk”.
            ./mlnxofedinstall --distro rhel7.4alternate --add-kernel-support --upstream-libs
--dpdk
This step might take longer than expected to be completed. If you are using a different pack- age than the required one, run “yum install”.
WarningIf the date is not set correctly while installing MLNX_OFED, first, set the date (e.g date -s 'Mon Feb 5 15:02:10 EST 2018'), then run the installation.
Restart openibd:
/etc/init.d/openibd restart
Updating BlueField Controller Card Firmware
The below commands apply to MBF1M616A-CSNAT. The commands vary per OPN.
The below steps demonstrate how to manually update the firmware if the automatic process fails. The firmware image can be found in the BlueField Software package.
Copy the firmware image to the BlueField Arm:
            scp fw-BlueField-rel--XX_XX_XXXX-MBF1M6X6A-CSNA_Ax.ini.bin \
root@192.168.100.2:/root
[root@localhost ~]# mst start
Starting MST (Mellanox Software Tools) driver set Loading MST PCI module - Success
Loading MST PCI configuration module - Success Create devices
Unloading MST PCI module (unused) - Success [root@localhost ~]# mst status
MST modules:
------------
MST PCI module is not loaded
MST PCI configuration module loaded
MST devices:
------------
/dev/mst/mt41682_pciconf0
- PCI configuration cycles access.
domain:bus:dev.fn=0000:04:00.0 addr.reg=88 data.reg=92
Chip revision is: 00
The output indicates that the device is “/dev/mst/mt41682_pciconf0”. To update the firmware:
            flint -d /dev/mst/mt41682_pciconf0 b \
-i /root/ fw-BlueField-rel-XX_XX_XXXX-MBF1M6X6A-CSNA_Ax.ini.bin
When using the mlx and ini files, use the following command instead:
mlxburn -d /dev/mst/mt41682_pciconf0 -fw fw-BlueField.mlx -c bf.ini
To burn the firmware which comes with OFED after OFED is installed, run:
/opt/mellanox/mlnx-fw-updater/firmware/mlxfwmanager_sriov_dis -force
Power cycle the BlueField Controller Card for the new firmware to take effect.
            root@bluefield:~# flint -i /opt/fw-Bluefield-red-18_99_4608_MBF1M6X6A-CSNA_Ax-Flexboot-3.5.404_UEFI-14.15.20.bin -d /dev/mst/mt41682_pciconf0 b

    Current FW version flash:     18.24.0013
	New FW version:               18.99.4608
Burning FW image without signatures - 55%
Burning FW image without signatures - OK
Restoring signature
-I- To load new FW run mlxfwreset or reboot machine.
root@bluefield:~#
WarningAfter MLNX_OFED is installed on the Arm cores, use the mlx5_core driver to use the two Ethernet ports on the BlueField Controller Card. If the Ethernet ports on the BlueField Controller Card are connected to the network, there is no need to bridge the host via RShim net to access the network.
To install the kernel modules, please follow the instruction in section RShim Host Driver.