Cluster Bring-Up Web Installation Steps
This section describes how to deploy Cluster Bring-Up Web on a Linux machine.
Prerequisites
Python 3.6 or greater is required on the host where the framework is to be deployed.
System Requirements
The system that runs the cluster bring-up framework must satisfy the following requirements:
At least 4GB of memory
At least 2 CPU cores
At least 30GB of space
Running Kubernetes
Supported Operating Systems
CentOS 8 or later 64-bit (x86)
Red Hat Enterprise Linux 8.2 or later 64-bit (x86)
Ubuntu 20.04 or later 64-bit (x86)
Supported Deployment Platforms
NVIDIA currently supports running cluster bring-up framework as a containerized application using Docker images deployed to a Kubernetes cluster.
In the following sections, you'll find deployment details and instructions for a Kubernetes platform.
This section describes how to deploy Cluster Bring-Up WEB in Kubernetes cluster.
Installation
There are two supported modes of installation: Online installation and installation using an image.
This section details how to install the Cluster Bring-Up WEB in each mode.
Online Installation
Your machine must have Internet access to pull the container images and install the Python packages.
Prerequisites
A Kubernetes deployment requires users to have access to a Kubernetes cluster. The kubectl command-line tool must also be configured to communicate with the cluster.
The following requirements must be met on the host where the framework is deployed:
Kubernetes server 1.25 or greater
kubectl 1.25 or greater
Python 3.6 or greater
Installation Steps
Follow the following steps to deploy the framework on a Kubernetes platform:
Log into the installation machine as root user.
Ensure Kubernetes is installed.
Untar the cluster bring-up package.
Run the installation script.
Keep in mind that you may get an ErrImagePull message which indicates that you have exceeded the pull rate limit. For more information about this issue, see Docker's article "Understanding Docker Hub Rate Limiting".
Installation with Image
This section shows how to install the and deploy the cluster-bring up in offline mode which requires the user to download and restore a machine image with most of the dependencies already located on the machine.
Prerequisites
The following is a list of requirements that must be met:
Clonezilla version 3.0.1.8
Installation Steps
For offline installation, perform the following steps:
Download the tar image file located here.
Move the download file to the data center and untar the file.
Restore the image on your machine via Clonezilla. See section Restore Image for procedure.
Log into the installation machine as the root user with the password "password".
Make sure Kubernetes is running in Ready status:
            $ kubectl get nodes
NAME                 STATUS   ROLES                  AGE   VERSION
ib-node-01-cot       Ready    control-plane,master   39m   v1.24.2+k3s1
Change directory to the location of the installation script located under /cot:
            $ pwd
/cot
$ ls -la
total 24
drwxr-xr-x  4 root root 4096 Jul 21 14:36 .
drwxr-xr-x 21 root root 4096 Jul 21 15:03 ..
drwxr-xr-x  3 root root 4096 Jul 21 14:35 ansible
drwxr-xr-x  5 root root 4096 Jul 21 14:36 installer
-rwxr-xr-x  1 root root  583 Jul 21 14:36 install.sh
-rwxr-xr-x  1 root root  393 Jul 21 14:36 uninstall.sh
Run the installation script with the --offline-mode flag:
            $ ./install.sh --offline-mode
Installing cluster-bringup-service
Installing awx-operator
Installing awx-cluster-bringup
AWX is currently upgrading
Importing AWX resources
Installation finished successfully
AWX interface URL: http://10.43.144.44:80
AWX username: admin
AWX password: SxFLNsjpjAuoUICJDl0XUvdjDDmQmBWf
AWX OAuth token: jacb63Ac3bzyXXTTzsYbzAdA1mymaP
API URL: http://cluster-bringup:5000/api
PyPI URL: http://cluster-bringup:5000/pypi/simple/
Downloads URL: http://cluster-bringup:5000/downloads/
Files folder: /opt/nvidia/cot/files
Restore Image
As part of the installation process, an image with Kubernetes and AWX-Operator already present must be restored on a machine. To restore, the Clonezilla software must be utilized.
Restore VM Using Hypervisor
The Clonezeilla restoration procedure can also be used for virtualization.
The following subsections provide the list of virtualization solutions that are supported.
KVM
Kernel-based Virtual Machine, or KVM, is a full virtualization solution for Linux on x86 hardware containing virtualization extensions. Using KVM, users can run multiple VMs running unmodified Linux or Windows images. Each VM has private virtualized hardware: A network card, disk, graphics adapter, etc.
Dependencies
The following is a list of required dependencies:
virt-manager application
Restoration Steps
Follow these steps to restore the image on a VM. Each step has a name prepended to the step which indicated from which machine to perform the action:
On the machine running a hypervisor, check if there is enough space in the root and /images directories.
            $ df -h
Filesystem        Size  Used Avail Use% Mounted on
devtmpfs           91G     0   91G   0% /dev
tmpfs              91G     0   91G   0% /dev/shm
tmpfs              91G   35M   91G   1% /run
tmpfs              91G     0   91G   0% /sys/fs/cgroup
/dev/sda2          44G  8.1G   33G  20% /
/dev/sda1         2.0G  226M  1.6G  13% /boot
/dev/sda5         392G   99G  274G  27% /images
tmpfs              19G  4.0K   19G   1% /run/user/0
l1:/vol/s1        2.9T  2.0T  931G  69% /auto/s1
On the machine running the hypervisor, download Clonezilla ISO and move it to the /tmp directory.
            $ ll /tmp
total 396484
-rw-r--r--   1 qemu qemu 379584512 Jul 17 16:06 clonezilla-live-3.0.1-8-amd64.iso
On the machine running the hypervisor, create a new directory in the /images directory with the name of the newly created machine.
- On the machine running the hypervisor, create a disk image with 65G. null
On the machine running the hypervisor, open the Virtual Manager GUI.
$ virt-manager
In the Virtual Manager GUI, click the "Create a virtual machine" icon on the top left.
Create a new VM (5 steps):
Select "Local install media".
For "Choose ISO", select the Clonezilla ISO placed in /tmp, uncheck "Automatically detect from the installation media", type and select the OS of choice (must be supported).
Memory: 4096; CPUs: 2
For "Select or create custom storage" and browse to the image disk created earlier.
Type in a unique machine name and check the "Customize configuration before install" box
Click "Finish".
In the Virtual Manager GUI, change the boot order:
Open the settings of the VM you are restoring on.
Boot Options.
Check the "Clonezilla CDROM" box and click the up arrow to move it up in the boot order.
Click "Apply".
After restarting the machine, the Clonezilla software will boot. Follow these steps to successfully restore the image:
Clonezilla live.
English.
Keep.
Start.
device-image.
ssh_server.
dhcp.
Type the IP address of the machine where the clone is located.
Port stays at "22" (default ssh).
Keep "root" as user.
Type the directory path extracted in step 2 of section "Installation Steps".
Type password to root user.
Mode: Beginner.
restoredisk.
Select the name of your image.
Select the name of your storage.
Yes, check.
Power off.
In the Virtual Manager GUI, select "Change Boot Order" and place (SATA) disk image first instead of Clonezilla (CDROM).
In the Virtual Manager GUI, select "Force off" and "Start VM".
After booting, log in as root.
$ sudo su
(Restore) Change the name of the machine since it has the cloned machine name configured.
            $ vi /etc/hostname
$ vi /etc/hosts
(Restore) If no Internet access is available on the machine, change the network interface in use.
            $ ifconfig -a
$ ethtool ens3 # Link detected: no
$ ethclient
$ ethtool ens3
$ ifconfig -a
$ vim /etc/netplan/00-installer-config.yaml
(Restore) Reboot machine → reboot.
Restore on Bare Metal
This section explains how to restore the image on a physical computer server.
Supported Hardware
ProLiant DL380p Gen8
Restoration Steps
Connect to machine's remote management, ILO for HPE.
Mount/add Clonezilla ISO via: Virtual Drives → Image File CDROM → Select Clonezilla ISO
Reset the machine: Power Switch → Reset.
Boot via Clonezilla ISO: Press F11 on startup → select CDROM Clonezilla ISO for boot.
Continue from step 9 of section Restore on VM Machine to the end.
For additional information on HPE's remote management, visit HPE's support website.
Installation Script
The installation script, install.sh, performs the following operations:
Creates a new virtual environment for installation
Ensures the dependencies for the installer are installed
Deploys cluster bring-up WEB framework on Kubernetes platform
Deploys cluster bring-up AWX framework on Kubernetes platform
Configures AWX resources for cluster orchestration
Usage:
Make sure to be located in the folder of the installation script (under /cot).
./install.sh [OPTIONS]
The following options are available for the installation script:
|
Option |
Description |
|
--hostfile |
Specify path to hosts file that contains hostnames for the inventory |
|
--hostname |
Specify host list expression that represents hostnames for the inventory |
|
--ib-host-manager |
Specify hostname to be a member of the ib_host_manager group |
|
--username |
Specify username to authenticate against the hosts |
|
--password |
Specify password (encoded in base64) to authenticate against the hosts |
|
--offline-mode |
Specify to run the installation script in offline mode. Supported only when using COT image. |
|
--config_file |
Specify the path to the configuration file to incorporate into the installation |
For example:
            $ ./install.sh --hostname ib-node-0[1-2,5] --ib-host-manager ib-node-01

Installing cluster-bringup-web
Installing awx-operator
Installing awx-cluster-bringup
AWX is currently upgrading
Importing AWX resources
Installation finished successfully
AWX interface URL: http://cluster-bringup:31873
AWX username: admin
AWX password: NDaXP7ULFjoHdxNwEYxLPRYx6PNWxwoX
AWX OAuth token: ihj219yX6w5cpmgqvHy923nyQTjuoB
API URL: http://cluster-bringup:5000/api
PyPI URL: http://cluster-bringup:5000/pypi/simple/
Downloads URL: http://cluster-bringup:5000/downloads/
Files folder: /opt/nvidia/cot/files
In this example, 3 hosts named ib-node-01, ib-node-02, and ib-node-05 are added to the inventory.
In addition, the ib-node-01 host configured to be a member of the ib_host_manager group for the In-Band operations.
Configuration File
This section provides the required information to add a YAML configuration file during the installation process.
Currently, the configuration file only supports adding inventory variables so that they are included in the IB Cluster Inventory variable list when AWX loads for the first time.
The YAML file must consist of an extra_variables parent key paired with a dictionary value. That dictionary must include an inventory_vars key which also has its own dictionary value. It will consist of a list of key-value pairs that are added to the inventory variables.
YAML configuration file example:
            ---
extra_variables:
  inventory_vars:
    - pass_fail_criteria:
        hca_fw_update:
          max_fail_percentage: 35
          action: stop
        ib_switch_fw_update:
          max_fail_percentage: 0
          action: stop
     - anotherVar: someVal
In this example, there are two variables, pass_fail_criteria and anotherVar, that will be added to the inventory variables list in AWX.
Example usage with the configuration file flag:
$ ./install.sh --config_file /PATH/TO/YAML
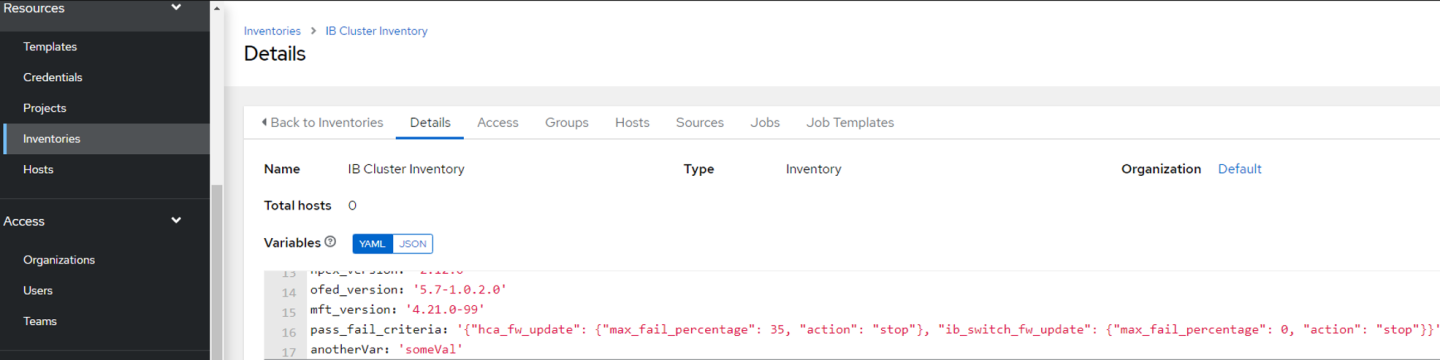
As seen in the picture above, pass_fail_criteria and anotherVar have been added to the IB Cluster Inventory after AWX loads for the first time.
COT API
This section details the operations that could be performed once the installation process concludes.
The following code block demonstrates all the available actions:
$ cot [-h] [-v] {install,update,show,uninstall}
The install and uninstall operations must be utilized via the install.sh and uninstall.sh scripts.
Update
The update command allows updating certain components of the Cluster Bring-up Tool.
$ cot update [-h] --cot_dir <PATH> {playbooks,awx_templates,cot_client}
The update command relies on the cot_dir argument, which refers to the path of the folder extracted from the tar.gz file given .
Mandatory arguments:
|
Arguments |
Description |
|
--cot_dir |
Specify the path of the folder extracted from the new tar.gz file. The tool uses the data inside the folder as the new data for the update operation. |
Optional arguments:
|
Arguments |
Description |
|
playbooks |
Update the ansible playbooks |
|
awx_templates |
Update the AWX templates (job templates and workflows). This updates the ansible playbooks as a pre-task. |
|
cot_client |
Update the COT client (on the ib_host_manager specified host) |
Show
Usage:
$ cot show [-h] [--awx_info] [--file_server_info] [--api_url]
Options:
|
Option |
Description |
|
--awx_info |
Get AWX URL and credentials |
|
--file_server_info |
Get file server URL and files folder |
|
--api_url |
Get the REST API URL |