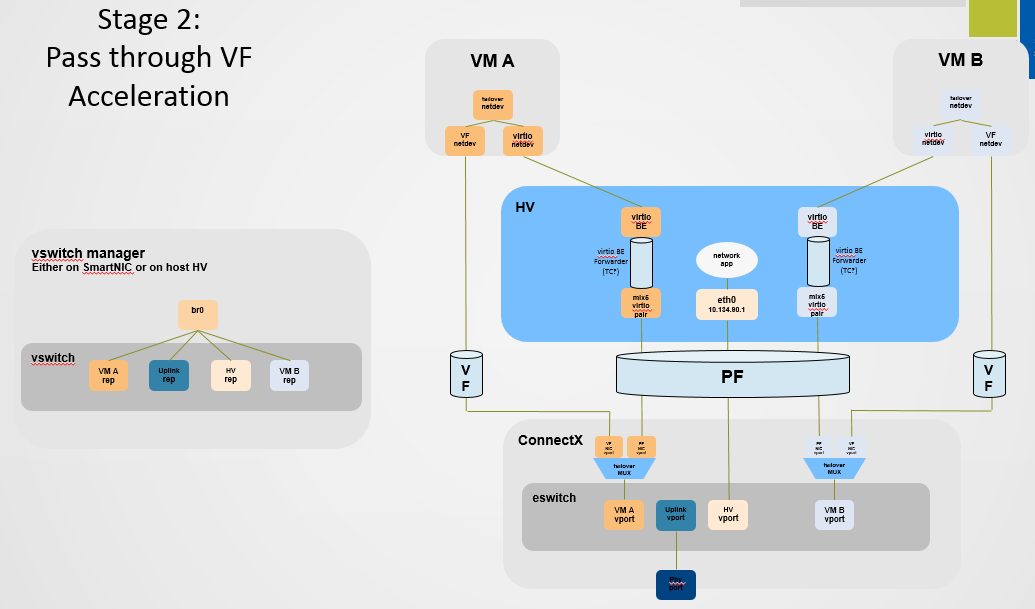
SR-IOV Live Migration
Support for this feature is at beta level.
This section describes how to set up and perform live migration on VMs with SR-IOV and with actively running traffic.
The below are the requirements for working with SR-IOV Live Migration.
VM network persistency for applications - VM’s applications must survive the migration process
No internal VM admin configuration
Support for ASAP2 solution (kernel OVS hardware offload)
No use of physical function (PF) network device in Paravirtual (PV) path for failover network traffic
Use of sub-function (SF) in HyperVisor as failover PV path
ConnectX-5 or higher adapter cards
Hypervisor host with RedHat/CentOS minimal version of 8.0 with MLNX_OFED minimal version of 5.4
VMs that run on CentOS v8.0 or higher
Hypervisor host with latest libvirt from hhttps://libvirt.org/news.html#v6-1-0-2020-03-03
Hypervisor host with latest QEMU from https://www.qemu.org/2021/04/30/qemu-6-0-0/
This section consists of the following steps.
The following steps should be performed in both host servers.
Install RedHat/CentOS v8.0 on the host server.
The CentOS 8.0 ISO image can be downloaded via this link.Connect the host servers to the Ethernet switch.
Two host servers HV1 (eth0: 10.20.1.118) and HV2 (eth0: 10.20.1.119) connected via an Ethernet switch with switch ports configured/enabled VLAN. For example, vlan=100Install the latest MLNX_OFED version.
Download and install NVIDIA MLNX_OFED driver for distribution RHEL/CentOS 8.0.# mount -o loop MLNX_OFED_LINIx-
5.4-rhel8.0-x86_64.iso /mnt # cd /mnt # ./mlnxofedinstall # rebootConfigure the host server and NVIDIA NIC with SR-IOV as instructed here.
Configure the host server and NVIDIA NIC with sub-function as instructed here (github.com/Mellanox/scalablefunctions/wiki).
mlxconfig -d
0000:03:00.0s PF_BAR2_ENABLE=0\ PER_PF_NUM_SF=1PF_TOTAL_SF=64PF_SF_BAR_SIZE=8Set the number of SFs same as that of VFs, as one SF-VF pair is used to attach to one VM.Configure storage for VMs' images as shared.
The default location for VMs' images is /var/lib/libvirt/images, which is a shared location that is set up as an NFS directory in this PoC. For example:# mount <nfs-server>:/opt/nfs/images /var/lib/libvirt/images
Set up the network bridge "installation" for VMs to enable external communication.
VMs must be able to download and install extra required packages for external sources.# cd /etc/sysconfig/network-scripts # vim ifcfg-installation DEVICE=installation TYPE=Bridge BOOTPROTO=dhcp ONBOOT=yes # vim ifcfg-eth0 BRIDGE=installation # systemctl network restart
Download CentOS v8.0 ISO image for VM installation.
Download CentOS v8.0 ISO image from one of the mirror sites to the local host.# wget http:
//isoredirect.centos.org/centos/8/isos/x86_64/CentOS-8-x86_64-1905-dvd1.iso
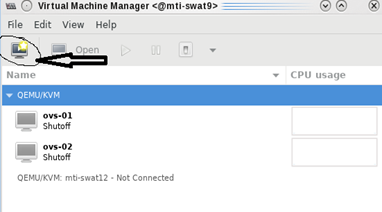
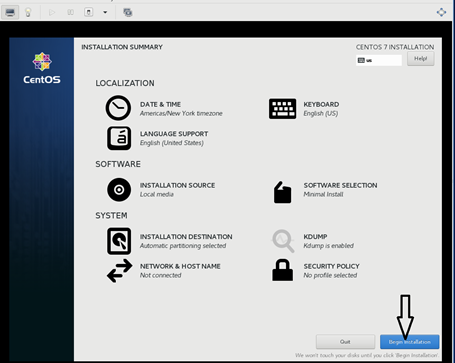
Launch "virt-manager" to create a new VM. Click the icon as shown below.
# virt-manager
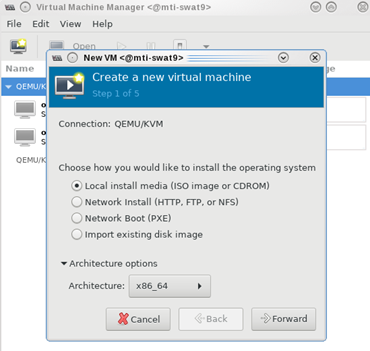
Choose “Local install media (ISO images or CDROM)”.
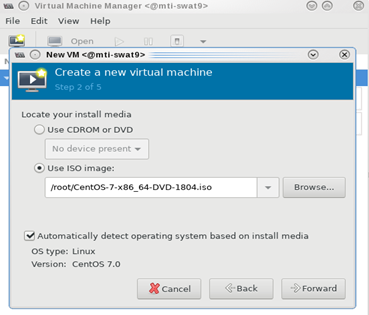
Specify the location of the downloaded CentOS 8.0 ISO image.
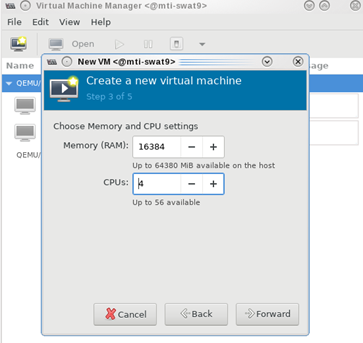
Fill in the fields under "Choose Memory and CPU settings" for the VM.
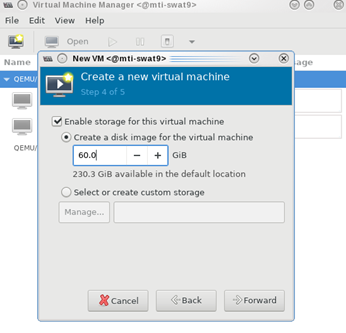
Create the disk image at the default root user location, for example: /var/lib/libvirt/images (NFS mount point). Make sure the storage is higher than 120GB and the virtual disk image is 60GB.
In the VM Name field, add "vm-01", and for the network selection, choose "Bridge installation: Host device eth0".
Click "vm-01", then "Open".
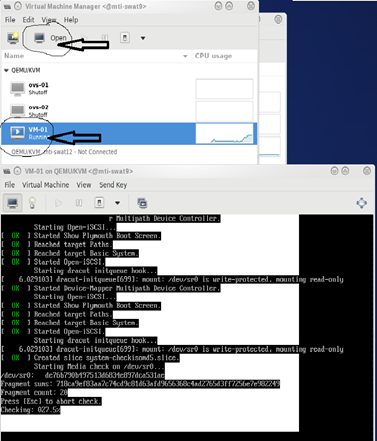
Follow the installation with “Minimal Install” and “Virtual Block Device” selection.
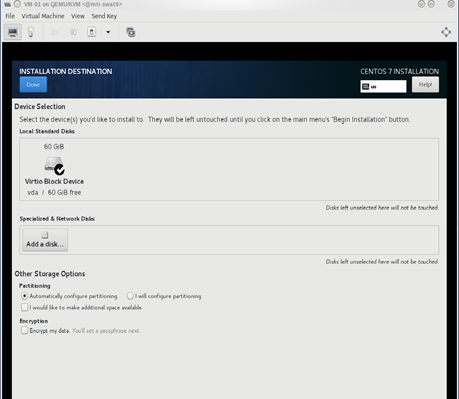
Click "Begin Installation".
Reboot VM "vm-01" after installation is completed.
Use the VM's console terminal to enable external communication.
            # [~]$ vi /etc/sysconfig/network-scripts/ifcfg-eth0
	ONBOOT=yes
	BOOTPROTO=dhcp

# systemctl network restart
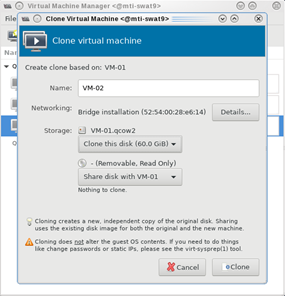
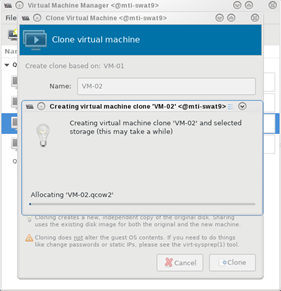
Shut down VM "vm-01" and clone it to VM "vm-02".
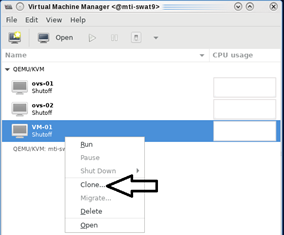
Clone the virtual disk VM-01.qcow to VM-02.qcow.
Test the VM installation and migration without VFs.
Boot both VMs and run ping to each other.
[root
@vm-01]# ping10.20.4.8[root@vm-02]# ping10.20.4.20Perform live migration using the "virsh" command line on HV1 where VM "vm-01" resides.
[root
@HV1]# virsh list --all Id Name State ----------------------------------------------------24VM-01runningPerform live migration.
[root
@HV1]# virsh migrate --live --unsafe --persistent --verbose VM-01qemu+ssh://HV2/systemVerify that vm-01 is migrated and resides at HV2.
[root
@HV2]# virsh list --all Id Name State ----------------------------------------------------1VM-01running2VM-02running
Make sure SR-IOV is enabled and VFs are available.
[root
@HV2]# lspci -D | grep Mellanox0000:06:00.0Ethernet controller: Mellanox Technologies MT27800 Family [ConnectX-5]0000:06:00.1Ethernet controller: Mellanox Technologies MT27800 Family [ConnectX-5Virtual Function]0000:06:00.2Ethernet controller: Mellanox Technologies MT27800 Family [ConnectX-5Virtual Function]0000:06:00.3Ethernet controller: Mellanox Technologies MT27800 Family [ConnectX-5Virtual Function]0000:06:00.4Ethernet controller: Mellanox Technologies MT27800 Family [ConnectX-5Virtual Function]Enable the usage of VF2 "0000:06:00.3" and VF3 "0000:06:00.4" to assign to VM-01 and VM-02 respectively.
Attach VF to VM with XML file using "virsh" command line.
Create VM-01-vf.xml and VM-02-vf.xml files to assign VF1 to VM-01 and VF2 to VM-02 as "hostdev" with MAC-address assigned.
root
@HV1]# cat VM-01-vf.xml <interfacetype='hostdev'managed='yes'> <mac address='52:54:00:53:53:53'/> <source> <address type='pci'domain='0x0000'bus='0x06'slot='0x00'function='0x1'/> </source> <address type='pci'domain='0x0000'bus='0x00'slot='0x0c'function='0x0'/> </interface>[root
@HV2]# cat VM-02-vf.xml <interfacetype='hostdev'managed='yes'> <mac address='52:54:00:54:54:54'/> <source> <address type='pci'domain='0x0000'bus='0x06'slot='0x00'function='0x2'/> </source> <address type='pci'domain='0x0000'bus='0x00'slot='0x0c'function='0x0'/> </interface>Assign the VF to the VM by running the "virsh" command line.
Before attaching the VF, VM-01 and VM-02 should have a single network interface.
[root
@VM-02]# ip link show1: lo: <LOOPBACK,UP,LOWER_UP> mtu65536qdisc noqueue state UNKNOWN mode DEFAULT groupdefaultqlen1000link/loopback00:00:00:00:00:00brd00:00:00:00:00:002: ens3: <BROADCAST,MULTICAST,UP,LOWER_UP> mtu1500qdisc noqueue state UP mode DEFAULT groupdefaultqlen1000link/ether52:54:00:06:83:8a brd ff:ff:ff:ff:ff:ffOn HV1 host, assign VF1 to VM-01.
[root
@HV1]# virsh attach-device VM-01VM-01-vf.xml Device attached successfullyOn HV2 host, assign VF2 to VM-02.
[root
@HV2]# virsh attach-device VM-02VM-02-vf.xml Device attached successfullyAfter attaching the VFs, VM-01 and VM-02 should have two network interfaces. The second interface "ens12" is the VF with the MAC-address assigned.
[root
@VM-02]# ip link show1: lo: <LOOPBACK,UP,LOWER_UP> mtu65536qdisc noqueue state UNKNOWN mode DEFAULT groupdefaultqlen1000link/loopback00:00:00:00:00:00brd00:00:00:00:00:002: ens3: <BROADCAST,MULTICAST,UP,LOWER_UP> mtu1500qdisc noqueue state UP mode DEFAULT groupdefaultqlen1000link/ether52:54:00:06:83:8a brd ff:ff:ff:ff:ff:ff3: ens12: <BROADCAST,MULTICAST,UP,LOWER_UP> mtu1500qdisc mq state UP mode DEFAULT groupdefaultqlen1000link/ether52:54:00:54:54:54brd ff:ff:ff:ff:ff:ff
Connect to VMs console, configure the IP address of the VF network interface and run traffic.
Install iperf, configure the IP address and run traffic between them on both VMs.[root
@VM-01]# yum -y install iperf3 … Resolving Dependencies --> Running transaction check ---> Package iperf3.x86_640:3.1.7-2.el7 will be installed … [root@VM-01]# ip addr add11.11.11.1dev ens12 [root@VM-02]# yum -y install iperf3 … Resolving Dependencies --> Running transaction check ---> Package iperf3.x86_640:3.1.7-2.el7 will be installed … [root@VM-02]# ip addr add11.11.11.2dev ens12 [root@VM-02]# ping11.11.11.164bytes from11.11.11.1: icmp_seq=1ttl=64time=0.046ms64bytes from11.11.11.1: icmp_seq=2ttl=64time=0.039ms [root@VM-02]# iperf3 -s -f m ----------------------------------------------------------- Server listening on5201-----------------------------------------------------------[root
@VM-01]# iperf3 -c11.11.11.2-P4-t600-i1
Perform the NVIDIA ASAP2 installation and configuration on both HV1 and HV2.
Download, build and install OpenvSwitch-2.12.0.
root
@HV1]# wget https://www.openvswitch.org/releases/openvswitch-2.15.0.tar.gz[root@HV1]# tar -xzf openvswitch-2.15.0.tar.gz [root@HV1]# cd openvswitch-2.15.0[root@HV1]# ./boot.sh [root@HV1]# ./configure [root@HV1]# make -j32; make install [root@HV1]# export PATH=$PATH:/usr/local/share/openvswitch/scriptsConfigure OVS with a single vSwitch "ovs-sriov" with hw-offload=true and tc-policy=verbose.
Create OVS "ovs-sriov" and set hw-offload=true and tc-policy=verbose
[root
@HV1]# export PATH=$PATH:/usr/local/share/openvswitch/scripts [root@HV1]# ovs-ctl start [root@HV1]# ovs-vsctl add-br ovs-sriov [root@HV1]# ovs-vsctl set Open_vSwitch . other_config:hw-offload=true[root@HV1]# ovs-vsctl set Open_vSwitch . other_config:tc-policy=verbose [root@HV1]# ovs-vsctl set Open_vSwitch . other_config:max-idle=100000[root@HV1]# ovs-ctl restart [root@HV1]# ovs-vsctl get Open_vSwitch . other_config {hw-offload="true", tc-policy=verbose}Enable SR-IOV and SWITCHDEV mode by executing "asap_config.sh" script for PF port 1.
[root
@HV1] cat asap_config.sh echo"Configure ASAP & VSWITCH OFFLOAD"devlink dev eswitch set pci/0000:${pci}.0mode switchdev ethtool -K $pf hw-tc-offload on ip link set dev $pf up # Number of Virtual Functions NUM_VFS=2# Mellanox NIC ID HCA=MT27800 pci=$(lspci |grep Mellanox|grep $HCA |head -n1|awk'{print $1}'| sed s/\.0\$//g)pf=$(ls -l /sys/class/net/| grep $pci|awk'{print $9}'| head -n1) echo"pci=$pci pf=$pf HCA=$HCA"sh -c"echo $NUM_VFS > /sys/class/net/${pf}/device/sriov_numvfs"lspci|grep Mell ls -l /sys/class/net/ ovs-vsctl show ovs-dpctl showCreate a sub-function on PF port 1 with the script "create_sf.sh".
[root
@HV1] cat create_sf.sh # Number of Sub-Functions NUM_SFS=2HCA=MT27800 pci=$(lspci |grep Mellanox|grep"$HCA"|head -n1|awk'{print $1}'| sed s/\.0\$//g)DEV=0000:$pci.0for((i=1; i<=$NUM_SFS; i++));do/opt/mellanox/iproute2/sbin/mlxdevm port add pci/0000:${pci}.0\ flavour pcisf pfnum0sfnum $i /opt/mellanox/iproute2/sbin/mlxdevm port function set en6s0f0pf0sf$i state active done [root@HV1] ./create_sf.sh [root@HV1] ip link …47: en6s0f0pf0sf0: <BROADCAST,MULTICAST,UP,LOWER_UP> mtu1500qdisc mq state UP mode DEFAULT groupdefaultqlen1000link/ether 7e:94:e9:79:48:0b brd ff:ff:ff:ff:ff:ff48: enp6s0f0s0: <BROADCAST,MULTICAST,UP,LOWER_UP> mtu1500qdisc mq state UP mode DEFAULT groupdefaultqlen1000link/ether36:76:c1:f9:3e:5d brd ff:ff:ff:ff:ff:ff49: en6s0f0pf0sf1: <BROADCAST,MULTICAST,UP,LOWER_UP> mtu1500qdisc mq state UP mode DEFAULT groupdefaultqlen1000link/ether96:03:d2:f1:27:f6 brd ff:ff:ff:ff:ff:ff50: enp6s0f0s1: <BROADCAST,MULTICAST,UP,LOWER_UP> mtu1500qdisc mq state UP mode DEFAULT groupdefaultqlen1000link/ether62:f0:68:a5:79:cb brd ff:ff:ff:ff:ff:ff NOTES: ====== There are2newSF netdevices (enp6s0f0s0, enp6s0f0s1) and their representors netdevices (en6s0f0pf0sf0, en6s0f0pf0sf1) createdRename the sub-function's netdevices.
Rename sub function's netdevices so that both source and destination systems can have same name. [root
@HV1] $ ip link set eth0 down $ ip link set eth0 name meth0 $ ip link set meth0 up $ ip link set eth1 down $ ip link set eth1 name meth1 $ ip link set meth1 up $ ip link set eth2 down $ ip link set eth2 name meth2 $ ip link set meth2 up $ ip link set eth3 down $ ip link set eth3 name meth3 $ ip link set meth3 up
Create bonding devices of VF and sub-function (SF) representors.
NOTES: ======= bond0 is bond device of sf1
's representor (primary slave) and vf0's representor bond1 is bond device of sf2's representor (primary slave) and vf1's representor [root@HV1]# ./bond_setup.sh bond0 en6s0f0pf0sf0 ens2_0 [root@HV1]# ./bond_setup.sh bond1 en6s0f0pf0sf1 ens2_1 [root@HV1]# cat ./bond_setup.sh BOND=$1# put here two SF/VF repsforwhich you want to share the block SFR1=$2VFR2=$3tc qdisc del dev $BOND ingress tc qdisc del dev $SFR1 ingress tc qdisc del dev $VFR2 ingress ip link set dev $SFR1 nomaster ip link set dev $VFR2 nomaster ip link del $BOND ip link add name $BOND type bond ip link set dev $SFR1 down ip link set dev $VFR2 down ip link set dev $BOND type bond mode active-backup ip link set dev $SFR1 master $BOND ip link set dev $VFR2 master $BOND # make SFR1 the primary -thisis paravirtual path echo $SFR1 > /sys/class/net/$BOND/bonding/primary ip link set dev $SFR1 up ip link set dev $VFR2 up ip link set dev $BOND upAdd Uplink "ens2" and bonding devices to "ovs-sriov" bridge.
[root
@HV1]# ovs-vsctl add-port ovs-sriov ens2 [root@HV1]# ovs-vsctl add-port ovs-sriov bond0 tag=100[root@HV1]# ovs-vsctl add-port ovs-sriov bond1 tag=100Modify the VM-01's xml file to have the default SF's macvtap-based virtio netdevice.
Edit VM-01 configuration with the same MAC address assigned to VF-1.
Make sure the alias name has the prefix "ua-".
Insert below configuration to VM-
01. [root@HV1]# virsh edit VM-01<interfacetype='direct'> <mac address='52:54:00:53:53:53'/> <source dev='enp6s0f0s0'mode='passthrough'/> <target dev='macvtap0'/> <model type='virtio'/> <teaming type='persistent'/> <alias name='ua-net0'/> <address type='pci'domain='0x0000'bus='0x05'slot='0x00'function='0x0'/> </interface>Edit VM-02 configuration with the same MAC address assigned to VF-2.
Make sure the alias name has the prefix "ua-".
Insert below configuration to VM-
01. [root@HV1]# virsh edit VM-02<interfacetype='direct'> <mac address='52:54:00:54:54:54'/> <source dev='enp6s0f0s1'mode='passthrough'/> <target dev='macvtap1'/> <model type='virtio'/> <alias name='ua-net1'/> <address type='pci'domain='0x0000'bus='0x06'slot='0x00'function='0x0'/> </interface>
Restart the VMs and verify that the PV path exists in both VMs and that it is accessible.
Each VM should have two extra netdevs, such as: eth0, eth1 where eth0 is master and eth1 is automatically enslaved to eth0.[root
@VM-01] ip link show1: lo: <LOOPBACK,UP,LOWER_UP> mtu65536qdisc noqueue state UNKNOWN mode DEFAULT qlen1000link/loopback00:00:00:00:00:00brd00:00:00:00:00:002: ens3: <BROADCAST,MULTICAST,UP,LOWER_UP> mtu1500qdisc pfifo_fast state UP mode DEFAULT qlen1000link/ether52:54:00:1c:91:0a brd ff:ff:ff:ff:ff:ff3: eth0: <BROADCAST,MULTICAST> mtu1500qdisc noop state DOWN mode DEFAULT qlen1000link/ether52:54:00:53:53:53brd ff:ff:ff:ff:ff:ff4: eth1: <BROADCAST,MULTICAST> mtu1500qdisc noop master eth0 state DOWN mode DEFAULT qlen1000link/ether52:54:00:53:53:53brd ff:ff:ff:ff:ff:ffConfigure the IP address and run iperf on VMs over SF PF path.
[root
@VM-01]# ip addr add11.11.11.1dev eth0 [root@VM-01]# iperf3 -s -f m[root
@VM-02]# ip addr add11.11.11.2dev eth0 [root@VM-02]# ping11.11.11.1[root@VM-02]# iperf3 -c11.11.11.1-P4-t600-i1Modify the XML file of the VFs to link to the persistent device of the SFs.
[root
@HV1]# cat VM-01-vf.xml <interfacetype='hostdev'managed='yes'> <mac address='52:54:00:53:53:53'/> <source> <address type='pci'domain='0x0000'bus='0x06'slot='0x00'function='0x1'/> </source> <teaming type='transient'persistent='ua-net0'/> <address type='pci'domain='0x0000'bus='0x00'slot='0x0c'function='0x0'/> </interface>[root
@HV2]# cat VM-02-vf.xml <interfacetype='hostdev'managed='yes'> <mac address='52:54:00:54:54:54'/> <source> <address type='pci'domain='0x0000'bus='0x06'slot='0x00'function='0x2'/> </source> <teaming type='transient'persistent='ua-net1'/> <address type='pci'domain='0x0000'bus='0x00'slot='0x0c'function='0x0'/> </interface>Attach VFs to VMs VM-01 and VM-02, and switch to the direct path in HyperVisors HV1 and HV2. I/O traffic should continue after the VFs have been successfully attached to the VMs.
[root
@HV1] virsh attach-device VM-01VM-01-vf.xml; echo ens2_0 > /sys/class/net/bond0/bonding/active_slave Device attached successfully [root@HV2] virsh attach-device VM-02VM-02-vf.xml; echo ens2_1 > /sys/class/net/bond1/bonding/active_slave Device attached successfullyEach VM should have one extra netdev from the attached VF that is automatically enslaved to eth0.
[root
@VM-01] ip link show1: lo: <LOOPBACK,UP,LOWER_UP> mtu65536qdisc noqueue state UNKNOWN mode DEFAULT qlen1000link/loopback00:00:00:00:00:00brd00:00:00:00:00:002: ens3: <BROADCAST,MULTICAST,UP,LOWER_UP> mtu1500qdisc pfifo_fast state UP mode DEFAULT qlen1000link/ether52:54:00:1c:91:0a brd ff:ff:ff:ff:ff:ff3: eth0: <BROADCAST,MULTICAST> mtu1500qdisc noop state DOWN mode DEFAULT qlen1000link/ether52:54:00:53:53:53brd ff:ff:ff:ff:ff:ff4: eth1: <BROADCAST,MULTICAST> mtu1500qdisc noop master eth0 state DOWN mode DEFAULT qlen1000link/ether52:54:00:53:53:53brd ff:ff:ff:ff:ff:ff5: ens12: <BROADCAST,MULTICAST> mtu1500qdisc noop master eth0 state DOWN mode DEFAULT qlen1000link/ether52:54:00:53:53:53brd ff:ff:ff:ff:ff:ff
Detach VF from VM, switch to SF PV path in HyperVisors HV1 and HV2. I/O traffic should pause 0.5s and then resume.
root
@HV1] virsh detach-device VM-01VM-01-vf.xml; echo en6s0f0pf0sf0 > /sys/class/net/bond0/bonding/active_slave Device detached successfullyPerform Live Migration on VM-01. iperf traffic should run as usual.
[root
@HV1] virsh migrate --live --unsafe --persistent --verbose VM-01qemu+ssh://HV2/systemAttach VF to VM again and switch to the direct path in HyperVisor. I/O traffic should run as usual.
[root
@HV2] virsh attach-device VM-01VM-01-vf.xml; echo ens2_0 > /sys/class/net/bond0/bonding/active_slave Device attached successfully