Network Management Interfaces
Simple Network Management Protocol (SNMP), is a network protocol for the management of a network and the monitoring of network devices and their functions. SNMP supports asynchronous event (trap) notifications and queries.NVIDIA Onyx supports:
SNMP versions v1, v2c and v3
SNMP trap notifications
Standard MIBs
Private MIBs
Standard MIBs
The following table presents the supported textual conventions and conformance MIBs:
MIB | Standard |
INET-ADDRESS-MIB | RFC-4001 |
SNMPV2-CONF | |
SNMPV2-TC | RFC 2579 |
SNMPV2-TM | RFC 3417 |
SNMP-USM-AES-MIB | RFC 3826 |
IANA-LANGUAGE-MIB | RFC 2591 |
IANA-RTPROTO-MIB | RFC 2932 |
IANAifType-MIB | |
IANA-ADDRESS-FAMILY-NUMBERS-MIB | |
IGMP-STD-MIB | RFC2933 (See IGMP-STD-MIB Information section) |
The following table presents the supported chassis and switch MIBs:
Private MIBs
MIB | Description |
MELLANOX-SMI-MIB | Private MIB main structure (no objects) |
MELLANOX-PRODUCTS-MIB | List of OID - per managed system (sysObjID) |
MELLANOX-IF-VPI-MIB | IfTable extensions |
MELLANOX-EFM-MIB | Partially deprecated MIB (based on Mellanox-MIB) Traps definitions and test trap set scalar are supported. |
MELLANOX-ENTITY-MIB | Enhances the standard ENTITY-MIB (contains GUID and ASIC revision). |
MELLANOX-POWER-CYCLE | Allows rebooting the switch system |
MELLANOX-SW-UPDATE-MIB | Allows viewing what SW images are installed, uploading and installing new SW images |
MELLANOX-CONFIG-DB | Allows loading, uploading, or deleting configuration files |
MELLANOX-ENTITY-STATE-MIB | Extension to support state change traps Note: Currently supported for power supply insertion and extraction only |
MELLANOX-XSTP-MIB | Extension to support STP information |
MELLANOX-DCB-TRAPS | Extension traps for ETC and PFC |
MELLANOX-QOS | Proprietary QoS MIBs |
MELLANOX-WJH-MIB | Defines what-just-happened traps |
Private MIBs can be downloaded from the support website.
Proprietary Traps
The following private traps are supported by the
NVIDIA Onyx
MELLANOX-EFM-MIB:
Trap | Action Required |
asicChipDown | Reboot the system. |
asicOverTempReset | Check fans and environmental temperature. |
asicOverTemp | Check fans and environmental temperature. |
lowPower | Add/connect power supplies. |
internalBusError | N/A |
procCrash | Generate SysDump and contact support. |
cpuUtilHigh | N/A |
procUnexpectedExit | Generate SysDump and contact support. |
diskSpaceLow | Clean images and sysDump files using the commands “image delete” and “file debug-dump delete”. |
systemHealthStatus | Refer to Health Status table. |
lowPowerRecover | N/A |
insufficientFans | Check Fans and environmental conditions. |
insufficientFansRecover | N/A |
insufficientPower | Add/connect power supplies, or change power mode using the command “power redundancy mode”. |
insufficientPowerRecover | N/A |
For additional information refer to MELLANOX-EFM-MIB.
For event-to-MIB mapping, please refer to “Supported Event Notifications and MIB Mapping”.
The only MELLANOX-POWER-CYCLE trap supported is mellanoxPowerCyclePlannedReload.
Configuring SNMP
Activate the SNMP server on your switch by running:
            switch (config) # snmp-server enable
switch (config) # snmp-server enable notify
switch (config) # snmp-server community public ro
switch (config) # snmp-server contact "contact name"
switch (config) # snmp-server host <host IP address> traps version 2c public
switch (config) # snmp-server location "location name"
switch (config) # snmp-server user admin v3 enable
switch (config) # snmp-server user admin v3 prompt auth md5 priv des
Community strings are case sensitive.
Resetting SNMPv3 Engine ID
Switch systems shipped with an OS versions older than 3.6.6102 have all had the exact same SNMPv3 engine ID. Going forward, however, all switch systems will ship with a system-specific engine ID.
Upgrading the OS version to 3.6.6102 or higher does not automatically change the current engine ID. That can be done through one of the following methods after performing the software upgrade:
Changing a switch system’s profile
Running “reset factory”
Using the command “snmp-server engineID reset” (for more details, please see the procedure below)
To reset SNMP engine ID using “snmp-server engineID reset”:
Prerequisites:
If any of the following SNMP configurations exist, please delete/disable them and re-enable/reconfigure them only after SNMP engine ID reset is performed:
Make sure SNMP is disabled. Run:
switch(config) # no snmp-server enableMake sure no SNMP trap host is configured. Run:
switch(config) # no snmp-server host <ip-address>Make sure no SNMP users are configured. Run:
switch(config) # no snmp-server user <username> v3
Procedure:
Check existing engine ID:
switch(config) # show snmp engineID Local SNMP engineID: <current_key>Reset existing engine ID:
switch(config) # snmp-server engineID resetVerify new engine ID:
switch(config) # show snmp engineID Local SNMP engineID: <new_key>
Configuring an SNMPv3 User
To configure an SNMPv3 user:
Configure the user using the command:
switch(config) # snmp-server user [role] v3 prompt auth <hash type> priv <privacy type>Where:
• user role—admin
• auth type—md5 or sha or sha224 or sha256 or sha384 or sha512
• priv type—des or aes-128 or 3des or aes-192 or aes-256 or aes-192-cfb or aes-256-cfbEnter authentication password and its confirmation.
Enter privacy password and its confirmation:
switch(config) # snmp-server user admin v3 prompt auth md5 priv des Auth password: ******** Confirm: ******** Privacy password: ******** Confirm: ********To retrieve the system table, run the following SNMP command:
snmpwalk -v3 -l authPriv -a MD5 -u admin -A “<Authentication password>” -x DES -X “<privacy password>” <system ip> SNMPv2-MIB::system
Configuring SNMP Notifications (Traps or Informs)
Make sure SNMP and SNMP notification are enable. Run:
switch(config) # snmp-server enableswitch(config) # snmp-server enable notifyConfigure SNMP host with the desired arguments (IP Address, SNMP version, authentication methods). More than one host can be configured. Each host may have different attributes. Run:
switch(config) # snmp-server host10.134.47.3traps version3user my-username auth sha my-passwordVerify the SNMP host configuration. Run:
switch(config) # show snmp host Notifications enabled: yes Default notification community:publicDefault notification port:162Notification sinks:10.134.47.3Enabled: yes Port:162(default) Notification type: SNMP v3 trap Username: my-username Authentication type: sha Privacy type: aes-128Authentication password: (set) Privacy password: (set)Configure the desired event to be sent via SNMP. Run:
switch(config) # snmp-server notify eventinterface-upWarningThis particular event is used as an example only.
Verify the list of traps and informs being sent to out of the system. Run:
switch(config) # show snmp events Eventsforwhich traps will be sent: asic-chip-down: ASIC (Chip) Down cpu-util-high: CPU utilization has risen too high disk-space-low: Filesystem free space has fallen too low health-module-status: Health module Status insufficient-fans: Insufficient amount of fans in system insufficient-fans-recover: Insufficient amount of fans in system recovered insufficient-power: Insufficient power supplyinterface-down: Aninterface's link state has changed to downinterface-up: Aninterface's link state has changed to up internal-bus-error: Internal bus (I2C) Error liveness-failure: A process in the system was detected as hung low-power: Low power supply low-power-recover: Low power supply Recover new_root: local bridge became a root bridge paging-high: Paging activity has risen too high power-redundancy-mismatch: Power redundancy mismatch process-crash: A process in the system has crashed process-exit: A process in the system unexpectedly exited snmp-authtrap: An SNMP v3 request has failed authentication topology_change: local bridge triggered a topology change unexpected-shutdown: Unexpected system shutdown
To print event notifications to the terminal (SSH or CONSOLE) refer to “Monitor”.
For the SNMPv1 traps or informs, by default, the "agent address" field is set to the IP address of the "mgmt0" interface. In the case that "source interface" is configured to the same VRF which is used for SNMPv1 traps or informs, the IP address of the source interface is used for "agent address" field. In other cases (e.g., if source interface might be configured in some other VRF), "127.0.0.1" is used for the "agent address".
SNMP SET Operations
The OS allows the user to use SET operations via SNMP interface. This is needed to configure a user/community supporting SET operations.
Enabling SNMP SET
To allow SNMP SET operations using SNMPv1/v2:
Enable SNMP communities. Run:
switch(config) # snmp-server enable communitiesConfigure a read-write community. Run:
switch(config) # snmp-server community my-community-name rwMake sure SNMP communities are enabled (they are enabled by default). Make sure “(DISABLED)” does not appear beside “Read-only communities” / “Read-write communities”. Run:
switch(config) # show snmp SNMP enabled : yes SNMP port :161System contact : System location: Read-only communities:publicRead-write communities: my-community-name Interface listen enabled: yes Listen Interfaces: Interface: mgmt0switch(config) # show snmp No Listen Interfaces.Configure this RW community in your MIB browser.
To allow SNMP SET operations using SNMPv3:
Create an SNMPv3 user. Run:
switch(config) # snmp-server user myuser v3 auth sha <password1> priv aes-128<password2>WarningIt is possible to use other configuration options not specified in the example above. Please refer to the command “snmp-server user” for more information.
Make sure the username is enabled for SET access and has admin capability level. Run:
switch(config) # show snmp user User name: myuser Enabled overall: yes Authentication type: sha Privacy type: aes-128Authentication password: (set) Privacy password: (set) Require privacy: yes SET access: Enabled: yes Capability level: admin
The OS supports the OIDs for SET operation listed in the following table which are expanded upon in the following subsections.
OID Name | OID | |
MELLANOX-EFM-MIB | sendTestTrapSet | 1.3.6.1.4.1.33049.2.1.1.1.6.0 |
SNMPv2-MIB | sysName | 1.3.6.1.2.1.1.5.0 |
MELLANOX-CONFIG-DB | mellanoxConfigDBCmdExecute mellanoxConfigDBCmdFilename mellanoxConfigDBCmdStatus mellanoxConfigDBCmdStatusString mellanoxConfigDBCmdUri | 1.3.6.1.4.1.33049.12.1.1.2.3.0 1.3.6.1.4.1.33049.12.1.1.2.2.0 1.3.6.1.4.1.33049.12.1.1.2.4.0 1.3.6.1.4.1.33049.12.1.1.2.5.0 1.3.6.1.4.1.33049.12.1.1.2.1.0 |
MELLANOX-POWER-CYCLE | mellanoxPowerCycleCmdExecute mellanoxPowerCycleCmdStatus mellanoxPowerCycleCmdStatusString | 1.3.6.1.4.1.33049.10.1.1.2.1.0 1.3.6.1.4.1.33049.10.1.1.2.2.0 1.3.6.1.4.1.33049.10.1.1.2.3.0 |
MELLANOX-SW-UPDATE | mellanoxSWUpdateCmdSetNext mellanoxSWUpdateCmdUri mellanoxSWUpdateCmdExecute mellanoxSWUpdateCmdStatus mellanoxSWUpdateCmdStatusString mellanoxSWActivePartition mellanoxSWNextBootPartition | 1.3.6.1.4.1.33049.11.1.1.2.1.0 1.3.6.1.4.1.33049.11.1.1.2.2.0 1.3.6.1.4.1.33049.11.1.1.2.3.0 1.3.6.1.4.1.33049.11.1.1.2.4.0 1.3.6.1.4.1.33049.11.1.1.2.5.0 1.3.6.1.4.1.33049.11.1.1.3.0.0 1.3.6.1.4.1.33049.11.1.1.4.0.0 |
Sending a Test Trap SET Request
The OS allows the user to use test the notification mechanism via SNMP SET. Sending a SET request with the designated OID triggers a test trap.
Prerequisites:
Enable SET operations by following the instructions in “Enabling SNMP SET”.
Configure host to which to send SNMP notifications.
Set a trap receiver in the MIB browser.
Procedure:
Send a SET request to the switch IP with the OID 1.3.6.1.4.1.33049.2.1.1.1.6.0.
Make sure the test trap is received by the aforementioned trap receiver (OID: 1.3.6.1.4.1.33049.2.1.2.13).
Setting Hostname with SNMP
The OS supports setting system hostname using an SNMP SET request as described in SNMPv2-MIB (sysName, OID: 1.3.6.1.2.1.1.5.0).
The restrictions on setting a hostname via CLI also apply to setting a hostname through SNMP. Refer to the command “hostname” for more information.
Power Cycle with SNMP
The OS supports power cycling its systems using an SNMP SET request as described in MELLANOX-POWER-CYCLE MIB.
Power cycle command is issued via the OID mellanoxPowerCycleCmdExecute. The following options are available:
Reload—saves any unsaved configuration and reloads the switch
Reload discard—reboots the system and discards of any unsaved changes
Reload force—forces an expedited reload on the system even if it is busy without saving unsaved configuration (equals the CLI command reload force)
Changing Configuration with SNMP
The OS supports making configuration changes on its systems using SNMP SET requests. Configuration requests are performed by setting several values (arguments) and then executing a command by setting the value for the relevant operation.
It is possible to set the parameters and execute the commands on the same SNMP request or separate them to several SET operations. Upon executing a command, the values of its arguments remain and can be read using GET commands.
Once a command is executed there may be two types of errors:
Immediate: This error results in a failure of the SNMP request. This means a critical error in the SNMP request has occurred or that a previous SET request is being executed
Delayed: The SET request has been accepted by the switch but an error occurred during its execution.
For example, when performing a fetch (download) operation, an immediate error can occur when the given URL is invalid. A delayed error can occur if the download process fails due to network connectivity issues.
The following parameters are arguments are supported:
Command URI—URI to fetch the configuration file from or upload the file to (for supported URI format please refer to the CLI command “configuration fetch” for more details)
Config file name—filename to save the configuration file to or to upload to remote location
The following commands are supported:
BinarySwitchTo—replaces the configuration file with a new binary configuration file. This option fetches the configuration file from the URI provided in the mellanoxConfigDBCmdUri and switches to that configuration file. This command should be preceded by a reload command in order for the new configuration to apply.
TextApply—fetches a configuration file in human-readable format and applies its configuration upon the current configuration.
BinaryUpload—uploads a binary format configuration file of the current running configuration or an existing configuration file on the switch to the URI in the mellanoxConfigDBCmdUri command. The filename parameter indicates what configuration file on the switch to upload.
TextUpload—uploads a human-readable configuration file of the current running configuration of an existing configuration file on the switch to the URI in the mellanoxConfigDBCmdUri command. The filename parameter indicates what configuration file on the switch to upload (same as the CLI command configuration text generate file <filename> upload).
ConfigWrite—saves active configuration to a filename on the switch as given in the filename parameter. In case filename is “active”, active configuration is saved to the current saved configuration (same as the CLI command configuration write).
BinaryDelete—deletes a binary based configuration file
TextDelete—deletes a text based configuration file
Upgrading OS Software with SNMP
The OS supports upgrading its software using an SNMP SET request as described in MELLANOX-SW-UPDATE MIB.
The software upgrade command is issued via the OID mellanoxSWUpdateCmdExecute. The following options are available:
Update—fetches the image from a specified URI (equivalent to the command “image fetch” followed by “image install”)
The image to update from is defined by the OID mellanoxSWUpdateCmdUri. The restrictions on the URI are identical to what is supported in the CLI command “image fetch”.Set-Next—changes the image for the next boot equivalent to the CLI command “image boot”)
The partition from which to boot is defined by the OID mellanoxSWUpdateCmdSetNext. The parameters for this OID are as follows:0—no change
1—partition 1
2—partition 2
3—next partition (default)
Using the OIDs mellanoxSWUpdateCmdStatus and mellanoxSWUpdateCmdStatusString, you may view the status of the latest operation performed from the aforementioned in either integer values, or human-readable forms, respectively. The integer values presented may be as follows:
0—no operation
1-100—progress in percentage
101—success
200—failure
IF-MIB and Interface Information
The OS supports displaying information of switch ports, LAG ports, MLAG ports and VLAN interfaces on all systems via SNMP interface. This feature is enabled by default. The interface information is available in the ifTables, ifXTable and mellanoxIfVPITable.
Additionally, traps for interface up/down, and internal link suboptimal speed are enabled. It is possible to enable one or both of these traps.
Interface up/down traps are sent whenever there is a change in the interface’s operational state. These traps are suppressed for internal links when the internal link’s speed does not match the configured speed of the link (mismatch condition).
IGMP-STD-MIB Information
The system exposes IGMP snooping information via the IGMP-STD-MIB. This MIB displays IGMP snooping information only and shows a minimal view. Below are tables that represent mapping IGMP snooping information into RFC2933 MIB tables. Both tables are read-only.
igmpInterfaceTable mapping information:
Column | Mapped IGMP Snooping Information |
igmpInterfaceIfIndex | VLAN interfaces indices on which snooping is enabled. This table displays VLAN interfaces only. For those VLANs that have no VLAN L3 interfaces, this table shows VLAN L2 indices. |
igmpInterfaceStatus | Always Active. |
igmpInterfaceQueryInterval | The IGMP snooping “query interval” field for this particular VLAN. |
igmpInterfaceVersion | The IGMP snooping “version” field for this particular VLAN. |
igmpInterfaceQuerier | The IGMP snooping "elected querier" field for this particular VLAN. |
igmpInterfaceRobustness | The IGMP snooping "Robustness" field for this particular VLAN. |
igmpInterfaceQueryMaxResponseTime | The IGMP snooping "Response interval" field for this particular VLAN. |
igmpInterfaceEntry | N/A. Always zero. |
igmpInterfaceQuerierExpiryTime | N/A. Always zero. |
igmpInterfaceVersion1QuerierTimer | N/A. Always zero. |
igmpInterfaceWrongVersionQueries | N/A. Always zero. |
igmpInterfaceJoins | N/A. Always zero. |
igmpInterfaceProxyIfIndex | N/A. Always zero. |
igmpInterfaceGroups | IGMP snooping groups count. |
igmpInterfaceLastMembQueryIntvl | N/A. Always zero. |
igmpCacheTable mapping information:
Column | Mapped IGMP Snooping Information |
igmpCacheAddress | Multicast group addresses registered in IGMP snooping module. |
igmpCacheIfIndex | VLAN interfaces indices (L3 and L2) and regular interface indices on which this particular multicast group is registered. |
igmpCacheSelf | N/A. Always “false”. |
igmpCacheLastReporter | N/A. Always “0.0.0.0”. |
igmpCacheUpTime | N/A. Always zero. |
igmpCacheExpiryTime | N/A. Always zero. |
igmpCacheStatus | Always Active. |
igmpCacheVersion1HostTimer | N/A. Always zero. |
Additional Readings and Use Cases
For more information about this feature and its potential applications, please refer to the following community posts:
JavaScript Object Notation (JSON) is a machine-to-machine data-interchange format which is supported in NVIDIA Onyx CLI.
The JSON API allows executing CLI commands and receiving outputs in JSON format which can be easily parsed by the calling software.
Authentication
The JSON API protocol runs over HTTP/HTTPS and uses the existing web authentication mechanism.
In order to access the system via HTTP/HTTPS, an HTTP/HTTPS client is needed to send POST requests to the system.
HTTPS access to the web-based management console needs to be enabled using the command “web https enable” to allow POST requests.
The HTTPS client must first be authenticated by sending a POST request to the following URL:
https://<ip-address>/admin/launch?script=rh&template=json-request&action=json-login
The POST request content should contain the following data (may also be saved as a file) in a JSON format:
            {
 "username": "<user name>",
 "password": "<user password>"
}
After a successful login, a session ID (cookie) is returned to be used for other HTTPS requests in the system.
Authentication Example
Before sending JSON HTTPS request, the user must first authenticate.
Create a JSON format file that contains the relevant login credentials. For example, add this content to a file called "post.json":
            {
 "username": "admin",
 "password": "admin"
}
Run the following from your server’s shell to create a login session ID in the file: cookiejar.
curl -L -X POST -d @post.json -c cookiejar "http://<ip-address>/admin/launch?script=rh&template=json-request&action=json-login"
Upon a successful login, you will receive a reply similar to the following:
            {
 "status": "OK",
 "status_message": "Successfully logged-in"
}
The session ID can now be used in all other JSON HTTPS requests to the system.
If authentication fails, the following message is received:
            {
 "status": "ERROR",
 "status_message": "<Invalid username or password | Please provide username and password>"
}
You may also log in and execute commands in the same JSON request. In this case, the JSON file must be in the following format:
            {
 "username": "<user name>",
 "password": "<user password>",
 "commands | cmd": ["<cli command 1>", "<cli command 2>"] | "<cli command>",
 "execution_type": "sync | async"
}
For example:
            {
 "username": "admin",
 "password": "admin",
 "cmd":  "show fan"
}
If login is successful, the JSON API response appears. Otherwise, login failure response is presented.
Changing Initial Password Through JSON API
This section provides support for changing the default password through JSON API.
Expected Input
To change the initial password, the payload will be as follows:
{
"username":"admin","password":"admin","initial_admin_password":"admin","initial_monitor_password":"monitor"}
Expected Outputs
Admin and Monitor passwords cannot be changed because they have already been changed:
{
"status":"ERROR","status_message":" ‘admin’ password was already set & ‘monitor’ password was already set"}Admin and Monitor passwords were changed successfully:
{
"status_message":" <‘admin’ password was updated successfully> & <‘monitor’ password was updated successfully> "}Admin and Monitor passwords were not updated:
{
"status":"OK","status_message":"’admin’ password was updated successfully & ‘monitor’ password was updated successfully"}One of the passwords of either Admin or Monitor was changed, while the other remained the same:
{
"status":"<ERROR|OK>","status_message":" < Initial password for the ‘admin’ password was already set | ‘admin’ password was updated successfully> "}When the payload does not have initial passwords, check change-password nodes to see if there is no updated password return in this JSON payload:
{
"status":"ERROR","status_message": “Please set thedefaultpasswordfor‘admin’ account by using initial password parameters” }
When there is no issue with the login, flow will proceed without needing this step.
JSON API Logout
To logout, do the following:
Performs a POST operation on URL (the request should contain the session cookie):
[switch_ip]/script=rh&template=json-request&action=json-logout
The switch will remove the session and return the following JSON in the response text (in case of error, content will be relevant to the error):
{
"status":"OK","status_message":"Successfully logged-out"}Make sure there is no cookie. A request with an invalid cookie will respond that the cookie is invalid.
Logout Example
To logout, use the “curl” tool.
curl -b cookiejar "http://[switch-ip]/admin/launch?script=rh&template=json-request&action=json-logout
Sending the Request
After successful authentication, the HTTPS client can start sending JSON requests. All requests (POST and GET) should be sent to the following URL:
After the request is handled in the system the HTTPS client receives a JSON response with an indication of the request execution result. If there is data resulting from the request, it is returned as part of the response.
See “JSON Request Format” for the CLI request format.
See “JSON Response Format” for the reply format.JSON requests may also be sent using the WebUI. For more information on using the WebUI with JSON, please refer to “JSON Request Using WebUI”.
JSON Request Format
JSON Execution Requests
JSON execution requests are HTTPS POST requests that contain CLI commands to be executed in the system.
Execution request can contain a single command or multiple commands to be executed.
Single command execution request format:
            {
     "cmd": "<CLI command to execute>"
}
Example:
            {
     "cmd": "show interfaces ethernet 1/1"
}
Multiple command execution request format:
            {
     "commands":["<CLI cmd 1>", "<CLI cmd 2>", … , <CLI cmd n>]
}
Example:
            {
     "commands":
     [
           "show interfaces ethernet 1/1",
           "show interfaces ethernet 1/2"
     ]
}
In case of a multiple command request, the execution of the commands is done in the order they appear in the execution list. Note that the execution of a multiple command request will be stopped upon first failure. That is, in case the execution of one of the commands fails, none of the remaining commands will be executed.
Execution Types
Execution requests can be either synchronous (default) or asynchronous.
Synchronous requests will wait for a JSON response from the system. The synchronous request has a defined wait time after which the user will receive a timeout response. The timeout for a synchronous request is configurable by the user and is 30 seconds by default (see the CLI command “json-gw synchronous-request-timeout”).
Asynchronous requests will return immediately after sending the request with a reply containing a “job_id” key. The user can use the given job ID to later query for request status and execution results. Queries for asynchronous request results are guaranteed to be accessible up to 60 seconds after the request has been completed. After the result has been successfully queried it will be deleted and will no longer be accessible (even if the result is not 60 seconds old).
To specify the execution type, the user needs to add the following key to the JSON execution request:
"execution_type":"<async|sync>"
Example:
            {
     "execution_type":"async",
     "cmd": "show interfaces ethernet 1/1"
}
JSON Query Requests
JSON Query requests are HTTPS GET requests that contain a job ID parameter. Using a query request, the user can get information on the current execution state of an ongoing request or the execution results of a completed request. To send a query request, the user should add the following parameters to the JSON URL:
job_id=<job number>
Example:
https://<switch-ip-address>/admin/launch?script=json&job_id=<job number>
See “JSON Examples” for more examples.
JSON Response Format
Set commands normally do not return any data or output. If a set command does return an output, it will be displayed in the “status_message” field.
Single Command Response Format
The HTTPS POST response format structure is a JSON object consisting of 4 name-value pairs as follows:
            {
    "executed_command": "<CLI command that was executed>",
    "status" = "<OK|ERROR>",
    "status_message" = "<information on the status received>",
    "data" = {the information that was asked for in the request}
}
executed_command—the CLI command that was executed in the request
status—the result of the request execution:
“OK” if the execution is successful
“ERROR” in case of a problem with the execution
The value type of this key is “string”.
data—a JSON object containing the information requested. Returns an empty string if there is no data.
status message—additional information on the received status. May be empty. The value type of this key is “string”.
Example:
            {
    “executed_command”: “show interfaces ethernet 1/1
    "status": "OK",
    "status_message": "",
    "data":
    {
        "speed": "40GbE",
        "admin_state": "up"
    }
}
See “JSON Examples” for more examples.
Multiple Command Response Format
The HTTPS response format structure is a JSON object consisting of a list of JSON results. Each JSON structure in the list is structured the same as in the single command execution response (see the previous section).
However, the status field can contain in this case an additional value, “ABORTED”, in case a previous command failed. This status value indicates that the command has not been executed at all in the system.
            {
    "results": [
    {
        "executed_command": "<…>",
        "status": "<OK|ERROR|ABORTED>",
        "status_message": "<…>",
        "data": {…}
     },
     {
        "executed_command": "<…>",
        "status": "<OK|ERROR|ABORTED>",
        "status_message": "<…>",
        "data": {…}
      },
…
      {
        "executed_command": "<…>",
        "status": "<OK|ERROR|ABORTED>",
        "status_message": "<…>",
        "data": {…}
       }
              ]
}
Example:
            {
    "results": [
    {
        "executed_command": "show interfaces ethernet 1/1",
        "status": "OK",
        "status_message": ""
        "data": {"speed":"40GbE", "admin_state":"up"}
    },
    {
        "executed_command": "show interfaces ethernet 1/100",
        "status": "ERROR",
        "status_message": "wrong interfaces name",
        "data": ""
    },
    {
        "executed_command": "show interfaces ethernet 1/2",
        "status": "ABORTED",
        "status_message": "",
        "data": ""
    }
              ]
}
See “JSON Examples” for more examples.
Query Response Format
Response to a query request can be of two types. In case the request completes its execution, the response will be similar to the single/multiple command response format, depending on the format of the request, and will display the execution results.
In case the execution is not complete yet, the response format will be similar to the single command response format. However, the status field will contain in this case the value “PENDING” to indicate that the request is still in progress. In addition, the “executed_command” field will contain the current request command being handled by the system.
Example:
            {
    "executed_command": "show interfaces ethernet 1/1",
    "status": "PENDING",
    "status_message": "",
    "data":""
}
Asynchronous Response Format
Response to an asynchronous request is similar to the HTTPS response format of the single command response. However, an additional unique field will be added, “job_id”, containing the job id number for querying the request later. The value of the job_id key is of type string.
Another difference is that the “executed_command” field will be empty.
Example:
            {
    "executed_command": ""
    "status": "OK"
    "status_message": ""
    "data": ""
    "job_id": "2754930426"
}
Supported Commands
Show commands
Set commands— all non-interactive CLI set commands are supported
WarningInteractive commands are commands which require user interaction to complete (e.g. type “yes” to confirm). These commands are not supported by the JSON API.
JSON Examples
The following examples use curl (a common tool in Linux systems) to send HTTPS POST requests to the system.
Synchronous Execution Request Example
Single Command
This example sends a request to query the system profile.
Request (save it to a file named req.json):
{"cmd": "show system profile"}
Send the request:
curl -b /tmp/cookie -X POST -d @req.json "https://10.10.10.10/admin/launch?script=json"
When the system finishes processing the request, the user will receive a response similar to the following:
            {
    "status": "OK",
    "executed_command": "show system profile",
    "status_message": "",
    "data": {
        "Profile": "eth",
        "Adaptive Routing": "yes",
        "Number of SWIDs": "1"
    }
}
Multiple Commands
This example sends a request to change an interface description and then queries for its status.
Request (save it to a file named req.json):
            {"commands": ["interfaces ethernet 1/1 description test description",
"show interfaces ethernet 1/1 status"]}
Send the request:
curl -b /tmp/cookie -X POST -d @req.json "https://10.10.10.10/admin/launch?script=json"
When the system finishes processing the request, the user will receive a response similar to the following:
            {
    "results": [
        {
            "status": "OK",
            "executed_command": "interfaces ethernet 1/1 description test description",
            "status_message": "",
            "data": ""
        },
        {
            "status": "OK",
            "executed_command": "show interfaces ethernet 1/1 status",
            "status_message": "",
            "data": {
                "ETH1/1": [
                    {
                        "Negotiation": "Auto",
                        "Operational state" : "Down"
                        "Speed": "Unknown",
                    }
                ]
            }
        }
    ]
}
Asynchronous Execution Request Example
This example sends an asynchronous request to change an interface description and then queries for its status.
Request (save it to a file named req.json):
            {"execution_type":"async",
"commands": ["interfaces ethernet 1/1 description test description",
"show interfaces ethernet 1/1 status"]}
Send the request:
curl -b /tmp/cookie -X POST -d @req.json "https://10.10.10.10/admin/launch?script=json"
The system immediately returns a response similar to the following:
            {
        "executed_command": "",
        "status": "OK",
        "status_message": "",
        "data": "",
        "job_id": "91329386"
}
Query Request Example
This example sends a request to query for a job ID received from a previous execution request.
The request is a an HTTPS GET operation to the JSON URL with the “job_id” parameter.
Send the request:
curl -b /tmp/cookie -X GET "https://10.10.10.10/admin/launch?script=json&job_id=91329386"
If the system is still processing the request, the user receives a response similar to the following:
            {
        "executed_command": " interfaces ethernet 1/1 description test description ",
        "status": "PENDING",
        "status_message": "",
        "data": ""
}
If the system is done processing the request, the user receives a response similar to the following:
            {
    "results": [
        {
            "status": "OK",
            "executed_command": "interfaces ethernet 1/1 description test description",
            "status_message": "",
            "data": ""
        },
        {
            "status": "OK",
            "executed_command": "show interfaces ethernet 1/1 status",
            "status_message": "",
            "data": {
                "ETH1/1": [
                    {
                        "Negotiation": "Auto",
                        "Operational state" : "Down"
                        "Speed": "Unknown",
                    }
                ]
            }
        }
    ]
}
Error Response Example
General Error
This example sends a request with an illegal JSON structure.
Request—without closing bracket “]” (save it to a file named req.json):
            {"commands": ["interfaces ethernet 1/1 description test description",
"show interfaces ethernet 1/1 status"}
Send the request:
curl -b /tmp/cookie -X POST -d @req.json "https://10.10.10.10/admin/launch?script=json"
Error response:
            {
    "status": "ERROR",
    "executed_command": "",
    "status_message": "Handle request failed. Reason:\nIllegal JSON structure found in given JSON data.\nExpecting , delimiter: line 1 column 95 (char 94)",
    "data": ""
}
Multiple Command Request Failure
This example sends a multiple command request where one command fails.
Request—with a non-existing interface (1/200) (save it to a file named req.json):
            {
        "execution_type": "sync",
        "commands": [   "interfaces ethernet 1/1 speed 25.0 Gbps",
                        "interfaces ethernet 1/200 speed 25.0 Gbps",
                        "interfaces ethernet 1/3 speed 25.0 Gbps"]
}
Send the request:
curl -b /tmp/cookie -X POST -d @req.json "https://10.10.10.10/admin/launch?script=json"
Error response:
            {
    "results": [
        {
            "status": "OK",
            "executed_command": "interfaces ethernet 1/1 speed 25.0 Gbps ",
            "status_message": "",
            "data": ""
        },
        {
            "status": "ERROR",
            "executed_command": "interfaces ethernet 1/200 speed 25.0 Gbps",
            "status_message": "% 1st Interface does not exist",
            "data": ""
        },
        {
            "status": "ABORTED",
            "executed_command": "interfaces ethernet 1/3 speed 25.0 Gbps",
            "status_message": "",
            "data": ""
        }
    ]
}
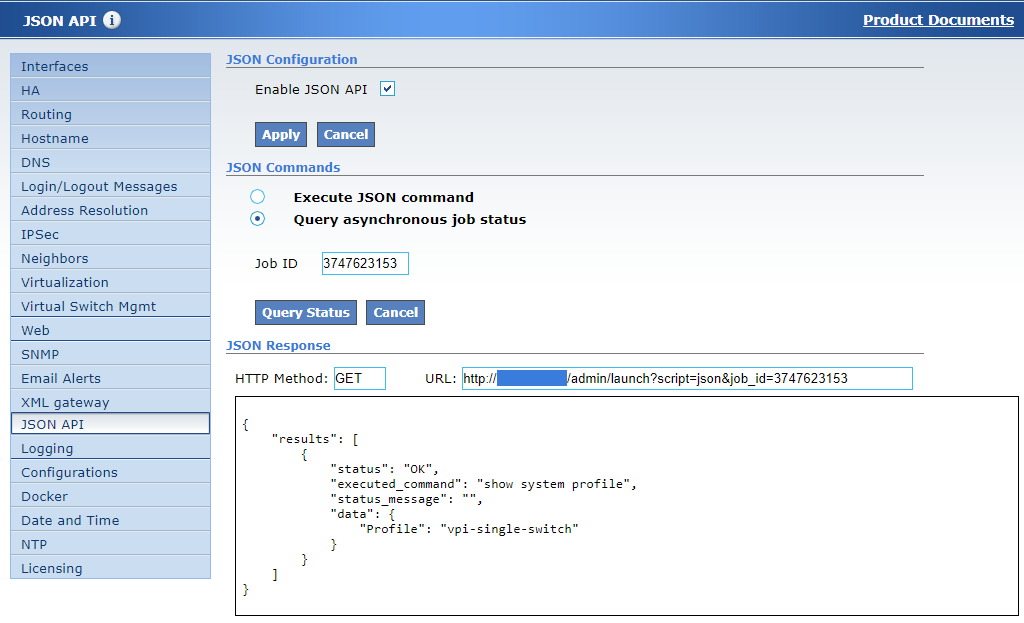
JSON Request Using WebUI
The
NVIDIA Onyx
WebUI also allows users to send JSON HTTPS POST and GET requests.
Log into the WebUI, go to the “Setup” tab, and select “JSON API” from the left side menu.
This section is displayed only if JSON API is enabled using the command “json-gw enable”.
To Execute a JSON Request
Choose “Execute JSON command”.
Choose the “execution_type” from the drop down list.
In the “commands” field, type the CLI command(s) to execute.
Use the “+” and “-” buttons to add or remove additional commands to the request.Click “Submit”.
The JSON response is then shown in the “JSON Response” box below.
The HTTPS method (HTTPS POST in this instance) and the URL used to send the request will be displayed next to the “HTTPS Method” and “URL” field respectively.

To Query an Asynchronous JSON Request
Choose “Query asynchronous job status”.
Type the job ID in the “Job ID” text box.
Press “Query Status”.
The JSON response is then shown in the “JSON Response” box below.
The HTTPS method (HTTPS GET in this instance) and the URL used to send the request will be displayed next to the “HTTPS Method” and “URL” field respectively.
Additional Reading and Use Cases
For more information about this feature and its potential applications, please refer to the following community post: