Additional Configuration (Optional)
Configure general settings in the conf/gv.cfg file.
When running UFM in HA mode, the gv.cfg file is replicated to the standby server.
Enabling SHARP Aggregation Manager
SHARP Aggregation Manager is disabled by default. To enable it, set:
            [Sharp]
sharp_enabled = true
Upon startup of UFM or SHARP Aggregation Manager, UFM will resend all existing tenant allocations to SHARP AM.
Running UFM in Monitoring Mode
monitoring_mode = yes
For more information, see Running the UFM Software in Monitoring Mode.
Enabling Predefined Groups
enable_predefined_groups = true
By default, pre-defined groups are enabled. In very large-scale fabrics, pre-defined groups can be disabled in order to allow faster startup of UFM.
Enabling Multi-NIC Host Grouping
multinic_host_enabled = true
Upon first installation of UFM 6.4.1 and above, multi-NIC host grouping is enabled by default. However, if a user is upgrading from an older version, then this feature will be disabled for them.
It is recommended to set the value of this parameter before running UFM for the first time.
Running UFM SM Only (UFM HA with Additional SMs)
management_mode = sm_only
For more information, see "Configuring UFM-SDN Appliance with External UFM-SMs".
Running UFM Over IPv6 Network Protocol
The default multicast address is configured to an IPv4 address. To run over IPv6, this must be changed to the following in section UFMAgent of gv.cfg.
            [UFMAgent]
...
# if ufmagent works in ipv6 please set this multicast address to FF05:0:0:0:0:0:0:15F
mcast_addr = FF05:0:0:0:0:0:0:15F
Adding SM Plugin (e.g. lossymgr) to event_plugin_name Option
            # Event plugin name(s)
event_plugin_name osmufmpi lossymgr
Add the plug-in options file to the event_plugin_options option:
            # Options string that would be passed to the plugin(s)
event_plugin_options --lossy_mgr -f <lossy-mgr-options-file-name>
These plug-in parameters are copied to the opensm.conf file in Management mode only.
Multi-port SM
SM can use up to eight-port interfaces for fabric configuration. These interfaces can be provided via /opt/ufm/conf/gv.cfg. The users can specify multiple IPoIB interfaces or bond interfaces in /opt/ufm/conf/gv.cfg, subsequently, the UFM translates them to GUIDs and adds them to the SM configuration file (/opt/ufm/conf/opensm/opensm.conf). If users specify more than eight interfaces, the extra interfaces are ignored.
            [Server]

# disabled (default) | enabled (configure opensm with multiple GUIDs) | ha_enabled (configure multiport SM with high availability)
 multi_port_sm = disabled
 # When enabling multi_port_sm, specify here the additional fabric interfaces for OpenSM conf
 # Example: ib1,ib2,ib5 (OpenSM will support the first 8 GUIDs where first GUID will
 # be extracted the fabric_interface, and remaining GUIDs from additional_fabric_interfaces
 additional_fabric_interfaces =
UFM treats bonds as a group of IPoIB interfaces. So, for example, if bond0 consists of the interfaces ib4 and ib8, then expect to see GUIDs for ib4 and ib8 in opensm.conf.
Duplicate interface names are ignored (e.g. ib1,ib1,ib1,ib2,ib1 = ib1,ib2).
Configuring UDP Buffer
This section is relevant only in cases where telemetry_provider=ibpm. (By default, telemetry_provider=telemetry).
To work with large-scale fabrics, users should set the set_udp_buffer flag under the [IBPM] section to "yes" for the UFM to set the buffer size (default is "no").
            # By deafult, UFM does not set the UDP buffer size. For large scale fabrics
# it is recommended to increase the buffer size to 4MB (4194304 bits).
set_udp_buffer = yes
# UDP buffer size
udp_buffer_size = 4194304
Virtualization
This allows for supporting virtual ports in UFM.
            [Virtualization]
# By enabling this flag, UFM will discover all the virtual ports assigned for all hypervisors in the fabric
enable = false
# Interval for checking whether any virtual ports were changed in the fabric
interval = 60
Static SM LID
Users may configure a specific value for the SM LID so that the UFM SM uses it upon UFM startup.
            [SubnetManager]
# 1- Zero value (Default): Disable static SM LID functionality and allow the SM to run with any LID.
#    Example: sm_lid=0
# 2- Non-zero value: Enable static SM LID functionality so SM will use this LID upon UFM startup.
sm_lid=0
To configure an external SM (UFM server running in sm_only mode), users must manually configure the opensm.conf file (/opt/ufm/conf/opensm/opensm.conf) and align the value of master_sm_lid to the value used for sm_lid in gv.cfg on the main UFM server.
Maximum Live Telemetry Sessions
In the gv.cfg configuration file, it is possible to set a limit on the number of live telemetry sessions running in parallel using the field max_live_sessions.
            [Telemetry]
# max parallel user live sessions
max_live_sessions=3
# UFM’s provider of telemetry (counters). possible values:telemetry, ibpm
telemetry_provider=telemetry
Configuring Log Rotation
This section enables setting up the log files rotate policy. By default, log rotation runs once a day by cron scheduler.
            [logrotate]
#max_files specifies the number of times to rotate a file before it is deleted (this definition will be applied to
#SM and SHARP Aggregation Manager logs, running in the scope of UFM).
#A count of 0 (zero) means no copies are retained. A count of 15 means fifteen copies are retained (default is 15)
max_files = 15
#With max_size, the log file is rotated when the specified size is reached (this definition will be applied to
#SM and SHARP Aggregation Manager logs, running in the scope of UFM). Size may be specified in bytes (default),
#kilobytes (for example: 100k), or megabytes (for exapmle: 10M). if not specified logs will be rotated once a day.
max_size = 3
Configuration Examples in gv.cfg
The following show examples of configuration settings in the gv.cfg file:
Polling interval for Fabric Dashboard information
ui_polling_interval = 30
[Optional] UFM Server local IP address resolution (by default, the UFM resolves the address by gethostip). UFM Web UI should have access to this address.
ws_address = <specific IP address>
HTTP/HTTPS Port Configuration
            # WebServices Protocol (http/https) and Port
ws_port = 8088
ws_protocol = http
Connection (port and protocol) between the UFM server and the APACHE server
            ws_protocol = <http or https>
ws_port = <port number>
For more information, see Launching a UFM Web UI Session.
SNMP get-community string for switches (fabric wide or per switch)
            # default snmp access point for all devices
[SNMP]
port = 161
gcommunity = public
Enhanced Event Management (Alarmed Devices Group)
            [Server]
auto_remove_from_alerted = yes
Log verbosity
            [Logging]
# optional logging levels
#CRITICAL, ERROR, WARNING, INFO, DEBUG
level = INFO
For more information, see "UFM Logs".
Settings for saving port counters to a CSV file
            [CSV]
write_interval = 60
ext_ports_only = no
For more information, see "Saving the Port Counters to a CSV File".
Max number of CSV files (UFM Advanced)
            [CSV]
max_files = 1
For more information, see "Saving Periodic Snapshots of the Fabric (Advanced License Only)".
WarningThe access credentials that are defined in the following sections of the conf/gv.cfg file are used only for initialization:
SSH_Server
SSH_Switch
TELNET
IPMI
SNMP
MLNX_OS
To modify these access credentials, use the UFM Web UI. For more information, see "Device Access".
Configuring the UFM communication protocol with MLNX-OS switches. The available protocols are:
http
https (default protocol for secure communication)
For configuring the UFM communication protocol after fresh installation and prior to the first run, set the MLNX-OS protocol as shown below.
Example:
            [MLNX_OS]
protocol = https
port = 443
Once UFM is started, all UFM communication with MLNX-OS switches will take place via the configured protocol.
For changing the UFM communication protocol while UFM is running, perform the following:
Set the desired protocol of MLNX-OS in the conf/gv.cfg file (as shown in the example above).
Restart UFM.
Update the MLNX-OS global access credentials configuration with the relevant protocol port. Refer to "Device Access" for help.
For the http protocol - default port is 80.
For the https protocol - default port is 443.Update the MLNX-OS access credentials with the relevant port in all managed switches that have a valid IP address.
SM Trap Handler Configuration
The SMTrap handler is the SOAP server that handles traps coming from OpenSM.
There are two configuration values related to this service:
osm_traps_debounce_interval – defines the period the service holds incoming traps
osm_traps_throttle_val – once osm_traps_debounce_interval elapses, the service transfers osm_traps_throttle_val to the Model Main
By default, the SM Trap Handler handles up to 1000 SM traps every 10 seconds.
CPU Affinity on UFM
This feature allows setting the CPU affinity for the major processes of the UFM (such as ModelMain, SM, SHARP, Telemetry).
In order to increase the UFM's efficiency, the number of context-switches is reduced. When each major CPU is isolated, users can decrease the number of context-switches, and the performance is optimized.
The CPU affinity of these major processes is configured in the following two levels:
Level 1- The major processes initiation.
Level 2- Preceding initiation of the model's main subprocesses which automatically uses the configuration used in level 1 and designates a CPU for each of the sub-processes.
According to user configuration, each process is assigned with affinity.
By default, this feature is disabled. In order to activate the feature, configure Is_cpu_affinity_enabled with true, check how many CPUs you have on the machine, and set the desired affinity for each process.
For example:
            [CPUAffinity]
Is_cpu_affinity_enabled=true
Model_main_cpu_affinity=1-4
Sm_cpu_affinity=5-13
SHARP_cpu_affinity=14-22
Telemetry_cpu_affinity=22-23
The format should be a comma-separated list of CPUs. For example: 0,3,7-11.
The ModelMain should have four cores, and up to five cores. The SM should have as many cores as you can assign. You should isolate between the ModelMain cores and the SM cores.
SHARP can be assigned with the same affinity as the SM. The telemetry should be assigned with three to four CPUs.
Quality of Service (QoS) Support
Infiniband Quality of Service (QoS) is disabled by default in the UFM SM configuration file.
To enable it and benefit from its capabilities, set the qos flag to TRUE in the /opt/ufm/files/conf/opensm/opensm.conf file.
Example:
            # Enable QoS setup
qos FALSE
The QoS parameters settings should be carefully reviewed before enablement of the qos flag. Especially, sl2vl and VL arbitration mappings should be correctly defined.
For information on Enhanced QoS, see Appendix – SM Activity Report.
UFM Failover to Another Port
You can configure UFM to fail over the UFM subnet manager (SM) to another InfiniBand port on the UFM server connected to the fabric. When failure is detected on an InfiniBand port or link, failover occurs without stopping the UFM Server or other related UFM services, such as mysql, http, DRDB, and so on.
When the UFM Server is connected by two or more InfiniBand ports to the fabric, you can configure UFM Subnet Manager failover to one of the other ports. When failure is detected on an InfiniBand port or link, failover occurs without stopping the UFM Server or other related UFM services, such as mysql, http, DRDB, and so on. This failover process prevents failure in a standalone setup, and preempts failover in a High Availability setup, thereby saving downtime and recovery.
Network Configuration for Failover to IB Port
UFM SM failover is not relevant for Monitoring mode, because in this mode, UFM must be connected to the fabric over ib0 only.
To enable UFM failover to another port:
Configure bonding between the InfiniBand interfaces to be used for SM failover. In an HA setup, the UFM active server and the UFM standby server can be connected differently; but the bond name must be the same on both servers.
Set the value of fabric_interface to the bond name. using the /opt/ufm/scripts/change_fabric_config.sh command as described in Configuring General Settings in gv.cfg. If ufma_interface is configured for IPoIB, set it to the bond name as well. These changes will take effect only after a UFM restart. For example, if bond0 is configured on the ib0 and ib1 interfaces, in gv.cfg, set the parameter fabric_interface to bond0.
If IPoIB is used for UFM Agent, add bond to the ufma_interfaces list as well.
When failure is detected on an InfiniBand port or link, UFM initiates the give-up operation that is defined in the Health configuration file for OpenSM failure. By default:
UFM discovers the other ports in the specified bond and fails over to the first interface that is up (SM failover)
If no interface is up:
In an HA setup, UFM initiates UFM failover
In a standalone setup, UFM does nothing
If the failed link becomes active again, UFM will select this link for the SM only after SM restart.
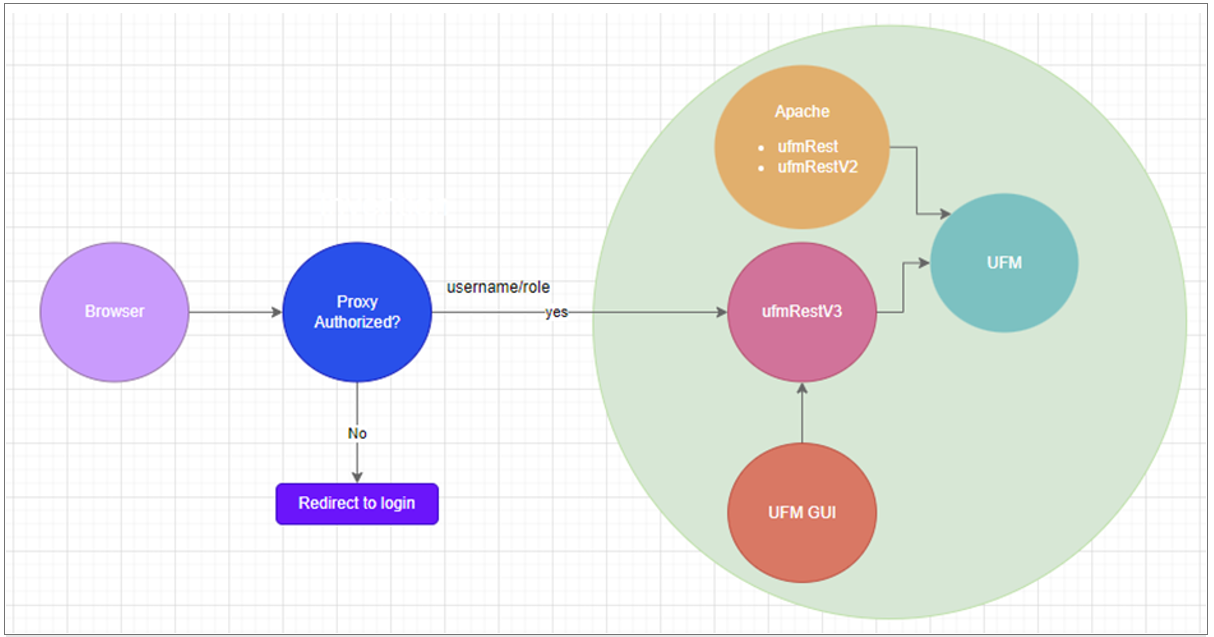
Delegating Authentication to a Proxy
You can configure UFM to delegate authentication to a reverse Proxy. The reverse Proxy is written by the user, thus, allowing flexibility on deciding how the authentication is performed.
By default, the feature is disabled. To activate the feature, configure auth_proxy_enabled with true.
Proxy should use ufmRestV3 to send requests to UFM. The request header should contain a username and role. The available roles are System_Admin, Fabric_Admin, Fabric_Operator, and Monitoring_Only. If the request header is sent without a username or a role, it is rejected by the UFM.
For example:
            [AuthProxy]
# Defaults to false, but set to true to enable this feature
auth_proxy_enabled = true
# HTTP Header name that will contain the username
auth_proxy_header_name = X_WEBAUTH_USER
# HTTP Header name that will contain the user roles. The available roles are as follows: System_Admin, Fabric_Admin, Fabric_Operator, and Monitoring_Only
auth_proxy_header_role = X_WEBAUTH_ROLE

# Set to `true` to enable auto sign up of users who do not exist in UFM DB. Defaults to `true`.
auth_proxy_auto_sign_up = true
# Limit where auth proxy requests come from by configuring a list of IP addresses.
# This can be used to prevent users spoofing the X_WEBAUTH_USER header.
# This option is required
# Example `whitelist = 192.168.1.1, 192.168.1.0/24, 2001::23, 2001::0/120`
auth_proxy_whitelist =
The following chart describes the flow:
Configuring Partial Switch ASIC Failure Events
You can configure UFM t o control Partial Switch ASIC Failure events. To configure, you may use the CLI command ufm unhealthy-ports switch-ports-threshold . UFM can identify switch ASIC failure by detecting pre-defined portion of the switch ports, reported as unhealthy. By default, this portion threshold is set to 20% of the total switch ports. Thus, the UFM will trigger the partial switch ASIC event in case the number of unhealthy switch ports exceeds 20% of the total switch ports.
For an example, in case the switch has 32 ports, once 7 ports are detected as unhealthy ports, the UFM will trigger the partial switch ASIC event. Example:

Enabling Network Fast Recovery
To enable the Network Fast Recovery feature, ensure that all switches in the fabric use the following MLNX-OS/firmware versions:
MLNX-OS version 3.10.6004 and up
Quantum firmware versions:
Quantum FW v27.2010.6102 and up
Quantum2 FW v31.2010.6102 and up
Fast recovery is a switch-firmware based facility for isolation and mitigation of link-related issues. This system operates in a distributed manner, where each switch is programmed with a simple set of rule-based triggers and corresponding action protocols. These rules permit the switch to promptly react to substrandard links within its locality, responding at a very short reaction time - as little as approximately 100 milliseconds. The policy is provided and managed via the UFM & SM channel. Moreover, every autonomous action taken by a switch in the network is reported to the UFM.
The immediate reactions taken by the switch enable SHIELD and pFRN. These mechanisms collaborate to rectify routing within the proximity of the problematic link before it can disrupt transactions at the transport layer. Importantly, this process occurs rapidly, effectively limiting the spreading of congestion to a smaller segment of the network.
To use the Network Fast Recovery feature, you need to enable the designated trigger in the conf/gv.cfg file. By doing this, you can specify which triggers the UFM will support. Alternatively, you may run the following command:
ufm network-fast-recovery enable
To use the Network Fast Recovery feature, you need to enable the designated trigger in the gv.cfg file. By doing this, you can specify which triggers the UFM will support.
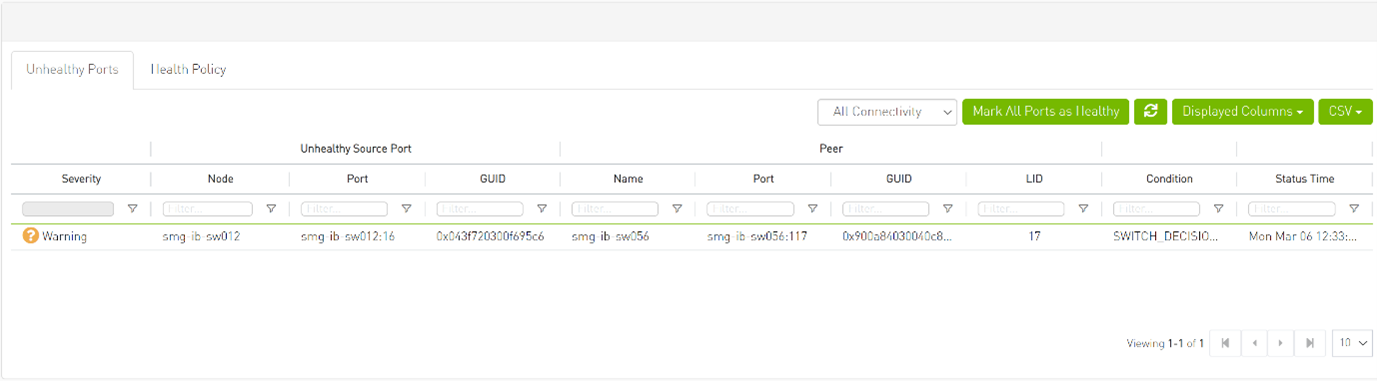
The "Unhealthy Ports" page provides visibility of these ports. If desired, the user can mark a port as healthy, triggering a restart of that specific port on the switch.
The trigger that initiated the isolation of ports can be viewed under the "Condition" column, as seen below.
Disabling Rest Roles Access Control
By default, the Rest Roles Access Control feature is enabled. It can be disabled by setting the roles_access_control_enabled flag to false:
            [RolesAccessControl]
roles_access_control_enabled = true
Enabling Azure AD Authentication
By default, Azure AD Authentication is disabled. To enable it, set the azure_auth_enabled flag to 'true'. Additionally, provide the required configurations from the Azure AD Application such as TENANT_ID, CLIENT_ID and CLIENT_SECRET which can be found under the "Overview" section of the registered application in the Azure portal.
            [AzureAuth]
azure_auth_enabled = false
# TENANT ID of app registration
TENANT_ID =
# Application (client) ID of app registration
CLIENT_ID =
# Application's generated client secret
CLIENT_SECRET =
Setting up telemetry deploys UFM Telemetry as bare metal on the same machine. Historical data is sent to SQLite database on the server and live data becomes available via UFM UI or REST API.
Enabling UFM Telemetry
The UFM Telemetry feature is enabled by default and the provider is the UFM Telemetry. The user may change the provider via flag in conf/gv.cfg
The user may also disable the History Telemetry feature in the same section.
            [Telemetry]
history_enabled=True
Changing UFM Telemetry Default Configuration
There is an option to configure parameters on a telemetry configuration file which takes effect after restarting the UFM or failover in HA mode.
The launch_ibdiagnet_config.ini default file is located under /opt/ufm/conf/telemetry_defaults and is copied to the telemetry configuration location ( (/opt/ufm/conf/telemetry) upon startup UFM.
All values taken from the default file take effect at the deployed configuration file except for the following:
hca
scope_file
plugin_env_PROMETHEUS_ENDPOINT
plugin_env_PROMETHEUS_INDEXES
config_watch_enabled=true;
plugin_env_PROMETHEUS_CSET_DIR
num_iterations
plugin_env_CLX_RESTART_FILE
The following attributes are configurable via the gv.cfg:
sample_rate (gv.cfg → dashboard_interval) – only if manual_config is set to false
prometheus_port
Supporting Generic Counters Parsing and Display
As of UFM v6.11.0, UFM can support any numeric counters from the Prometheus endpoint. The list of supported counters are fetched upon starting the UFM from all the endpoints that are configured.
Some of the implemented changes are as follows:
Counter naming – all counters naming convention is extracted from the Prometheus endpoint. The default cst file is configured as follows:
“Infiniband_LinkIntegrityErrors=^LocalLinkIntegrityErrorsExtended$” to get this name to the UFM.
Counters received as floats should contain a suffix such as: Infiniband_CBW_f=^infiniband_CBW$Attribute units – To see units of a specific counter on the UI graphs, configure the cset file to have the counter returned as “counter_name_u_unit”.
Telemetry History:
The SQLite history table (ufm_telemetry.db – telemetry_calculated), contains the new naming convention of the telemetry counters.In the case of an upgrade, all previous columns that were configured are renamed following the new naming convention, and then, the data is saved.if a new counter that is not in the table needs to be supported, the table is altered upon UFM start.
New counter/cset to fetch – if there is a new cset/counter that needs to be supported AFTER the UFM already started, preform system restart.
Created New API/UfmRestV2/telemetry/counters for the UI visualization. This API returns a dictionary containing the counters that the UFM supports, based on the fetched URLs and their units (if known).
Supporting Multiple Telemetry Instances Fetch
This feature allows brining up another telemetry instance (local or remote) or use a different cset file.
To enable this feature, under the [Telemetry] section in gv.cfg,the flag named “additional_cset_url” holds the list of additional URLs to be fetched.
the URLs should be separated by “ “ (with a space) and should follow the following format: http://<IP>:<PORT>/csv/<CSET_NAME>. For example http://10.10.10.10:9001/csv/minimal http://10.10.10.10:9002/csv/test.
Only csv extensions are supported.
Each UFM Telemetry instance run by UFM can support multiple cset (counters set) in parallel.If the user would like to have a second cset file fetched by UFM and exposed by the same UFM Telemetry instance, the new cset file should be placed under conf/telemetry/prometheus_configs/cset/ and configured in gv.cfg to fetch its data as described above.
Secondary Telemetry
By default, a second instance of UFM Telemetry runs, providing access to an extended set of counters not available in the default configuration. These additional counters can be accessed via the following API endpoint: http://<UFM_IP>:9002/csv/xcset/low_freq_debug. It is important to note that these exposed counters are not accessible through UFM's REST APIs.All the configurations for the second telemetry can be found under conf/secondary_telemetry/, where the defaults are located under conf/secondary_telemetry_defaults/. The second telemetry instance also allows telemetry data to be exposed on disabled ports, although this feature can be disabled if desired.
The relevant flags in the gv.cfg file are as follows:
secondary_telemetry = true (To enable or disable the entire feature)
Alternatively, secondary telemetry can be enabled or disabled via the following CLI command:
[no] ufm low-frequency-telemetry enable
The no form disables the feature.
UFM restart is required for changes to take effect. Run:ufm process model restart
secondary_endpoint_port = 9002 (The endpoint's exposed port)
secondary_disabled_ports = true (If set to true, secondary telemetry will expose data on disabled ports)
The following is a list of available counters which includes a variety of metrics related to timestamps, port and node information, error statistics, firmware versions, temperatures, cable details, power levels, and various other telemetry-related data.
timestamp,port_guid,Node_GUID,Port_Number,tag,Device_ID,node_description,lid,port_label,Phy_Manager_State,phy_state,logical_state,Link_speed_active,Link_width_active,Active_FEC,Total_Raw_BER,Effective_BER,Symbol_BER,Raw_Errors_Lane_0,Raw_Errors_Lane_1,Raw_Errors_Lane_2,Raw_Errors_Lane_3,Effective_Errors,Symbol_Errors,Time_since_last_clear_[Min],hist0,hist1,hist2,hist3,hist4,hist5,Hist6,Hist7,Hist8,Hist9,Hist10,Hist11,hist12,hist13,hist14,hist15,FW_Version,Chip_Temp,Temperature,Link_Down,Link_Down_IB,LinkErrorRecoveryCounter,PlrRcvCodes,PlrRcvCodeErr,PlrRcvUncorrectableCode,PlrXmitCodes,PlrXmitRetryCodes,PlrXmitRetryEvents,PlrSyncEvents,HiRetransmissionRate,PlrXmitRetryCodesWithinTSecMax,link_partner_description,link_partner_node_guid,link_partner_lid,link_partner_port_num,Cable_PN,Cable_SN,cable_technology,cable_type,cable_vendor,cable_length,cable_identifier,vendor_rev,cable_fw_version,rx_power_lane_0,rx_power_lane_1,rx_power_lane_2,rx_power_lane_3,tx_power_lane_0,tx_power_lane_1,tx_power_lane_2,tx_power_lane_3,Module_Temperature,Module_Voltage,fast_link_up_status,time_to_link_up_ext_msec,Advanced_Status_Opcode,Status_Message,down_blame,local_reason_opcode,remote_reason_opcode,e2e_reason_opcode,num_of_ber_alarms,PortRcvRemotePhysicalErrors,PortRcvErrors,PortXmitDiscards,PortRcvSwitchRelayErrors,ExcessiveBufferOverrunErrors,LocalLinkIntegrityErrors,PortRcvConstraintErrors,PortXmitConstraintErrors,VL15Dropped,PortXmitWait,PortXmitDataExtended,PortRcvDataExtended,PortXmitPktsExtended,PortRcvPktsExtended,PortUniCastXmitPkts,PortUniCastRcvPkts,PortMultiCastXmitPkts,PortMultiCastRcvPkts,SyncHeaderErrorCounter,PortSwLifetimeLimitDiscards,PortSwHOQLifetimeLimitDiscards,rq_num_wrfe,rq_num_lle,sq_num_wrfe
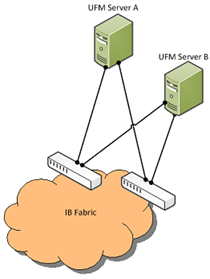
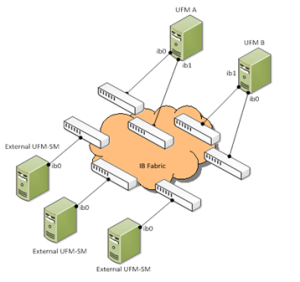
You can run UFM in HA mode with additional external UFM Subnet Managers. This mode:
Provides additional Subnet Managers for failover.
Enables UFM upgrade without fabric downtime.
While the main UFM Server is running, it synchronizes the configuration files on all the external UFM-SMs. If the main UFM Server fails (or stops for maintenance operations) an External SM takes mastership and manages the fabric until the main UFM Server resume operations.
The External UFM-SM is responsible for identifying a situation where it does not receive configuration updates while the main UFM-SM is still active. In this case, one of the following occurs:
The priority of the SM is reduced to 0 (default)
or
The SM is stopped if configured: stop_disconnected_sm = yes (see configuration section).
Configuration files should be modified only on the main UFM Server and only while the main UFM Server is operational.
UFM HA with Additional External UFMs Installation Prerequisites
Before you install the UFM HA with Additional External UFMs, ensure that the following requirements are met:
Provide a list of remote UFM-SM’s—IP addresses: (one IP per line) /opt/ufm/files/conf/external_sm.conf
Define a ssh trust mode between UFM hosts and hosts that running remote UFM-SM. password-less ssh between UFM HA and every external UFM-SM host (2 x N) according to the /opt/ufm/files/conf/external_sm.conf file
Installing UFM with External UFM-SMs
The main UFM Server can be installed in Standalone or High Availability mode. External UFM-SM requires installation of the entire UFM package in the Standalone mode. For installing External UFM-SM see Installing the UFM Server Software as Standalone. All External UFM-SM must have the same version as the main UFM-SM.
Configuring UFM HA on Main UFM
The following are several configuration settings changed when configuring UFM HA on the Main UFM:
Set management mode
In the /opt/ufm/files/conf/gv.cfg (on the primary UFM) set the management_mode to a mode that allows other SM. UFM will continue to print a warning if another SM runs in the fabric. It is crucial to change the management_mode when UFM is stopped since this setting effects the start / stop behavior.
management_mode = allow_other_sm
List of External UFM-SMs
In the/opt/ufm/files/conf/ external_sm.conf file (on the primary UFM) add the IP addresses of all the External UFM-SMs. IP addresses of UFM HA hosts such as the examples below should not appear in this file.
192.168.10.11192.168.10.12192.168.10.13Parameters to be overwritten when opensm.conf is copied to the External SM
In the /opt/ufm/files/conf/opensm.conf.sync_mask file (on the primary UFM) the parameters below will be overwritten once the opensm.com file is copied to the External SM.
log_flags
0x03sm_priority14sminfo_polling_timeout30000polling_retry_number6WarningModifying the values of GUID and sm_priority is forbidden.
Configuration of External SM behavior
In the/opt/ufm/files/conf/sm_sync.conf file (on the primary UFM) set the stop_disconnected_sm file as shown below to handle disconnection state (A state in which the Remote UFM-SM does not receive configuration updates while the main UFM-SM is still active)
stop_disconnected_sm = no
If set to "no" (default): The external SM is not stopped even when not synchronized, but the SM priority reduced.
If set to yes: The SM process is stopped and is resumed only after the new configuration files is received.
Time interval to check and synchronize the configuration
conf_update_time =
60
Configuring UFM HA on External UFM SMs
To configure the UFM HA on External UFM SMs set the running mode as SM only on each additional UFM Server in the /opt/ufm/files/conf/gv.cfg (on the external UFM-SM) file:
management_mode = sm_only
Running the UFM Software with External UFM-SM
To run the UFM Software with External UFM-SM, do the following:
Run the main UFM Server according to the operating mode (Management Mode, HA or, Monitoring Mode).
Once all the External UFM-SMs are synchronized, start each External UFM-SM by invoking /etc/init.d/ufmd start
The main UFM-SM must run with priority 15 and it must be the only SM with priority 15.If another SM with priority 15 is found during the startup, the UFM will not start
If another SM with a lower priority is found during startup, a warning message with the current master SM details will be printed and the main UFM-SM will start and take mastership
The External UFM-SM runs with priority 14 or moved to priority 0 if in the disconnected state.
Stopping ufmd & ufmha
The safe_stop command forces synchronization of all external UFM-SM configuration, changes the local SM priority to 12 and waits for other remote UFM-SM to take over before stopping the ufmd. If an error is detected during safe_stop, an error message is displayed describing the error and the stop procedure is canceled.
It is recommended using the safe_stop instead of stop to prevent unexpected loss in the fabric.
/etc/init.d/ufmd safe_stop - in the Standalone mode
/etc/init.d/ufmha safe_stop - in HA mode