1. NGC User Guide#
This document is a comprehensive guide to NVIDIA GPU Cloud (NGC), providing detailed instructions on setting up, managing, and optimizing your cloud environment, including creating accounts, managing users, accessing pre-trained models, and leveraging NGC’s suite of AI and HPC tools.
1.1. What is NVIDIA NGC?#
NVIDIA NGC™ is a cloud platform providing fully managed services, including NVIDIA AI Enterprise, NVIDIA DGX™ Cloud, and NVIDIA Riva Studio for Natural Language Understanding (NLU) and speech AI solutions. AI practitioners can leverage DGX Cloud for model training, NVIDIA AI Enterprise to obtain the latest NVIDIA NIM™ models, and the NGC Private Registry for securely sharing proprietary AI software. NGC also hosts a catalog of GPU-optimized AI software, SDKs, and Jupyter Notebooks to accelerate AI workflows and offers support through NVIDIA AI Enterprise.
Enterprises access their AI cloud services via a dedicated virtual NVIDIA Cloud Account (NCA) linked to the NGC organization where their services are enabled.
1.2. Why NGC Software#
NGC provides software to meet the needs of data scientists, developers, and researchers across various levels of AI expertise.
All software hosted on NGC undergoes thorough scans for common vulnerabilities and exposures (CVEs), crypto, and private keys.
In addition to security scanning, NGC software is tested against a wide range of GPU-enabled platforms, including public cloud instances, workstations, and OEM servers designed for data center or edge deployments. Supported GPUs include H100, V100, A100, T4, Jetson, and the RTX Quadro.
NGC software is tested and assured to scale across multiple GPUs and, in some cases, across multiple nodes, ensuring users can fully utilize their GPU-powered servers out of the box.
For select containers, NVIDIA offers NGC Support Services to run software on DGX platforms or certified OEM servers. The service gives enterprise IT direct access to NVIDIA subject matter experts to address software issues and quickly minimize system downtime.
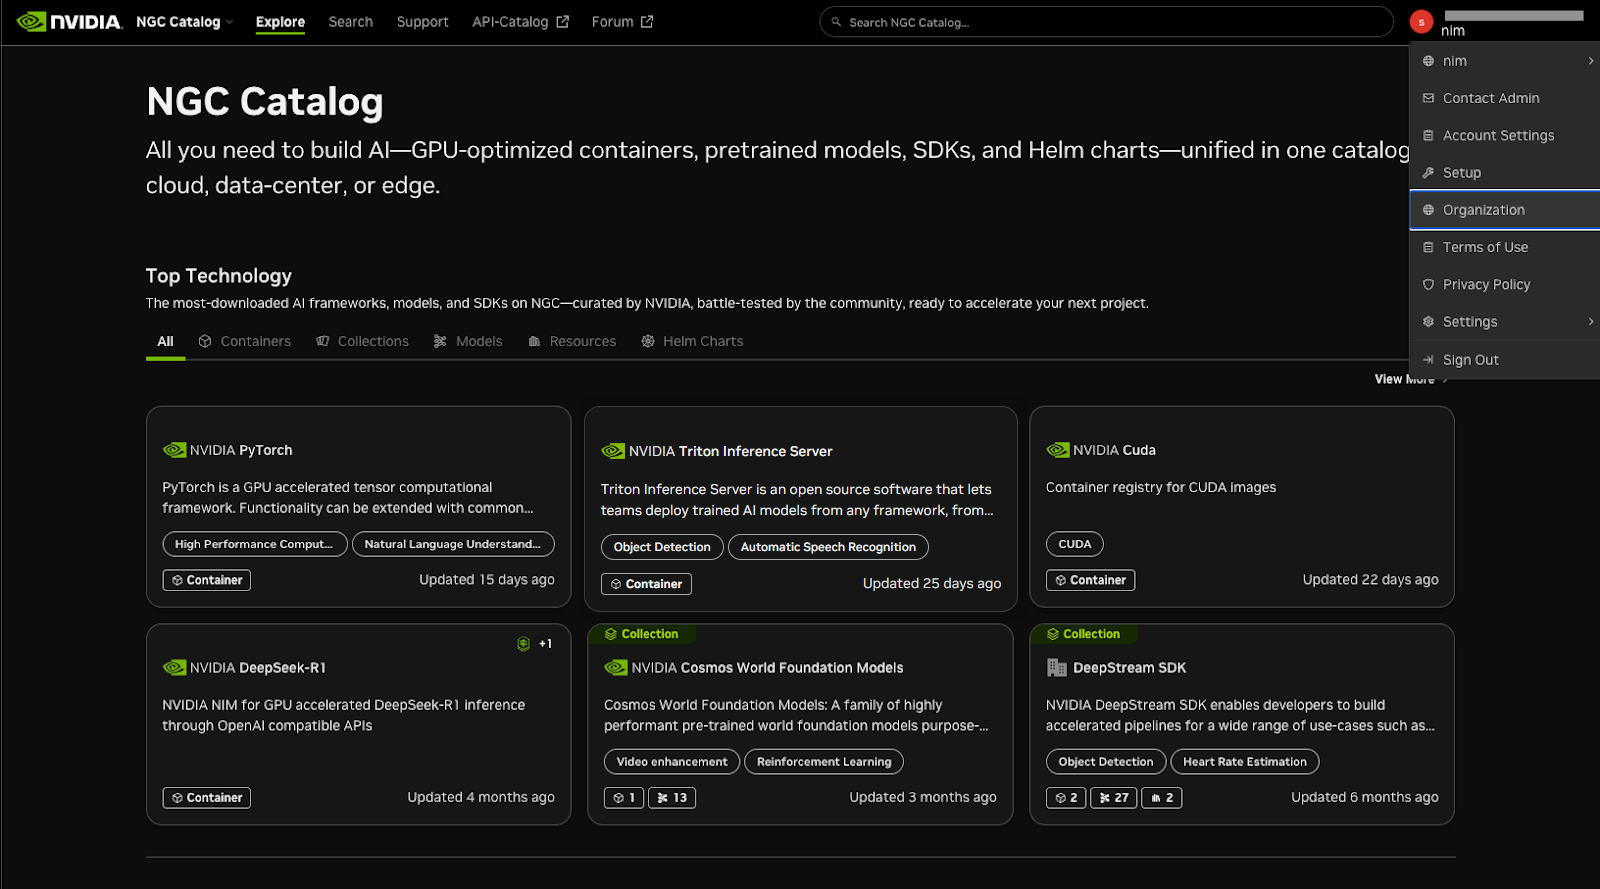
1.3. NGC Organizations and Teams#
An NGC organization (org) is linked to an NVIDIA Cloud Account (NCA) and shares the same account number. The dedicated account instance is used to enable and manage NVIDIA cloud services.
Users can access an NGC org in the following ways:
Sign-Up through the NGC Portal: A user can sign up for a free NGC org through the NGC sign-in portal and create a new NVIDIA cloud account that grants access to an NGC org enabled with NVIDIA Catalog access (public artifacts only).
Entitlement Message: NVIDIA sends a message to the company or person granted entitlement for a service delivered in NGC. This can happen through a purchase order, early trial program, or other commercially related offers. The recipient follows the entitlement steps to be granted an NVIDIA Cloud Account and gain access to their NGC service.
Account Owner Invitation: The account owner adds a user to an NCA account and grants the required permissions to access the NGC org. The account owner will invite the user through an NCA invitation email or add the user using a corporate AD group membership rule mapped to the NGC org. Note that only enterprise type orgs support the ability for account owners to manage additional users.
Users who sign up for an NGC org through the NGC sign-in portal get assigned an NCA account linked to an individual org that is automatically enabled with the NGC Catalog service and grants authenticated access to the catalog. An individual org is only accessible by a single user, the org owner. The NCA account linked to the org supports additional users, but these users cannot be assigned NGC access permissions.
An NVIDIA premium cloud service subscription, such as NVIDIA AI Enterprise or NVIDIA DGX Cloud, will be granted through purchase, an early access program, or the NGC Activate Subscription portal. Subscriptions get enabled on enterprise NGC orgs. Alternatively, an individual org is converted to an enterprise org when a user activates their subscription through the NGC Activate Subscription portal. An NGC enterprise org is linked to an NCA account, supports additional users, subdivides NGC resources into NGC teams, and provides role-based access rules.
1.3.1. NVIDIA Cloud Accounts and NGC#
NVIDIA Cloud Accounts (NCA) provide a convenient and scalable way to set up and manage access to NVIDIA cloud services for various users within your company.
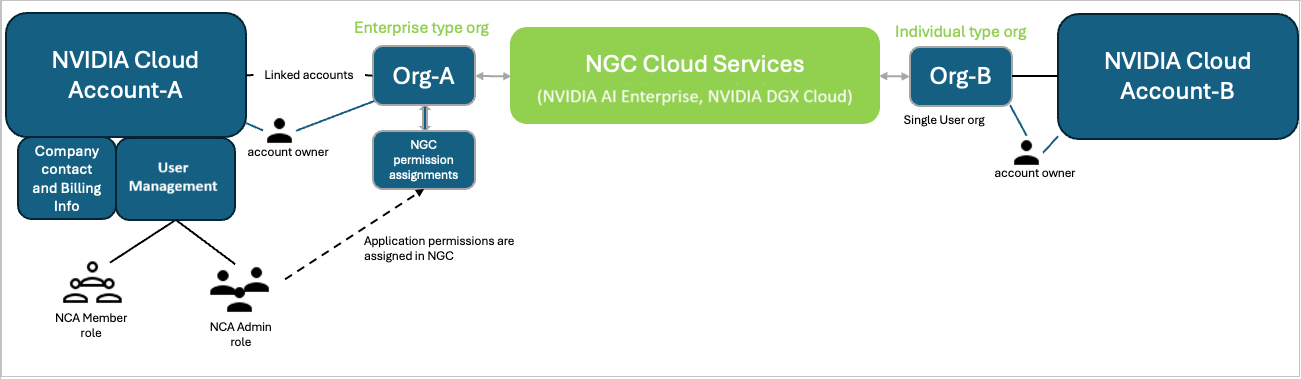
NCA is required for managing user access within NGC. It is fully integrated with NGC, allowing user management to be handled within the NGC environment. Adding users through the NGC Add User pane automates the process of updating the NCA account, saving NGC owners and administrators the step of navigating to the NCA user interface.
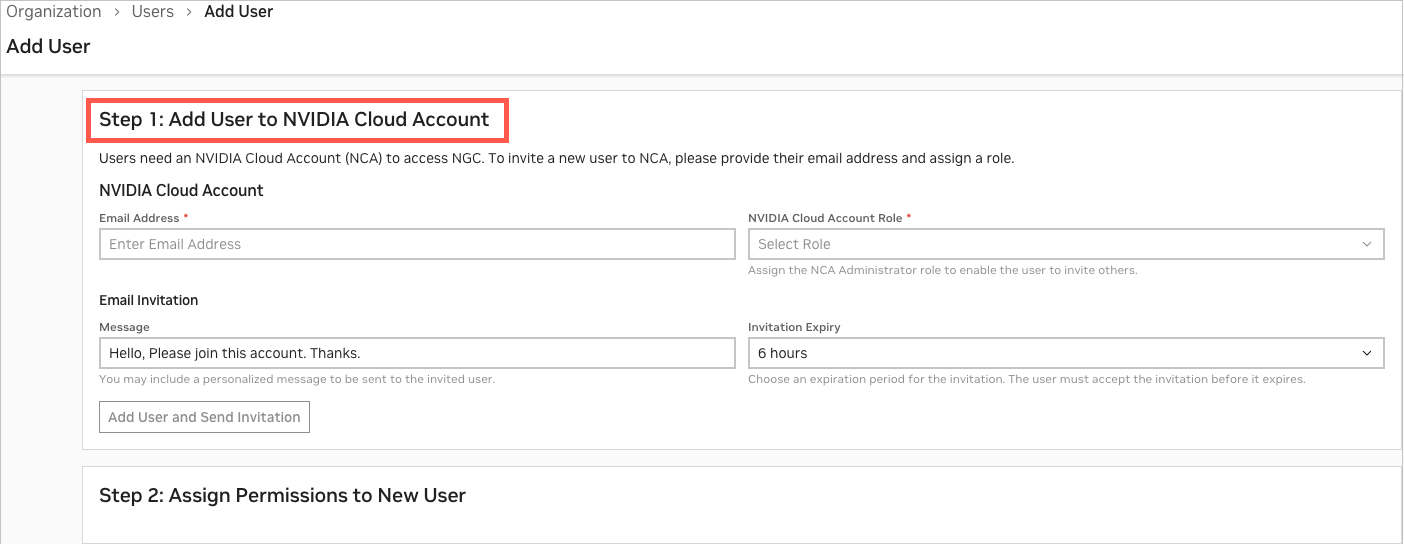
After the user is added, the next step (Step 2) requires the NGC owner or administrator to assign access permissions to the service entitlements hosted in the NGC org (for example, NVIDIA AI Enterprise or NVIDIA DGX Cloud).
As a follow-up step, the owner or administrator can navigate to the NCA UI console to set up essential services like the following:
Set up an account recovery email (Highly recommended)
Add additional NCA administrators (Highly recommended)
Enter company information
Manage user tenancy status
Removing a user from NGC doesn’t remove their associated NCA account. The user’s access permissions within the NGC organization are revoked, but the NCA account itself remains active. To completely remove a user from all NVIDIA cloud services, the user must be removed at the NCA account level.
While users can be added and assigned permissions within the NGC UI console, administrators should be aware of additional steps necessary to manage the NCA account.
To learn more about NCA, visit NVIDIA Cloud Accounts.
1.3.2. NGC Teams#
NGC organizations (orgs) serve as the top-level container for enterprise deployments. Within an org, administrators can create teams to implement role-based access control and segment private registry resources by department or project.
Teams provide isolated registry namespaces, ensuring members can share containers, models, and resources within their team while maintaining separation from other teams in the organization.
User management permissions:
Org owners and org-level user admins: Create teams and manage users across all teams
Team-level user admins: Manage users within their assigned team only
Note
NVIDIA does not provide user management services; customers are responsible for all user provisioning
To create an NGC team, follow these steps:
Log in to your NGC org.
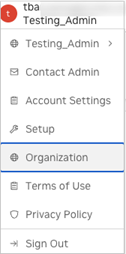
Select Organization from the user account menu.
On the dashboard or in the left navigation, select Teams.
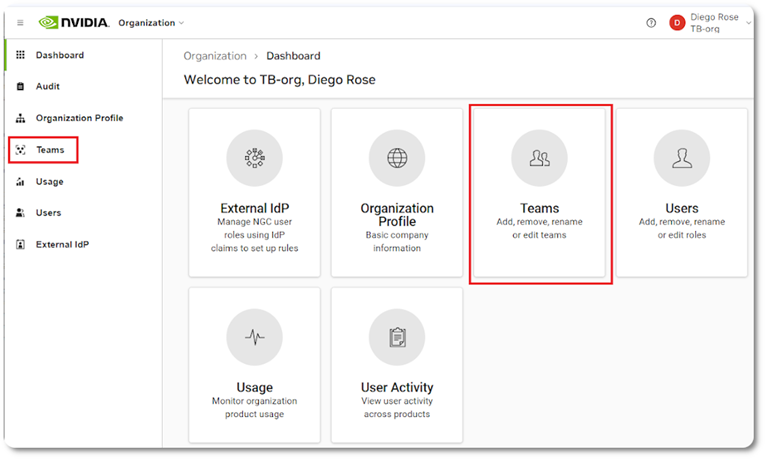
On the Teams page, click Create Team on the upper right corner.
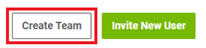
Enter a team name and description. Note that names must be all lowercase.
Click Create Team to finish.
1.3.3. NGC Org Owner and Other Org Users#
When an NGC org is created, an NVIDIA Cloud Account (NCA) is required to access the NGC org. The NCA account is automatically generated, and the user needs to name it. The user is assigned the owner role in NCA and NGC as the initial user.
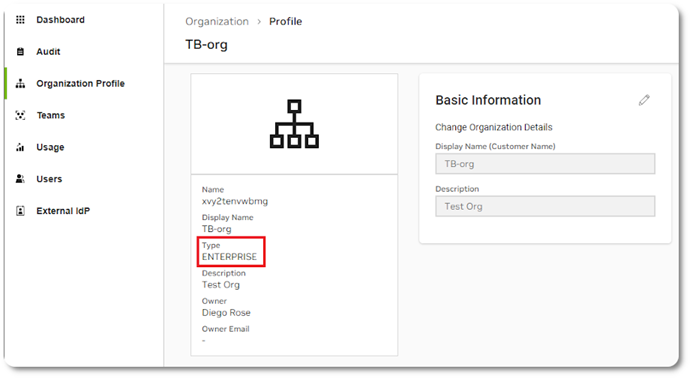
As mentioned previously, an individual org is only accessible by the org owner; additional users are not supported. To verify the type of org you manage, sign in to NGC to access your org. Under the user account menu, select Organization, and then select Organization Profile in the left navigation pane.
The org owner possesses the highest admin privileges in an NGC org. The org owner of an enterprise org can add and remove NGC teams and users, and assign NGC permissions to each added user by managing the assignment of teams and roles. When a new user gets added, the org owner invites the user to join the NVIDIA Cloud Account, then assigns access to the entire org or limits the user’s access to a team or a set of teams created within the org. Then, the org owner controls the user’s access by assigning the permissions (roles) necessary to perform their functions within the org or team.
An org supports up to three org owners, and only an org owner can add or invite additional org owners to share in the NGC org management responsibilities. In NCA, only one owner is supported; therefore, to support additional NGC org owners, the account owner must assign the NCA “Admin” role when creating the add user invitation. For details, see the steps to add additional org owners. To prevent accidentally adding an outside user as an org owner, the email address domain between all org owners’ users must match.
For example, if the users’ email addresses are john@intelligence.ai, jane@intelligence.ai, and peter@intelligence.ai, then all three can be added as org owners because their email address domains match. In contrast, if Peter’s email address were peter@artificial.ai, Peter could not be added as an org owner.
Follow the steps in the next section to add a new org owner or additional users with different access permissions.
1.3.3.1. Adding NGC Users to an Org#
The following section guides you through the steps to add a new org owner or additional users with different access permissions. Only NGC org owners and user admins can perform user management operations. NVIDIA cannot manage users on behalf of a customer.
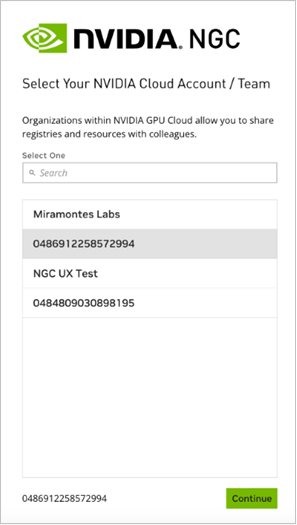
Sign in to NGC. Select the correct NCA account linked to the NGC org you want to manage, and click Continue.
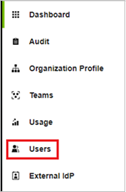
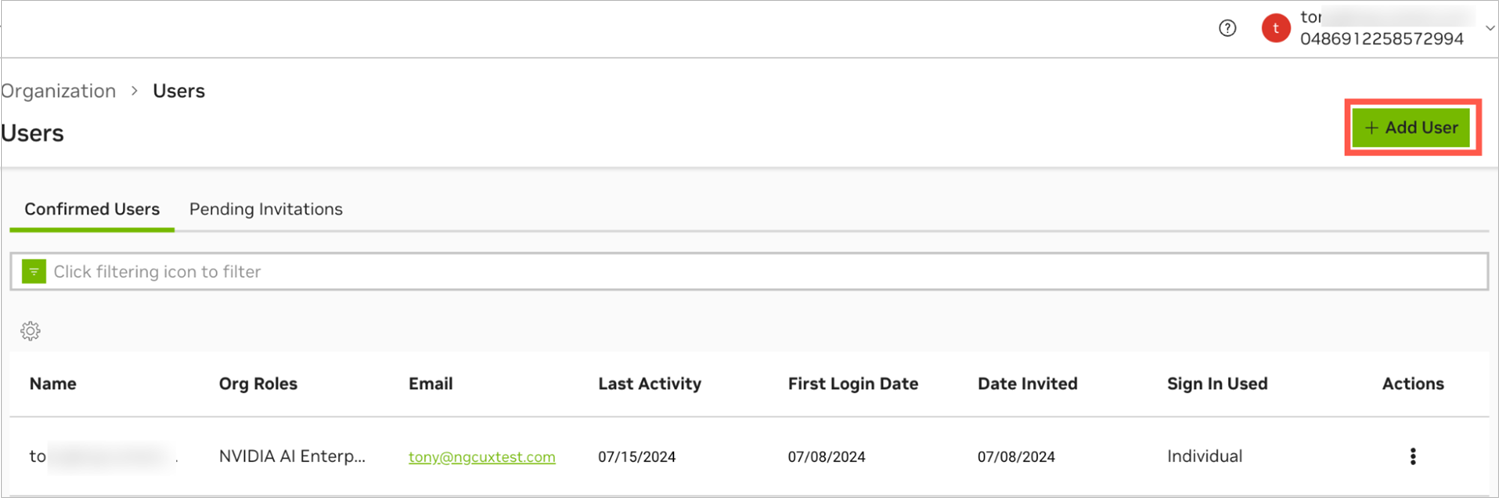
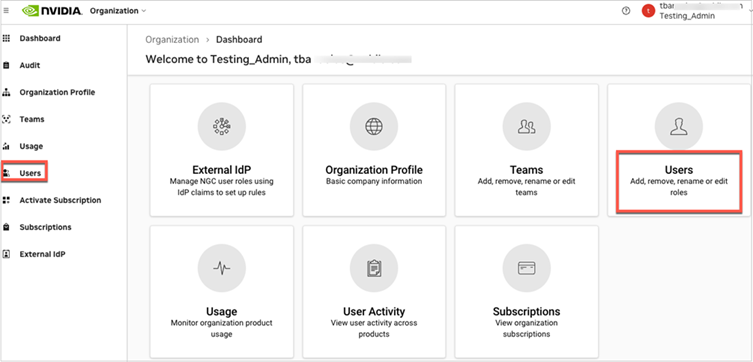
Select Organization from the user account menu. On the dashboard or in the left navigation, select Users.
Click Add User at the top-right corner.
Important
If your org is linked to an external IdP/SSO service, managing user membership using NGC IdP Membership Rules is recommended. If your IdP doesn’t support groups, you can use the NGC add user service.
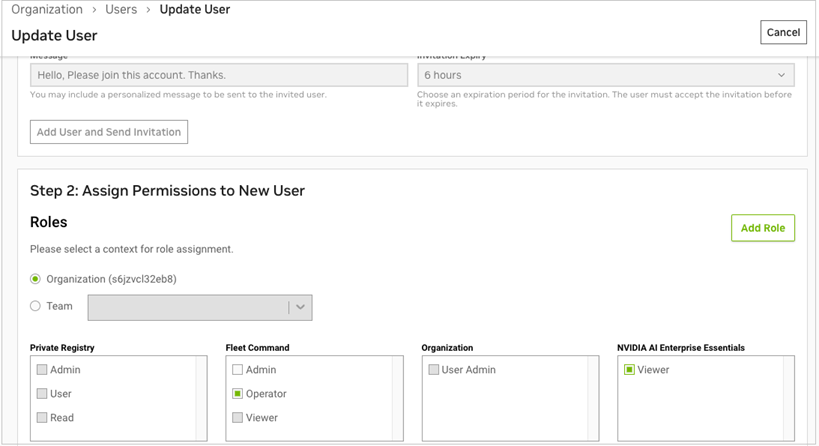
In Step 1, invite the user to be an “admin” if they require the ability to manage users in the NCA account, or assign the “member” role in NCA if they do not manage users.
Enter the user email address, making sure the domain matches your email domain.
Assign the NVIDIA Cloud Account Role “Administrator” or “Member.”
Customize the invitation email to inform the user what this is for (optional).
Set an expiry for the invitation link (default: 6 hours).
Click Add User and Send Invitation to proceed to Step 2.
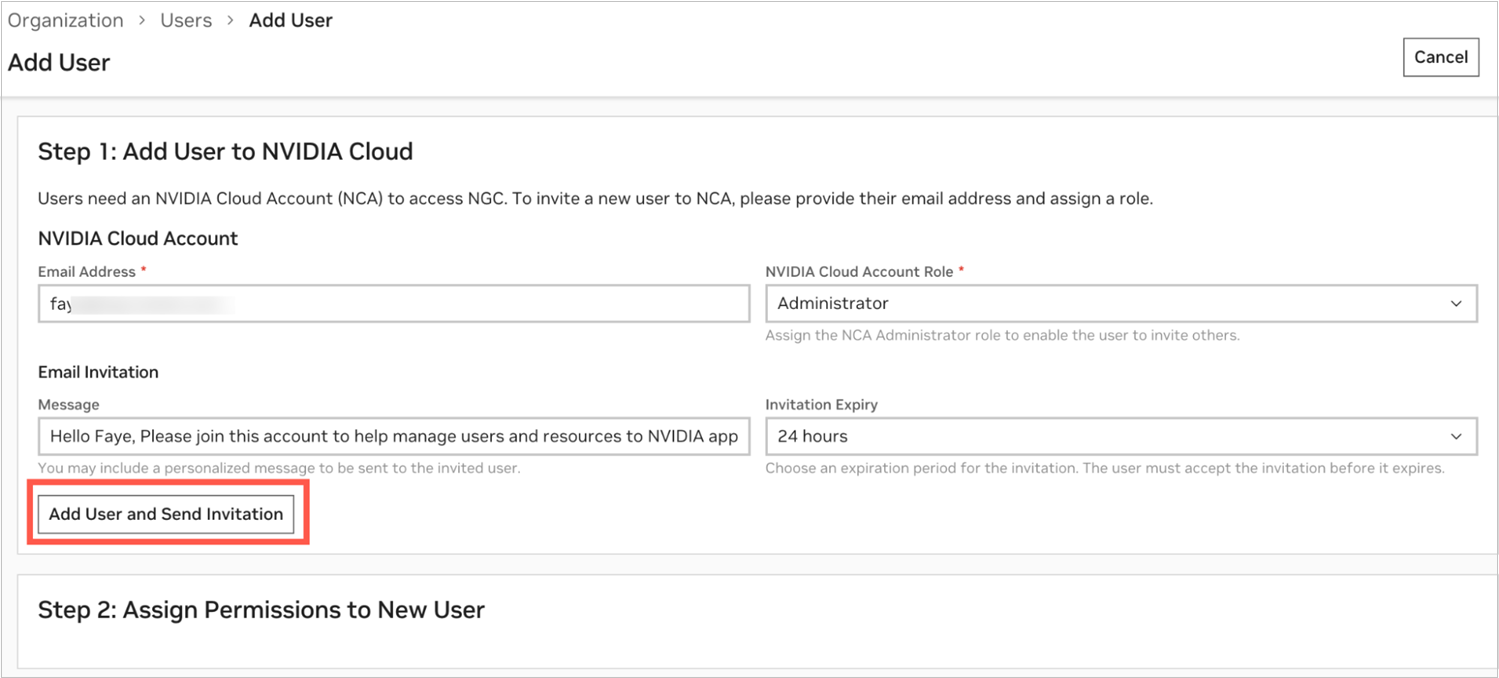
After completing Step 1, you will see a successful invitation dialog and Step 2 configuration buttons become active.
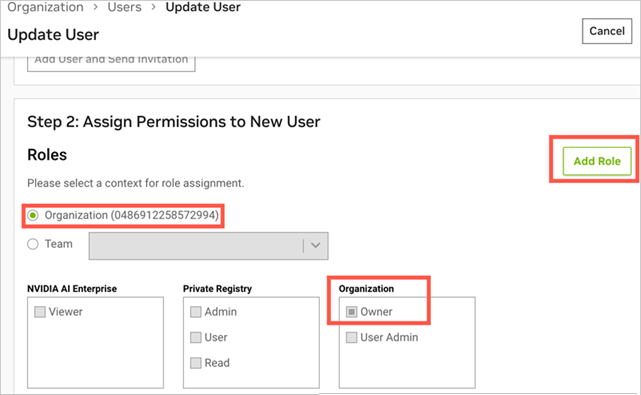
User Role
To assign a role to the user:
Select Organization for role assignment.
Under the Organization roles, select Owner.
Click Add Role to finish.
Important
When adding a user who does not need to manage users or NGC teams, assign them the “member” role in NCA and do not assign the Owner or User Admin role in NGC. If the user later needs to manage users, update their status in NCA to “admin” and grant them the User Admin role in NGC. You can manage these permissions in NVIDIA Cloud Accounts (NCA).
Controlled Permissions
To assign controlled permissions to a user:
Click the Organization or Team radio button.
Assign a “role” under each NGC application, depending on the level of access to grant the user.
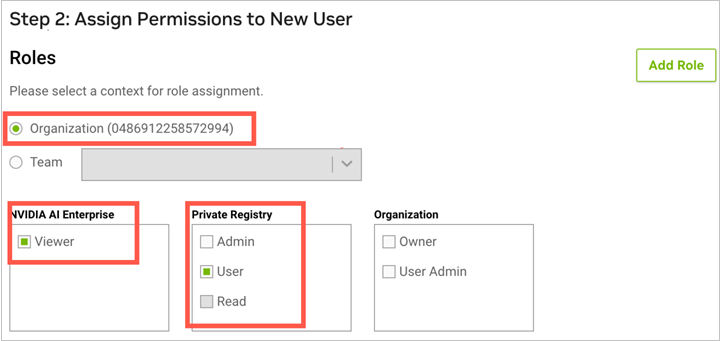
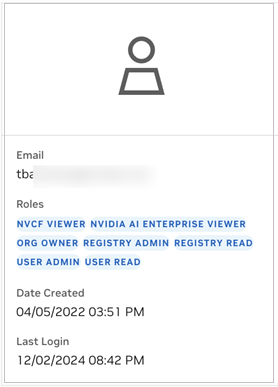
In this example, the user added is assigned the Viewer role under NVIDIA AI Enterprise and the User role under Private Registry. These permissions limit the user to viewing and pulling artifacts from the NVIDIA Catalog and pushing and pulling artifacts to the org’s private registry.
To learn more about NGC product roles, refer to the documentation for each product.
Note
NVIDIA NGC is introducing a new user role, “Public API Endpoints User,” to control access to NVIDIA inferencing credits used for calling NVIDIA API Catalog NIM endpoints. This role must be assigned to NGC organization users who need to generate an NGC Personal Key to use API Catalog credits. For more information, go to Assigning Services to Your Personal API Key. To update user roles, go to Updating User Roles.
Team Role Assignment
Assigning the user permissions at the Team level grants them access only to resources (such as containers, models) shared with that specific team. To grant a user access to resources across the entire org, assign the user roles at the Organization level.
The user added will receive an NCA invitation email message that includes the NCA URL to accept the invite and access the NGC org. Share the link to Accepting an NCA Invitation to Access NGC with the invited user.
In the case of org owners, after all three org owners are added, any org owner can replace another org owner when needed. An org owner can remove another org owner by going to the ‘users’ list and selecting Remove User.

When an org owner is deleted, an email notification is sent to the remaining active owners about the deletion event. Using the same steps above, a replacement owner can be invited.
1.3.3.2. Updating User Roles#
The following section guides you through the steps to update user roles.
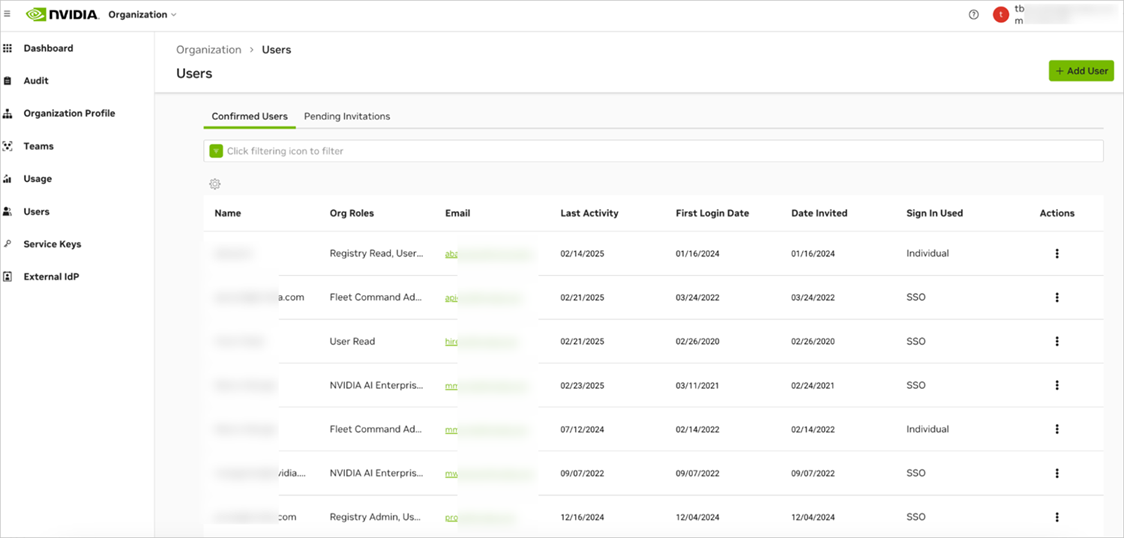
After signing in and selecting the NGC org to update, navigate to the Organization > Users page.
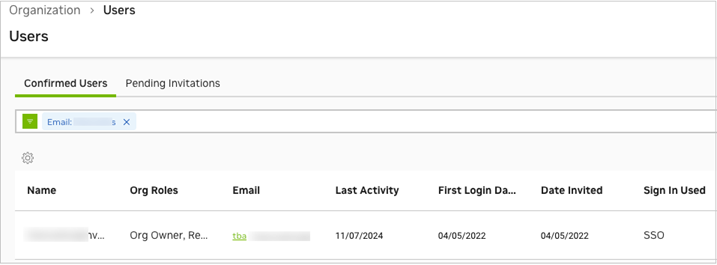
To locate the user, you can search by either email address or name using the filtering bar.
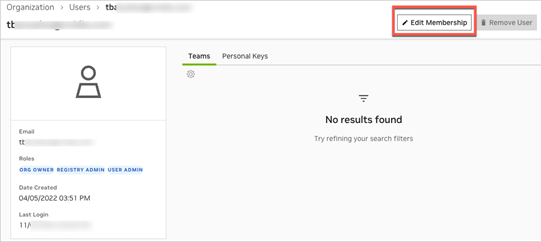
Click the user you want to modify, then click Edit Membership at the top of the page.
Select the desired roles to add to the user and click Add Role. A confirmation message will appear.
To remove roles, find the assigned roles in the table at the bottom of the page. Click the X to remove that role from the user.

Afterwards, you’ll see a confirmation dialog.
1.3.3.3. Removing a User from an NGC Org#
The following section guides you through the steps to remove a user from an NGC org.
Only the organization owner or organization-level user_admin can remove a user from the org.
To remove a user from an NGC org, follow these steps:
Click on your user account icon to open the menu, then select Organization and click on Users.
Use the filter tool to find the email address of the user you want to remove.
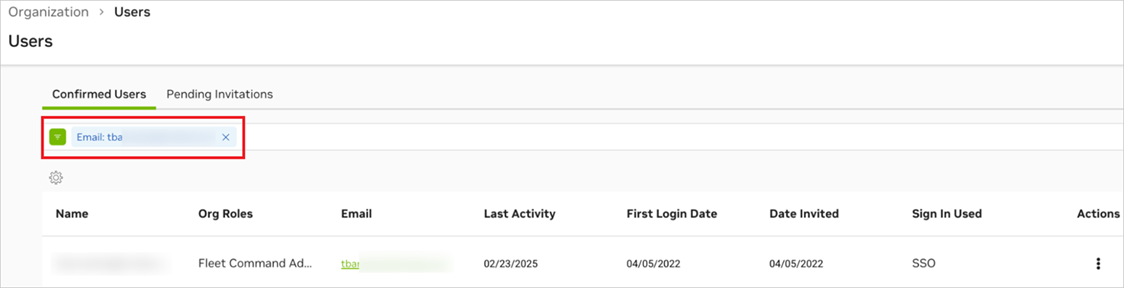
Click the Actions ellipsis and select Remove User.
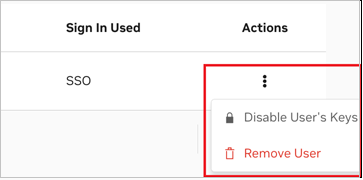
Removing a user from the NGC org will revoke all their access to NGC. However, the user will still remain an active tenant member in the NVIDIA Cloud Account (NCA), where user tenancy is managed.
In NGC, you grant access permissions (roles) to a user, and removing the user only removes these permissions. To completely delete the user from NCA, follow the steps provided in the NCA User Guide.
1.3.3.4. Securing the Owner Account with Multi-Factor Authentication#
When you create your owner account, you receive an NVIDIA identity account that is protected by a password you set at the time of owner account creation. You can further secure access to your owner account by setting up multi-factor authentication using the directions below:
Go to NVIDIA and click the sign-in icon.
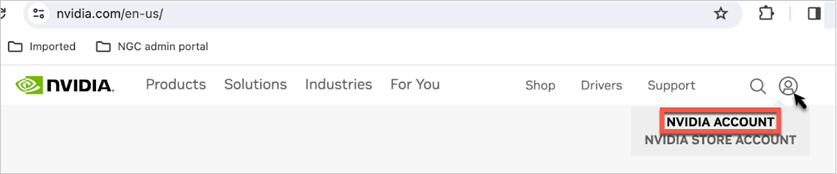
Sign in with the credentials you set up during the org owner account setup.
From your NVIDIA user profile page, navigate to the bottom, click Security settings, then Update.
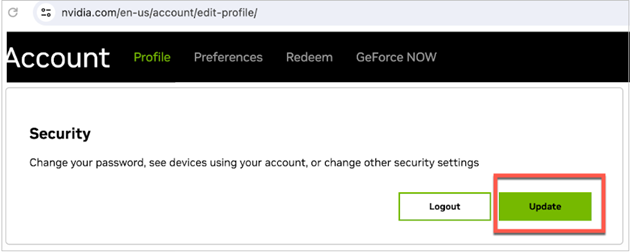
You will be prompted to enter your password again to access security settings.
Navigate to the Multi-factor Security settings.
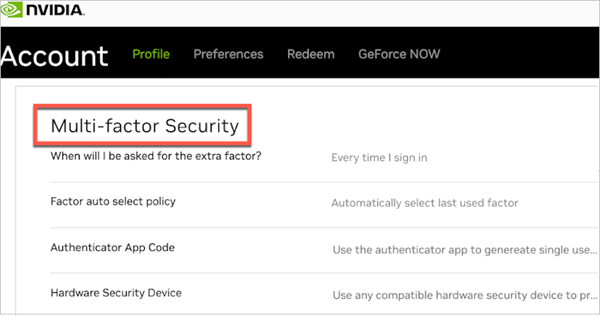
You can now configure your identity account for two-factor authentication. Go to the NVIDIA N-factor help page for details on how to set it up.
1.3.3.5. Contacting your Org Owner#
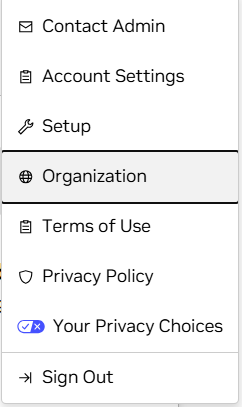
As a user within an NGC organization, you may need to contact the organization owner to request a new service subscription or add a new user. NGC simplifies this communication with the Contact Admin option in your user account menu.
Sign in to the NGC application with your organization, then click your user ID in the top-right corner to access the user account menu.
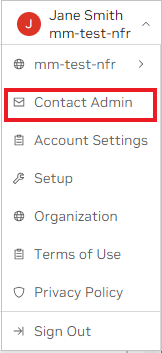
Select Contact Admin to open the email editor dialog.
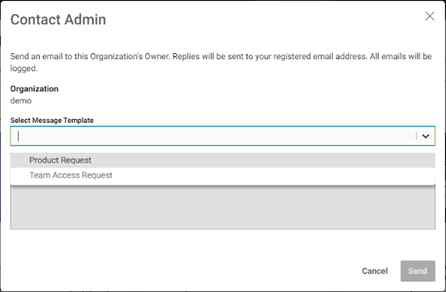
Within this editor, you can choose from the following email templates:
Product Request: Use this template when requesting a specific product for your <org-name> organization. For example, “I’d like to request the [product name] product for the <org-name> organization.”
Team Access Request: Select this template if you need to request access to the org or a particular team, such as “[team-name],” within your <org-name> organization.
Both templates come with pre-populated message content, but you can edit or delete portions of the message to create a customized message to send to your organization owner.
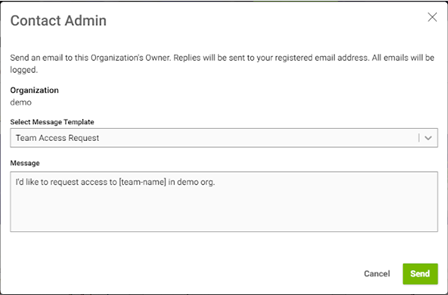
Once you are ready to send the message, click Send.
The organization owner will receive an email from
noreply-ngc@nvidia.comthat will include your email address. The following is a sample email message: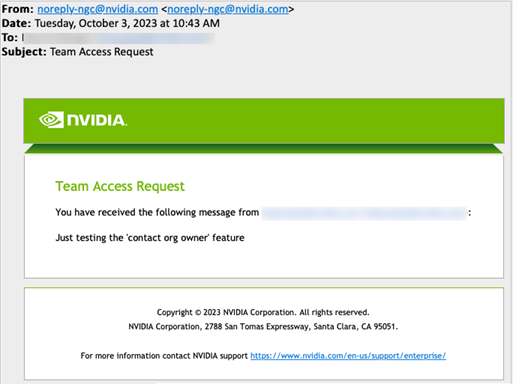
By following these steps and using the Contact Admin option, you can easily initiate communication with your organization owner.
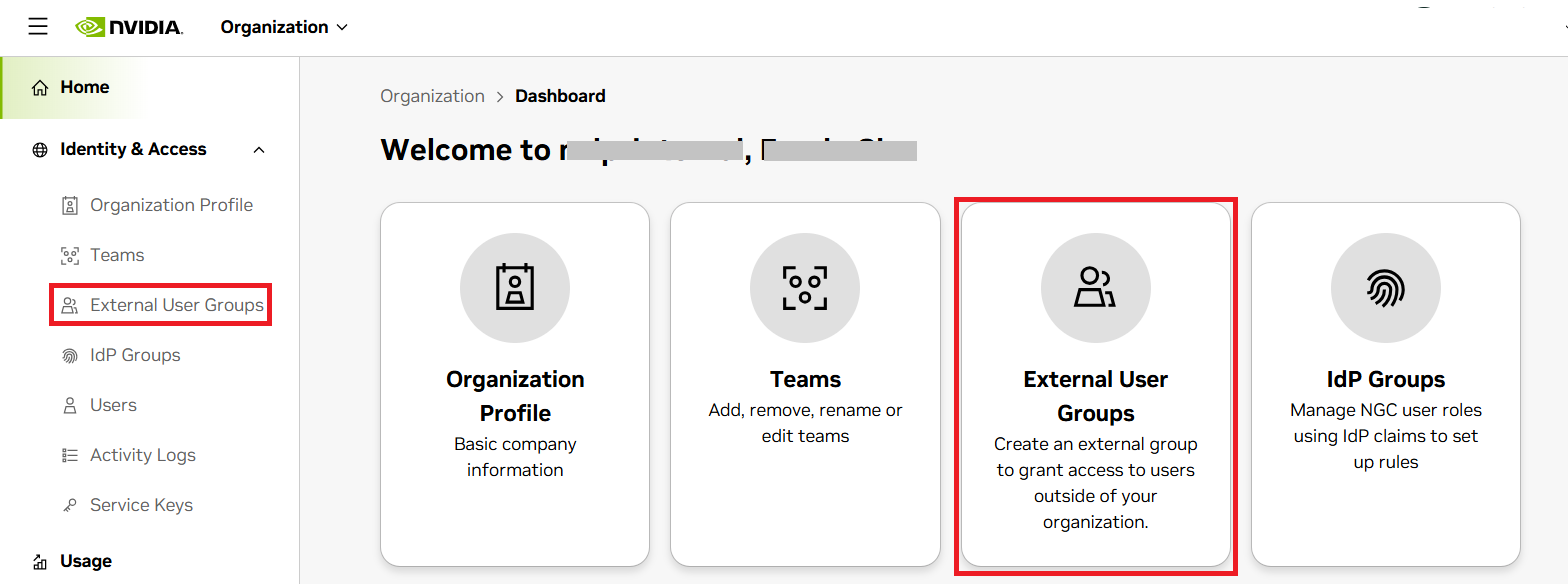
1.3.3.6. External User Groups#
As an NGC organization owner or administrator, you may need to share NGC resources with users outside your organization. While you could add external users as regular account members, doing so can grant broader account access than intended. External User Groups provide a more controlled way to collaborate with external users by granting permissions to a group instead of adding those users directly to your NGC organization.
The External User Groups page is organized into tabs for Managed External User Groups, Delegated External User Groups, and API Keys. Use the Managed External User Groups tab when your NGC organization will create and manage the group membership directly. Use the Delegated External User Groups tab when you want an external company administrator to manage the group membership while your NGC organization controls the permissions granted to the group.
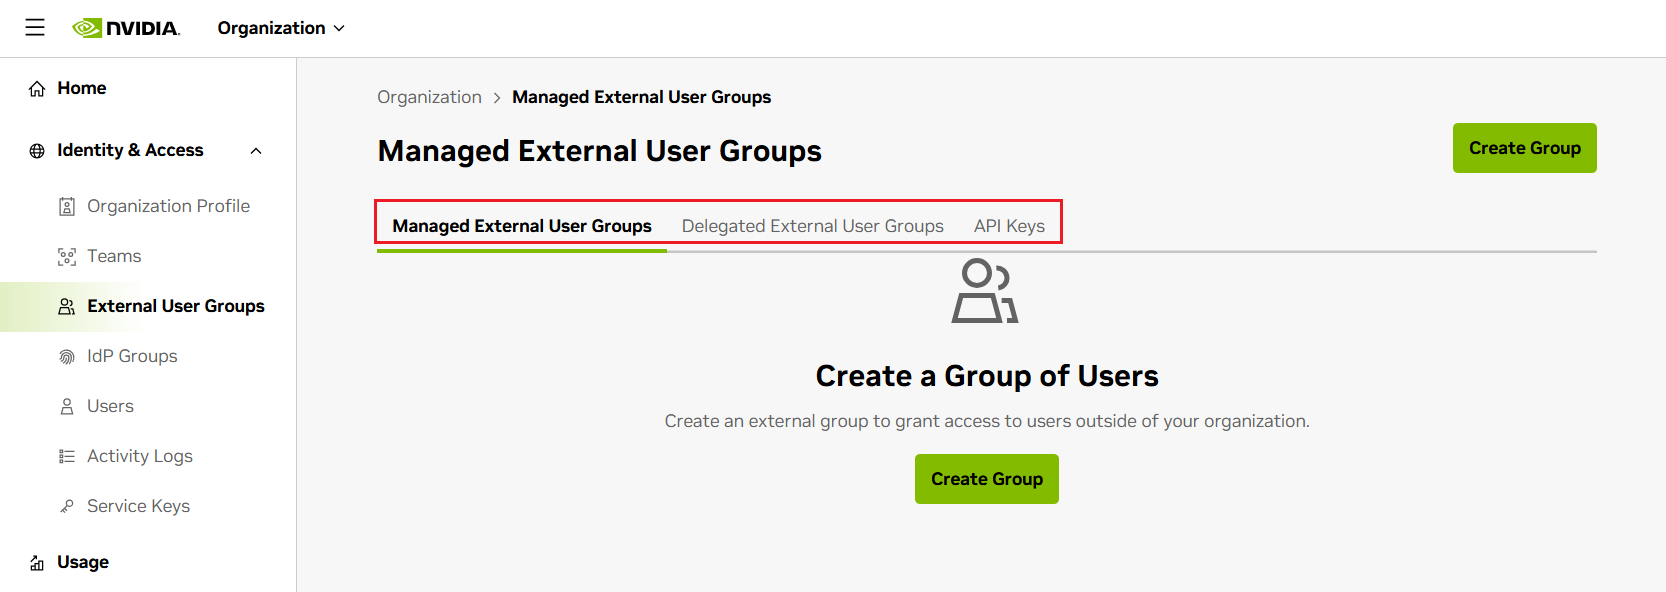
External User Groups are supported for NGC applications such as Private Registry and Catalog. An organization can have up to 500 external user groups, and each group can include up to 1,000 users.
For managing access in your organization, NGC recommends the following approach:
For your company’s internal users: Add them as account members through the Users management page or use your Enterprise Identity Provider (IdP) to grant access with IdP groups.
For external users with email domains outside your company or IdP: Use External User Groups.
1.3.3.6.1. Managed External User Groups (mEUG)#
A Managed External User Group (mEUG) is created, owned, and managed by an NGC organization owner or authorized user administrator. Use a managed group when your NGC organization needs direct visibility into the group membership and wants to add or remove external users itself.
Managed external user groups are designed for secure collaboration with external users while keeping their tenancy separate from the main NGC organization. External users receive only the permissions granted to the group and do not receive the broader access that internal account members may have.
NGC organization owners and user administrators are not automatically granted management access to a managed external user group. To manage the group’s members, an owner or administrator must be explicitly added to the group by the group owner.
1.3.3.6.1.1. Creating a Managed External User Group#
Sign in to NGC and open the NGC organization you want to manage.
From the user account menu, select Organization.
In the left navigation or on the main panel, select External User Groups.
On the Managed External User Groups tab, click Create Group.
Enter the group name and description.
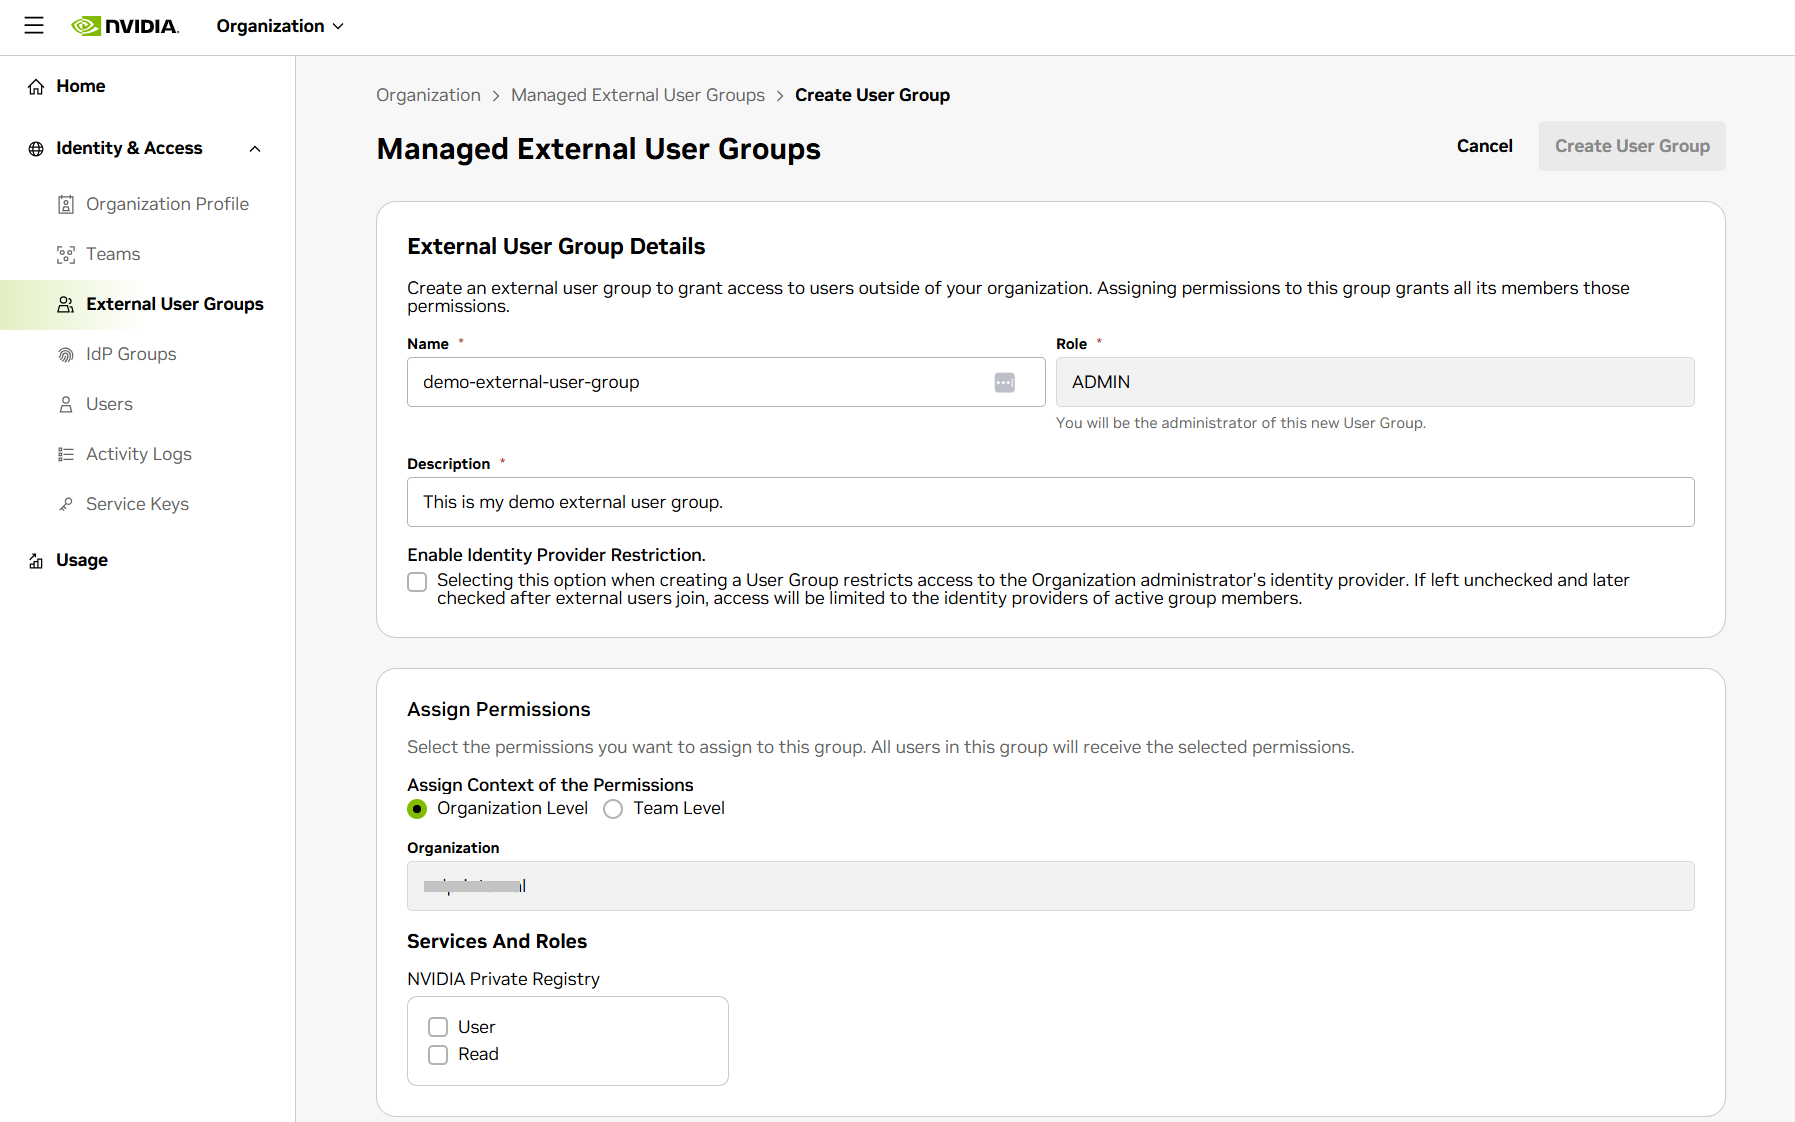
Create the group, then assign permissions for the NGC resources the external users should access.
1.3.3.6.1.2. Inviting Users to a Managed External User Group#
Open the Managed External User Groups tab.
Select the managed external user group you want to update.
Invite the external users who should join the group.
Assign the appropriate group role to each user you invite to the group.
Ask invited users to check their inbox for the invitation email. If they do not see the invitation within a few minutes, ask them to check their junk or spam folder.
1.3.3.6.1.3. Managing Managed External User Group Permissions and Membership#
From the Managed External User Groups tab, open the group you want to manage.
Add or remove group permissions to control which NGC resources the group can access.
Add or remove group members as external collaboration changes.
Review access regularly to make sure group permissions still match the intended collaboration.
1.3.3.6.1.4. Guide for External Users: Accepting a Managed External User Group Invitation#
Open the invitation email from NVIDIA NGC.
Click Accept Invitation.
Sign in with an existing NVIDIA account or create an account if prompted.
After accepting the invitation, sign in to NGC to access the resources shared with the managed external user group.
1.3.3.6.1.5. API Access for Managed External User Group Users#
To access shared NGC resources programmatically, a managed external user must generate a Personal API Key in their NGC account.
The permissions on the key are derived from the managed external user group’s access grants. External users cannot expand these permissions themselves.
Depending on the permissions granted to the group, the key may allow viewing and listing shared artifacts, pulling artifacts, or pushing artifacts.
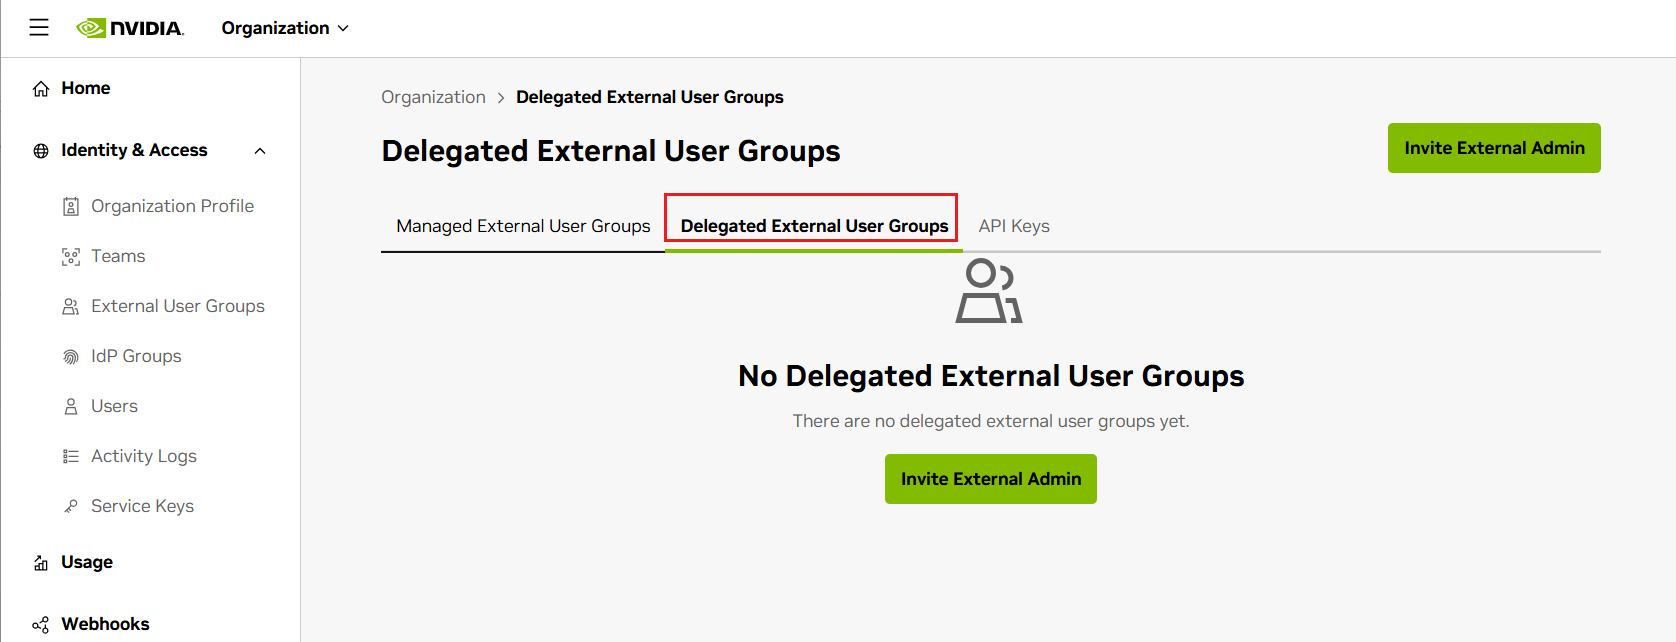
1.3.3.6.2. Delegated External User Groups (dEUG)#
A Delegated External User Group (dEUG) allows an NGC organization owner or administrator to grant an external company access to specific NGC resources without adding those users directly to the NGC organization. The NGC organization controls which resources the group can access, while the external company’s administrator manages the group membership.
Delegated external user groups support three personas:
NGC organization owner or administrator: Initiates the delegation, assigns access permissions, and monitors or manages the delegated group.
External dEUG administrator: Accepts the invitation, creates the delegated group, and manages membership in the NVIDIA UCS Team portal.
External group user: Accepts membership in the delegated group as a member, administrator, or operator and can access the shared NGC resources assigned to the group.
1.3.3.6.2.1. Persona 1: NGC Organization Owner or Administrator#
The NGC organization owner or user administrator initiates the delegated EUG invitation, assigns access permissions, and monitors or manages the delegated group.
1.3.3.6.2.2. Initiating a Delegated EUG Invitation#
Navigate to the Delegated External User Groups tab in your NGC organization settings.
Enter the email address of the individual who will create and manage the external user group.
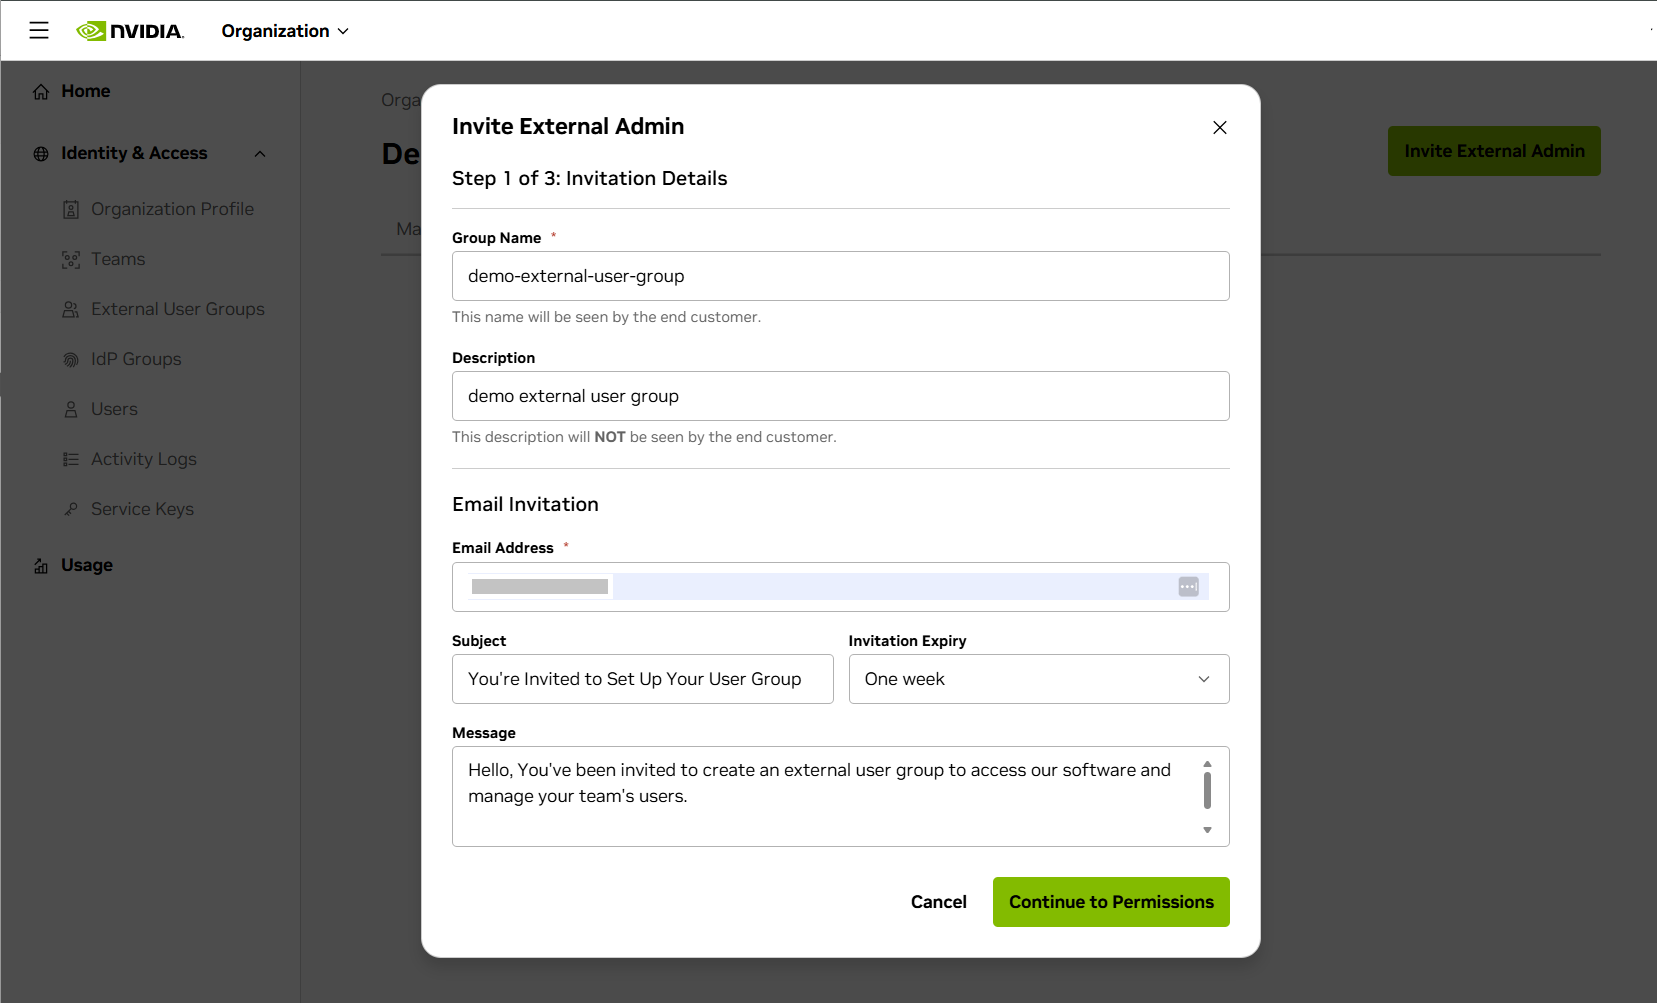
Assign the permissions for the group. All users added to the group by the external group administrator inherit the access level you define here. You can set permissions at the organization level or at the NGC team level.
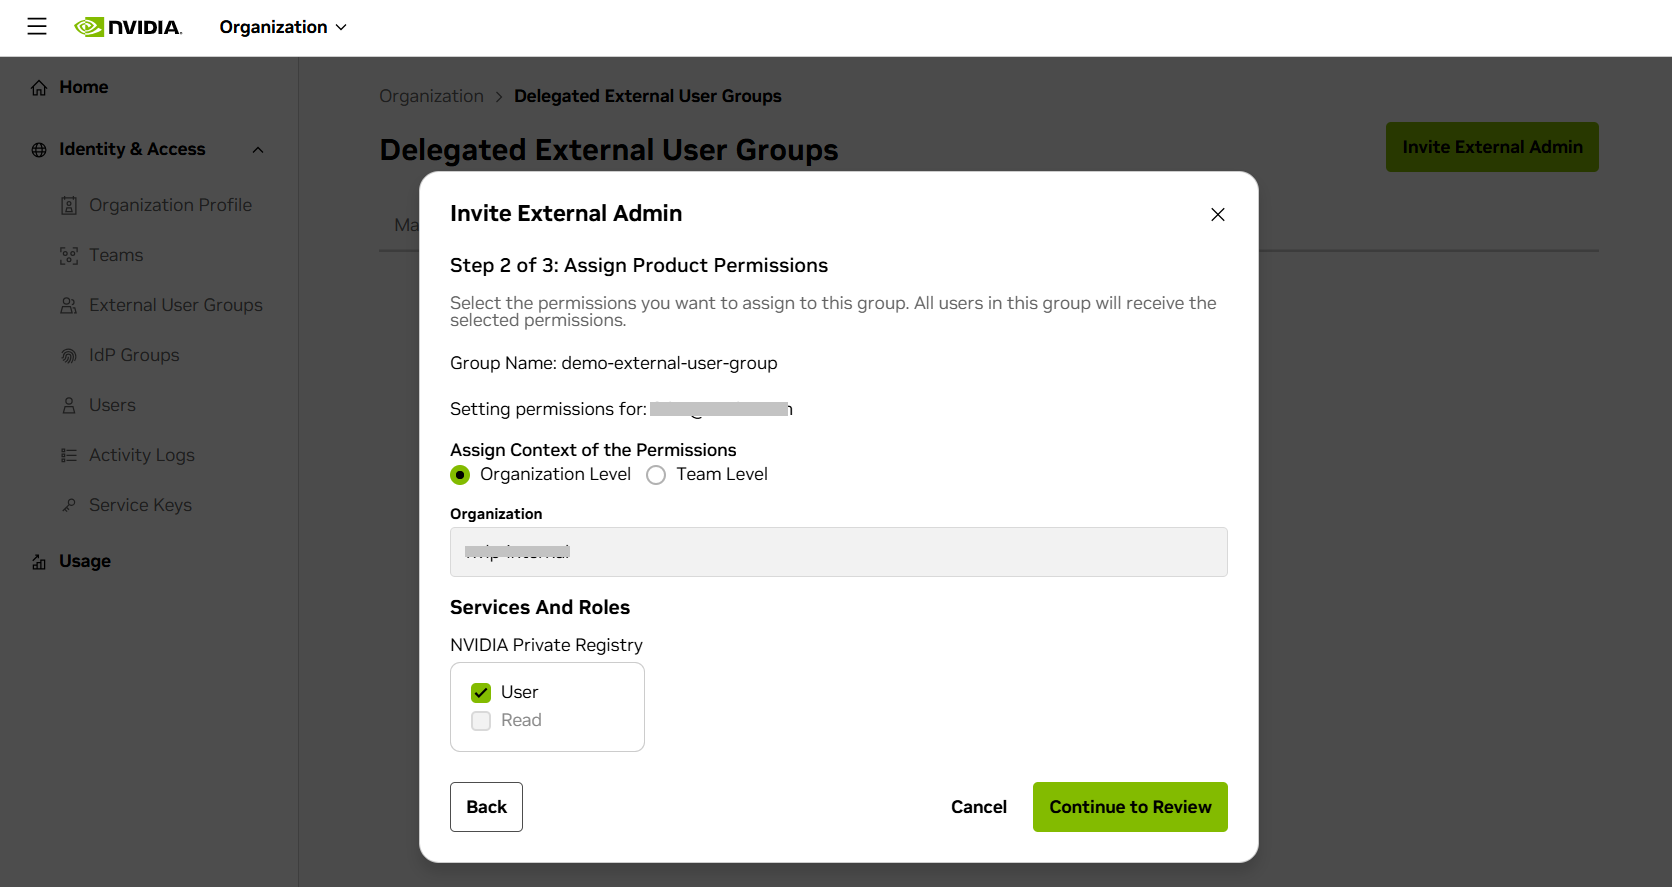
Only subscriptions that support external group sharing are available for selection. Subscriptions that do not support external sharing appear disabled with a tooltip explaining why they are unavailable.
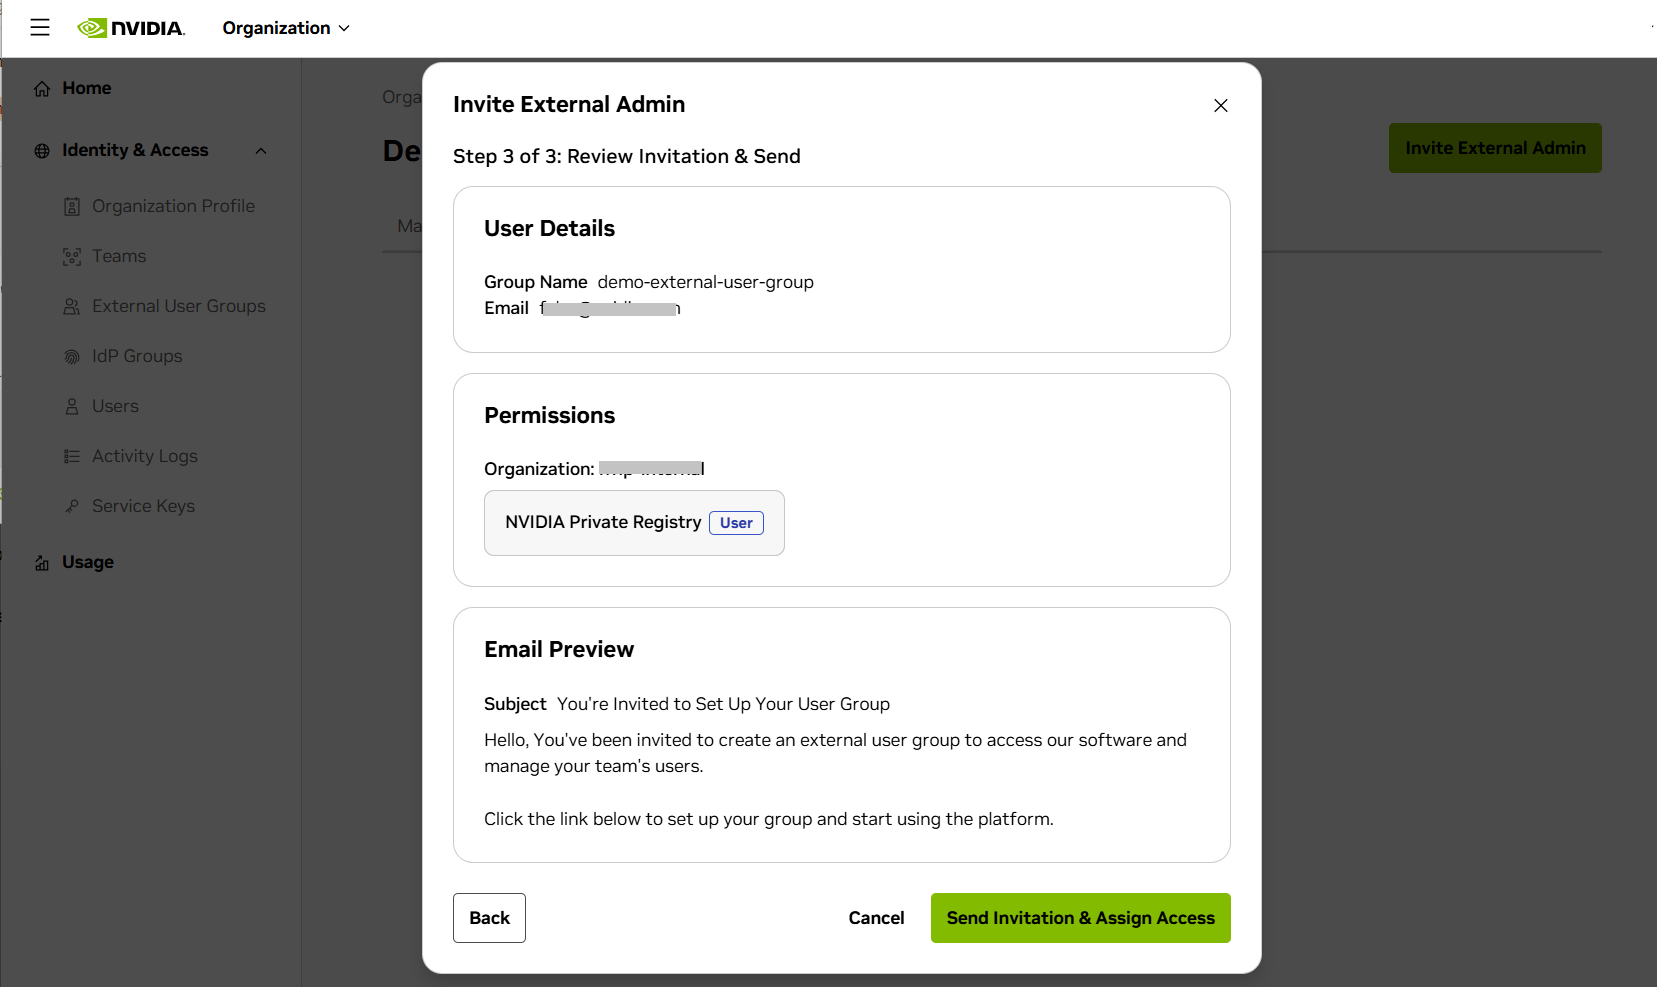
Review the invitation settings, including the email subject line and message preview, then confirm to send the invitation and assign access.
If the invitee reports not receiving the email, ask them to check their junk or spam folder.
1.3.3.6.2.3. Tracking and Monitoring Delegated EUGs#
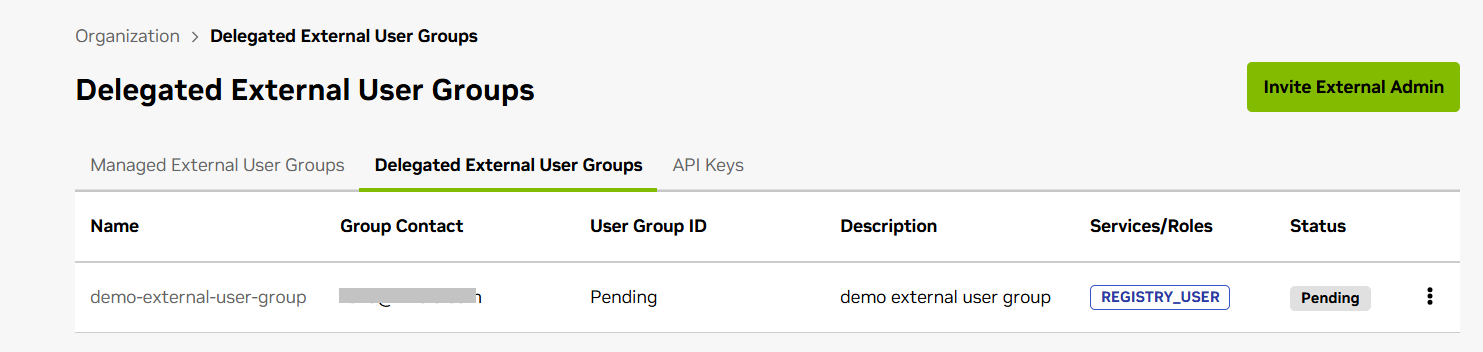
After the invitation is sent, it appears in the Delegated External User Groups list with a Pending status. The invitation can be tracked or revoked from this view.
After the external administrator accepts the invitation and creates the group, its status changes to Accepted. You can open the group details to view the group administrator name, group name, and group ID. Member lists are not visible to the NGC organization owner or administrator.
1.3.3.6.2.4. Advanced Security and Management for Delegated EUGs#
To suspend access for an existing delegated EUG, suspend role permissions in the NGC UI. A confirmation prompt helps prevent accidental changes.
After suspension, all members and administrators of the group lose access to the NGC organization’s shared resources within a maximum of 30 minutes.
You can restore access by updating the group’s roles.
To revoke access associated with an external user’s Personal API Key, navigate to External User’s Personal Keys in the NGC UI. Search by personal key ID or key value, then deactivate.
1.3.3.6.2.5. Persona 2: External dEUG Administrator#
The external dEUG administrator receives the invitation from the NGC organization, creates the delegated group, and manages all user membership within it.
1.3.3.6.2.6. Accepting the Invitation and Creating the Group#
Check your inbox for an invitation email from NVIDIA NGC. If you do not see it, check your junk or spam folder.
Click the link in the email to open the invitation.
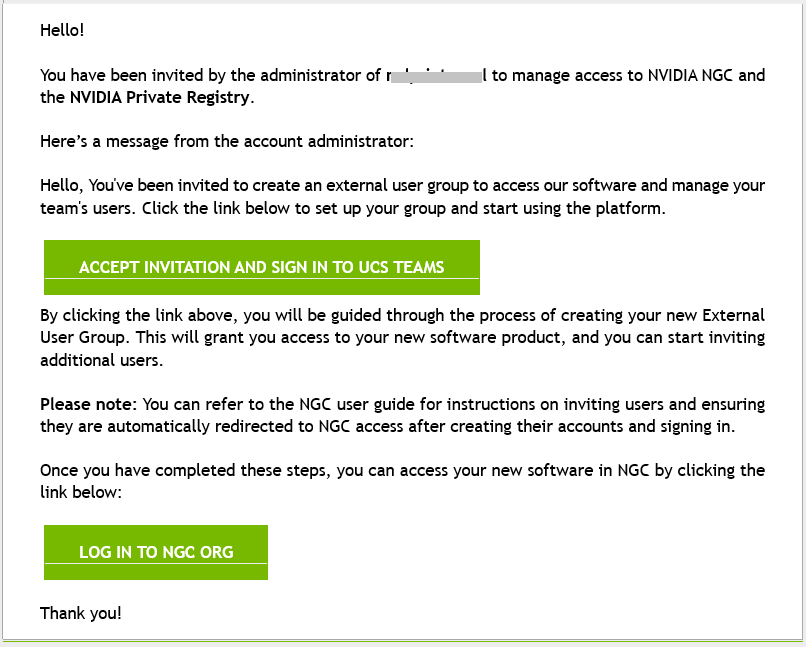
Complete account setup if prompted, including password creation or terms acceptance.
Click Accept Invitation to create the delegated external user group.
To access NGC resources, go back to your email message and click Log In To NGC Org after accepting and creating the group.
From the NGC org UI, you can navigate back to your external user group to manage additional users.
1.3.3.6.2.7. Managing Delegated Group Membership#
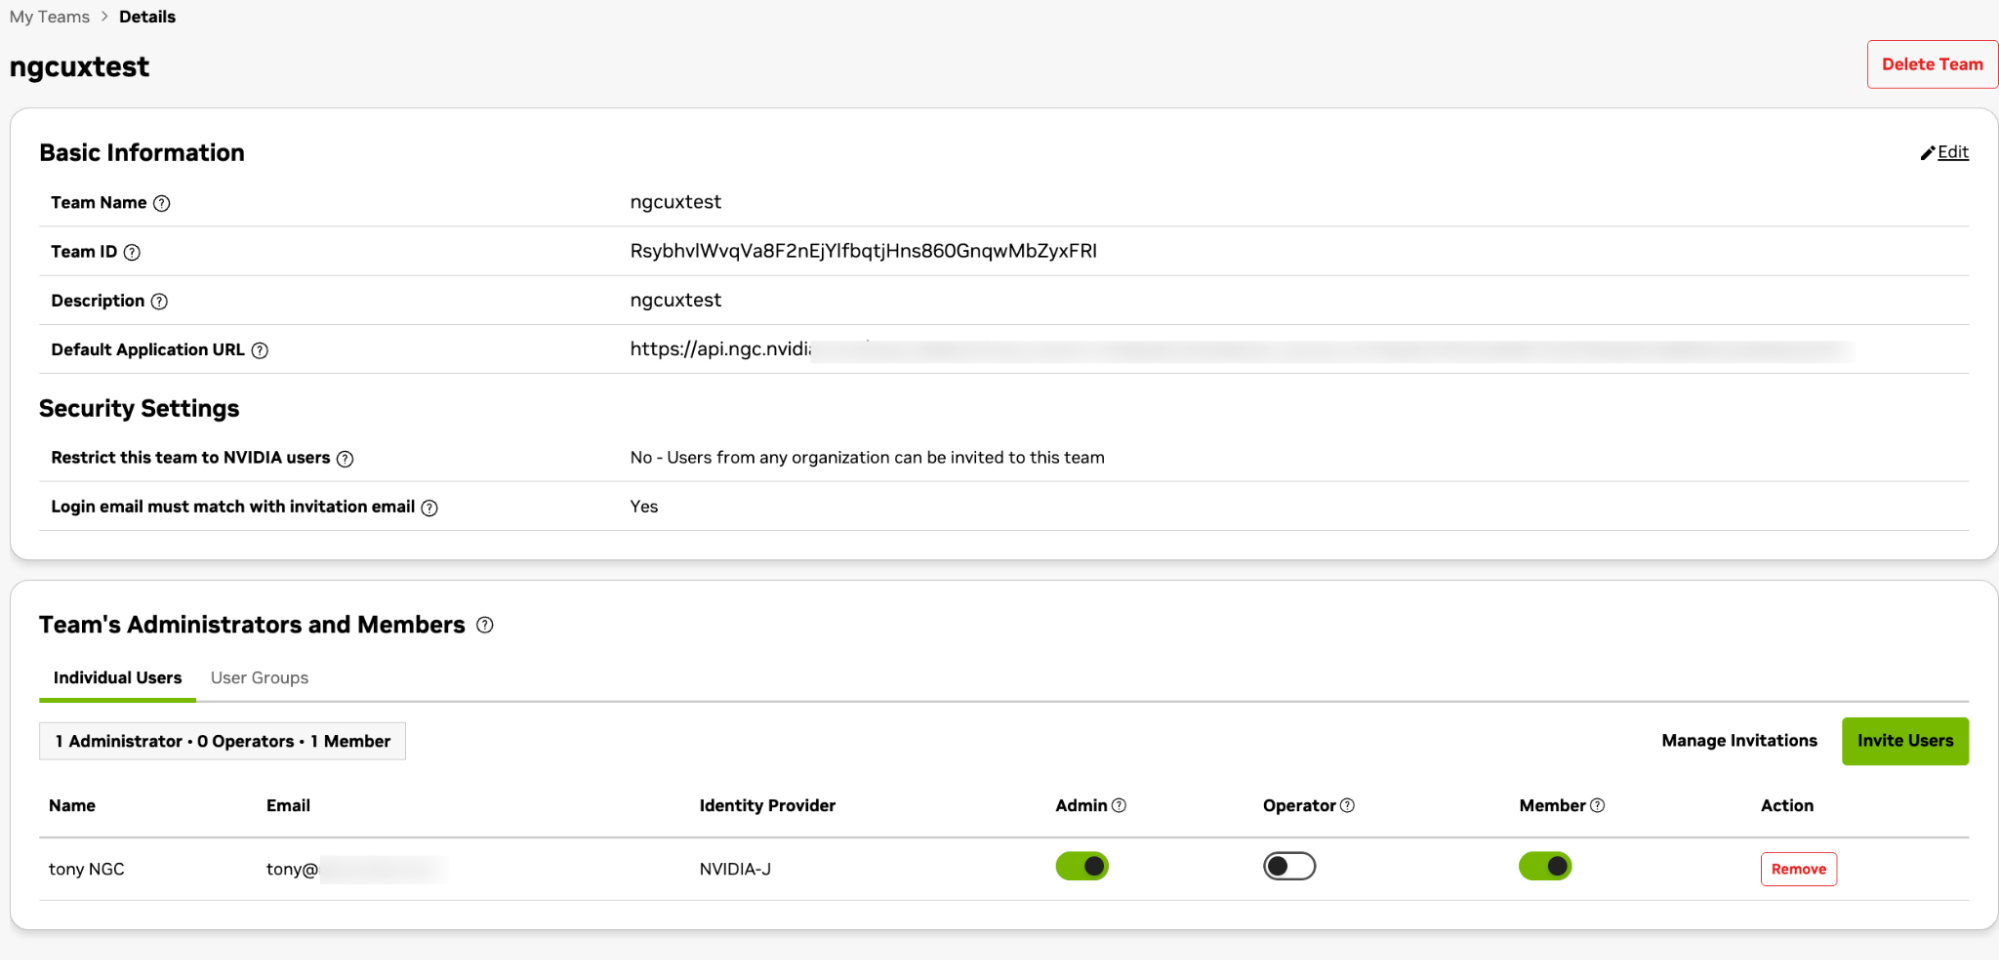
As the group administrator, you control all user membership within your delegated EUG in the NVIDIA UCS Team portal. The NGC organization owner manages the access permissions granted to the group.
Note
Roles are assigned at the invitation level. All users included in a single invitation batch receive the same role. To assign different roles, send separate invitations for each role group.
Admin is the highest-privilege role and can add or remove Admins, Members, and Operators.
Operator can add and remove Members only. Operators cannot manage other Operators or Admins, modify the group name or description, delete the group, change their own role, or change group assignments.
Member can access shared resources but does not have user-management privileges.
Users invited with the Member role are redirected to NVIDIA NGC and can begin accessing the shared NGC resources after accepting the invitation.
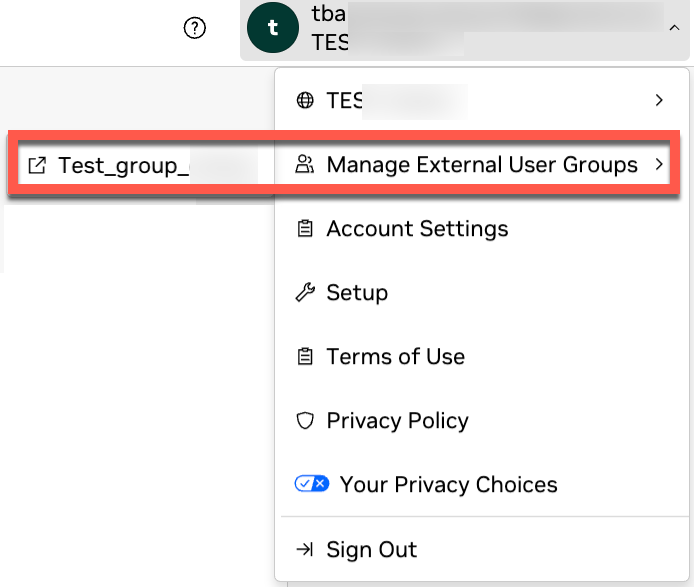
Users invited with the Admin or Operator role are redirected to NVIDIA NGC after accepting the group invitation. To manage group users, they should open the NGC organization application and then use the NVIDIA UCS Team link to access External User Groups in the UCS Team portal.
1.3.3.6.2.8. Monitoring and Resending Invitations#
Use the Pending Invitations tab to track invitations that have not yet been accepted.
After a user accepts an invitation, they move to the Confirmed Users tab.
You can resend expired invitations. Resent invitations keep the same validity period as the original invitation.
1.3.3.6.2.9. Persona 3: External Group User#
External group users receive an invitation to join an existing delegated EUG and access the NGC resources shared with that group.
1.3.3.6.2.10. Accepting the Group Membership Invitation#
Check your inbox for the invitation email. If you do not see it, check your junk or spam folder.
Click Accept Invitation in the email.
If you were assigned the Member role, you are redirected to the NGC sign-in page to access your assigned resources.
If you were assigned the Admin or Operator role, you are directed to NGC to access your assigned resources. From the NGC organization application, you can access the UCS Team portal to manage users in the delegated external user group.
1.3.3.6.2.11. API Access for Delegated External User Group Users#
To access shared NGC resources programmatically, generate a Personal API Key in your NGC account.
Navigate the NGC UI to discover the artifacts shared with your group.
Go to your NGC account settings and generate a Personal API Key.
The permissions on the key are derived from the delegated external user group’s access grants. These permissions are set by the NGC organization owner and cannot be edited by the external user.
Depending on the permissions granted to the group, the key may allow viewing and listing shared artifacts, pulling artifacts, or pushing artifacts.
1.3.3.6.3. Managing External Users’ Personal API Keys#
The API Keys tab under External User Groups lets an NGC organization owner or administrator review and manage Personal API Keys that external users generate for access to shared resources.
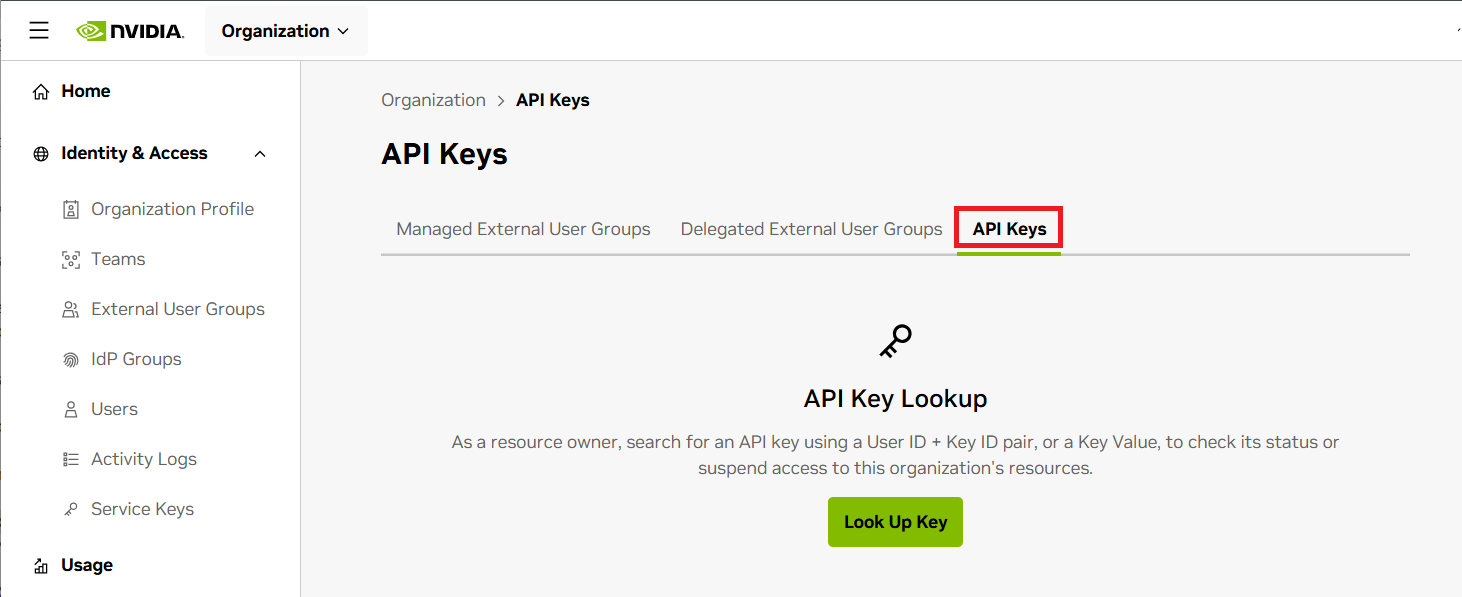
Use this tab when you need to revoke or restore API-key access for an external user without changing the whole group membership.
Search for the key by entering the personal key ID or key value.
If the key is active and has permissions to the shared organization, deactivate it to revoke current permissions to the shared assets.
If the key is deactivated, reactivate it only when access should be restored.
If the key has no permissions to your shared resources, the system confirms that no action is available.
See the NGC API keys documentation for general API key information.
1.3.3.6.4. Setting Up API Access#
To access shared organization resources via CLI or API, you’ll need to generate a personal key:
On the API Keys page, click Generate Personal Key.
Important
If the Generate Personal Key button is inactive, follow these steps:
Create an NVIDIA Cloud Account (NCA) where you are an active member.
Create and activate an NGC organization in that account. This organization will authorize your personal key for the shared organization where you are an external user.
Return to generate your key.
To create your NCA and NGC organization:
Click Create NVIDIA NGC Org and authenticate with your NVIDIA Cloud Account credentials.
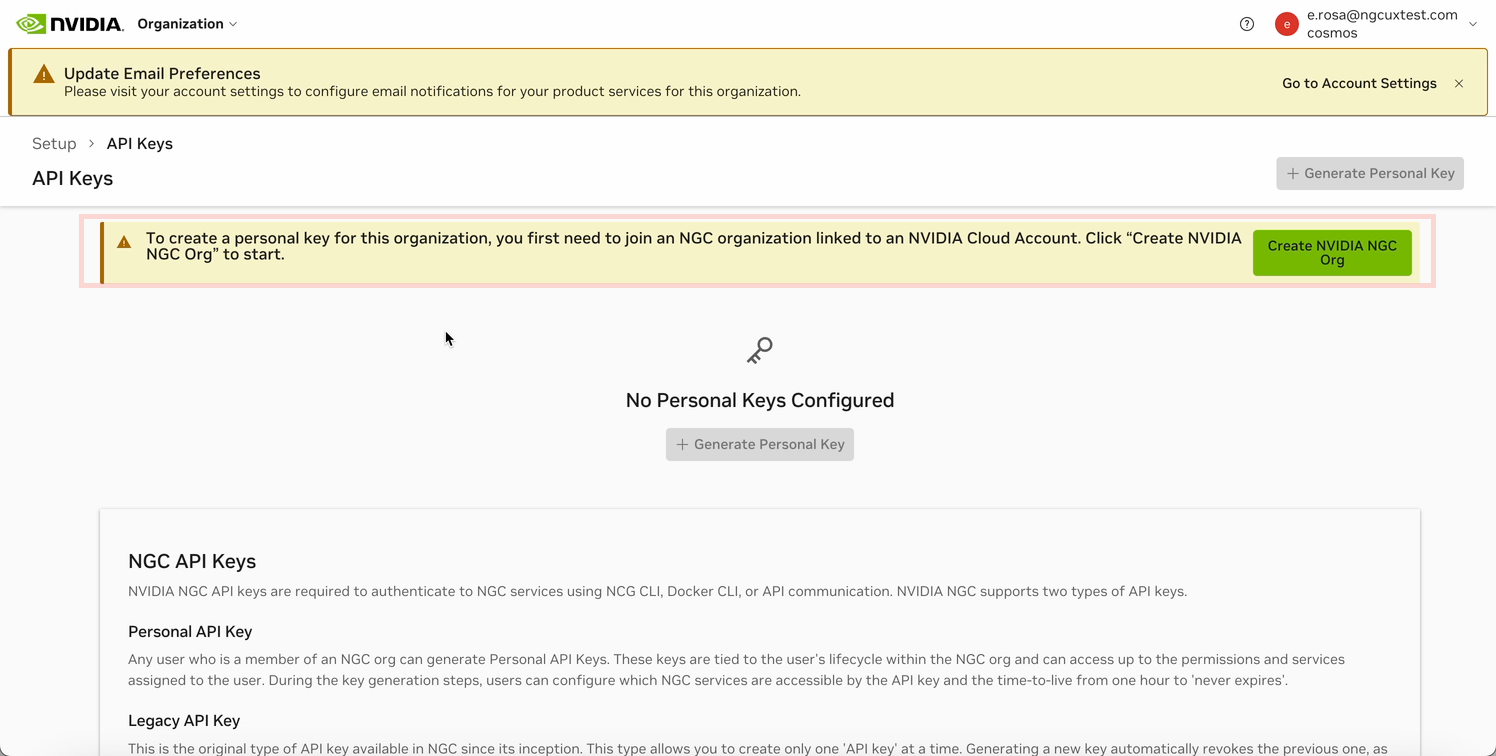
Enter a name for your NCA and click Create NVIDIA Cloud Account.
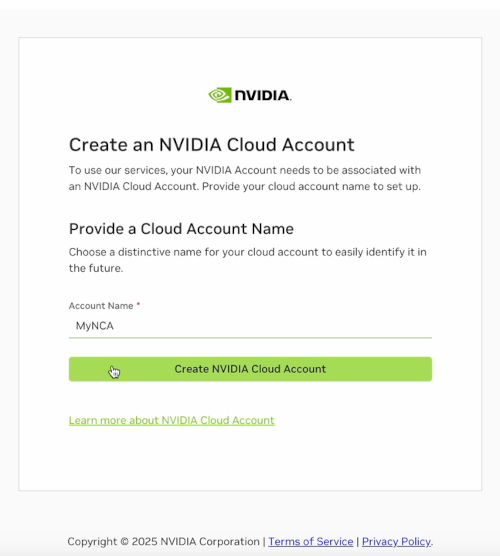
Click Continue to return to the NGC Personal Key management page.
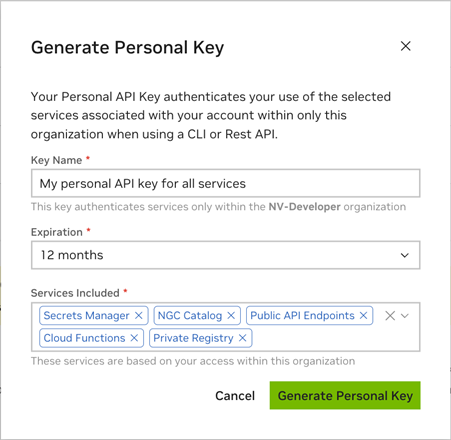
Configure your personal key:
Key Name: Enter a descriptive name that identifies the key’s purpose.
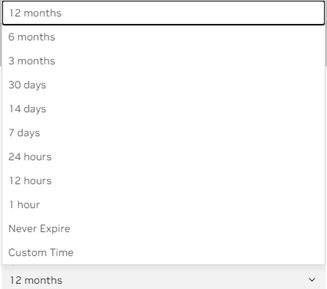
Expiration: Choose a preset period, set a custom date, or select “never expire”.
Services Included: Select the services this key will access.
User Organization: Select an NGC organization you belong to (required for key authorization).
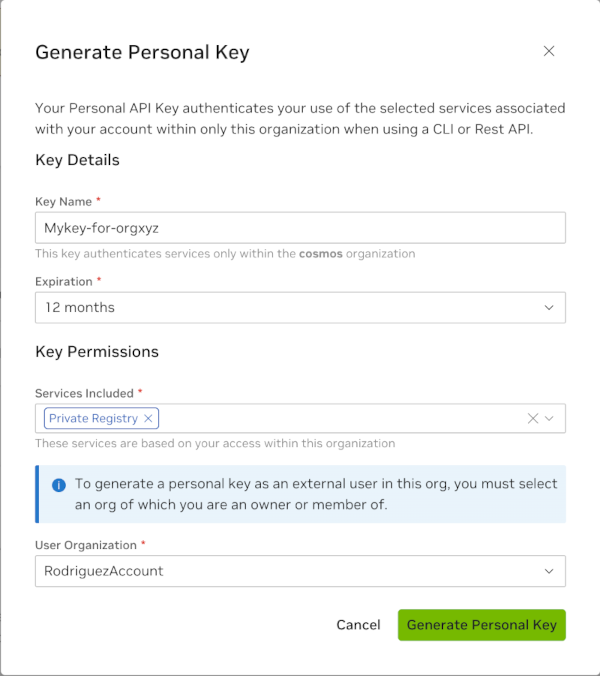
Click Generate Personal Key.
Warning
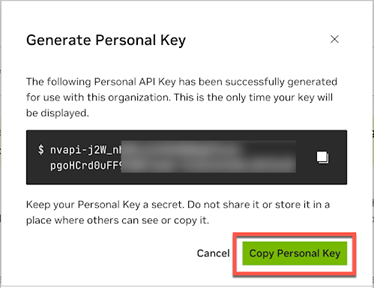
Copy and store your key immediately; it will only be shown once.
For additional information:
See the NGC API keys documentation for general API key information.
Refer to the NGC Catalog and NGC CLI guide for using your key with CLI clients.
1.3.4. Transferring Your Product Activation Invitation#
When you receive an NGC product activation email and want to activate the product in an account you don’t own, you must transfer the product activation invitation to the account owner. Follow the steps below to transfer.
Note
The account selector supports activation invitation transfers only for invitations received directly from NGC. For “NVIDIA entitlement certificate” activations, contact your org owner.
To transfer a product, at the Activate Product page, click View All NVIDIA Cloud Accounts. This displays accounts you are a member of but do not own; those without the ‘owner’ tag are not owned by you. Review carefully to identify the account associated with the desired NGC organization before starting the transfer process.
Click the Transfer Product Activation link under the Actions column.
Review the pop-up indicating that the transfer cannot be undone and confirm that you are certain about proceeding with the transfer.
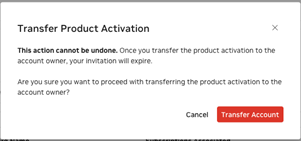
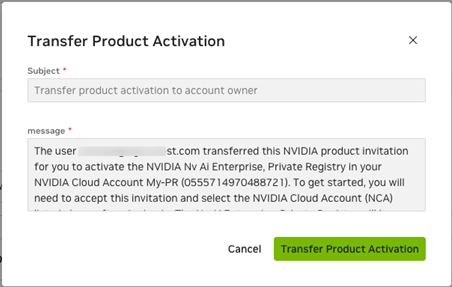
Check the default email template for accuracy, then click Transfer Product Activation. Editing is optional if the content is correct.
1.4. Accessing NGC Org#
Activating an NVIDIA NGC product depends on how you obtained the product activation message. This chapter provides comprehensive instructions for activating your NGC product, regardless of whether you received an NGC email invitation from NGC (noreply-ngc@nvidia.com), an NVIDIA commercial entitlement certificate (noreply@nvidia.com), or you registered for a free individual NGC organization. It outlines the steps to create and link your NVIDIA Identity account and NVIDIA Cloud Account to your NGC organization, and details the activation process required to access NGC products.
1.4.1. Activating Your NGC Product from an NGC Email Invitation#
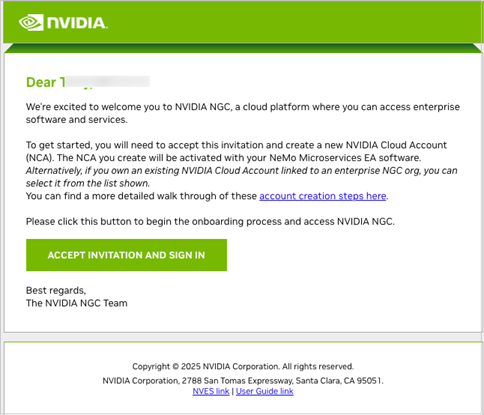
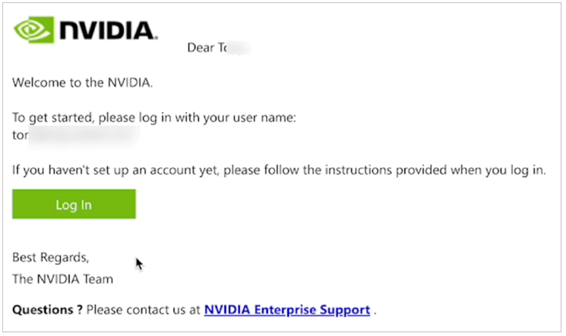
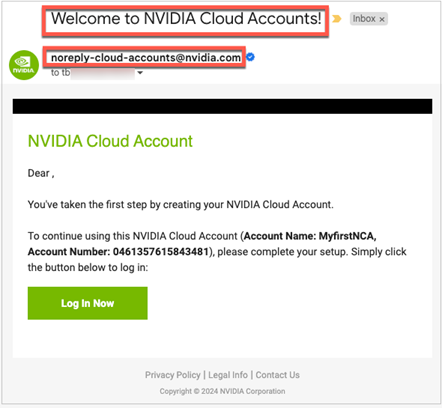
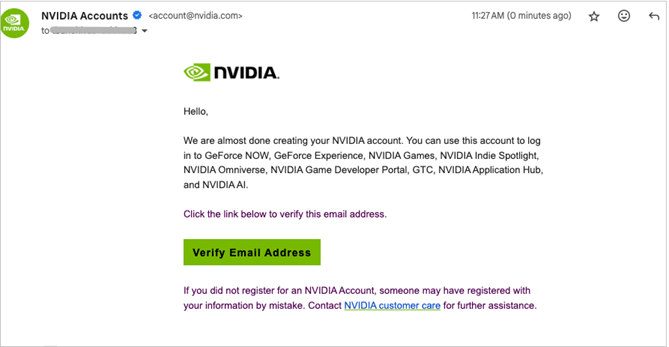
Customers can try upcoming NVIDIA NGC AI products through NVIDIA Developer or by engaging directly with the NVIDIA product team. Once approved, you will receive a welcome email from NVIDIA NGC, similar to the image shown below, guiding you on how to begin your onboarding process and activate the software. To access NGC, you need to be a tenant of an NVIDIA Cloud Account used to manage access to NGC for you and additional users. The following sections explain how to use your NVIDIA NGC welcome email.
If you’re already an NVIDIA NGC user, go directly to NGC Product Activation by Invitation - Existing User.
1.4.1.1. NGC Product Activation by Invitation - New User#
This section describes the steps necessary to activate a new NGC product as a new user on NVIDIA NGC.
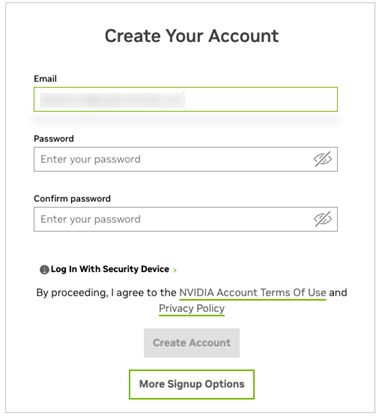
Go to your inbox to find the email “Welcome to NVIDIA NGC”. Click the Accept invitation and sign-in button.
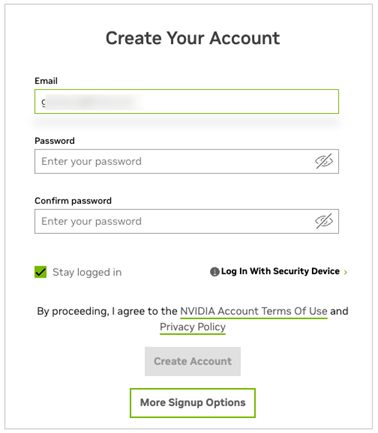
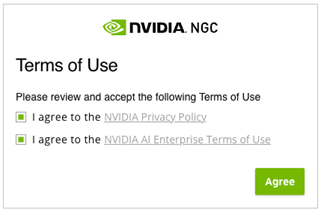
To create your NVIDIA sign-in identity account, type in a password and confirm it (must meet the complexity check), review the NVIDIA account Terms of Use and Privacy Policy, and click Create Account to accept and proceed with your identity account creation.
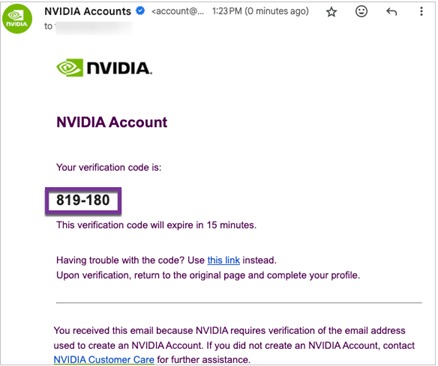
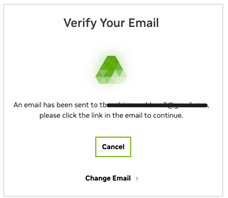
A verification email is sent to your email address.
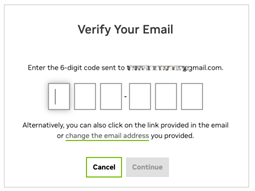
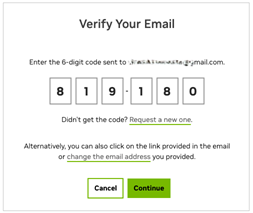
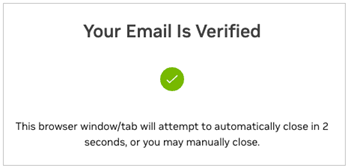
Open the email, copy the code, paste it in the Verify Your Email screen, and click Continue.
You may see an additional browser page open to validate the creation of your user account. Close this page and return to the browser page you started on.
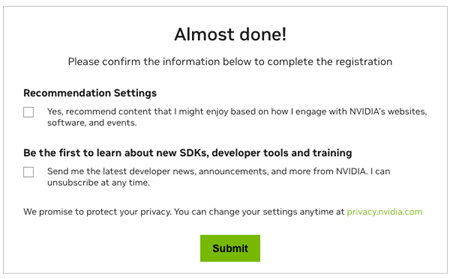
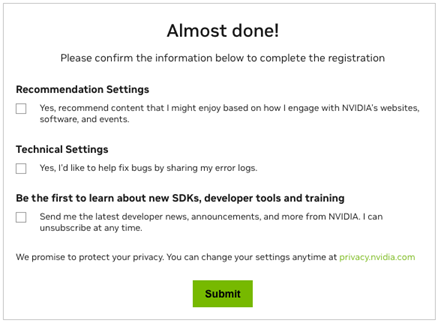
In the Almost done! dialog, select your communication preferences, and then click Submit.
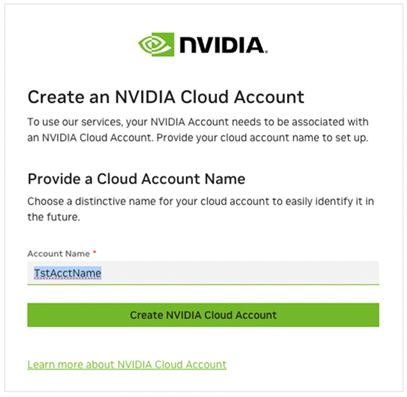
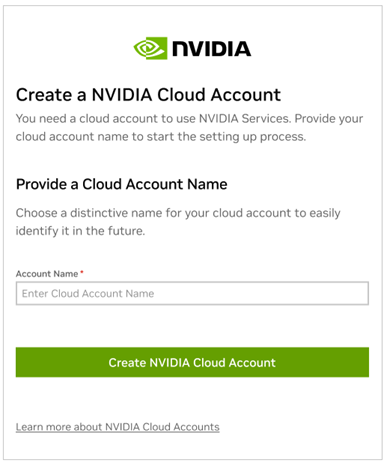
You must now complete the creation of your new NVIDIA Cloud Account. Provide a meaningful name (spaces are not allowed) that helps you identify it easily against other accounts you own or are a member of.
Note
Creating a new NCA will generate a new NGC org where your product will be activated. The NGC org is directly linked to this NCA.
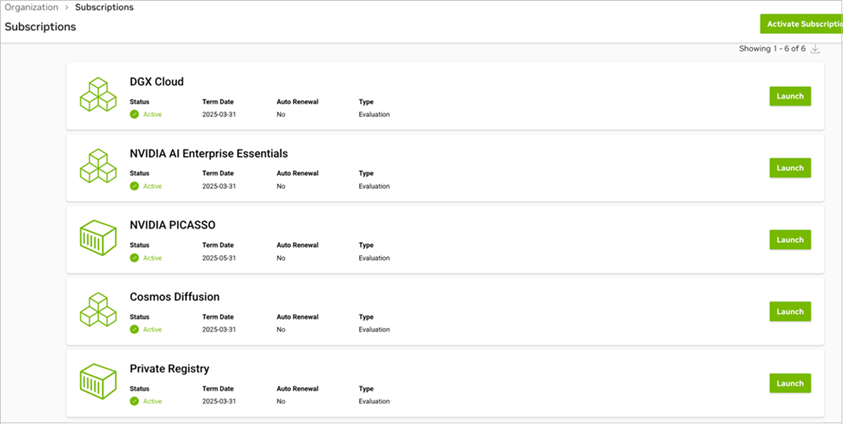
You’ve now activated your NGC product, and you will be redirected to the NGC org subscription page where you can verify your product is active.
That’s it! You’re all set up with your product.
Optional: You should have received a welcome email from your NVIDIA Cloud account. You can choose to complete the setup of your account now or at a later time.
Complete the steps in Setting up your NCA Account to configure your NCA account. The users you add to your NGC org are automatically added to the NCA account. To remove users or update NCA-related tenancy settings for a user, you need to take these actions in NCA.
Note
You cannot access NGC and NGC permissions cannot be assigned in NCA. NCA only manages user tenancy membership. To add users and assign NGC permissions, perform these actions in Adding NGC Users to an Org.
1.4.1.2. NGC Product Activation by Invitation - Existing User#
This section describes the steps to activate a new NGC product invitation when you already have an NVIDIA NGC organization.
Go to your inbox to find the email “Welcome to NVIDIA NGC”. Click the Accept invitation and sign-in button.
Sign in to your NVIDIA identity account.
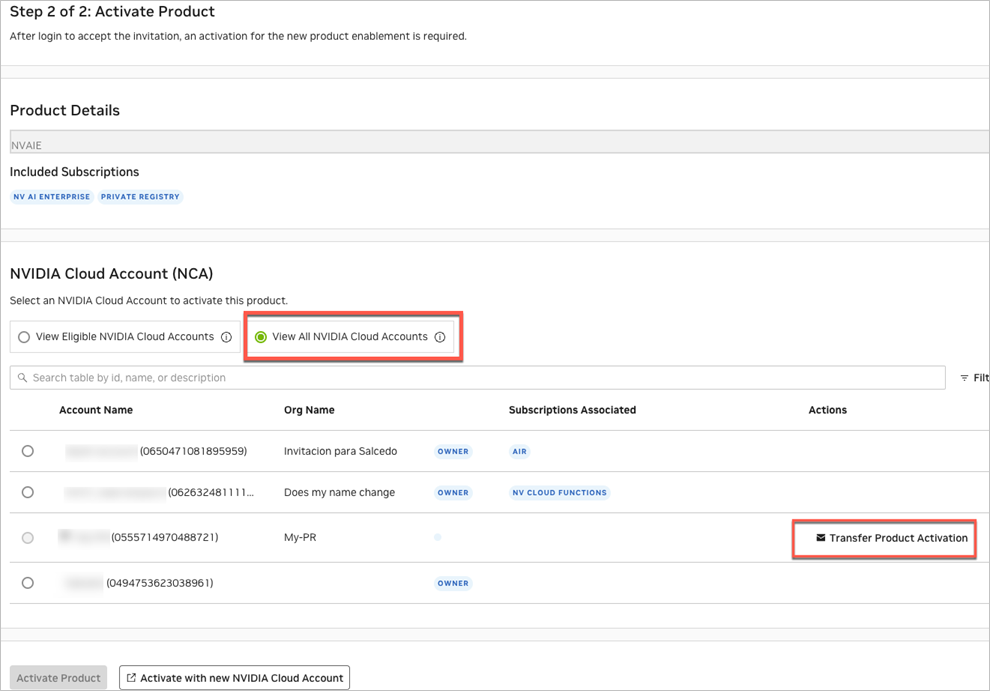
Review the product details you want to activate on the Activate Product page, select the account under which the product should be activated, and click Activate Product. By default, only the accounts eligible to activate the product are displayed. Alternatively, you can activate the new product under a new account and NGC organization by clicking Activate with a new NVIDIA Cloud Account.
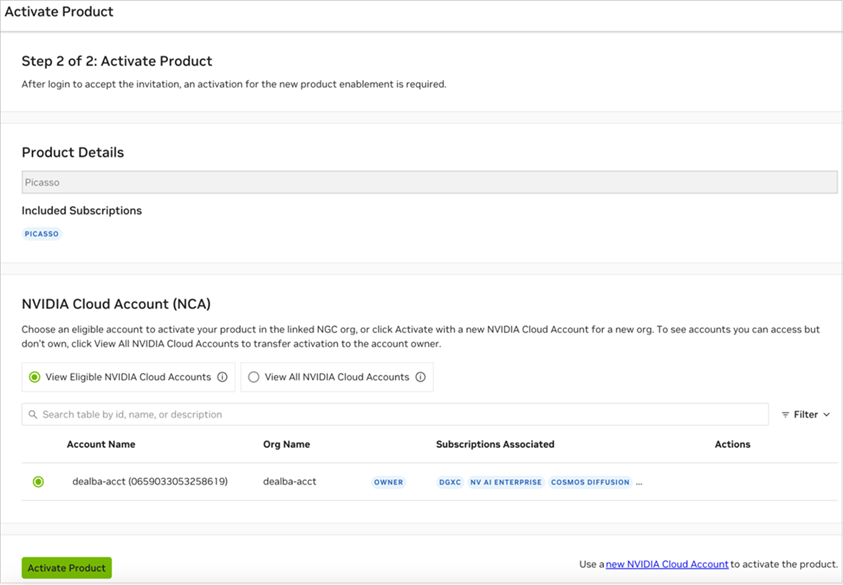
Note
If you want to activate the product in an account you do not own, transfer the product activation invitation to the owner. See Transferring Your Product Activation Invitation for the transfer steps.
You’ve now activated your NGC product, and you will be redirected to the NGC org subscription page where you can verify your product is active. Click the Launch button for the service you want to access.
That’s it! You’re all set up with your product.
Optional: You should have received a welcome email from your NVIDIA Cloud account. You can choose to complete the setup of your account now or at a later time.
Complete the steps in Setting up your NCA Account to configure your NCA account. The users you add to your NGC org are automatically added to the NCA account. To remove users or update NCA-related tenancy settings for a user, you need to take these actions in NCA.
Note
You cannot access NGC and NGC permissions cannot be assigned in NCA. NCA only manages user tenancy membership. To add users and assign NGC permissions, perform these actions in Adding NGC Users to an Org.
1.4.2. Activating NGC Product from an NVIDIA Commercial Entitlement Certificate#
When you procure a software subscription for an NVIDIA product, you’ll receive an entitlement certificate attachment in an email with instructions on how to claim your entitlement. The following steps guide you through the entitlement registration process.
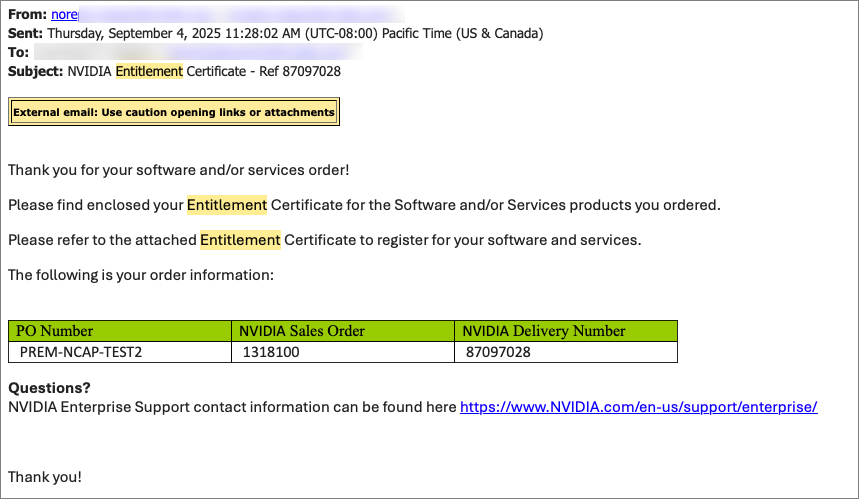
Find the Entitlement Certificate Email
Open your email inbox and locate the email titled “NVIDIA Entitlement Certificate - Ref” containing your entitlement certificate attachment.
Here is a sample entitlement certificate email:
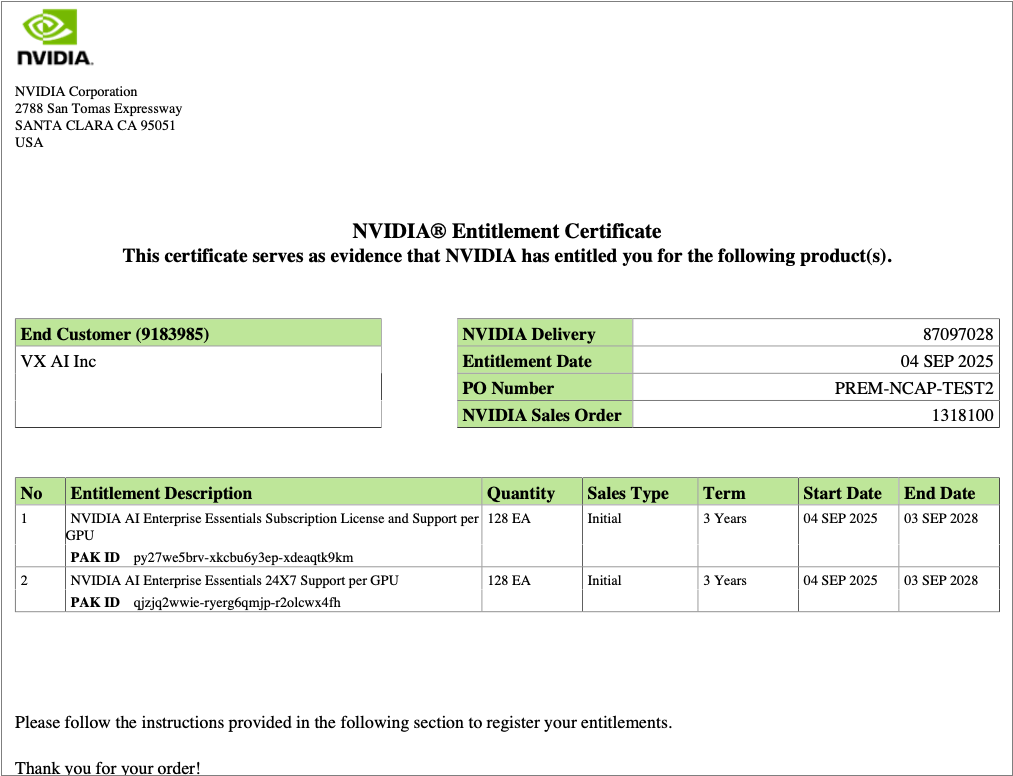
The entitlement certificate is provided as a PDF attachment. The following is an example:
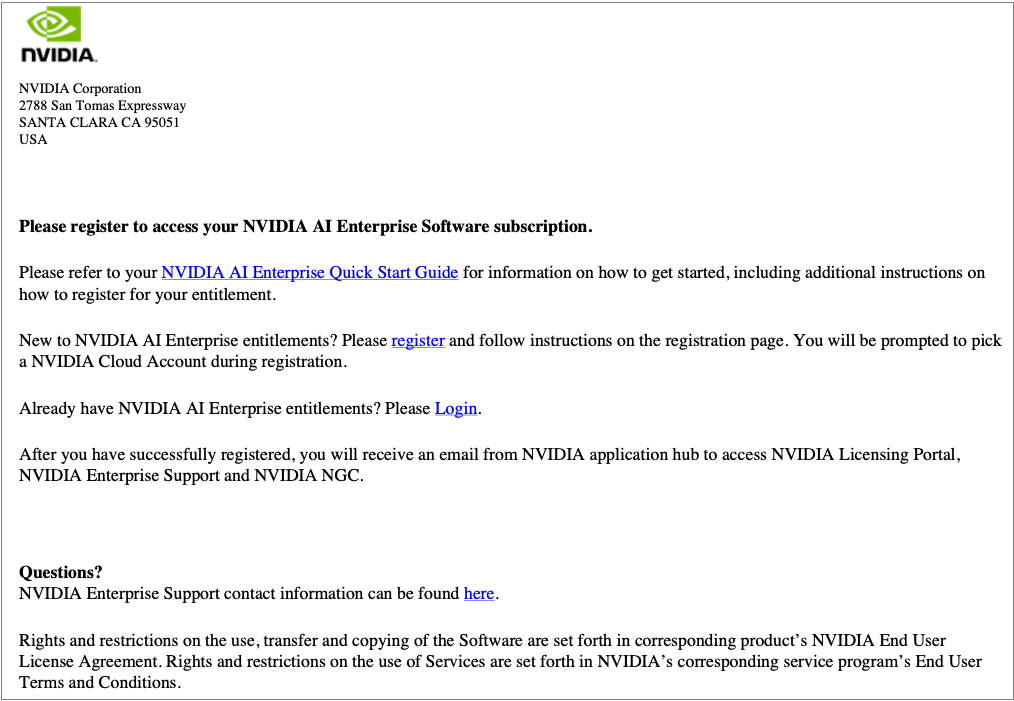
The PDF also includes instructions for using the certificate. Here is an example:
Login or Register
If you’re an existing NVIDIA customer, click Already have an entitlement? Please Login.
If you’re a new NVIDIA customer, click register to begin claiming your entitlement.
Sign In
Enter your username. If you are using an NVIDIA user account, your username will be your email address. If you are signing in through your corporate single sign-on portal, please use your company username. After entering your username, click Sign In.
Existing NVIDIA customers: Enter your password, and then click Login.
New customers: Create a new identity user account by setting a password.
Select or Create an NVIDIA Cloud Account (NCA)
Follow the steps below for returning or new customers.
For returning customers:
The registration page displays different options for product activation.
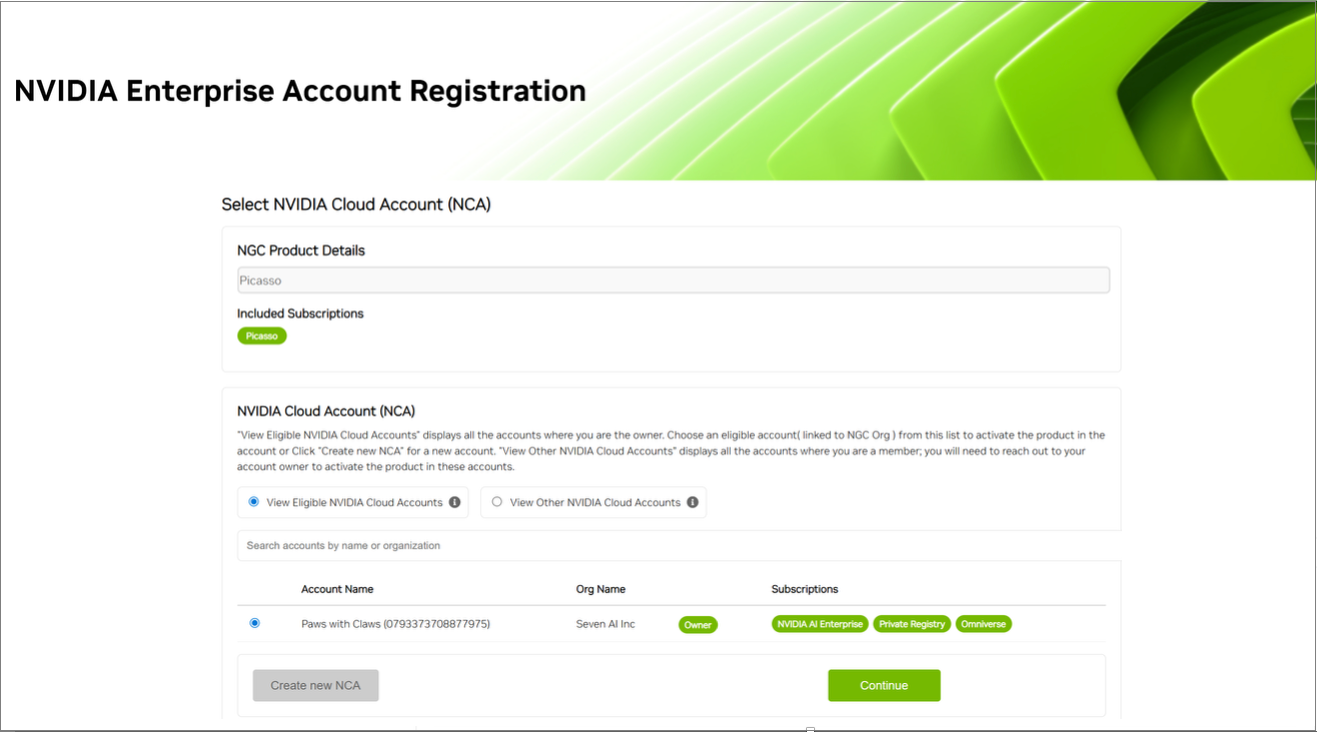
Option A: Use an existing NCA
In the NCA pane, select View Eligible NVIDIA Cloud Accounts to review available accounts that you own.
Check the associated NGC org and active product subscriptions for each account.
Select the desired account and click Continue.
Option B: Create a separate org
Click Create new NCA to activate your product in a separate NGC org.
Follow the steps below for creating new accounts.
Option C: Use an account you don’t own
If you need to activate the product in an account you’re a member of that is owned by someone else (under View Other NVIDIA Cloud Accounts):
Cancel the current registration process.
Contact the account owner to request product activation.
See Contacting your Org Owner for more details.
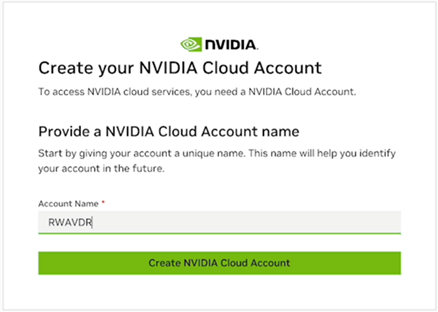
For new or returning customers choosing to create a new account:
You will be prompted to create a new NCA.
Choose a meaningful account name for easy identification.
Click Create NVIDIA Cloud Account when done.
Complete Entitlement Registration
After selecting or creating an NCA, you will be directed to the entitlement registration page. Fill out the required fields and click Register.
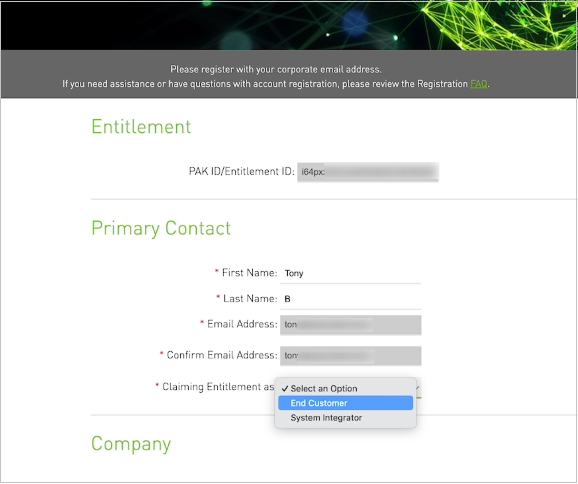
Required Information:
- Primary Contact Information
First Name
Last Name
Email Address
- Primary Contact Details
Location (Country)
Address
Phone
Job Role
Email Confirmation and Access
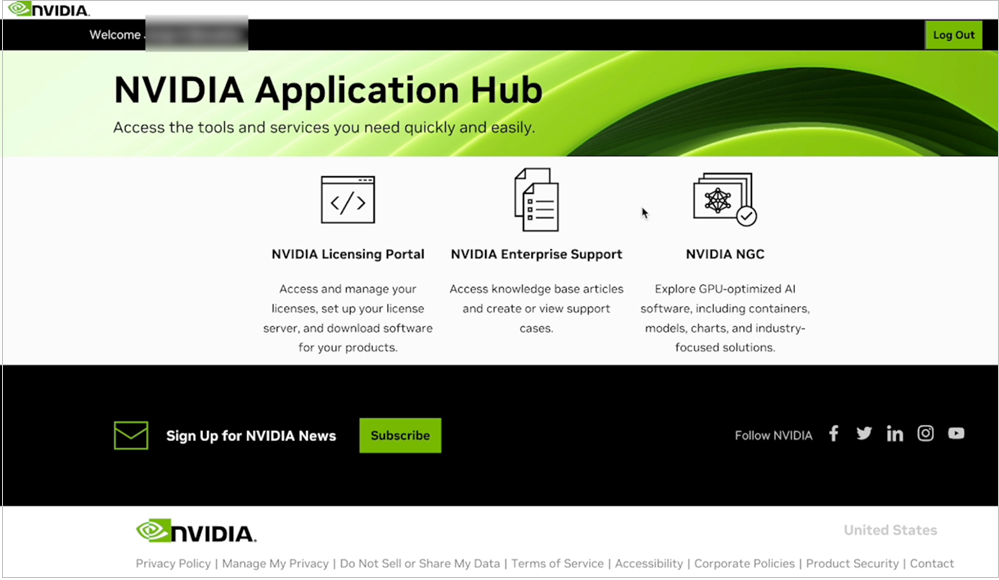
After a successful registration, you’ll receive an email from NVIDIA Application Hub:
Click Log In to go to the hub.
Click the NVIDIA NGC card to access your software subscription in NGC.
When you are in NGC, you can add additional users so they can access NGC by following the steps in Adding NGC Users to an Org.
Your registration is now complete!
Optional: You can log in to NVIDIA Cloud Accounts to set up your recovery email.
Note
You cannot access NGC and NGC permissions cannot be assigned in NCA. NCA only manages user tenancy membership. To add users and assign NGC permissions, perform these actions in Adding NGC Users to an Org.
1.4.3. Signing Up for a Free Individual NGC Org#
This section describes the steps to sign up for an individual NGC org to access NGC Catalog artifacts gated by authentication. While setting up the NGC org, an NVIDIA Cloud Account is also created.
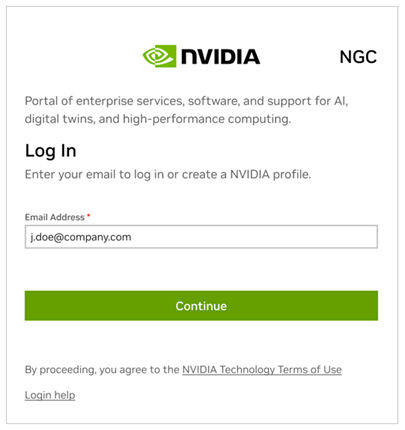
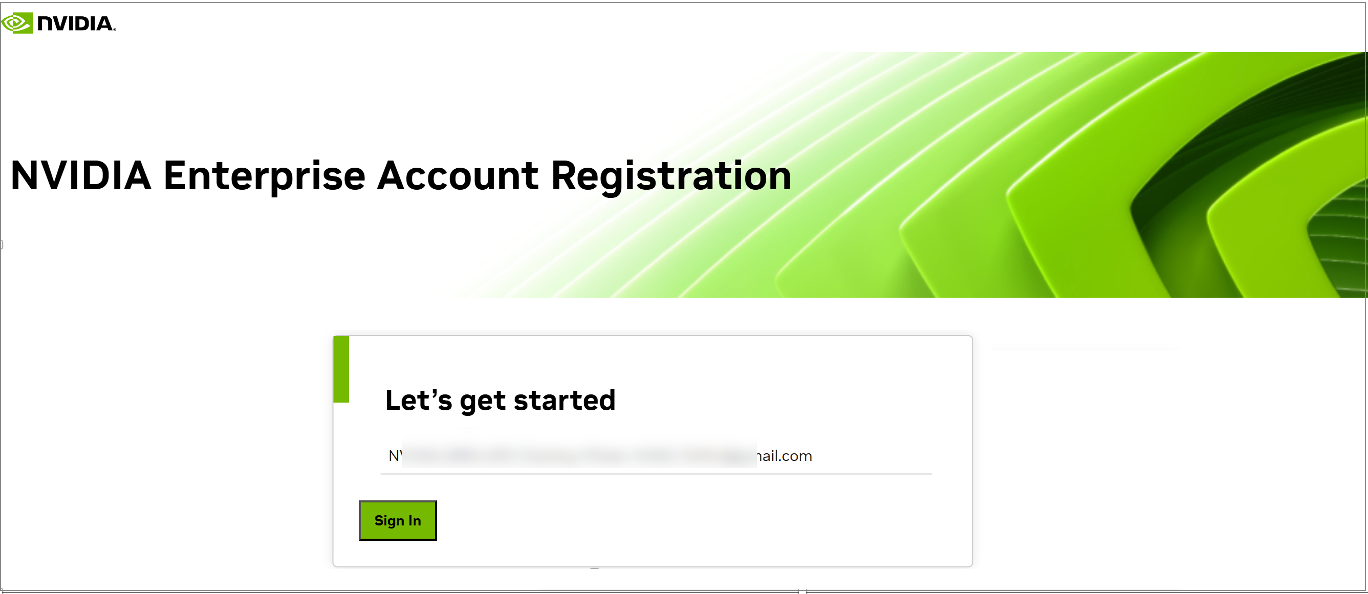
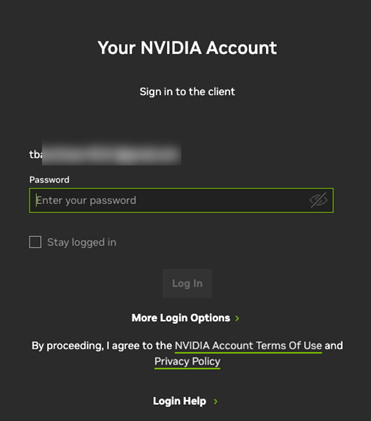
Go to the NGC sign-in page from your browser, enter your email address, and then click Continue.
To create your NVIDIA sign-in identity account, type in a password and confirm it (must meet the complexity check), review the NVIDIA account Terms of Use and Privacy Policy, and click Create Account to accept and proceed with your identity account creation.
A verification email is sent to your email address.
Open the email, copy the code, paste it in the Verify Your Email screen, and click Continue.
You may see an additional browser page open to validate the creation of your user account. Close this page and return to the browser page you started on.
In the Almost done! dialog, select your communication preferences, and then click Submit.
Give your NVIDIA Cloud Account (NCA) a name that will help you identify it easily the next time you sign in.
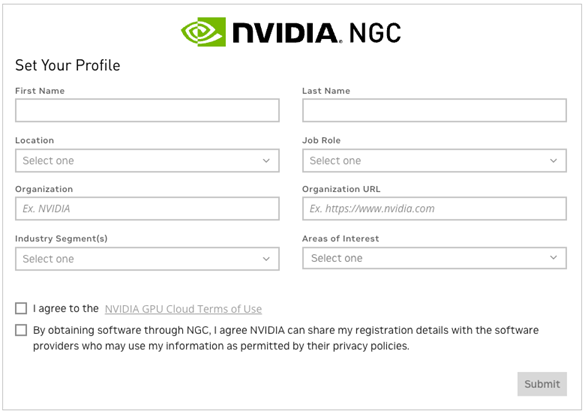
Complete your user profile at the Set Your Profile screen, agree to the NVIDIA GPU Cloud Terms of Use, and then click Submit.
Your NVIDIA account is created, and you are automatically redirected to your individual NGC org.
Your registration is now complete.
Optional: From the NCA email, complete the steps in Setting up your NCA Account to configure your NCA account. The users you add to your NGC org are automatically added to the NCA account. To remove users or update NCA-related tenancy settings for a user, you need to take these actions in NCA.
Note
You cannot access NGC and NGC permissions cannot be assigned in NCA. NCA only manages user tenancy membership. To add users and assign NGC permissions, perform these actions in Adding NGC Users to an Org.
1.4.4. Setting up your NCA Account#
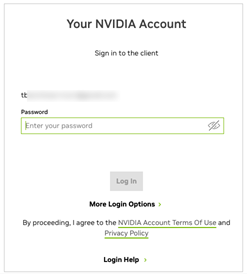
To finish setting up your NVIDIA Cloud Account, find your NCA invitation email message in your inbox and click Log In Now.
Your NVIDIA Cloud Account (NCA) provides the services to set up a recovery email address in case your existing one becomes unavailable, manage access for additional users (subscription required), and set up billing information to purchase consumption-based NVIDIA cloud products.
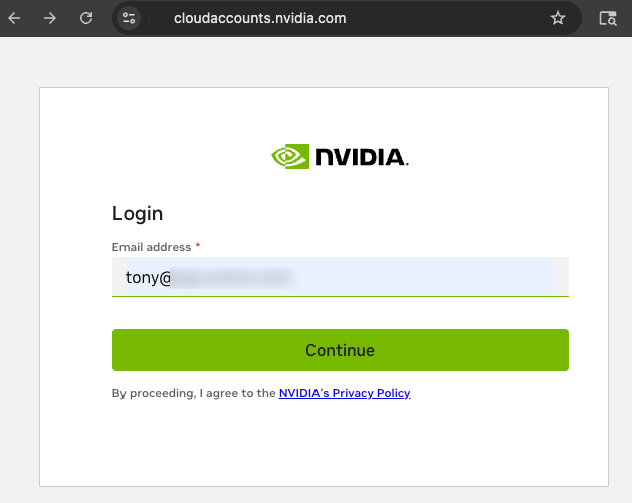
Enter your email address to log in and click Continue.

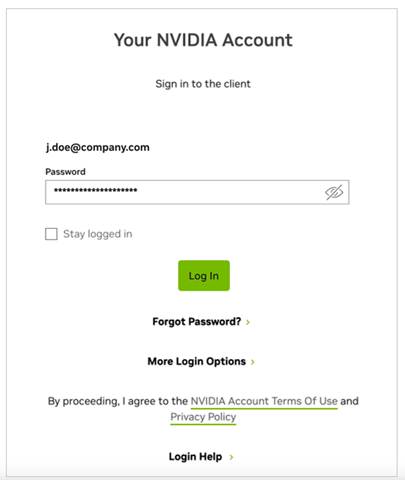
Enter the credentials you created for your NVIDIA identity account.
On the NCA landing page you can find the details of your account. Here you can set up a recovery email address that can be used to regain access if the email address you used to create your account becomes unavailable. Go to Setting Up NCA Recovery Email for steps on how to set up your recovery email.
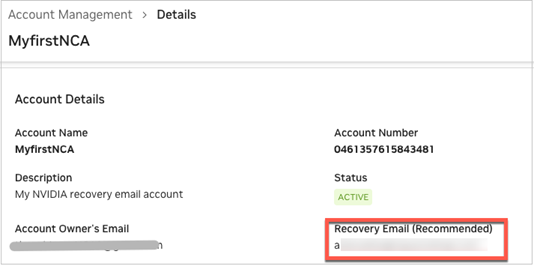
1.4.4.1. Setting Up NCA Recovery Email#
To set up your NVIDIA Cloud Account (NCA) recovery email, follow these steps.
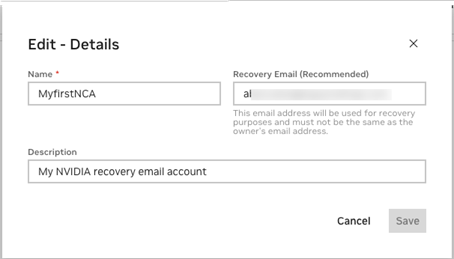
Click Edit on the Account Details pane under the Account Management > Details page.
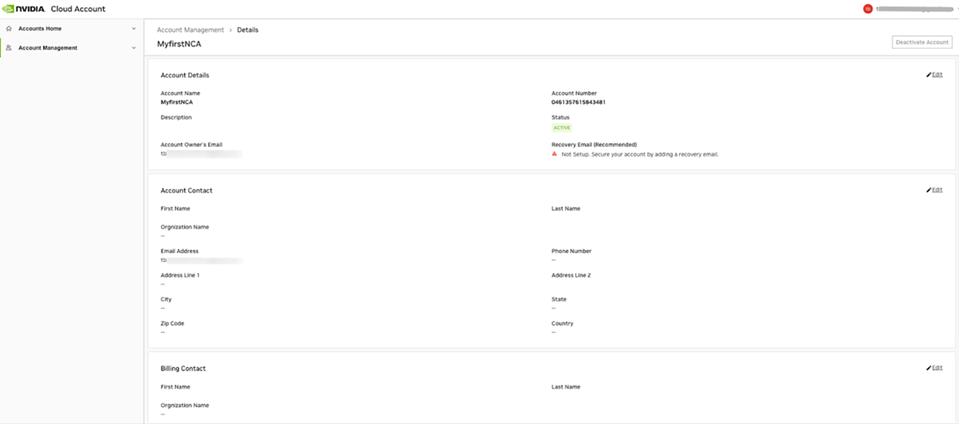
On the Edit - Details dialog, enter the email address that you want to use for account recovery. This email address must be different from the address used to create the account. You can optionally set a description for this account. Click Save.
Check to see that the recovery email status on the Account Details pane changed to Pending.

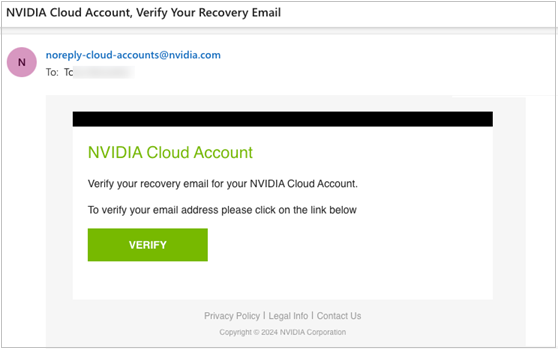
Go to your recovery email inbox, search for the NVIDIA message with the title “NVIDIA Cloud Account, Verify Your Recovery Email”, and click Verify.
You should see that your email has been verified.
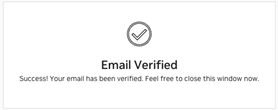
Go back to your NCA console and check that the recovery email status has been updated with the address you assigned.
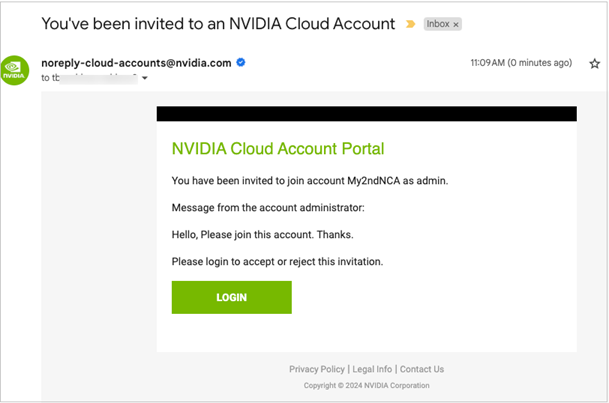
1.4.5. Accepting an NCA Invitation to Access NGC#
Follow these steps to accept an invitation to join an NVIDIA Cloud Account and access NGC.
Check your email inbox for a message titled “You’ve been invited to an NVIDIA Cloud Account.” Open the email and click Login to proceed.
If you are new to NVIDIA, you are prompted to create an NVIDIA identity account. Create a password that is at least 9 characters long and uses a mix of uppercase and lowercase letters, numbers, and special characters. If you already have an NVIDIA identity account, enter your password to continue. You can skip to Step 6 below.
You will be asked to verify your email address in a confirmation email.
Check your email inbox for a message titled “NVIDIA Accounts”. Open the email and click Verify Email Address.
The email confirmation message will display in your browser.
NVIDIA would like permission to send you the latest news related to our software and products, as well as learn more about how you use our websites to make sure we send you information relevant to you. Select your options and click Submit.
You are prompted by NVIDIA Cloud Accounts to accept the invitation to join your company’s account. Click Accept Invitation to continue joining.
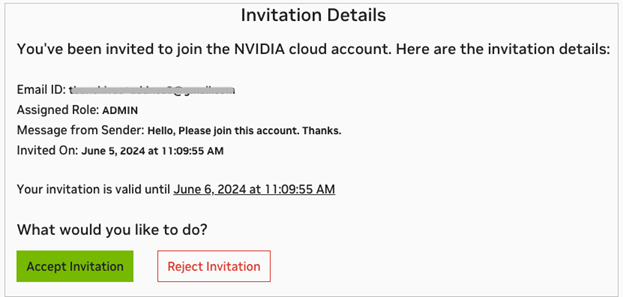
Enter your password (required for security).
Accept the terms of use and privacy policy to access your software subscription.
You can now access the NGC org.
1.5. Using an External SSO for Enterprise Platform Authentication#
An enterprise org can federate its external SSO/IdP with NVIDIA to centralize user authentication and manage access to NVIDIA cloud services. When you federate, the following NVIDIA services are involved:
Service |
Access |
|---|---|
NVIDIA NGC |
Access to NGC Catalog, Private Registry, and other NVIDIA AI services |
NVIDIA Application Hub |
Access to NVIDIA Licensing, Enterprise Support, NGC, and NVIDIA Partner Network portals |
NVIDIA Registration Web Application |
Access to register your NVIDIA software product entitlement certificates |
NVIDIA Cloud Accounts |
Access the tool used by NGC to manage user org account membership |
Important
For NVIDIA to automatically detect the deletion or deactivation of a user managed by the external IdP, the customer must integrate their IdP user management service with the NVIDIA identity federation system using System for Cross-domain Identity Management (SCIM) or Security Event Tokens, and allow user update events to flow to NVIDIA. NVIDIA will use these events to ensure deleted user accounts from the enterprise side are reflected across all NVIDIA services. Any credential assets (for example, API keys) owned by the removed user are immediately revoked upon receiving the deletion or deactivation event.
During the federation process, NVIDIA will share our IdP federation “Synchronization of users and group changes” document, and we will need to record a written acknowledgment (email is okay) of receipt of this information and a decision on whether or not you (customer) will implement the security event integration.
Some NVIDIA products (like NGC) provide a UI option for customers to manually disable, deactivate, or disenroll users within the NVIDIA application and trigger the revocation of credential assets by deleting the user. For example, NGC supports removing a user from an NGC org, and this event automatically triggers the revocation of user-owned NGC API keys.
However, application-specific removal does not remove the user from other NVIDIA applications unless you remove them at the NCA account level. If the user had access to other NVIDIA services that grant credential assets, these assets would remain as active dangling assets against those services because the user account remains “active” in our central identity service and NCA.
To ensure a user account is removed across all NVIDIA services, integrate user event sharing with the NVIDIA IdP federation service and follow NVIDIA’s recommended de-provisioning operations.
To begin IdP onboarding, see Federating IdP with NVIDIA Cloud Services.
1.5.1. Federating IdP with NVIDIA Cloud Services#
To begin onboarding your Identity Provider (IdP), your domain must be associated with at least one NVIDIA NGC org that has an active enterprise product subscription, such as NVIDIA AI Enterprise.

To request to onboard your external IdP, go to NVIDIA Cloud Accounts and enter your email to sign in. Use the email address whose domain you will use for your IdP configuration.
Enter your password.
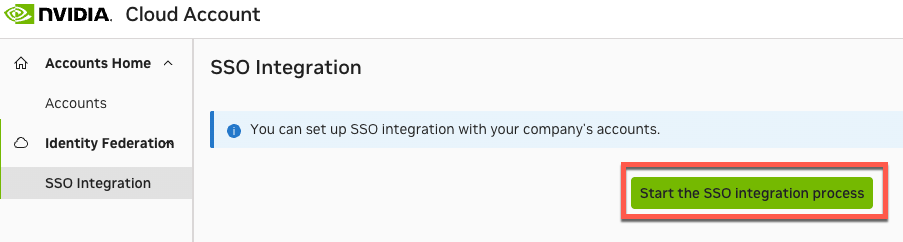
After signing in, you will land in the NVIDIA Cloud Account portal. Navigate to the SSO integration option and click Start the SSO integration process.
Complete the request form with the following information:
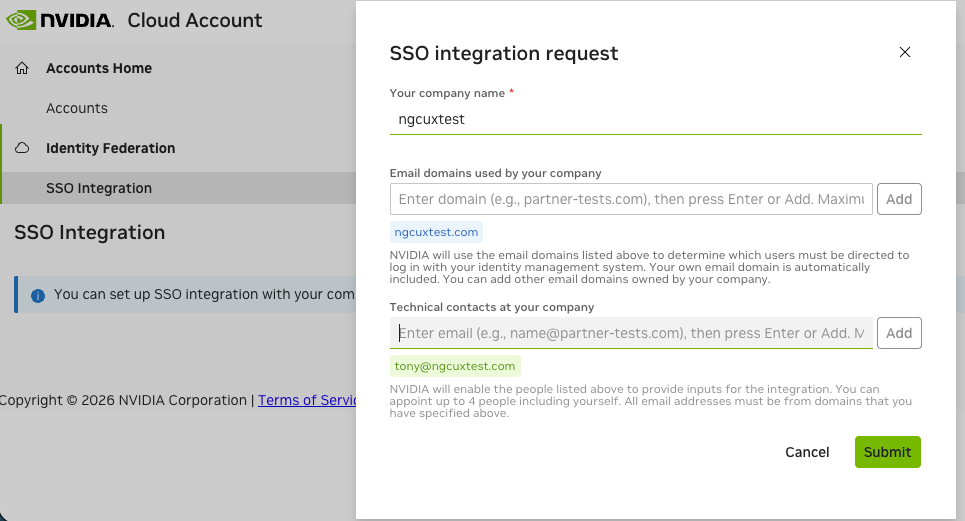
Company name: Enter your company name.
Additional domains: Enter any additional domains your users will use to sign in to NVIDIA. The request tool automatically detects and populates the domain from the email you used to sign in.
Technical contacts: Add additional technical contact email addresses for delegates who will help with integration during onboarding.
Click Submit.
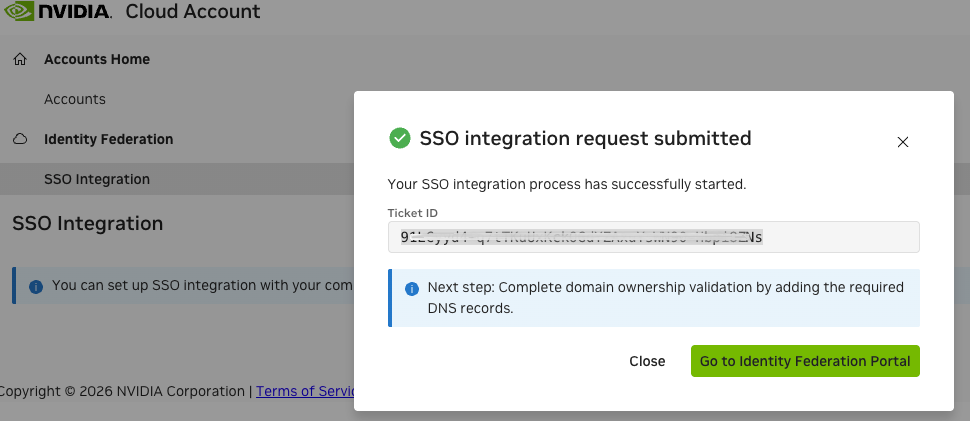
Record the Ticket ID in case you need to open a support ticket, then click Go to Identity Federation Portal.
At the login prompt, sign in with the email account you used to submit the onboarding request. After you log in, you will see the initial screen of the IdP onboarding tool. Complete the required fields and click Next.
Your company name: NVIDIA will ask to verify ownership of your company domain.
Your identity management system: Select your IdP (for example, Azure AD, Okta) from the dropdown.
Your email domains: Enter the domains managed by your IdP.

Onboarding Wizard
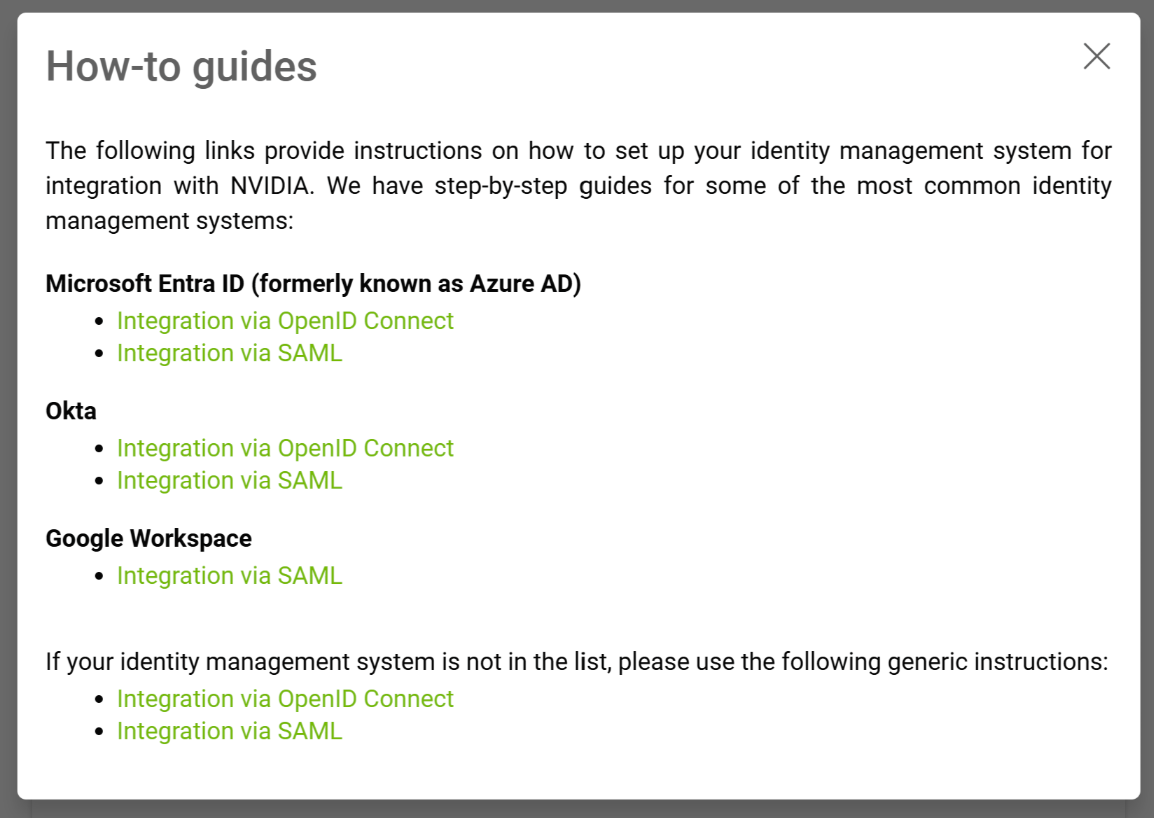
You will be guided through a configuration wizard based on the IdP system you selected (Azure AD, OpenID Connect, or SAML). The wizard provides step-by-step guides for your chosen IdP type.
Note
After the ticket ID is generated (Step 4), detailed configuration guides are also available at the NVIDIA Identity Federation portal.
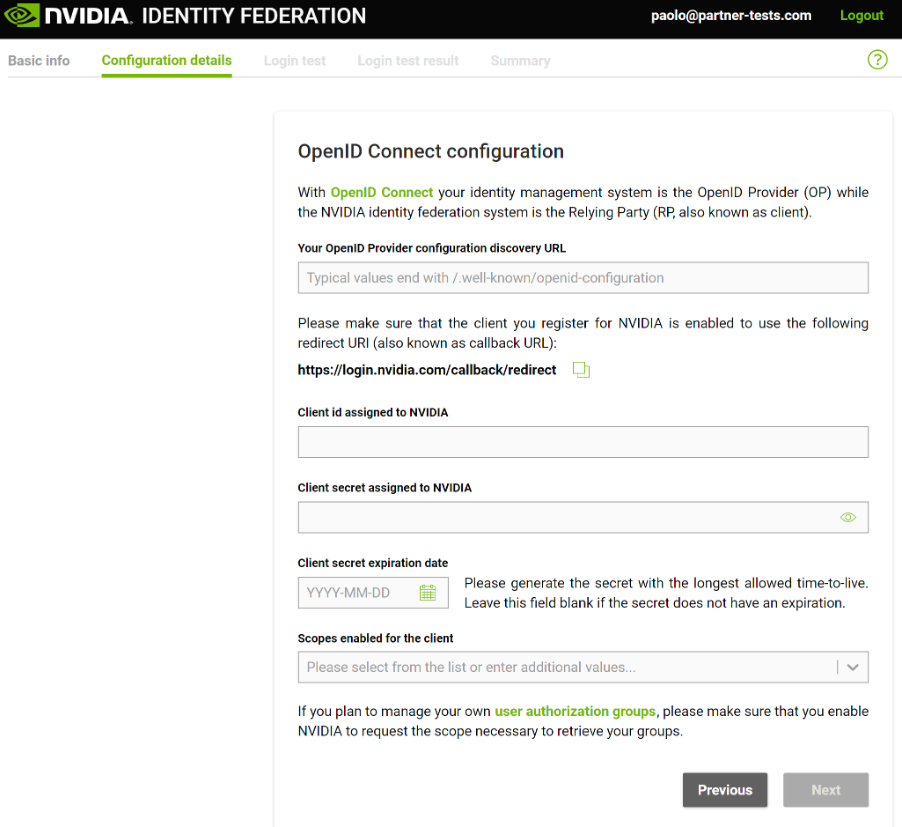
For the OpenID Connect option, the wizard may display the following screen:
OpenID Connect Provider
Perform a Login Test
After completing the IdP onboarding configuration, follow the instructions to test the login process.
Read the Login test instructions and click Next.
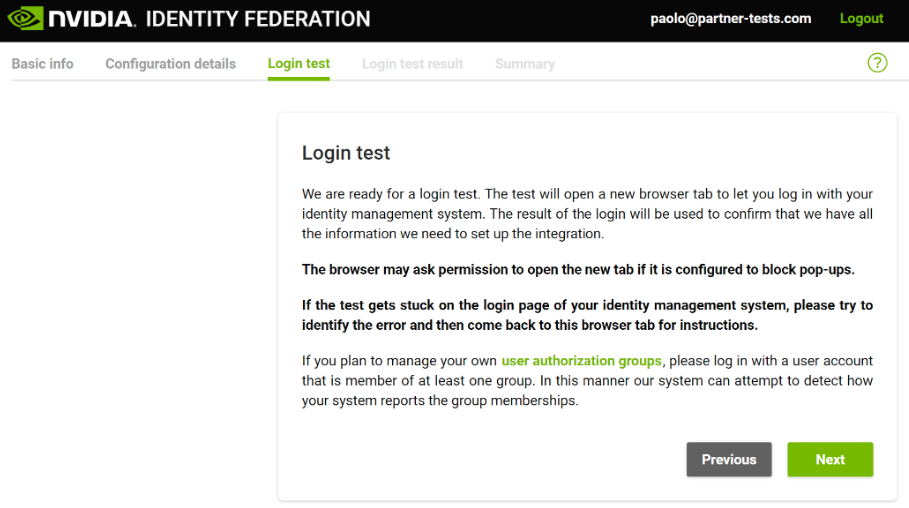
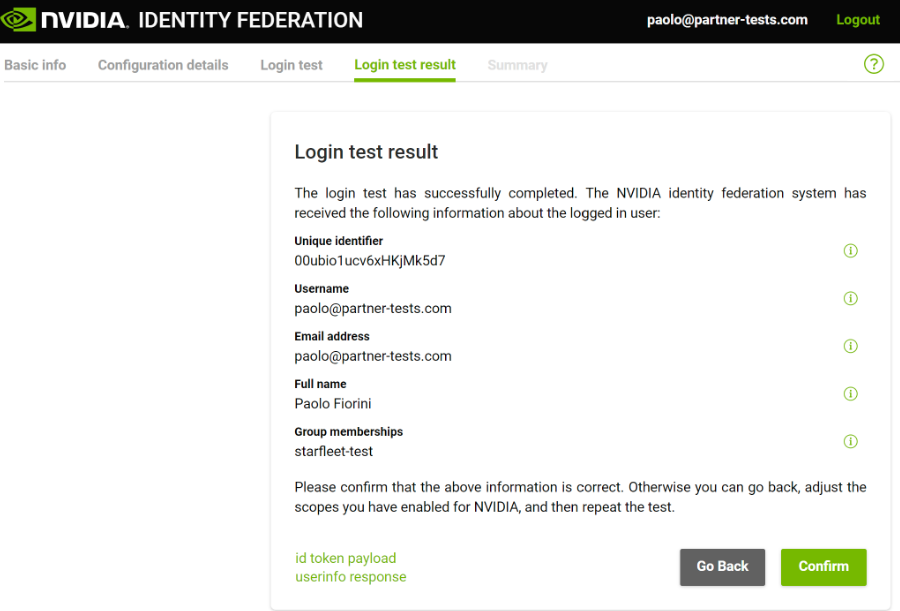
Review your login test results. If successful across all login services, click Confirm. If not, troubleshoot your IdP system and retest.
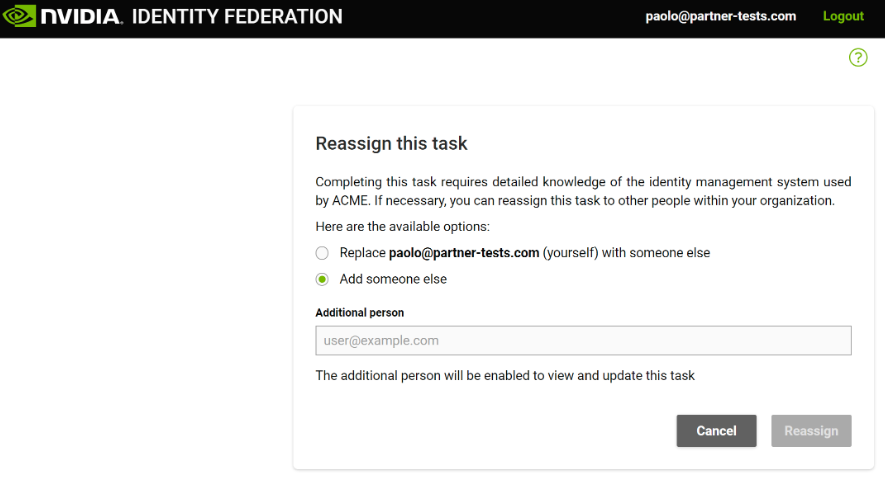
(Optional) Seek Support or Reassign Task
Use the “Help” button to access support options.

You can reassign the IdP configuration task to a colleague.
Complete the IdP onboarding
Once your login test is successful, you will see a success message.
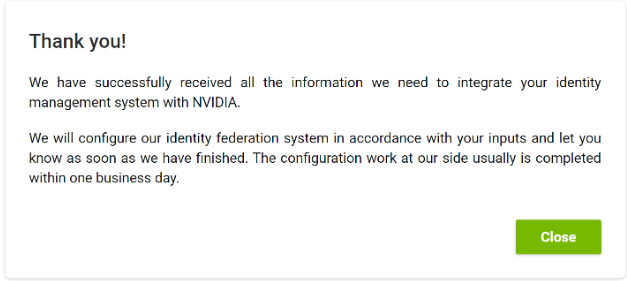
The NVIDIA team will typically finalize the onboarding within one business day, and you will receive a confirmation email.
Important
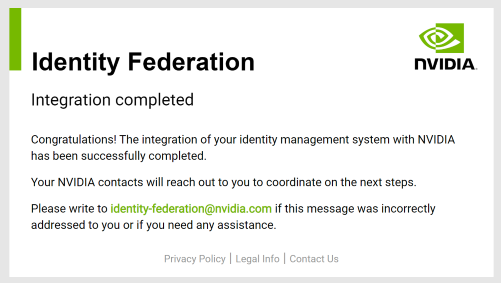
Once your IdP is federated, NVIDIA cloud platforms are not automatically enabled to authenticate users through your external IdP. Since your company may have users accessing NVIDIA cloud platforms with NVIDIA-based identity user accounts, we would like to assist in identifying these users, communicating upcoming changes, and planning the migration of enterprise entitlements to their new external IdP-based identity user accounts. Please contact ngc-sso@nvidia.com to conduct this audit and coordinate the transition.
1.5.2. Authenticating and Managing User Access#
This section describes how users authenticate through an enterprise SSO/IdP, how to add new users, and how to manage user permissions and roles in order to secure access to organizational resources.
After your company’s IdP is onboarded and federated with NVIDIA, users signing in to NGC with those domains authenticate through your enterprise IdP and are then redirected back to NGC after successful sign-in.
To add new users to an org federated to an external SSO/IdP provider, the org owner follows the steps described in Adding NGC Users to an Org.
If your IdP provides OIDC or SAML group membership claims, NGC can be configured to map those claims to NGC org, team, and role assignments; see the NGC IdP Membership Rules section for more details.
Note
NGC orgs no longer manage user tenancy directly; users and/or groups are assigned “permissions” to access NGC org resources and are tenants of the NVIDIA Cloud Account (NCA) linked to the NGC org. Users and groups are now added to the NVIDIA Cloud Account.
If you are managing user memberships using IdP-based group tags (claims), you will add these groups in the NCA and assign access permissions for NGC under “External IdP > IdP rules.”
To ensure access to the NCA account and NGC org is never lost, even if the IdP service is rendered inaccessible, configure a “Recovery email address” under the NCA account. This email address will be used to authenticate you outside of your IdP. For more information about email recovery, refer to Setting Up NCA Recovery Email.
1.5.3. NGC IdP Membership Rules#
When your organization’s IdP is federated with the NVIDIA identity federation service and your NGC org is linked to that federated account, the org owner can create membership rules from the Organization > Enterprise IdP configuration page.
Important
Only the org owner or users with the user_admin role at the organization level can manage IdP rules.
If you are an org owner, even if you are a member of a group configured in an IdP rule, the rule will not update your roles. By default, the org owner inherits admin privileges across all enablements and services in the owned org, and these role assignments are immutable.

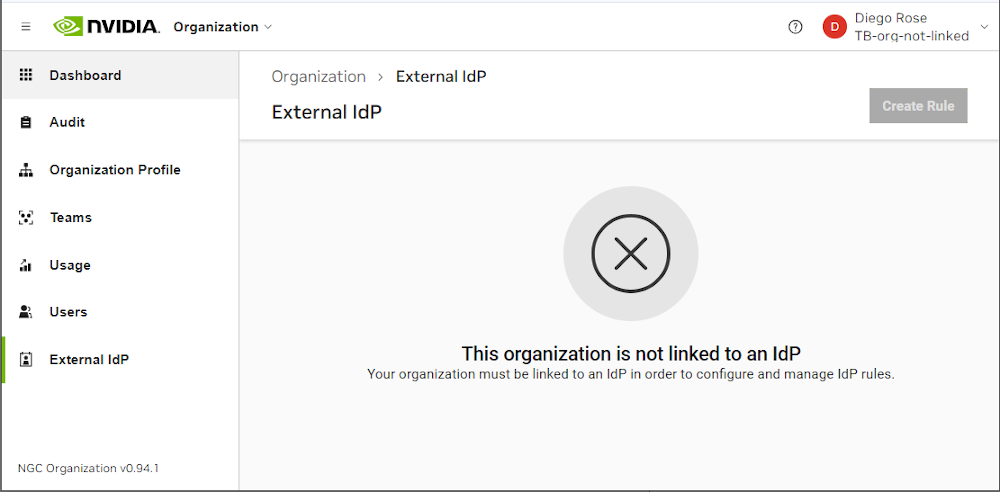
If the NGC org is not linked to an enterprise-owned SSO IdP provider, the Enterprise IdP option is disabled and a message states that the org is not linked to an IdP. To link your org, sign in to NVIDIA Cloud Accounts as described in Using an External SSO for Enterprise Platform Authentication.
The membership rules feature uses OpenID Connect (OIDC) or SAML group claims containing the user’s membership attributes.
To make sure your IdP is sending the group claim values correctly, ensure that your “test login” results reflect the group values you expect during testing. See the “Perform a Login Test” step in Federating IdP with NVIDIA Cloud Services.
An org owner or organization-level user_admin will create membership rules by mapping the name (alias) value of the IdP ‘groups’ claim to NGC org roles and permissions. Within the enterprise AD service, users assigned to these groups will receive the roles and permissions assigned to the group name in the NGC IdP rules.
1.5.3.1. Example#
In this example, we are using Okta as the enterprise-owned SSO IdP provider. It is assumed the same person managing Okta also has NGC org owner permissions.
Okta Settings
First, the NGC org gets linked as a client application to the Okta IdP service.
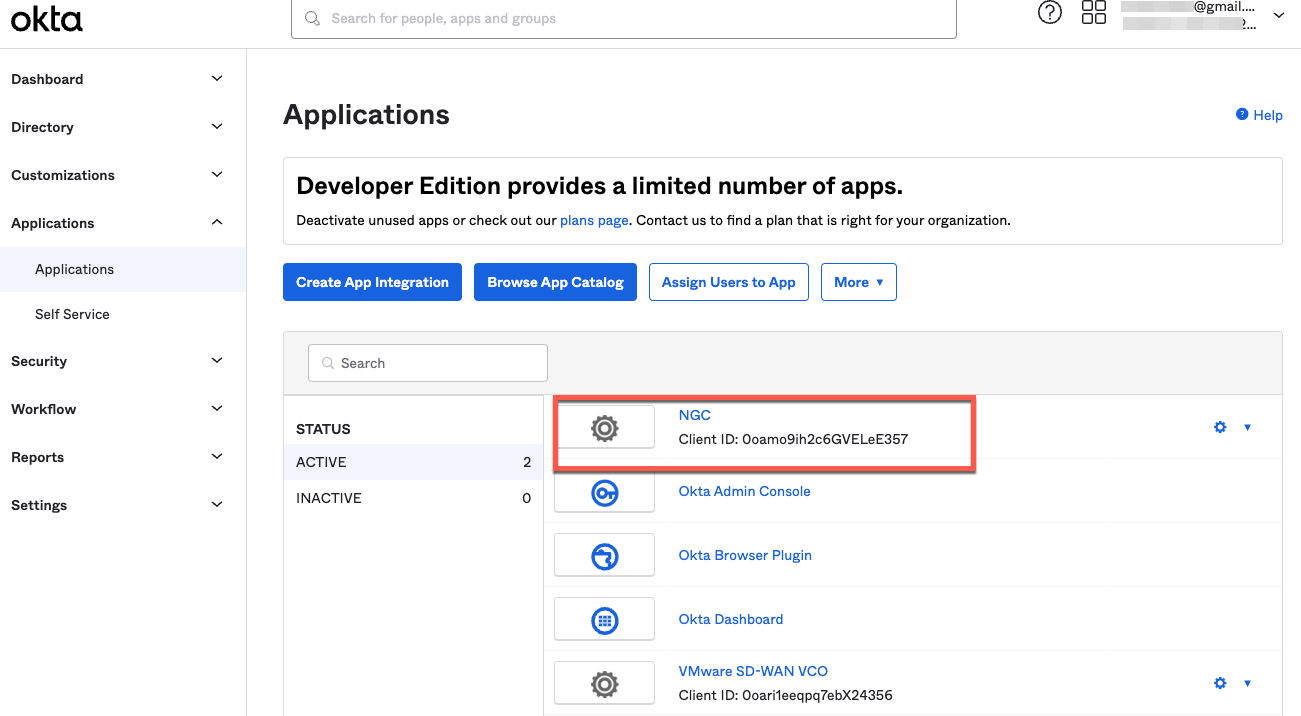
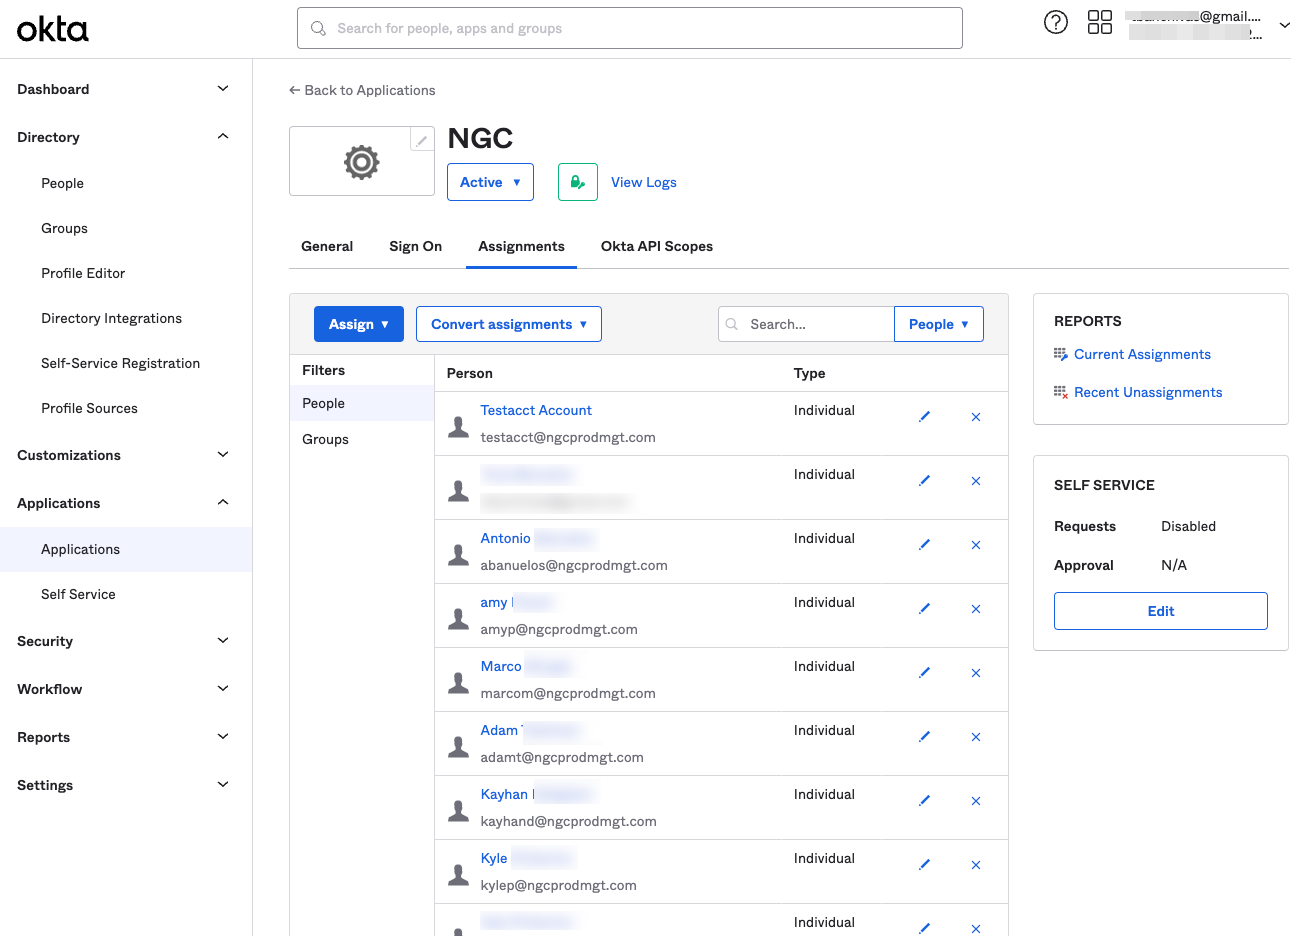
On Okta, managed users get assigned to the NGC client application, enabling them to sign in to NGC using their Okta SSO account.
At this point, users have not been assigned to a ‘group’.
On Okta, secure AD groups are created, and users can be assigned to a group or a set of groups.
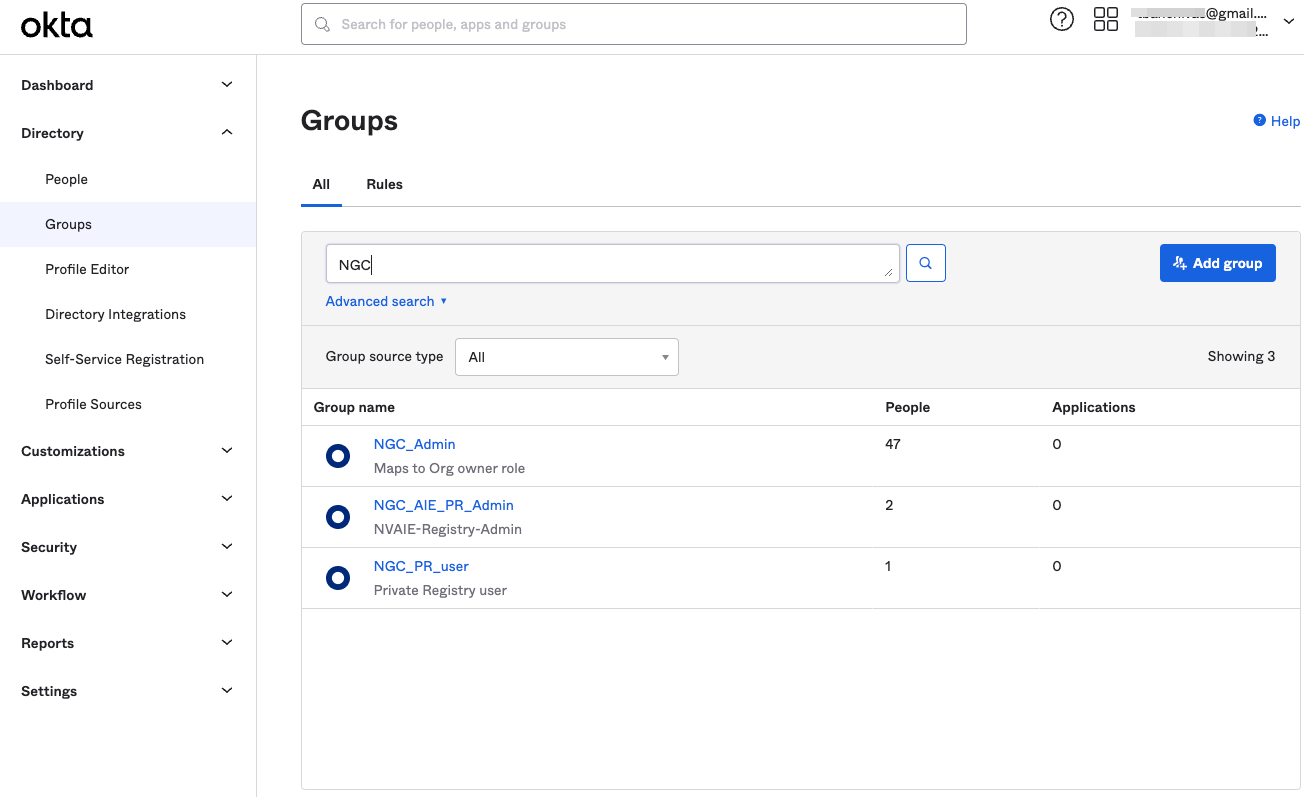
In this example, Adam and Amy are assigned to the NGC_AIE_PR_Admin group. Note that this is being done manually using the Okta user management feature, but this is typically managed automatically by using an enterprise active directory integrated into the IdP provider.
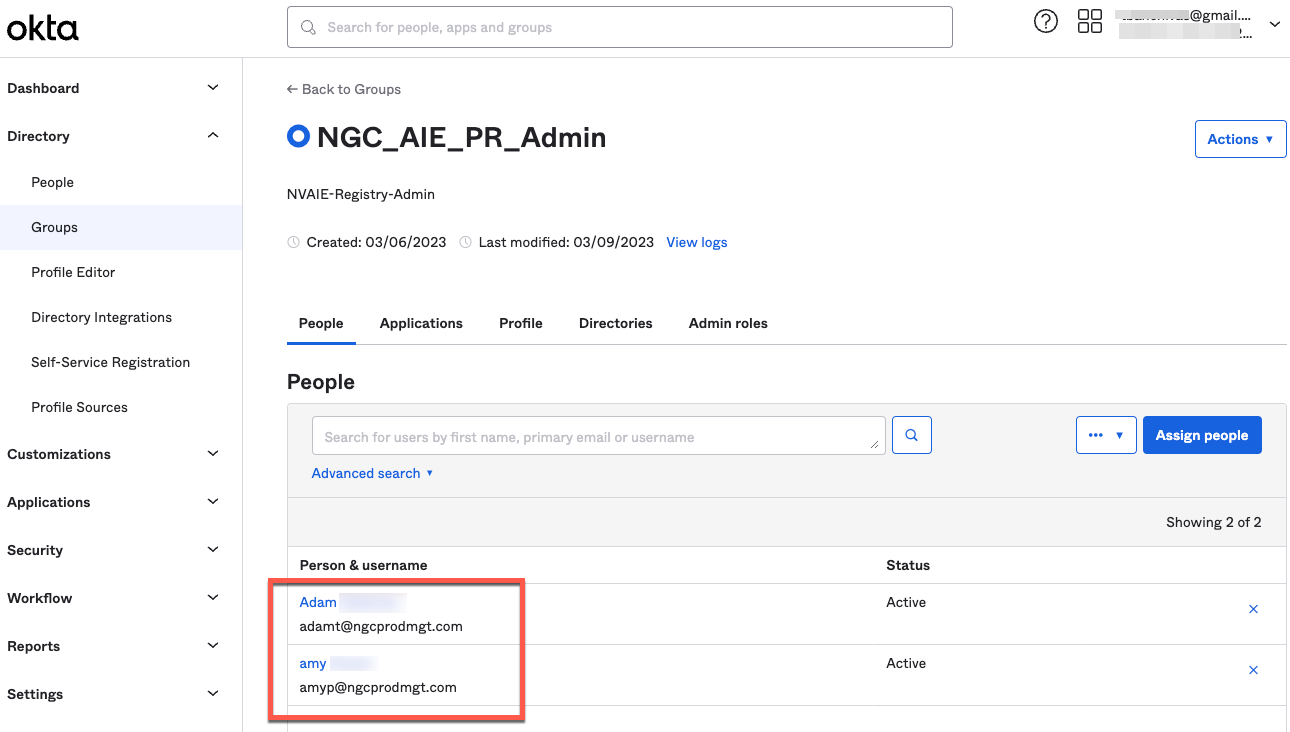
At this point, Adam and Amy can sign in to NGC, but there isn’t an IdP rule that assigns them NGC org roles and permissions. The next section covers creating the NGC IdP membership rules that will grant Adam and Amy their roles.
1.5.3.2. Configuring NGC#
Now that the IdP groups are created and users are assigned to secure AD groups on the Okta IdP side, the administrator (org owner) is ready to configure NGC IdP membership rules. Do this from the Organization > Enterprise IdP configuration page.
Create a rule and name it as follows:
Click Create Rule.
In the Rule Name field, enter a name that describes the purpose of the rule.
Create an Identity Provider (IdP) group:
Click Create IdP Group to open a popup window.
In the popup, in the IdP Group Equals to field, type the group name exactly as it appears in your IdP.
In the popup, in the Role for IdP Group field, select Member.
Click Create IdP Group to close the popup.
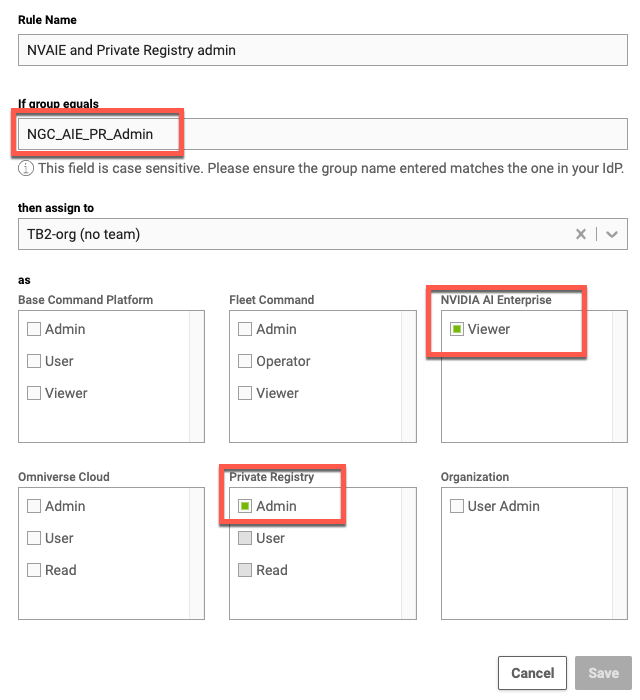
Select the team and NGC access roles that the rule applies to:
Select Assign to Organization to apply this rule to the entire NGC org.
Select roles for each cloud service that group members will be granted. In this example, select NVIDIA AI Enterprise Viewer and Private Registry Admin.
Finish creating the rule by clicking Create IdP Rule.
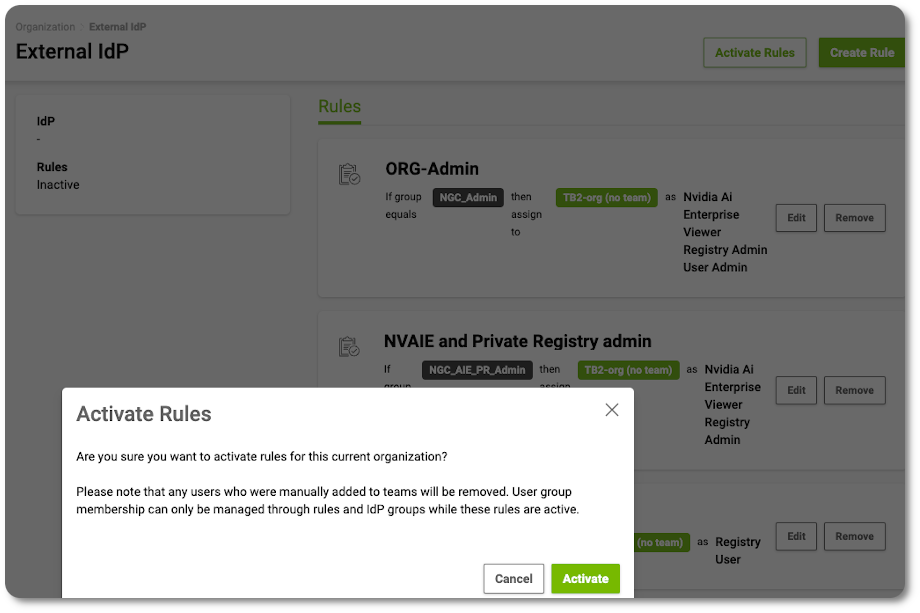
Once your rule has been saved, you must click the Activate Rules button to apply the rule-based membership roles to your IdP users. This will occur per user when they sign in.
The org owner or organization-level user_admin can create multiple rules to support multiple group claim values from the IdP. An example of multiple IdP membership rules created can be seen below.
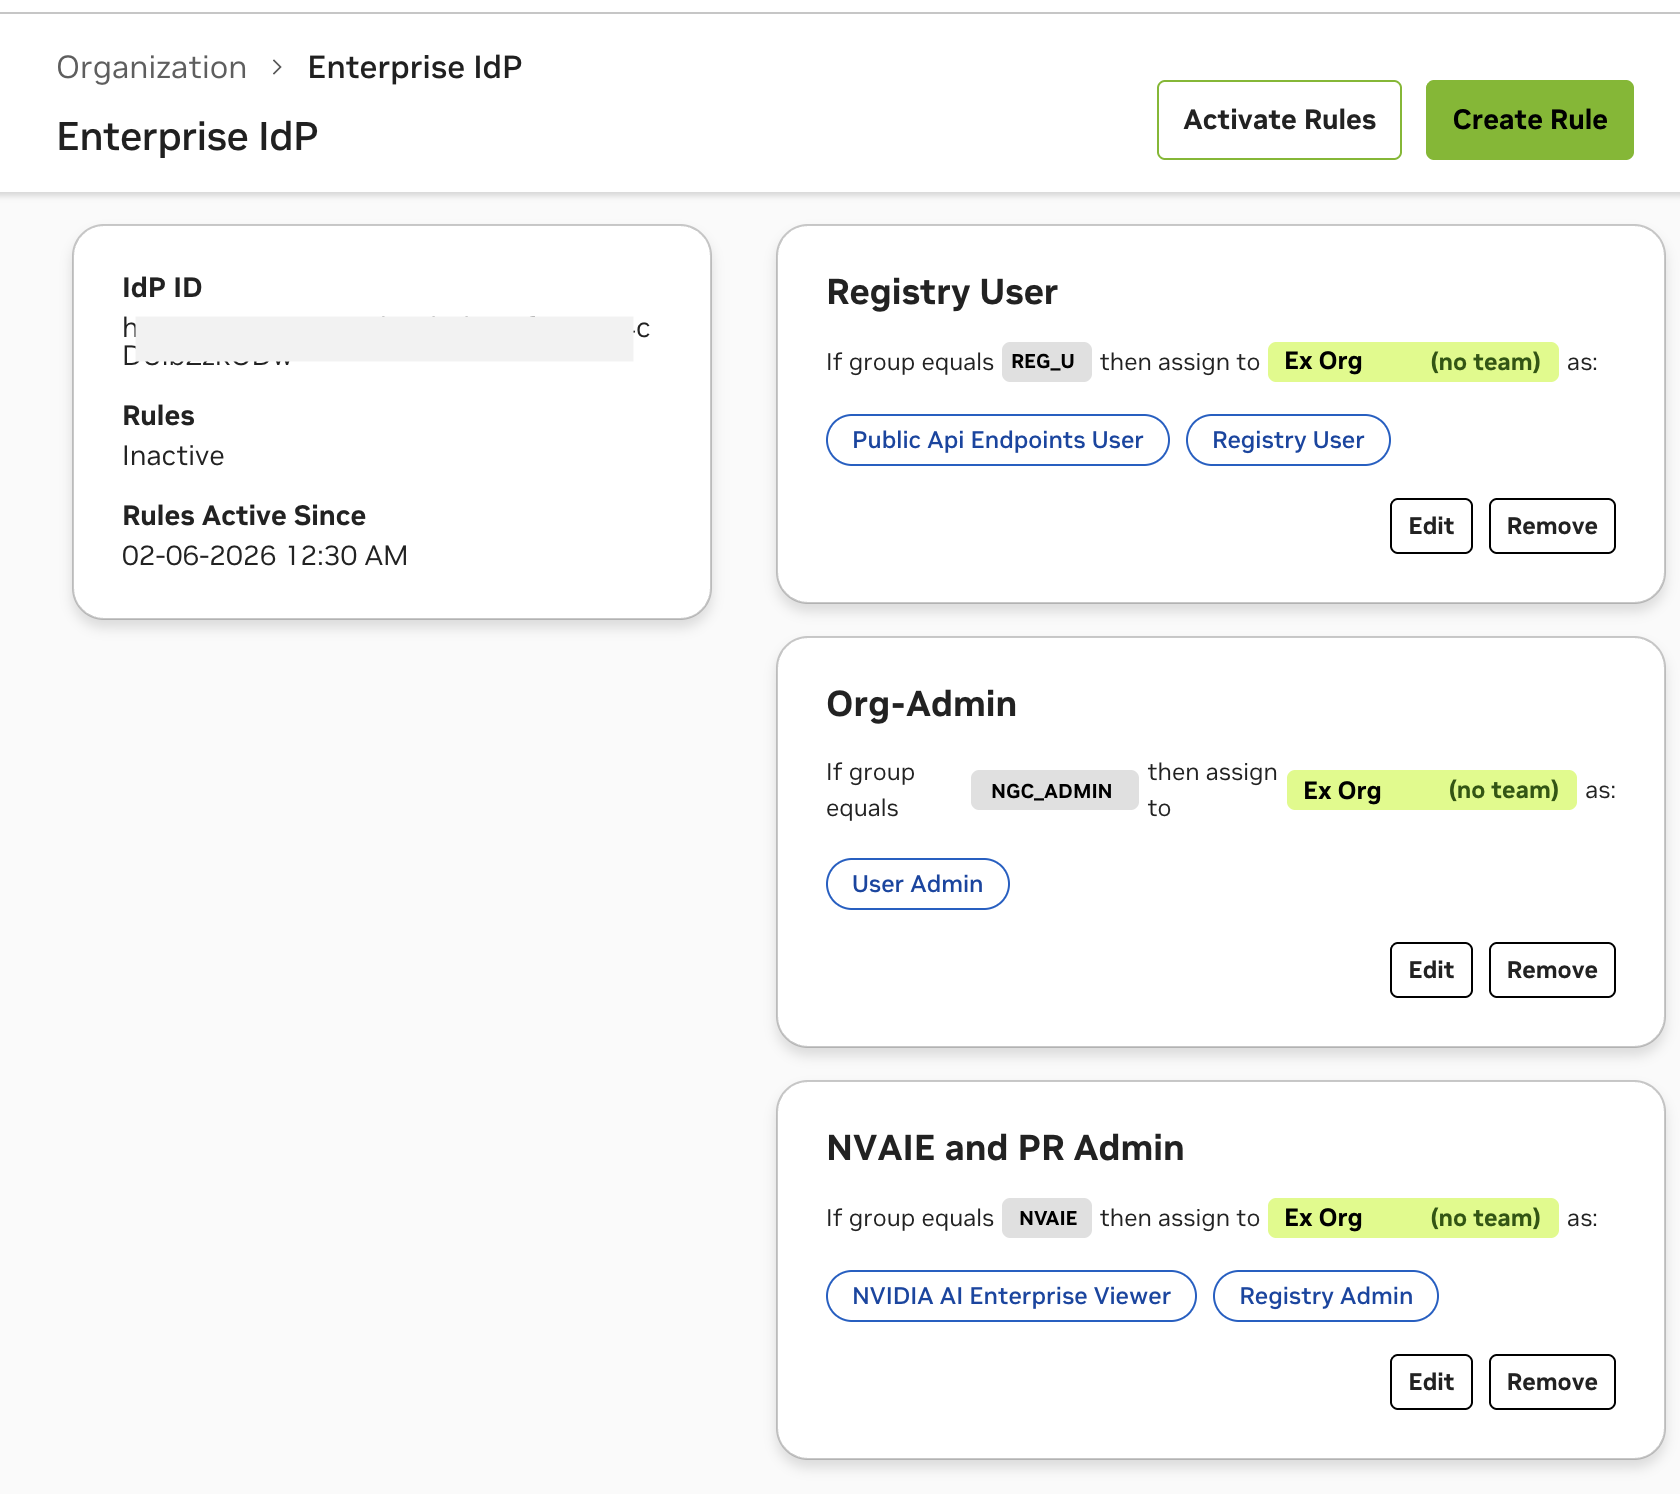
Important
The NGC IdP membership rules do not go into effect until they are “activated”. Users’ accounts that were added using the manual method will continue to use NGC role permissions assigned through ‘Users’ invite user membership configurations.
When you click Activate Rules, the org owner or organization-level user_admin is prompted to confirm activation of the IdP rules. When the rules are activated, the NGC IdP rule system reviews user memberships previously added to the org using the “user invitation” method. It checks whether each user account maps to an IdP membership rule. If a match is found, the previous account membership is removed and a new user account membership is created with the same email address and IdP association. The permissions and roles assigned to the new account membership are based on the IdP groups claim attribute.
Note
Previous user accounts that do not map to an IdP rule remain as active user accounts under Users account memberships. An org owner or organization-level user_admin can remove these users if the org should only be accessible by members mapped to IdP rules.
1.6. Activating Your Subscription (Offer Dependent)#
This section describes activating a subscription and linking it to your NGC Account.
Note
These steps are only required for customers who have been given an activation code as part of the purchase of a GPU or DPU.
Access the activation page directly via Activate Subscription.
Sign in to NGC with your email address and password if prompted. If you have not created an NGC account, create one now.
On the Activate Subscription page, enter your Business Information using your company’s headquarters address and the serial number or activation code described by the specific offer. If entering multiple serial numbers or activation codes, use a comma to separate each.
Click Activate Subscription.

Once the system validates the serial numbers, review the information displayed and click Request Activation.
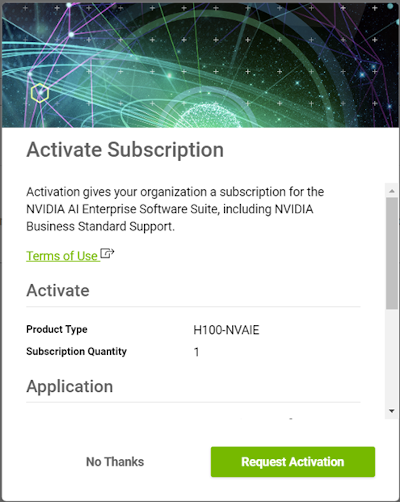
The Subscriptions page will display for your organization with the active NVIDIA AI Enterprise subscription.
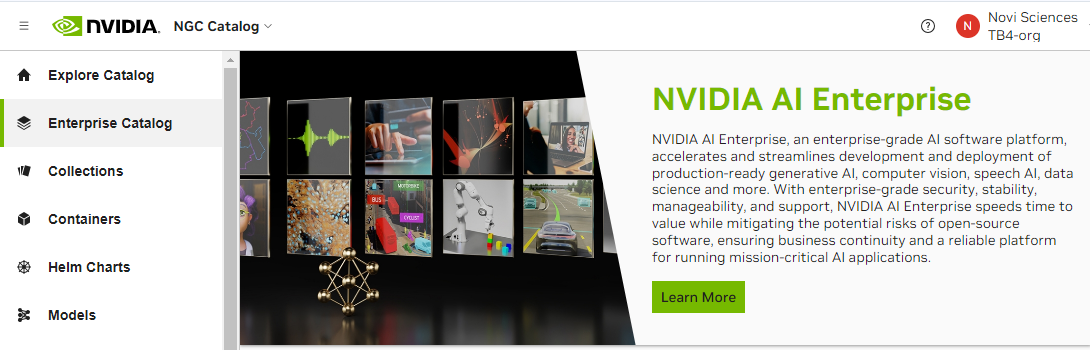
Use the left navigation and click Enterprise Catalog to access the NVIDIA AI Enterprise software suite.
1.7. Switching Orgs or Teams After Logging into NGC#
This section describes switching to a different org or team after logging in.
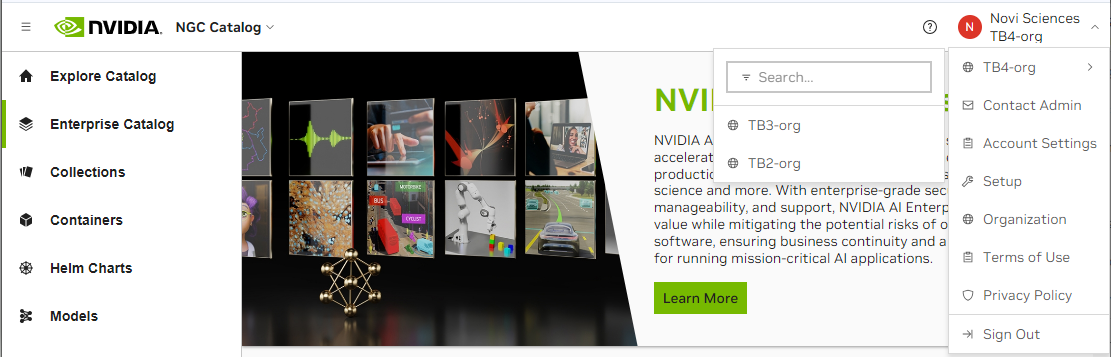
In the top menu bar, click your user account icon. Then, select your org menu to expand the view to other available orgs. If you manage many orgs, you can use the search field to find the specific org you want to select. Select the desired org by clicking it once.
Depending on the org or team you select, your current page may also refresh.
1.8. NGC API Keys#
NVIDIA NGC API keys are required to authenticate with NGC services using NGC CLI, Docker CLI, or direct API requests.
NGC provides two types of API keys:
Personal Keys
Any NGC org user can generate a personal key.
An NGC org user can grant a personal key up to the permissions assigned to them in the NGC org.
A personal key is linked to the user’s NGC org lifecycle.
If the user’s permissions change, the available permissions that can be or are assigned to the personal key also change.
If the user is removed from the NGC org, the key’s validity is revoked.
Supports updating permissions, rotation, and deletion (immediate revocation).
Org owners and organization-level user_admins can revoke any member’s key on demand.
Each user can generate up to 32 personal keys across all organizations they are a member of.
Use personal keys to begin using NGC services within your sandbox. Personal keys are best suited for individuals working on early development and testing code before moving to pre-production and production releases.
To learn how to authorize the services you have access to in the org and generate a personal key, go to Generating a Personal API Key.
Important
Use the legacy NGC API Key for cross-org authorization. NVIDIA encourages you to use the Personal Key, but if you need to continue using the legacy API key, go to Generating a Legacy NGC API Key to find out where to create a new one. Also, your current NGC API key will continue to work.
Service Keys
The lifecycle of service keys is linked to the NGC org account, not associated with an individual user.
Only NGC org owners and organization-level user_admins can manage service keys.
A service key can be scoped to access only the permissions and services required, or full access to the services enabled in the org.
Supports scoped permissions, updating permissions, on-demand revocation, rotation, and deletion.
An NGC org can have up to 64 service keys.
Use service keys when you require automated communication between machines and need to deploy to pre-production and production environments where you do not want to depend on a user’s membership status in the NGC org.
Note
Service keys currently do not support listing artifacts in NGC CLI or Docker CLI. This functionality will be added in the future. In the meantime, use a Personal API key to list artifacts.
Examples using NGC API Keys
Here are some examples of using NGC API keys to authenticate with NGC CLI and Docker CLI:
NGC CLI
$ ngc config set
Paste your key value at the API_KEY prompt:
[Enter API key [****API-Key]. Choices: [<VALID_APIKEY>]
Important
Always use the latest NGC CLI version to access the newest features, bug fixes, performance improvements, and security updates. Check for the latest versions at NGC CLI Installers or run ngc version list to view the latest releases, then upgrade using the following command:
ngc version upgrade
Docker CLI
docker login nvcr.io --username '$oauthtoken'
For the username, enter '$oauthtoken' exactly as shown. It is a special name that indicates that you will authenticate with an API key. Paste your key value at the Password prompt.
1.8.1. Supported NGC Applications and API Key Types#
The NVIDIA NGC applications/services that support Personal and Service Keys are listed below:
NGC Application/ Services |
Service Description |
|---|---|
NVIDIA NGC Catalog |
Grants your key permission to access or download containers and artifacts from the NGC Catalog. The permission level matches your account’s permissions for the catalog. |
NVIDIA NGC Private Registry |
The key is authorized to perform actions on your organization’s private registry service, such as pulling, retrieving, creating, or deleting containers and artifacts. The permission level assigned to the key matches the permission level of your user account. Therefore, your user account must have permissions for the Private Registry. |
NVIDIA Cloud Functions |
This authorization allows your key to perform actions on your organization’s cloud functions service. If your organization has private functions published by NVIDIA, or if your cloud functions service enables you to create, deploy, and run your own functions, your personal key will have the same permissions as your user account for the cloud functions service. Therefore, it’s important that your user account has the necessary permissions for Cloud Functions. |
NVIDIA Public API Endpoints |
Grants permission for your key to access NVIDIA NIM inference endpoints listed in the NVIDIA API Catalog. Therefore, your user account must have Public API Endpoints permissions. |
NVIDIA Secrets Manager |
Authorizes your key to perform actions on the NVIDIA Secrets Manager service, which is used to store and manage secrets. Your key will have the same permission level as your user account, so your user account must possess Secrets Manager permissions. |
1.8.2. Generating NGC API Keys#
Generating API keys is essential for authenticating with NGC services using the NGC CLI, Docker CLI, or direct API requests.
1.8.2.1. Generating a Personal API Key#
Sign in to the NGC website. From a browser, go to https://ngc.nvidia.com/signin and then enter your email and password.
Click your user account icon in the top-right corner and select Account Settings.
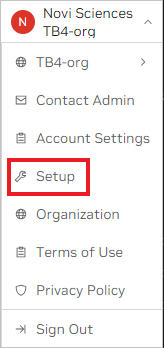
Scroll to the bottom and click Generate API Key from the available options.
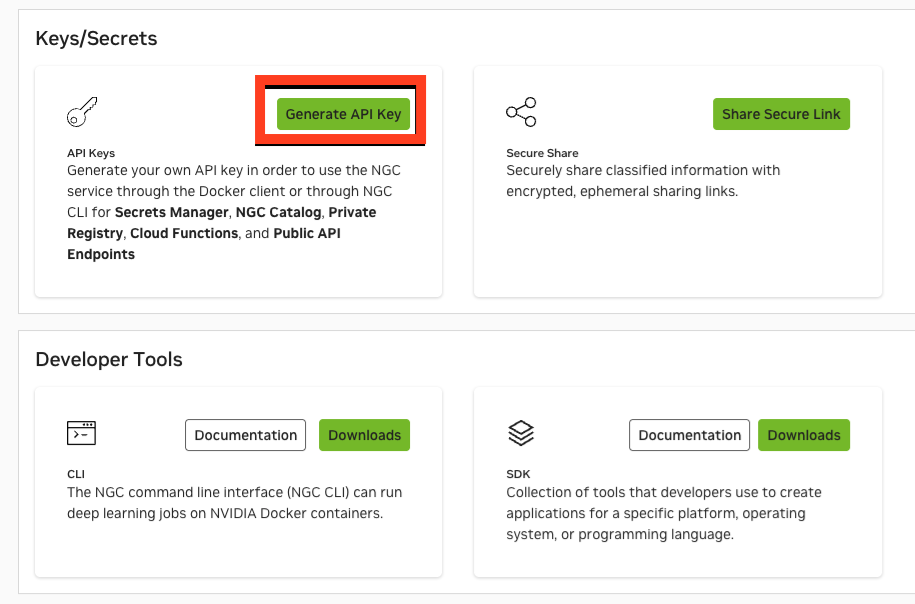
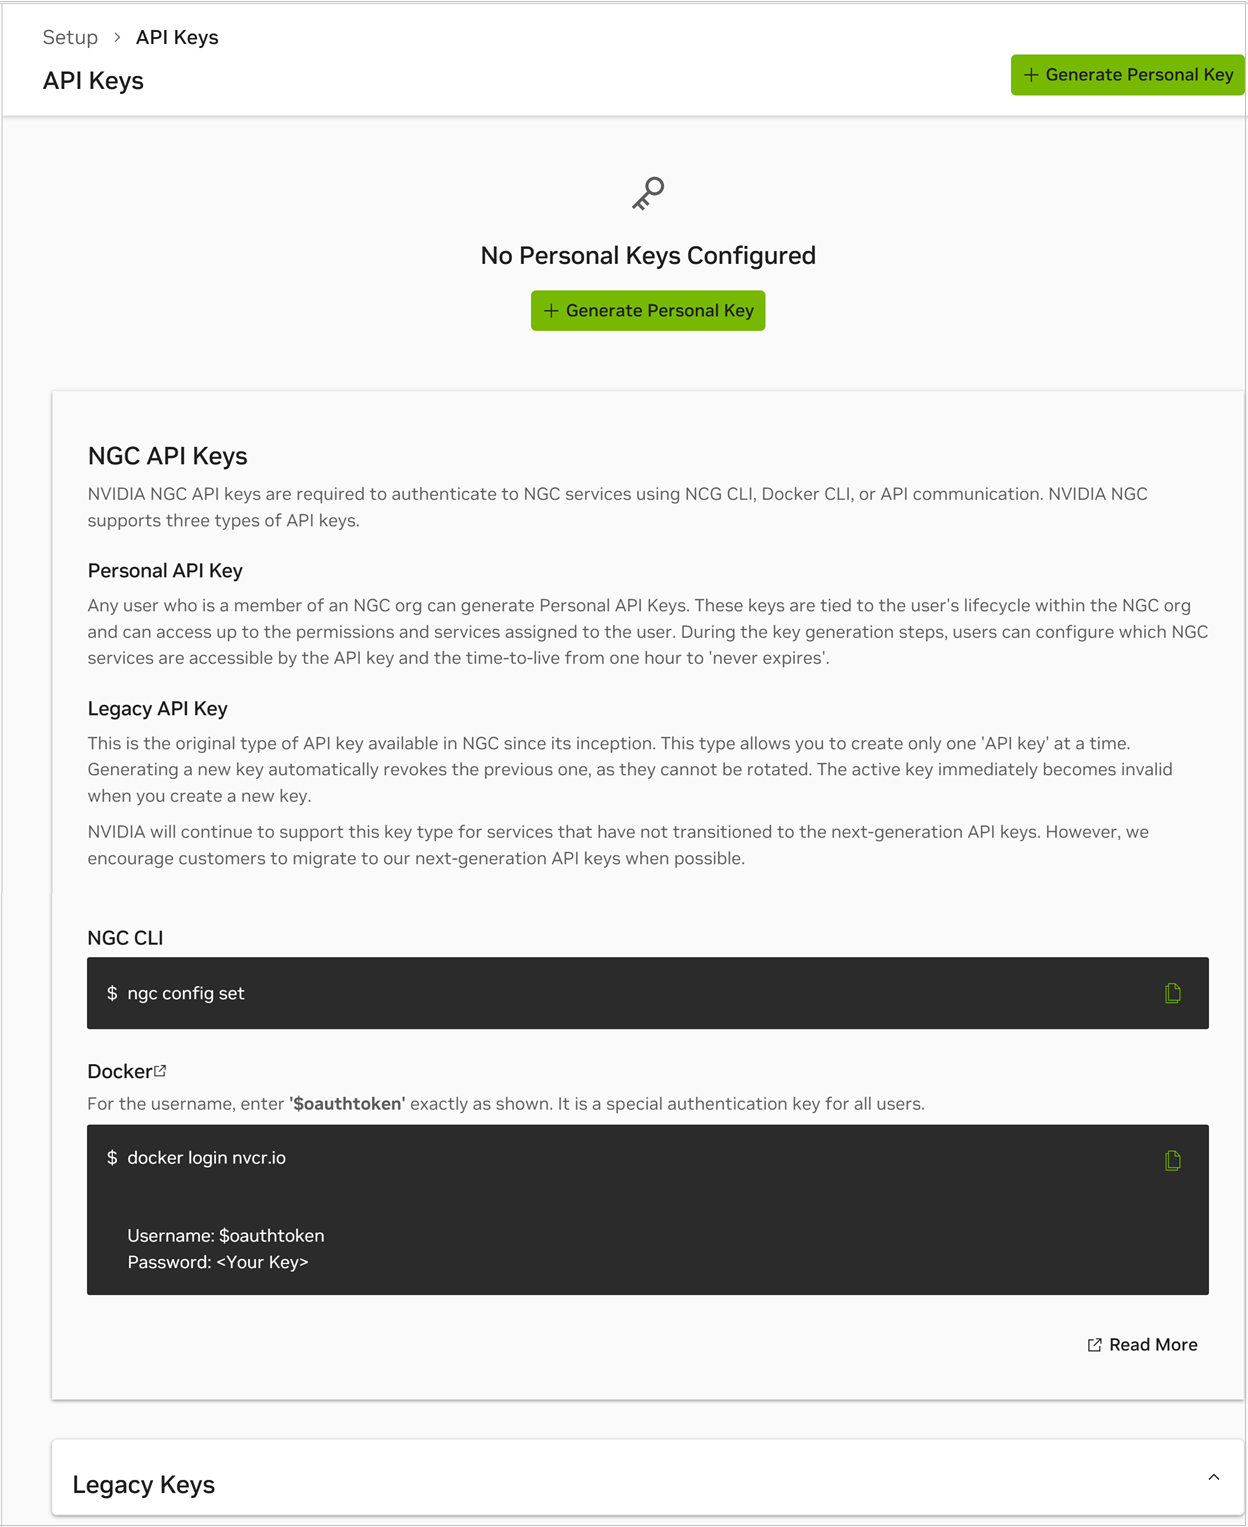
On the Setup > API Keys page, click + Generate Personal Key on the menu or the pane.
In the Generate Personal Key dialog, fill in the required information for your key.
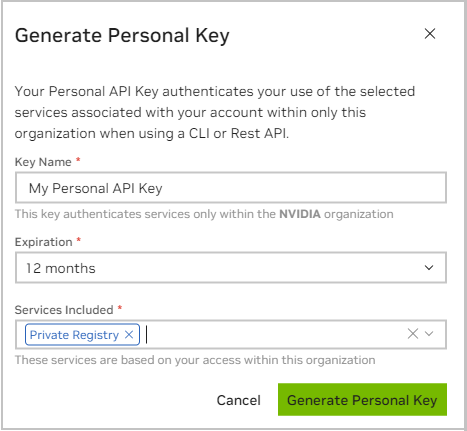
Key Name: Enter a unique name for your key.
Expiration: Choose the expiration date for the key.
Services Included: Choose from the available services the key is permitted to access. Refer to Assigning Services to Your Personal API Key to learn more about each service and when to assign service access to your Personal Key.
Click Generate Personal Key when finished.
Your API key appears in the following dialog.
NGC does not save your key, so store it securely. You can copy your API Key to the clipboard by selecting Copy Personal Key or using the copy icon to the right of the API key.
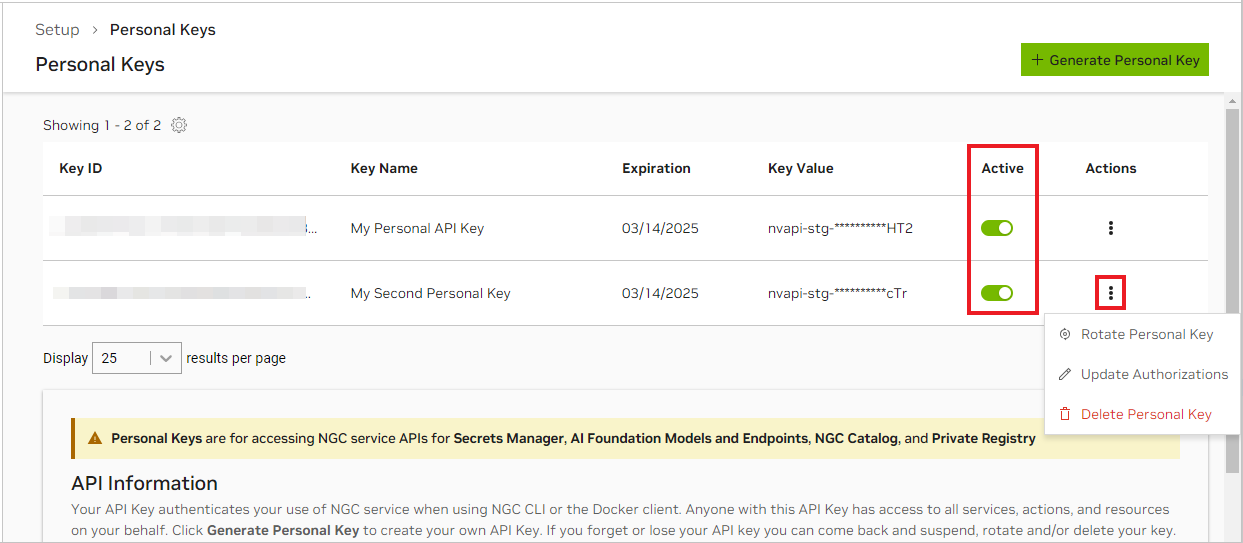
You can generate up to eight personal keys and manage them from the Setup > Personal Keys dashboard. To activate or deactivate a key, click the Active toggle. The Actions (ellipsis) menu allows you to rotate or delete a personal key.
1.8.2.1.1. Assigning Services to Your Personal API Key#
The services you can assign to a personal API key depend on two factors:
The services enabled for the NGC org where you generate the API key.
The service roles assigned to you by your NGC org owner or administrator.
For example, consider an NGC org with the following services enabled:
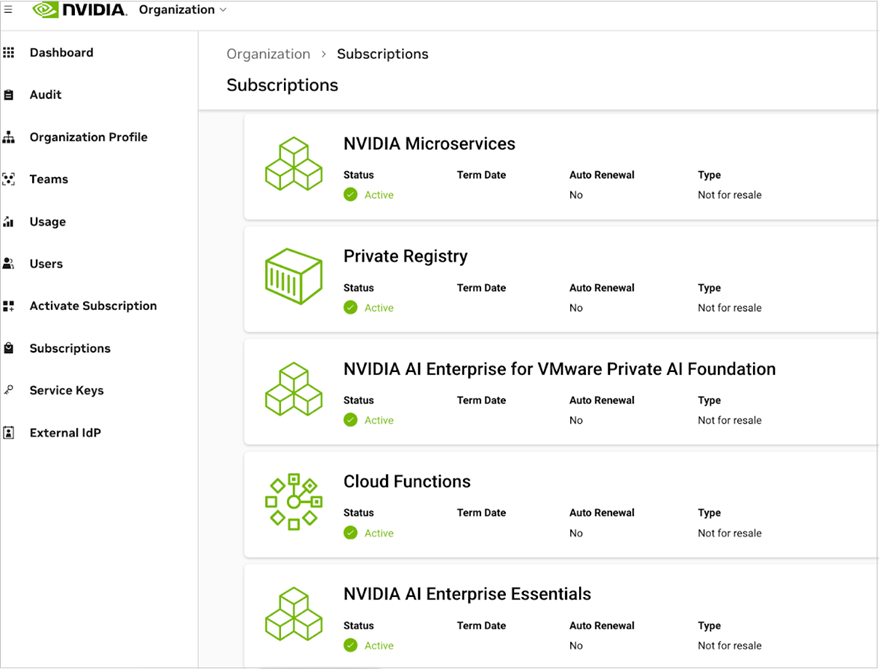
An NGC user account might have the following access roles assigned:
In this scenario, the NGC org has enabled NVIDIA Microservices, Private Registry, NVIDIA AI Enterprise, and Cloud Functions (NVCF). The user account has been granted access roles for all these services. Therefore, a personal API key can be generated with permissions to access one or all of them.
If a service is unavailable for assignment to the API key, it indicates that the org owner or administrator has not granted the user the necessary role for that service.
For details about each service listed above and its function, see the table Supported NGC Applications and API Key Types.
1.8.2.1.2. Generating a Legacy NGC API Key#
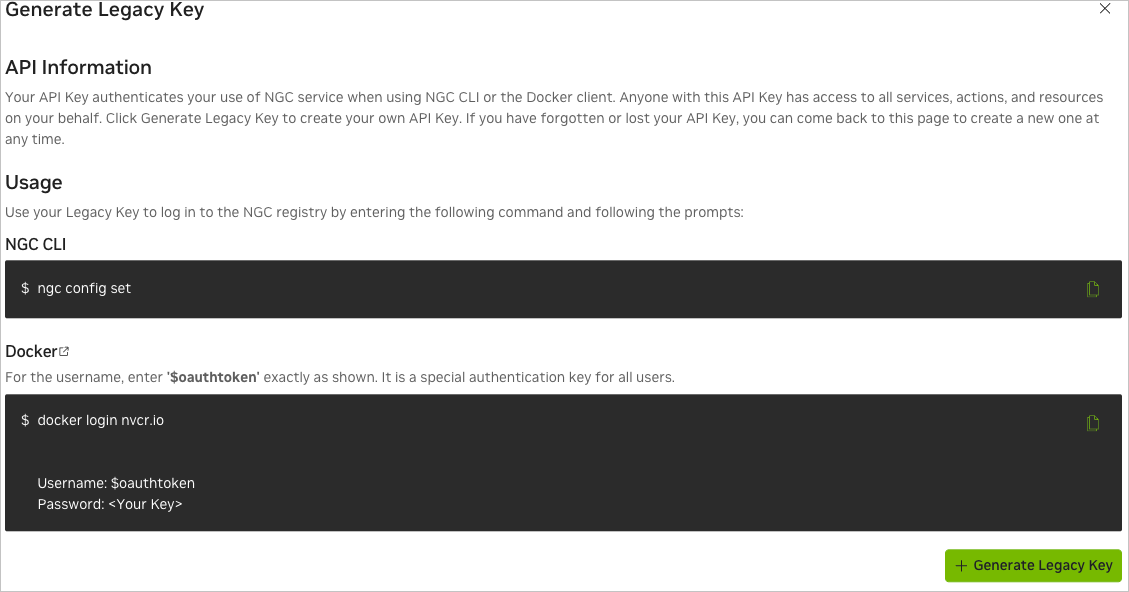
Important
Legacy API keys are the original key type available in NGC since its inception. This type supports only one active key per user account. When a new key is generated, the previous one is automatically revoked and cannot be rotated. NVIDIA will continue to support this key type for services that have not yet transitioned to the next-generation API keys. However, we strongly recommend migrating to our next-generation Personal or Service API keys whenever possible for improved security.
To generate a legacy API key, go to Setup > API Keys and click + Generate Legacy Key in the Legacy Keys drop-down.
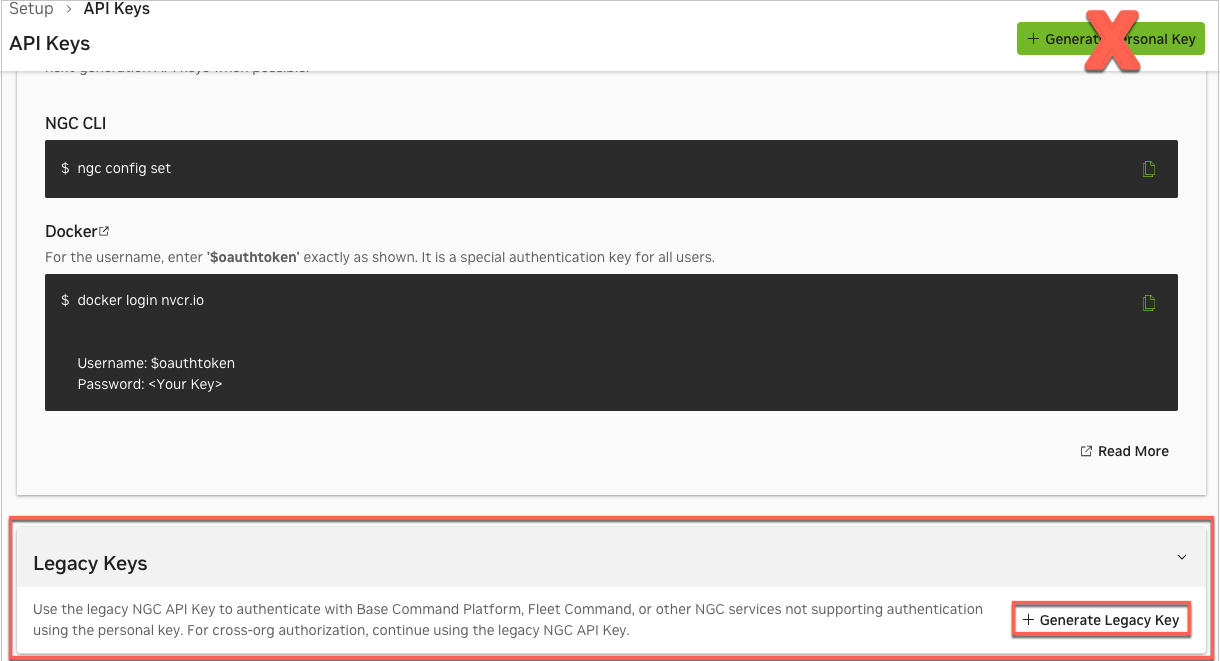
In the Generate Legacy Key dialog, click + Generate Legacy Key.
1.8.2.2. Generating a Service API Key#
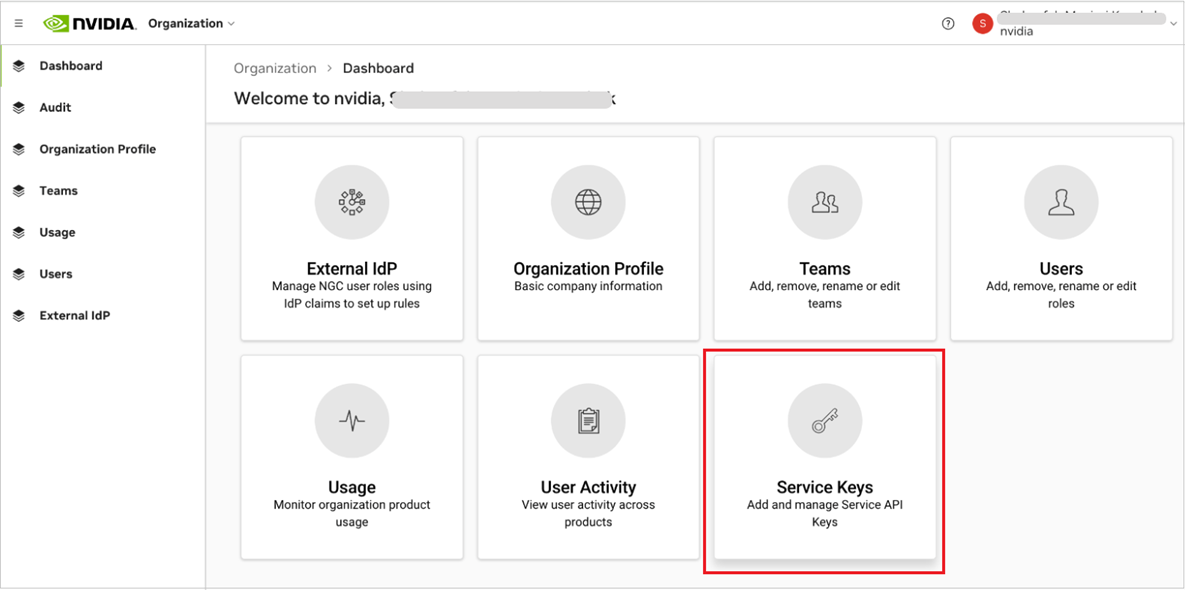
Sign in to the NGC website. From a browser, go to https://ngc.nvidia.com/signin and then enter your email and password.
Select Organization from the user account menu on the upper right.
Select Service Keys on the organization dashboard.
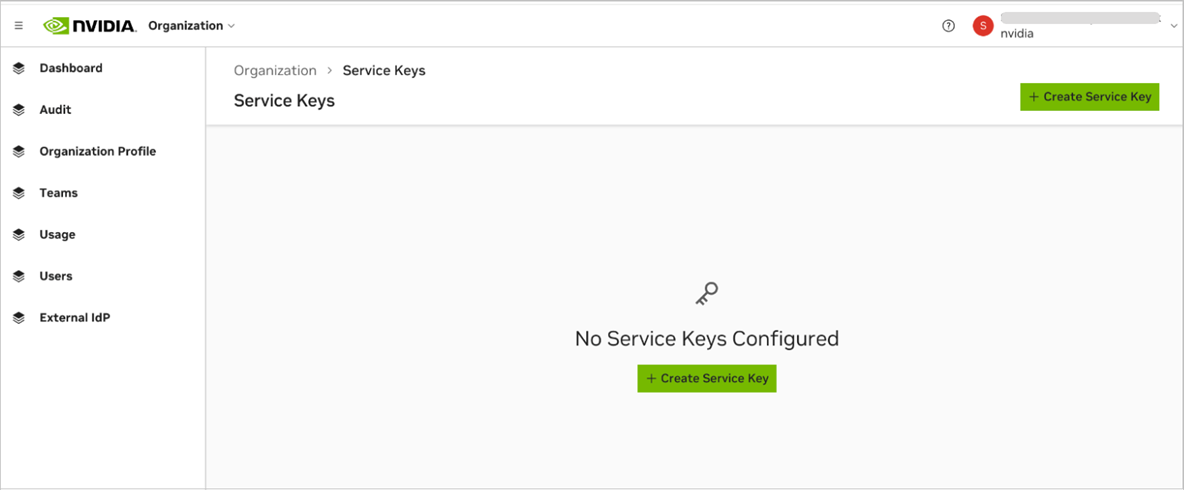
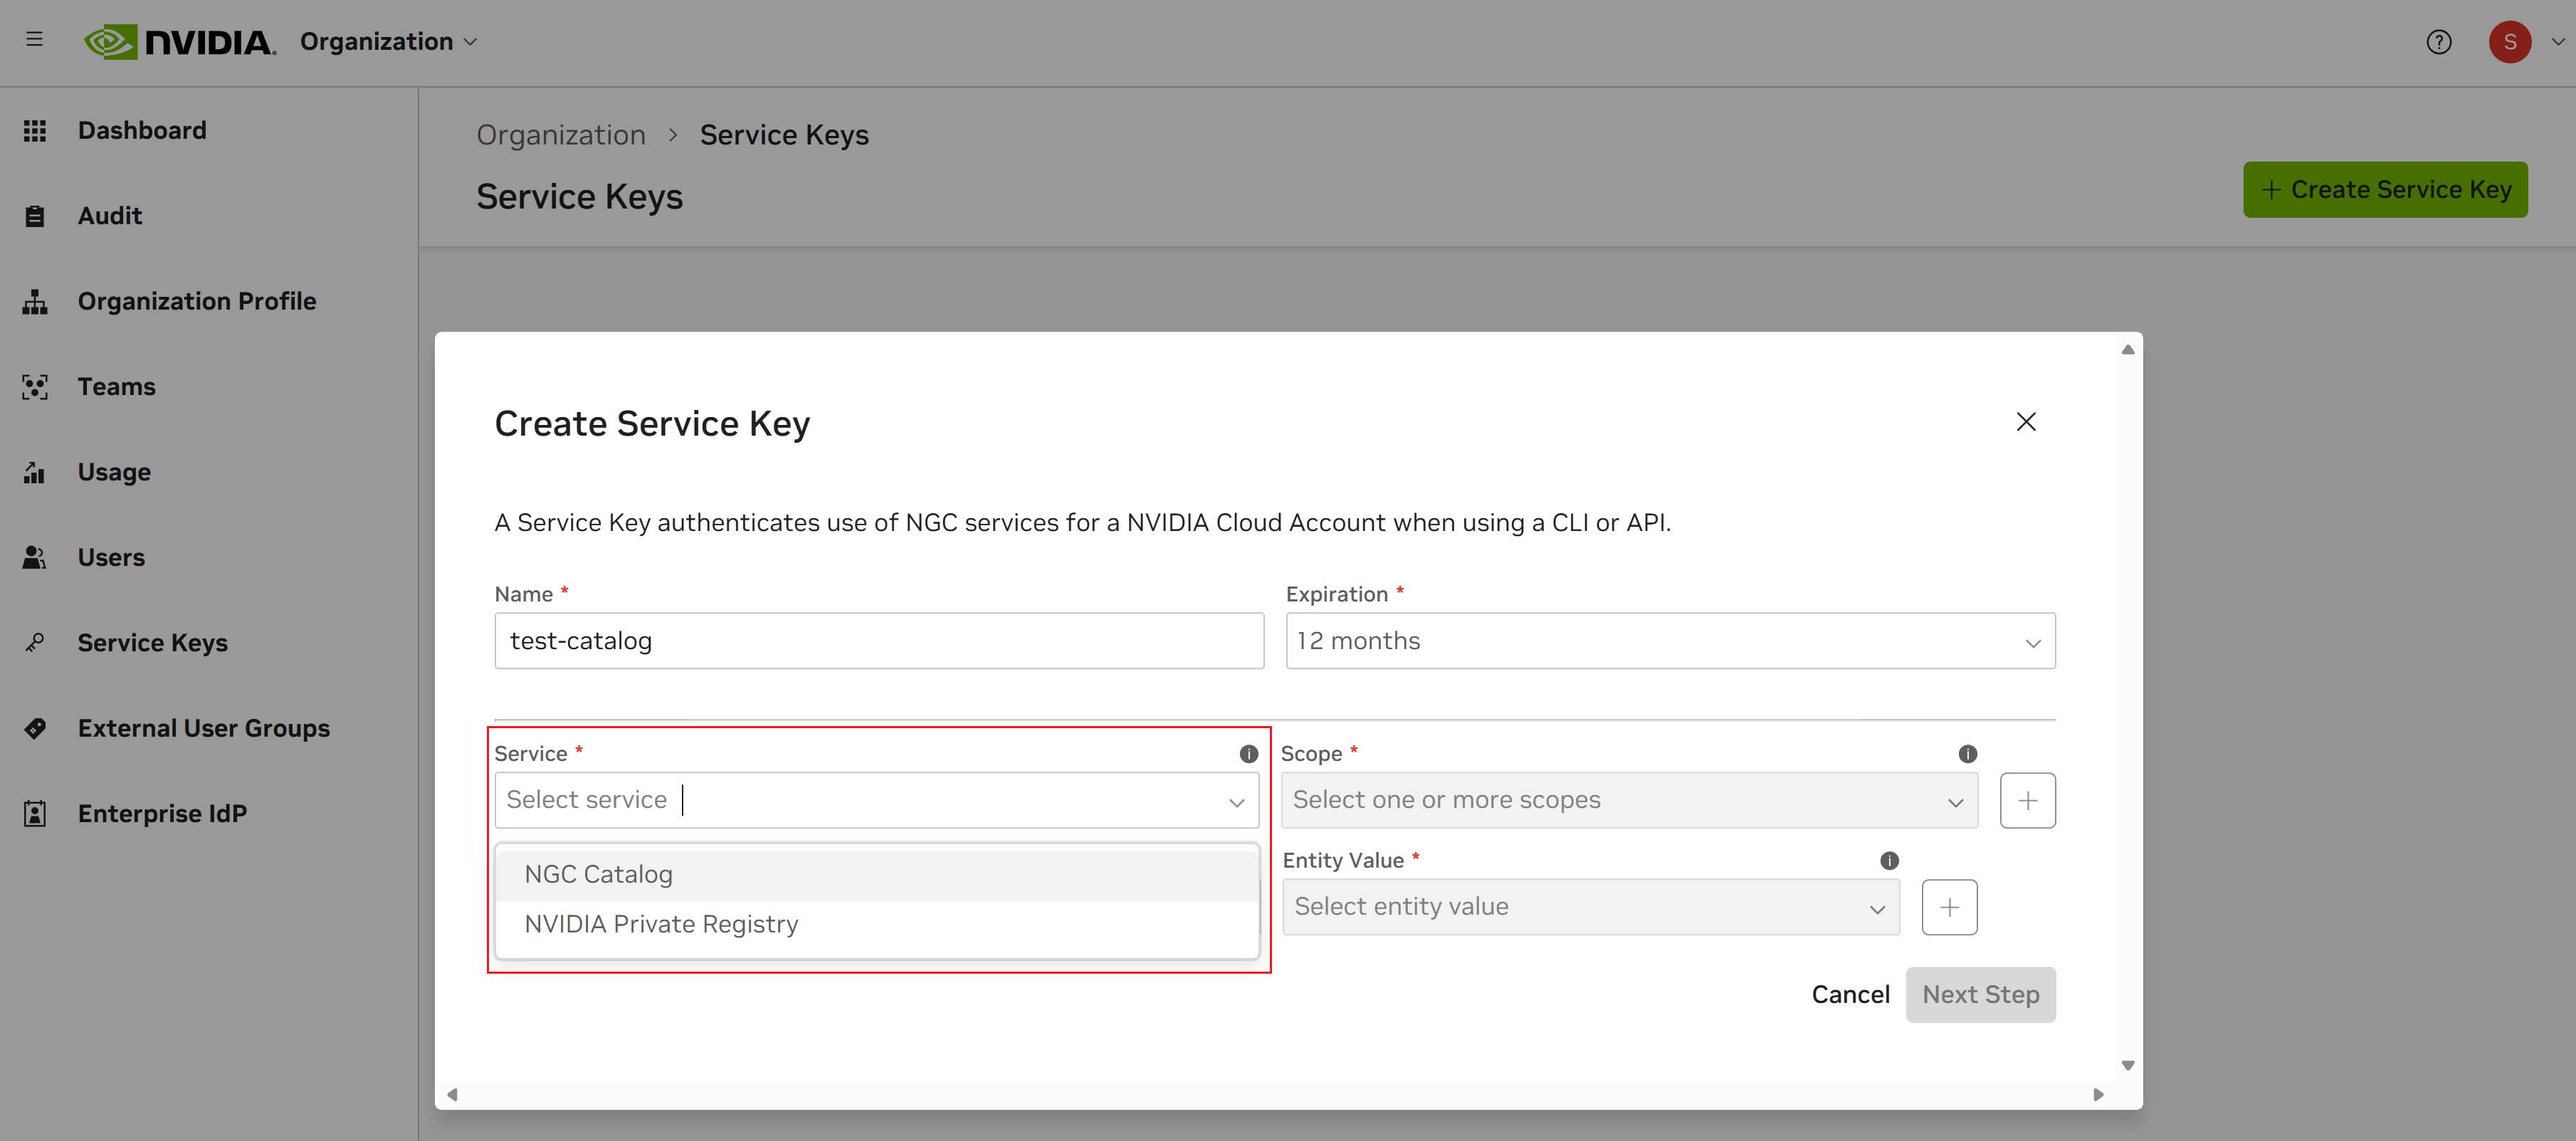
On the Organization > Service Keys page, click + Create Service Key to create a key.
In the Create Service Key dialog, you can select one or more services to authorize for the service API key, and configure scoped permissions that apply to either all entities or a specific subset accessible through those services. Begin by entering the required configuration details.
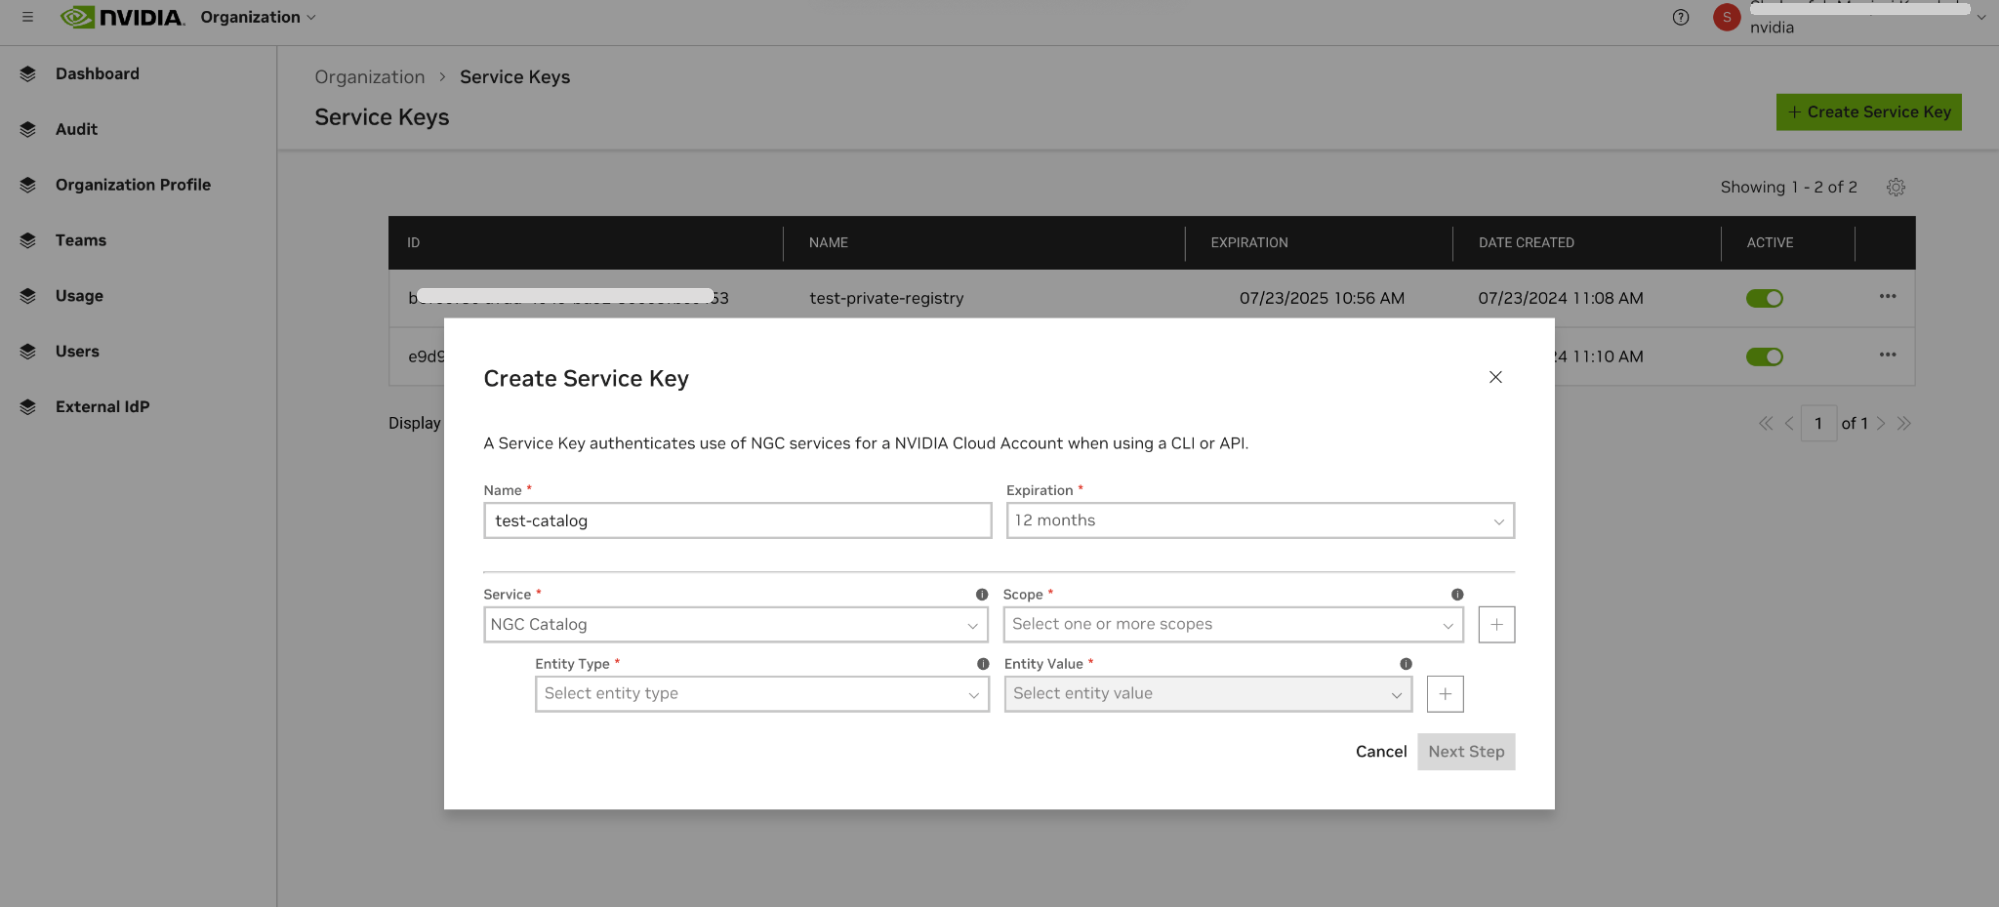
Service: Select a service. Service keys currently support a range of services, including NVIDIA Cloud Functions, NIM API endpoints, NGC Catalog, and Private Registry.
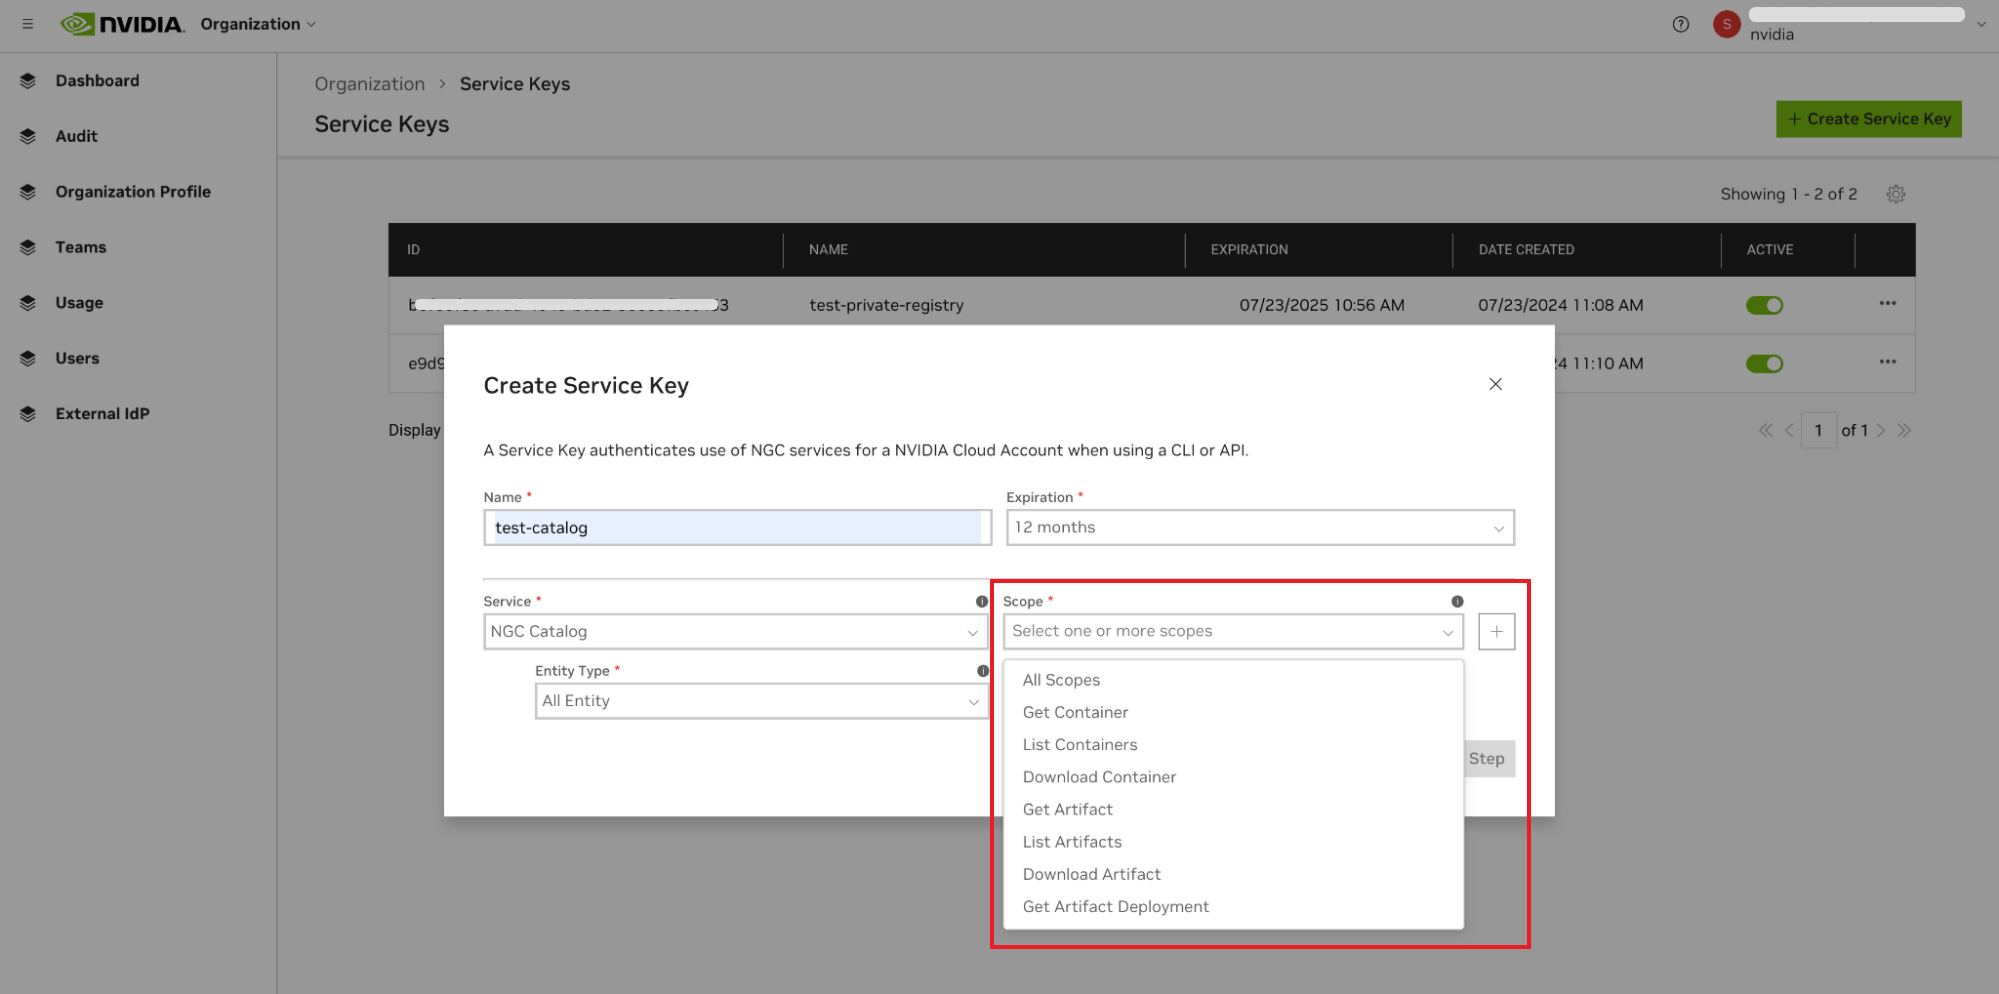
Scope: Specifies the exact permissions or actions the key can perform for a selected NGC service. Examples for Private Registry and NGC Catalog include “Get Container”, “Get Container list”, “Get Artifact”, and “Get Artifact list”. Other services list the scopes (actions) that can be assigned to the key.
Note
Select only the permissions you need (least privilege). Refer to Least-Privilege Service Key Recipes for more information.
Important
When generating a key for Private Registry or NGC Catalog services and granting access to containers, assign the scopes Get Container and Get Container list to your service key. For other artifact types, assign Get Artifact and Get Artifact list. These are the minimum scopes required to discover artifacts that need to be managed. Refer to the NGC Catalog User Guide and Private Registry User Guide for more information.
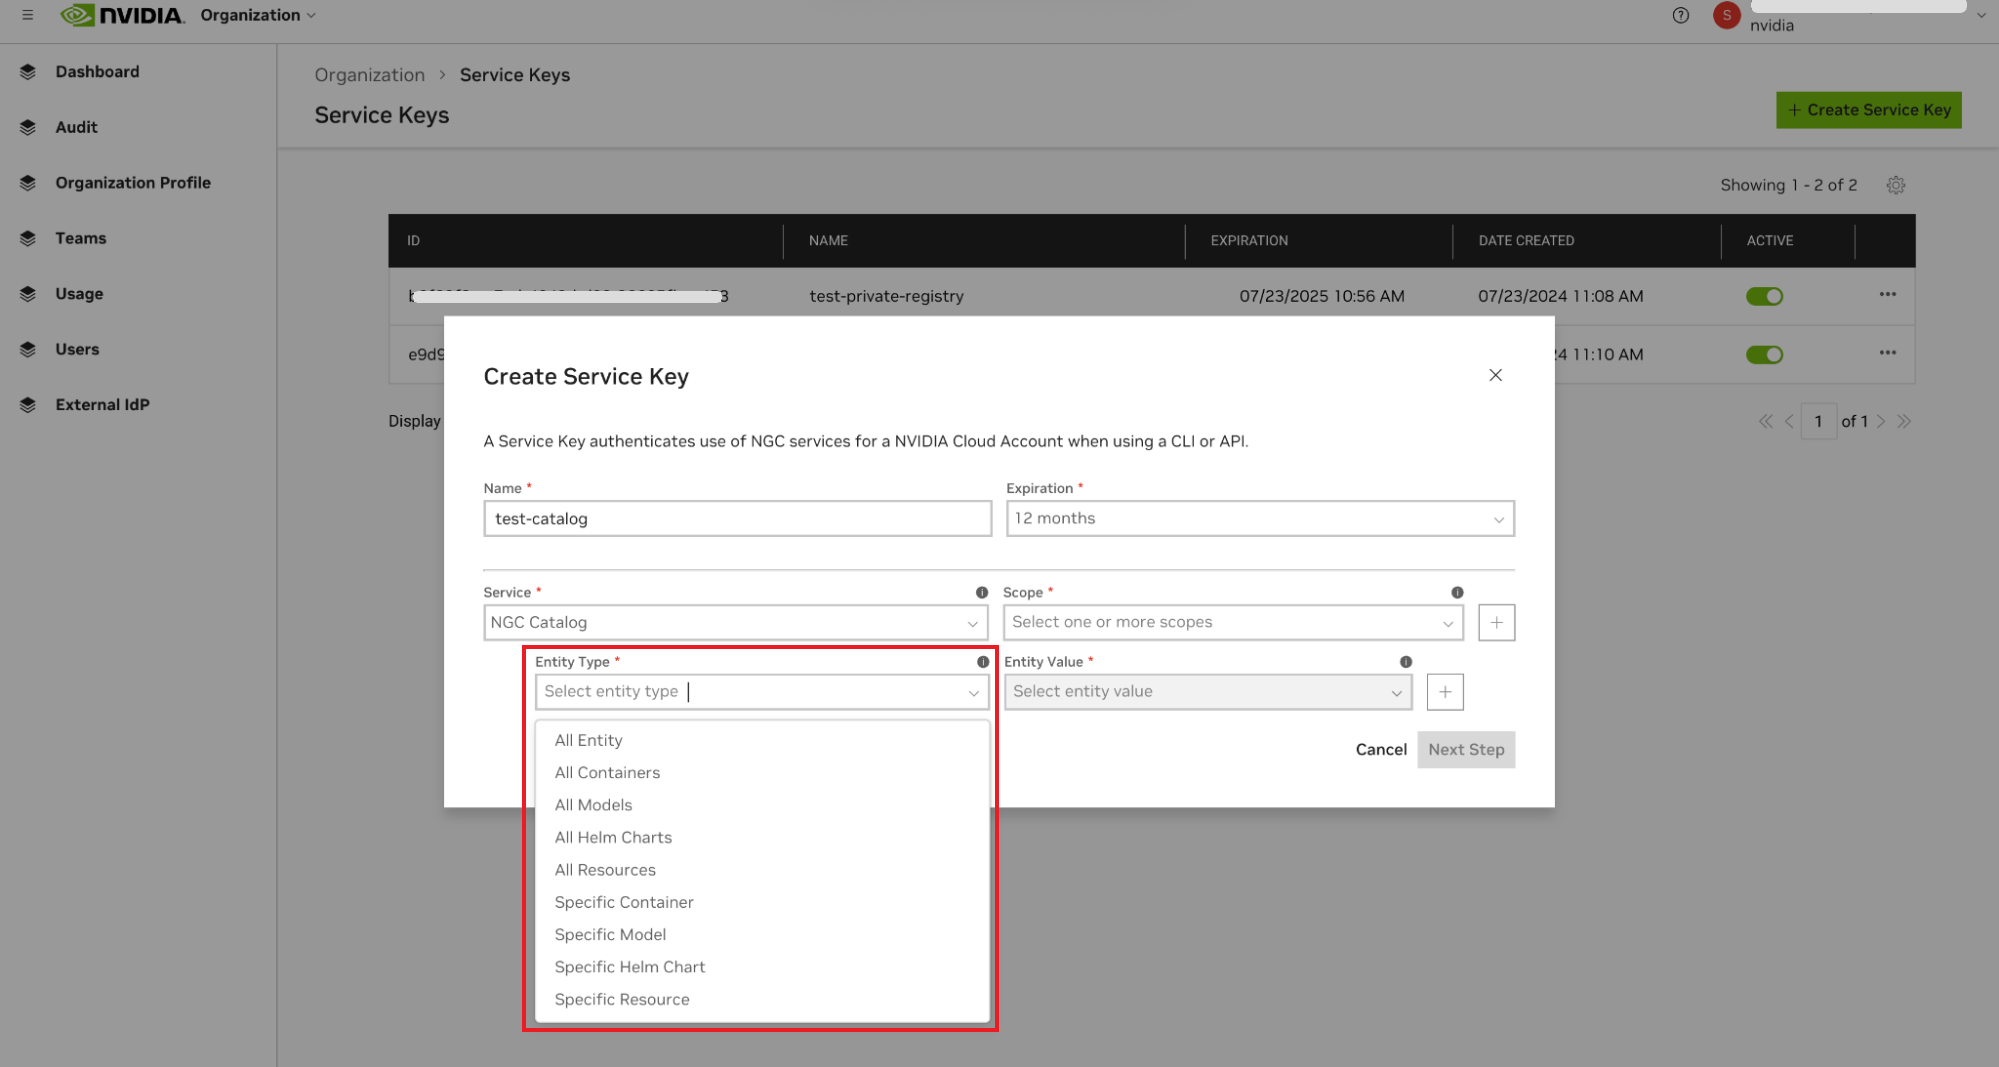
Entity Type: An entity is a resource that can be managed with the appropriate permissions and access controls. In Private Registry, an entity can be a container or a collection of containers that, depending on the permitted scopes, can be downloaded, updated, or deleted. In NVIDIA Cloud Functions, an entity is an “inference function” that can be listed, invoked, or deleted based on the scopes assigned to the service key.
Note
Choose the smallest unit that matches your use case. Refer to Least-Privilege Service Key Recipes for more information.
Entity Value: Specifies whether the key has access to all entities in the NGC org and teams, or only to a single entity or a defined list of entities within the org.
Important
If a service key requires access to all organization-level and NGC team-level entity types, define two entity values for the key.
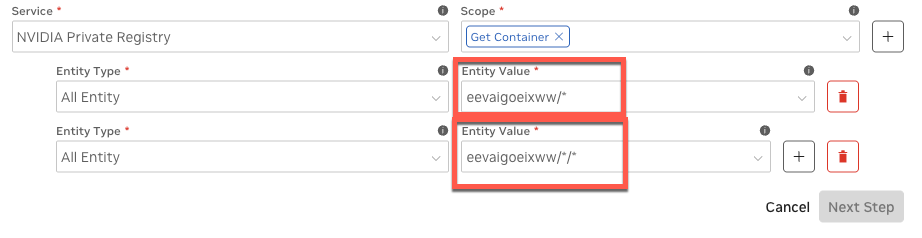
The example above shows the Entity Value configuration required for the service key to access all entities at the organizational level and across all NGC teams. For additional examples, refer to Configuring Access to NGC Catalog Artifacts.
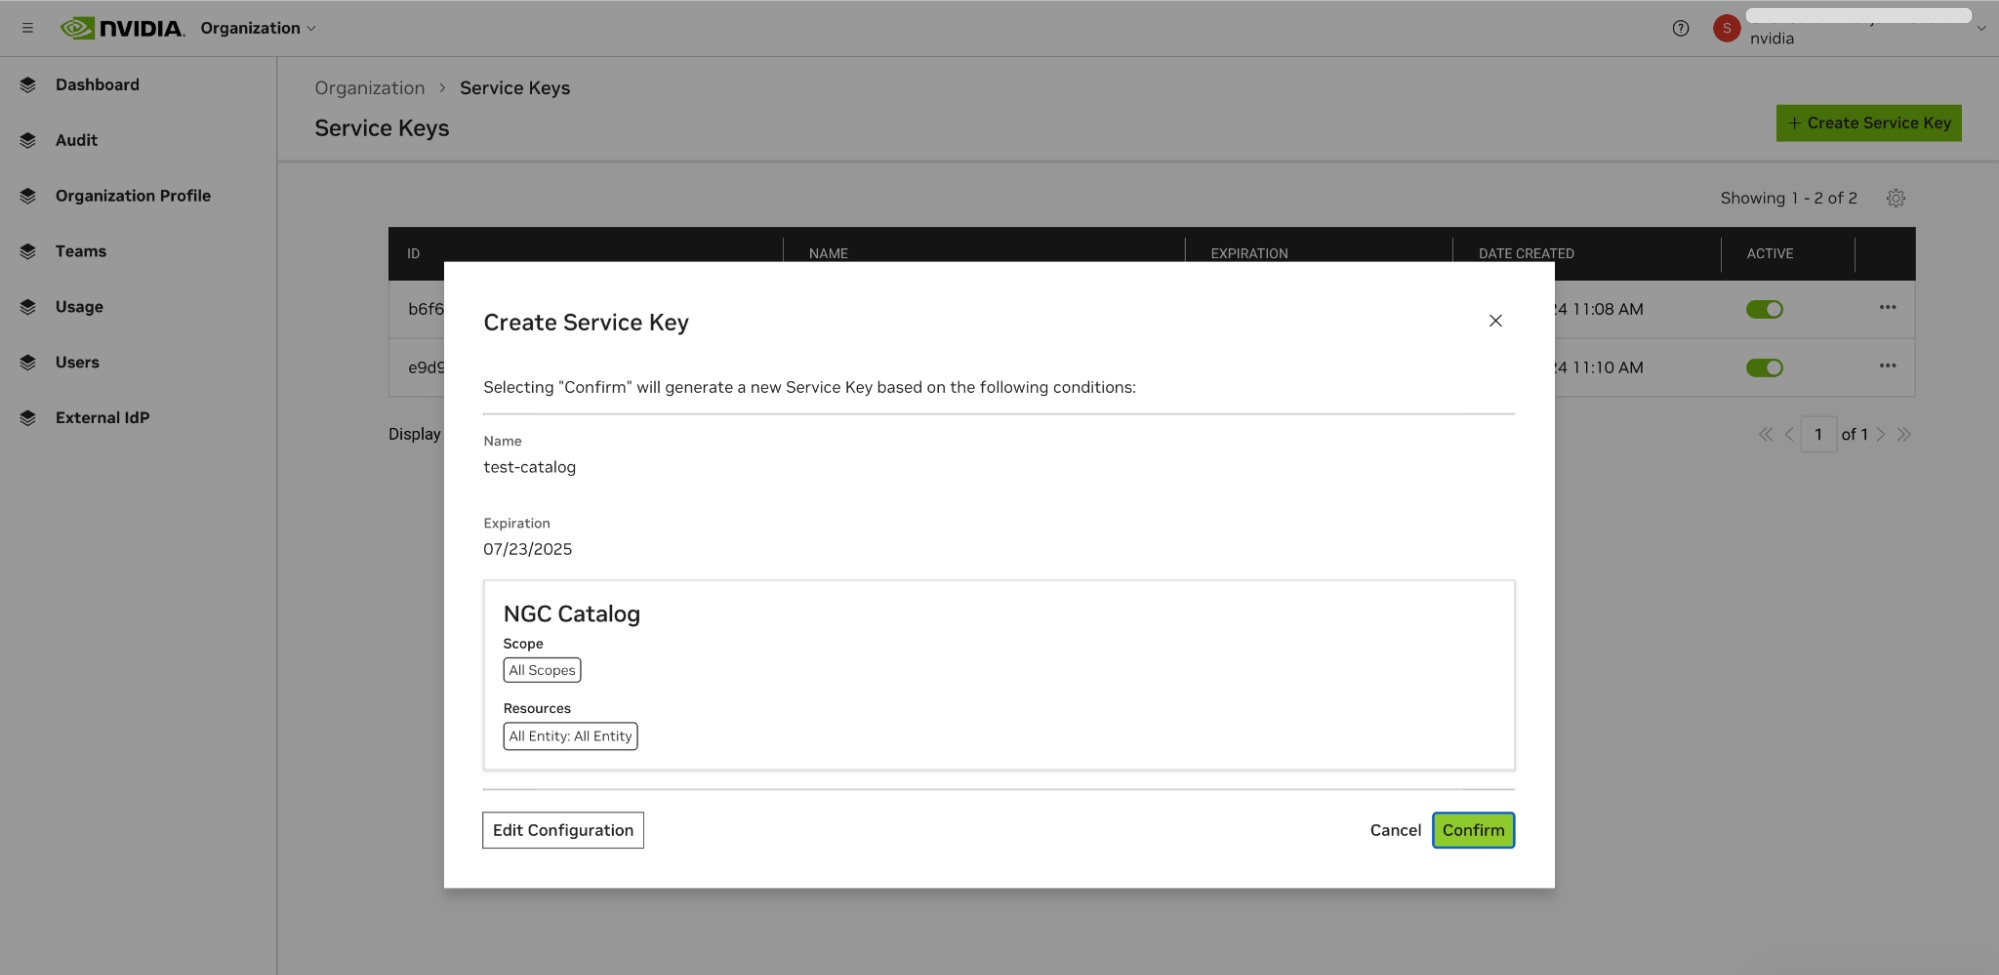
Click Next Step to review your key configuration.

Once you have verified the configuration, click Confirm to generate your service key. Your service key appears in the next dialog.
NGC does not save your key, so store it securely. You can copy your API Key to the clipboard by clicking the copy icon to the right of the API key or the Copy Service Key button.
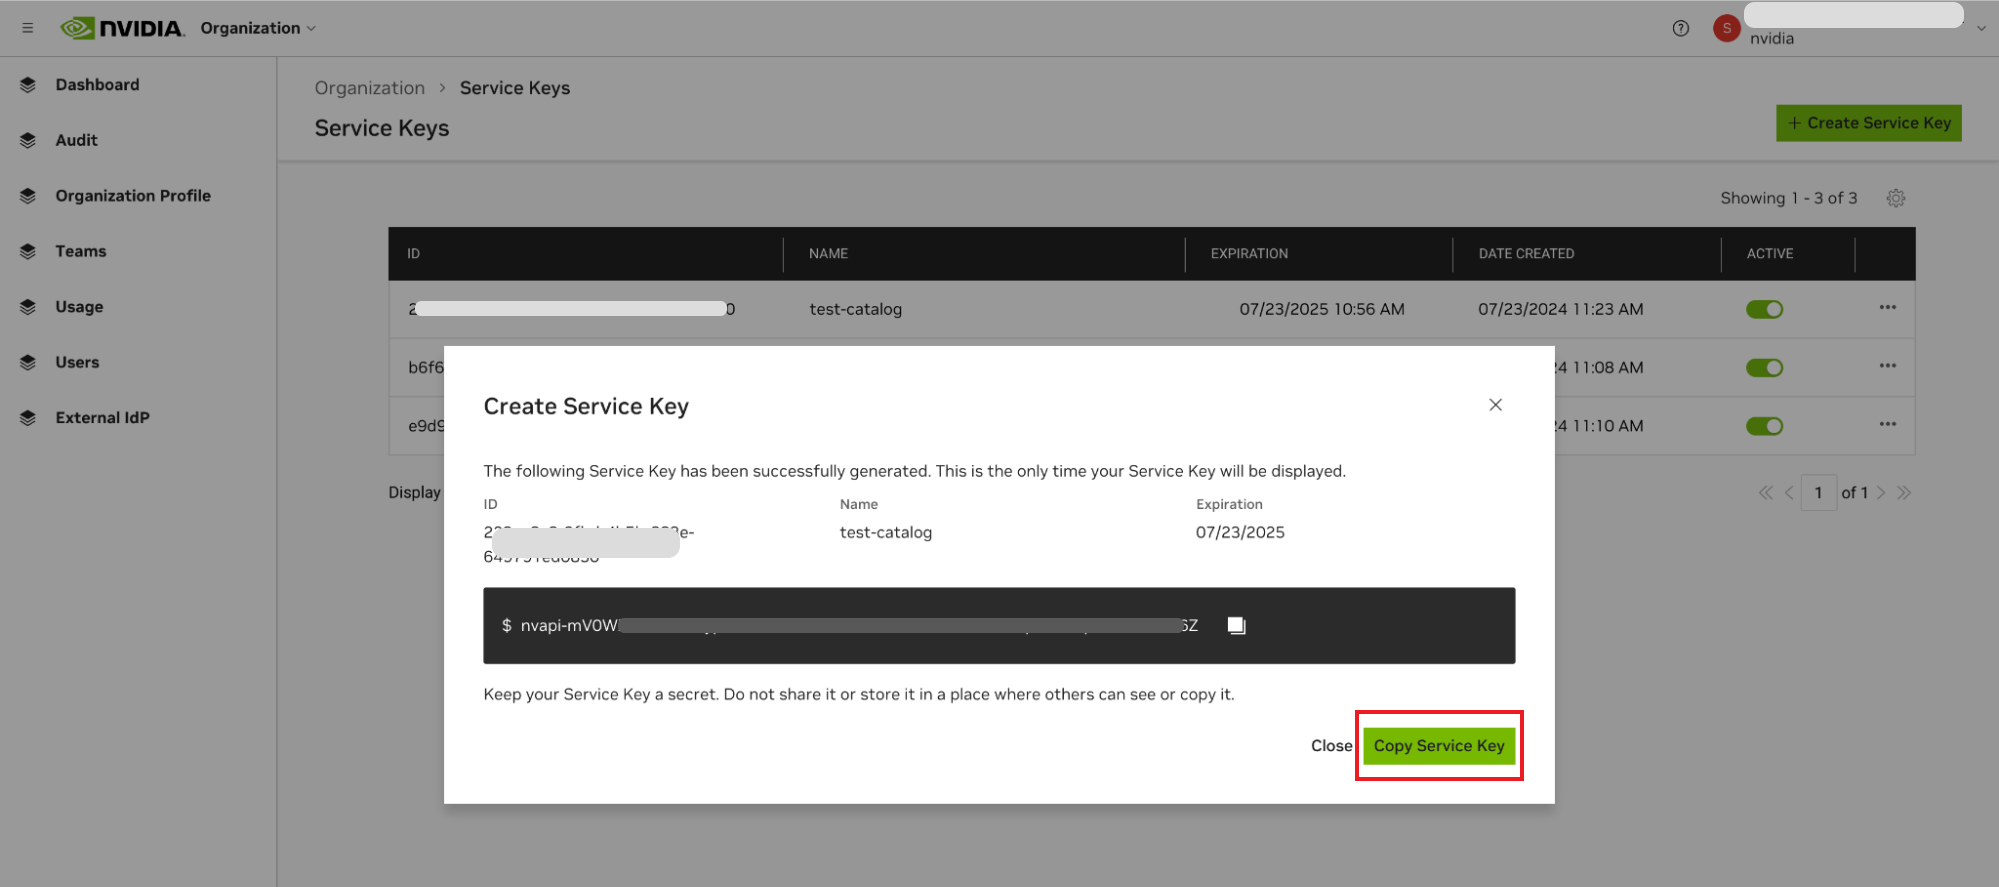
Make sure to copy the key value before leaving this page. Once you navigate away, the key value cannot be retrieved, and replacing it will require generating a new key.
1.8.2.2.1. Configuring Access to NGC Catalog Artifacts#
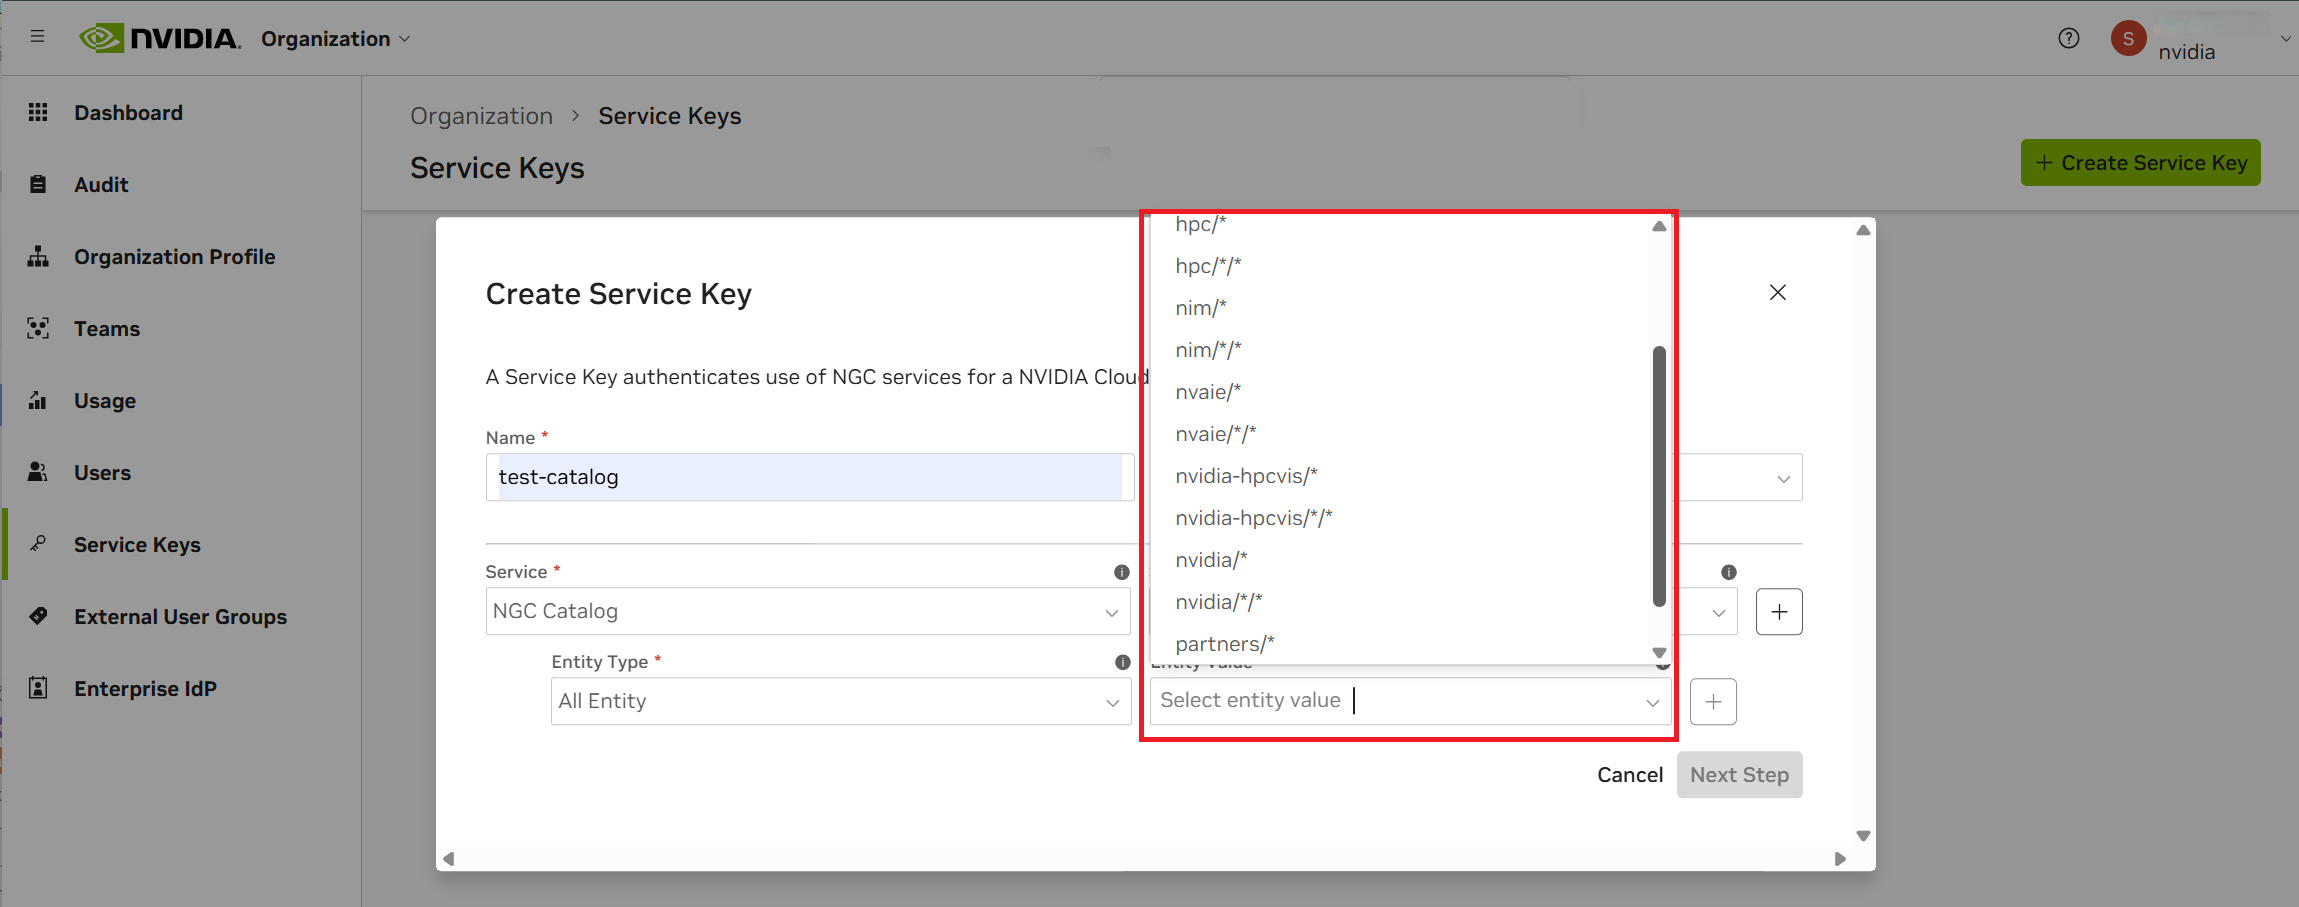
To configure a service key for NGC Catalog access, you must specify the path where each artifact is published. Include all required paths, as artifacts are published under different NVIDIA-managed NGC organizations depending on type.
Here are some examples:
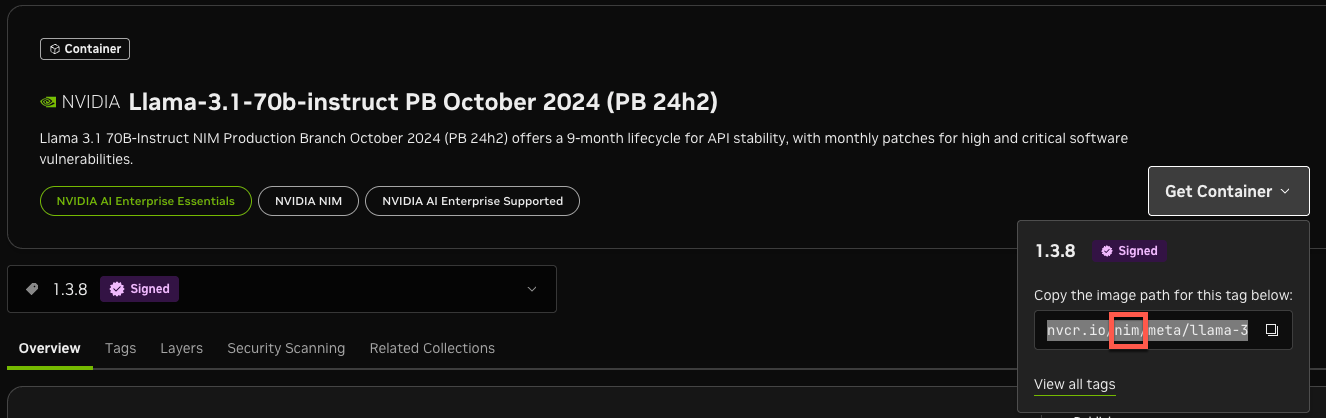
NVIDIA NIMs are published in the
nimNGC org (for example,nim/*/*).
The NVIDIA GPU Operator and other artifacts are published in the
nvidiaNGC org (for example,nvidia/*/*).

1.8.2.2.1.1. Setting the Path for Specific Artifacts#
To access a specific artifact, check its publishing details (for example, by examining the GET path information).
For artifacts within the
nimNGC organization, the service key must be set up to permit access to the relevant repository. Although the configuration below provides access to all NVIDIA NIM artifacts, you can restrict the key’s access by specifying the path to a particular artifact in the Entity Value field (for example,nim/<team>/<artifact>).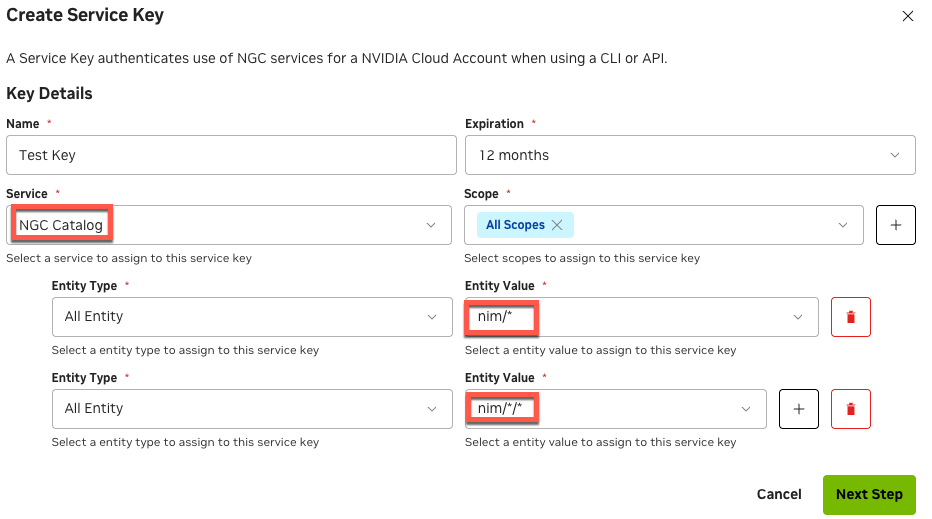
If you need to access artifacts in a different NVIDIA-managed NGC org, such as the
nvidiaorg (for artifacts like the NVIDIA GPU Operator), add that specific path to your service key configuration (for example,nvidia/*/*).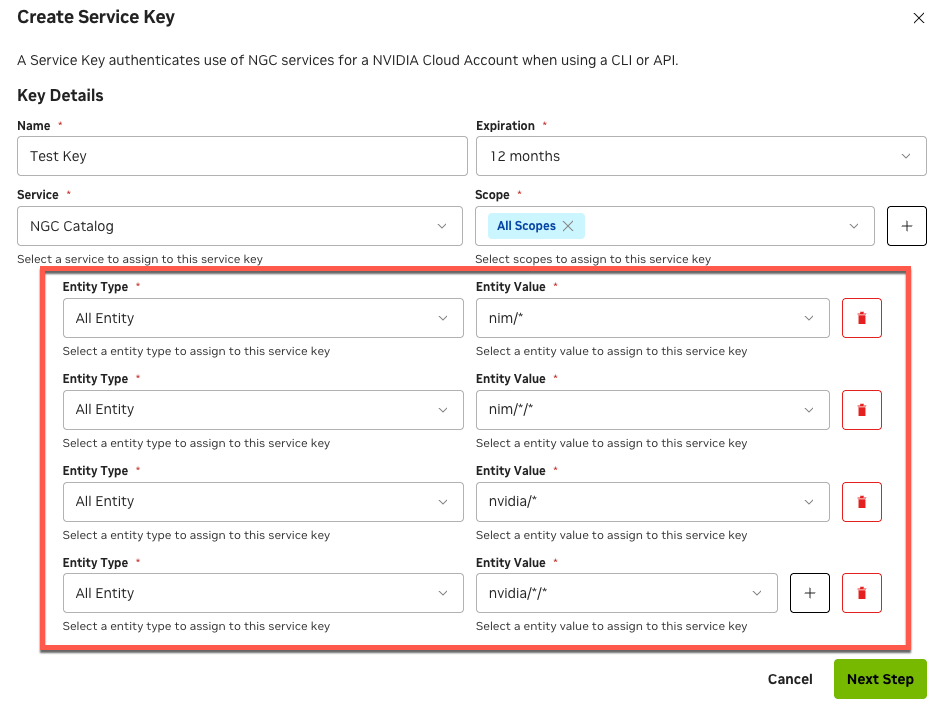
1.8.2.2.1.2. Comprehensive Access Configuration#
To grant a service key access to all entities (artifacts) available in both primary NVIDIA-managed orgs, include both wildcard paths. For example:
nim/*/*nvidia/*/*
This configuration grants the service key access to all entities published in the root and all subfolders of the NVIDIA-managed nim and nvidia orgs.
Important
Access to certain restricted artifacts in the catalog (such as those requiring NVIDIA AI Enterprise) depends on active subscriptions. If your NGC organization does not have the necessary subscription, a service key may be denied access to specific artifacts even if the permissions are configured as described above. Always check the access requirements for each product listed in the NGC Catalog.
1.8.2.2.2. Configuring Service Keys for NVIDIA Cloud Functions#
To configure a service key for use with NVIDIA Cloud Functions (NVCF), you must select the appropriate Scopes, Entity Types, and Entity Values based on the operations your service key needs to perform. As outlined earlier in this guide, Scopes are the actions the key can perform and Entity Types are the resources those actions apply to. For NVCF, the available entity types are:
All Functions — all functions in this org.
Function — a single function, specified by function ID.
Function Version — a single function and a specific version of that function.
All Clusters — cluster and GPU infrastructure information.
All Entity — all resource types in the org. Required by certain org-level scopes (see below).
You can find the full list of scopes, compatible resource types, and troubleshooting guidance in the NVCF Service Keys Documentation.
Important
The following scopes only work with the All Entity resource type. Selecting any other resource type will result in a 403 error: Manage Registry Credentials, Manage Telemetries, Read GPU Quota Rule, and GPU Capacity.
1.8.2.2.3. Managing Service API Keys#
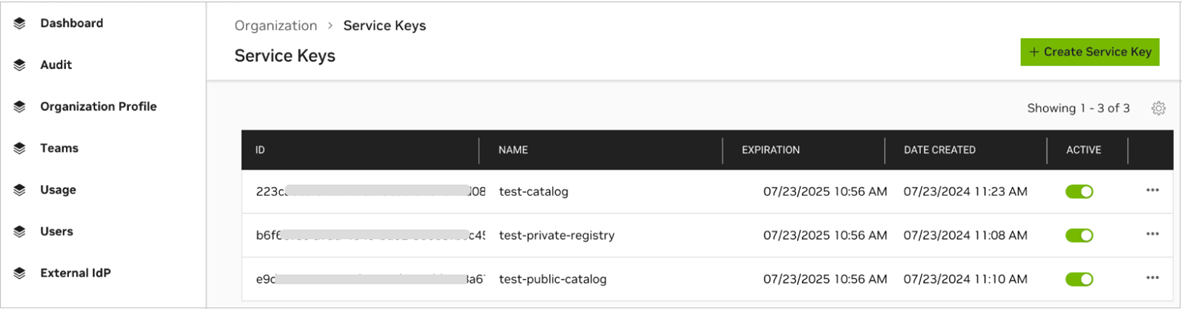
NGC supports multiple Service API keys, which are managed from the Organization > Service Keys dashboard.
To activate or deactivate a key, click the Active toggle. The Actions (ellipsis) menu allows you to rotate or delete a service key.
1.8.2.2.4. Least-Privilege Service Key Recipes#
Here are some examples of least-privilege service key recipes:
Private Registry: List, push and pull only containers
Service: Private Registry
Entity Type: All Containers
Entity Value: <org name>/* and <org name>/*/*
Scope: List Container, Upload Container, Download Container
Note
In the entity value,
<org name>/*includes all org-level entities, while<org name>/*/*includes all team-level entities across the org.NGC Catalog: Read-only pull for a single model
Service: Catalog
Entity Type: Specific Model
Entity Value: nvidia/ace/nemovision-4b-v2-instruct
NVCF: Invoke-only (production inference client)
Service: Cloud Functions
Scope: Invoke Function, Queue Details
Entity Type: Function → <function-id> (or All Functions for access to all functions)
NVCF: Manage function lifecycle
Service: Cloud Functions
Scope: Register Function, Deploy Function, List Functions, List Function Details, Update Function, Delete Function
Entity Type: All Functions → Account-owned Functions
1.8.3. Troubleshooting API Key Errors#
Below are errors you might encounter, with guidance on how to troubleshoot and resolve each one.
401 Unauthorized
A
401 Unauthorizedresponse indicates that you aren’t properly logged into nvcr.io. Verify correctness of your authentication secret or trydocker logoutand logging back in.403 Forbidden
A
403 Forbiddenresponse indicates that either a required scope is missing or the entity type and value are not correctly configured for the resource the API is trying to access. You likely need to select Update Authorizations and reconfigure the service key.Recently updated keys
After you modify a Service Key’s scopes or entity type/value, it can take up to 15 minutes for the changes to propagate. Requests made before propagation completes will continue to be evaluated against the previous authorization policy and may return an error.
1.9. Secure Sharing Service#
NGC Secure Share is a security-focused service designed to help NGC users share sensitive credentials and secrets with each other. This service eliminates risky credential-sharing practices such as sending passwords or API keys through email, chat, or public forums.
Important
Exchanging credentials in clear text or through unprotected channels can result in the compromise of both user artifacts and the hosted services in NGC. Always utilize Secure Share to distribute sensitive information.
Secure Share enables secure, auditable, and ephemeral sharing of secrets—including API keys, usernames/passwords, and tokens—between NGC users and collaborators. Instead of transmitting credentials in an unsafe medium, users generate a secure, time-limited “Secure Share link” that is strictly controlled by access policies.
Key Features
End-to-end encryption for all shared secrets
Recipient restriction: limit access to specified organization
Burn-after-read: each link will expire after a single access
Short link lifespan: customizable expiration (5 min to 24 hours)
No secrets stored after access: secrets are unrecoverable after viewing or expiration
Common Use Cases
Safely hand off API keys between team members
Securely provide one-time passwords or recovery codes to partners or support
Distribute model secrets or other credentials during project onboarding
1.9.1. Securely Sharing Secrets#
Follow these steps to securely share credentials using NGC Secure Share:
Log in and access Secure Share Service.
If not already signed in, log in to the NGC web portal using your NVIDIA credentials.
In the top right corner, click your profile and go to Account Settings, then click Secure Share.
Alternatively, you can navigate directly to https://org.ngc.nvidia.com/account/secure-share.
Enter secret content by pasting or typing the credential or secret (for example, API key, username/password) you want to share.
(Optional) Configure additional share details:
Set the recipient organization.
For organizations you belong to, pick from the list.
For an external organization, you must enter the exact NGC organization name provided by the recipients. This is needed to ensure proper access controls. If your recipient needs help finding their organization name, they can refer to the Finding your Organization Name section.
Set the expiration time for the link: from 5 minutes to 24 hours.
Set a display name to help you track the share.
Click Create Link.
Click Copy Link to copy the link to your clipboard before closing.

Provide the link directly to the intended recipient (for example, via email or direct chat).
1.9.2. Receiving a Secure Share Link#
When someone invites you to access a shared secret:
Receive Secure Share link.
Watch for a direct message (for example, email or chat) with a secure share link.
Open the link and authenticate.
Click the link. If prompted, sign in with your NGC credentials.
You’ll be redirected to the Secure Share access interface.
Decide to view now or wait until later.
You have only one opportunity to view and copy the secret.
You will be given the option to choose Reveal Now or Close to reveal the secret later.
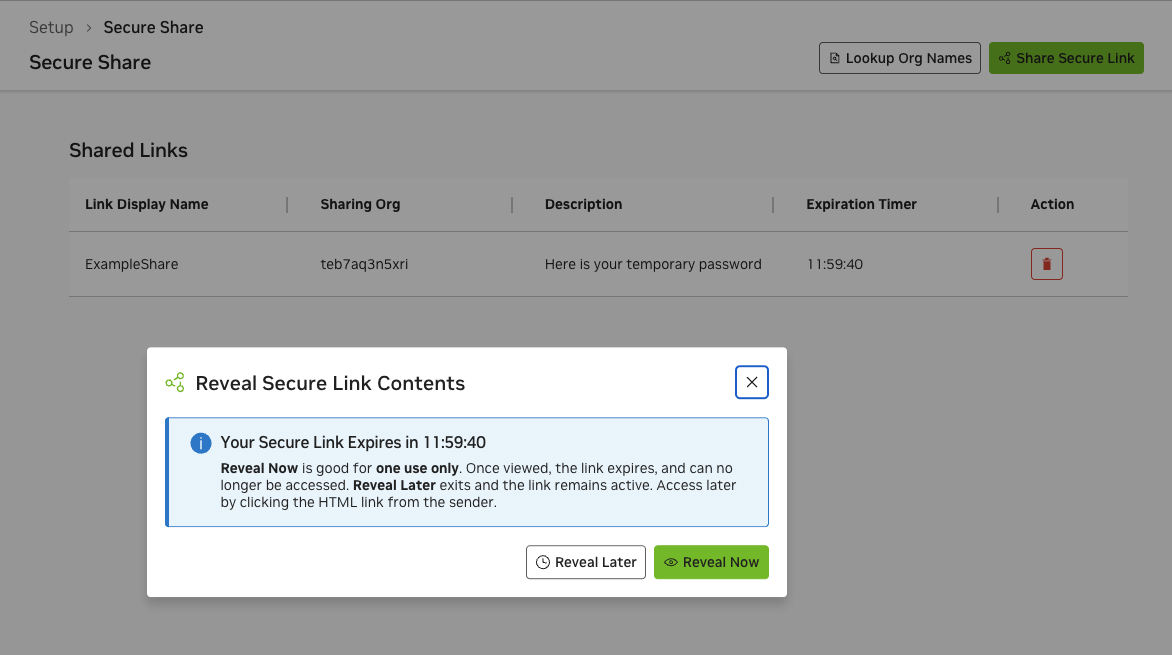
If you choose to access the secret now:
Click Reveal Now.
You will be given the option to copy the secret content to your clipboard.
Copy the content before closing. The secure content will no longer be accessible.
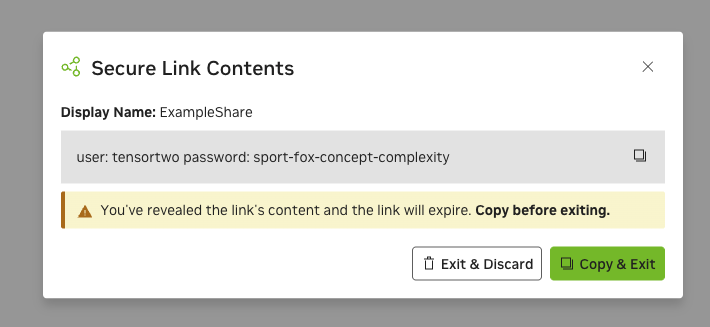
Note
If access is denied (wrong org, expired, or already viewed), contact the sender for a new link.
1.9.3. Finding your Organization Name#
To receive a Secure Share link that can only be opened by your NGC organization, you may need to confirm or provide your organization name. This can be done within the Secure Share service UI.
To simplify sharing and find your NGC organization name:
Navigate to https://org.ngc.nvidia.com/account/secure-share.
Click Request Content.
If you belong to multiple organizations, locate the correct one and click Create Link.
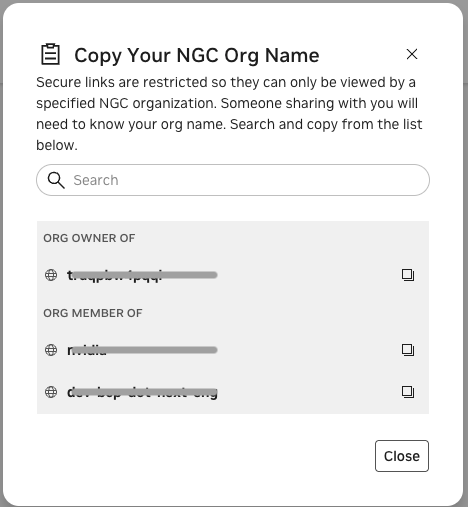
Review the pre-configured share link, then click Copy Link.
Send this link to the person who will share secure content with you. When they open it, your organization will be pre-selected, allowing them to encrypt and send their data securely.
Important
For security, always verify you are entering or selecting the correct organization to avoid access issues or failed link attempts. If you are unsure or you cannot find your organization name, contact your NGC administrator.
Note
You cannot receive shares to organizations in which you are an external user.
1.9.4. Viewing Active Links#
You can review your active, unclaimed Secure Share links on the View Active Links tab. On this tab, you can see each link’s display name, target organization, creation time, and expiration status. You can also delete links you no longer need; deleted links become immediately inaccessible.
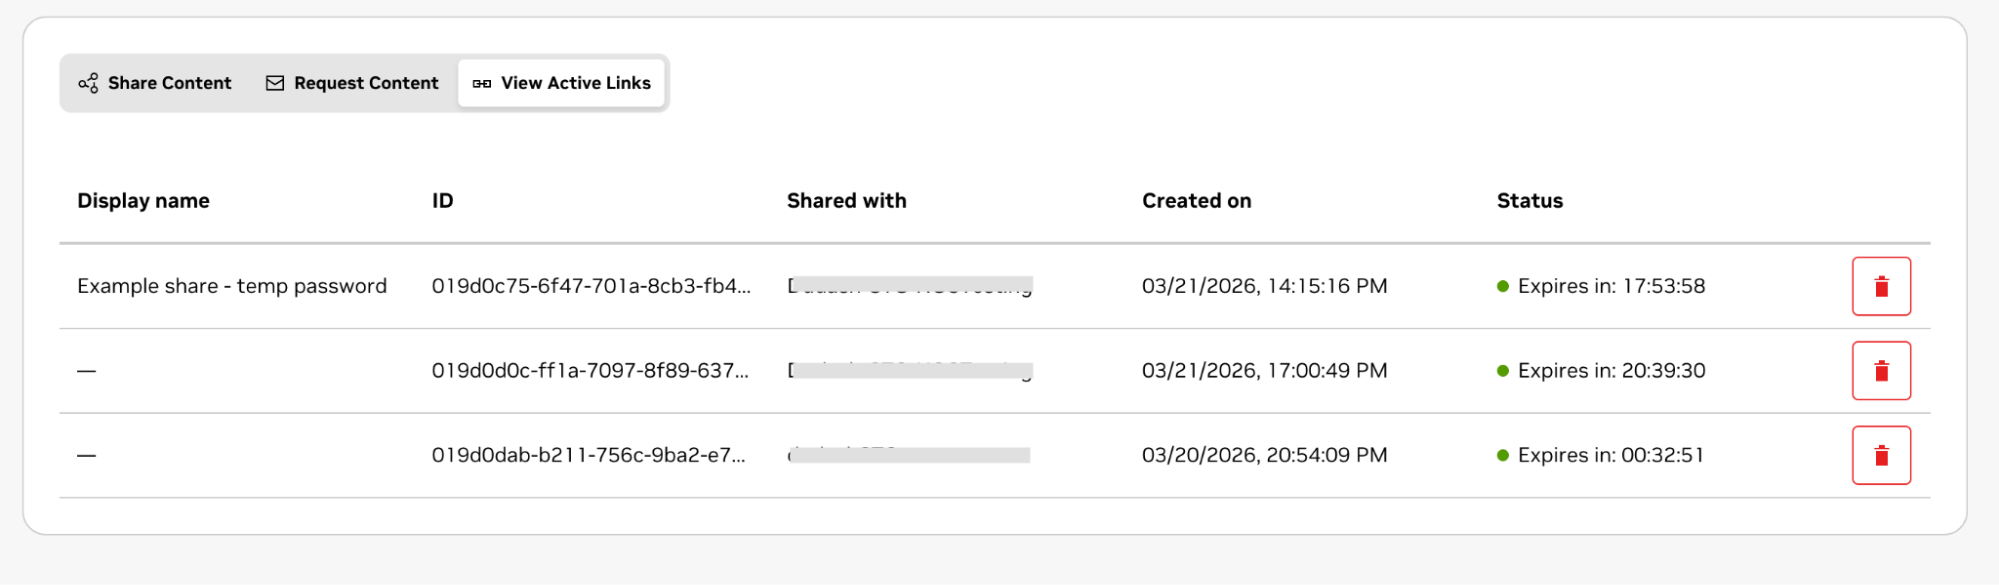
1.10. Notification Services#
The NGC Notification Services feature enables NGC users to subscribe to email notifications to receive service change events. By subscribing to notifications, users can stay updated with the latest changes and developments in the NGC cloud platform and its services.
NGC customers can be informed of the following types of changes:
Customer-impacting service enhancements (release notes)
Security vulnerabilities (CVEs) and scanning reports
Software end-of-life announcements
Scheduled web portal maintenance to an NGC property
NGC customers can subscribe to notifications in the following ways:
During their first sign-in, the NGC portal will display a modal allowing users to set their notification preferences.
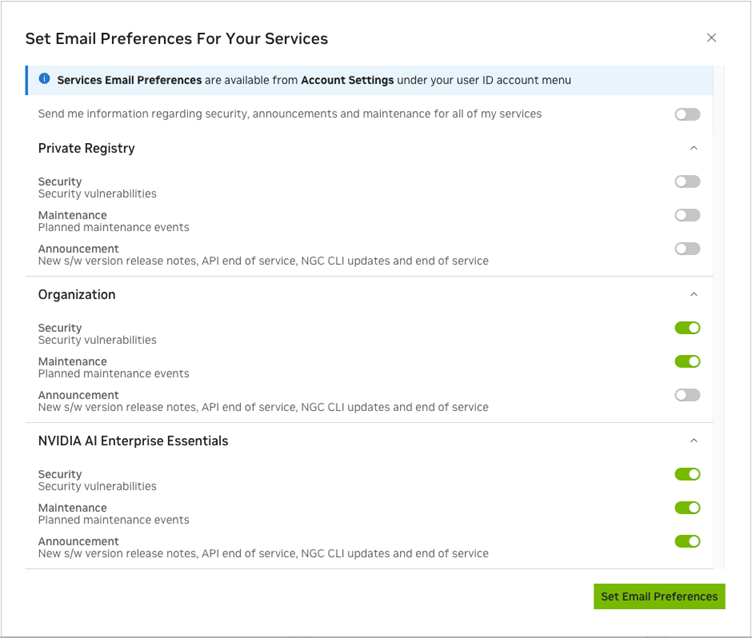
The following sample toast notification confirms the user’s email preference settings:
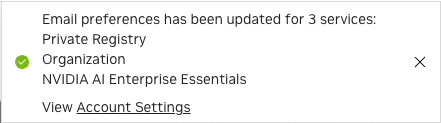
After their initial sign-in, users can edit their notification preferences under their NGC user account settings page.
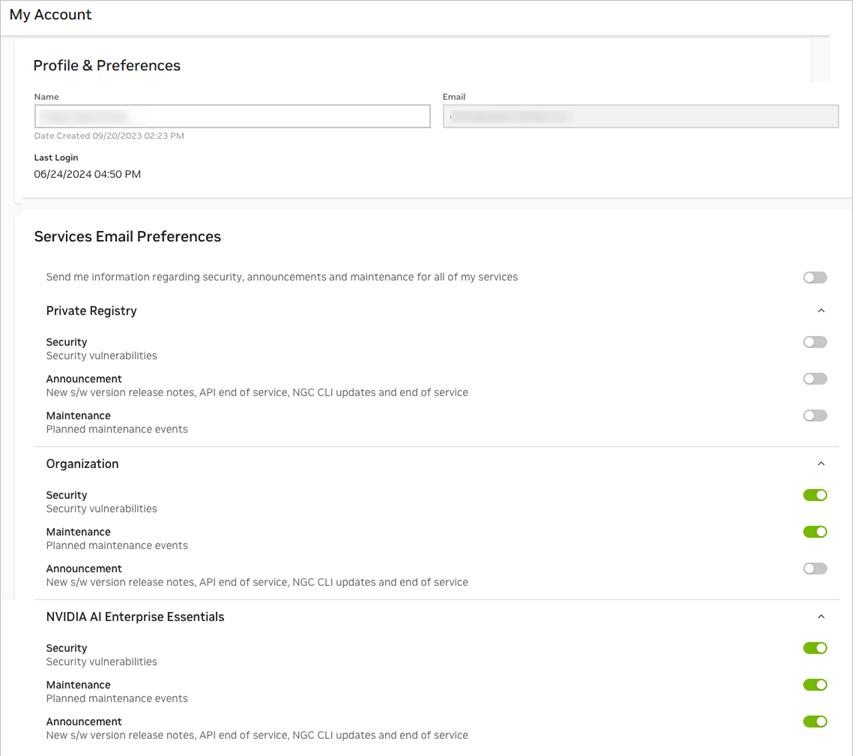
Notification preferences are organized based on the subscriptions enabled within the organization. Access to these preferences will be gated by the service roles assigned to each user.
1.11. Appendix#
1.11.1. NVIDIA NGC Network Protocols#
The table below lists the required network protocols and port configurations for communication with NVIDIA NGC services.
To enable access, ensure that these ports are open in your web proxy, which connects your network to external services.
Location |
Description |
URL |
Port |
|---|---|---|---|
NGC |
Authentication URL |
|
443 |
NGC |
Container Registry URL |
|
443 |
NGC |
Container Registry URL |
|
443 |
NGC |
Helm Chart Registry |
|
443 |
NGC |
API URL |
|
443 |
NGC |
Telemetry URL |
|
8282 |
NGC |
Catalog |
|
443 |
NGC |
Catalog |
|
443 |
NGC |
Catalog |
|
443 |