Red Hat Enterprise Linux with KVM Installation and vGPU Configuration#
Note
This guide uses RHEL KVM 9.6. For earlier versions, please refer to the official Broadcom documentation.
Installing Red Hat Enterprise Linux#
Download the latest RHEL ISO from the Red Hat Customer Portal. Use this ISO to create a bootable installation medium (such as a USB drive or DVD). Boot the system from the installation medium and follow the prompts to install RHEL on your server. For detailed steps, see Creating a Bootable Installation Medium for RHEL.
Preparing RHEL to Host Virtual Machines (KVM Setup)#
After the base RHEL installation, enable and configure KVM on the host. KVM allows your RHEL system to function as a hypervisor capable of running virtual machines (VMs). To install and configure KVM, follow the steps in Preparing RHEL to Host Virtual Machines.
NVIDIA vGPU Configuration#
NVIDIA vGPU Manager#
Start by installing and configuring the NVIDIA vGPU Manager. See Installing the NVIDIA Virtual GPU Manager for detailed instructions.
Selecting the Correct vGPU Profiles#
Select the appropriate vGPU profile based on your user’s needs and application requirements. More information can be found in the vGPU Sizing and Selection guides.
Creating the Virtual Machines#
Follow these instructions to create a VM with KVM on RHEL.
To start the VM, use the command:
sudo virsh start <vm-name>
If a display window does not appear, open it with:
sudo virt-viewer <vm-name>
To shut down the VM, you can do it from the display window or use the command:
sudo virsh shutdown <vm-name>
MIG-Backed vGPU#
The NVIDIA RTX PRO 6000 Blackwell Server Edition introduces support for MIG-backed vGPU, enabling vGPUs to be created from individual MIG instances and assigned to VMs. This model combines MIG’s hardware-level spatial partitioning with the temporal partitioning capabilities of vGPU, offering flexibility in how GPU resources are shared across workloads. More information on MIG-backed vGPU is available here.
Note
MIG configurations are not persistent across system reboots by default. When the host reboots, all GPU instances and compute instances are removed. After each reboot, MIG must be re-enabled and the desired GPU/compute instance configuration recreated before vGPUs can be attached.
If you are planning to use MIG-Backed vGPU:
Start by enabling MIG Mode: Open a terminal as the root user on your RHEL host, then follow these instructions.
Create GPU Instances: Once MIG mode is enabled, create GPU instances on the MIG-enabled GPU by following Creating GPU Instances on a MIG-Enabled GPU.
In the screenshot below, you can see an example where four MIG GPU instances were successfully created using the command nvidia-smi mig -cgi 47,47,47,47 -C.

The 1g.24gb+gfx profile defines the size and capabilities of each slice as follows:
1g: This indicates one compute slice, which is a portion of the GPU’s processing cores. Specifically, it means that the GPU instance is allocated one-fourth of the total SMs available on the GPU. This allocation ensures that the instance has dedicated compute resources
24gb: This specifies that 24 GB of dedicated GPU memory is assigned to that instance. This memory is isolated and dedicated to the GPU instance, ensuring that other instances cannot access or interfere with it
gfx: This denotes that graphics capabilities are enabled for this instance. This allows the instance to handle workloads that require graphics acceleration, such as virtual workstations, rendering tasks, and other graphics-intensive applications
Each GPU instance represents a hardware-isolated partition of the physical GPU. Each compute instance is a logical unit created within a GPU instance. It runs workloads and manages scheduling. Compute instances share the memory and engines of the parent GPU instance but have dedicated SM resources.
Creating an NVIDIA vGPU#
Start by Getting the BDF and Domain of the GPU.
If your GPU you use supports SR-IOV, make sure to Prepare the Virtual Function for the NVIDIA vGPU.
If you want to enable heterogeneous vGPU, see Putting a GPU or GPU Instance into Mixed-Size Mode.
Then, proceed to creating the NVIDIA vGPU. If you want to use MIG-backed time-sliced vGPU (multiple vGPUs on the same MIG instance), repeat this step for each vGPU and ensure they are all created on the same MIG instance.
To list the available vGPU profiles, run:
grep -H . /sys/bus/pci/devices/$VF/mdev_supported_types/*/name
Replace $VF with the path of your Virtual Function (for example, /sys/bus/pci/devices/0000:41:00.4).
Note
You can also create a simple script to automatically scan through all mdev_supported_types directories and display the vGPU profiles that have an available instance. This makes it easier to identify which vGPU types can currently be created.
Adding a vGPU to the VM#
On your RHEL host, follow these instructions to attach a vGPU to the VM.
Removing a vGPU from the VM#
To remove a vGPU from a VM, follow these instructions.
Installing the NVIDIA Graphics Driver#
After the VM is created and assigned a vGPU, install the NVIDIA vGPU Software Graphics Driver inside the VM. Instructions are available here.
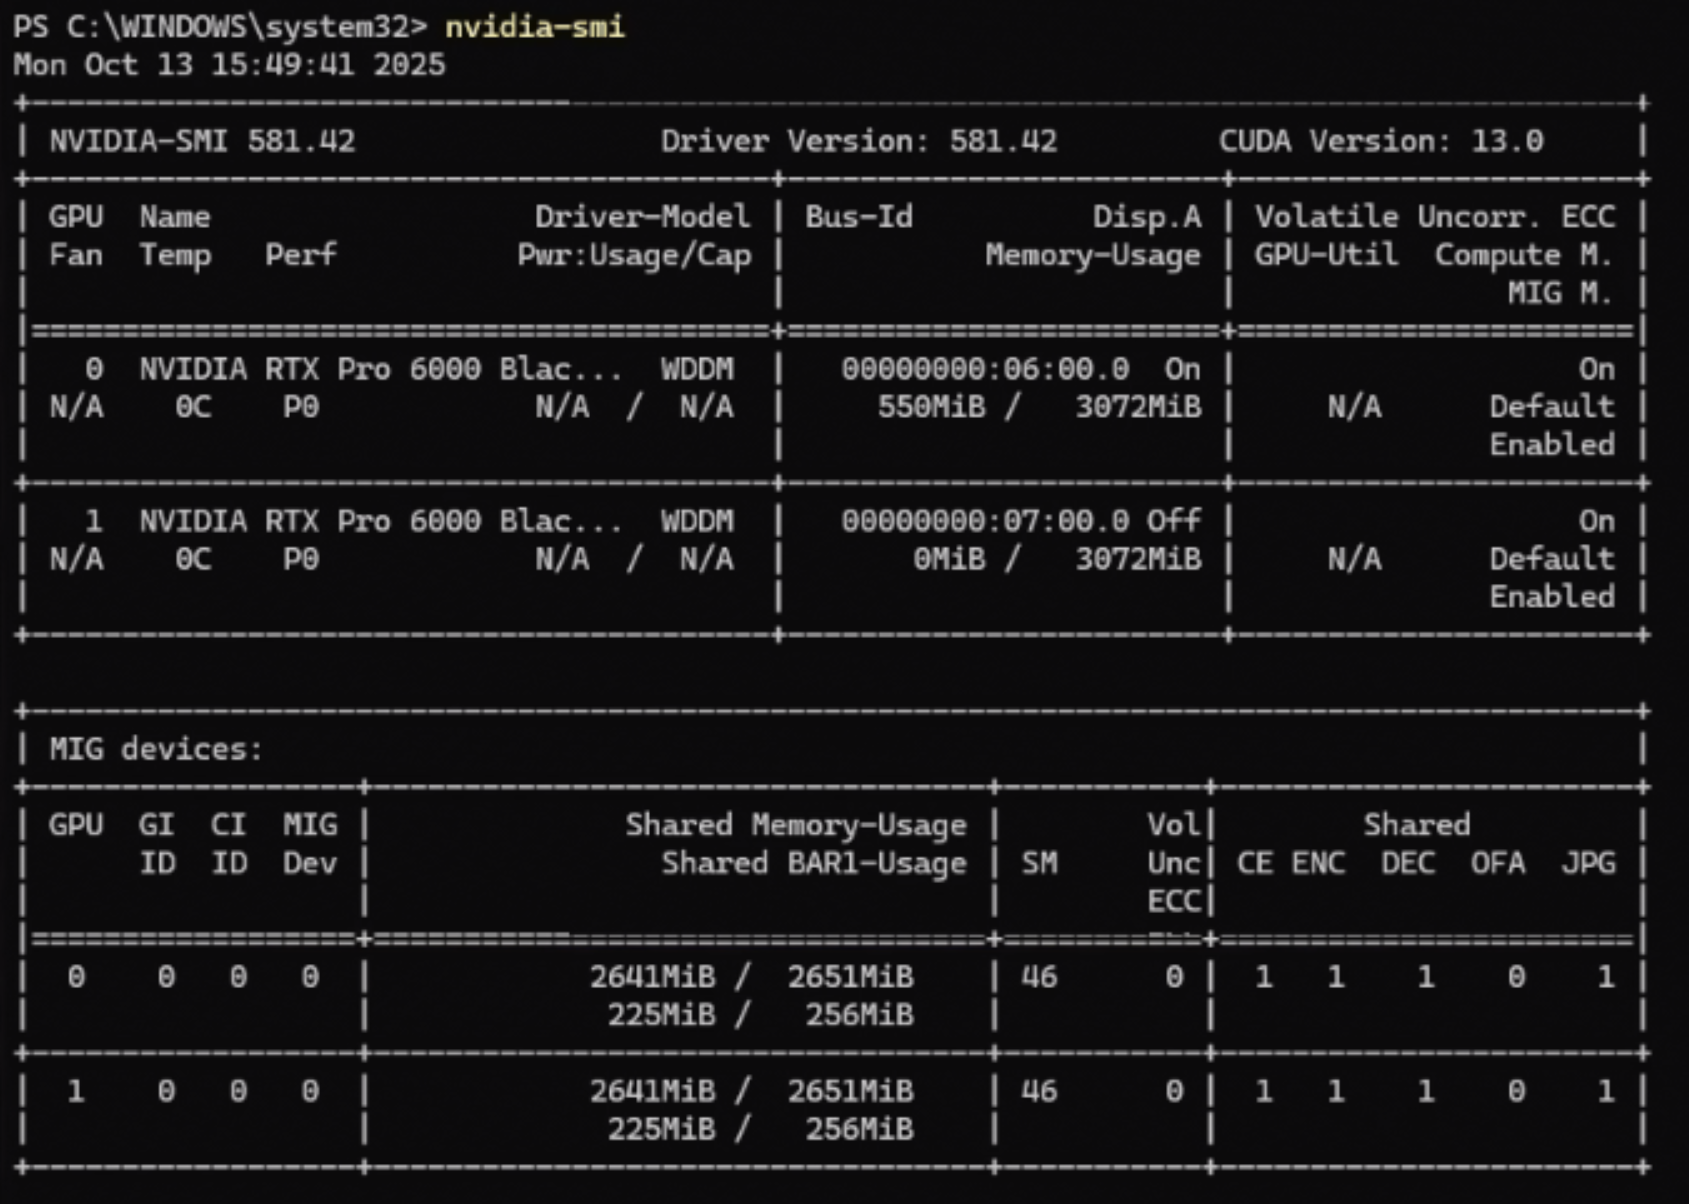
Once completed, you can verify that the vGPU has been successfully added by running nvidia-smi inside PowerShell or the command prompt window in the VM.
Configuring Licensing#
The NVIDIA License System serves licenses to NVIDIA software products. To activate licensed functionalities, a licensed client leases a software license served over the network from an NVIDIA License System service instance. The NVIDIA License System Documentation explains how to install, configure, and manage licenses for virtual GPU software.
To configure a license client of the NVIDIA license system, start by generating a client configuration token, then follow these instructions.
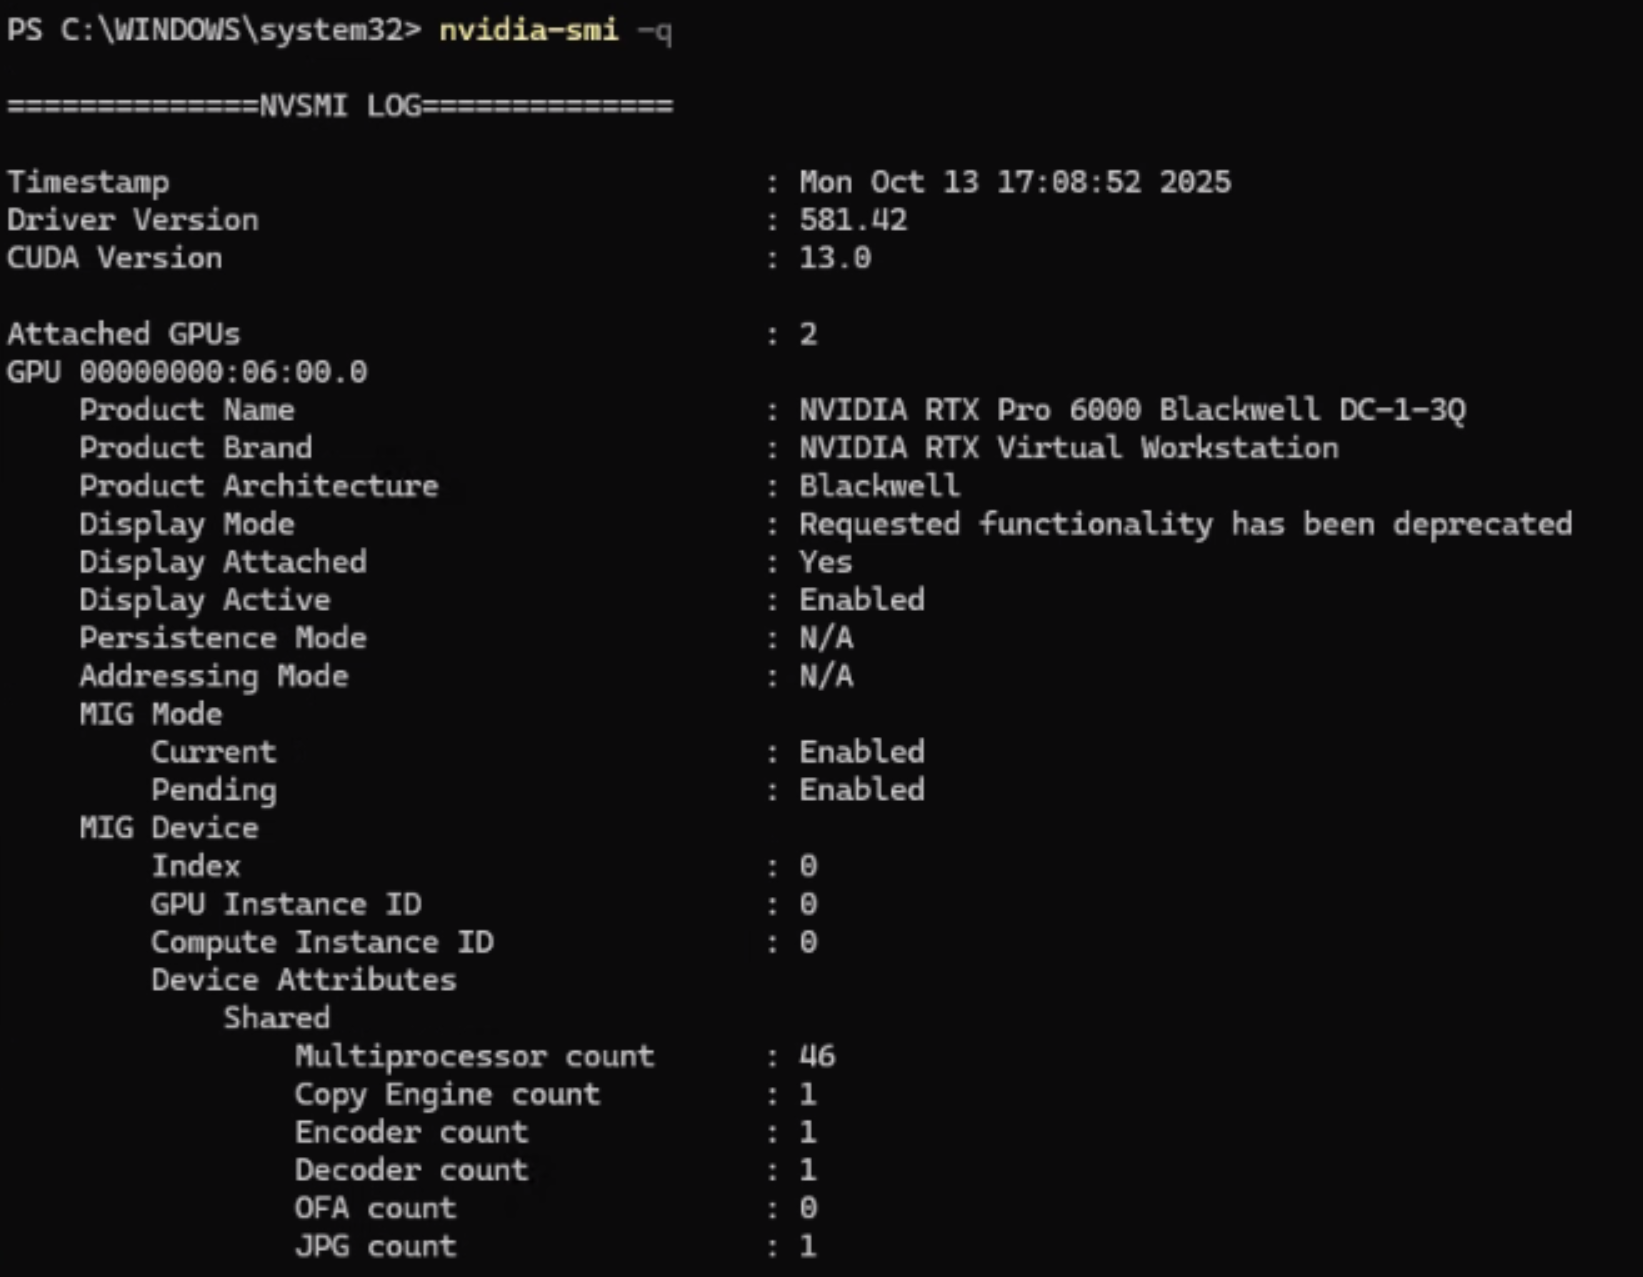
To verify the license status, run nvidia-smi -q from the command line.
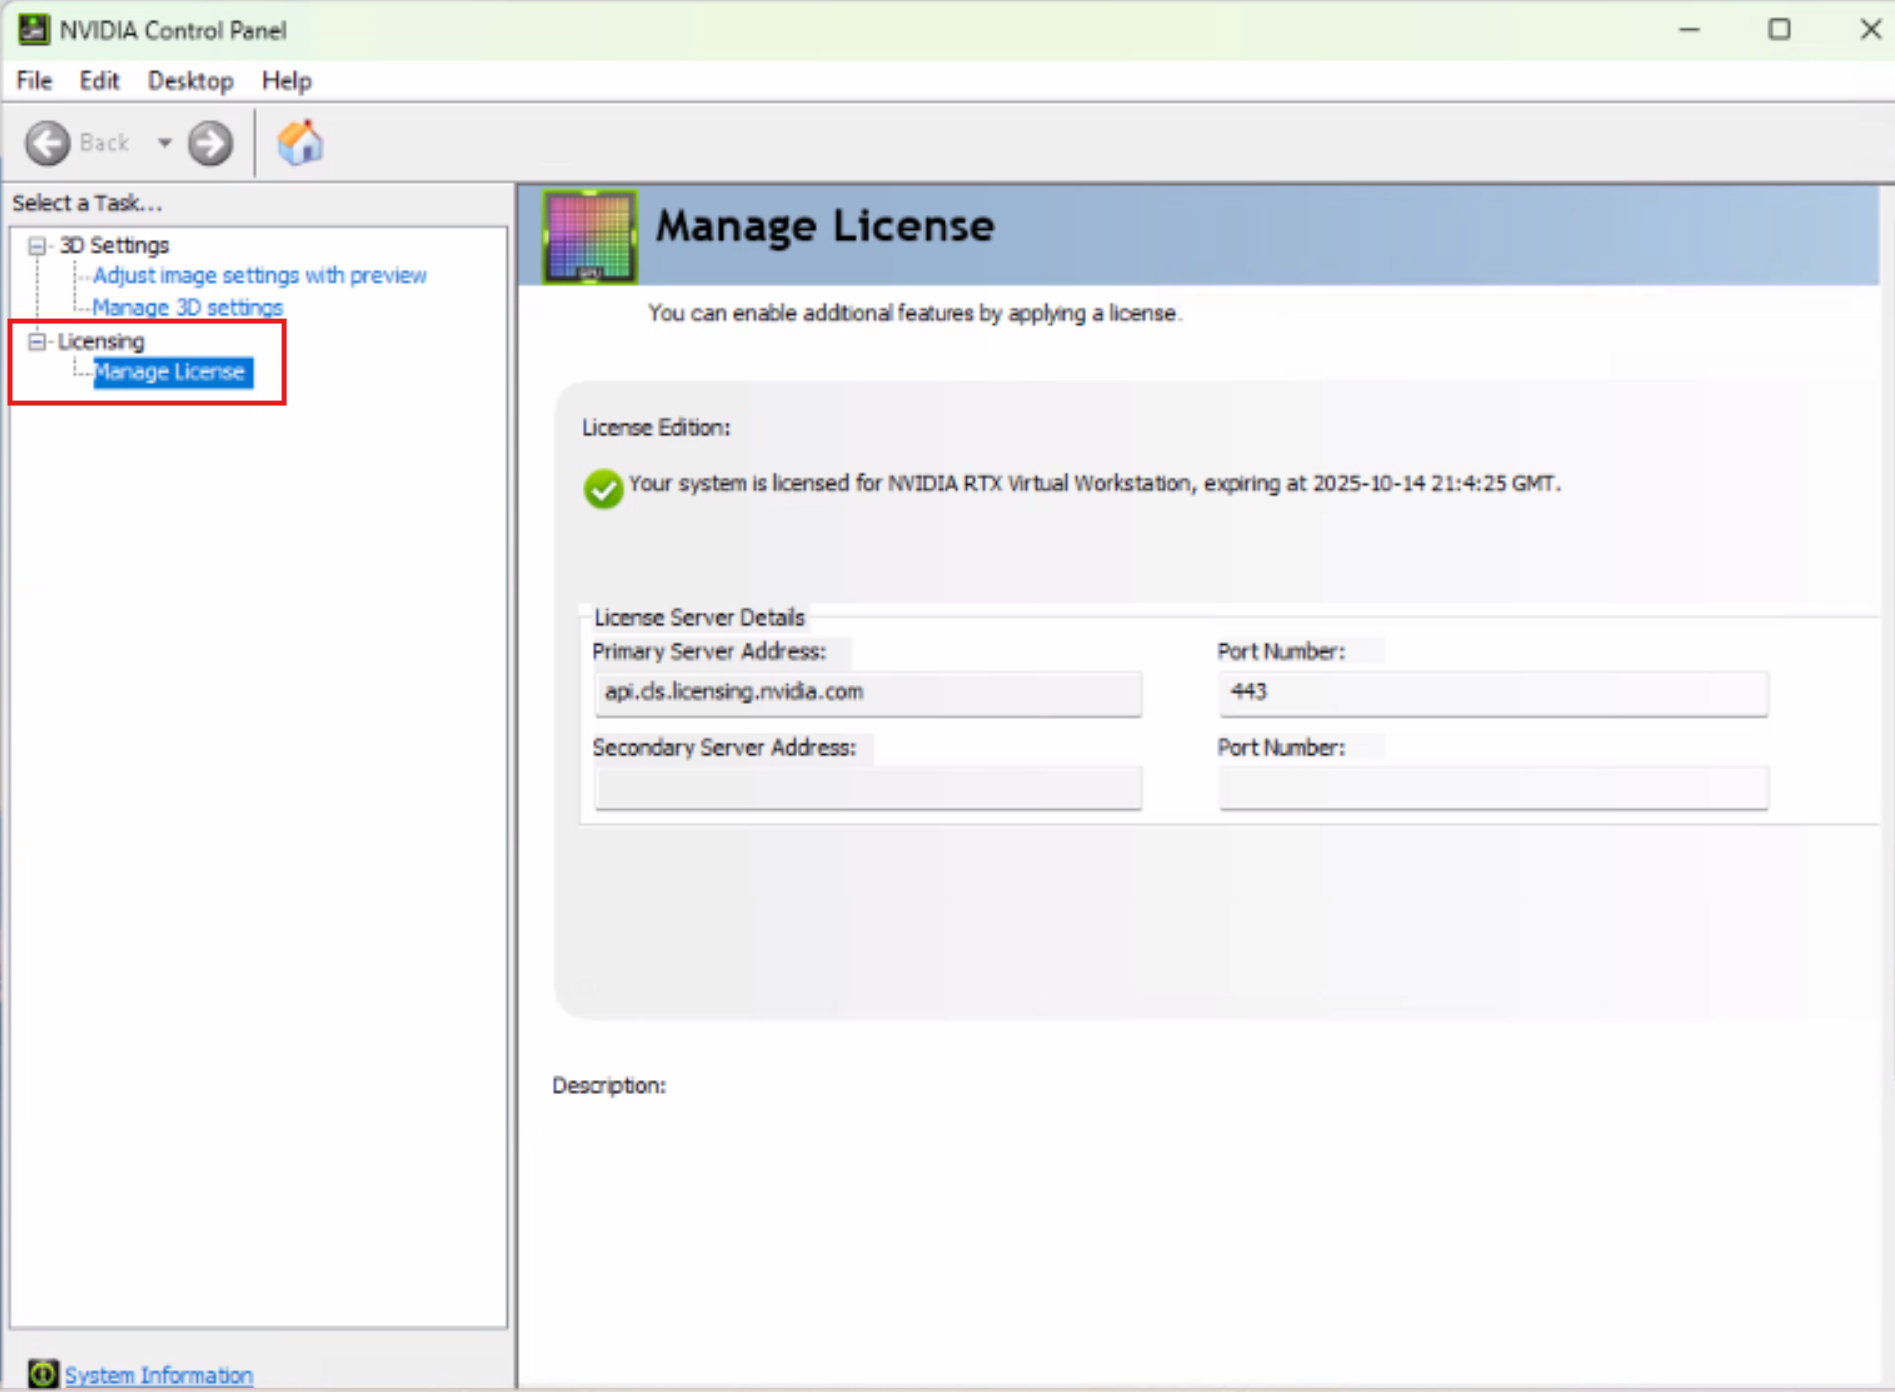
You can also verify the license status through the NVIDIA Control Panel under Licensing → Manage License.
For troubleshooting issues, you can check the log files.
vGPU Configuration and VM Management#
Modifying vGPU Configurations:
To configure vGPU plugin parameters, see Setting vGPU Plugin Parameters on Red Hat Enterprise Linux KVM
To place a vGPU on a physical GPU or GPU instance in heterogeneous GPU mode, see Placing a vGPU on a Physical GPU or GPU Instance in Mixed-Size Mode
Migrating and Monitoring:
To migrate a VM configured with vGPU, see Migrating a VM with vGPU
To suspend and resume a VM with vGPU, see Suspending and Resuming a VM with vGPU
Configuring GPU Pass-Through:
To configure GPU pass-through, see Using GPU Pass-Through
Enabling Unified Memory:
To enable unified memory for a vGPU, see Enabling Unified Memory for vGPU