


Creating and Using an NVIDIA RTX Virtual Workstation Instance from the Amazon Web Services Elastic Compute Cloud Marketplace#
NVIDIA® RTX™ Virtual Workstation in the cloud is an NVIDIA Virtual Machine Image (VMI) preconfigured with NVIDIA RTX Virtual Workstation software and NVIDIA GPU hardware. The NVIDIA RTX Enterprise driver is preinstalled on the VMI and NVIDIA ensures that the image is always up to date with the latest NVIDIA RTX ISV certifications, patches, and upgrades. Support and technical information to help you get started are available on the NVIDIA RTX Virtual Workstation (vWS) on CSP Marketplace community forum and from additional resources.
Creating a GPU-Accelerated Virtual Workstation#
Prepare for creating a GPU-accelerated virtual workstation from the Amazon Web Services Elastic Compute Cloud marketplace as follows:
Ensure that you have a Amazon Web Services Elastic Compute Cloud account and an active subscription.
Decide the EC2 instance on which you want to deploy your GPU-accelerated virtual workstation.
Instances are grouped according to the NVIDIA GPU with which the instances are configured. For details, refer to the following table, which links to information about the instances on the Amazon Web Services Elastic Compute Cloud website.
NVIDIA GPU
Amazon Web Services Elastic Compute Cloud Instances
NVIDIA L4
NVIDIA A10G
NVIDIA T4
List the available NVIDIA RTX Virtual Workstation AMIs.
In a web browser, sign in to AWS Marketplace (https://aws.amazon.com/marketplace/).
In the search box, type
rtx.Refine the results by following the Business Applications link and selecting NVIDIA as the publisher.
Go to the listing NVIDIA RTX Virtual Workstation for the AMI that you want to use, for example, NVIDIA RTX Virtual Workstation - WinServer 2025.
Click View purchase options.
On the Subscribe to NVIDIA RTX Virtual Workstation page that opens, review the purchase options and click Subscribe.
When the subscription is complete, click Launch your software.
On the Launch NVIDIA RTX Virtual Workstation page that opens, select the Launch method option that you want.
The only Service option available is Amazon EC2.
If you want full control over the configuration of your instance, select Launch from EC2 Console.
If you select this option, the Launch from EC2 button is added to this page.
If you want a quick deployment with minimal configuration, select One-click launch from AWS Marketplace.
If you select this option, the options to enable you to configure the instance are added to this page.
From the Region drop-down list, select the region in which you want the instance to be launched.
Configure and launch the instance.
If you selected Launch from EC2 Console, click Launch from EC2 and in the Launch an Instance page that opens, configure and launch the instance.
For more information, refer to Launch an Amazon EC2 instance from an AWS Marketplace AMI in the Amazon Elastic Compute Cloud documentation.
If you selected One-click launch from AWS Marketplace, use the options that were added to this page to configure the instance and click Launch.
When prompted to create a key pair or add a key pair to the set of keys authorized for this instance, ensure that the following conditions are met:
The key pair type is RSA.
The private key file is in
.pemformat.You have a copy of the private key file.
Otherwise, you will not be able to log in to the instance.
When the instance is launched, a confirmation page is displayed with a link to the instance on the EC2 Console.
In the launch confirmation page, click View instance on EC2 to confirm that the instance is running and that all status checks are completed.
If you are creating a Windows instance and want to connect to the instance through RDP, edit the instance’s security group to add an inbound RDP security rule to open port 3389 for TCP connections.
Follow the instructions for your chosen OS to connect to the instance:
Connecting to a GPU-Accelerated Virtual Workstation on a Windows VM Instance
Connect to your Linux instance in Amazon EC2 User Guide for Linux Instances
After connecting to the instance, verify that it was created properly as explained in Verifying the Creation of your GPU-Accelerated Virtual Workstation
Connecting to a GPU-Accelerated Virtual Workstation on a Windows VM Instance#
Note
For instructions for a Linux VM, refer to Connect to your Linux instance in Amazon EC2 User Guide for Linux Instances.
In the list of instances on the EC2 Dashboard, select the instance and click Connect.
In the Connect window that opens, download the RDP file and get the password for connecting to your instance.
Click the RDP client tab.
Set the Connection Type option to Connect using RDP client.
Click Download remote desktop file.
Click Get password.
In the Get Windows password window, provide the private key file and click Decrypt password.
When the remote desktop file is downloaded, double-click the file to start a Remote Desktop Connection session on the VM.
If you are warned that the publisher of the remote connection cannot be identified and are asked about whether to connect anyway, click Connect.
When you are prompted, log in to the VM with the user name
Administratorand the password that you got earlier.Note
If you are logging in from a computer that is joined to a domain, specify the user name as
~.\administrator. In this way, you ensure that you log in asAdministratoron the VM where the Remote Desktop Connection session is running. Otherwise, Windows automatically prefixes the user name with the name of the domain to which your computer is joined and attempts to log you in there.If you are warned that the publisher of the remote connection cannot be identified and are asked about whether to connect anyway, click Yes.
Close the Connect to Your Instance window.
After connecting to your GPU-accelerated virtual workstation, verify that it was created properly as explained in Verifying the Creation of your GPU-Accelerated Virtual Workstation.
Verifying the Creation of your GPU-Accelerated Virtual Workstation#
After connecting to your GPU-accelerated virtual workstation, verify that it was created properly by listing its GPUs. On a Windows VM instance you can also use NVIDIA Control Panel to verify that the NVIDIA driver is running.
For details, see:
Verifying the Creation of a GPU-Accelerated Virtual Workstation on a Windows VM Instance
Verifying the Creation of a GPU-Accelerated Virtual Workstation on a Linux VM Instance
After verifying the creation of your GPU-accelerated virtual workstation, you are now ready to run your design and engineering software.
Verifying the Creation of a GPU-Accelerated Virtual Workstation on a Windows VM Instance#
Open a command prompt window and change to the folder that contains the
nvidia-smicommand.C:\Users\Administrator>cd C:\Program Files\NVIDIA Corporation\NVSMIList the GPUs in your GPU-accelerated virtual workstation by running the
nvidia-smicommand without any options.The following example shows the output from
nvidia-smifor a Windows VM instance configured with a single NVIDIA L4 GPU.C:\Program Files\NVIDIA Corporation\NVSMI> nvidia-smi Fri Jan 9 22:41:58 2026 +--------------------------------------------------------------------------+ | NVIDIA-SMI 581.42 Driver Version: 581.42 CUDA Version: 13.0 | |-----------------------------+---------------------+----------------------+ | GPU Name Driver-Model | Bus-Id Disp.A | Volatile Uncorr. ECC | | Fan Temp Perf Pwr:Usage/Cap| Memory-Usage | GPU-Util Compute M. | | | | MIG M. | |=============================+=====================+======================| | 0 NVIDIA L4 WDDM |00000000:00:1E.0 Off | 0 | | N/A 29C P8 14W / 70W | 0MiB / 23028MiB | 2% Default | | | | N/A | +-----------------------------+---------------------+----------------------+ +--------------------------------------------------------------------------+ | Processes: | | GPU GI CI PID Type Process name GPU Memory | | ID ID Usage | |==========================================================================| | 0 N/A N/A 660 C+G C:\Windows\System32\WUDFHost.exe N/A | | 0 N/A N/A 860 C+G C:\Windows\System32\dwm.exe N/A | | 0 N/A N/A 964 C+G ...indows\System32\ShellHost.exe N/A | | 0 N/A N/A 1220 C+G C:\Windows\System32\dwm.exe N/A | | 0 N/A N/A 5272 C+G ..._cw5n1h2txyewy\SearchHost.exe N/A | | 0 N/A N/A 5800 C+G ...2txyewy\CrossDeviceResume.exe N/A | | 0 N/A N/A 5844 C+G C:\Windows\explorer.exe N/A | | 0 N/A N/A 5932 C+G C:\Windows\System32\LogonUI.exe N/A | | 0 N/A N/A 7020 C+G ....0.3650.96\msedgewebview2.exe N/A | | 0 N/A N/A 7672 C+G ...y\StartMenuExperienceHost.exe N/A | | 0 N/A N/A 9872 C+G ...yb3d8bbwe\WindowsTerminal.exe N/A | +--------------------------------------------------------------------------+ C:\Program Files\NVIDIA Corporation\NVSMI>
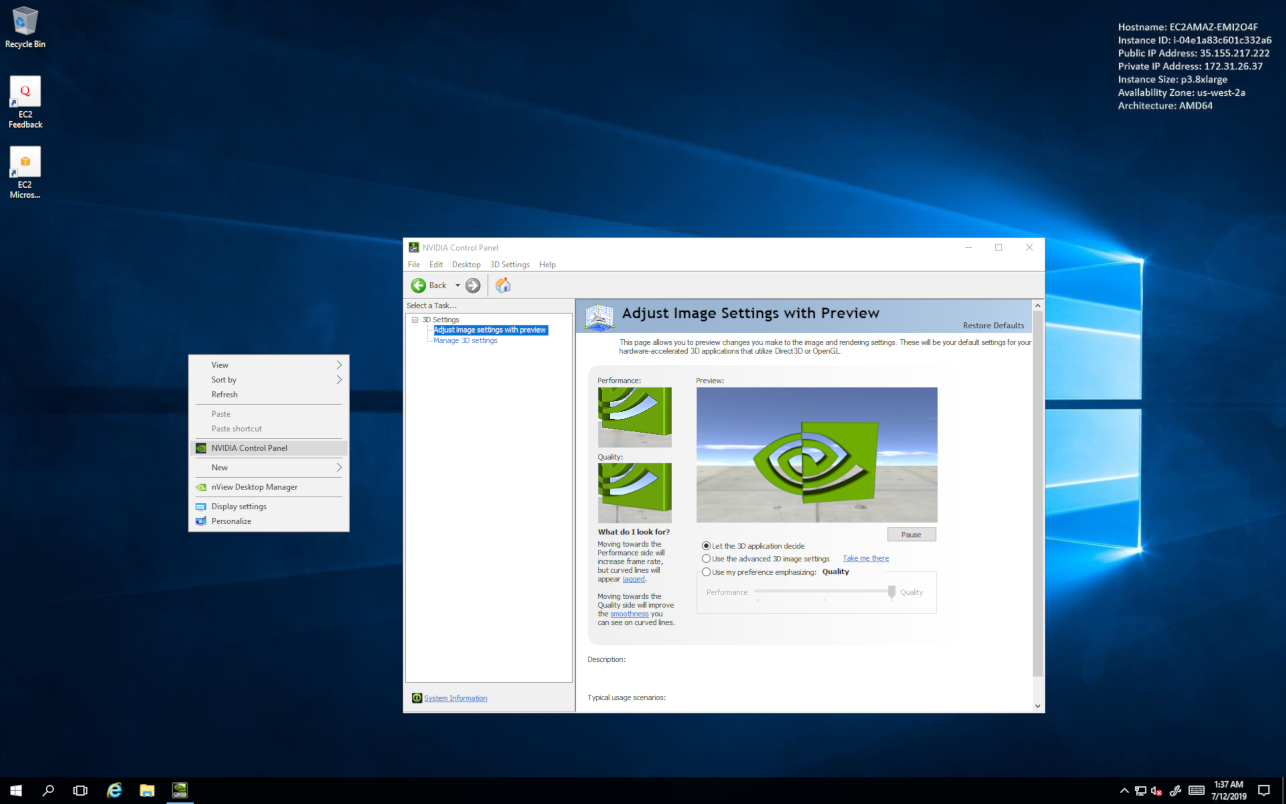
Start NVIDIA Control Panel to verify that the NVIDIA driver is running.
Right-click on the desktop.
From the menu that opens, choose NVIDIA Control Panel.
In the NVIDIA Control Panel, from the Help menu, choose System Information to get information about the GPU.
NVIDIA Control Panel reports the GPU that is being used, its capabilities, and the NVIDIA driver version that is loaded.
Verifying the Creation of a GPU-Accelerated Virtual Workstation on a Linux VM Instance#
List the GPUs in your GPU-accelerated virtual workstation by running the nvidia-smi command without any options.
The following example shows the output from nvidia-smi for a Linux VM instance configured with a single NVIDIA A10G GPU.
:~$ nvidia-smi
Fri Jan  9 23:21:53 2026
+-----------------------------------------------------------------------------+
| NVIDIA-SMI 580.95.05    Driver Version: 580.95.05    CUDA Version: 13.0     |
|-------------------------------+----------------------+----------------------+
| GPU  Name        Persistence-M| Bus-Id        Disp.A | Volatile Uncorr. ECC |
| Fan  Temp  Perf  Pwr:Usage/Cap|         Memory-Usage | GPU-Util  Compute M. |
|                               |                      |               MIG M. |
|===============================+======================+======================|
|   0  NVIDIA A10G          On  | 00000000:00:1E.0 Off |                    0 |
|  0%   24C    P8   11W /  300W |     0MiB /  23028MiB |      0%      Default |
|                               |                      |                  N/A |
+-------------------------------+----------------------+----------------------+

+-----------------------------------------------------------------------------+
| Processes:                                                                  |
|  GPU   GI   CI        PID   Type   Process name                  GPU Memory |
|        ID   ID                                                   Usage      |
|=============================================================================|
|  No running processes found                                                 |
+-----------------------------------------------------------------------------+
:~$