


Creating and Using an NVIDIA RTX Virtual Workstation Instance from the Oracle Cloud Infrastructure Marketplace#
NVIDIA® RTX™ Virtual Workstation in the cloud is an NVIDIA Virtual Machine Image (VMI) preconfigured with NVIDIA RTX Virtual Workstation software and NVIDIA GPU hardware. The NVIDIA RTX Enterprise driver is preinstalled on the VMI and Oracle ensures that the image is always up to date with the latest patches and upgrades. Support and technical information to help you get started are available on the NVIDIA RTX Virtual Workstation (vWS) on CSP Marketplace community forum.
Creating a GPU-Accelerated Virtual Workstation#
Prepare for creating a GPU-accelerated virtual workstation from the Oracle Cloud Infrastructure marketplace as follows:
Ensure that you have a Oracle Cloud Infrastructure account and an active subscription.
Decide the Oracle Cloud Infrastructure instance shape on which you want to deploy your GPU-accelerated virtual workstation.
For information about the Oracle Cloud Infrastructure instance shapes that support NVIDIA RTX Virtual Workstation, see NVIDIA RTX Virtual Workstation on Oracle Cloud Infrastructure Release Notes.
Creating a GPU-accelerated virtual workstation involves following this sequence of instructions:
Creating a Virtual Cloud Network (VCN)#
In a web browser, sign in to the Oracle Cloud Infrastructure Console as explained in Signing In to the Console in the Oracle Cloud Infrastructure documentation.
Select a region where GPUs are available, for example, Germany Central (Frankfurt).
Under Quick Actions, click Set up a network with a wizard.
Select VCN with Internet Connectivity and click Start VCN Wizard.
Provide a name for the VCN and select a compartment.
Review the default settings to see if they meet your requirements, change any settings as required, and click Next.
Review your choices and click Create.
Launching an NVIDIA RTX Virtual Workstation Instance#
Go to the NVIDIA RTX Virtual Workstation listing for the guest OS that you want to use:
In the upper right corner of the page, click Get App.
The Install Application page opens.
From the Select OCI Region list, select the region where you created your VCN and click Sign In.
Select the latest image version, for example, 2020.04.03-1-vdws-10.1, select your compartment, confirm that you have reviewed the terms of use, and click Launch Instance.
Specify the details required to create the instance.
- Image Source
Select NVIDIA GPU Cloud Machine Image.
- Availability Domain
Select an availability domain where GPUs are available, for example, EU-FRANKFURT-1-AD-3.
- Instance Type
Select Virtual Machine or Bare Metal.
- Instance Shape
Select one of the available instance shapes listed in NVIDIA RTX Virtual Workstation on Oracle Cloud Infrastructure Release Notes.
- Configure Networking
Select the correct compartment and the VCN and subnets that you created.
For details, see Connecting to a Windows Instance in the Oracle Cloud Infrastructure documentation.
If you want to connect to the instance through RDP, add a stateful ingress security rule for TCP traffic on destination port 3389 from source 0.0.0.0/0 and any source port.
You can add this security rule either to a network security group to which the Windows instance belongs or to a security list that is used by the instance’s subnet.
For more information, see the following topics in the Oracle Cloud Infrastructure documentation:
If necessary, add block storage to provide additional space for your workloads.
For details, see Adding a Block Volume in the Oracle Cloud Infrastructure documentation.
In preparation for connecting to your instance, note the public IP address of the instance from the Oracle Cloud Infrastructure console.
Connect to your instance as explained in Connecting to a GPU-Accelerated Virtual Workstation.
After connecting to the instance, verify that it was created properly as explained in Verifying the Creation of your GPU-Accelerated Virtual Workstation.
Connecting to a GPU-Accelerated Virtual Workstation#
On your local computer, start a Remote Desktop client, for example, Remote Desktop Connection on Windows.
In the Computer field, type the public IP address of the instance
If you don’t already have the public IP address of the instance, you can get it from the Oracle Cloud Infrastructure console.
In the User name field, type the user name
opc.Some Remote Desktop clients require you to connect to the instance before you can provide the user name.
Click Connect.
If you are warned that the publisher of the remote connection cannot be identified and are asked about whether to connect anyway, click Yes.
When prompted, type your password and press Enter.
If you are connecting to the instance for the first time, type the initial password that was provided to you by Oracle Cloud Infrastructure when you launched the instance.
You are prompted to change the password as soon as you log in. Your new password must be at least 12 characters long and meet the requirements described in Password must meet complexity requirements on the Microsoft documentation site.
If you have previously connected to the instance and created a password, type the password that you created.
If you are using a custom image, type the appropriate password, which might be the password for the instance from which the image was created.
For details about Windows custom images, see Creating Windows Custom Images in the Oracle Cloud Infrastructure documentation.
After connecting to your GPU-accelerated virtual workstation, verify that it was created properly as explained in Verifying the Creation of your GPU-Accelerated Virtual Workstation.
Verifying the Creation of your GPU-Accelerated Virtual Workstation#
After connecting to your GPU-accelerated virtual workstation, verify that it was created properly by listing its GPUs. On a Windows VM instance you can also use NVIDIA Control Panel to verify that the NVIDIA driver is running.
Open a command prompt window and change to the folder that contains the
nvidia-smicommand.C:\Users\opc>cd C:\Program Files\NVIDIA Corporation\NVSMIList the GPUs in your GPU-accelerated virtual workstation by running the
nvidia-smicommand without any options.The following example shows the output from
nvidia-smifor a Windows VM instance configured with one NVIDIA P100 GPU.C:\Program Files\NVIDIA Corporation\NVSMI>nvidia-smi Tue Apr 21 00:50:57 2020 +-------------------------------------------------------------------------+ | NVIDIA-SMI 432.33 Driver Version: 432.33 CUDA Version: 10.1 | |-------------------------------+----------------------+------------------+ | GPU Name TCC/WDDM | Bus-Id Disp.A | Volatile Uncorr. ECC | | Fan Temp Perf Pwr:Usage/Cap| Memory-Usage | GPU-Util Compute M. | |===============================+======================+==================| | 0 Tesla P100-SXM2... WDDM | 00000000:00:04.0 Off | 0 | | N/A 34C P0 31W / 300W | 340MiB / 16384MiB | 2% Default | +-------------------------------+----------------------+------------------+ +-------------------------------------------------------------------------+ | Processes: GPU Memory | | GPU PID Type Process name Usage | |=========================================================================| | 0 452 C+G Insufficient Permissions N/A | | 0 1116 C+G ...t_cw5n1h2txyewy\ShellExperienceHost.exe N/A | | 0 1948 C+G Insufficient Permissions N/A | | 0 5076 C+G Insufficient Permissions N/A | | 0 5132 C+G C:\Windows\explorer.exe N/A | | 0 5544 C+G ...dows.Cortana_cw5n1h2txyewy\SearchUI.exe N/A | +-------------------------------------------------------------------------+
Start NVIDIA Control Panel to verify that the NVIDIA driver is running.
Right-click on the desktop.
From the menu that opens, choose NVIDIA Control Panel.
In the NVIDIA Control Panel, from the Help menu, choose System Information to get information about the GPU.
NVIDIA Control Panel reports the GPU that is being used, its capabilities, and the NVIDIA driver version that is loaded.
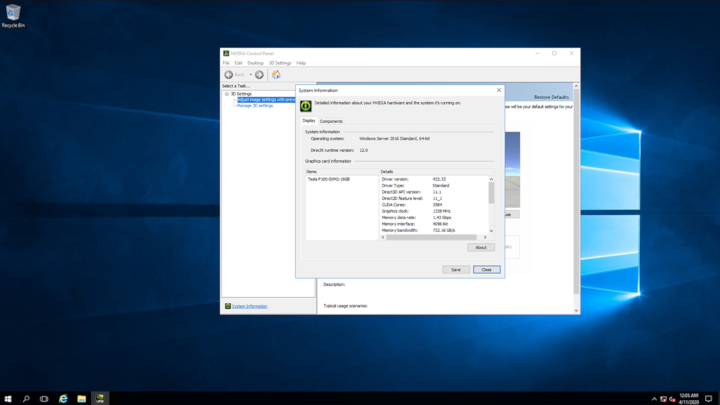
After verifying the creation of your GPU-accelerated virtual workstation, you are now ready to run your design and engineering software.