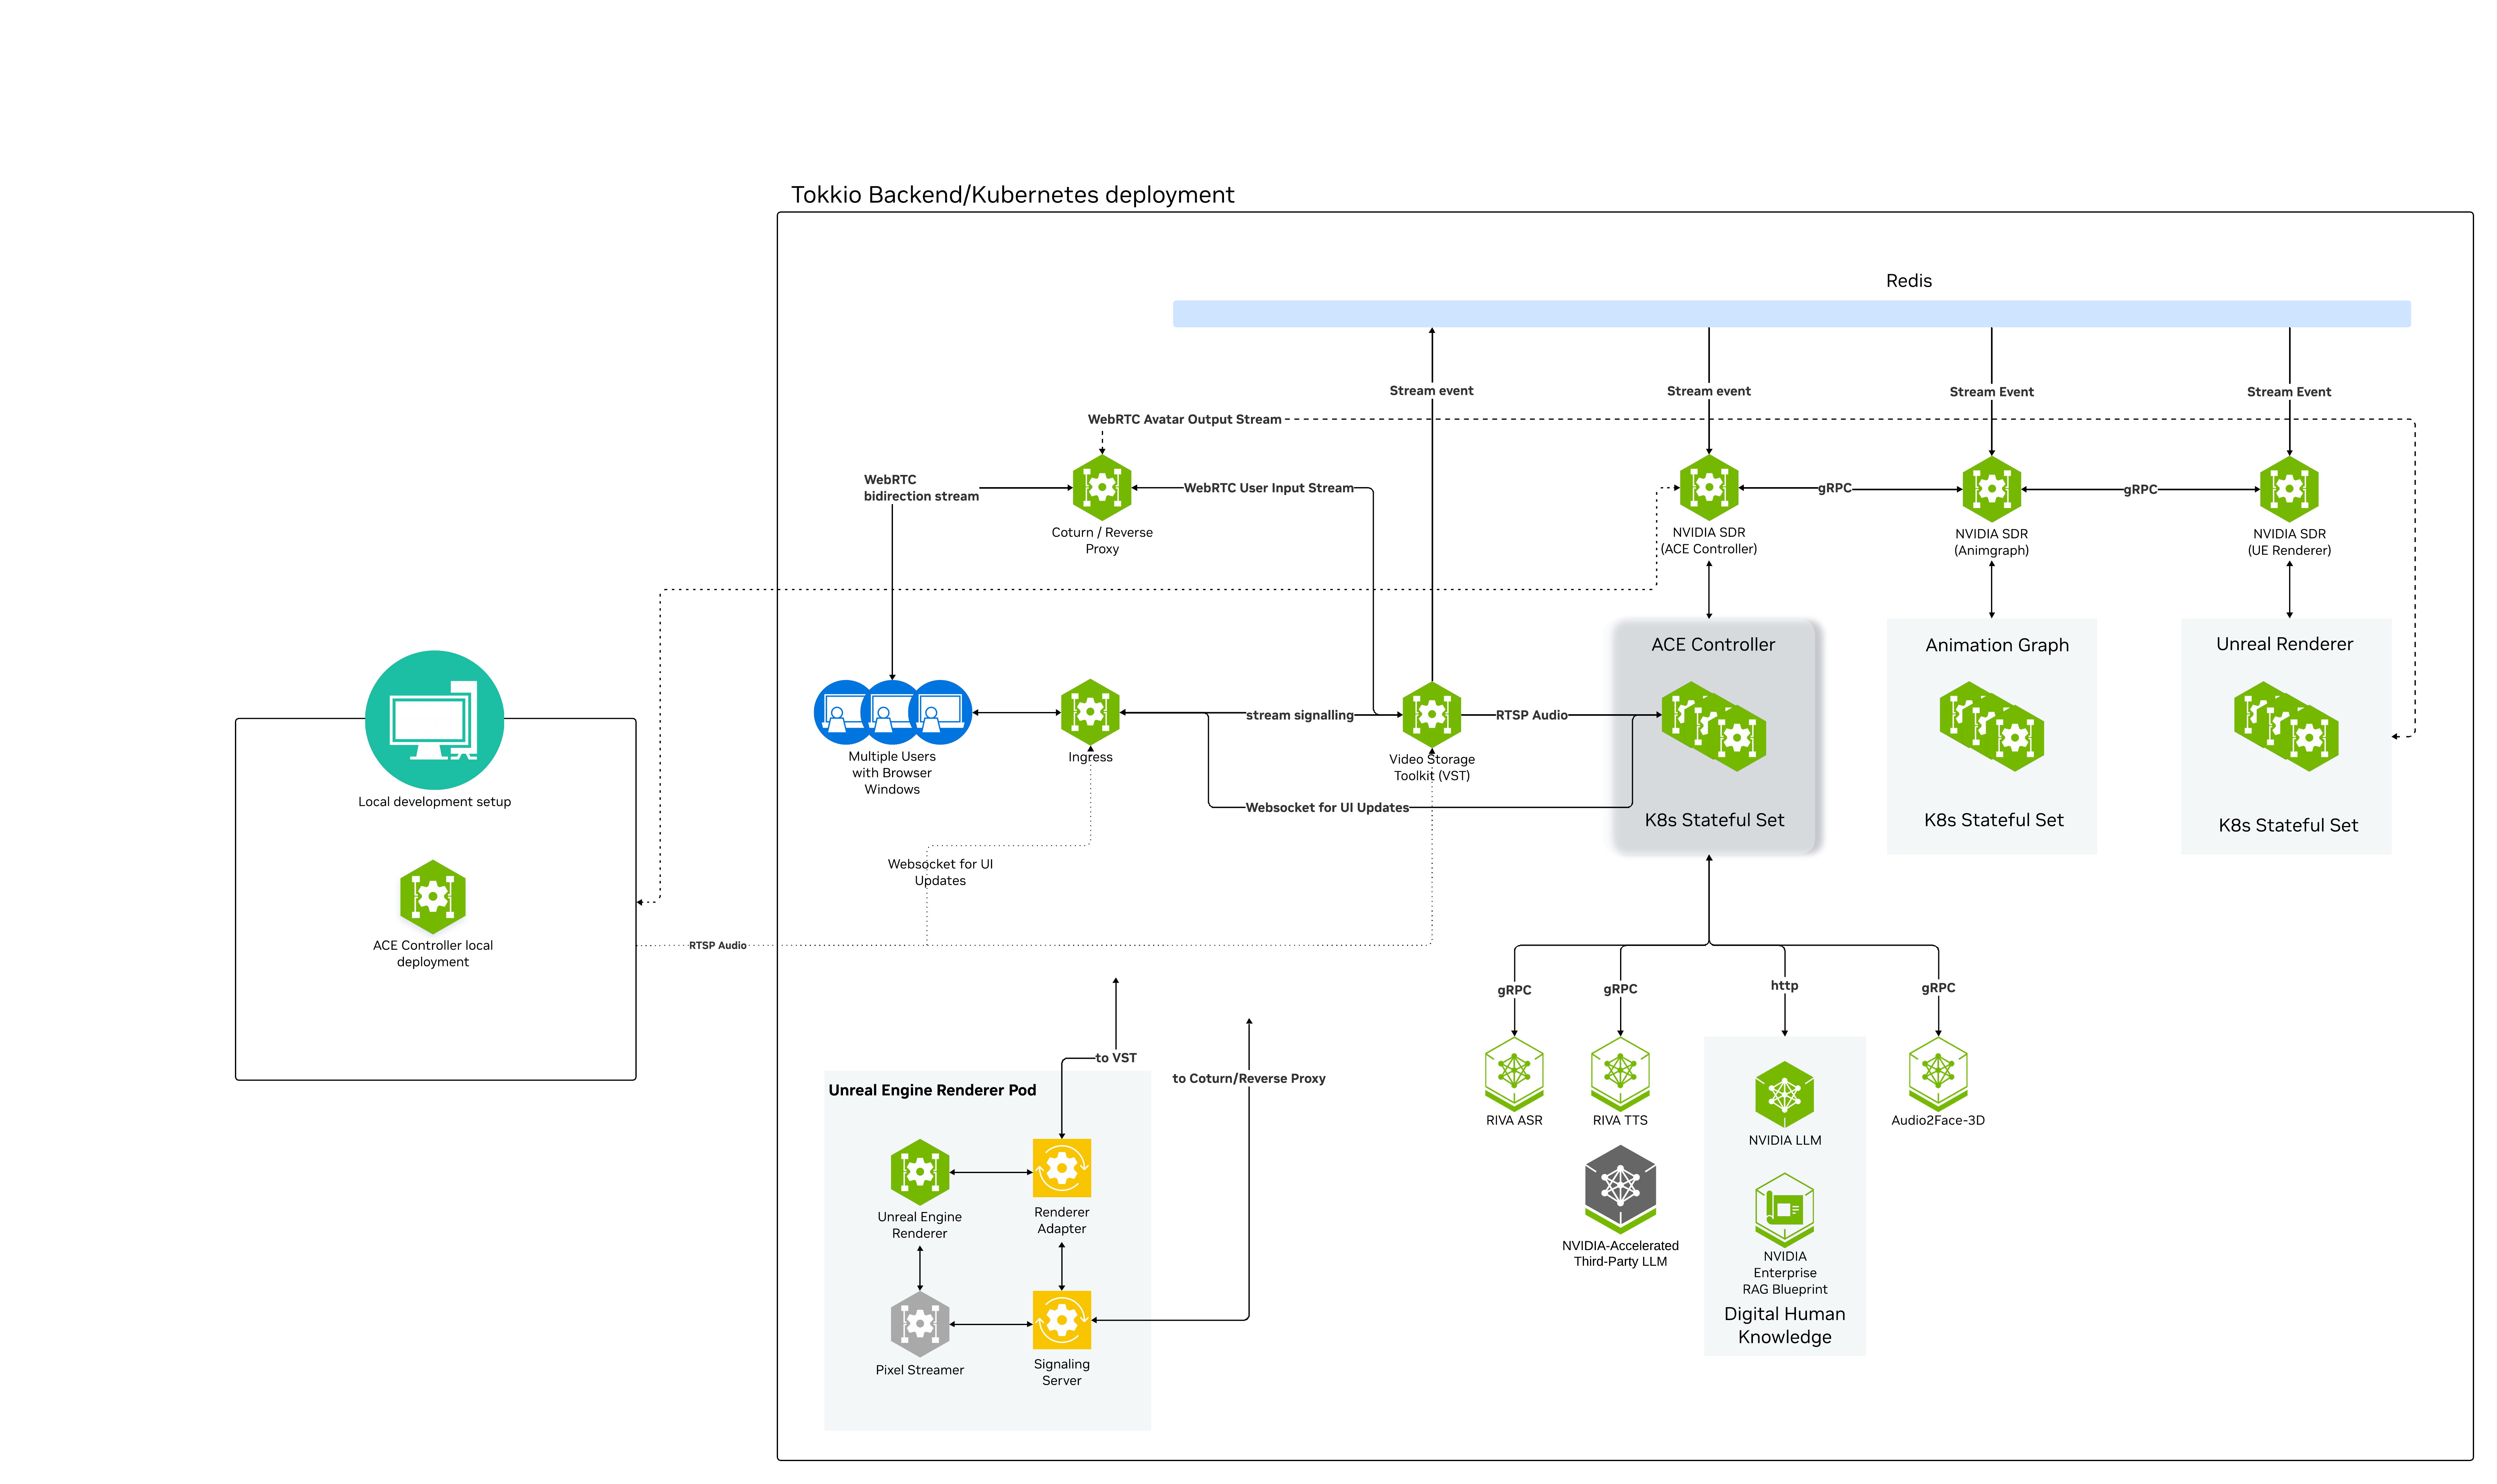
Local Developer Workflow Method#
The Tokkio Developer Tool enables you to work on your customized ACE Controller locally. You can test your changes immediately in the Tokkio app running in a Kubernetes cluster. This workflow enables fast, convenient, and, iterative development. You can use all your existing tools and credentials from your local machine.
The Tokkio Developer Tool automatically detects and generates all the required environment settings. These settings connect the local ACE Controller to the remote cluster running the Tokkio app. The tool also updates the Tokkio app deployment to enable communication between the UI, Tokkio backend, and local ACE Controller. You only need minimal setup and configuration to start using this efficient development workflow.
What the Tool Does#
The Developer Tool makes configuration changes to the Kubernetes cluster running the Tokkio app to enable the local ACE Controller to communicate with the Tokkio app and for the local controller to get information about added or removed streams. For this the ACE Controller SDR is disabled and a few Kubernetes services are converted from ClusterIp to NodePort with dynamic node port assignment such that the services are accessible from the local workstation. In addition, the tool generates the ENV file which contains all the ENV variables to connect your local ACE Controller to the Kubernetes service endpoints (the ENV is automatically picked up by the ACE Controller when it is started).
Source#
The source for the Tokkio Developer Tool is available on NVIDIA/ACE.git.
Prerequisites#
A Linux workstation
Software Dependencies#
Please ensure that you have the following dependencies installed on the workstation used to run the local developer tool.
Application Dependencies#
On the workstation that is used for loading the UI, the chrome flags must be updated to allow the Websocket connection between the Tokkio UI MS and the workstation running the local developer tool/local ACE Controller.
Set the chrome://flags/ under
Insecure origins treated as securesection to allow the WebSocket connection from the Tokkio UI MS. Make sure the actual IP address of your workstation is specified instead of localhost
ws://{local-ace-controller-host}:{local-ace-controller-ws-port}
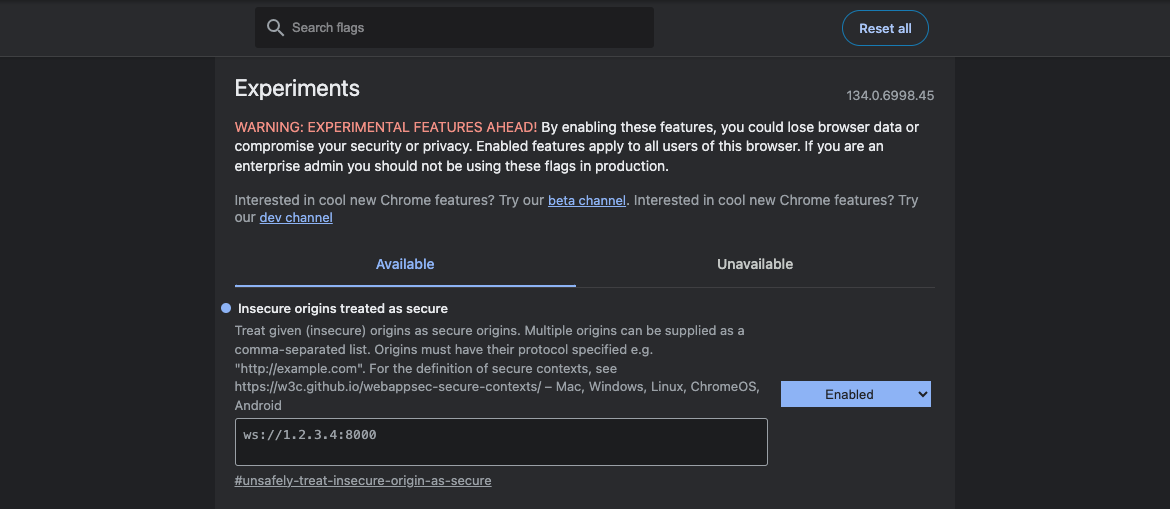
Screenshot of the chrome://flags/ page with the Insecure origins treated as secure section highlighted where the actual IP address of the workstation needs to be specified#
Using the Tokkio Developer Tool#
In the following, we will walk you through the steps to use the Tokkio Developer Tool.
Initial Setup#
Make sure the workstation that the developer tool is going to be running on is connected to the Kubernetes cluster running the Tokkio app.
Check your Kubernetes configuration file with
cat ~/.kube/configCheck your connected cluster with
kubectl config get-contexts
Navigate to the
local-dev-workflowfolder from the downloaded source. Set the ENV variables required by ACE Controller in the file.env
NVIDIA_API_KEY=nvapi-xxx
Add a firewall rule to allow WebSocket traffic coming from Tokkio UI to the local ACE Controller
sudo ufw allow 8000/tcp
Important
Make sure that the port matches the port ACE Controller is listening for incoming websocket connections as specified in bot.py or entrypoint.sh (default is 8000).
Install and activate the Python virtual environment.
uv venv && source .venv/bin/activate
Install dependencies for running the developer tool from the
pyproject.toml
uv sync
Configuring the Developer Tool#
Configure the fields listed below from the config.py. You can keep all other fields at their default values unless you absolutely need to change them.
  settings = {
     "namespace": "default", # kubernetes namespace which your app is deployed
     "ace_controller": {
        "http_url": "http://<ace-controller-host>:<ace-controller-port>", # local ACE controller HTTP endpoint to receive the SDR add/remove calls emulated by this tool
        "ws_url": "ws://<ace-controller-host>:<ace-controller-port>/ws", # local ACE controller websocket endpoint to accept websocket connection from Tokkio UI MS from the kubernetes cluster
     },
     "env_file": {
        "target": "../src/llm-rag/.env", # output ENV file containing the user-defined ENV + auto-generated ENV.  To be used by the local Ace controller
        "src": ".env" # source ENV file containing all the user-defined ENV
     },

  ...
}
Short explanation of the fields:
Field |
Description |
|---|---|
settings.namespace |
Kubernetes namespace where your app is deployed |
settings.ace_controller.http_url |
Local ACE Controller HTTP endpoint to receive SDR add/remove calls. The port number is usually defined in |
settings.ace_controller.ws_url |
Local ACE Controller WebSocket endpoint to accept WebSocket connection from Tokkio UI MS.
Important: Use the local ACE Controller host IP address and NOT
localhost as the Tokkio UI MS will try to connect to the local ACE Controller using the host IP address. |
settings.env_file.target |
Output ENV file containing user-defined ENV + auto-generated ENV from this tool. This file will be used by the ACE Controller and should be placed in the ACE Controller project folder (e.g., |
Note
Refer to the config.py for all the available configurations.
Running the Developer Tool#
After the configuration is done, you can run the developer tool by executing the start_dev.py script.
python start_dev.py
Ensure the .env is generated in the location specified in settings.env_file.target. The .env will be loaded automatically by the load_dotenv from bot.py.
Important
Make sure the ace-controller-sdr-envoy-sdr-deployment and tokkio-ui-deployment pods have restarted before proceeding.
Starting the ACE Controller and Interacting with the Application#
Now that the developer tool is running, you can work with the ACE Controller Python code as you normally would in a local development environment. You can make code changes rerun the Python code an you will be able to test your changes immediately with the Tokkio app running in the Kubernetes cluster.
Go into the the Tokkio example folder you would like to run. For example,
llm-rag/Make the needed modifications, e.g., by updating the
bot.pyfile.In a new terminal, run the following command to activate the virtual environment and install the dependencies
uv venv && source .venv/bin/activate && uv sync
Start the ACE Controller locally by running
entrypoint.shor directly with Python usingpython -m src.bot
Note
You will need to restart ACE Controller whenever the start_dev.py is restarted in order to apply the latest .env.
Open the Tokkio UI at
https://{CLUSTER-HOST-IP}:30111/.
Cleaning up#
When you are done, go back to the terminal where you started the developer tool and press Ctrl+C to terminate the tool and revert all Kubernetes settings.
Important
Make sure the ace-controller-sdr-envoy-sdr-deployment and tokkio-ui-deployment pods restart is completed before proceeding.
Troubleshooting#
Below you will find the solutions to resolve some of the most common issues.
Error creating .env file when running start_dev.py#
$ python start_dev.py
Creating ENV file at /home/user/workspace/tokkioucfapp/src/llm-rag/.env
Error occur: (404)
Reason: Not Found
HTTP response headers: HTTPHeaderDict({'Audit-Id': '3c5ea6eb-e9f1-430a-9690-a56a96ac7b70', 'Cache-Control': 'no-cache, private', 'Content-Type': 'application/json', 'X-Kubernetes-Pf-Flowschema-Uid': '696a457b-27fd-4029-84b2-362de0329283', 'X-Kubernetes-Pf-Prioritylevel-Uid': '6873dfd6-96af-4082-9b38-69a86d011466', 'Date': 'Tue, 11 Mar 2025 18:20:13 GMT', 'Content-Length': '236'})
HTTP response body: {"kind":"Status","apiVersion":"v1","metadata":{},"status":"Failure","message":"services \"a2f-a2f-deployment-a2f-service\" not found","reason":"NotFound","details":{"name":"a2f-a2f-deployment-a2f-service","kind":"services"},"code":404}
Solution#
Make sure the namespace where you deployed your Tokkio app is correctly set in the settings.namespace from the config.py. See Configuring the Developer Tool section.
SecurityError in web browser: failed to construct WebSocket#
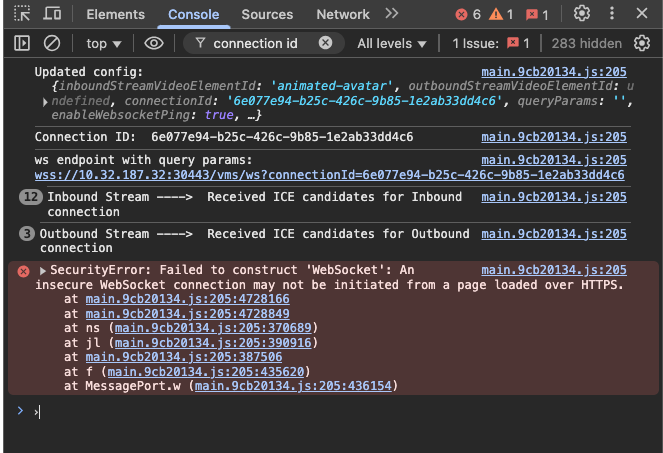
Screenshot of the web browser console showing the SecurityError: Failed to construct WebSocket.#
Solution#
Make sure the chrome flag for the WebSocket endpoint is correctly set. See Initial Setup section. for example, ws://{ace-controller-host-ip}:{ace-controller-ws-port}/ws.
No module named ‘redis’ error when running start_dev.py#
$ python start_dev.py
Traceback (most recent call last):
 File "/workspace/tokkioucfapp/dev_tool/local_dev/start_dev.py", line 2, in <module>
   import redis.asyncio as redis
ModuleNotFoundError: No module named 'redis'
# or any other missing module(s)
Solution#
Make sure to run the uv sync command to install the dependencies. See the Initial Setup section.
NVIDIA API key error#
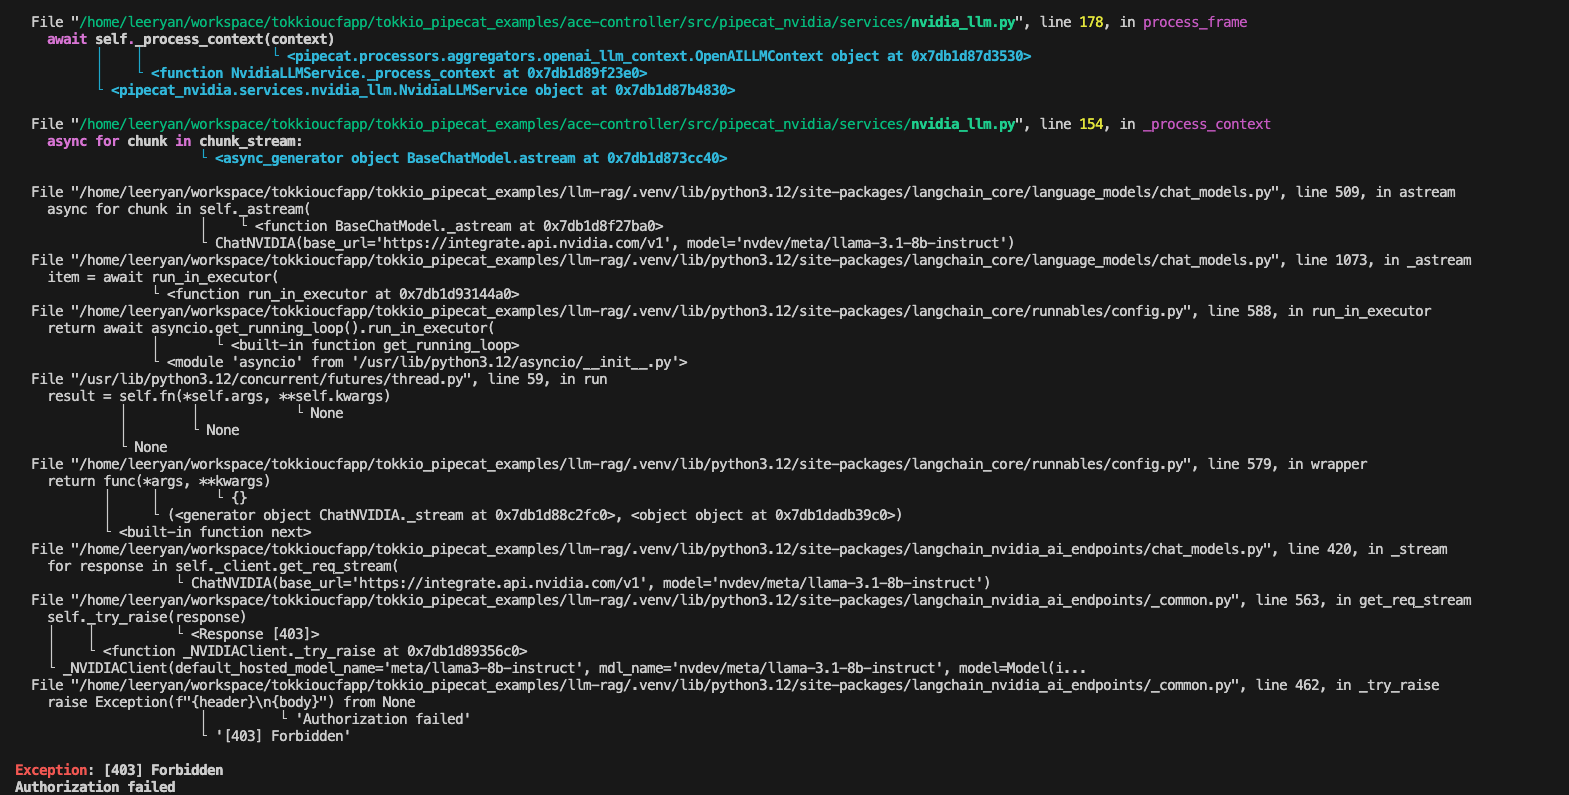
Screenshot of the terminal showing the NVIDIA API key error.#
Solution#
Make sure the NVIDIA_API_KEY is correctly set in the .env file. For example, NVIDIA_API_KEY=nvapi-xxxx. See the Initial Setup section.
HTTP request fails#
12T06:53:10Z","event":{"camera_id":"783bbfeb-2eeb-4e29-8dbc-3e4d2fd3c05a","camera_name":"webcam_783bbfeb-2eeb-4e29-8dbc-3e4d2fd3c05a","camera_url":"rtsp://1.2.3.4:30554/webrtc/783bbfeb-2eeb-4e29-8dbc-3e4d2fd3c05a","change":"camera_streaming"},"source":"vst"}\n'}
Making http call to simulate ace-controller-ace-controller-deployment-ace-controller-service's SDR call for camera_streaming
uri => http://1.2.3.4:8000/stream/add => {}
payload => {'alert_type': 'camera_status_change', 'created_at': '2025-03-12T06:53:10Z', 'event': {'camera_id': '783bbfeb-2eeb-4e29-8dbc-3e4d2fd3c05a', 'camera_name': 'webcam_783bbfeb-2eeb-4e29-8dbc-3e4d2fd3c05a', 'camera_url': 'rtsp://1.2.3.4:30554/webrtc/783bbfeb-2eeb-4e29-8dbc-3e4d2fd3c05a', 'change': 'camera_streaming'}, 'source': 'vst'}
HTTP Request failed:
Solution#
Make sure your local ACE Controller is running and the correct settings.ace_controller.http_url is specified accordingly. See the Configuring the Developer Tool section.
SSLCertVerificationError#
$ python start_dev.py
2025-03-13 10:45:54.015 | ERROR    | __main__:<module>:205 - Error occur: HTTPSConnectionPool(host='1.2.3.4', port=6443): Max retries exceeded with url: /api/v1/nodes (Caused by SSLError(SSLCertVerificationError(1, '[SSL: CERTIFICATE_VERIFY_FAILED] certificate verify failed: unable to get local issuer certificate (_ssl.c:1010)')))
Solution#
Make sure the local ACE Controller host is connected to the Kubernetes cluster. See the Initial Setup section.
check your Kubernetes configuration file using
cat ~/.kube/configcommand.check your connected cluster using
kubectl config get-contextscommand.