Deployment#
This guide outlines the process for deploying the complete Tokkio Workflow on various target platforms. The Tokkio Workflow setup encompasses multiple components, and a successful deployment requires several configurations to work in coherence. In this section, we will walk you through the building blocks of Deployment scripts and the workflow of using Deployment scripts to bring up a functional Tokkio environment.
Setting up these components and establishing proper connectivity between them could be very involved and take up some time and expertise. These deployment scripts help simplify the initial setup and let you bring up Tokkio Workflow swiftly to interact with. All the necessary components on the target machine(s) will be set up.
Building Blocks#
Using deployment scripts involves dealing with the following components:
Controller instance
Config file
Environment variables file
Application instance

Controller Instance#
Referring to the machine from which the Deployment scripts will be launched. Any machine running Ubuntu OS version 22.04 can be used as a Controller Instance. At a minimum, this machine should have connectivity to the internet and should run bash scripts.
To ensure successful execution, these deployment scripts rely on specific software components. If not already present on the instance, the scripts will attempt to install or upgrade the following:
Required Software#
Terraform
The mode of installation for Terraform is now via the apt package manager.
The default binary expected to run IaC is now
tofu(opentofu), while terraform can be used by providing the--tf-binary / -tflag.We recommend using the
--tf-binary / -tflag to use the Terraform binary.
Python
Python runtime is required by the underlying components of Deployment scripts.
Python modules
Installed within a virtual environment, e.g., ansible.
Isolates project dependencies from system-wide packages
jq
Command-line JSON processor
Useful for parsing and manipulating JSON data
opentofu
Installed via the apt package manager.
The deployment scripts are designed to check for these dependencies and install them if necessary, ensuring a smooth execution environment.
Config File#
This file captures all the information about the target environment, such as the target platform, the Helm chart version to be used, and the UI parameters to be used while setting up Tokkio UI, etc. By default, the script expects a config.yml file in the current directory from which the script is launched. If your config file has a different name, it can be supplied with either the -f or --config-file option during the install and uninstall subcommands.
While there are a large number of parameters you can tune in this config.yml, we recommend that you start with a copy of the example config templates we provide along with the scripts. Look for the config-template-examples folder for each target environment supported, for example, azure/config-template-examples.
Environment Variables File#
This file helps abstract out reused parameters and secret-like values that are supplied at the time of installation. For this reason, prior to running the envbuild.sh command, you will need to ensure these environment variables are supplied to the current bash shell. This can be done by using the source <my-env-file.env> command.
The primary reason for separating these values from the config file is to allow version control of the config file and maintain secret-like values in a different manner.
Application Instance#
Referring to the machine where the Tokkio application will be deployed, this machine will have the Tokkio application installed. Note that in the case of CSP Automated setups, this machine will be created as part of the deployment scripts. In the case of Bare-metal setup, we will assume the machine is already present and will be used as an Application Instance to only configure the software.
Interacting With Deployment Scripts#
A typical usage of the deployment scripts starts by invoking ./envbuild.sh bash script. This follows <command subcommand options> style. We will cover other subcommands in the subsequent sections.
Example usage for install sub-command:
./envbuild.sh install --tf-binary terraform --component all --config-file <your-config-file.yml>
For more details, you can run the command with the --help option shown below.
$ ./envbuild.sh --help
Usage: ./envbuild.sh (-v|--version)
   or: ./envbuild.sh (-h|--help)
   or: ./envbuild.sh (install/uninstall) (-c|--component <component>) [options]
   or: ./envbuild.sh (force-destroy) [options]
   or: ./envbuild.sh (info) [options]
install/uninstall components:
-c, --component        one or more of all/infra/platform/app, pass arg multiple times for more than one
install/uninstall options:
-f, --config-file      path to file containing config overrides, defaults to config.yml
-t, --tf-binary        the IaC binary to use, can be tofu or terraform, defaults to tofu
-i, --skip-infra       skip install/uninstall of infra component
-p, --skip-platform    skip install/uninstall of platform component
-a, --skip-app         skip install/uninstall of app component
-d, --dry-run          don't make any changes, instead, try to predict some of the changes that may occur
-h, --help             provide usage information
-x, --debug            output additional information in order to debug issues
force-destroy options:
-f, --config-file      path to file containing config overrides, defaults to config.yml
-t, --tf-binary        the IaC binary to use, can be tofu or terraform, defaults to tofu
-h, --help             provide usage information
-x, --debug            output additional information in order to debug issues
info options:
-f, --config-file      path to file containing config overrides, defaults to config.yml
-t, --tf-binary        the IaC binary to use, can be tofu or terraform, defaults to tofu
-h, --help             provide usage information
-x, --debug            output additional information in order to debug issues
Deployment Scripts Workflow#
A typical workflow involves the following phases, as shown in the diagram below:
Prepare
Setup
Maintain
Teardown
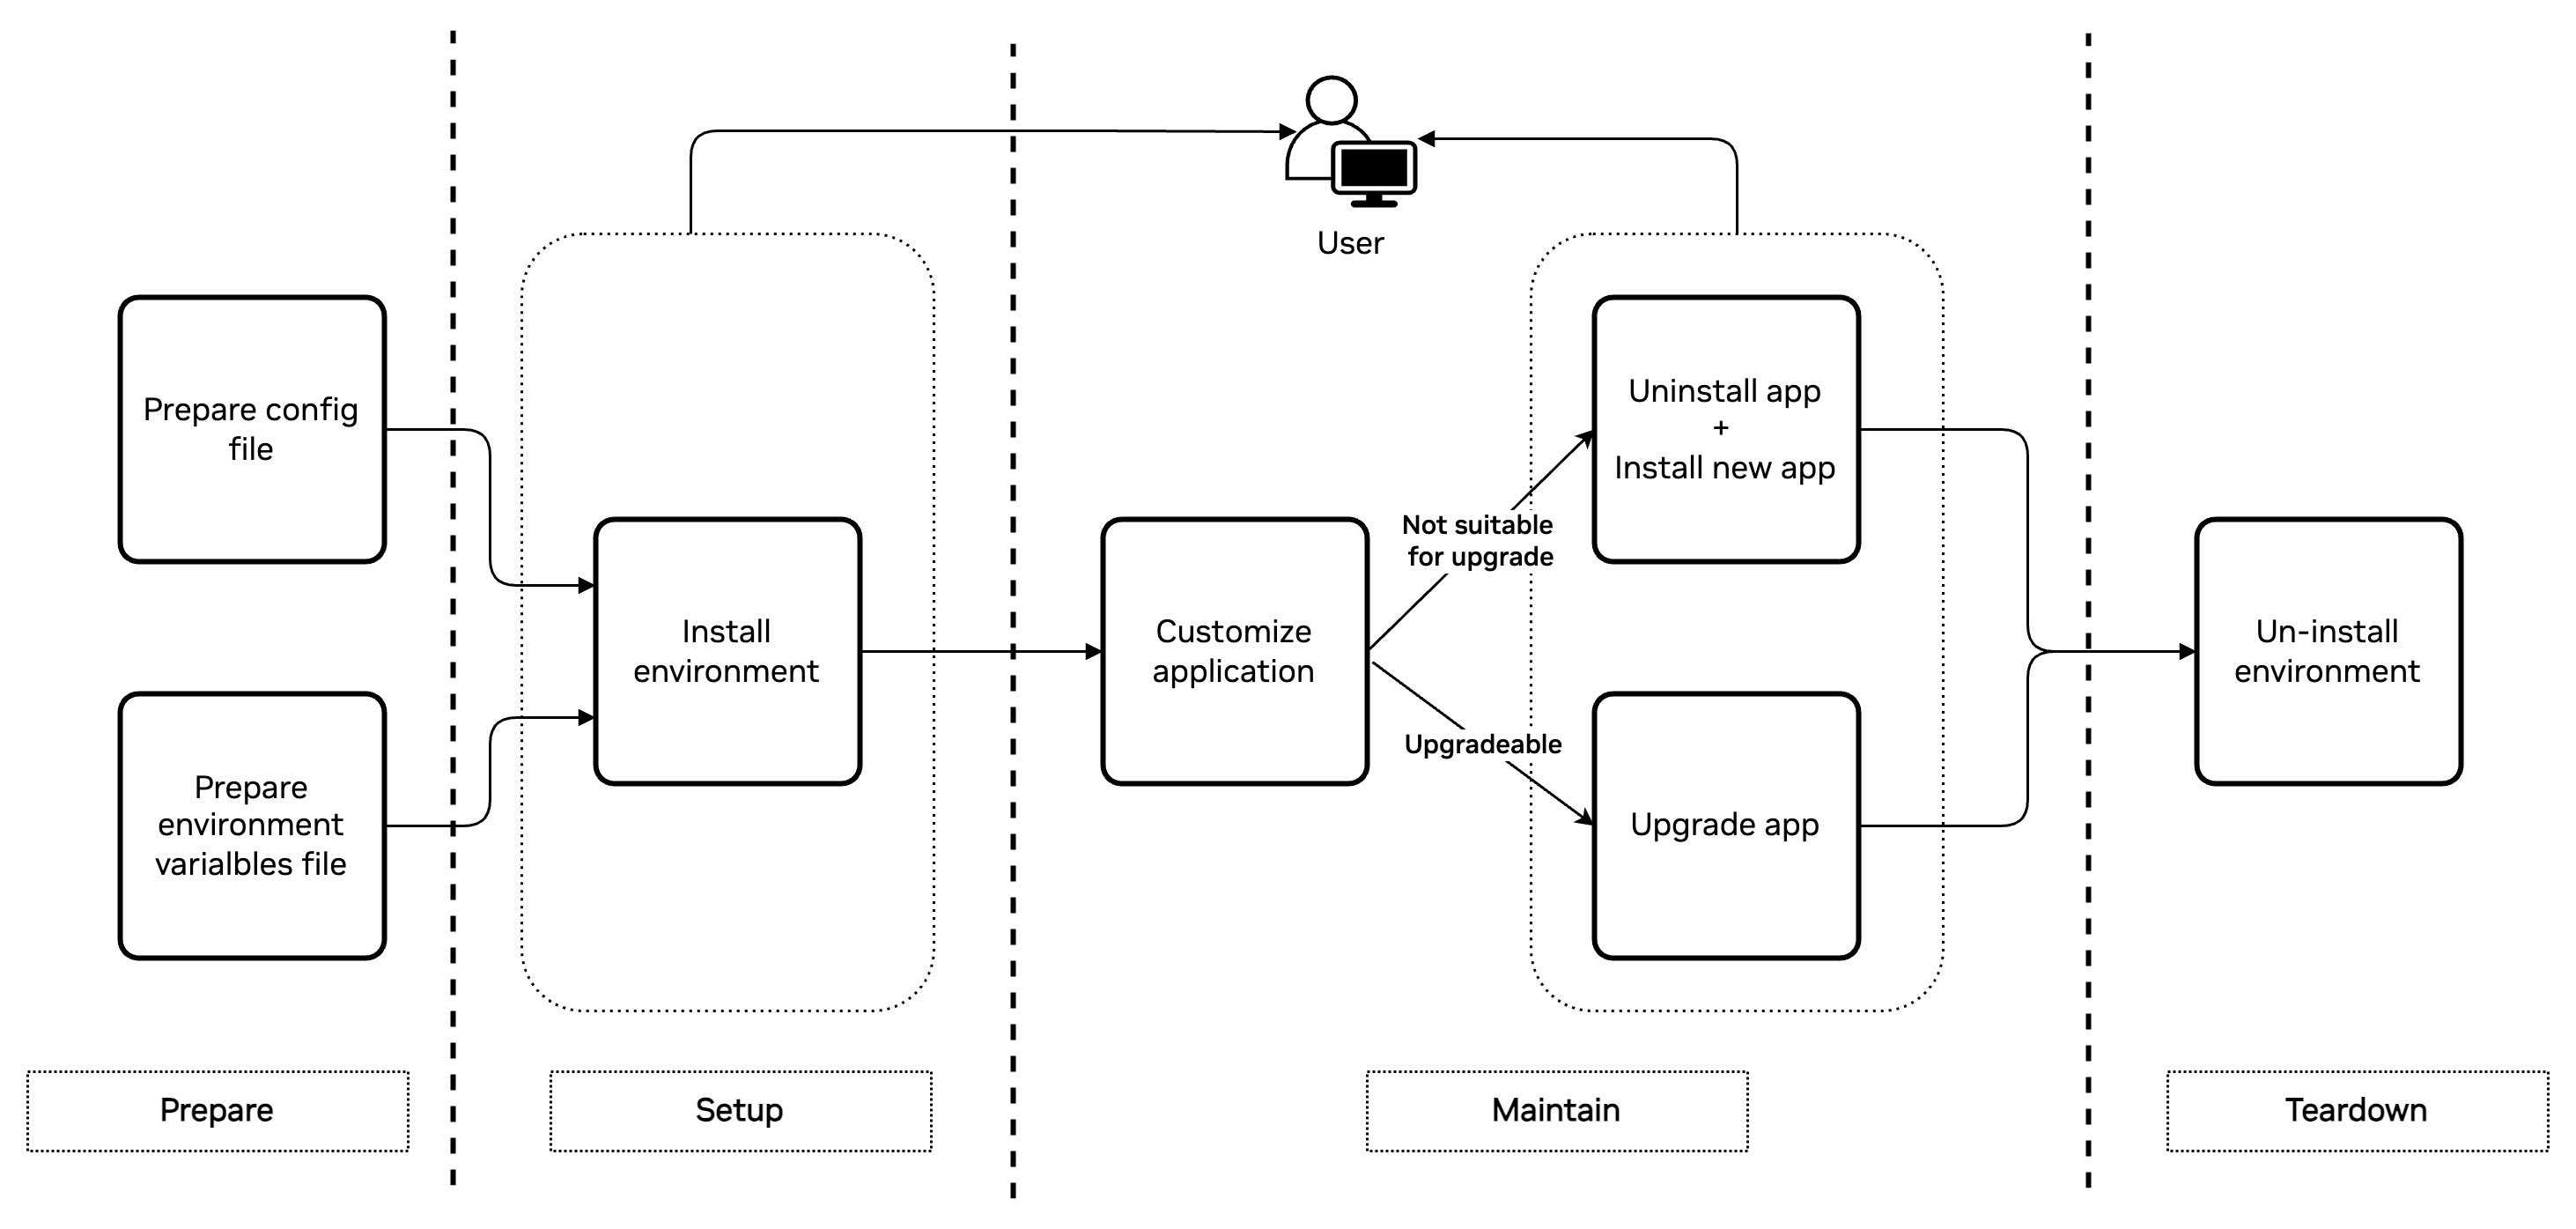
Prepare#
Preparation includes identifying a machine to be used for the Controller instance. Based on the target platform of your choice (AWS, Bare-metal, etc.), take a copy of the sample template and environment file from the provided examples and modify them to your needs.
For example, if you chose to work with a Bare-metal sample, you might end up with the files below.
dev1-baremetal-configs.ymldev1-baremetal-env-vars.env
Note
File names are completely arbitrary. However, for simplicity, we will use these sample file names while showing examples here in the following sections.
Setup#
In this phase you will load the secret values into the bash environment and launch the deployment script with the config file created above.
Loading environment variables:
$ source ./dev1-baremetal-env-vars.env
Launching deployment script:
$ ./envbuild.sh install --tf-binary terraform --component all --config-file dev1-baremetal-configs.yml
By the end of this script, you will be presented with a summary of results and key URLs that you will need in future. Here is a sample output:
<..logs trimmed for brevity>
<..logs trimmed for brevity>
<..logs trimmed for brevity>
access_urls:
 app:
   ace_configurator_endpoint: http://<application-instance-ip>:30180/
   api_endpoint: https://<application-instance-ip>:30888/
   ui_endpoint: https://<application-instance-ip>:30111/
   grafana_endpoint: http://<application-instance-ip>:32300/
 turn: {}
ssh_command:
 app:
   master: ssh -i /home/horde/.ssh/id_rsa -o StrictHostKeyChecking=no -o UserKnownHostsFile=/dev/null local-sarathm@10.176.197.17
 turn:
   master: ssh -i /home/horde/.ssh/id_rsa -o StrictHostKeyChecking=no -o UserKnownHostsFile=/dev/null local-sarathm@10.176.197.17
Here is a quick run down of the output and what it means. This will be similar to other target platforms as well.
Key |
Description |
|---|---|
access_urls -> app -> ace_configurator_endpoint |
Tokkio ACE Configurator can be accessed on this endpoint. |
access_urls -> app -> api_endpoint |
Tokkio Backend API can be accessed at this URL. |
access_urls -> app -> ui_endpoint |
Tokkio UI API can be accessed at this URL. |
access_urls -> app -> grafana_endpoint |
Grafana dashboard installed as part of platform services. Useful to watch metrics of GPU usage, etc., |
ssh_command -> app -> master |
Pre-populated SSH command that can be used to access your Application Instance |
ssh_command -> turn -> master |
Pre-populated SSH command that can be used to access your TURN server Instance. In case of Bare-metal setup, TURN server gets installed on the same Application instance so it will be the same. |
Maintain#
This is the phase where application customizations take place. As you customize the application, you can use the Deployment script to update it into the target environment by using the appropriate subcommand. Below are the steps you will take in this process.
Update config file
Apply the changes in the target environment.
For instance, if your changes to configurations are for the Tokkio back-end, you can run the subcommand below to get these changes applied.
./envbuild.sh install --tf-binary terraform --component app --config-file dev1-baremetal-configs.yml
Notice the --component switch now refers to app instead of all. Based on what changes to the config template you wish to apply, you may choose from different options for --component such as all, infra, platform, and app.
Note
In scenarios where you need to replace the application altogether, you can first uninstall just the application by ./envbuild.sh uninstall --tf-binary terraform --component app --config-file dev1-baremetal-configs.yml and then install the application using the above method.
Output of this command will be similar to what we saw during the Setup phase.
During the maintenance phase, you may want to see the summary of results of a given deployment. In such a case, you can use the info subcommand by supplying the environment variables and the correct config file as shown below.
Load the environment variables
$ source ./dev1-baremetal-env-vars.env
Launch
infosub command
./envbuild.sh info --tf-binary terraform --config-file dev1-baremetal-configs.yml
This command’s output will be in the same format we discussed during the Setup phase. For example:
access_urls:
 app:
   ace_configurator_endpoint: http://<application-instance-ip>:30180/
   api_endpoint: https://<application-instance-ip>:30888/
   ui_endpoint: https://<application-instance-ip>:30111/
   grafana_endpoint: http://<application-instance-ip>:32300/
 turn: {}
ssh_command:
 app:
   master: ssh -i /home/horde/.ssh/id_rsa -o StrictHostKeyChecking=no -o UserKnownHostsFile=/dev/null local-sarathm@10.176.197.17
 turn:
   master: ssh -i /home/horde/.ssh/id_rsa -o StrictHostKeyChecking=no -o UserKnownHostsFile=/dev/null local-sarathm@10.176.197.17
Teardown#
If you want to uninstall some component from this setup or the entire setup itself, you can use the uninstall subcommand with appropriate options for --component.
For instance if you chose to uninstall only the application component, you may run the command below:
./envbuild.sh uninstall --tf-binary terraform --component app --config-file dev1-baremetal-configs.yml
Additionally, if you choose to uninstall the entire setup, you can run the command with the combination below. Notice the --component option’s value is “all,” and be cautious when using this option since this will basically reverse all the steps you did since the start.
./envbuild.sh uninstall --tf-binary terraform --component all --config-file dev1-baremetal-configs.yml
For CSPs, you can use the force-destroy option to speed up the teardown process. This will delete all the resources created by the deployment scripts in a faster way.
./envbuild.sh force-destroy --tf-binary terraform --config-file <config-file.yaml>
Warning
This force-destroy option is only effective on CSPs. Use this option with caution.
Deployment Options#
At present we have deployment scripts for below environments:
Note
While these scripts help as a reference for initial setup, such as for development environments, we recommend that you review these thoroughly before bringing up production-like environments for scaling and security.