Installation#
The Aerial Omniverse Digital Twin (AODT) Installer is a tool to help you get up and running quickly with fresh installations on qualified systems. Several components must be installed and configured for a deployed system to run AODT. This section outlines the steps for using the AODT Installer for each qualified system configuration.
System Requirements#
Installing AODT involves deploying a set of frontend components and a set of backend components. Both frontend and backend components require one NVIDIA GPU and can be deployed to either the same node (i.e., colocated) or to separate nodes (i.e. multi-node). The frontend and backend can be deployed on a single GPU when used sequentially, or two GPUs when used concurrently. Refer to the Database Replay section in this guide for more information on single-GPU operation. The following table details the GPU requirements for each case:
System Type |
GPU Qnty |
GPU vRAM |
GPU Requirement |
GPU Notes |
|---|---|---|---|---|
Frontend alone |
1 |
12GB+ |
GTX/RTX |
e.g. RTX 6000 Ada, A10, L40 |
Backend alone |
1 |
48GB+ |
e.g. RTX 6000 Ada, L40, A100, H100 |
|
Frontend and backend init and replay |
1 |
48GB+ |
e.g. RTX 6000 Ada, L40 |
|
Frontend and backend colocated |
2 |
see note |
see note |
1x frontend-capable GPU, 1x backend GPU |
OS support for each use case is as follows:
System Type |
OS |
|---|---|
Frontend alone |
Windows 11, Windows Server 2022, Ubuntu 22.04 |
Backend alone |
Ubuntu 22.04 |
Frontend and backend replay |
Ubuntu 22.04 |
Frontend and backend colocated |
Ubuntu 22.04 |
In all cases, the supported NVIDIA driver is 575.57.0, except for AWS (576.80) and Azure (553.62) when using Windows.
Additional Information#
The backend supports the following streaming multiprocessor (SM) architectures: 80, 86, 89, and 90. The availability of such architectures is checked multiple times:
Runtime: At start-up, the backend confirms that it is running on a system with a supported SM architecture. If an unsupported architecture is detected, an error is reported to the standard error console, and the application terminates.
Compilation: Similarly, at compile-time the build system checks that the native architecture of the GPU in use is part of the supported SM architectures. Overriding
CMAKE_CUDA_ARCHITECTUREis only effective if the specified values fall within the supported set.
Compilation Option: If you wish to run the backend on the same system used for compilation, or a different system with the same SM Architecture, the CMake build system allows for specifying -DCMAKE_CUDA_ARCHITECTURES="native" during the CMake generation phase. This ensures that the compiled version aligns with the device architecture, thereby preventing the errors mentioned above. The “native” value is also the default in case you do not specify a value for -DCMAKE_CUDA_ARCHITECTURES during CMake generation time.
Deployment#
The following qualified systems have been tested and are directly supported with the AODT Installer:
Qualified system |
Node 1 |
Node 2 |
|---|---|---|
AWS VM (Multi-Node) |
|
|
Azure VM (Multi-Node) |
|
|
Dell R750 (Colocated) |
|
N/A |
Note
Installations on AWS and Azure A10 VMs require NVIDIA GRID drivers.
AWS / Azure#
AODT can be installed on AWS and Azure using the Cloud Installers with version tag 1.4.0 at NGC - Aerial Omniverse DT Installer. Refer to the detailed instructions in the README.md file bundled with the installer. You will need the following:
Appropriate Cloud provider permissions
An SSH key pair for accessing the instance
An NGC API key for downloading AODT
More information on NGC_API_KEY can be found in the NGC User Guide. Note that you should use the NGC key marked as the ‘Personal Key,’ which is tied to the organization within which it was created. When creating the key, ensure you are logged in to the Aerial-OV-Digital-Twin organization. All legacy keys have been deprecated.
If necessary, the following command can be used to find LOCAL_IP, which is the external IP address of the machine used to connect to the VMs.
curl ifconfig.me
The private SSH key (e.g., ~/.ssh/azure.pem) is needed on the server with LOCAL_IP when connecting to the VMs using SSH. Once the Cloud variables mentioned in the installation README.md are configured, a CLI container can be used to run the provisioning scripts.
Provisioning for AWS (experimental)#
Use the amazonlinux:2023 Docker image to run the AWS provisioning scripts.
Mount the AWS credentials from ~/.aws into the container:
docker run --rm -it --env-file .aws.env -v ./aodt_1.4.0:/aodt -w /aodt/cloud -v ~/.aws:/root/.aws amazonlinux:2023 bash
Run the following command inside the Docker container:
bash -e aws_install.sh
Note: installation on AWS is currently in experimental stage. If any issue is encountered, please report to the developer forum.
Provisioning for Azure#
Use the mcr.microsoft.com/azure-cli:azurelinux3.0 Docker image to run the Azure provisioning scripts.
docker run --rm -it --env-file .azure.env -v ./aodt_1.4.0:/aodt -w /aodt/cloud mcr.microsoft.com/azure-cli:azurelinux3.0
The Docker container will mount the downloaded scripts. Run the following commands inside the Docker container:
az login
bash -e azure_install.sh
Installation after Provisioning#
The provisioning script will create the VMs, configure the network inbound ports, and download the scripts needed for the next step. At the end of execution, it will output the following message:
To install AODT on the VMs, execute the following command:
BACKEND_IP=<backend-ip> FRONTEND_IP=<frontend-ip> bash -e ./aodt_install.sh
Where BACKEND_IP and FRONTEND_IP are the IP addresses of the respective VMs.
While in the Docker container, execute the following command:
$ BACKEND_IP=<IP> FRONTEND_IP=<IP> bash -e ./aodt_install.sh
This will take several minutes to complete, after which the following message will be displayed:
Use Microsoft Remote Desktop Connection to connect to <ip-address>
Username: .\aerial
Password: REDACTED-check-secrets-file

BACKEND_IP=<ip-address>
Logging into the Cloud VM#
You can use the Microsoft Remote Desktop Client to connect to the IP address shown at the end of the installation, using the configured username and password from the .aws.env or .azure.env files. Once you are logged in to the remote desktop session, after the installation scripts have completed, the AODT application will launch along with a Jupyter notebook in the browser.
Dell R750#
For a complete on-prem deployment, select the pre-qualified Dell PowerEdge R750 server and install Ubuntu-22.04.3 Server using the default options. When loading the Ubuntu 22.04 Server ISO, you can use a bootable USB drive or the virtual media function on the server. Refer to the Ubuntu documentation for installing Ubuntu 22.04 Server and creating a bootable USB drive. For instructions on using the R750 virtual media function, refer to Dell documentation.
After installing Ubuntu-22.04.3 Server, log in using SSH and run the following commands:
sudo apt-get install -y jq unzip

export NGC_API_KEY=<NGC_API_KEY>

versionTag="1.4.0"
downloadedZip="$HOME/aodt_1.4.0.zip"

curl -L "https://api.ngc.nvidia.com/v2/org/nvidia/team/aerial/resources/aodt-installer/versions/$versionTag/files/aodt_1.4.0.zip" -H "Authorization: Bearer $NGC_API_KEY" -H "Content-Type: application/json" -o $downloadedZip

# Unzip the downloaded file
unzip -o $downloadedZip || jq -r . $downloadedZip
More information on NGC_API_KEY can be found in the NGC User Guide. Note that you should use the NGC key marked as the ‘Personal Key,’ which is tied to the organization within which it was created. When creating the key, ensure you are logged in to the Aerial-OV-Digital-Twin organization. All legacy keys have been deprecated.
Once the aodt_1.4.0.zip file has been downloaded, extract it and run the following commands:
cd aodt_1.4.0
./make_install.sh
./install.sh
Note
Do not run this script from a graphical desktop environment (e.g., GNOME, KDE). Instead, run it from an SSH session or a non-graphical shell.
When installation is complete, you can use a VNC client to connect to the VNC server on port 5901. The VNC password is nvidia. The script has already launched the AODT application and opened up a Jupyter notebook in the browser. If the server was rebooted and the application is not running, open a terminal and issue this command:
~/aodt_1.4.0/frontend/start.sh
As an alternative, you can use the AODT-1.4.0 desktop icon to start the application with debug logs printed into a terminal window. You may need to right-click the icon and select Allow Launching first.
Validation#
Once the AODT graphical interface is running, click the toolbar icon showing gears and connect to the RAN digital twin.
If asked for credentials, use the following:
Username:
omniversePassword:
aerial_123456
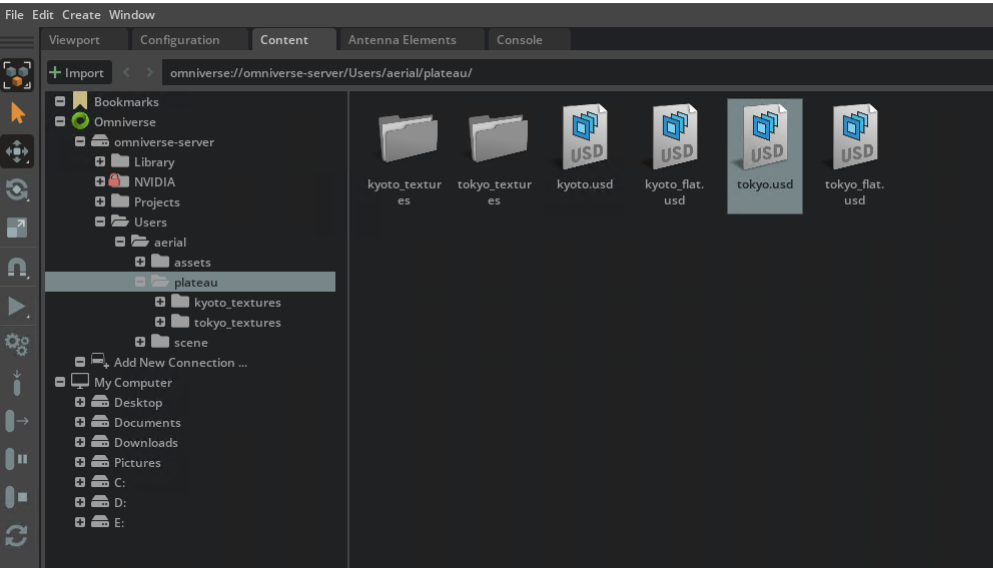
Once you are successfully logged in, you can click the Content tab and select Add New Connection–refer to the Graphical User Interface section for more details. In the dialog window, perform the following steps:
Type “omniverse-server”.
Click OK.
Expand the omniverse-server tree view.
Right-click on “omniverse://omniverse-server/Users/aerial/plateau/tokyo.usd” and open the map.
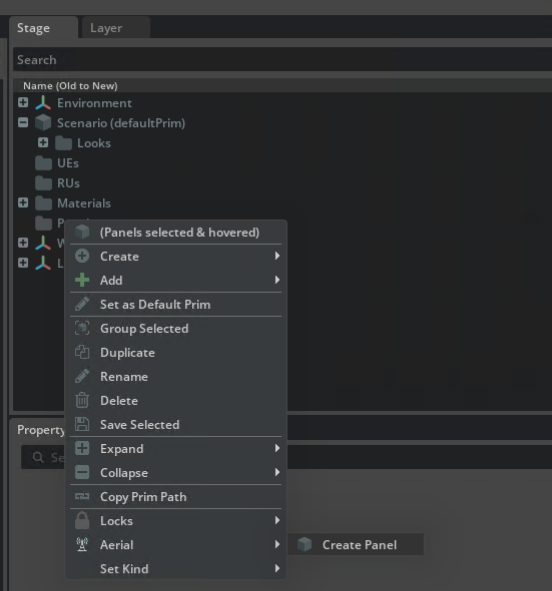
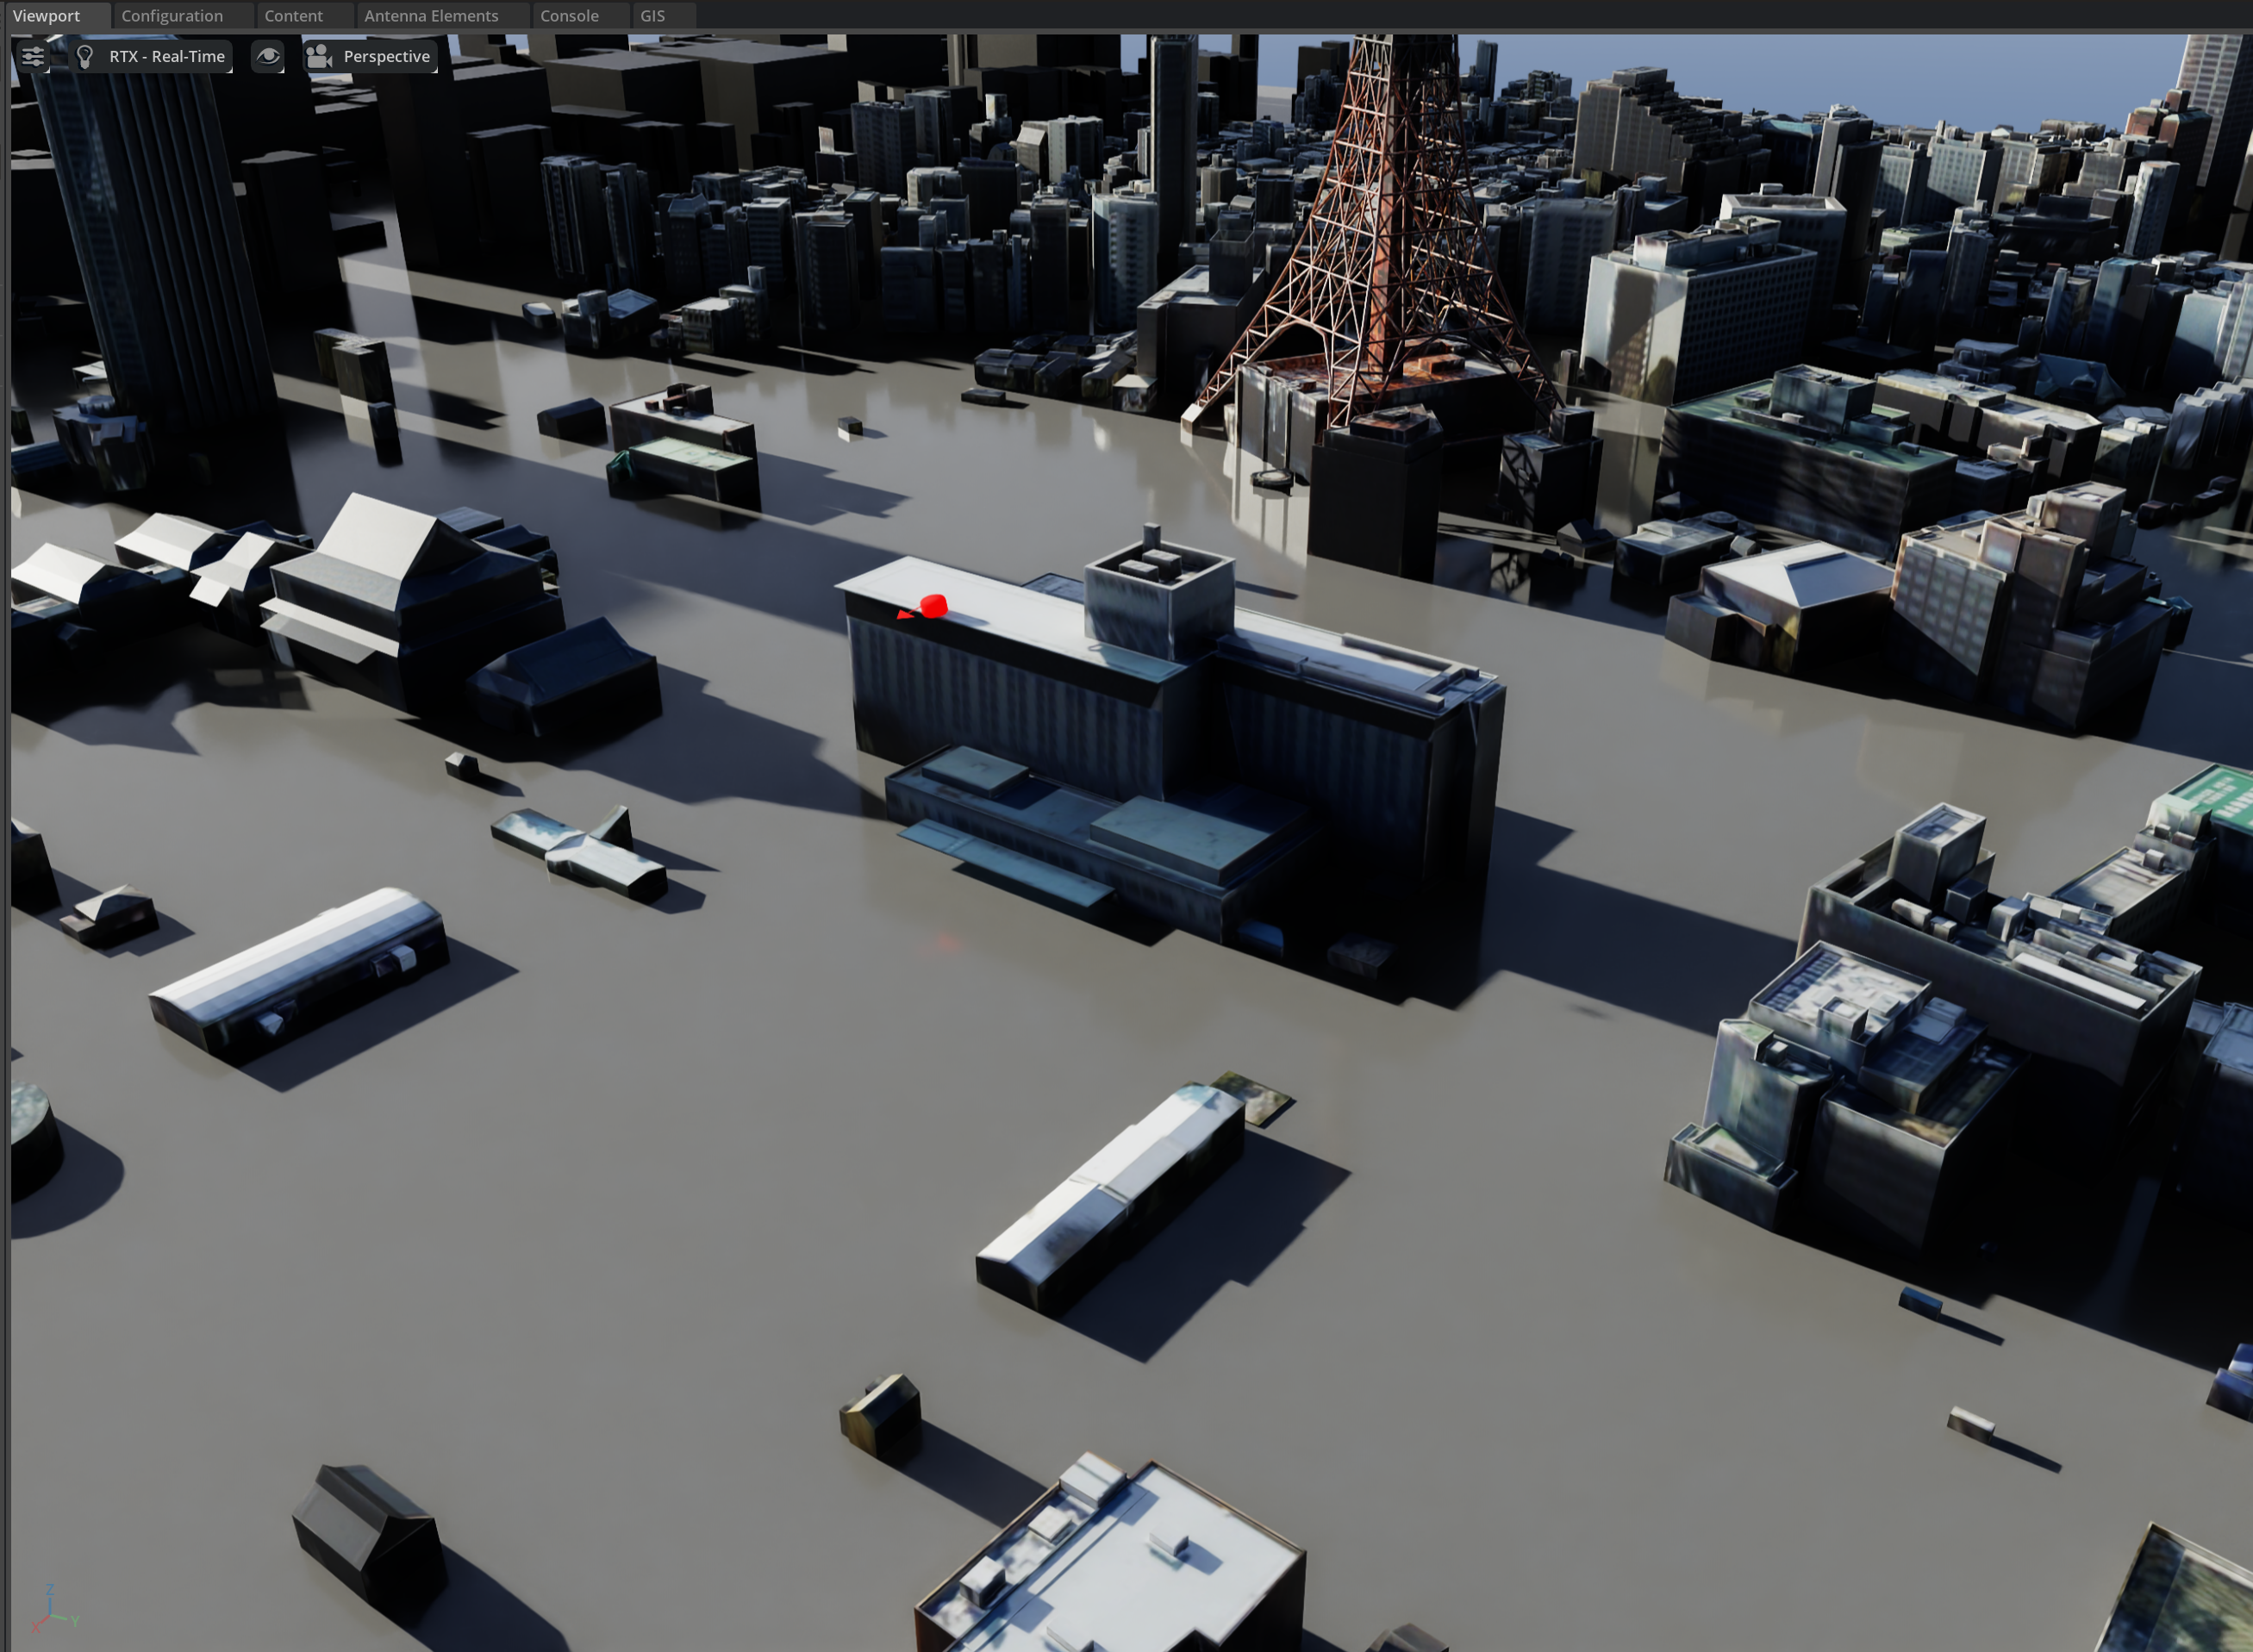
Once the map is loaded, perform the following steps:
Select the Viewport tab.
Right-click on the Stage widget.
Select Aerial > Create Panel twice from the context menu.
By default, the first panel will be used (refer to the /Scenario scope in the Graphical User Interface ) for the user equipment and the second for the radio unit (RU).
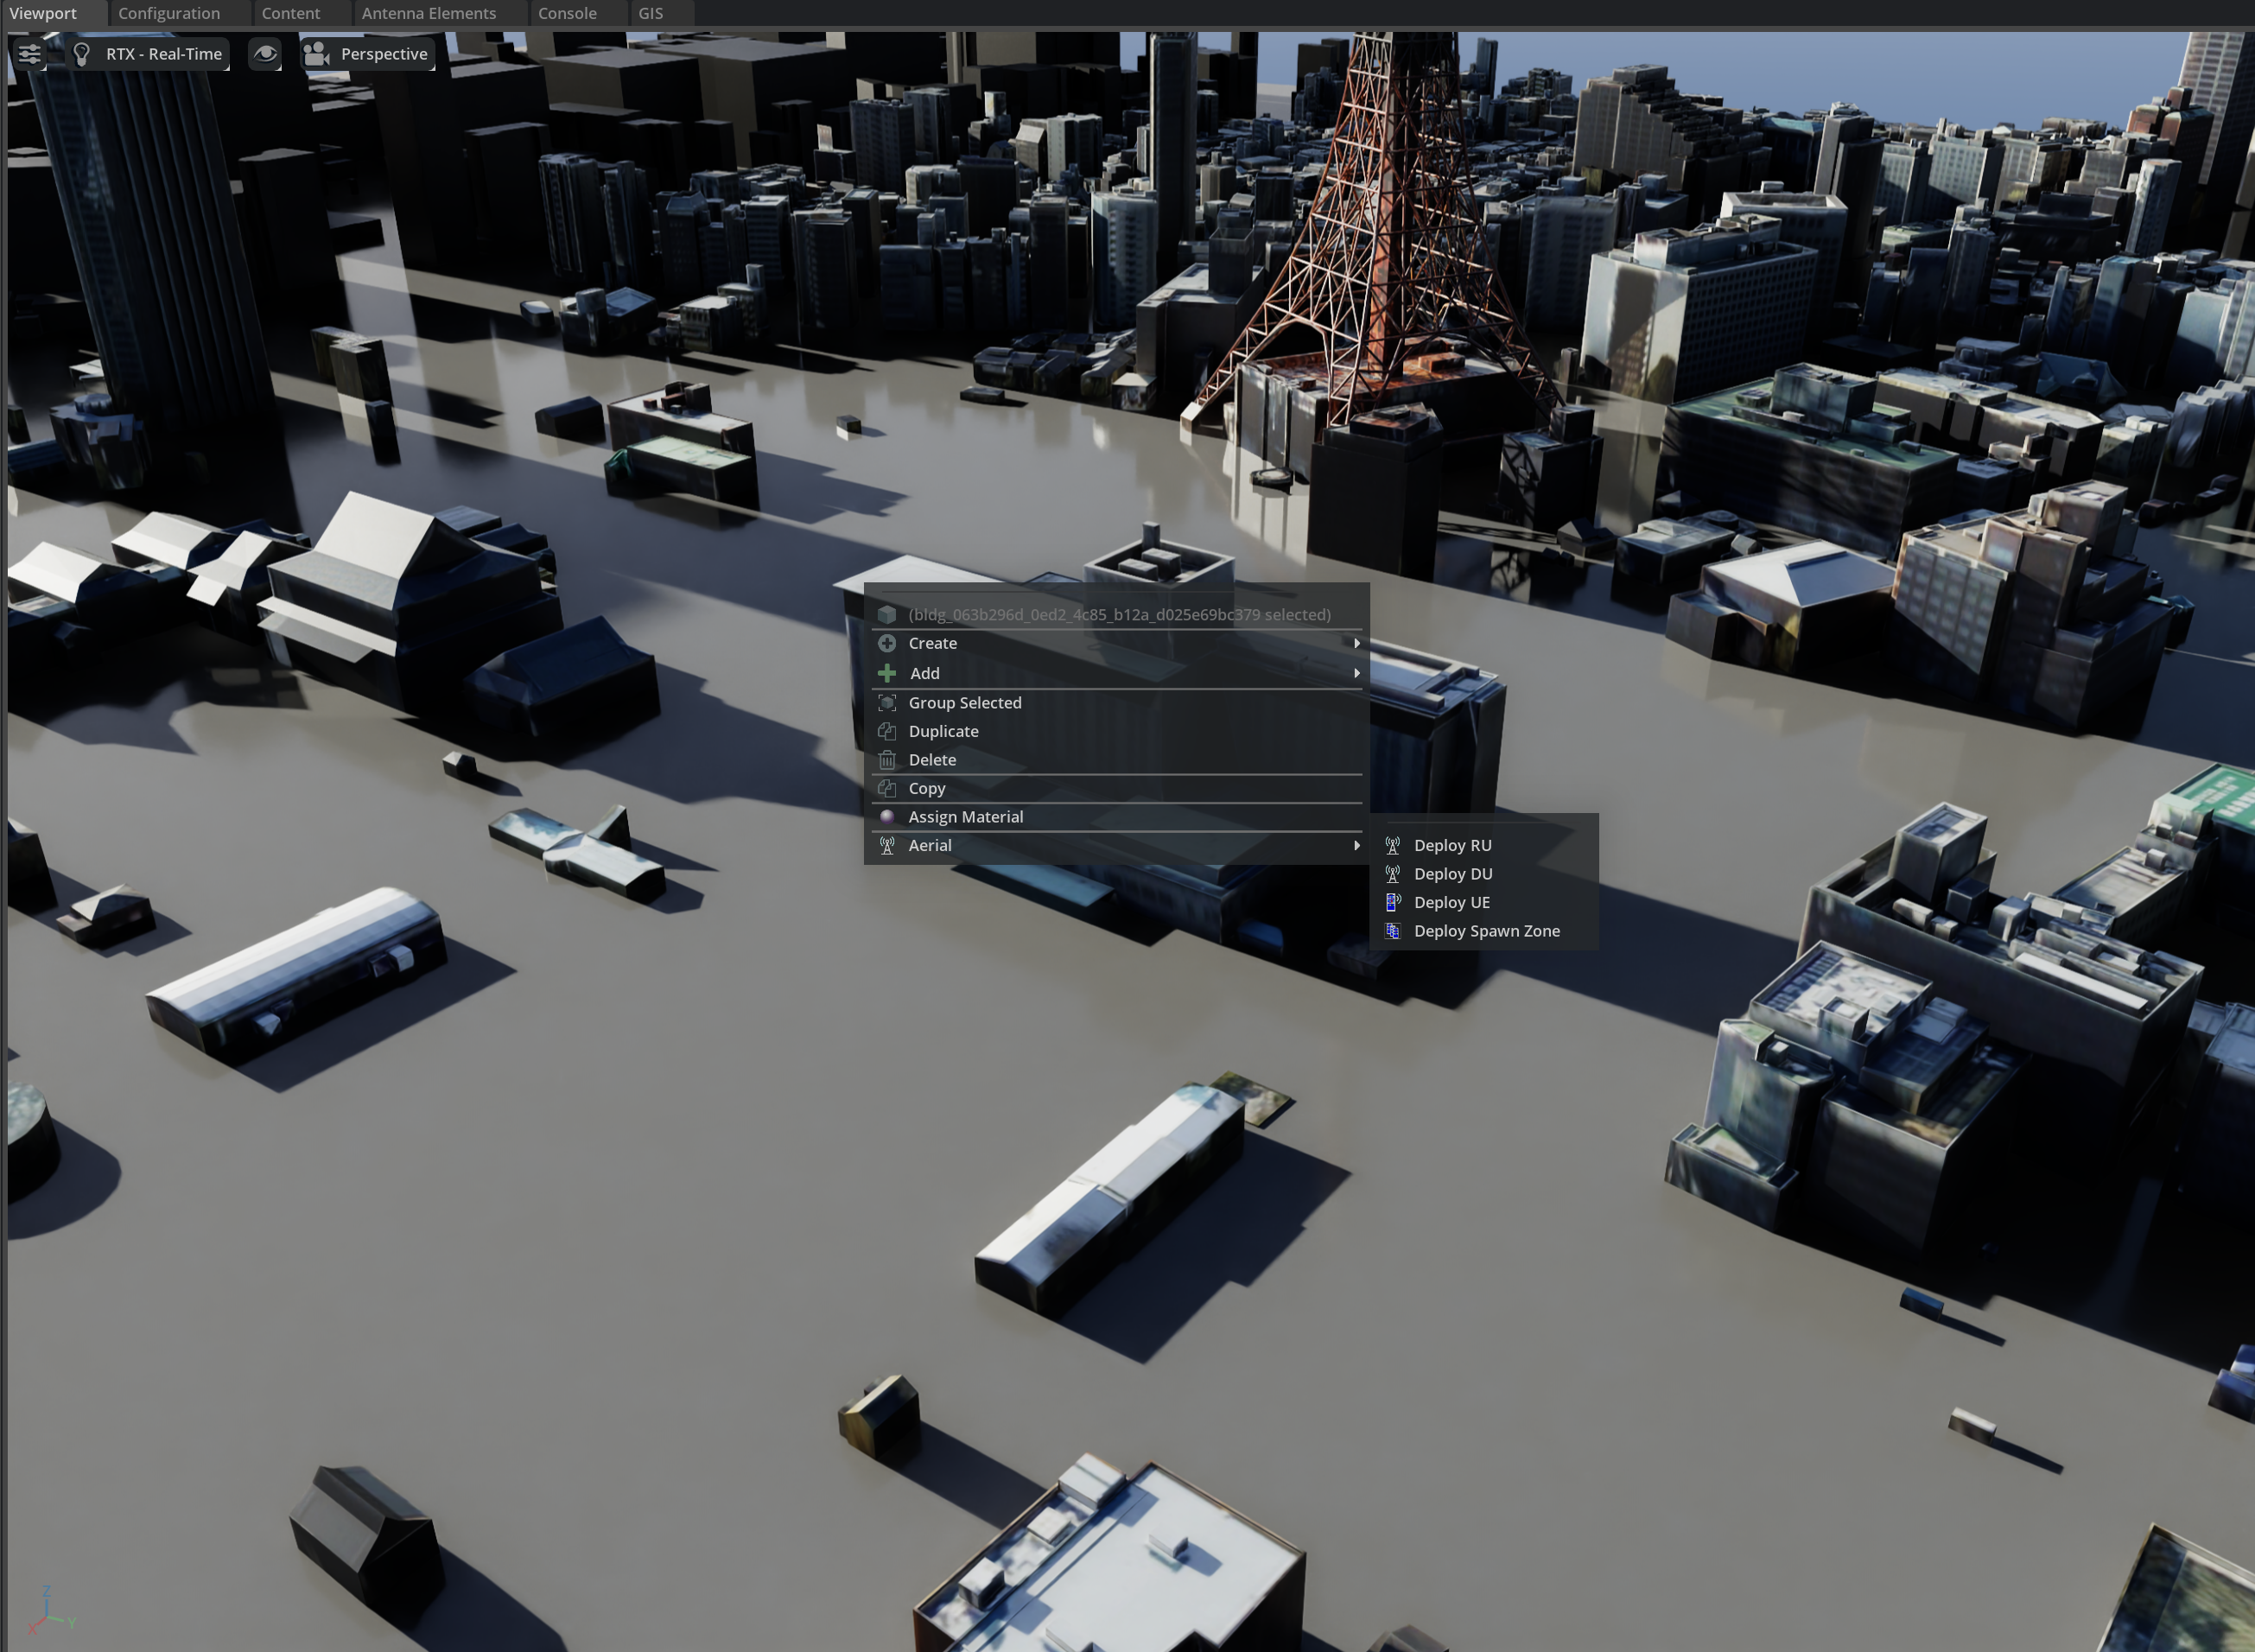
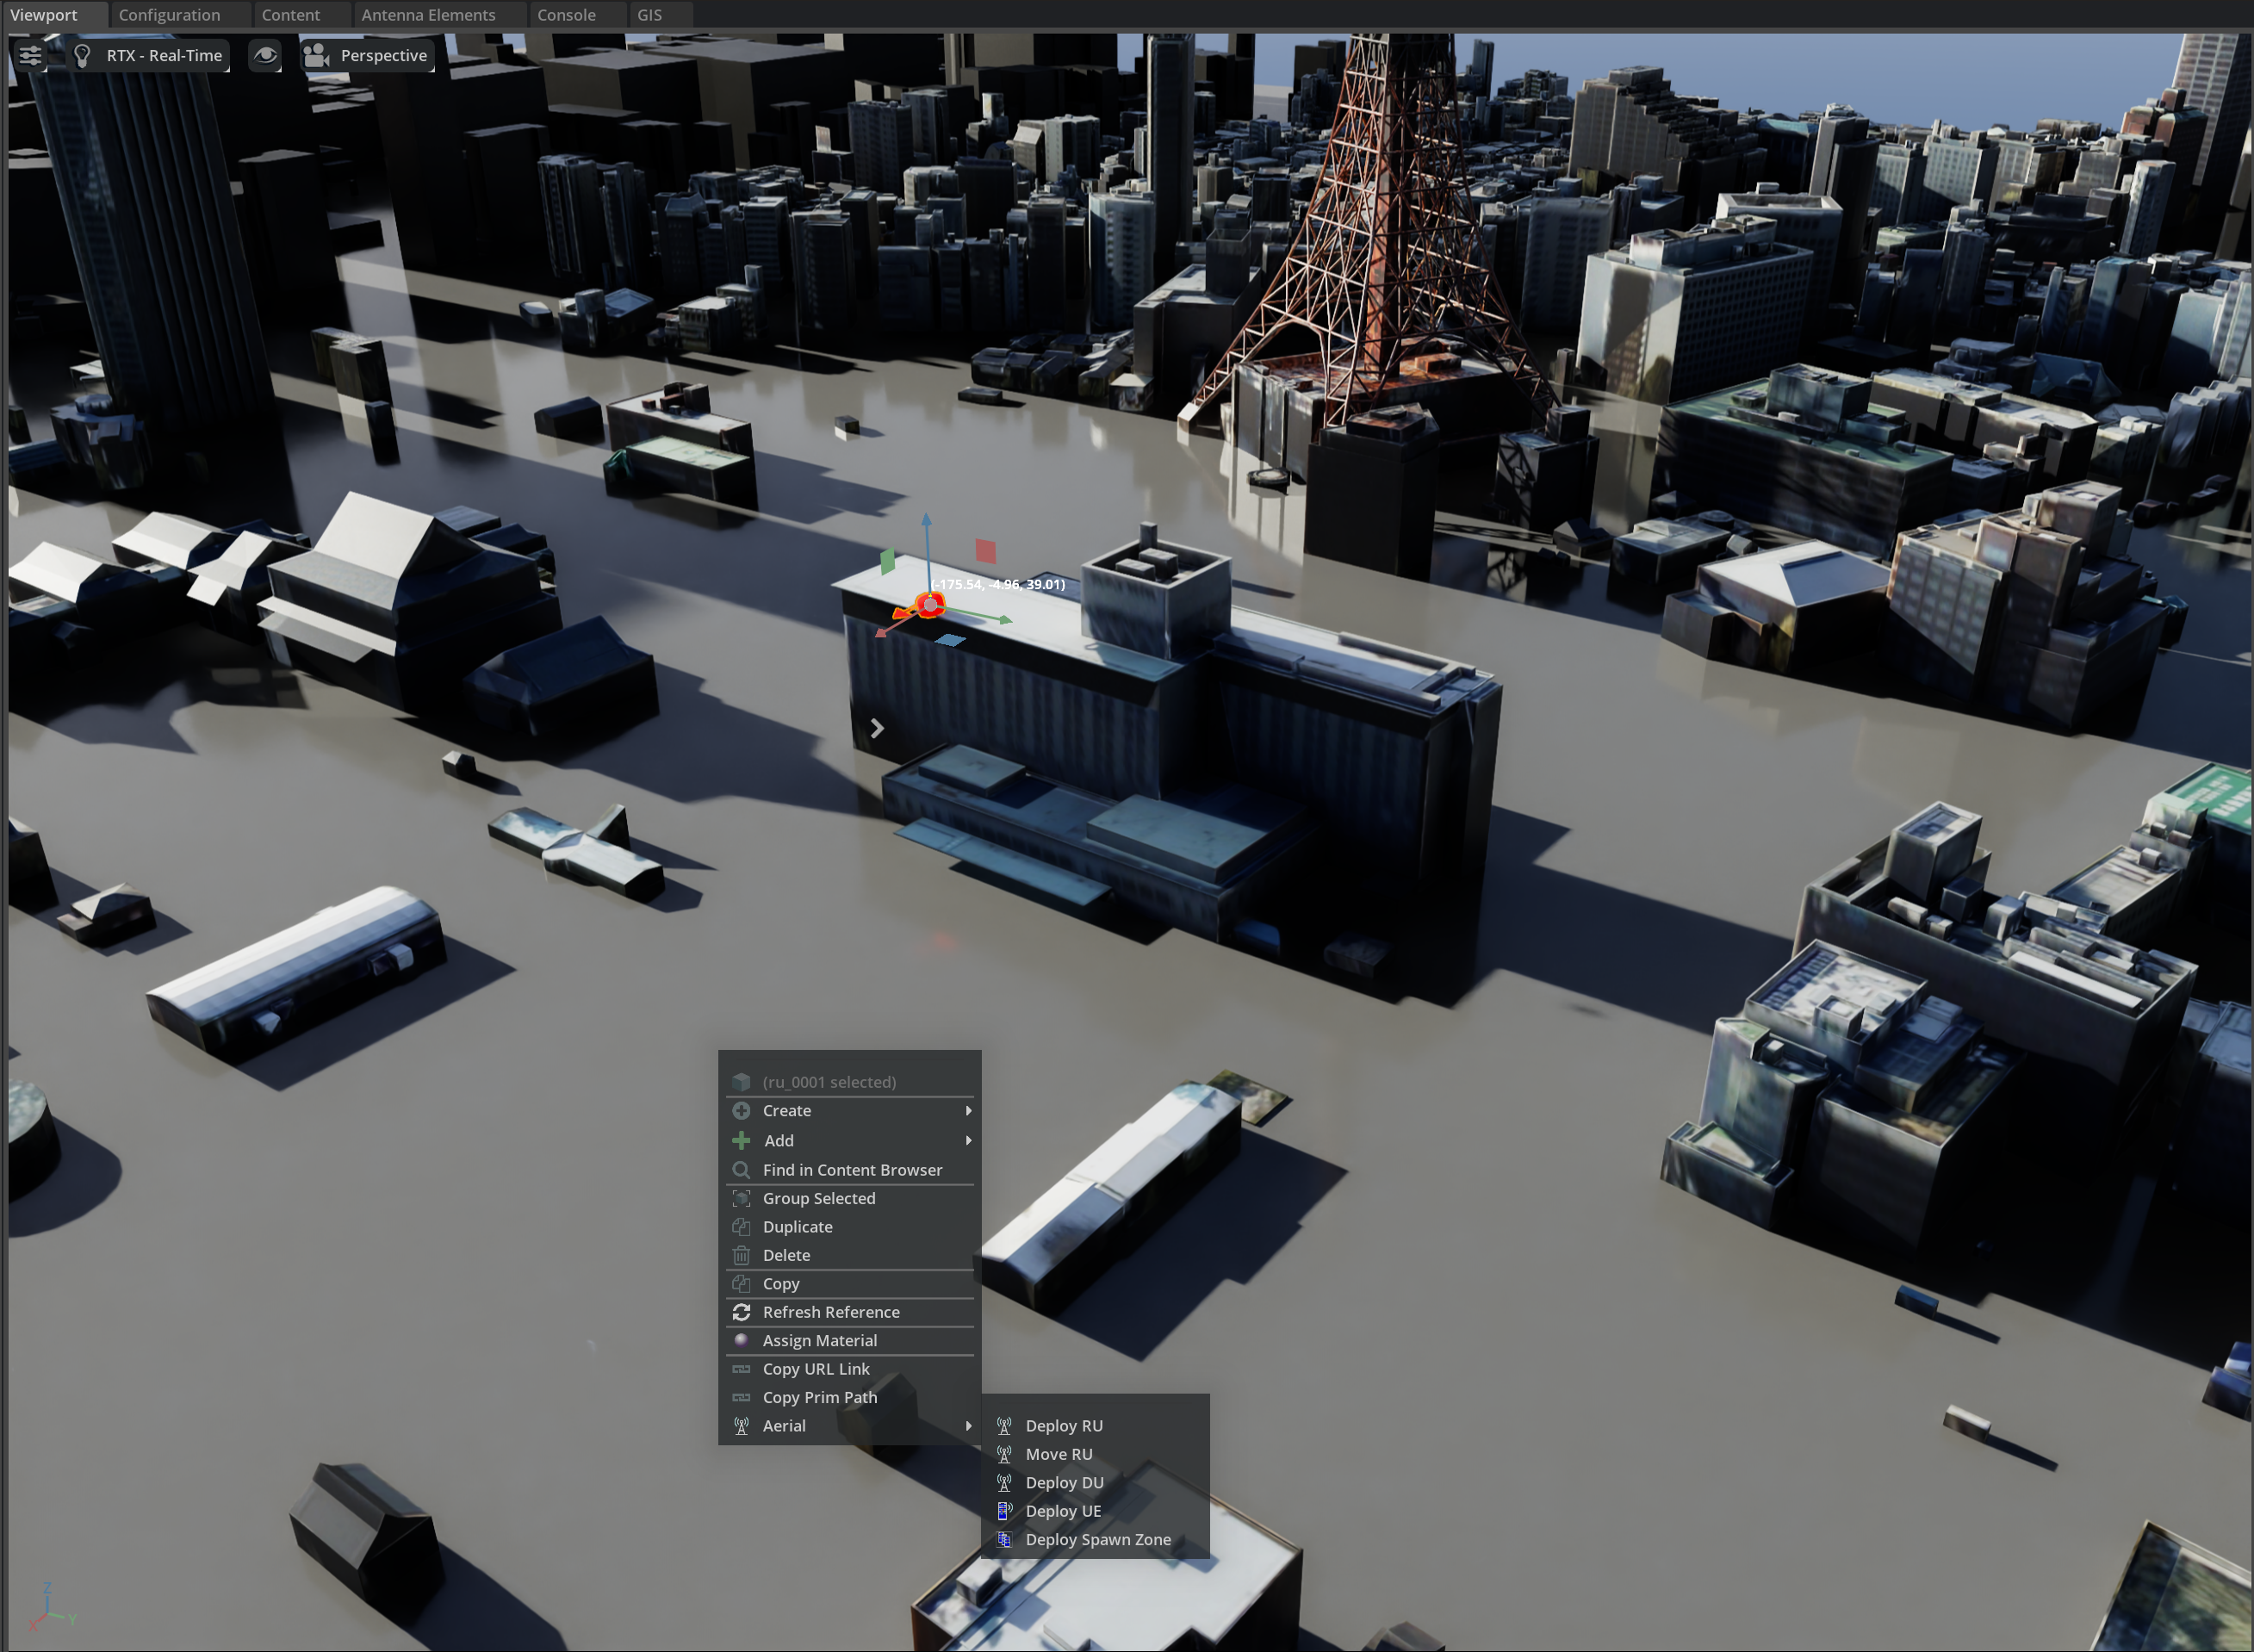
With the panels defined, perform the following steps:
Right-click in the Viewport.
Select Aerial > Deploy RU from the context menu.
Click on the final location where you would like to place the RU.
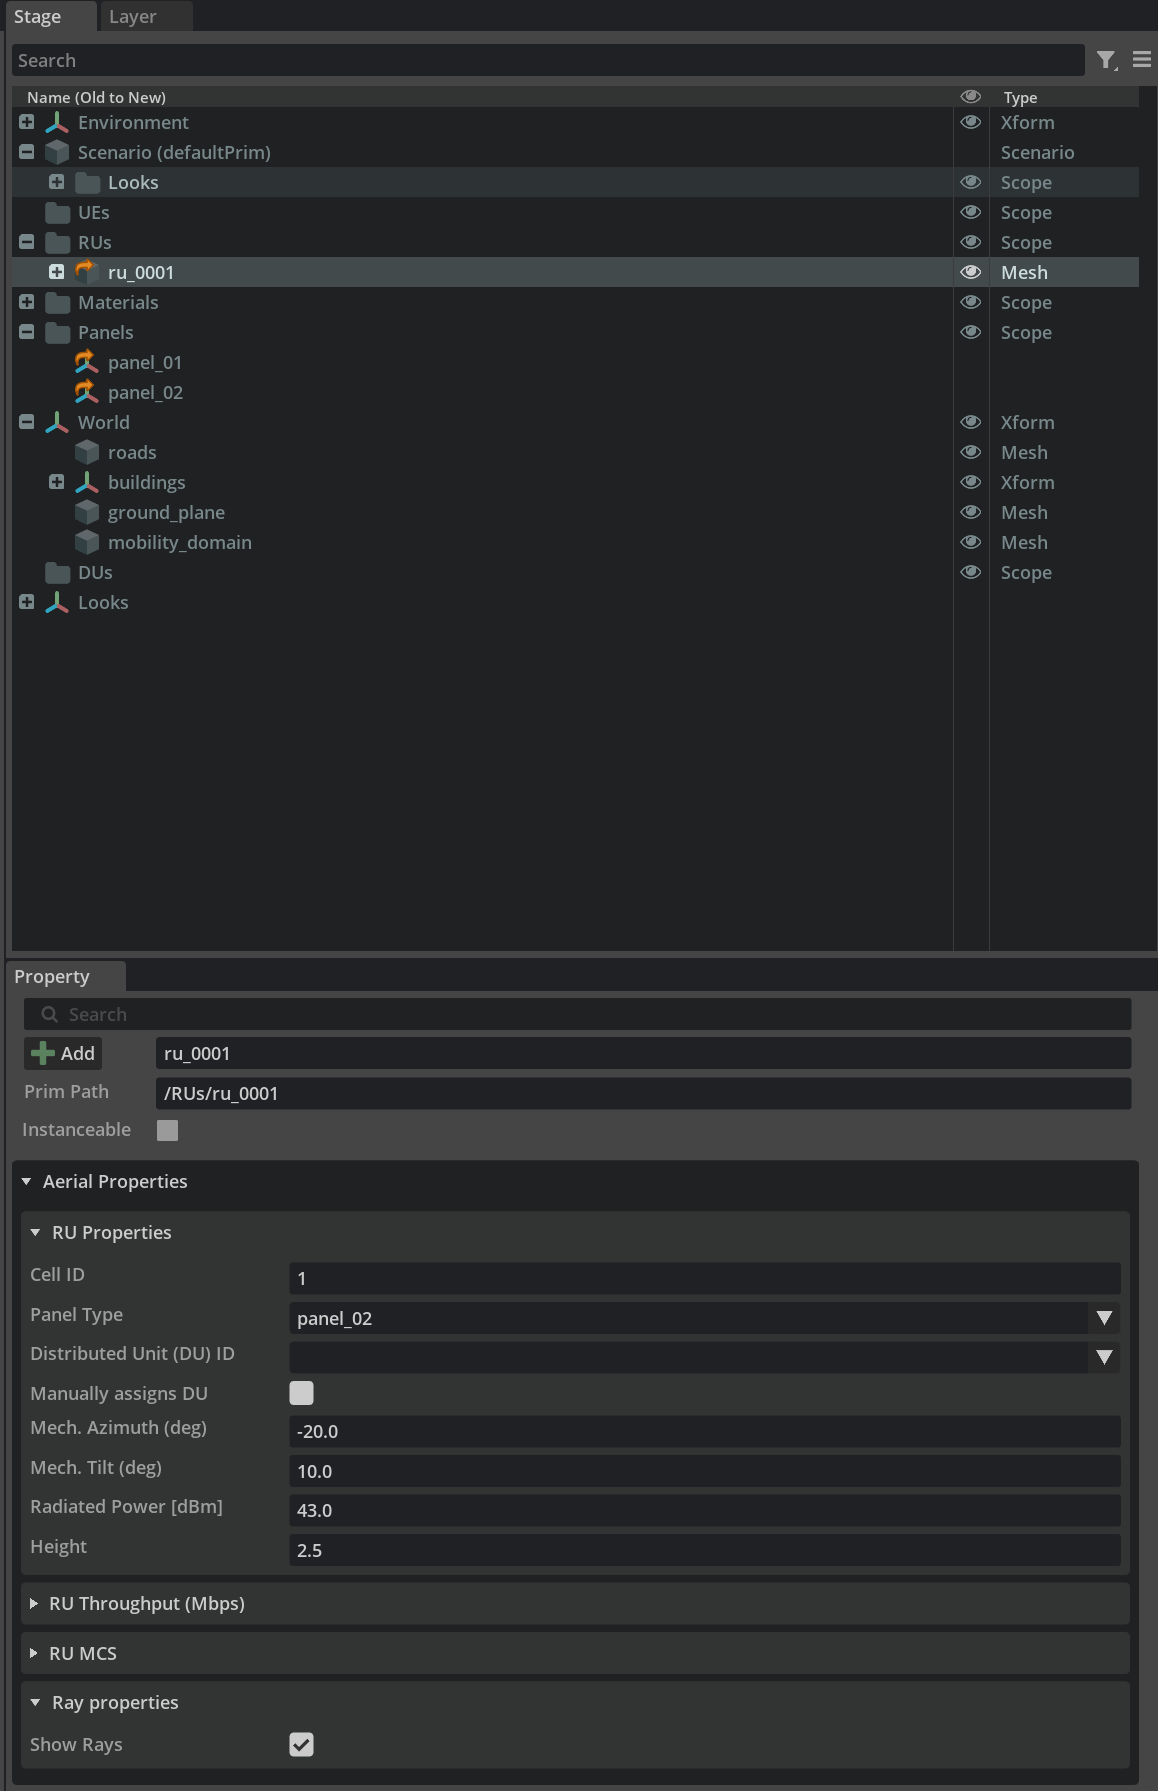
With the RU deployed, you can select it from the Stage widget and enable the Show Raypaths checkbox in the Property widget.
Similarly, perform the following steps:
Right-click on the Viewport.
Select Aerial > Deploy UE from the context menu.
This will drop the UE in the location where the right-click took place.
Finally, you perform the following steps:
Select the /Scenario scope in the Stage widget.
Set the following values:
Duration to 10.0
Interval to 0.1
 Click the Generate UEs icon in the toolbar.
 Click the Start UE Mobility icon.
This will initiate a simulation and update the graphical interface, as shown in the figure below.
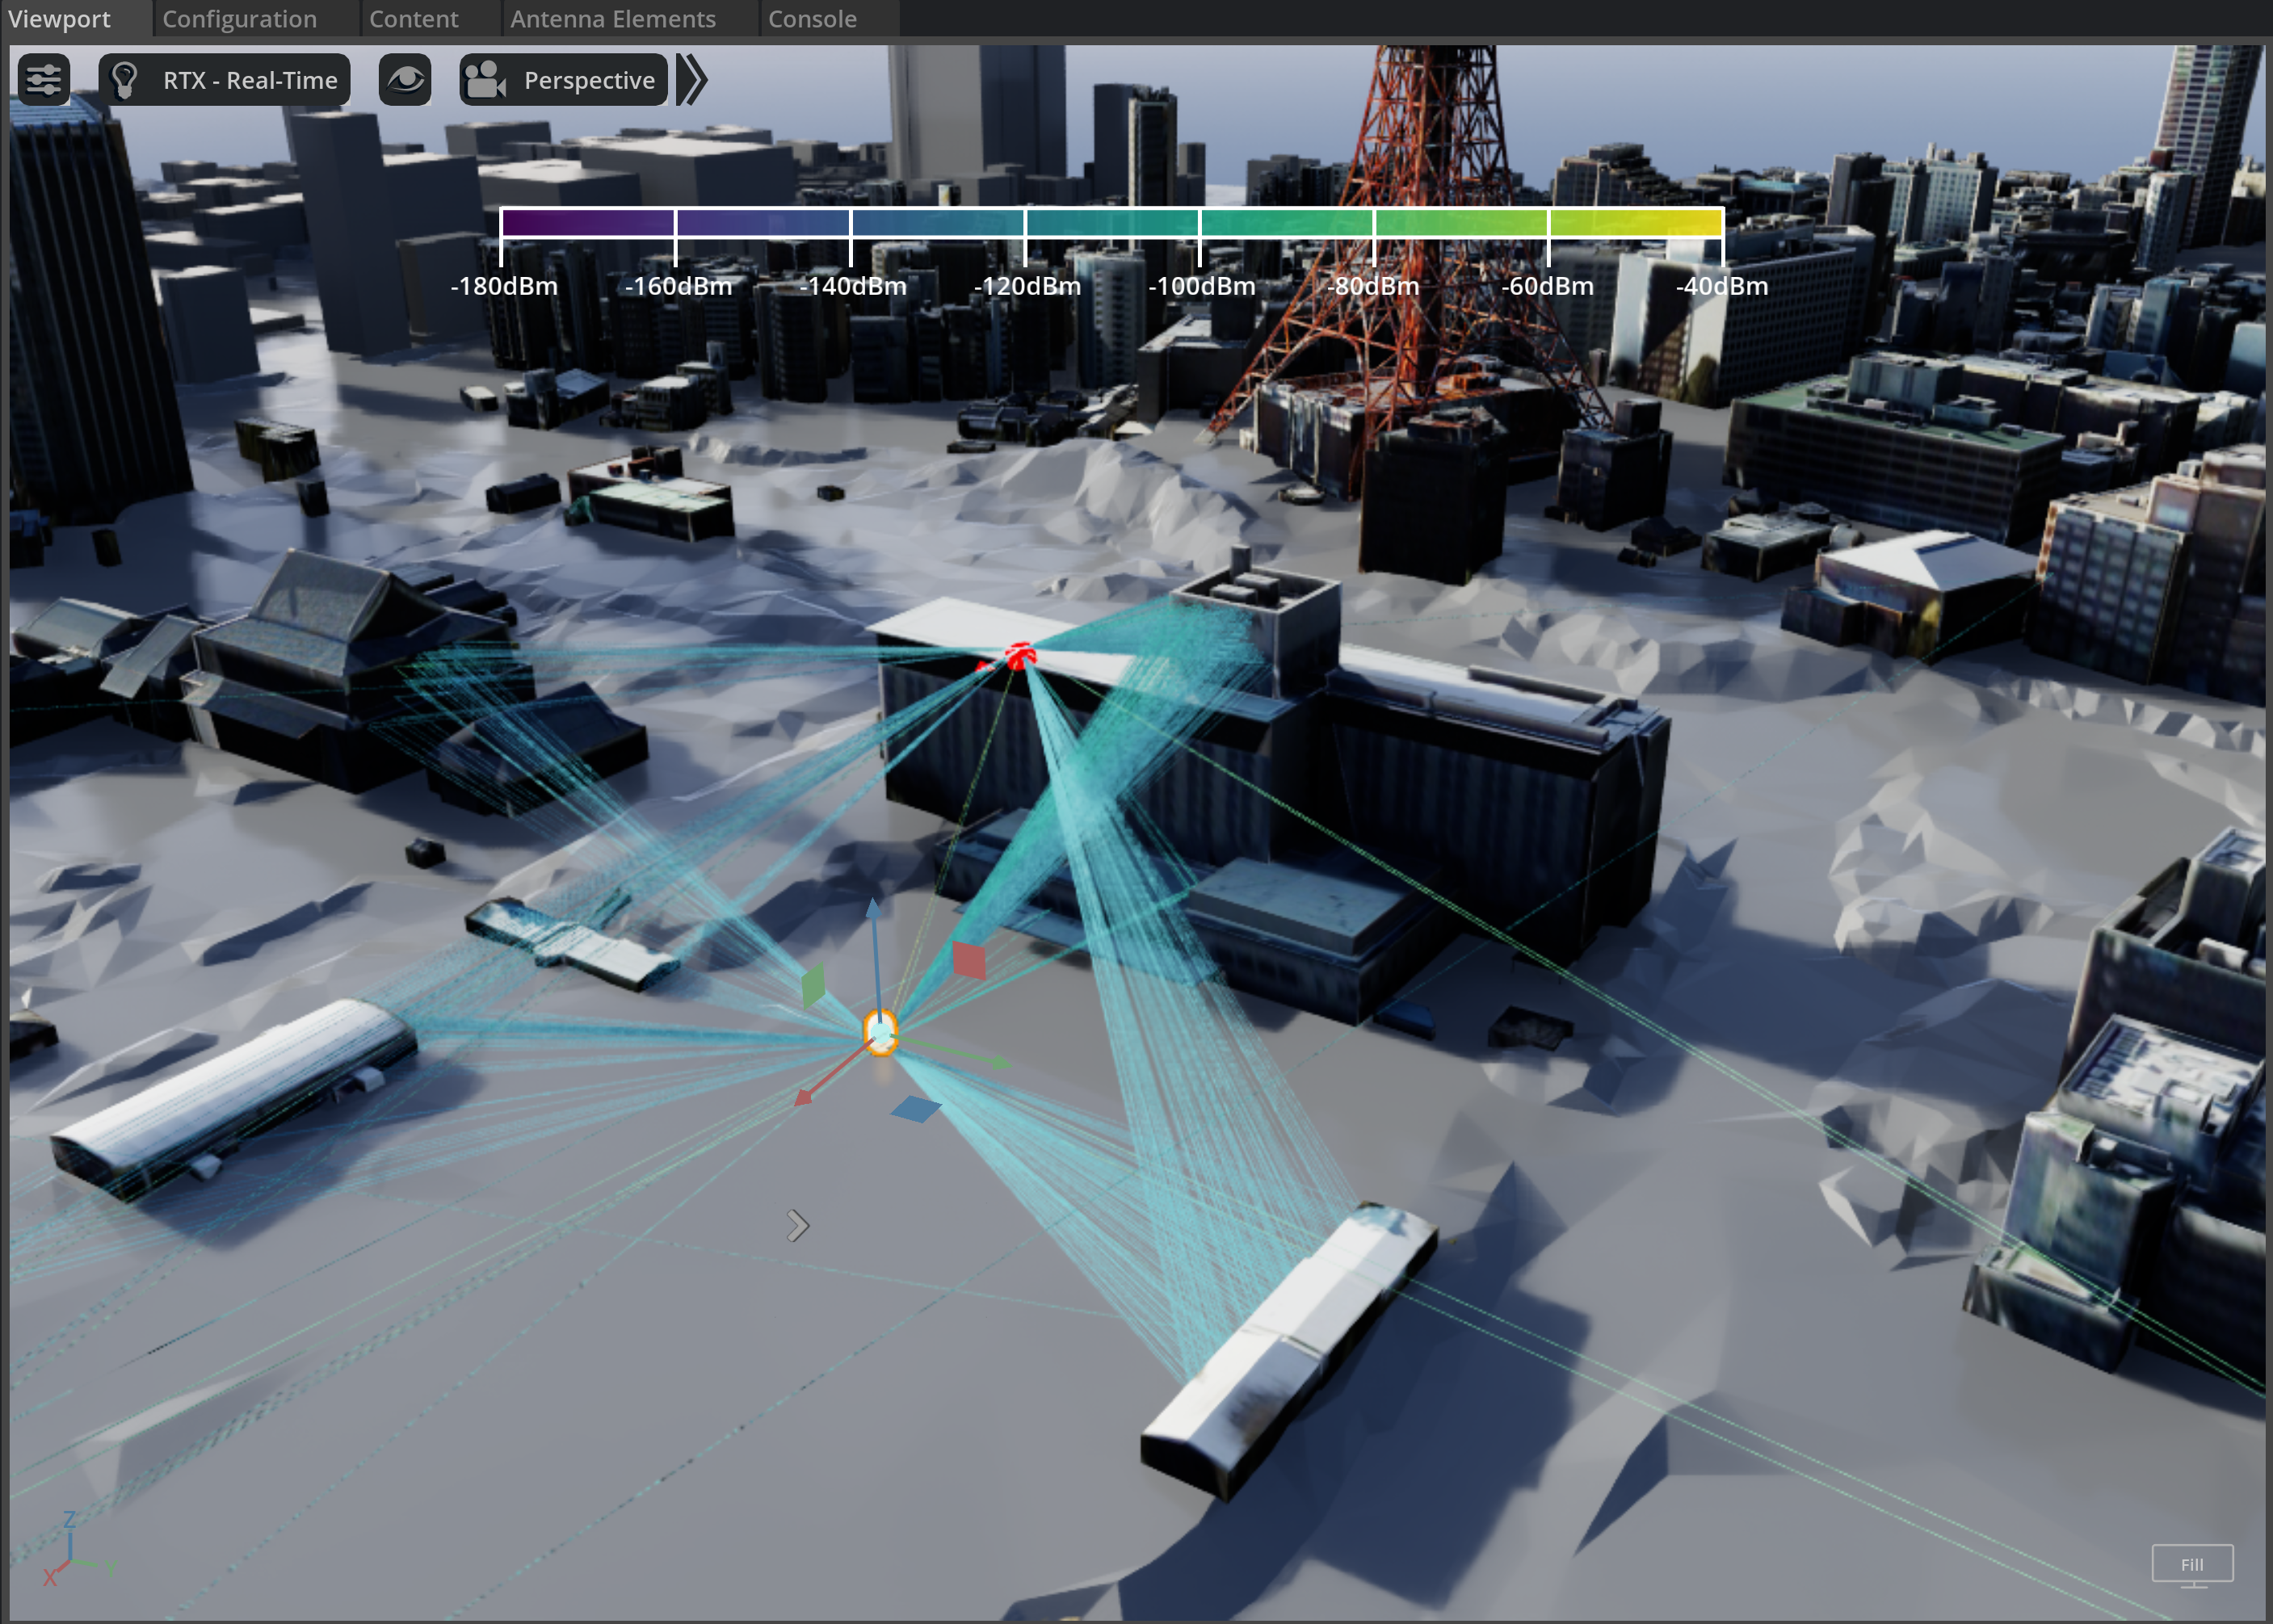
By clicking the Play button in the toolbar, you can inspect the evolution of UE mobility and the corresponding rays that illustrate how the radiation emitted by the RU reaches the UE.
Storage for Clickhouse database#
The default installation setup Clickhouse to persist its data using Docker volumes. This means that the data is stored on the disk of the backend server. The installation includes template configurations that allow for data to be stored in S3 buckets.
Note: When installing AODT on AWS using the provided provisioning scripts, the Clickhouse data will be stored in a S3 bucket given by the environment variables specified in the .aws.env
# S3 Configuration for ClickHouse
# The S3 bucket where ClickHouse will store/access data
# Example: my-clickhouse-data-bucket
S3_BUCKET_NAME=
# Optional: S3 bucket region (defaults to AWS_DEFAULT_REGION if not specified)
# S3_BUCKET_REGION=us-east-1
# Optional: Prefix/path within the bucket (e.g., "clickhouse/" or "data/clickhouse/")
# S3_BUCKET_PREFIX=clickhouse/
Which means there is no need to follow the remaining instructions in this section!
Clickhouse persistent data on AWS S3#
Prerequisite#
Before configuring the AODT Clickhouse to use persistent storage on AWS S3 bucket, prepare the following:
Create a AWS S3 bucket
Make sure the bucket permission allow: [“s3:GetObject”, “s3:ListBucket”, “s3:PutObject”, “s3:DeleteObject”]
Create an object in the bucket that will store the Clickhouse data
Find the URL to the bucket
Find the AWS_ACCESS_KEY_ID and AWS_SECRET_ACCESS_KEY that allow access to the bucket
Update the clickhouse configuration#
Open a Linux terminal on the backend server and change directory to the backend folder of the AODT installation
Open the clickhouse_aerial_config_aws.xml file an an editor.
Find the AWS bucket configuration section in the xm file, and replace YOUR_BUCKET, YOUR_REGION and YOUR_PREFIX in the endpoint
            <!-- AWS S3 Disk -->
            <aws_s3>
                <type>s3</type>

                <!-- ✅ User-specified -->
                <!-- Replace {YOUR_BUCKET}, {YOUR_REGION}, and optional {YOUR_PREFIX} -->
                <!-- Example: https://aerial-aodt.s3.us-west-2.amazonaws.com/clickhouse/ -->
                <endpoint>https://{YOUR_BUCKET}.s3.{YOUR_REGION}.amazonaws.com/{YOUR_PREFIX}/</endpoint>

                <use_environment_credentials>true</use_environment_credentials>

                <!-- Local metadata path (small, required) -->
                <metadata_path>/var/lib/clickhouse/disks/s3_disk/</metadata_path>
            </aws_s3>
Open the docker-compose.yaml file in an editor.
Find the clickhouse configuration in the docker-compose.yaml file, and make sure clickhouse_aerial_config_aws.xml configuration is mounted into the container
  clickhouse:
    image: clickhouse/clickhouse-server:24.7.4.51-alpine
    volumes:
      - clickhouse:/var/lib/clickhouse
      - ./clickhouse_aerial_config_aws.xml:/etc/clickhouse-server/config.d/clickhouse_aerial_config.xml
      - /var/log/clickhouse-server:/var/log/clickhouse-server
    ports:
      - 9000:9000
    environment:
      - AWS_ACCESS_KEY_ID
      - AWS_SECRET_ACCESS_KEY
Export the environment variables for AWS credentials in the terminal
export AWS_ACCESS_KEY_ID=<Your access key>
export AWS_SECRET_ACCESS_KEY=<Your secret>
Restart the backend containers
:~/aodt_1.4.0/backend$ docker compose down -v
:~/aodt_1.4.0/backend$ docker compose up -d
Note: the -v option to docker compose down, will delete all the data in the clickhouse. Create a backup before restarting, if needed
Clickhouse persistent data on MinIO S3#
The installation include a MinIO server that can be used as an example for an on-prem S3 installation. The MinIO server persist the S3 bucket using Docker volumes, just like the default Clickhouse installation, meaning that the data is stored on the disk of the backend server.
Update the clickhouse configuration#
Open a Linux terminal on the backend server and change directory to the backend folder of the AODT installation
Open the docker-compose.yaml file in an editor.
Find the clickhouse configuration in the docker-compose.yaml file, and make sure clickhouse_aerial_config_mio.xml configuration is mounted into the container
  clickhouse:
    image: clickhouse/clickhouse-server:24.7.4.51-alpine
    volumes:
      - clickhouse:/var/lib/clickhouse
      - ./clickhouse_aerial_config_mio.xml:/etc/clickhouse-server/config.d/clickhouse_aerial_config.xml
      - /var/log/clickhouse-server:/var/log/clickhouse-server
Restart the backend containers
:~/aodt_1.4.0/backend$ docker compose down -v
:~/aodt_1.4.0/backend$ docker compose up -d
Note: the -v option to docker compose down, will delete all the data in the clickhouse. Create a backup before restarting, if needed
Open a browser and connect to port :19001 on the backend server
Login to the MinIO object store using the default credentials: minioadmin:aerial_123456
In the MinIO Object Browser, click “Create a Bucket” and name it: aerial-aodt
In the bucket click “Create new path” button. Fill in the New Folder Path: clickhouse
The default credentials can be changed in the backend/docker-compose.yaml file
Troubleshooting Clickhouse persistent storage on S3#
Check the logs from the clickhouse container
:~/aodt_1.4.0/backend$ docker compose logs -f clickhouse
Check logs from the clickhouse server
sudo tail -F /var/log/clickhouse-server/clickhouse-server.*
Detailed Explanation#
The installation process, as described above, is intended to be automatic and to abstract away as much of the underlying provisioning as possible. However, there are times when these extra details are helpful. The following section provides detailed information on some of the most common sources of problems.
Azure - Subscriptions#
This installation assumes that the user has a single subscription. If there are multiple subscriptions, the subscription can be changed from the Azure CLI Docker container by issuing the following command before provisioning.
az account set --subscription "xxxxxxxx-xxxx-xxxx-xxxx-xxxxxxxxxxxx"
AWS and Azure - Connectivity#
The provisioning scripts for AWS and Azure configure the VMs so that they can be accessed from the LOCAL_IP address stored in the .aws.env, .azure.env files. The instructions above demonstrate how to find LOCAL_IP by using the curl command-line tool to query a public endpoint. However, such an IP address might change. In this case, the network security rules will not allow connectivity. If this becomes a problem, you can do the following:
Update the network security rules in the Cloud provider to include the exact IP address each time it changes. This can be done using the Cloud provider configuration portal, for example.
Change the network security rules to be less restrictive: For example, if the subnet of IPs from which
LOCAL_IPcan be assigned is known.
Docker Compose#
The backend VM utilizes Docker Compose to control all the various applications. This includes the aodt-sim container, the aodt-gis container, the ClickHouse database, the Jupyter Notebook, the NATS server, and the Nucleus server. Docker and Docker Compose can be used to troubleshoot these services (e.g. by restarting containers or modifying configurations).
Install Scripts#
The installation process has been split up into two steps. The first step, corresponding to make_install.sh, probes the system and creates an installation script. The second step uses the generated install.sh script to install the software.
If needed, users can inspect the generated installation scripts before running them, in case some of the modules require customization. The make_install.sh script can be used to generate installation scripts for three different scenarios:
./make_install.sh: Generatesinstall.shfor both backend and frontend components (default)../make_install.sh frontend: Generatesinstall.shfor frontend components only../make_install.sh backend: Generatesinstall.shfor backend components only.