Part 5. Set up Aerial with OAI gNB and CN5G (Optional)
This section is required only if you skipped the steps in Part 3 – Install ARC-OTA Using SDK Manager.
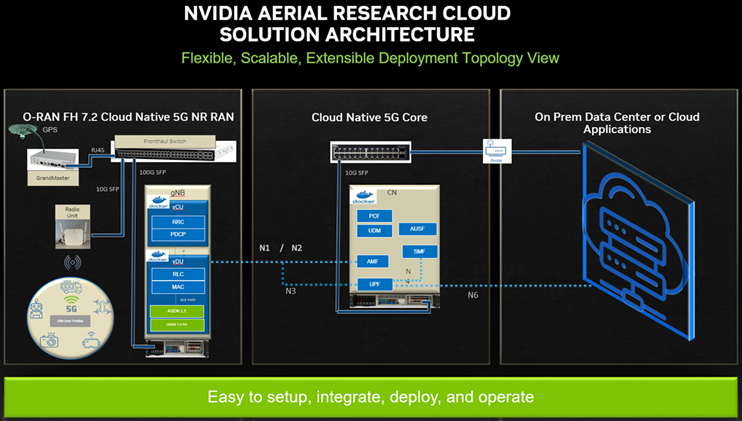
This section describes how to set up the Aerial private 5G network, which consists of the following:
Aerial SDK L1
Remaining components of OAI gNB
OAI Core Network
User Equipment (UE)
Edge Server Applications (for example, iPerf)
| Component | Version |
| Aerial SDK (ASDK) PHY | 23-2 |
| OAI gNB | OAI_Aerial_v2.2.1 |
| OAI CN | OAI_Aerial_v2.2.1 |
In the installation guide for cuBB, in the ARC-OTA software release manifest, find the Aerial SDK L1, and follow the instructions. Installing ARC-OTA using SDK Manager.
You can also refer to the following tutorial videos for installation steps:
            export GPU_FLAG="--gpus all"
export cuBB_SDK=/opt/nvidia/cuBB
#Name of your docker container
export AERIAL_CUBB_CONTAINER=cuBB_$USER
#Docker image downloaded from NGC
export AERIAL_CUBB_IMAGE=nvcr.io/ea-aerial-sdk/aerial:23-2-cubb

sudo usermod -aG docker $USER

docker run --detach --privileged \
   -it $GPU_FLAG --name $AERIAL_CUBB_CONTAINER \
   --hostname c_aerial_$USER \
   --add-host c_aerial_$USER:127.0.0.1 \
   --network host \
   --shm-size=4096m \
   -e cuBB_SDK=$cuBB_SDK \
   -w $cuBB_SDK \
   -v $(echo ~):$(echo ~) \
   -v /dev/hugepages:/dev/hugepages \
   -v /usr/src:/usr/src \
   -v /lib/modules:/lib/modules \
   -v ~/share:/opt/cuBB/share \
   --userns=host \
   --ipc=host \
   -v /var/log/aerial:/var/log/aerial \
   $AERIAL_CUBB_IMAGE

docker exec -it $AERIAL_CUBB_CONTAINER bash
For installation instructions, see the Aerial cuBB Installation Guide, in the link above.
Since the cuBB 22.2.2 release, the test vectors are not included in the SDK. You need to generate the TV files before running cuPHY examples or cuBB end-to-end tests.
Using Aerial Python mcore Module
There is no Matlab license required to generate TV files using the Aerial Python mcore module. The cuBB Container already has aerial_mcore installed. To generate the TV files, run the following commands inside the Aerial container:
The TV generation can take a few hours on the devkit with the current isocpus parameter setting in the kernel command line. Make sure that the host has sufficient space to contain 111GB of TV files.
            cd ${cuBB_SDK}/5GModel/aerial_mcore/examples
source ../scripts/setup.sh
export REGRESSION_MODE=1
time python3 ./example_5GModel_regression.py allChannels
echo $?
ls -alF GPU_test_input/
du -h GPU_test_input/
Example output is shown below. The “real” time takes less than one hour on a 24 cores x86 host. The “echo $?” shows the exit code of the process, which should be 0. A non-zero exit code indicates a failure.
            Channel  Compliance_Test  Error   Test_Vector  Error  Performance_Test   Fail
------------------------------------------------------------------------------
SSB           37            0         42          0           0            0
PDCCH         71            0         80          0           0            0
PDSCH        274            0        286          0           0            0
CSIRS         86            0         87          0           0            0
DLMIX          0            0        1049          0           0            0
PRACH         60            0         60          0          48            0
PUCCH        469            0        469          0          96            0
PUSCH        388            0        398          0          41            0
SRS          125            0        125          0           0            0
ULMIX          0            0        576          0           0            0
BFW           58            0         58          0           0            0
------------------------------------------------------------------------------
Total       1568            0       3230          0         185            0

Total time for runRegression is 2147 seconds
Parallel pool using the 'local' profile is shutting down.

real    36m51.931s
user    585m1.704s
sys     10m28.322s
To generate the launch pattern for each test case using cubb_scripts:
            cd $cuBB_SDK
cd cubb_scripts
python3 auto_lp.py -i ../5GModel/aerial_mcore/examples/GPU_test_input -t launch_pattern_nrSim.yaml
Then copy the launch pattern and TV files to testVectors repo.
            cd $cuBB_SDK
cp ./5GModel/aerial_mcore/examples/GPU_test_input/TVnr_* ./testVectors/.
cp ./5GModel/aerial_mcore/examples/GPU_test_input/launch_pattern* ./testVectors/multi-cell/.
Using Matlab
To generate TV files using Matlab, run the following command in Matlab:
cd('nr_matlab'); startup; [nTC, errCnt] = runRegression({'TestVector'}, {'allChannels'}, 'compact', [0, 1] );
All the cuPHY TVs are generated and stored under nr_matlab/GPU_test_input.
Generate the launch pattern for each test case using cubb_scripts:
            cd $cuBB_SDK
cd cubb_scripts
python3 auto_lp.py -i ../5GModel/nr_matlab/GPU_test_input -t launch_pattern_nrSim.yaml
Copy the launch pattern and TV files to testVectors repo.
            cd $cuBB_SDK
cp ./5GModel/nr_matlab/GPU_test_input/TVnr_* ./testVectors/.
cp ./5GModel/nr_matlab/GPU_test_input/launch_pattern* ./testVectors/multi-cell/.
Clone the gNB Source Code
Clone the OpenAirInterface5G repository. Access to the private branch is required. For access contact NVIDIA.
            git clone --branch OAI_Aerial_v2.2.1 https://gitlab.eurecom.fr/rssilva/openairinterface5g.git ~/openairinterface5g

cd openairinterface5g
gNB Configuration File
Update the configuration of OAI L2. The configuration is located here ~/openairinterface5g/targets/PROJECTS/GENERIC-NR-5GC/CONF/vnf.sa.band78.fr1.273PRB.Aerial.conf
NVIDIA tested configuration files are available NGC https://registry.ngc.nvidia.com/orgs/ea-aerial-sdk/teams/aerial/resources/arc-full-stack
Build gNB Docker Image
When building a Docker image, the files are copied from the filesystem into the image. Changes in the configuration after you build the image must also be done inside the container.
            export OAI_GNB_IMAGE=i_oai_aerial:latest
docker build --tag $OAI_GNB_IMAGE . -f docker/Dockerfile.aerial.ubuntu20
Do the iptables setup, below, after every a system reboot. Or make this permanent in your Ubuntu system configuration.
            On CN5G server, configure it to allow the traffic coming in by
adding this rule to iptables:

# On CN5G, upon startup:

sudo sysctl net.ipv4.conf.all.forwarding=1
sudo iptables -P FORWARD ACCEPT
Install the core network by following the Gitlab steps for setting up OAI CN5G.
To run the correct configuration for Aerial RAN CoLab Over-the-Air replace section 2.2 and 2.3 OAI CN5G configuration files with the following:
            # Get openairinterface5g source code
git clone --branch OAI_Aerial_v2.2.1 https://gitlab.eurecom.fr/rssilva/openairinterface5g.git ~/openairinterface5g
cd ~/openairinterface5g
cp -rT ~/openairinterface5g/doc/tutorial_resources/oai-cn5g ~/oai-cn5g
The user configurable configuration files are:
~/oai-cn5g/database/oai_db.sql
For the purpose of understanding which address is what in the example configuration setting and commands below, we will assume the gNB and CN5G servers have these interface names and IP addresses.
CN5G Server
            eno1: 10.31.66.x            = SSH management port for terminal
eno2: 169.254.200.6         = BH connection on SFP switch for gNB-CN5G traffic
gNB Server
            eno1:     10.31.66.x        = SSH management port for terminal
ens6f0:   b8:ce:f6:4e:75:40 = FH MAC address
ens6f0.2: 169.254.1.105     = FH IP address
ens6f1:   169.254.200.5     = BH connection SFP switch for gNB-CN5G traffic
gNB to set static route
On the gNB server, add this static route for a path to the CN5G server. Apply this route after each server power-on.
            Syntax:
sudo ip route add 192.168.70.128/26 via <CN5G IP> dev <gNB interface for CN5G>

Example:
sudo ip route add 192.168.70.128/26 via 169.254.200.6 dev ens6f1
gNB to set the CN5G server to uses for AMF
Edit gNB configuration file: targets/PROJECTS/GENERIC-NR-5GC/CONF/vnf.sa.band78.fr1.273PRB.Aerial.conf
Below is an example with lab-specific network parameters. Your IP address and interface names may differ.
            GNB_INTERFACE_NAME_FOR_NG_AMF = "ens6f1";       # gNB side interface name of the SFP port toward CN (was eno1)
GNB_IPV4_ADDRESS_FOR_NG_AMF = "169.254.200.5";  # gNB side IP address of interface above (was 172.21.16.130)
GNB_INTERFACE_NAME_FOR_NGU = "ens6f1";          # gNB side interface name of the SFP port toward CN (was eno1)
GNB_IPV4_ADDRESS_FOR_NGU = "169.254.200.5";     # Same IP as GNB_IPV4_ADDRESS_FOR_NG_AMF above (was 172.21.16.130)
To start CN5G
docker-compose up -d
To Stop CN5G
docker-compose down
To monitor CN5G logs while running
docker logs oai-amf -f
To capture PCAPs
            docker exec -it oai-amf /bin/bash
apt update && apt install tcpdump -y
tcpdump -i any -w /tmp/amf.pcap
Then copy the pcap out from the container.
docker cp oai-amf:/tmp/amf.pcap .
            aerial@aerial-rf-r630:~/oai-cn5g$ docker compose up -d
[+] Building 0.0s (0/0)
[+] Running 11/11
✔ Network demo-oai-public-net  Created                                                                     0.1s
✔ Container oai-nrf            Started                                                                     0.7s
✔ Container mysql              Started                                                                     0.7s
✔ Container asterisk-ims       Started                                                                     0.7s
✔ Container oai-udr            Started                                                                     0.9s
✔ Container oai-udm            Started                                                                     1.2s
✔ Container oai-ausf           Started                                                                     1.5s
✔ Container oai-amf            Started                                                                     1.7s
✔ Container oai-smf            Started                                                                     2.0s
✔ Container oai-spgwu-tiny     Started                                                                     2.3s
✔ Container oai-ext-dn         Started                                                                     2.6s
            aerial@aerial-rf-r630:~/oai-cn5g$ docker ps
CONTAINER ID   IMAGE                                       COMMAND                  CREATED              STATUS                        PORTS                          NAMES
d5af4f51c393   oaisoftwarealliance/trf-gen-cn5g:latest     "/bin/bash -c ' ip r…"   About a minute ago   Up About a minute (healthy)                                  oai-ext-dn
a9b2d18c7f77   oaisoftwarealliance/oai-spgwu-tiny:v1.5.1   "python3 /openair-sp…"   About a minute ago   Up About a minute (healthy)   2152/udp, 8805/udp             oai-spgwu-tiny
b61c383f9e60   oaisoftwarealliance/oai-smf:v1.5.1          "python3 /openair-sm…"   About a minute ago   Up About a minute (healthy)   80/tcp, 8080/tcp, 8805/udp     oai-smf
3681b1048c53   oaisoftwarealliance/oai-amf:v1.5.1          "python3 /openair-am…"   About a minute ago   Up About a minute (healthy)   80/tcp, 9090/tcp, 38412/sctp   oai-amf
c602f7cb1c67   oaisoftwarealliance/oai-ausf:v1.5.1         "python3 /openair-au…"   About a minute ago   Up About a minute (healthy)   80/tcp                         oai-ausf
752acae83ac0   oaisoftwarealliance/oai-udm:v1.5.1          "python3 /openair-ud…"   About a minute ago   Up About a minute (healthy)   80/tcp                         oai-udm
4bf281d08229   oaisoftwarealliance/oai-udr:v1.5.1          "python3 /openair-ud…"   About a minute ago   Up About a minute (healthy)   80/tcp                         oai-udr
33aa959be775   mysql:8.0                                   "docker-entrypoint.s…"   About a minute ago   Up About a minute (healthy)   3306/tcp, 33060/tcp            mysql
5d22e4745d00   asterisk-ims:latest                         "asterisk -fp"           About a minute ago   Up About a minute (healthy)                                  asterisk-ims
1a93b3ffe305   oaisoftwarealliance/oai-nrf:v1.5.1          "python3 /openair-nr…"   About a minute ago   Up About a minute (healthy)   80/tcp, 9090/tcp               oai-nrf