Setting Up NVIDIA vGPU Devices#
To enhance the AI capabilities of your virtual machine (VMs) on a RHEL host, you can create multiple vGPU profiles from a physical GPU, and assign these devices to multiple guests. This is supported on select NVIDIA GPUs with RHEL KVM Virtualization, and only one mediated device can be assigned to a single guest.
Note
NVIDIA AI Enterprise supports up to a maximum of 16 vGPUs per VM on Red Hat Enterprise Linux with KVM
Note
Red Hat Enterprise Linux guest OS support is limited to running containers by using Docker without Kubernetes. NVIDIA AI Enterprise features that depend on Kubernetes, for example, the use of GPU Operator, are not supported on Red Hat Enterprise Linux.
Managing NVIDIA vGPU Devices#
NVIDIA vGPU technology makes it possible to divide a physical NVIDIA GPU device into multiple virtual devices. These mediated devices can then be assigned to multiple VMs as virtual GPUs. As a result, these VMs can share the performance of a single physical GPU.
Important
Assigning a physical GPU to VMs, with or without using vGPU devices, makes it impossible for the host to use the GPU.
Setting Up NVIDIA vGPU Devices#
To setup the NVIDIA vGPU feature, please download NVIDIA vGPU drivers for your GPU device, create mediated devices, and assign them to the intended virtual machines. For detailed instructions, see below.
Note
Please refer here for a list of supported GPUs for utilizing NVIDIA vGPU with RHEL KVM.
If you do not know which GPU your host is using, install the lshw package and use the lshw -C display command. The following example shows the system is using an NVIDIA A100 GPU, compatible with vGPU.
# lshw -C display

Now that we have verified the presence of an NVIDIA GPU on the host, we will install the NVIDIA AI Enterprise Guest driver within the VM to fully enable GPU operation.
NVIDIA Driver#
The NVIDIA driver is the software driver that is installed on the OS and is responsible for communicating with the NVIDIA GPU.
NVIDIA AI Enterprise drivers are available by either downloading them from the NVIDIA Enterprise Licensing Portal, the NVIDIA Download Drivers web page, or pulling them from NGC Catalog. Please review the NVIDIA AI Enterprise Quick Start Guide for more details regarding licensing entitlement certificates.
Installing the NVIDIA Driver using CLS#
This section will cover the steps required to properly install, configure, and license the NVIDIA driver for CLS users.
Now that you have installed Linux, the NVIDIA AI Enterprise Driver will fully enable GPU operation. Before proceeding with the NVIDIA Driver installation, please confirm that Nouveau is disabled. Instructions to confirm this are located in the RHEL section.
Downloading the NVIDIA AI Enterprise Software Driver Using NGC#
Important
Before you begin you will need to generate or use an existing API key.
From a browser, go to https://ngc.nvidia.com/signin/email and then enter your email and password.
In the top right corner, click your user account icon and select Setup.
Click Get API Key to open the Setup > API Key page.
Note
The API Key is the mechanism used to authenticate your access to the NGC container registry.
Click Generate API Key to generate your API key.
Note
A warning message appears to let you know that your old API key will become invalid if you create a new key.
Click Confirm to generate the key.
Your API key appears.
Important
You only need to generate an API Key once. NGC does not save your key, so store it in a secure place. (You can copy your API Key to the clipboard by clicking the copy icon to the right of the API key.)Should you lose your API Key, you can generate a new one from the NGC website. When you generate a new API Key, the old one is invalidated.
Run the following commands to install the NGC CLI for AMD64
AMD64 Linux Install: The NGC CLI binary for Linux is supported on Ubuntu 16.04 and later distributions.
Download, unzip, and install from the command line by moving to a directory where you have execute permissions and then running the following command:
wget --content-disposition https://ngc.nvidia.com/downloads/ngccli_linux.zip && unzip ngccli_linux.zip && chmod u+x ngc-cli/ngc
Note
The NGC CLI installations for Windows NGC CLI, Arm64 MacOs, or Intel MacOs can be found here
Check the binary’s MD5 hash to ensure the file wasn’t corrupted during download.
$ md5sum -c ngc.md5
Add your current directory to path.
$ echo "export PATH=\"\$PATH:$(pwd)\"" >> ~/.bash_profile && source ~/.bash_profile
You must configure NGC CLI for your use so that you can run the commands. Enter the following command, including your API key when prompted.
 1$ ngc config set
 2
 3Enter API key [no-apikey]. Choices: [<VALID_APIKEY>, 'no-apikey']:
 4
 5Enter CLI output format type [ascii]. Choices: [ascii, csv, json]: ascii
 6
 7Enter org [no-org]. Choices: ['no-org']:
 8
 9Enter team [no-team]. Choices: ['no-team']:
10
11Enter ace [no-ace]. Choices: ['no-ace']:
12
13Successfully saved NGC configuration to /home/$username/.ngc/config
Download the NVIDIA AI Enterprise Software Driver.
Installing the NVIDIA Driver using the .run file with RHEL#
Important
Before starting the driver install Secure Boot will need to be disabled as shown in Installing Red Hat Enterprise Linux 8.4 section.
Register machine to RHEL using subscription-manager with the command below.
subscription-manager registerSatisfy the external dependency for EPEL for DKMS.
dnf install https://dl.fedoraproject.org/pub/epel/epel-release-latest-8.noarch.rpm
dnf install dkms
Note
Please refer to The Getting Started with EPEL documentation for more information.
For RHEL 8, ensure that the system has the correct Linux kernel sources from the Red Hat repositories.
dnf install -y kernel-devel-$(uname -r) kernel-headers-$(uname -r)
Note
The NVIDIA driver requires that the kernel headers and development packages for the running version of the kernel be installed at the time of the driver installation, as well whenever the driver is rebuilt. For example, if your system is running kernel version 4.4.0, the 4.4.0 kernel headers and development packages must also be installed.
Install additional dependencies for NVIDIA drivers.
1dnf install elfutils-libelf-devel.x86_64
2dnf install -y tar bzip2 make automake gcc gcc-c++ pciutils libglvnd-devel
Update the running kernel:
dnf install -y kernel kernel-core kernel-modules
Confirm the system has the correct Linux kernel sources from the Red Hat repositories after update.
dnf install -y kernel-devel-$(uname -r) kernel-headers-$(uname -r)
Download the NVIDIA AI Enterprise Software Driver.
ngc registry resource download-version "nvidia/vgpu/vgpu-guest-driver-x_x:xxx.xx.xx"
Note
Where
x_x:xxx.xx.xxis the current driver version from NGC Catalog.Navigate to the directory containing the NVIDIA Driver .run file. Then, add the Executable permission to the NVIDIA Driver file using the chmod command.
1sudo chmod +x NVIDIA-Linux-x86_64-xxx.xx.xx-grid.run
Note
Where
xxx.xx.xxis the current driver version from NGC Catalog.From the console shell, run the driver installer and accept defaults.
sudo sh ./NVIDIA-Linux-x86_64-xxx.xx.xx-grid.run
Note
Where
xxx.xx.xxis the current driver version from NGC Catalog.Note
Accept any warnings and ignore the CC version check
Reboot the system.
sudo rebootAfter the system has rebooted, confirm that you can see your NVIDIA vGPU device in the output from nvidia-smi.
nvidia-smi
After installing the NVIDIA vGPU compute driver, you can license any NVIDIA AI Enterprise Software licensed products you are using.
Creating NVIDIA vGPU Devices#
Once completed, check that the kernel has loaded the nvidia_vgpu_vfio module and that the nvidia-vgpu-mgr.service service is running.
# lsmod | grep nvidia_vgpu_vfio
1nvidia_vgpu_vfio 45011 0
2nvidia 14333621 10 nvidia_vgpu_vfio
3mdev 20414 2 vfio_mdev,nvidia_vgpu_vfio
4vfio 32695 3 vfio_mdev,nvidia_vgpu_vfio,vfio_iommu_type1
# systemctl status nvidia-vgpu-mgr.service
1nvidia-vgpu-mgr.service - NVIDIA vGPU Manager Daemon
2Loaded: loaded (/usr/lib/systemd/system/nvidia-vgpu-mgr.service; enabled; vendor preset: disabled)
3Active: active (running) since Fri 2018-03-16 10:17:36 CET; 5h 8min ago
4Main PID: 1553 (nvidia-vgpu-mgr)
5[...]
If creating a vGPU based on an NVIDIA Ampere GPU device, ensure that virtual functions are enabled for the physical GPU. For instructions, please refer to Creating an NVIDIA vGPU that supports SR-IOV on Linux with KVM Hypervisor.
Generate a device UUID.
# uuidgen
Example result.
30820a6f-b1a5-4503-91ca-0c10ba58692a
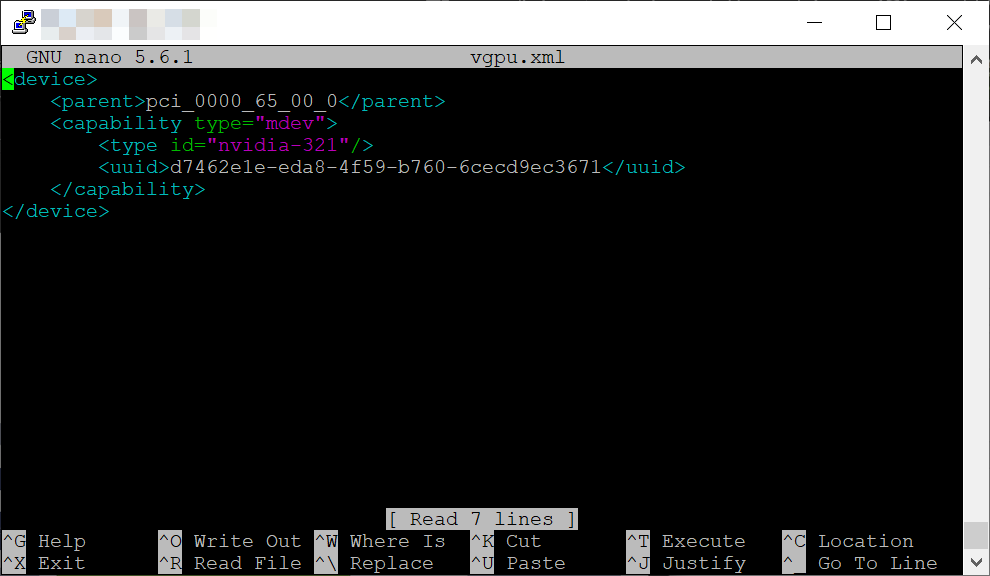
Prepare an XML file with a configuration of the mediated device, based on the detected GPU hardware. For example, the following configures a mediated device of the nvidia-321 vGPU type on an NVIDIA T4 card that runs on the 0000:65:00.0 PCI bus and uses the UUID generated in the previous step.
1<device>
2    <parent>pci_0000_65_00_0</parent>
3    <capability type="mdev">
4        <type id="nvidia-321"/>
5        <uuid>d7462e1e-eda8-4f59-b760-6cecd9ec3671</uuid>
6    </capability>
7</device>

To find your vGPU profile name and description, navigate to mdev_supported_types and list the description and name. An example is shown below using the NVIDIA T4 with profile name nvidia-321 that corresponds to a T4-16C NVIDIA vGPU profile.
cd /sys/bus/pci/devices/0000:65:00.0/mdev_supported_types/nvidia-321

Note
For more information on how to locate the correct profile name for various NVIDIA vGPU profiles, please refer here.
Define a vGPU mediated device based on the XML file you prepared. For example:
# virsh nodedev-define vgpu.xml
Tip
Verify that the mediated device is listed as inactive.
# virsh nodedev-list --cap mdev --inactive
mdev_30820a6f_b1a5_4503_91ca_0c10ba58692a_0000_01_00_0
Start the vGPU mediated device you created.
# virsh nodedev-start mdev_30820a6f_b1a5_4503_91ca_0c10ba58692a_0000_01_00_0
Device mdev_30820a6f_b1a5_4503_91ca_0c10ba58692a_0000_01_00_0 started
Tip
Ensure that the mediated device is listed as active.
# virsh nodedev-list --cap mdev
mdev_30820a6f_b1a5_4503_91ca_0c10ba58692a_0000_01_00_0
Set the vGPU device to start automatically after the host reboots.
# virsh nodedev-autostart mdev_30820a6f_b1a5_4503_91ca_0c10ba58692a_0000_01_00_0
Device mdev_d196754e_d8ed_4f43_bf22_684ed698b08b_0000_9b_00_0 marked as autostarted
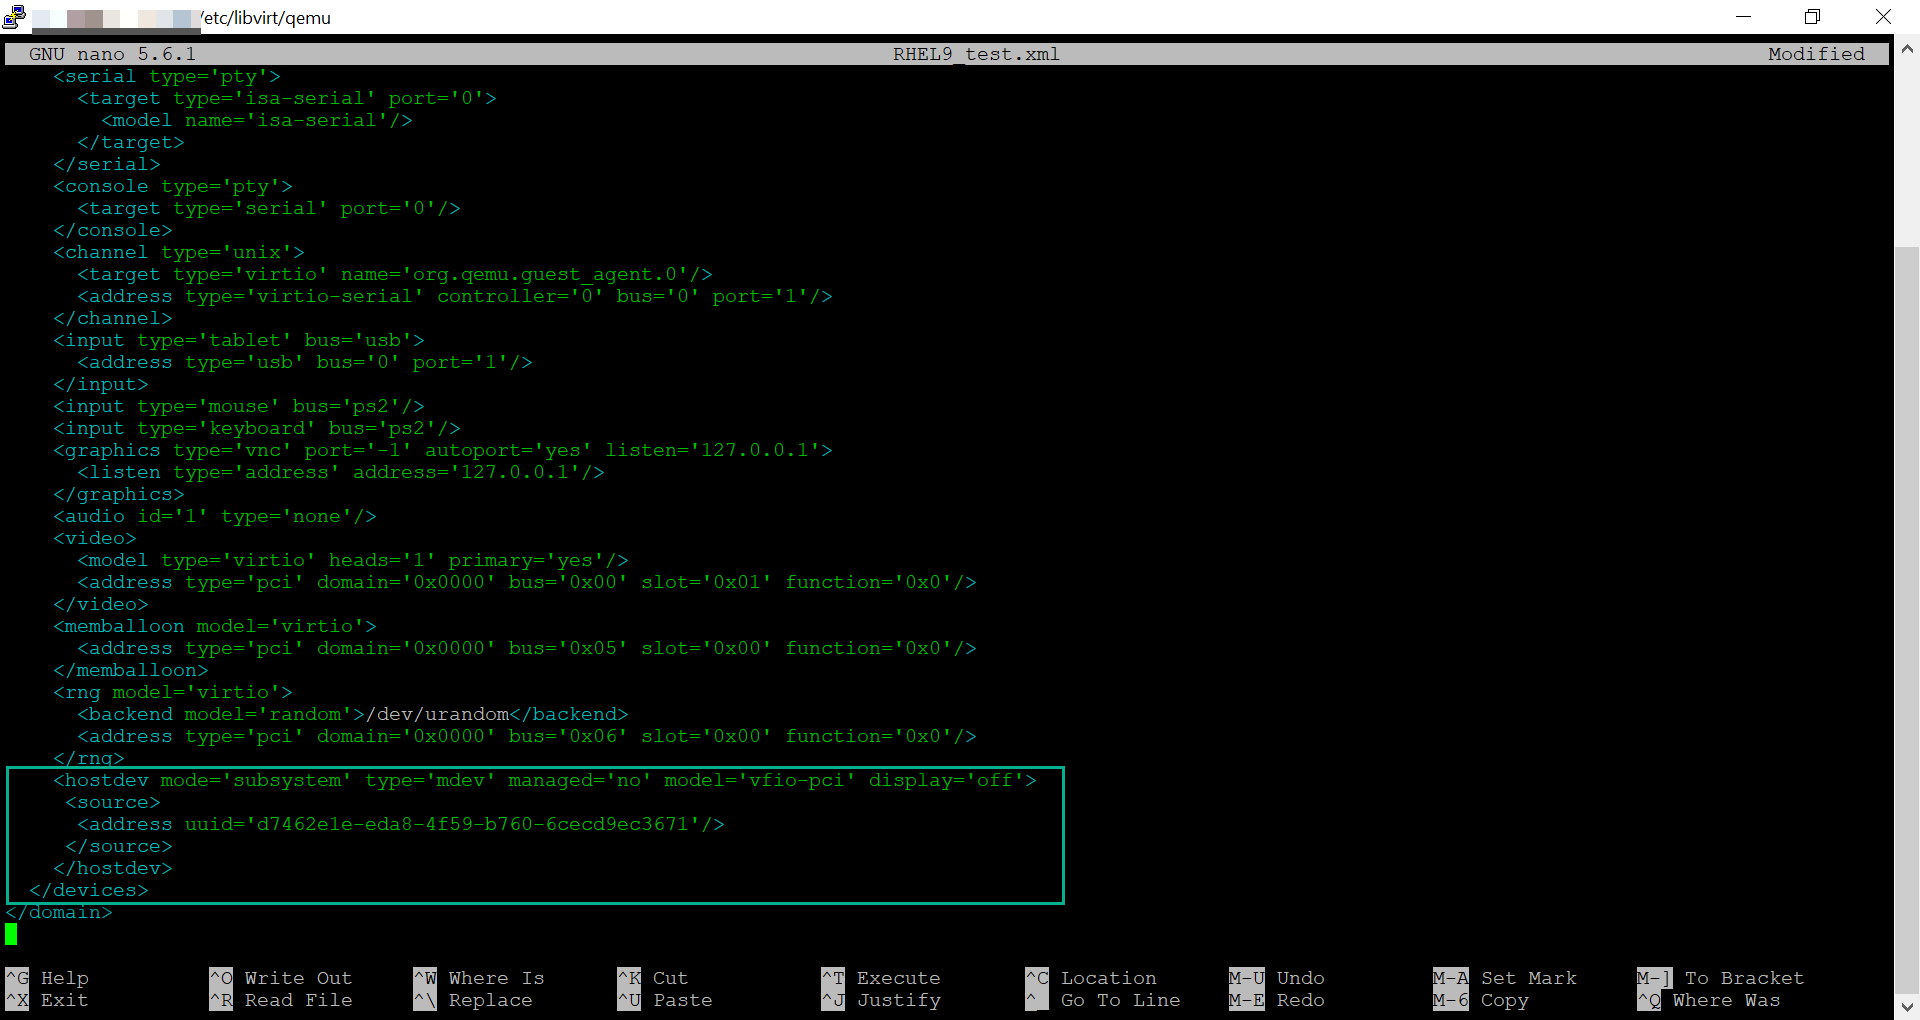
Attach the mediated device to a VM that you want to share the vGPU resources. To do so, add the following lines, along with the previously generated UUID, to the <devices/> sections in the XML configuration of the VM.
First navigate to where the VM’s XML configurations are located at path:
cd /etc/libvirt/qemu/
Then nano into the XML configuration and look for the <devices/> section to add the following to the VM’s XML configuration.
1<hostdev mode='subsystem' type='mdev' managed='no' model='vfio-pci' display='off'>
2    <source>
3        <address uuid='d7462e1e-eda8-4f59-b760-6cecd9ec3671'/>
4    </source>
5</hostdev>

Important
Each UUID can only be assigned to one VM at a time. In addition, if the VM does not have QEMU video devices, such as virtio-vga, add also the ramfb=’on’ parameter on the <hostdev> line.
Now we will verify the capabilities of the vGPU created, and ensure it is listed as active and persistent.
# virsh nodedev-info mdev_30820a6f_b1a5_4503_91ca_0c10ba58692a_0000_01_00_0
1Name:           virsh nodedev-autostart mdev_30820a6f_b1a5_4503_91ca_0c10ba58692a_0000_01_00_0
2Parent:         pci_0000_01_00_0
3Active:         yes
4Persistent:     yes
5Autostart:      yes
Start the VM and verify that the guest operating system detects the mediated device as an NVIDIA GPU. For example:
# lspci -d 10de: -k

After installing the NVIDIA vGPU compute driver, you can license any NVIDIA AI Enterprise Software licensed products you are using.
Note
For additional information on how to manage your NVIDIA vGPU within the KVM hypevisor, please refer to NVIDIA vGPU software documentation in addition to the man virsh command for managing guests with virsh.
Tip
Please refer to the NVIDIA vGPU release notes for instructions on how to change the vGPU scheduling policy for time-sliced vGPUs.
Licensing the VM#
To use an NVIDIA vGPU software licensed product, each client system to which a physical or virtual GPU is assigned must be able to obtain a license from the NVIDIA License System. A client system can be a VM that is configured with NVIDIA vGPU, a VM that is configured for GPU pass through, or a physical host to which a physical GPU is assigned in a bare-metal deployment.