Quick Start Guide#
This Quick Start Guide will help you rapidly deploy and configure NVIDIA AI Enterprise, enabling AI workloads on bare-metal, public cloud, or virtualized environments. Follow these steps to seamlessly set up and optimize your infrastructure for accelerated AI and deep learning tasks.
Refer to the NVIDIA AI Enterprise Deployment Guide for complete instructions on installing and configuring NVIDIA AI Enterprise, using it in an NVIDIA vGPU deployment, or using multiple nodes.
Note
These instructions do not apply to NVIDIA DGX systems. For information about how to use these systems, refer to NVIDIA DGX Systems.
Attention
If you have previously purchased NVIDIA AI Enterprise, have an NVIDIA Enterprise Account, and an NGC account, you can directly go to Installing NVIDIA AI Enterprise Software Components.
Activating the Accounts for Getting NVIDIA AI Enterprise#
After your order for NVIDIA AI Enterprise is processed, you will receive an order confirmation message. This message contains the information you need to get NVIDIA AI Enterprise and technical support from NVIDIA. To get NVIDIA AI Enterprise and technical support from NVIDIA, you must have an NVIDIA Enterprise Account, which provides login access to the following NVIDIA software components:
NVIDIA NGC - provides access to all enterprise software, services, and management tools included in NVIDIA AI Enterprise
NVIDIA Enterprise Support Portal - provides access to to support services for NVIDIA AI Enterprise
NVIDIA Licensing Portal - provides access to your entitlements and options for managing your NVIDIA AI Enterprise license servers. Installing and managing NVIDIA AI Enterprise license servers is a prerequisite for deploying vGPU software.
These components can be accessed from the NVIDIA Application Hub. To activate your account and access NVIDIA AI Enterprise, follow these steps:
Before You Begin#
Before you attempt the procedures in this guide, ensure that the following prerequisites are met:
You have a third-party NVIDIA-certified server platform that supports NVIDIA AI Enterprise.
One or more NVIDIA GPUs that support NVIDIA AI Enterprise are installed in your server platform.
You have a valid NVIDIA software subscription.
If you use a GPU supplied with NVIDIA AI Enterprise software, such as the NVIDIA H100 PCIe GPU, your NVIDIA AI Enterprise license for H100 has been activated.
The NVIDIA AI Enterprise Release Notes provide information about supported hardware and software and any known issues related to this release of NVIDIA AI Enterprise.
Your Order Confirmation Message#
After your order for NVIDIA AI Enterprise is processed, you will receive an order confirmation message with your NVIDIA Entitlement Certificate attached. The certificate contains your product activation keys and provides instructions for using it.
If you are a data center administrator, follow the instructions in the NVIDIA Entitlement Certificate to use the certificate. Otherwise, forward your order confirmation message, including the attached NVIDIA Entitlement Certificate, to a data center administrator in your organization.
NVIDIA Enterprise Account Requirements#
You must have a suitable NVIDIA Enterprise Account to access NVIDIA AI Enterprise and technical support from NVIDIA.
Whether or not you have a suitable NVIDIA Enterprise Account depends on whether you have previously purchased NVIDIA AI Enterprise.
If you have previously purchased NVIDIA AI Enterprise, you already have a suitable NVIDIA Enterprise Account. Download the software assets you require from the NVIDIA AI Enterprise Infra Release 5 collection on NVIDIA NGC to use this account to get NVIDIA AI Enterprise. For details, refer to Accessing the NVIDIA AI Enterprise Software Suite.
If you have obtained an evaluation license but have not previously purchased NVIDIA AI Enterprise, you do not have a suitable NVIDIA Enterprise Account. To create a suitable NVIDIA Enterprise Account, follow the Register link in the instructions for using the certificate to create an account for your purchased licenses. You can create a separate account for your purchased licenses or link your existing account for an evaluation license to the account for your purchased licenses.
To create a separate account for your purchased licenses, follow the instructions in Creating your NVIDIA Enterprise Account, specifying a different email address than the address with which you created your existing account.
To link your existing account for an evaluation license to the account for your purchased licenses, follow the instructions in Linking an Evaluation Account to an NVIDIA Enterprise Account for Purchased Licenses, specifying the email address with which you created your existing account.
If you have not previously purchased NVIDIA AI Enterprise, you do not have a suitable NVIDIA Enterprise Account.
To create a suitable NVIDIA Enterprise Account, follow the Register link in the instructions for using the certificate to create your account. For details, refer to Creating your NVIDIA Enterprise Account.
Creating your NVIDIA Enterprise Account#
If you do not have an NVIDIA Enterprise Account, you must create one to get access to the NVIDIA AI Enterprise software components and technical support from NVIDIA. For details on these software components, refer to Activating the Accounts for Getting NVIDIA AI Enterprise.
Suppose you have an account created for an evaluation license and want to access the licenses you purchased. In that case, you must repeat the registration process when you receive your purchased licenses. You can create a separate account for your purchased licenses or link your existing account for an evaluation license to the account for your purchased licenses.
To create a separate account for your purchased licenses, perform this task by specifying an email address other than the one with which you created your existing account.
To link your existing account for an evaluation license to the account for your purchased licenses, follow the instructions in Linking an Evaluation Account to an NVIDIA Enterprise Account for Purchased Licenses, specifying the email address with which you created your existing account.
Before you begin, ensure that you have your order confirmation message.
Follow the Register link in the instructions for using your NVIDIA Entitlement Certificate.
Fill out the NVIDIA Enterprise Account Registration page form and click REGISTER. A message confirming that an account has been created will appear. The email address you provided will then receive an email instructing you to log in to your account on the NVIDIA Application Hub.
Open the email instructing you to log in to your account and click Log In.
On the open NVIDIA Application Hub Login page, type the email address you provided in the text-entry field and click Sign In.
On the Create Your Account page that opens, provide and confirm a password for the account and click Create Account. A message prompting you to verify your email address appears. An email instructing you to verify your email address is sent to your provided email address.
Open the email instructing you to verify your email address and click Verify Email Address. A message confirming that your email address is confirmed appears.
You can now log in to the components listed in Activating the Accounts for Getting NVIDIA AI Enterprise from the NVIDIA Application Hub page.
Linking an Evaluation Account to an NVIDIA Enterprise Account for Purchased Licenses#
If you have an account created for an evaluation license, you must repeat the registration process when you receive your purchased licenses. To link your existing account for an evaluation license to the account for your purchased licenses, register for an NVIDIA Enterprise Account with the email address with which you created your existing account.
If you want to create a separate account for your purchased licenses, follow the instructions in Creating your NVIDIA Enterprise Account, specifying a different email address than the address with which you created your existing account.
Follow the Register link in the instructions for using the NVIDIA Entitlement Certificate for your purchased licenses.
Fill out the NVIDIA Enterprise Account Registration page form, specifying the email address with which you created your existing account, and click Register.

When a message stating that your email address is already linked to an evaluation account is displayed, click LINK TO NEW ACCOUNT.

Log in to the NVIDIA Licensing Portal with the credentials for your existing account.
Installing NVIDIA AI Enterprise Software Components#
The NVIDIA NGC Catalog#
NVIDIA AI Enterprise components are distributed through the NVIDIA NGC Catalog. Infrastructure and workload management components are distributed as resources in the NVIDIA AI Enterprise Infra Release 5 collection. Tools for AI development and use cases are available from the NVIDIA AI Enterprise Software Suite.
Accessing the NVIDIA AI Enterprise Infrastructure Resources#
Infrastructure and workload management components of NVIDIA AI Enterprise are distributed as resources in the NVIDIA AI Enterprise Infra Release 5 collection.
The NVIDIA AI Enterprise Infra Release 5 collection offers infrastructure management and orchestration software bundled together to manage and scale AI workloads efficiently and contains the following resources:
GPU Operator
Network Operator
NVIDIA NIM Operator
vGPU Host Driver
Containerized vGPU Guest Driver
Containerized NVIDIA GPU Datacenter Driver
NVIDIA Base Command Manager Essentials
Before downloading any NVIDIA AI Enterprise software assets, ensure you have signed in to NVIDIA NGC from the NVIDIA NGC Sign In page.
Go to the NVIDIA AI Enterprise Infra Release 5 collection on NVIDIA NGC.
Click the Entities tab and select the resource you are interested in.
Click Download and, from the open menu, choose to download the resource using a direct download in the browser, the displayed
wgetcommand, or the CLI.
Accessing the NVIDIA AI Enterprise Software Suite#
Tools for AI development and use cases are available from the NVIDIA AI Enterprise Software Suite and are distributed through the NVIDIA NGC Catalog.
Before downloading any NVIDIA AI Enterprise software assets, ensure you have signed in to NVIDIA NGC from the NVIDIA NGC Sign In page.
View the NVIDIA AI Enterprise Software Suite on NVIDIA NGC.
Go to the NVIDIA AI Enterprise Supported page on NVIDIA NGC.
Visit the NVIDIA NGC site and set the NVIDIA AI Enterprise Support filter.
Browse the NVIDIA AI Enterprise Software Suite to find software assets you are interested in.
For each software asset you are interested in, click the asset to learn more about or download the asset.
NVIDIA AI Enterprise Deployment Options#
The following table outlines the most common approaches used to deploy NVIDIA AI Enterprise.
Category |
Getting Started |
Deployment Guide |
Reference Tutorials |
|---|---|---|---|
Deploy on bare metal |
|||
Deploy on the public cloud |
Running an LLM NIM on Microsoft Azure using NVIDIA AI Enterprise |
||
Deploy in virtualized environments using NVIDIA vGPU (C-Series) |
Installing NVIDIA AI Enterprise on Bare Metal Ubuntu 22.04#
This section of the NVIDIA AI Enterprise Quick Start Guide provides minimal instructions for a bare-metal, single-node deployment of NVIDIA AI Enterprise using Docker on a third-party NVIDIA-certified system.
NVIDIA AI Enterprise Software Prerequisites#
To enable NVIDIA GPU acceleration for compute and AI workloads running in data centers:
Download the NVIDIA GPU data center drivers from this location.
Select Linux 64 bits, Ubuntu 22.04 as the Operating System to download the
.runfile.
Installing NVIDIA AI Enterprise using the TRD Driver on Ubuntu 22.04 from a .run File#
Installation of the NVIDIA AI Enterprise software driver for Linux requires:
Compiler toolchain
Kernel headers
Prerequisites
Ensure you follow the pre-installation steps.
Note
Refer to the Debian instructions if you prefer a Debian package.
Steps
Log into the system and check for updates.
sudo apt-get update
Install the GCC compiler and the make tool in the terminal.
sudo apt-get install build-essential
Copy the NVIDIA AI Enterprise Linux driver package, for example,
NVIDIA-Linux-x86_64-550.90.12.run, to the host machine where you are installing the driver.Where
x_x:xxx.xx.xxis the current NVIDIA AI Enterprise version and driver version.Navigate to the directory containing the NVIDIA Driver
.runfile. Then, add the Executable permission to the NVIDIA Driver file using thechmodcommand.sudo chmod +x NVIDIA-Linux-x86_64-xxx.xx.xx-grid.run
From a console shell, run the driver installer as the root user and accept the defaults.
sudo sh ./NVIDIA-Linux-x86_64-xxx.xx.xx-grid.run
Reboot the system.
sudo reboot
After the system has rebooted, confirm that you can see your NVIDIA vGPU device in the output from
nvidia-smi.nvidia-smi
Installing the NVIDIA Container Toolkit#
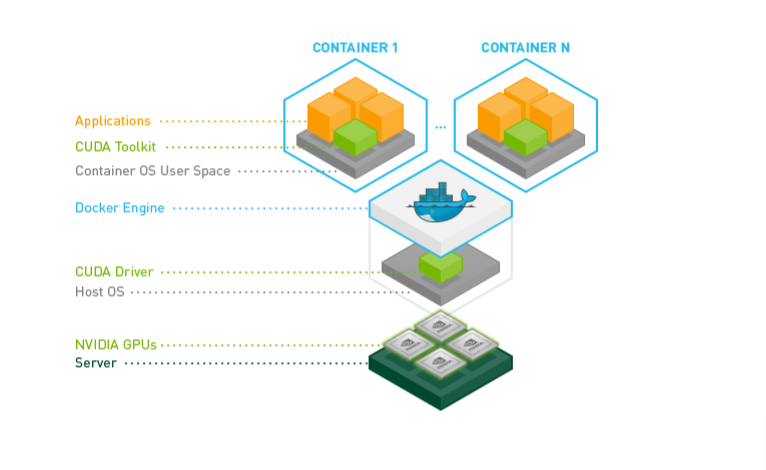
The NVIDIA Container Toolkit allows users to build and run GPU-accelerated Docker containers. It includes a container runtime library and utilities configuring containers to leverage NVIDIA GPUs automatically. Complete documentation and frequently asked questions are available on the repository wiki.
Install Docker - Refer to Install Docker Engine on Ubuntu | Docker Documentation for the installation procedure for Ubuntu.
Install the NVIDIA Container Toolkit - To enable the Docker repository and install the NVIDIA Container Toolkit, refer to Installing the NVIDIA Container Toolkit | NVIDIA Documentation.
After installing the NVIDIA Container Toolkit, refer to the Configuration | NVIDIA Documentation to configure the Docker container runtime.
Verifying the Installation of NVIDIA Container Toolkit#
Run the
nvidia-smicommand contained in the latest official NVIDIA CUDA Toolkit image that is compatible with the release of the NVIDIA CUDA Toolkit driver running on your machine.Note
Do not use a release of the NVIDIA CUDA Toolkit image later than the release of the NVIDIA CUDA Toolkit driver that is running on your machine. For a list of all NVIDIA CUDA Toolkit images, refer to nvidia/cuda on Docker Hub.
$ sudo docker run --rm --runtime=nvidia --gpus all ubuntu nvidia-smi
Start a GPU-enabled container on any two available GPUs.
$ docker run --runtime=nvidia --gpus 2 nvidia/cuda:12.4.0-base-ubuntu22.04 nvidia-smi
Start a GPU-enabled container on two specific GPUs identified by their index numbers.
$ docker run --runtime=nvidia --gpus '"device=1,2"' nvidia/cuda:12.4.0-base-ubuntu22.04 nvidia-smi
Start a GPU-enabled container on two specific GPUs, with one GPU identified by its UUID and the other GPU identified by its index number.
$ docker run --runtime=nvidia --gpus '"device=UUID-ABCDEF,1"' nvidia/cuda:12.4.0-base-ubuntu22.04 nvidia-smi
Specify a GPU capability for the container.
$ docker run --runtime=nvidia --gpus all,capabilities=utility nvidia/cuda:12.4.0-base-ubuntu22.04 nvidia-smi
Installing Software Distributed as Container Images#
The NGC container images accessed through the NVIDIA NGC Catalog include the AI and data science applications and frameworks. Each container image for an AI and data science application or framework contains the entire user-space software stack that is required to run the application or framework, namely, the CUDA libraries, cuDNN, any required Magnum IO components, TensorRT, and the framework.
Ensure that you have completed the following tasks in the NGC Private Registry User Guide:
Perform this task from the host machine. Obtain the Docker pull command to download each of the following applications and deep learning framework components from the listing for the application or component in the NGC Public Catalog.
Applications
NVIDIA NIMs
NVIDIA Clara Parabricks
NVIDIA DeepStream
NVIDIA Riva
MONAI - Medical Open Network for Artificial Intelligence
RAPIDS
RAPIDS Accelerator for Apache Spark
TAO
Deep learning framework components
NVIDIA TensorRT
NVIDIA Triton Inference Server
PyTorch
TensorFlow 2
Running ResNet-50 with TensorFlow#
Launch the TensorFlow 1 container image on all GPUs in interactive mode, specifying that the container will be deleted when stopped.
$ sudo docker run --gpus all -it --rm \
nvcr.io/nvidia/tensorflow-pb24h1:24.03.06-tf2-py3nvcr.io/nvidia/tensorflow:21.07-tf1-py3
From within the container runtime, change to the directory that contains test data for
cnnexample.# cd /workspace/nvidia-examples/cnnRun the ResNet-50 training test with FP16 precision.
# python resnet.py --layers 50 -b 64 -i 200 -u batch --precision fp16Confirm that all operations on the application are performed correctly and that a set of results is reported when the test is completed.
Press Ctrl+P > Ctrl+Q to exit the container runtime and return to the Linux command shell.
Running ResNet-50 with TensorRT#
Launch the NVIDIA TensorRT container image on all GPUs in interactive mode, specifying that the container will be deleted when stopped.
$ sudo docker run --gpus all -it --rm nvcr.io/nvidia/tensorrt:21.07-py3
From within the container runtime, change to the directory that contains test data for the ResNet-50 convolutional neural network.
# cd /workspace/tensorrt/data/resnet50Run the ResNet-50 convolutional neural network with FP32, FP16, and INT8 precision and confirm that each test is completed with a PASSED result.
To run ResNet-50 with the default FP32 precision, run this command:
# trtexec --duration=90 --workspace=1024 --percentile=99 --avgRuns=100 \
--deploy=ResNet50_N2.prototxt --batch=1 --output=prob
To run ResNet-50 with FP16 precision, add the
--fp16option:# trtexec --duration=90 --workspace=1024 --percentile=99 --avgRuns=100 \ --deploy=ResNet50_N2.prototxt --batch=1 --output=prob --fp16
To run ResNet-50 with INT8 precision, add the
--int8option:# trtexec --duration=90 --workspace=1024 --percentile=99 --avgRuns=100 \ --deploy=ResNet50_N2.prototxt --batch=1 --output=prob --int8
Press Ctrl+P > Ctrl+Q to exit the container runtime and return to the Linux command shell.
Running NVIDIA NIM on Bare Metal Ubuntu 22.04#
NVIDIA Inference Microservices (NIMs) provide a streamlined path for developing AI-powered enterprise applications and deploying AI models in production. You can download and run the NIM of your choice from the NVIDIA NGC Catalog. Follow the instructions below to deploy a Llama3 8B Instruct NIM on your bare metal host machine setup and run inference.
Pull and run
meta/llama3-8busing Docker (this will download the full model and run it in your local environment).$ docker login nvcr.io Username: $oauthtoken Password: <PASTE_API_KEY_HERE>
Pull and run NVIDIA NIM. This will download the optimized model for your infrastructure.
export NGC_API_KEY=<PASTE_API_KEY_HERE>
export LOCAL_NIM_CACHE=~/.cache/nim
mkdir -p "$LOCAL_NIM_CACHE"
docker run -it --rm \
    --gpus all \
    --shm-size=16GB \
    -e NGC_API_KEY=$NGC_API_KEY \
    -v "$LOCAL_NIM_CACHE:/opt/nim/.cache" \
    -u $(id -u) \
    -p 8000:8000 \
    nvcr.io/nim/meta/llama3-8b-instruct:1.0.0
Make a local API call.
curl -X 'POST' \
'http://0.0.0.0:8000/v1/chat/completions' \
-H 'accept: application/json' \
-H 'Content-Type: application/json' \
-d '{
    "model": "meta/llama3-8b-instruct",
    "messages": [{"role":"user", "content":"Write a limerick about the wonders of GPU computing."}],
    "max_tokens": 64
}'
For more information about running inference on this locally deployed LLM NIM, refer to Launch NVIDIA NIM for LLMs.
Installing NVIDIA AI Enterprise on Public Cloud#
NVIDIA AI Enterprise can be run on Amazon Web Services (AWS), Google Cloud, Microsoft Azure, Oracle Cloud Infrastructure (OCI), Alibaba Cloud, and Tencent Cloud.
This NVIDIA AI Enterprise Quick Start Guide section provides minimal instructions for deploying NVIDIA AI Enterprise on Microsoft Azure using the NVIDIA AI Enterprise VMI.
Installing NVIDIA AI Enterprise on Microsoft Azure using the NVIDIA AI Enterprise VMI#
The NVIDIA AI Enterprise On-Demand VMI generates a GPU-accelerated Compute Engine VM instance in minutes with pre-installed software to accelerate your Machine Learning, Deep Learning, Data Science, and HPC workloads.
The On-Demand VMI is preconfigured with the following software:
Ubuntu Operating System
NVIDIA GPU Data Center Driver
Docker-ce
NVIDIA Container Toolkit
CSP CLI, NGC CLI
Miniconda, JupyterLab, Git
Token Activation Script
Getting started with NVIDIA AI Enterprise in your Enterprise (On-Demand) VMI cloud instance can be broken down into two simple steps:
Authorize the VMI cloud instance with NVIDIA NGC by copying over the provided instance ID token into the Activate Subscription page on NGC. There are four key steps to complete this part of the process:
Get an identity token from the VMI.
Activate your NVIDIA AI Enterprise subscription with the token.
Generate an API key to access the catalog.
Put the API key on the VMI.
Follow the instructions outlined here to complete this step.
Pulling and running NVIDIA AI Enterprise Containers. Refer to this section of the Cloud Deployment Guide for pulling and running NGC container images through the NVIDIA NGC Catalog.
Detailed instructions on installing NVIDIA AI Enterprise on the public cloud can be found in the Microsoft Azure Overview.
Running an LLM NIM on Microsoft Azure using NVIDIA AI Enterprise#
Refer to the Appendix section of the Cloud Deployment Guide for pulling and running NGC container images through the NVIDIA NGC Catalog.
Installing NVIDIA AI Enterprise in Virtualized Environments using NVIDIA vGPU (C-Series)#
The NVIDIA AI Enterprise VMware Deployment Guide offers detailed information for deploying NVIDIA AI Enterprise on a third-party NVIDIA-certified system running VMware vSphere using NVIDIA vGPU (C-Series).
NVIDIA AI Enterprise Software Prerequisites#
NVIDIA vGPU (C-Series) Host Driver
NVIDIA vGPU (C-Series) Guest Driver
NVIDIA License System
To download the NVIDIA vGPU (C-Series) software drivers, follow the instructions in Accessing the NVIDIA AI Enterprise Infrastructure Resources.
The NVIDIA AI Enterprise license entitles customers to download NVIDIA vGPU (C-Series) software through NVIDIA NGC. Deploying NVIDIA AI Enterprise using vGPU requires a valid license, which is enforced by installing the NVIDIA License System. The NVIDIA License System is a pool of floating licenses for licensed NVIDIA software products configured with licenses obtained from the NVIDIA Licensing Portal.
NVIDIA License System supports the following types of service instances:
Cloud License Service (CLS) instance. A CLS instance is hosted on the NVIDIA Licensing Portal.
Delegated License Service (DLS) instance. A DLS instance is hosted on-premises at a location accessible from your private network, such as inside your data center.
An NVIDIA vGPU (C-Series) client VM with a network connection obtains a license by leasing it from an NVIDIA License System service instance. The service instance serves the license to the client over the network from a pool of floating licenses obtained from the NVIDIA Licensing Portal. The license is returned to the service instance when the licensed client no longer requires the license.
To activate an NVIDIA vGPU (C-Series), software licensing must be configured for the vGPU VM client when booted. NVIDIA vGPU (C-Series) VMs run at a reduced capability until a license is acquired.
Refer to the NVIDIA Licensing Quick Start Guide for instructions on configuring an express Cloud License Service (CLS) instance and verifying the license status of a licensed vGPU VM client.
If you use Delegated License Service (DLS) instances to serve licenses, refer to the NVIDIA License System User Guide. It provides detailed instructions on installing, configuring, and managing the NVIDIA License System.
Obtaining NVIDIA Base Command Manager Essentials#
NVIDIA Base Command Manager Essentials streamlines cluster provisioning, workload management, and infrastructure monitoring in the data center. In bare-metal deployments, it simplifies the installation of operating systems supported by NVIDIA Base Command Manager Essentials.
Before obtaining NVIDIA Base Command Manager Essentials, ensure you have activated the accounts for NVIDIA AI Enterprise, as explained in Activating the Accounts for Getting NVIDIA AI Enterprise.
Request your NVIDIA Base Command Manager Essentials product keys by emailing your entitlement certificate to sw-bright-sales-ops@NVIDIA.onmicrosoft.com. After your entitlement certificate has been reviewed, you will receive a product key from which you can generate a license key for the number of licenses you purchased.
Go to this page to download NVIDIA Base Command Manager Essentials for your operating system.
The Base Command Manager Essentials product manuals provide detailed instructions on deploying and using Base Command Manager Essentials.
After obtaining NVIDIA Base Command Manager Essentials, follow the NVIDIA Base Command Manager Essentials Installation Manual steps to create and license your head node.