Get Started with NVIDIA NIM for LLMs#
Use the following documentation to get started with NVIDIA NIM for LLMs. For step-by-step deployment instructions, whether you are using optimized models through LLM-specific NIMs or bringing your own model through the multi-LLM compatible NIM container, see the Launch NVIDIA NIM for LLMs section.
Prerequisites#
CPU#
x86 processor with at least 8 cores (modern processor recommended)
Memory requirements vary greatly depending on use case. For
trtllm_buildableprofiles, the memory requirements are approximately equal to the amount of memory used by GPUs.
GPU#
NVIDIA NIM for LLMs should, but is not guaranteed to, run on any NVIDIA GPU, as long as the GPU has sufficient memory, or on multiple, homogeneous NVIDIA GPUs with sufficient aggregate memory and CUDA compute capability > 7.0 (8.0 for bfloat16).
Note
NVIDIA NIM for LLMs supports Multi-Instance GPU (MIG) mode to partition supported NVIDIA GPUs into multiple isolated instances. This feature works best with smaller parameter models (less than or equal to 8 billion parameters). For setup instructions and performance trade-off considerations, refer to the Multi-Instance GPU (MIG) User Guide.
You can approximate the amount of required memory using the following guidelines. However, these guidelines do not apply to trtllm_buildable profiles in LLM-specific NIM containers and tensorrt_llm profiles in the multi-LLM compatible NIM container for HuggingFace model formats:
5–10 GB for OS and other processes
16 GB for Docker (16 GB of shared memory is required by docker in multi-GPU, non-NVLink cases)
# model parameters * 2 GB of memory
Llama 8B: ~ 15 GB
Llama 70B: ~ 131 GB
Mistral 7B Instruct v0.3: ~ 14 GB
Mixtral 8x7B Instruct v0.1: ~ 88 GB
These recommendations are a rough guideline and actual memory required can be lower or higher depending on hardware and NIM configuration.
Some model/GPU combinations, including vGPU, are optimized. Refer to Supported Models for NVIDIA NIM for LLMs for further information.
NIM Container Access#
To download and deploy NIM container, you need to join the free NVIDIA Developer Program or obtain an NVIDIA AI Enterprise license.
To join the NVIDIA Developer Program, do the following:
Go to the NVIDIA API Catalog.
Find a model that you are interested in.
Select the Deploy tab.
Click the Get API key button.
Sign in with your email ID.
To learn more about the NVIDIA AI Enterprise program, including how to request a free 90-day license, refer to Ways to Get Started With NVIDIA AI Enterprise and Activate Your NVIDIA AI Enterprise License.
Software#
A Linux operating system (Ubuntu 22.04 or later recommended) that:
Has
glibc>= 2.35 (see output ofld -v)
NVIDIA Driver release 580 or later.
Docker >= 23.0.1
NVIDIA GPU(s): NVIDIA NIM for LLMs runs on any NVIDIA GPU with sufficient GPU memory, but some model/GPU combinations are optimized. Homogeneous multi-GPU systems with tensor parallelism enabled are also supported. Refer to Supported Models for NVIDIA NIM for LLMs for more information.
CUDA Drivers: Follow the installation guide. We recommend:
Using a network repository as part of a package manager installation, skipping the CUDA toolkit installation as the libraries are available within the NIM container, then
Installing the open kernels for a specific version:
Major Version
EOL
Data Center & RTX/Quadro GPUs
GeForce GPUs
> 580
TBD
X
X
560
Aug. 2025
X
X
550
Feb. 2025
X
X
545
Oct. 2023
X
X
535
June 2026
X
525
Nov. 2023
X
470
Sept. 2024
X
Install Docker
Install the NVIDIA Container Toolkit
Note
After installing the toolkit, follow the instructions in the Configure Docker section in the NVIDIA Container Toolkit documentation.
To ensure that your setup is correct, run the following command (refer to the GPU Selection section for a note on using --gpus all):
docker run --rm --runtime=nvidia --gpus all ubuntu nvidia-smi
This command should produce output similar to one of the following, where you can confirm CUDA driver version, and available GPUs.
+-----------------------------------------------------------------------------------------+
| NVIDIA-SMI 550.54.14              Driver Version: 550.54.14      CUDA Version: 12.4     |
|-----------------------------------------+------------------------+----------------------+
| GPU  Name                 Persistence-M | Bus-Id          Disp.A | Volatile Uncorr. ECC |
| Fan  Temp   Perf          Pwr:Usage/Cap |           Memory-Usage | GPU-Util  Compute M. |
|                                         |                        |               MIG M. |
|=========================================+========================+======================|
|   0  NVIDIA H100 80GB HBM3          On  |   00000000:1B:00.0 Off |                    0 |
| N/A   36C    P0            112W /  700W |   78489MiB /  81559MiB |      0%      Default |
|                                         |                        |             Disabled |
+-----------------------------------------+------------------------+----------------------+

+-----------------------------------------------------------------------------------------+
| Processes:                                                                              |
|  GPU   GI   CI        PID   Type   Process name                              GPU Memory |
|        ID   ID                                                               Usage      |
|=========================================================================================|
|  No running processes found                                                             |
+-----------------------------------------------------------------------------------------+
Installing WSL2 for Windows#
Certain downloadable NIMs can be used on an RTX Windows system with Windows System for Linux (WSL). To enable WSL2, see Installing WSL2 for Windows.
Important
You should set NIM_RELAX_MEM_CONSTRAINTS=1 when you deploy this NIM on WSL2
due to high memory usage.
Launch NVIDIA NIM for LLMs#
You can download and run the NIM of your choice using one of three approaches:
API Catalog: Use pre-built, optimized models and LLM-specific NIM containers directly from NVIDIA’s API catalog. For a step-by-step walk through, watch this video guide.
NGC: Use pre-built, optimized models and LLM-specific NIM containers from the NGC registry.
HuggingFace or Local Disk: Use the multi-LLM compatible NIM container to deploy supported HuggingFace or local models.
Common Setup Steps#
The following steps are required for all deployment approaches:
Generate an API Key#
For API Catalog deployments:
Navigate to the API Catalog.
Select a model.
Select an Input option. The following example is of a model that offers a Docker option. Not all of the models offer this option, but all include a “Get API Key” link.
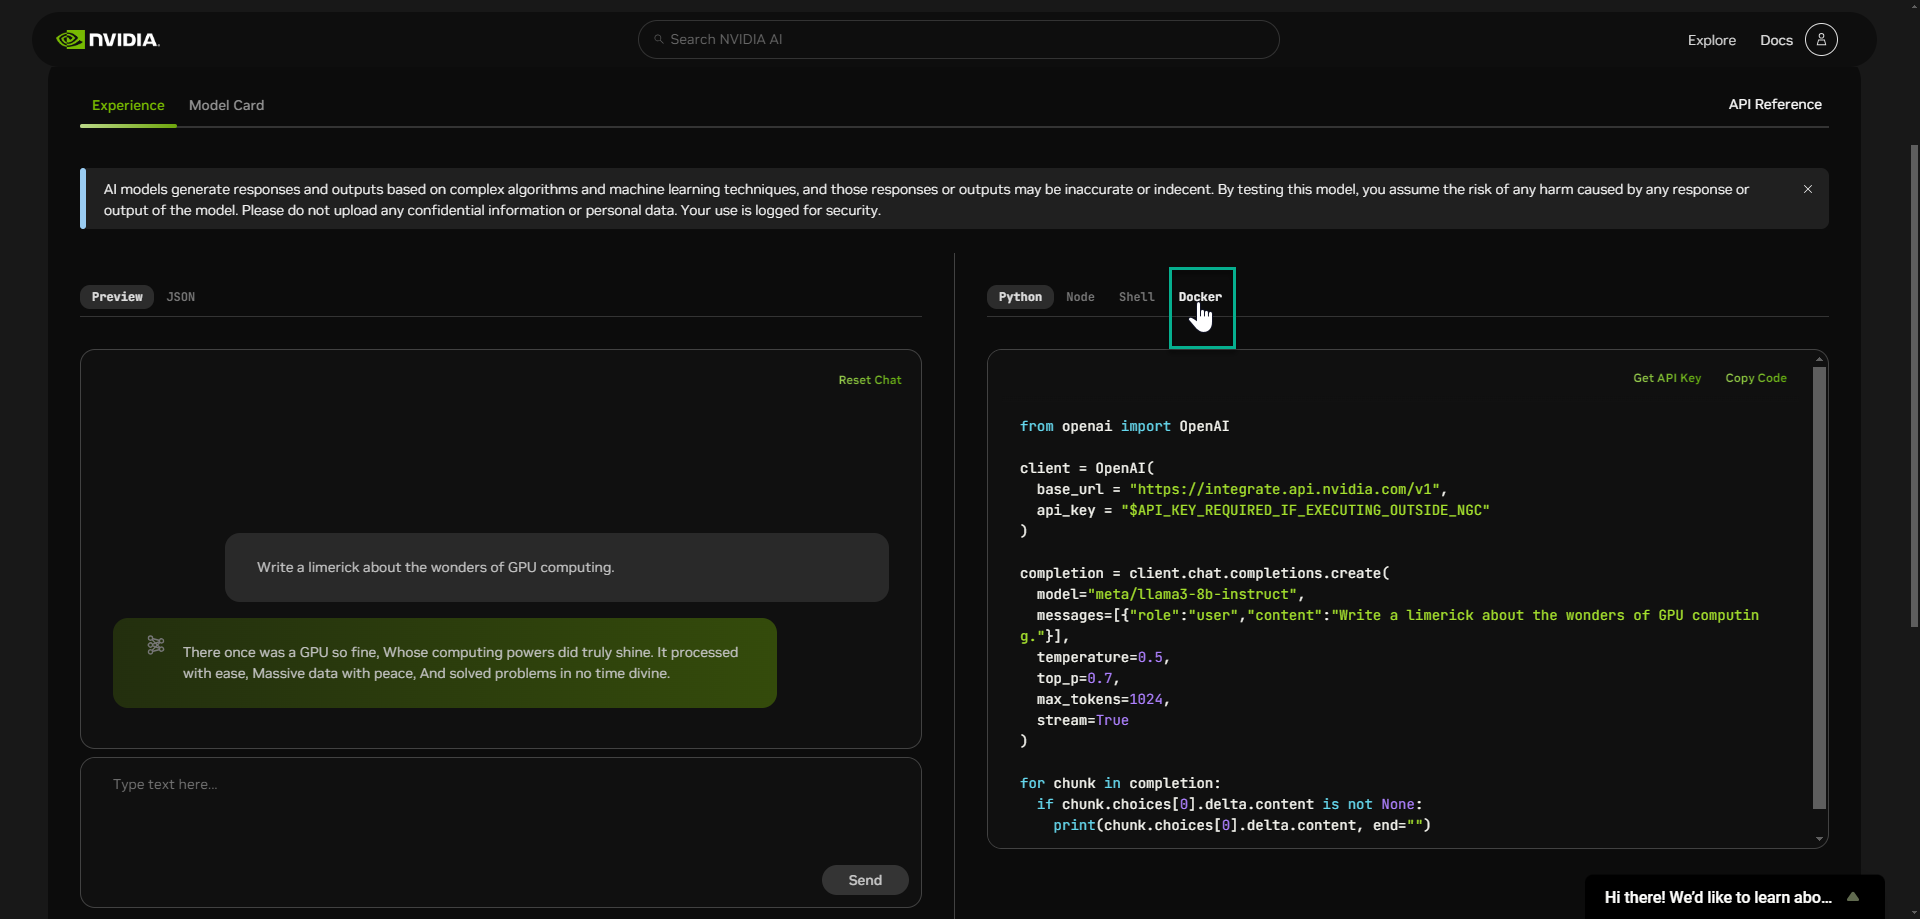
Select “Get API Key” and login if prompted.
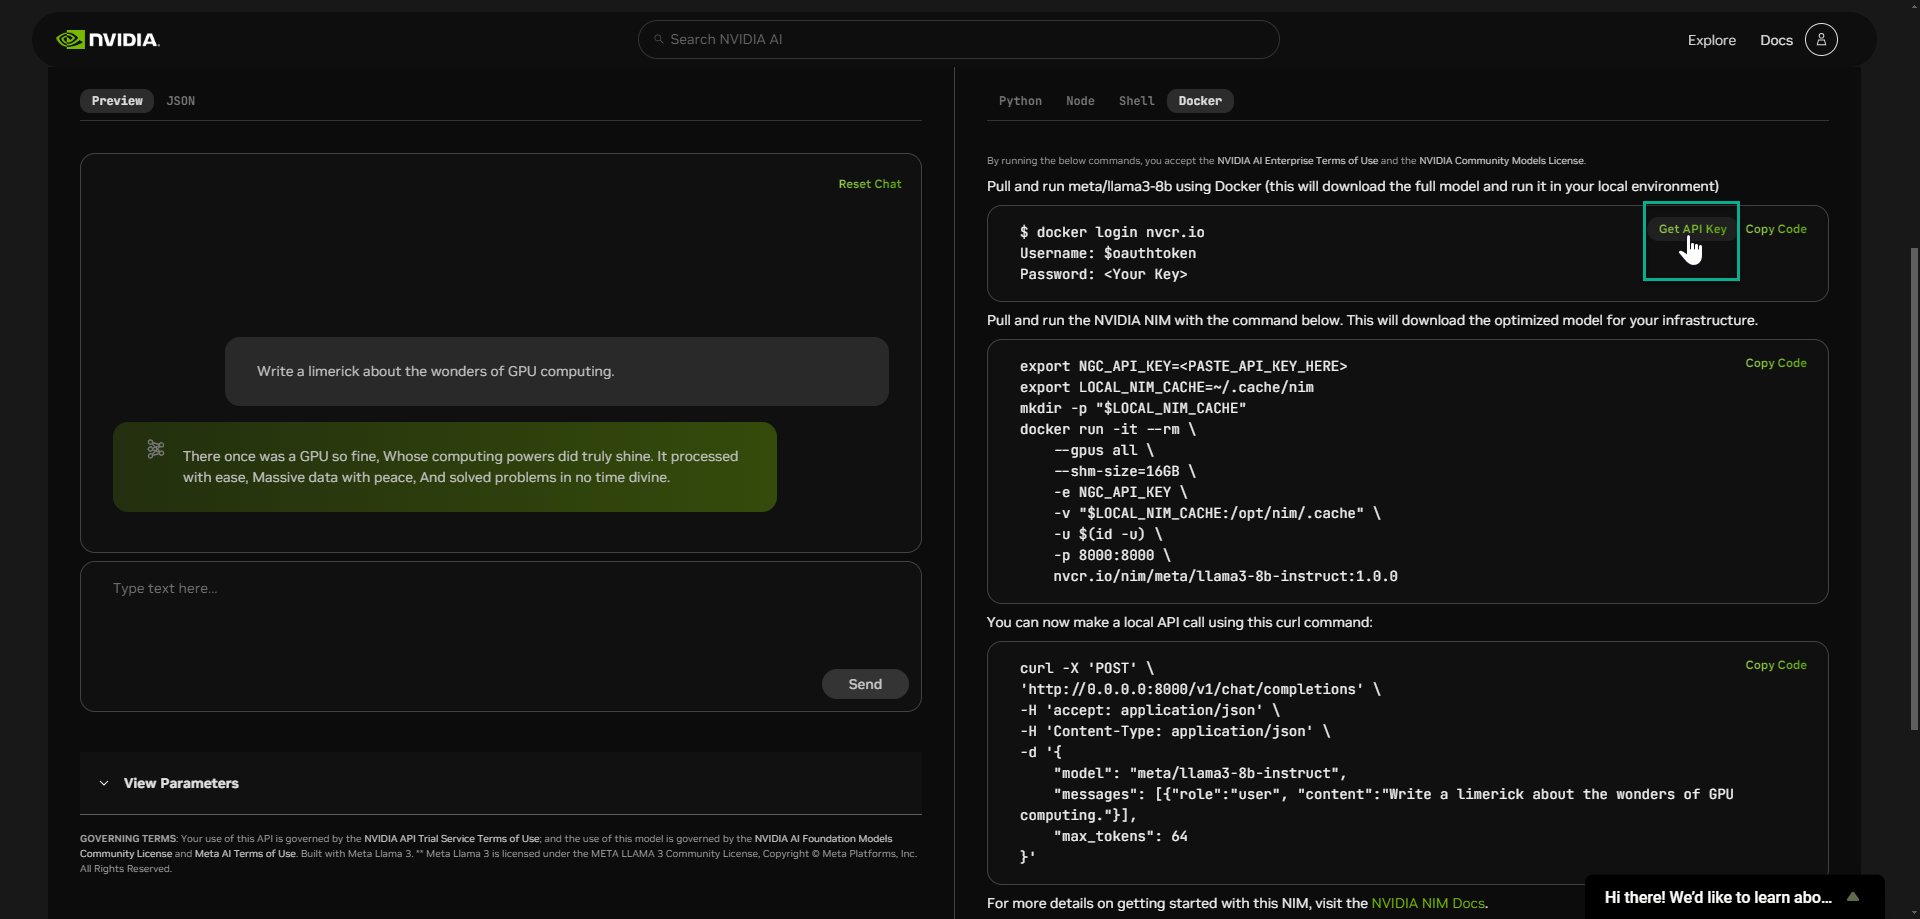
Select “Generate Key”
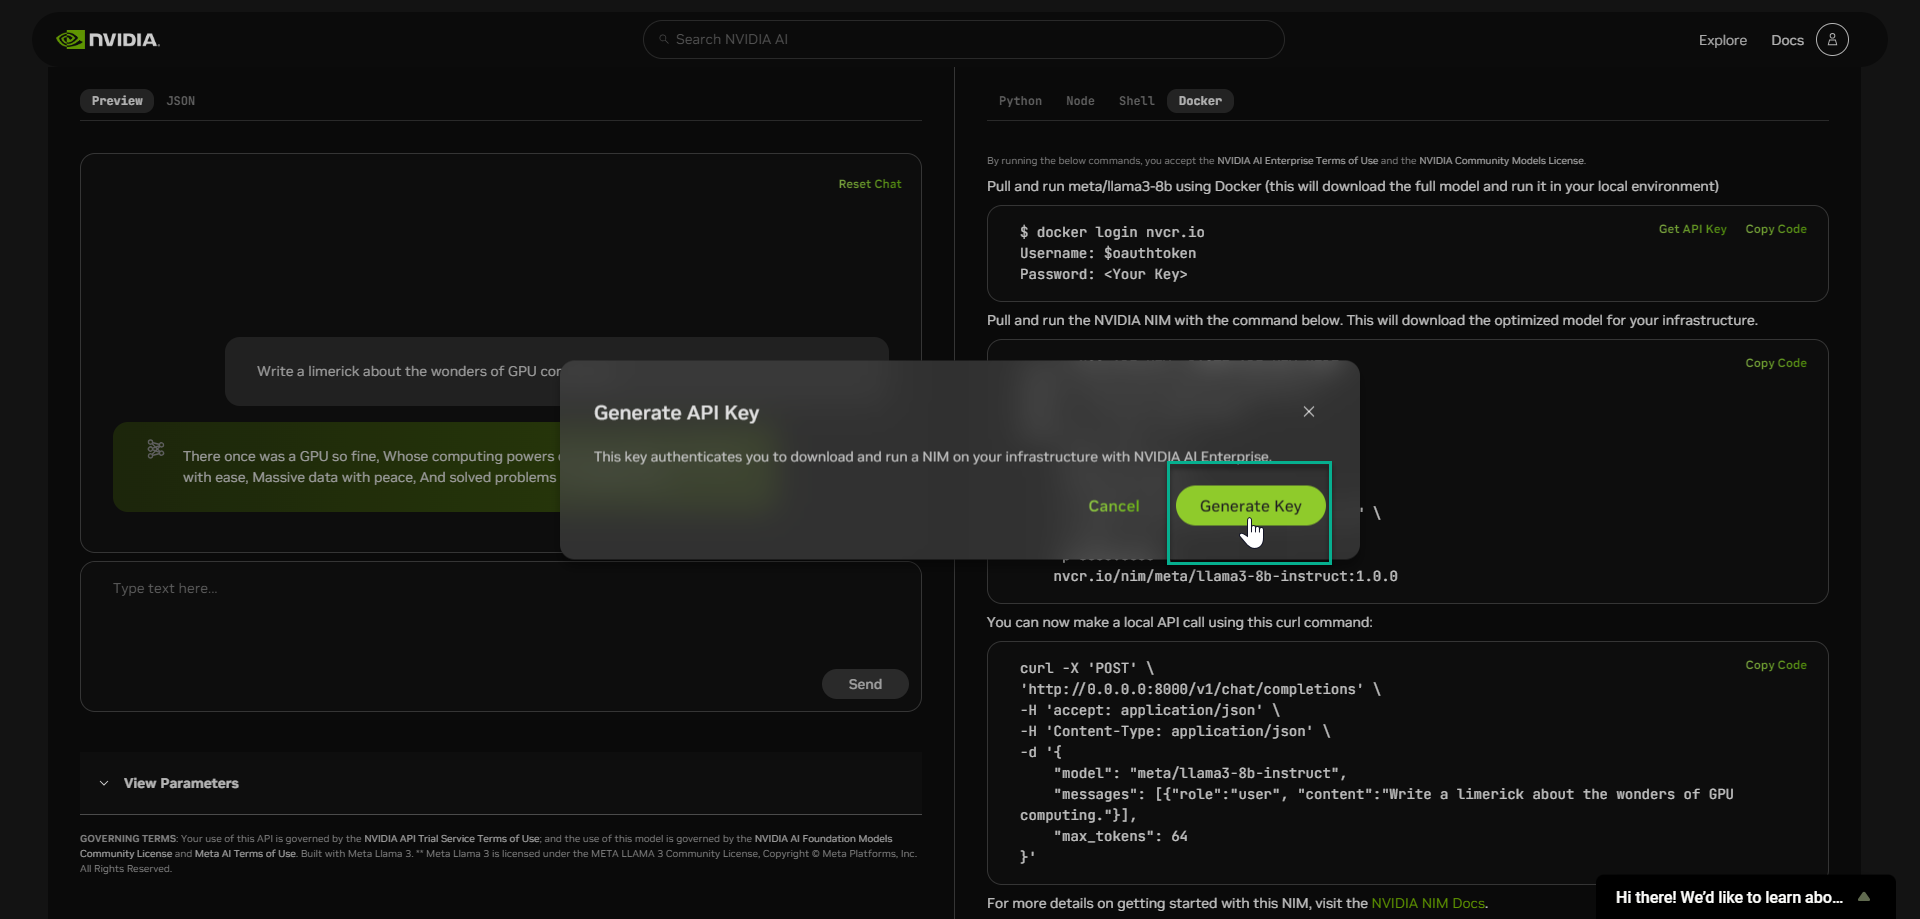
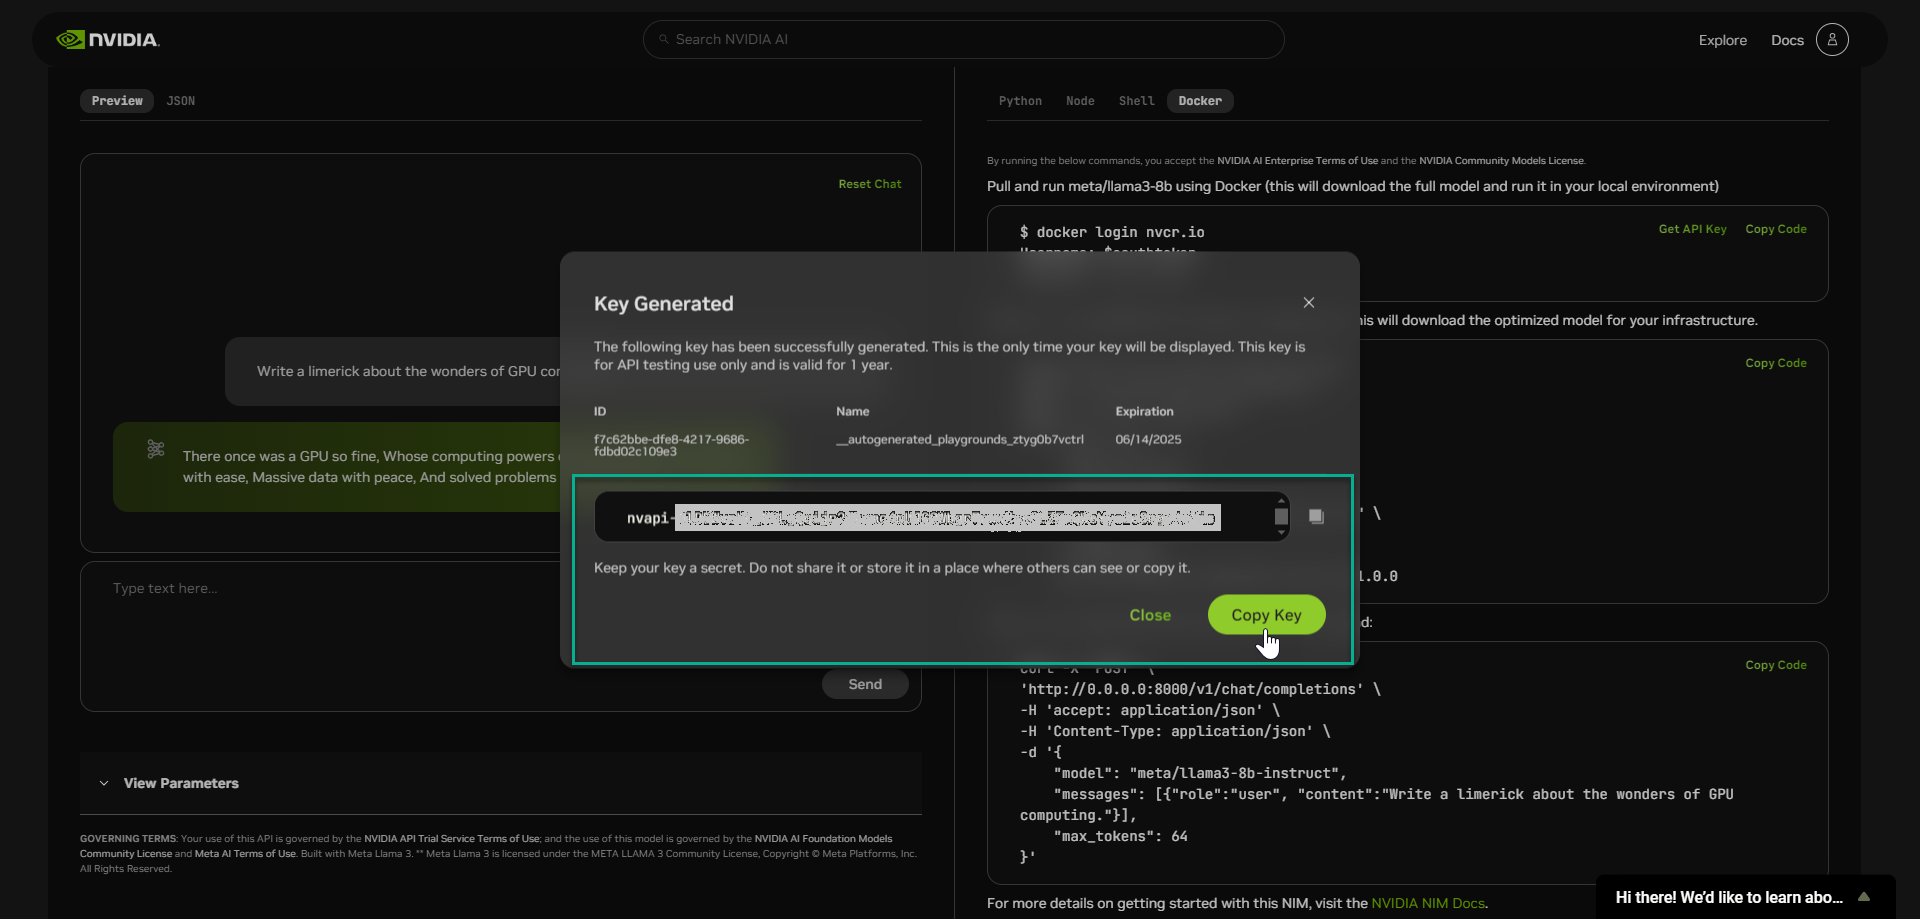
Copy your key and store it in a secure place. Do not share it.
For NGC deployments:
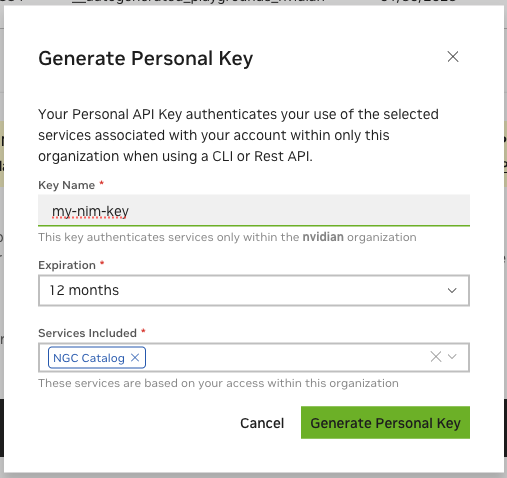
An NGC Personal API key is required to access NGC resources. Generate the key on the Setup API Keys page.
Note
Legacy API keys are not supported by NVIDIA NIM for LLMs. Always use a Personal API key.
When creating a Personal API key, select (at least) NGC Catalog from the Services Included list. You can include more services to use this key for other purposes.
Export the API key#
Pass the value of the API key to the docker run command in the next section as the NGC_API_KEY environment variable to download the appropriate models and resources when starting the NIM.
If you are not familiar with how to create the NGC_API_KEY environment variable, the simplest way is to export it in your terminal, as shown in the following example, where VALUE is the value of your API key:
export NGC_API_KEY=VALUE
Run one of the following commands to make the key available at startup:
# If using bash
echo "export NGC_API_KEY=$NGC_API_KEY" >> ~/.bashrc

# If using zsh
echo "export NGC_API_KEY=$NGC_API_KEY" >> ~/.zshrc
Note
Other, more secure options include saving the value in a file, so that you can retrieve with something like cat $NGC_API_KEY_FILE, or using a password manager.
Docker Login#
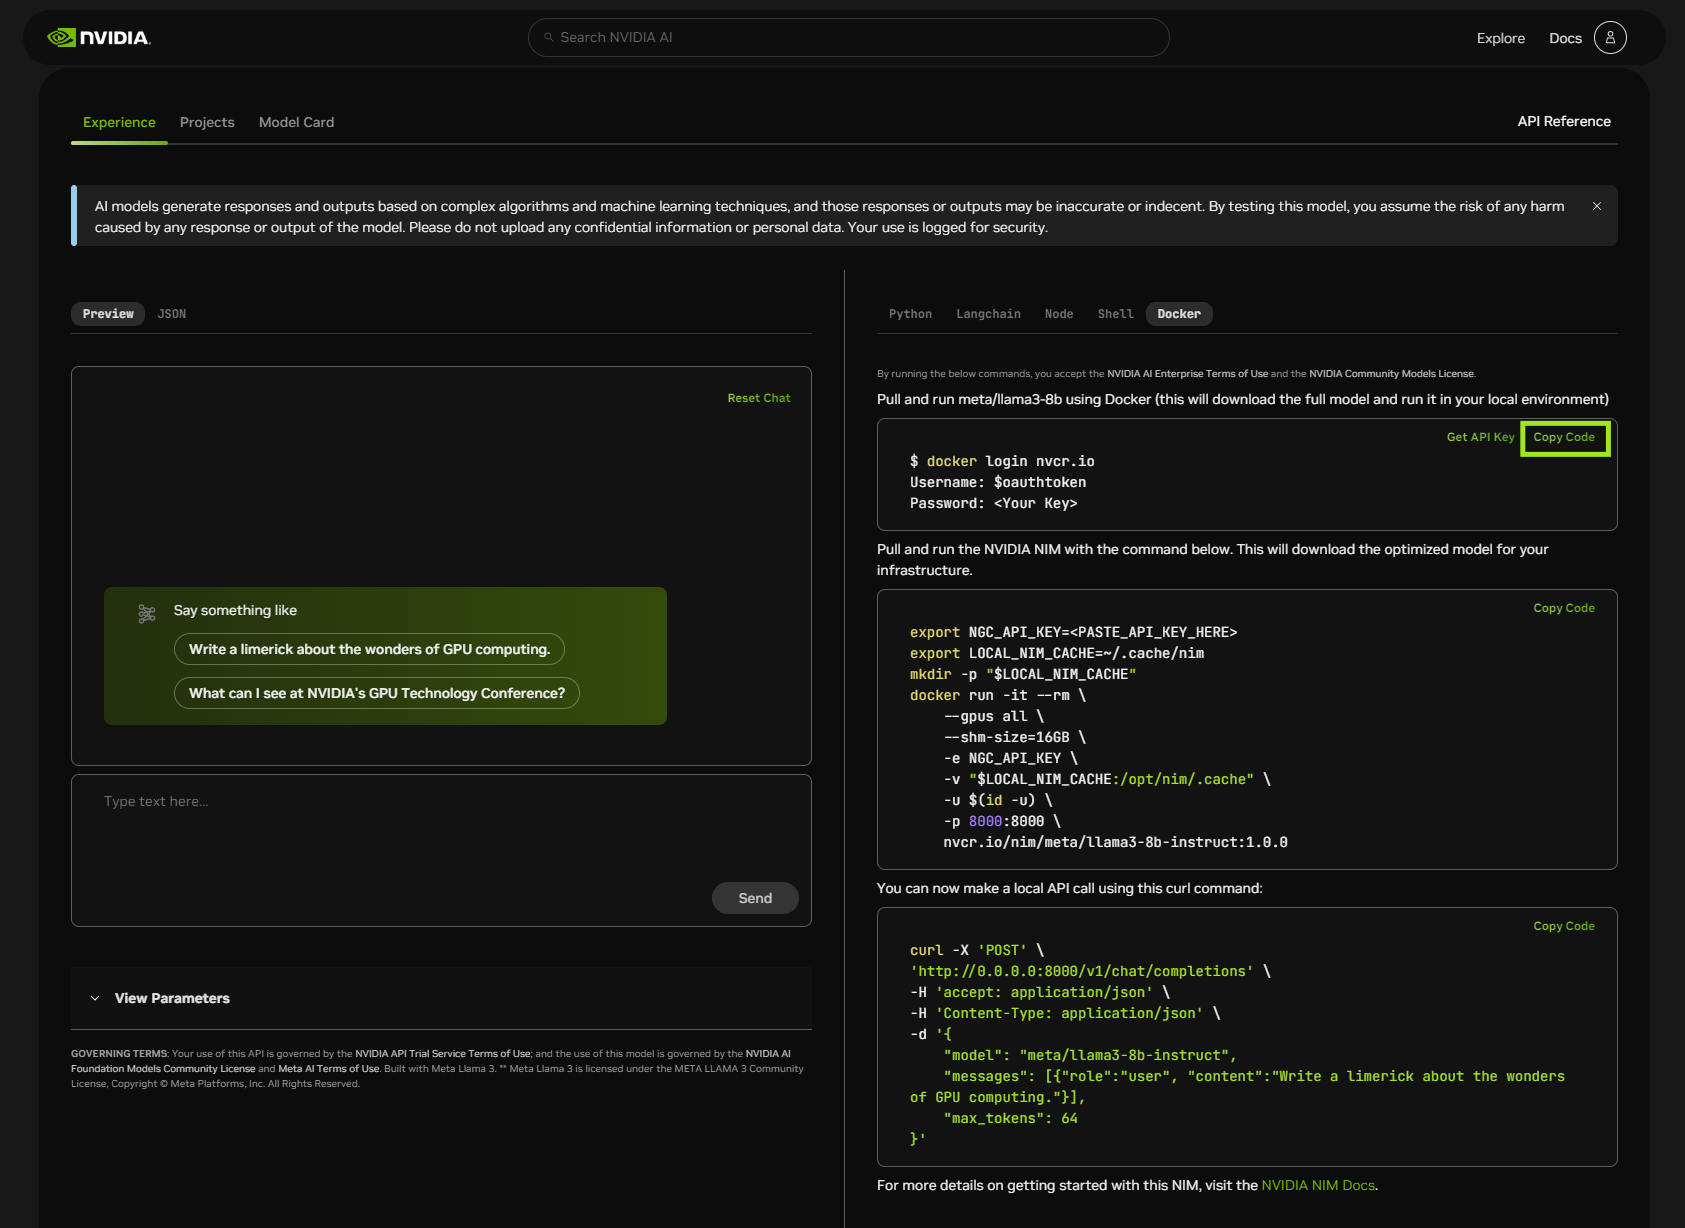
For API Catalog deployments:
Use the docker login command, as shown in the following screenshot, to log in to Docker. Replace the placeholders for Username and Password with your values.
For NGC deployments:
To pull the NIM container image from NGC, first authenticate with the NVIDIA Container Registry with the following command:
echo "$NGC_API_KEY" | docker login nvcr.io --username '$oauthtoken' --password-stdin
Use $oauthtoken as the username and NGC_API_KEY as the password. The $oauthtoken username is a special name that indicates that you will authenticate with an API key and not a user name and password.
Option 1: Deploy from API Catalog (LLM-specific NIM)#
After completing the common setup steps, use the following command to pull and run the NIM using Docker.
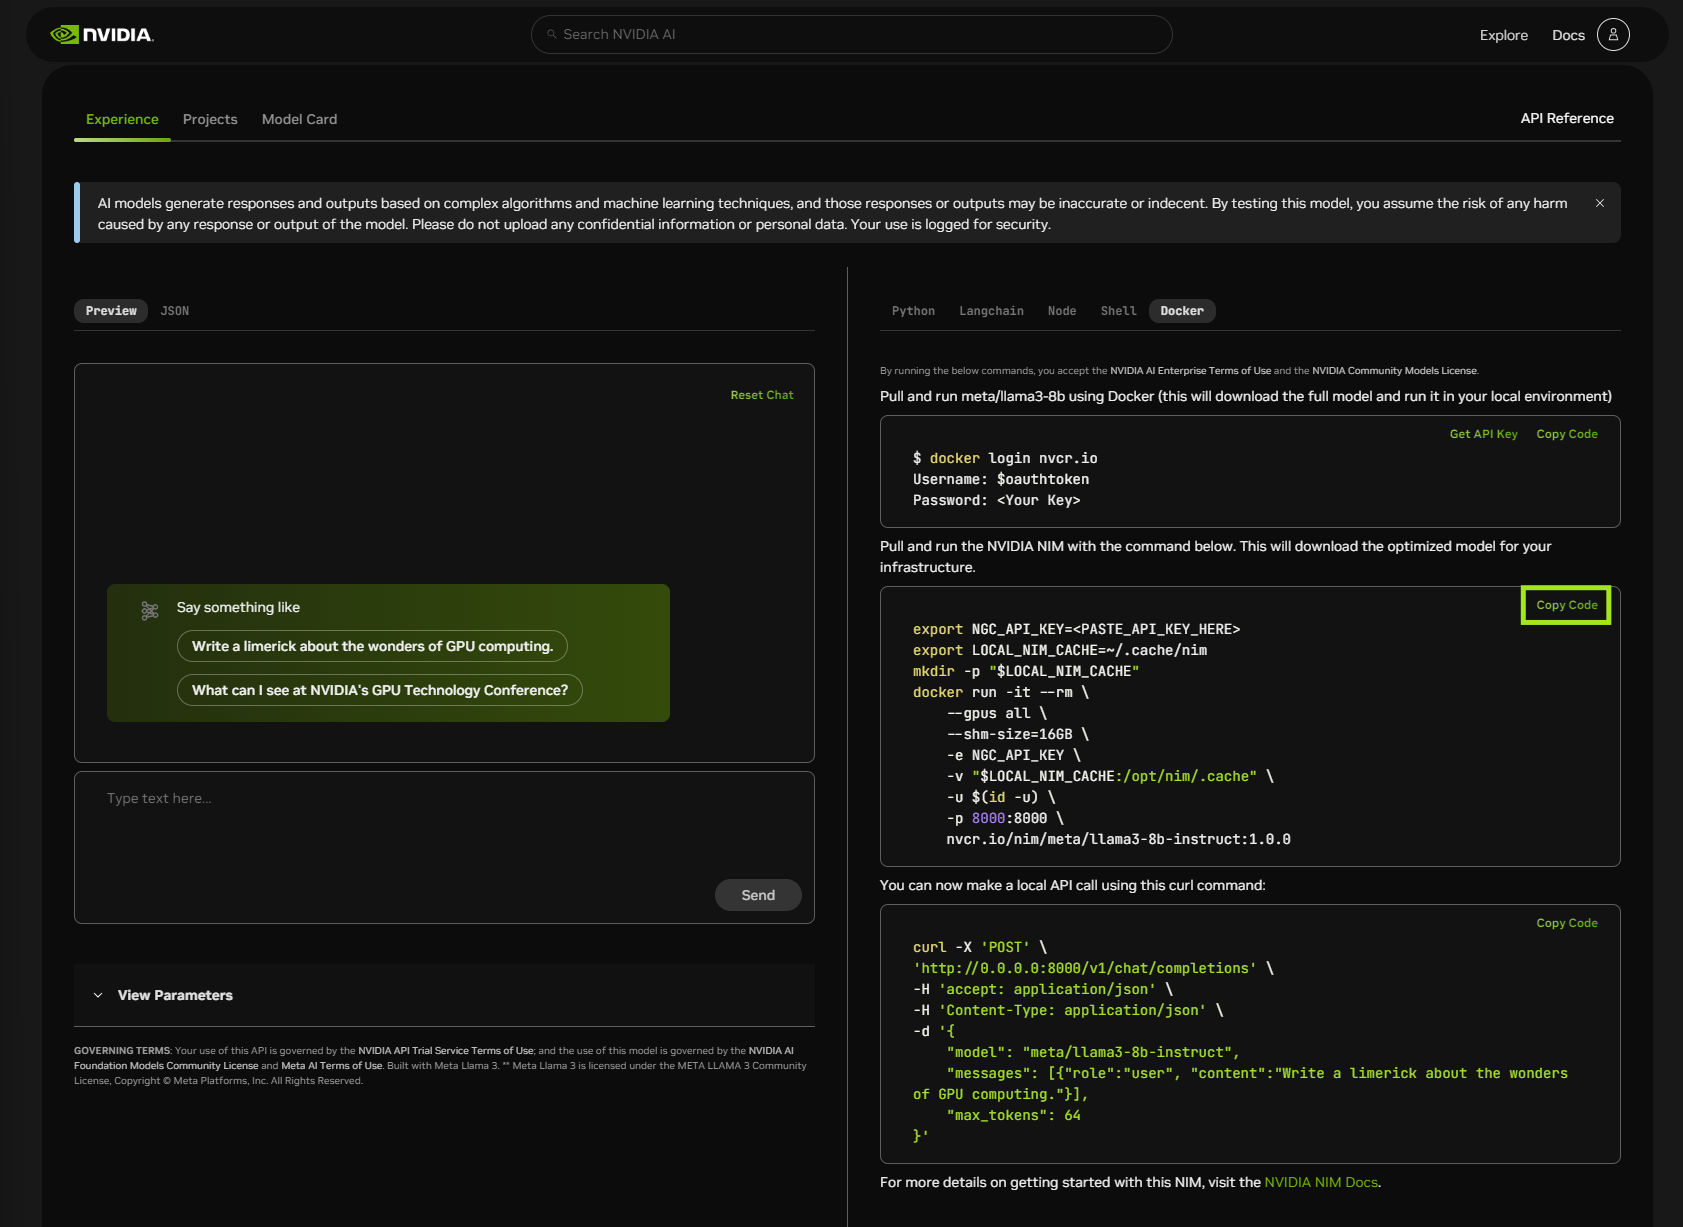
To modify the docker run parameters, see Docker Run Parameters.
Now, you can jump to running inference.
Option 2: Deploy from NGC (LLM-specific NIM)#
After completing the common setup steps, follow these additional steps to pull and run the NIM using NGC:
List Available NIMs#
This documentation uses the ngc CLI tool in a number of examples.
See the NGC CLI documentation
for information on downloading and configure the tool.
Use the following command to list the available NIMs and their latest versions in a readable table format:
ngc registry image list --format_type ascii nvcr.io/nim/*
This command should produce output similar to the following:
+-----------------+--------------+------------+------------+--------------+------------+-------------+-------------+--------------+
| Name            | Repository   | Latest Tag | Image Size | Updated Date | Permission | Signed Tag? | Access Type | Associated   |
|                 |              |            |            |              |            |             |             | Products     |
+-----------------+--------------+------------+------------+--------------+------------+-------------+-------------+--------------+
| Meta/Llama-3.1- | nim/meta/lla | 1.13.1     | 12.28 GB   | Sep 18, 2025 | unlocked   | True        | LISTED      | nim-dev, nv- |
| 8B-Instruct     | ma-3.1-8b-   |            |            |              |            |             |             | ai-          |
|                 | instruct     |            |            |              |            |             |             | enterprise   |
+-----------------+--------------+------------+------------+--------------+------------+-------------+-------------+--------------+
From this output, note the Repository field (for example, nim/meta/llama-3.1-8b-instruct)
and Latest Tag field (for example, 1.13.1) as you will need both values for the next steps.
Note
To always get the newest version of a NIM, use the latest tag. If you want to deploy a specific version of a NIM, use that version’s tag instead.
Launch LLM-specific NIM#
The following example launches a Docker container for the llama-3.1-8b-instruct model. To launch a container for a different NIM, replace the example values of Repository and TAG with values from the previous image list command output or Supported Models table.
First, set the repository, tag, and container name values from the registry output. For example:
# Choose a container name for bookkeeping
export CONTAINER_NAME=llama-3.1-8b-instruct

# Set the repository from the registry output (for example, nim/meta/llama-3.1-8b-instruct)
export Repository=nim/meta/llama-3.1-8b-instruct

# Set the tag to latest or a specific version (for example, 1.13.1)
export TAG=latest
You can verify you have the correct repository and tag by getting detailed information about the model:
ngc registry image info --format_type ascii $Repository:$TAG
You should see output similar to the following.
----------------------------------------------------------
 Image Information
    Name: nim/meta/llama-3.1-8b-instruct:latest
   Architecture: amd64
      Image Size: 12.28 GB

...

----------------------------------------------------------
Note
To deploy models that do not fit on a single node, see Multi-node Deployments
# Choose an LLM NIM Image from NGC using the repository and tag from previous steps (for example, llama-3.1-8b-instruct:latest)
export IMG_NAME="nvcr.io/$Repository:$TAG"

# Choose a path on your system to cache the downloaded models
export LOCAL_NIM_CACHE=~/.cache/nim
mkdir -p "$LOCAL_NIM_CACHE"

# Add write permissions to the NIM cache for downloading model assets
chmod -R a+w "$LOCAL_NIM_CACHE"

# Start the LLM NIM
docker run -it --rm --name=$CONTAINER_NAME \
  --runtime=nvidia \
  --gpus all \
  --shm-size=16GB \
  -e NGC_API_KEY=$NGC_API_KEY \
  -v "$LOCAL_NIM_CACHE:/opt/nim/.cache" \
  -u $(id -u) \
  -p 8000:8000 \
  $IMG_NAME
Option 3: Hugging Face or Local Disk (Multi-LLM NIM)#
If an LLM-specific NIM container is not yet available for your model, you can use the multi-LLM compatible NIM container to deploy your own model. This approach uses the same common setup steps as NGC deployments but with a different launch process that is only supported by the multi-LLM compatible NIM container.
Model Support#
You can set NIM_MODEL_NAME to downloaded checkpoints from HuggingFace repositories or simply pick from local disk. The checkpoint formats can be one of the following formats:
TRTLLM pre-built checkpoints in full precision and quantized formats
TRTLLM pre-built engines in full precision and quantized formats
Refer to Automatic Profile Selection for more details on which profile will be chosen for a given model.
Launch Multi-LLM NIM with a HuggingFace Model#
# Choose a container name for bookkeeping
export CONTAINER_NAME=LLM-NIM

# Set the multi-LLM NIM repository
export Repository=nim/nvidia/llm-nim

# Set the tag to latest or a specific version (for example, 1.15.0)
export TAG=latest

# Set HF_TOKEN for downloading HuggingFace repository
export HF_TOKEN=hf_xxxxxx

# Choose the multi-LLM NIM image from NGC
export IMG_NAME="nvcr.io/$Repository:$TAG"

# Choose a HuggingFace model
export NIM_MODEL_NAME=hf://meta-llama/Llama-3.1-8B-Instruct

# Choose a served model name
export NIM_SERVED_MODEL_NAME=meta/llama-3.1-8b-instruct

# Choose a path on your system to cache the downloaded models
export LOCAL_NIM_CACHE=~/.cache/nim
mkdir -p "$LOCAL_NIM_CACHE"

# Add write permissions to the NIM cache for downloading model assets
chmod -R a+w "$LOCAL_NIM_CACHE"

# Start the LLM NIM
docker run -it --rm --name=$CONTAINER_NAME \
  --runtime=nvidia \
  --gpus all \
  --shm-size=16GB \
  -e HF_TOKEN=$HF_TOKEN \
  -e NIM_MODEL_NAME=$NIM_MODEL_NAME \
  -e NIM_SERVED_MODEL_NAME=$NIM_SERVED_MODEL_NAME \
  -v "$LOCAL_NIM_CACHE:/opt/nim/.cache" \
  -u $(id -u) \
  -p 8000:8000 \
  $IMG_NAME
Launch Multi-LLM NIM with a Local Model#
# Choose a container name for bookkeeping
export CONTAINER_NAME=LLM-NIM

# Set the multi-LLM NIM repository
export Repository=nim/nvidia/llm-nim

# Set the tag to latest or a specific version (for example, 1.15.0)
export TAG=latest

# Choose the multi-LLM NIM image from NGC
export IMG_NAME="nvcr.io/$Repository:$TAG"

# Set path to local model
export LOCAL_MODEL_DIR=~/meta-llama-3.1-8b-instruct

# Choose a HugginFace model (Local)
export NIM_MODEL_NAME=~/meta-llama-3.1-8b-instruct

# Choose a served model name
# Highly recommended to set this to a custom model name. By default, NIM will pick the path to local model inside the container as model name
export NIM_SERVED_MODEL_NAME=meta/llama-3.1-8b-instruct

# Choose a path on your system to cache the downloaded models
export LOCAL_NIM_CACHE=~/.cache/nim
mkdir -p "$LOCAL_NIM_CACHE"

# Add write permissions to the NIM cache for downloading model assets
chmod -R a+w "$LOCAL_NIM_CACHE"

# Start the LLM NIM
docker run -it --rm --name=$CONTAINER_NAME \
  --runtime=nvidia \
  --gpus all \
  --shm-size=16GB \
  -e NIM_MODEL_NAME="/opt/models/local_model" \
  -e NIM_SERVED_MODEL_NAME=$NIM_SERVED_MODEL_NAME \
  -v "$LOCAL_MODEL_DIR:/opt/models/local_model" \
  -v "$LOCAL_NIM_CACHE:/opt/nim/.cache" \
  -u $(id -u) \
  -p 8000:8000 \
  $IMG_NAME
Note
If you need to deploy behind a proxy, see Deploy Behind a TLS Proxy for NVIDIA NIM for LLMs for more information.
Docker Run Parameters#
Flags |
Description |
|---|---|
|
|
|
Delete the container after it stops (refer to Docker –rm container command) |
|
Give a name to the NIM container for bookkeeping (here |
|
Ensure NVIDIA drivers are accessible in the container. |
|
Expose all NVIDIA GPUs inside the container. See the configuration page for mounting specific GPUs. |
|
Allocate host memory for multi-GPU communication. Not required for single GPU models or GPUs with NVLink enabled. |
|
Provide the container with the token necessary to download adequate models and resources from NGC. See Export the API key. |
|
Mount a cache directory from your system ( |
|
Use the same user as your system user inside the NIM container to avoid permission mismatches when downloading models in your local cache directory. |
|
Forward the port where the NIM server is published inside the container to access from the host system. The left-hand side of |
|
Name and version of the LLM NIM container from NGC. The LLM NIM server automatically starts if no argument is provided after this. |
Note
See the Configuring a NIM topic for information about additional configuration settings.
Note
If you have an issue with permission mismatches when downloading models in your local cache directory, add the -u $(id -u) option to the docker run call.
Note
NIM automatically selects the most suitable profile based on your system specification. For details, see Automatic Profile Selection
Run Inference#
During startup the NIM container downloads the required resources and begins serving the model behind an API endpoint.
INFO: Application startup complete.
INFO: Uvicorn running on http://0.0.0.0:8000 (Press CTRL+C to quit)
Note
While log messages provide helpful information, they should not be relied upon to determine server readiness. Instead, use the /v1/health/ready endpoint to properly check if the server is ready to accept inference requests: curl http://0.0.0.0:8000/v1/health/ready. The server is ready when this endpoint returns a 200 status code with a success message.
Once the server is ready, you can validate the deployment of NIM by executing an inference request. In a new terminal, run the following command to show a list of models available for inference:
curl -X GET 'http://0.0.0.0:8000/v1/models'
To make the output easier to read, pipe the results of curl commands into a tool like jq or python -m json.tool.
For example: curl -s http://0.0.0.0:8000/v1/models | jq.
This command should produce output similar to the following:
{
   "object": "list",
   "data": [
     {
       "id": "meta/llama-3.1-8b-instruct",
       "object": "model",
       "created": 1715659875,
       "owned_by": "vllm",
       "root": "meta/llama-3.1-8b-instruct",
       "parent": null,
       "permission": [
         {
           "id": "modelperm-e39aaffe7015444eba964fa7736ae653",
           "object": "model_permission",
           "created": 1715659875,
           "allow_create_engine": false,
           "allow_sampling": true,
           "allow_logprobs": true,
           "allow_search_indices": false,
           "allow_view": true,
           "allow_fine_tuning": false,
           "organization": "*",
           "group": null,
           "is_blocking": false
         }
       ]
     }
   ]
 }
For comprehensive API documentation, including detailed parameter descriptions, request/response schemas, and additional endpoints, refer to the API Reference. The following examples demonstrate basic usage, but the API Reference provides complete information for customizing requests according to your specific use case.
OpenAI Completion Request#
The Completions endpoint is typically used for base models. With the Completions endpoint, prompts are sent as plain strings, and the model produces the most likely text completions subject to the other parameters chosen. To stream the result, set "stream": true.
To update the model name, such as for a llama-3.1-8b-instruct model, use the following command:
curl -X 'POST' \
    'http://0.0.0.0:8000/v1/completions' \
    -H 'accept: application/json' \
    -H 'Content-Type: application/json' \
    -d '{
      "model": "meta/llama-3.1-8b-instruct",
      "prompt": "Once upon a time",
      "max_tokens": 64
    }'
You can also use the OpenAI Python API library.
from openai import OpenAI
client = OpenAI(base_url="http://0.0.0.0:8000/v1", api_key="not-used")
prompt = "Once upon a time"
response = client.completions.create(
    model="meta/llama-3.1-8b-instruct",
    prompt=prompt,
    max_tokens=16,
    stream=False
)
completion = response.choices[0].text
print(completion)

# Prints:
# , there was a young man named Jack who lived in a small village at the
OpenAI Chat Completion Request#
The Chat Completions endpoint is typically used with chat or instruct tuned models that are designed to be used through a conversational approach. With the Chat Completions endpoint, prompts are sent in the form of messages with roles and contents, giving a natural way to keep track of a multi-turn conversation. To stream the result, set "stream": true.
To update model name, such as for a llama-3.1-8b-instruct model, use the following command:
curl -X 'POST' \
'http://0.0.0.0:8000/v1/chat/completions' \
    -H 'accept: application/json' \
    -H 'Content-Type: application/json' \
    -d '{
      "model": "meta/llama-3.1-8b-instruct",
      "messages": [
          {
              "role":"user",
              "content":"Hello! How are you?"
          },
          {
              "role":"assistant",
              "content":"Hi! I am quite well, how can I help you today?"
          },
          {
              "role":"user",
              "content":"Can you write me a song?"
          }
      ],
      "max_tokens": 32
    }'
You can also use the OpenAI Python API library.
from openai import OpenAI
client = OpenAI(base_url="http://0.0.0.0:8000/v1", api_key="not-used")
messages = [
    {"role": "user", "content": "Hello! How are you?"},
    {"role": "assistant", "content": "Hi! I am quite well, how can I help you today?"},
    {"role": "user", "content": "Write a short limerick about the wonders of GPU computing."}
]
chat_response = client.chat.completions.create(
    model="meta/llama-3.1-8b-instruct",
    messages=messages,
    max_tokens=32,
    stream=False
)
assistant_message = chat_response.choices[0].message
print(assistant_message)
Which prints:
ChatCompletionMessage(content='There once was a GPU so fine,\nProcessed data in parallel so divine,\nIt crunched with great zest,\nAnd computational quest,\nUnleashing speed, a true wonder sublime!', role='assistant', function_call=None, tool_calls=None)
If you encounter a BadRequestError with an error message indicating that you are missing the messages or prompt field, you might inadvertently be using the wrong endpoint.
For example, if you make a Completions request with a request body intended for Chat Completions, you get the following error:
{
  "object": "error",
  "message": "[{'type': 'missing', 'loc': ('body', 'prompt'), 'msg': 'Field required', ...",
  "type": "BadRequestError",
  "param": null,
  "code": 400
}
Conversely, if you make a Chat Completions request with a request body intended for Completions, you get the following error:
{
  "object": "error",
  "message": "[{'type': 'missing', 'loc': ('body', 'messages'), 'msg': 'Field required', ...",
  "type": "BadRequestError",
  "param": null,
  "code": 400
}
Verify that the endpoint you are using, such as /v1/completions or /v1/chat/completions, is correctly configured for your request.
Improving TRT-LLM Performance#
TRT-LLM, which is the runtime for the model configurations listed as optimized in Supported Models for NVIDIA NIM for LLMs, has a number of parameters you can tune to improve performance. Refer to Best Practices for Tuning the Performance of TensorRT-LLM for details.
Parameter-Efficient Fine-Tuning#
Parameter-Efficient Fine-Tuning (PEFT) methods enable efficient adaptation of large pretrained models. Currently NIM only supports LoRA PEFT. See Parameter-Efficient Fine-Tuning for details.
Stopping the container#
If a Docker container is launched with the --name command line option, you can use the following command to stop the running container.
docker stop $CONTAINER_NAME
Use docker kill if stop is not responsive. Follow that command by docker rm $CONTAINER_NAME if you do not intend to restart the container as-is (with docker start $CONTAINER_NAME), in which case you need to re-use the docker run ... instructions from the beginning of this section to start a new container for your NIM.
If you did not start a container with --name, examine the output of the docker ps command to get a container ID for the given image you used.
Kubernetes Installation#
The nim-deploy GitHub repository showcases several reference implementations for Kubernetes installations. These examples are experimental, and might require modification for you to run in your particular cluster set-up.
Serving models from local assets in LLM-specific NIMs#
NIM for LLMs provides utilities which enable downloading models to a local directory either as a model repository or to NIM cache. See the Utilities section for details.
Use the following commands to launch a NIM container. From there, you can view and download models locally.
# Choose a container name for bookkeeping
export CONTAINER_NAME=llama-3.1-8b-instruct

# Set the repository from the registry output (for example, nim/meta/llama-3.1-8b-instruct)
export Repository=nim/meta/llama-3.1-8b-instruct

# Set the tag to latest or a specific version (for example, 1.13.1)
export TAG=latest

# Choose an LLM NIM Image from NGC using the repository and tag from previous steps (for example, llama-3.1-8b-instruct:latest)
export IMG_NAME="nvcr.io/$Repository:$TAG"

# Choose a path on your system to cache the downloaded models
export LOCAL_NIM_CACHE=~/.cache/downloaded-nim
mkdir -p "$LOCAL_NIM_CACHE"

# Add write permissions to the NIM cache for downloading model assets
chmod -R a+w "$LOCAL_NIM_CACHE"

docker run -it --rm --name=$CONTAINER_NAME \
    -e LOG_LEVEL=$LOG_LEVEL \
    -e NGC_API_KEY=$NGC_API_KEY \
    --gpus all \
    -v $LOCAL_NIM_CACHE:/opt/nim/.cache \
    -u $(id -u) \
    $IMG_NAME \
    bash -i
Use the list-model-profiles command to list the available profiles.
list-model-profiles  \
  -e NGC_API_KEY=$NGC_API_KEY
#SYSTEM INFO
#- Free GPUs:
#  -  [26b3:10de] (0) NVIDIA RTX 5880 Ada Generation (RTX A6000 Ada) [current utilization: 1%]
#  -  [26b3:10de] (1) NVIDIA RTX 5880 Ada Generation (RTX A6000 Ada) [current utilization: 1%]
#  -  [1d01:10de] (2) NVIDIA GeForce GT 1030 [current utilization: 2%]
#MODEL PROFILES
#- Compatible with system and runnable:
#  - 19031a45cf096b683c4d66fff2a072c0e164a24f19728a58771ebfc4c9ade44f (vllm-fp16-tp2)
#  - 8835c31752fbc67ef658b20a9f78e056914fdef0660206d82f252d62fd96064d (vllm-fp16-tp1)
#  - With LoRA support:
#    - c5ffce8f82de1ce607df62a4b983e29347908fb9274a0b7a24537d6ff8390eb9 (vllm-fp16-tp2-lora)
#    - 8d3824f766182a754159e88ad5a0bd465b1b4cf69ecf80bd6d6833753e945740 (vllm-fp16-tp1-lora)
#- Incompatible with system:
#  - dcd85d5e877e954f26c4a7248cd3b98c489fbde5f1cf68b4af11d665fa55778e (tensorrt_llm-h100-fp8-tp2-latency)
#  - f59d52b0715ee1ecf01e6759dea23655b93ed26b12e57126d9ec43b397ea2b87 (tensorrt_llm-l40s-fp8-tp2-latency)
#  - 30b562864b5b1e3b236f7b6d6a0998efbed491e4917323d04590f715aa9897dc (tensorrt_llm-h100-fp8-tp1-throughput)
#  - 09e2f8e68f78ce94bf79d15b40a21333cea5d09dbe01ede63f6c957f4fcfab7b (tensorrt_llm-l40s-fp8-tp1-throughput)
#  - a93a1a6b72643f2b2ee5e80ef25904f4d3f942a87f8d32da9e617eeccfaae04c (tensorrt_llm-a100-fp16-tp2-latency)
#  - e0f4a47844733eb57f9f9c3566432acb8d20482a1d06ec1c0d71ece448e21086 (tensorrt_llm-a10g-fp16-tp2-latency)
#  - 879b05541189ce8f6323656b25b7dff1930faca2abe552431848e62b7e767080 (tensorrt_llm-h100-fp16-tp2-latency)
#  - 24199f79a562b187c52e644489177b6a4eae0c9fdad6f7d0a8cb3677f5b1bc89 (tensorrt_llm-l40s-fp16-tp2-latency)
#  - 751382df4272eafc83f541f364d61b35aed9cce8c7b0c869269cea5a366cd08c (tensorrt_llm-a100-fp16-tp1-throughput)
#  - c334b76d50783655bdf62b8138511456f7b23083553d310268d0d05f254c012b (tensorrt_llm-a10g-fp16-tp1-throughput)
#  - cb52cbc73a6a71392094380f920a3548f27c5fcc9dab02a98dc1bcb3be9cf8d1 (tensorrt_llm-h100-fp16-tp1-throughput)
#  - d8dd8af82e0035d7ca50b994d85a3740dbd84ddb4ed330e30c509e041ba79f80 (tensorrt_llm-l40s-fp16-tp1-throughput)
#  - 9137f4d51dadb93c6b5864a19fd7c035bf0b718f3e15ae9474233ebd6468c359 (tensorrt_llm-a10g-fp16-tp2-throughput-lora)
#  - cce57ae50c3af15625c1668d5ac4ccbe82f40fa2e8379cc7b842cc6c976fd334 (tensorrt_llm-a100-fp16-tp1-throughput-lora)
#  - 3bdf6456ff21c19d5c7cc37010790448a4be613a1fd12916655dfab5a0dd9b8e (tensorrt_llm-h100-fp16-tp1-throughput-lora)
#  - 388140213ee9615e643bda09d85082a21f51622c07bde3d0811d7c6998873a0b (tensorrt_llm-l40s-fp16-tp1-throughput-lora)
You can download any of these profiles to the NIM cache using the download-to-cache command. The following example downloads the tensorrt_llm-l40s-fp8-tp1-throughput profile to the NIM cache.
download-to-cache --profile 09e2f8e68f78ce94bf79d15b40a21333cea5d09dbe01ede63f6c957f4fcfab7b
You can also let the download-to-cache decide the most optimal profile given the hardware to download by providing no profiles to download, as shown in the following example.
download-to-cache
Further information on download-to-cache tool, execute the following command:
download-to-cache -h
# Downloads selected or default model profiles to NIM cache. Can be used to pre-
# cache profiles prior to deployment.

# options:
#   -h, --help            show this help message and exit
#   --profiles [PROFILES ...], -p [PROFILES ...]
#                         Profile hashes to download. If none are provided, the
#                         optimal profile is downloaded. Multiple profiles can
#                         be specified separated by spaces.
#   --all                 Set this to download all profiles to cache
#   --lora                Set this to download default lora profile. This
#                         expects --profiles and --all arguments are not
#                         specified.
For information about serving models in an air gap system, see Air Gap Deployment.