Flexera License, Debian Package
Installing Parabricks via the Debian/APT bare metal installer requires:
A working CUDA installation,
Clara Parabricks Debian file (.deb). This file can be downloaded from the Clara Parabricks NGC registry
Access to the Nvidia NGC Licensing Portal.
You can test whether you have CUDA installed by running the following:
nvidia-smi
If the command is not found, you do not receive a valid status message for your GPU or your CUDA version is older than:
CUDA 10.1 for non-Ampere GPUs
CUDA 11.0 for Ampere GPUs
then you will need to install CUDA. Instructions for doing so can be found at https://developer.nvidia.com/cuda-downloads. Once you have installed CUDA, you may proceed with the following steps.
To check if your system has Ampere GPUs, run the following:
nvidia-smi --query-gpu=name --format=csv,noheader
Any GPU labeled with the first letter A (e.g. 'Tesla A100', 'Tesla A40') is an Ampere GPU.
If your machine has more GPUs than you have licenses you will need to specify how many GPUs to use, and which GPUs to use. For example, use the following flags to use only the first two GPUs:
CUDA_VISIBLE_DEVICES="0,1" pbrun [command and inputs] --num-gpus 2
Using a Flexera license requires a dedicated license server but the allows the Clara Parabricks software to be run on multiple machines, depending on how many licenses are purchased.
Setting up a Flexera License Server on Ubuntu: Quick Start Guide
For a more detailed and customizable configuration of the Flexera License Server, please refer to this guide: https://docs.nvidia.com/grid/ls/latest/grid-license-server-user-guide/index.html
Step 1: Download the Clara Parabricks software
Request NVIDIA Parabricks access from https://developer.nvidia.com/clara-parabricks to get an installation package for your GPU server.
Before setting up a license server you must register your entitlements by following your welcome guide directions.
Step 2: Login to the Nvidia license portal
Login to the NVIDIA License Portal by going to https://nvid.nvidia.com.
Step 3: Download the Flexera software
In another browser tab, download the Flexera License Server .zip file by navigating to the NVIDIA License Portal software downloads tab, click on the ‘additional software’ button, and download the latest version of the Linux license server.
Step 4: Setup the Flexera license server
Setup the Flexera License Server on your Ubuntu system:
            # Step 1: Update Installation Packages.
$ sudo apt-get update

# Step 2: Install Java Runtime Environment.
$ sudo apt install -y default-jre

# Step 3: Install and Run Apache Tomcat Server.
$ sudo apt install -y tomcat8
$ sudo systemctl enable tomcat8.service
$ sudo systemctl start tomcat8.service

# Step 4: Unzip the NVIDIA License Server.
$ sudo apt install -y unzip
$ unzip NVIDIA-ls-linux-xxxx.xx.x.xxxxxxxx.zip

# Step 5: Run the NVIDIA License Server Setup.
$ cd NVIDIA-ls-linux-xxxx.xx.x.xxxxxxxx
$ chmod +x setup.bin
$ sudo ./setup.bin
After installation, access the Flexera License Server management interface in a web browser by using the format of the base URL:
scheme://hostname:port/licserver
- scheme
- hostname
- port
The URL scheme, which is either http or https.
The hostname of the license server, which can be a fully-qualified domain name such as gridlicense1.example.com, or an IP address such as 10.31.20.45.
The port number through which the license server is accessed. By default, the http scheme has a port of 8080.
Ensure that the license server host’s firewall is configured to allow remote access to server TCP port 8080.
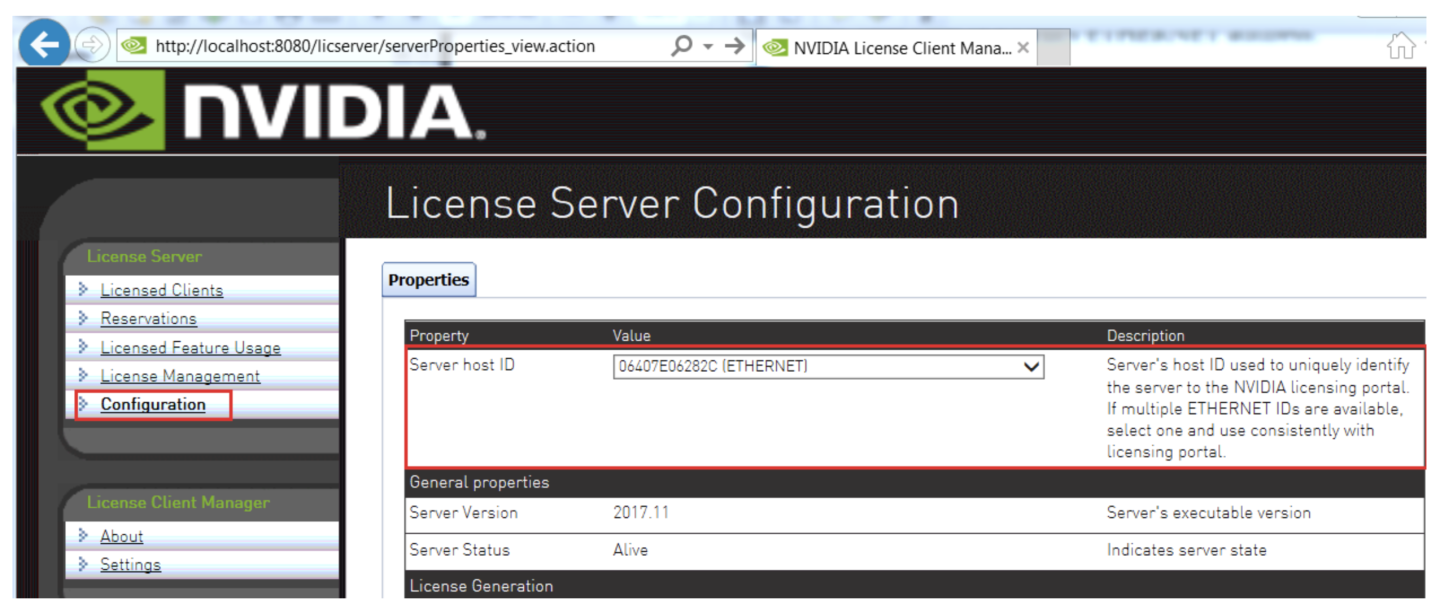
Obtain the MAC address of the machine you're running the Flexera License Server on by navigating to the Configuration tab in the Flexera web interface.
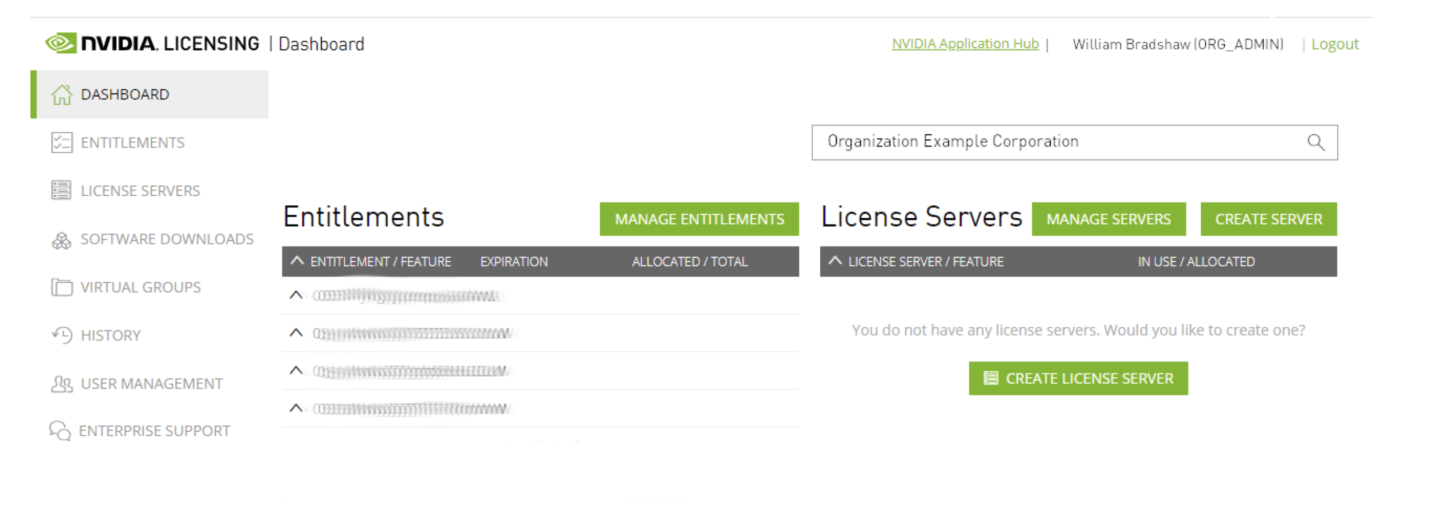
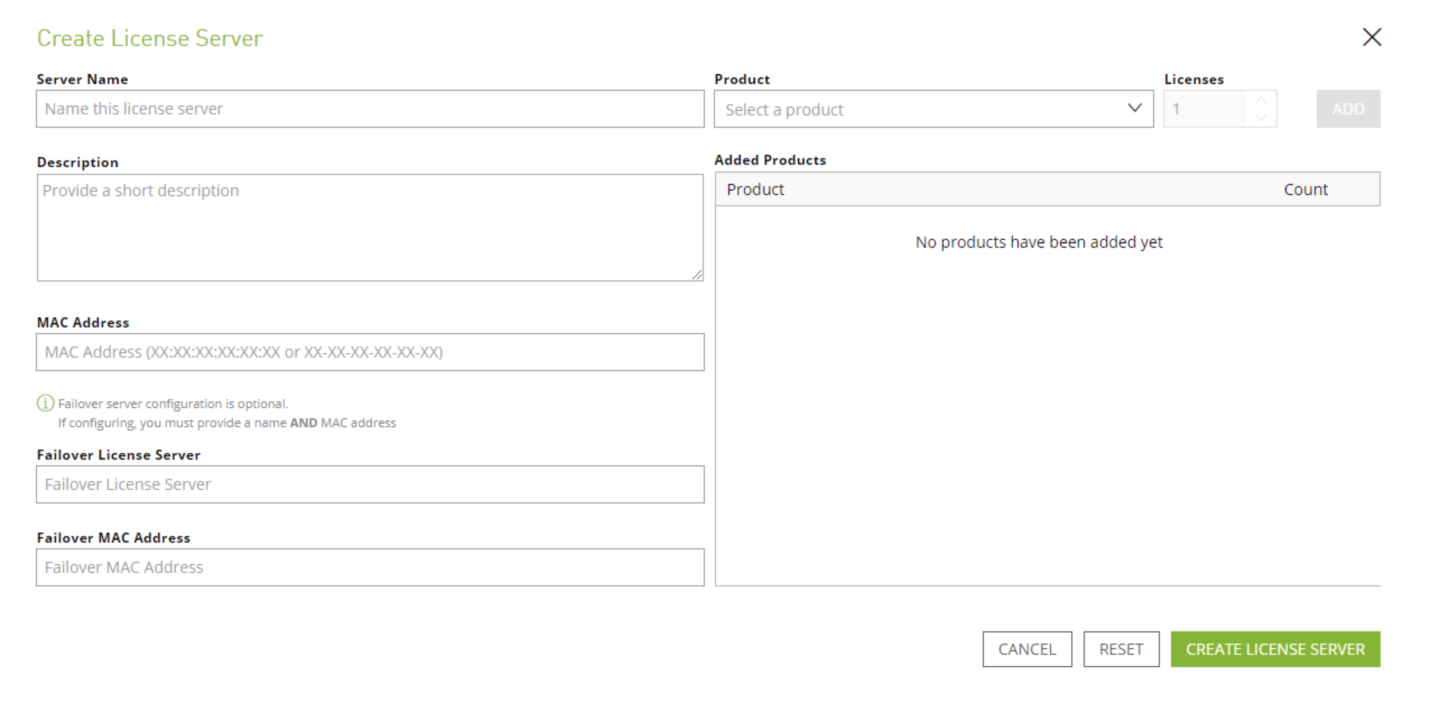
Step 5: Create a license server
Create a License Server in the NVIDIA License Portal by navigating to the License Servers tab and clicking ‘CREATE SERVER’. Make sure to point it to the MAC address of the machine the Flexera license server is running on.
Step 6: Add entitlements
Add the pipeline entitlements to the NVIDIA License Portal License Server you have just created by clicking ‘ADD FEATURES’. Select the pipeline entitlements from the dropdown and then add the number of licenses you have purchased.
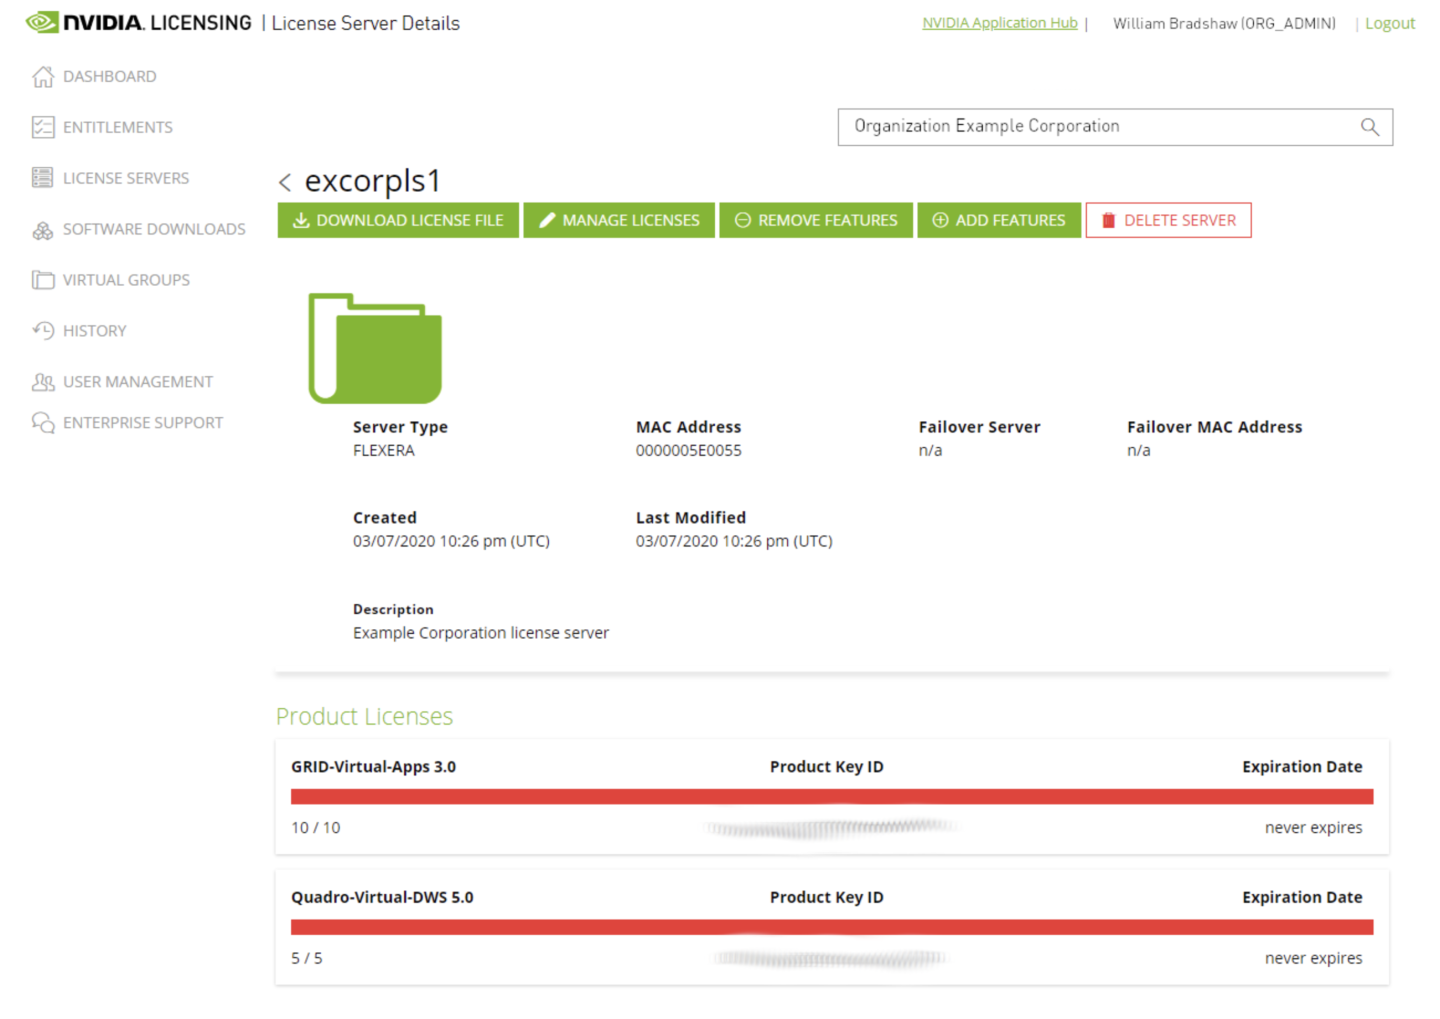
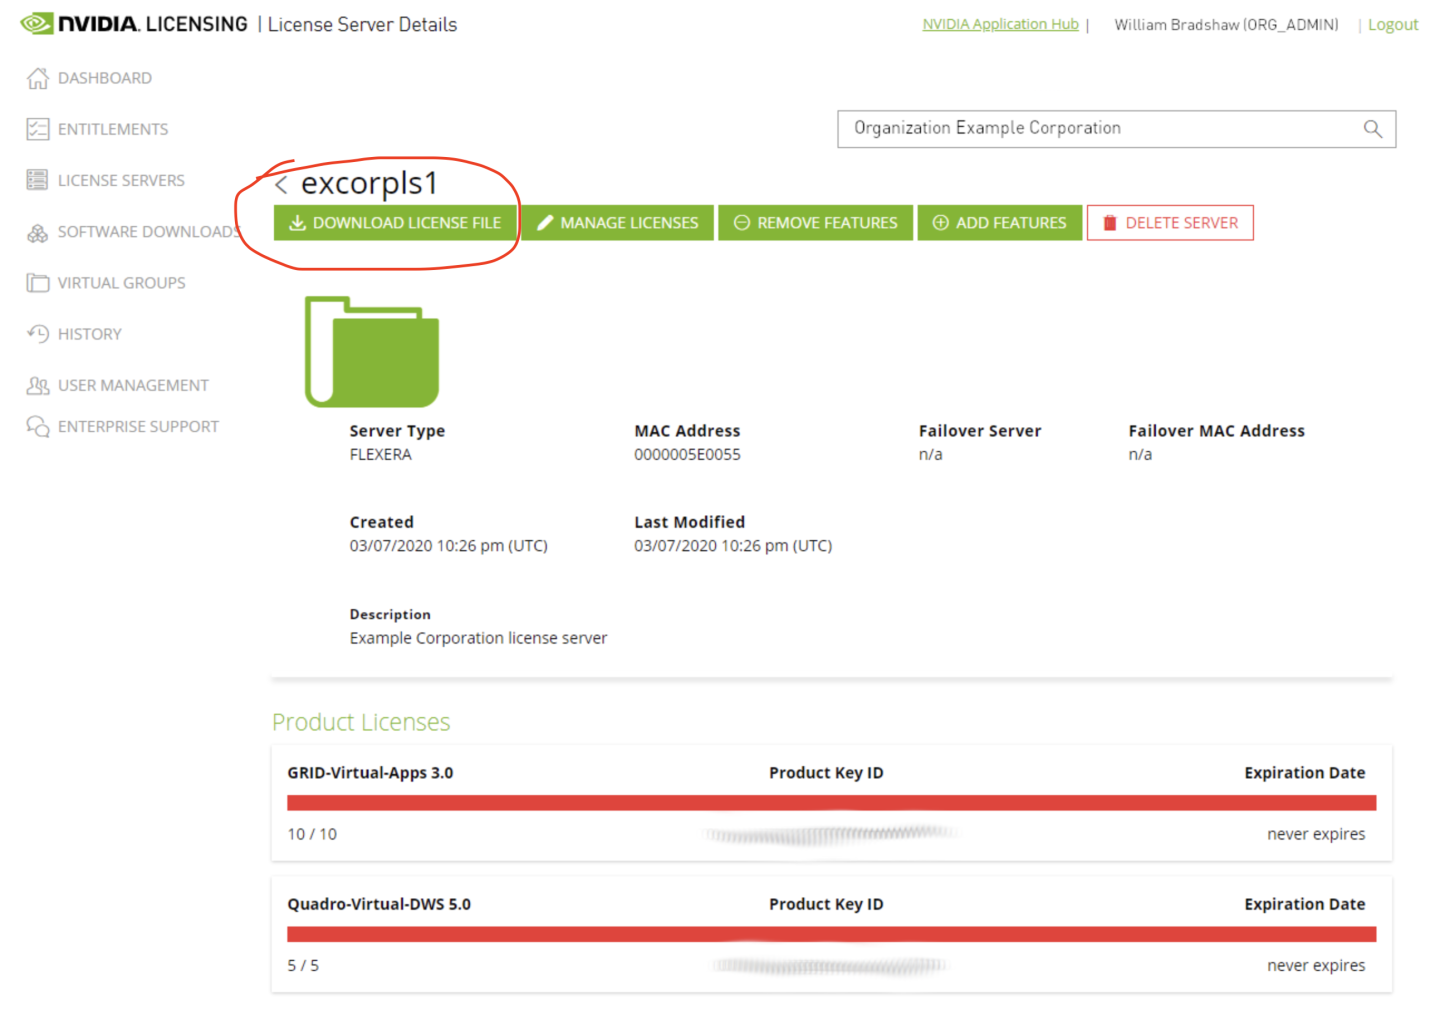
Step 7: Download the license file
Download the license.bin file from the NVIDIA License Portal License Server by clicking the 'DOWNLOAD LICENSE FILE' button. As downloaded, the license file name will be of the form license_0123456789AB_MM-DD-YYYY-HH-MM-SS.bin. Please rename it to license.bin for the next steps.
Step 8: Copy the license file to the Flexera server
Copy the license.bin file to the Flexera License Server by navigating to License Management in the Flexera License Server panel. From here, the license.bin file can be uploaded to the server.
A proper installation will display the message:
Successfully applied license file to license server.
Once the Flexera server setup is complete, follow these steps to copy the license file:
            #Create the license file.
$ sudo echo "flexera-server:<SERVER_IP>" >> /usr/local/parabricks/config.txt

#Copy the license file generated from the Flexera server setup process to installation folder.
$ sudo cp license.bin /usr/local/parabricks/license.bin
If your machine has more GPUs than you have licenses, you will need to specify which, and how many, GPUs to use. For example, use the following flags to select only the first two GPUs:
CUDA_VISIBLE_DEVICES="0,1" pbrun [command and inputs] --num-gpus 2
            wget https://repo.anaconda.com/miniconda/Miniconda3-latest-Linux-x86_64.sh
chmod +x ./Miniconda3-latest-Linux-x86_64.sh
./Miniconda3-latest-Linux-x86_64.sh
## Add Conda path to your environment path
export PATH="<PATH-TO-CONDA>:$PATH"
## Restart your shell, or log out and back in
conda config --remove channels defaults
            ## Create the conda environment and add the conda-forge repos
conda create -y --name parabricks -c conda-forge python=3.7 && \
conda activate parabricks && \
conda config --add channels bioconda

## Install dependencies into the new environment and then deactivate it.
conda install -y Cython matplotlib pysam wheel vcflib && \
conda deactivate
In order to use the optional extra tools (cnvkit, vcfqc, strelka & manta), the following Anaconda environments are required to be set up:
cnvkit (Optional):
            conda create -y --name cnvkit_env -c conda-forge python=3.7 && \
conda activate cnvkit_env && \
conda config --add channels bioconda && \
conda install -y numpy scipy pandas matplotlib reportlab biopython pyfaidx pysam pyvcf networkx==2.5 pomegranate && \
conda deactivate
vcfqc (Optional):
            conda create -y --name vcfqc -c conda-forge python=3.7 && \
conda activate vcfqc && \
pip install pandas==1.0.1 pysam==0.15.4 numpy==1.18.3 pytest jinja2 matplotlib seaborn upsetplot weasyprint bokeh selenium && \
conda deactivate
Manta & Strelka (Optional):
            conda create -y --name manta_strelka -c conda-forge --no-default-packages python=2.7 && \
conda activate manta_strelka && \
conda deactivate
            # Install the software.
$ sudo apt install ./parabricks.deb

# Verify your installation.
# This should display the parabricks version number:
$ pbrun version