Getting Started With The DIGITS Container
Abstract
You can pull (download) an NVIDIA container that is already built, tested, tuned, and ready to run. DIGITS container includes the code required to build the framework so that you can make changes to the internals. Before you can run DIGITS, there are some setup requirements that you must first meet. This guide provides instructions on pulling and using the DIGITS container.
DIGITS (the Deep Learning GPU Training System) is a web app for training deep learning models, and currently supports the TensorFlow framework. DIGITS puts the power of deep learning into the hands of engineers and data scientists.
DIGITS is not a framework. DIGITS is a wrapper for TensorFlow; which provides a graphical web interface to those frameworks rather than dealing with them directly on the command-line.
DIGITS can be used to rapidly train highly accurate deep neural network (DNNs) for image classification, segmentation, object detection tasks, and more. DIGITS simplifies common deep learning tasks such as managing data, designing and training neural networks on multi-GPU systems, monitoring performance in real time with advanced visualizations, and selecting the best performing model from the results browser for deployment. DIGITS is completely interactive so that data scientists can focus on designing and training networks rather than programming and debugging. DIGITS is available through multiple channels such as:
- GitHub download
- NVIDIA’s Docker repository,
nvcr.io
This guide walks you through getting up-and-running with the DIGITS container downloaded from NVIDIA’s Docker repository. To install the DIGITS application by itself, see the DIGITS Installation Guide.
The container image available in the NVIDIA Docker repository, nvcr.io, is pre-built and installed into the /usr/local/python/ directory.
DIGITS also includes the NVIDIA TensorFlow deep learning framework.
Before you can pull a container from the NGC Registry, you must have Docker and nvidia-docker installed. For DGX users, this is explained in Preparing to use NVIDIA Containers Getting Started Guide.
For users other than DGX, follow the NVIDIA® GPU Cloud™ (NGC) registrynvidia-docker installation documentation based on your platform.
You must also have access and be logged into the NGC Registry as explained in the NGC Getting Started Guide. There are four repositories where you can find the NGC docker containers.
-
nvcr.io/nvidia -
The deep learning framework containers are stored in the
nvcr.io/nvidiarepository. -
nvcr.io/hpc -
The HPC containers are stored in the
nvcr.io/hpcrepository. -
nvcr.io/nvidia-hpcvis -
The HPC visualization containers are stored in the
nvcr.io/nvidia-hpcvisrepository. -
nvcr.io/partner -
The partner containers are stored in the
nvcr.io/partnerrepository. Currently the partner containers are focused on Deep Learning or Machine Learning, but that doesn’t mean they are limited to those types of containers.
About this task
On your system, before running the application, use the docker pull command to ensure an up-to-date image is installed. Once the pull is complete, you can run the application. This is because nvidia-docker ensures that drivers that match the host are used and configured for the container. Without nvidia-docker, you are likely to get an error when trying to run the container.
Procedure
- Issue the command for the applicable release of the container that you want. The following command assumes you want to pull the latest container.
docker pull nvcr.io/nvidia/digits:19.xx-tensorflow
- Open a command prompt and paste the pull command. The pulling of the container image begins. Ensure the pull completes successfully before proceeding to the next step.
- Run the application. A typical command to launch the application is:
            docker run --gpus all -it --rm –v local_dir:container_dir
nvcr.io/nvidia/digits:<xx.xx>-<framework>
-itmeans interactive--rmmeans delete the application when finished–vmeans mount directorylocal_diris the directory or file from your host system (absolute path) that you want to access from inside your container. For example, thelocal_dirin the following path is/home/jsmith/data/mnist.-v /home/jsmith/data/mnist:/data/mnist
If you are inside the container, for example,
ls /data/mnist, you will see the same files as if you issued thels /home/jsmith/data/mnistcommand from outside the container.container_diris the target directory when you are inside your container. For example,/data/mnistis the target directory in the example:-v /home/jsmith/data/mnist:/data/mnist
<xx.xx>is the container version. For example,19.01.<framework>is the framework that you want to pull. For example,tensorflow.
- To run the server as a daemon and expose port 5000 in the container to port 8888 on your host:
            docker run --gpus all --name digits -d -p 8888:5000
nvcr.io/nvidia/digits:<xx.xx>-<framework>
Note:Note:DIGITS 6.0 uses port 5000 by default.
- To mount one local directory containing your data (read-only), and another for writing your DIGITS jobs:
            docker run --gpus all --name digits -d -p 8888:5000 -v
/home/username/data:/data -v /home/username/digits-
jobs:/workspace/jobs nvcr.io/nvidia/digits:<xx.xx>-<framework>
Note:Note: In order to share data between ranks, NVIDIA® Collective Communications Library ™ (NCCL) may require shared system memory for IPC and pinned (page-locked) system memory resources. The operating system’s limits on these resources may need to be increased accordingly. Refer to your system’s documentation for details. In particular, Docker containers default to limited shared and pinned memory resources. When using NCCL inside a container, it is recommended that you increase these resources by issuing:
--shm-size=1g --ulimit memlock=-1
in the command line to:
docker run --gpus all
- See
/workspace/README.mdinside the container for information on customizing your DIGITS application. For more information about DIGITS, see:- DIGITS website
- DIGITS project
- nvidia-docker documentation
Note:
Note: There may be slight variations between the Dockerhub images and this image.
The DIGITS application in the NVIDIA Docker repository, nvcr.io, comes with DIGITS, but also comes with TensorFlow. You can read the details in the container release notes here (http://docs.nvidia.com/deeplearning/digits/ ). For example, the 21.01 release of DIGITS includes the 21.01 release of TensorFlow.
DIGITS is a training platform that can be used with NVIDIA TensorFlow deep learning frameworks. Using any of these frameworks, DIGITS will train your deep learning models on your dataset.
The following sections include examples using DIGITS with a TensorFlow backend.
4.1. TensorFlow for DIGITS
TensorFlow for DIGITS works with DIGITS v6.0 and later.
4.1.1. Example 1: MNIST
The MNIST dataset comes with the DIGITS application.
- The first step in training a model with DIGITS and TensorFlow is to pull the DIGITS container from the nvcr.io registry (be sure you are logged into the appropriate registry).
$ docker pull nvcr.io/nvidia/digits:17.04
- After the container has been pulled, you can start DIGITS on the DGX system. Because DIGITS is a web-based frontend for TensorFlow, we will run the DIGITS application in a non-interactive way using the following command.
docker run --gpus all -d --name digits-17.04 -p 8888:5000 nvcr.io/nvidia/digits:17.04
- The first option “-d” tells Docker to run the container in “daemon” mode.
- The “--name” option “names” the running container (we will need this later).
- The “-p 8888:5000” option maps the DIGITS port 5000 to port 8888 (you will see how this is used below).
After you run this command you need to find the IP address of the DIGITS node. This can be found by running the command
ifconfigas shown here:$ ifconfig docker0: flags=4163<UP,BROADCAST,RUNNING,MULTICAST> mtu 1500 inet 192.168.99.1 netmask 255.255.255.0 broadcast 0.0.0.0 inet6 fe80::42:5cff:fefb:1c30 prefixlen 64 scopeid 0x20<link> ether 02:42:5c:fb:1c:30 txqueuelen 0 (Ethernet) RX packets 22649 bytes 5171804 (4.9 MiB) RX errors 0 dropped 0 overruns 0 frame 0 TX packets 29088 bytes 123439479 (117.7 MiB) TX errors 0 dropped 0 overruns 0 carrier 0 collisions 0 enp1s0f0: flags=4163<UP,BROADCAST,RUNNING,MULTICAST> mtu 1500 inet 10.31.229.99 netmask 255.255.255.128 broadcast 10.31.229.127 inet6 fe80::56ab:3aff:fed6:614f prefixlen 64 scopeid 0x20<link> ether 54:ab:3a:d6:61:4f txqueuelen 1000 (Ethernet) RX packets 8116350 bytes 11069954019 (10.3 GiB) RX errors 0 dropped 9 overruns 0 frame 0 TX packets 1504305 bytes 162349141 (154.8 MiB) TX errors 0 dropped 0 overruns 0 carrier 0 collisions 0 ...
In this case, we want the Ethernet IP address since that is the address of the web server for DIGITS (10.31.229.56 for this example). Your IP address will be different.
- We now need to download the MNIST data set into the container. The DIGITS container has a simple script for downloading the data set into the container. As a check, run the following command to make sure the container is running.
            $ docker ps -a

CONTAINER ID    IMAGE                       ...  NAMES

c930962b9636    nvcr.io/nvidia/digits:17.04 ...  digits-17.04
The application is running and has the name that we gave it (
digits-17.04).Next you need to “shell” into the running container from another terminal on the system.
            $ docker exec -it digits-17.04 bash

root@XXXXXXXXXXXX:/workspace#
We want to put the data into the directory
/data/mnist. There is a simple Python script in the application that will do this for us. It downloads the data in the correct format as well.# python -m digits.download_data mnist /data/mnist Downloading url=http://yann.lecun.com/exdb/mnist/train-images-idx3-ubyte.gz ... Downloading url=http://yann.lecun.com/exdb/mnist/train-labels-idx1-ubyte.gz ... Downloading url=http://yann.lecun.com/exdb/mnist/t10k-images-idx3-ubyte.gz ... Downloading url=http://yann.lecun.com/exdb/mnist/t10k-labels-idx1-ubyte.gz ... Uncompressing file=train-images-idx3-ubyte.gz ... Uncompressing file=train-labels-idx1-ubyte.gz ... Uncompressing file=t10k-images-idx3-ubyte.gz ... Uncompressing file=t10k-labels-idx1-ubyte.gz ... Reading labels from /data/mnist/train-labels.bin ... Reading images from /data/mnist/train-images.bin ... Reading labels from /data/mnist/test-labels.bin ... Reading images from /data/mnist/test-images.bin ... Dataset directory is created successfully at '/data/mnist' Done after 13.4188599586 seconds.
- You can now open a web browser to the IP address from the previous step. Be sure to use port 8888 since we mapped the DIGITS port from 5000 to port 8888. For this example, the URL would be the following.
10.31.229.56:8888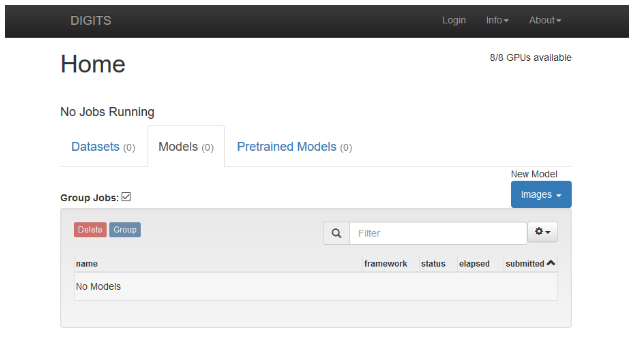
This is the home page of DIGITS. Notice that in the top right corner it says that there are 8 of 8 GPUs available on this DGX-1. For a DGX Station this should be 4 or 4 GPUs available. For NVIDIA NGC Cloud Services on a cloud provider, the number of GPUs should match the number for the instance type.
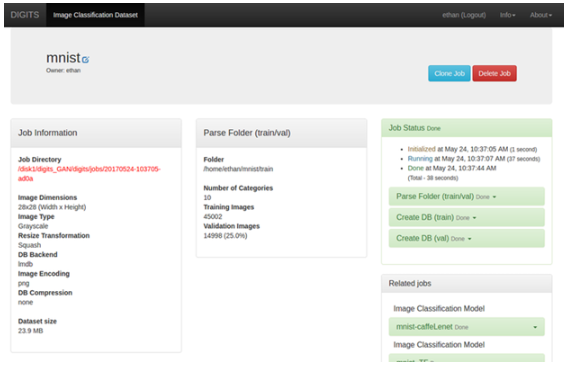
- Load a dataset. We are going to use the MNIST dataset as an example since it comes with the application.
- Click the Datasets tab.
- Click the Images drop down menu and select Classification. If DIGITS asks for a user name, you can enter anything you want. The New Image Classification Dataset window displays. After filling in the fields, your screen should look like the following.
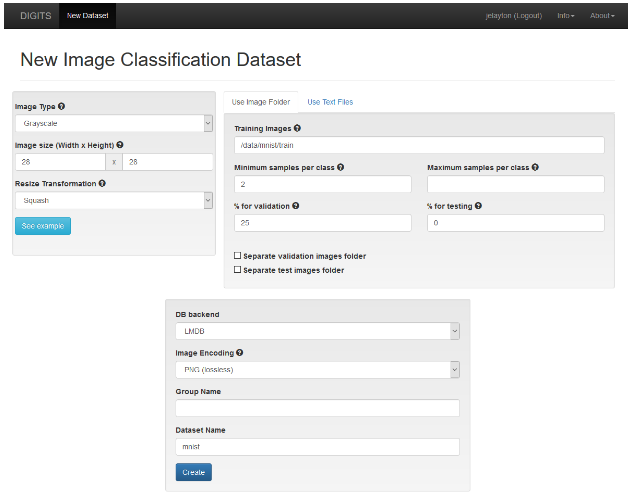
- Provide values for the Image Type and the Image size as shown in the above image.
- Give your dataset a name in the Dataset Name field. You can name the dataset anything you like. In this case the name is just “mnist”.
- Click Create. This tells DIGITS to tell Caffe to load the datasets. After the datasets are loaded, your screen should look similar to the following.
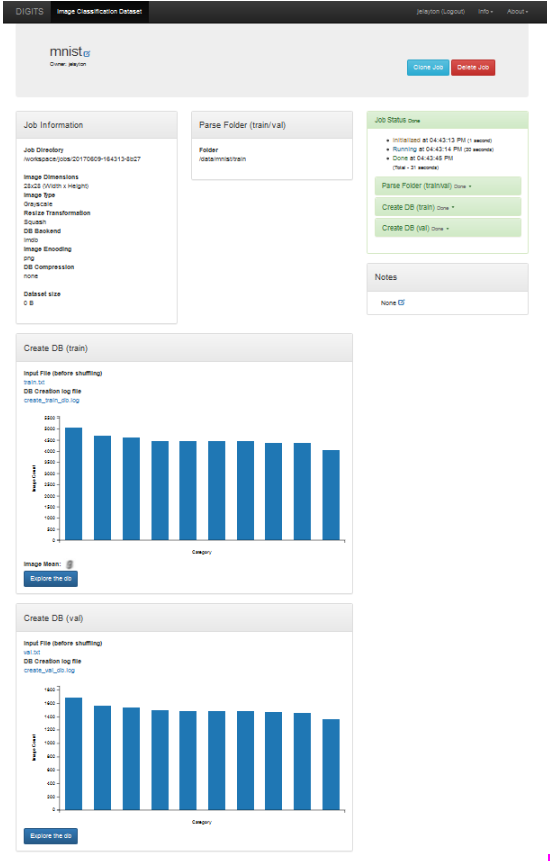 Note:
Note:Note: There are two sections that allow you to “explore” the db (database). The Create DB (train) is for training data and Create DB (val) is for validating data. In either of these displays, you can click Explore the db for the training set.
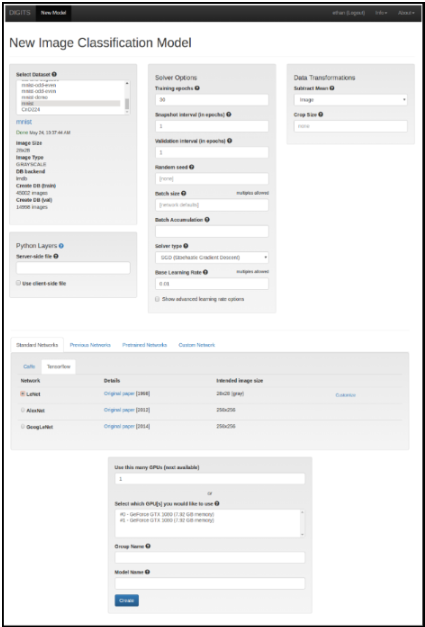
- Train a model. We’re going to use Yann Lecun’s LeNet model as an example since it comes with the application.
- Define the model. Click DIGITS in the upper left corner to be taken back to the home page.
- Click the Models tab.
- Click the Images drop down menu and select Classification. The New Image Classification Model window displays.
- Provide values for the Select Dataset and the training parameter fields.
- In the Standard Networks tab, click Caffe and select the LeNet radio button.
Note:
Note: DIGITS allows you to use previous networks, pretrained networks, and customer networks if you want.
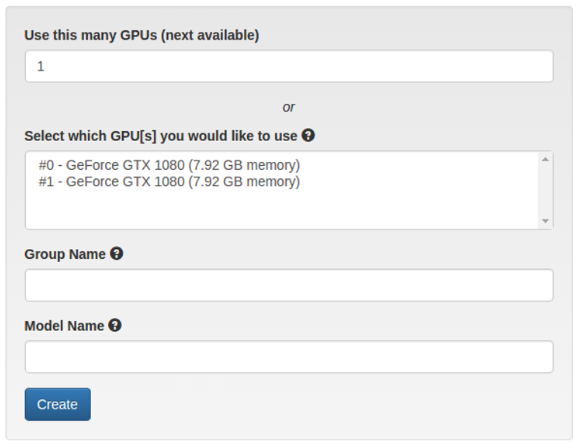
- Click Create. The training of the LeNet model starts.
During the training, DIGITS displays the history of the training parameters, specifically, the loss function for the training data, the accuracy from the validation data set, and the loss function for the validation data. After the training completes, (all 30 epochs are trained), your screen should look similar to the following.
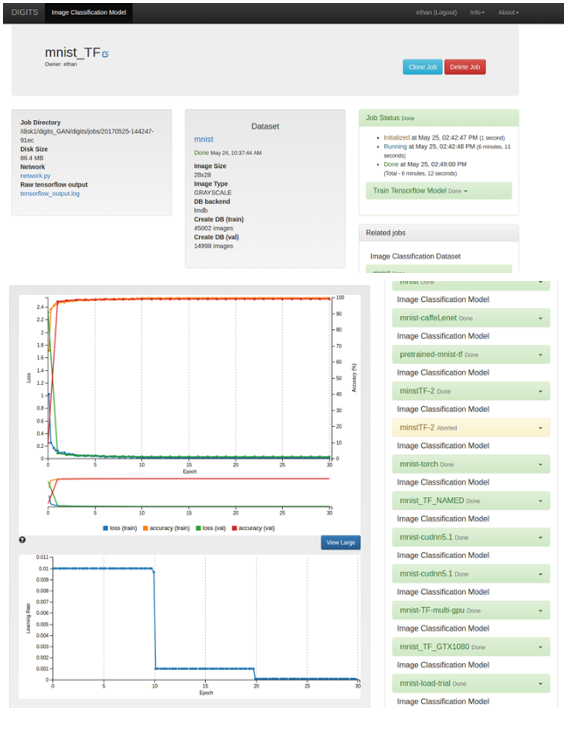 Note:
Note:Note: This screen capture has been truncated because the web page is very long.
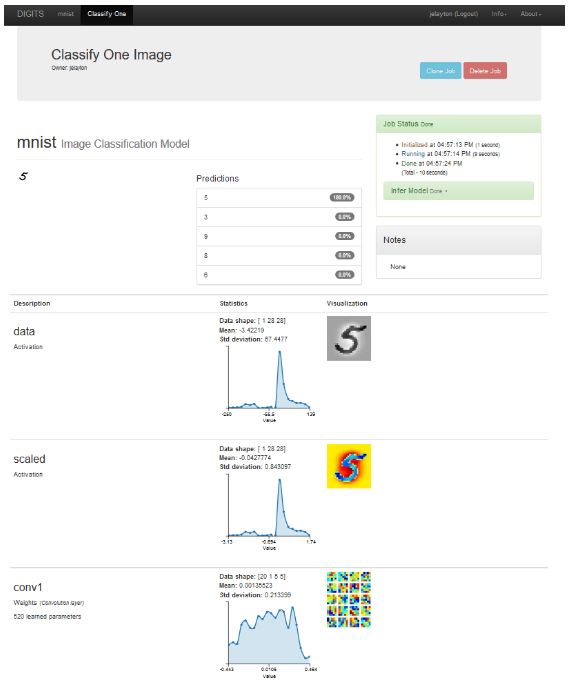
- Optional: You can test some images (inference) against the trained model by scrolling to the bottom of the web page. For illustrative purposes, a single image is input from the test data set. You can always upload an image if you like. You can also input a list of test images if you want.
The screen below does inference against a test image called
/data/mnist/test/5/06206.png. Also, select the Statistics and Visualizations checkbox to ensure that you can see all of the details from the network as well as the network prediction.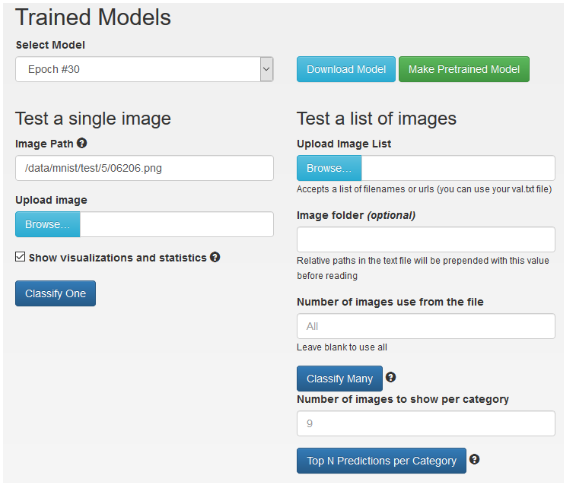 Note:
Note:Note: You can select a model from any of the epochs if you want. To do so, click the Select Model drop down arrow and select a different epoch.
- Click Classify One. This opens another browser tab and displays predictions. The screen below is the output for the test image that is the number “5”.
4.1.2. Example 2: Siamese Network
- In order to train a Siamese dataset, you must first have the MNIST dataset. To create the MNIST dataset, see the “TensorFlow MNIST example”.
- Remember the Job Directory path, since this is needed in this task.
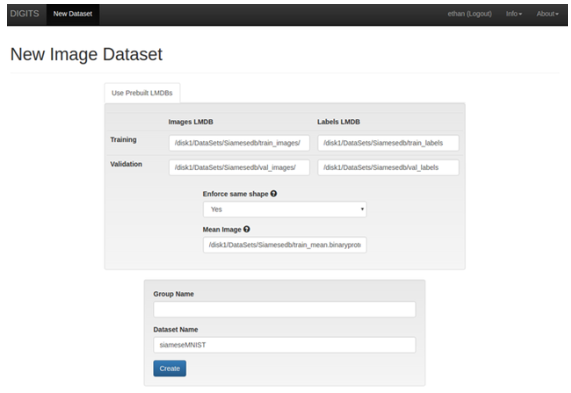
- Execute the Python script available from: https://github.com/NVIDIA/DIGITS/blob/master/examples/siamese/create_db.py. The script requires the following parameters:
Create_db.py <where to save results><the job directory> -c <how many samples>Where:<where to save results>is the directory path where you want to save your output.<the job directory>is the name of the directory that you took note of in the prerequisites.<how many samples>is where you define the number of samples. Set this number to100000.
- Create the Siamese dataset.
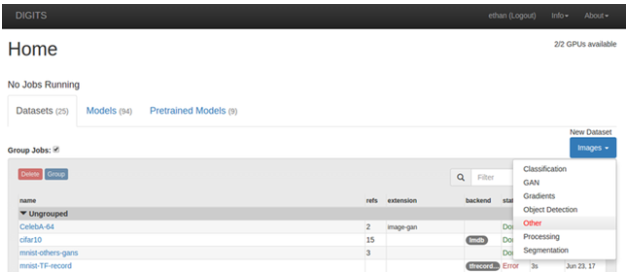
- Click New Model > Images > Other to create the model. In this example, we will use Caffe to train our Siamese network.
- Test the model.
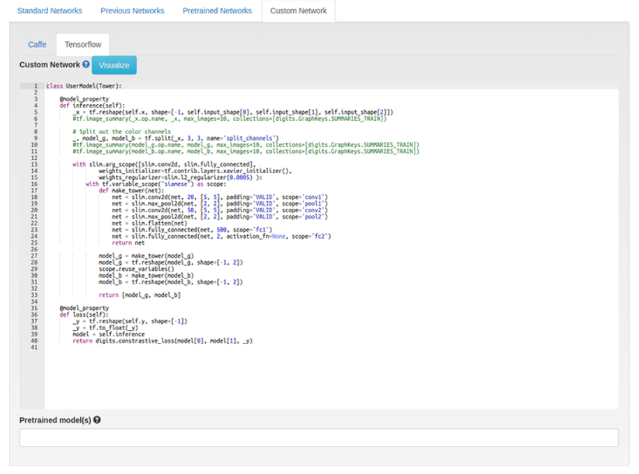
- Click the Custom Network tab and select TensorFlow.
- Copy and paste the following network definition: https://github.com/NVIDIA/DIGITS/blob/master/examples/siamese/siamese-TF.py.
- Ensure the
Base Learning Rateis set to0.01, keep the default settings to all other fields, and click Train.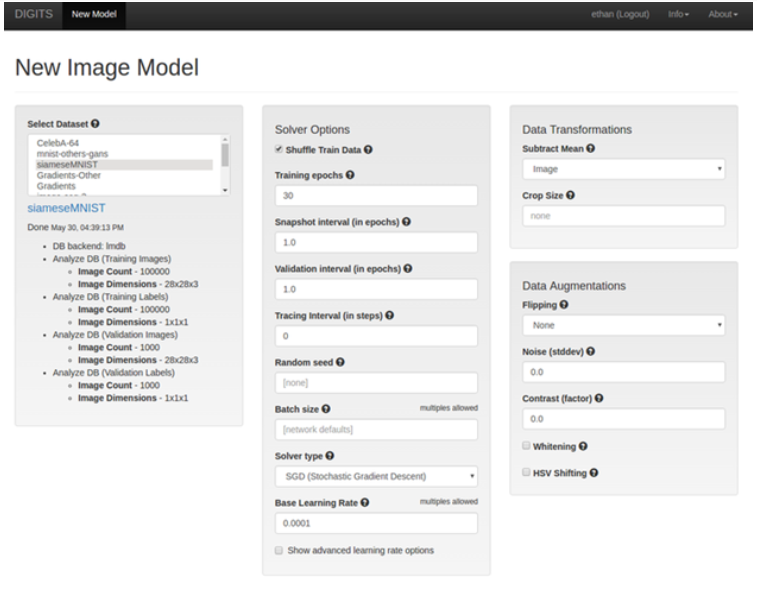

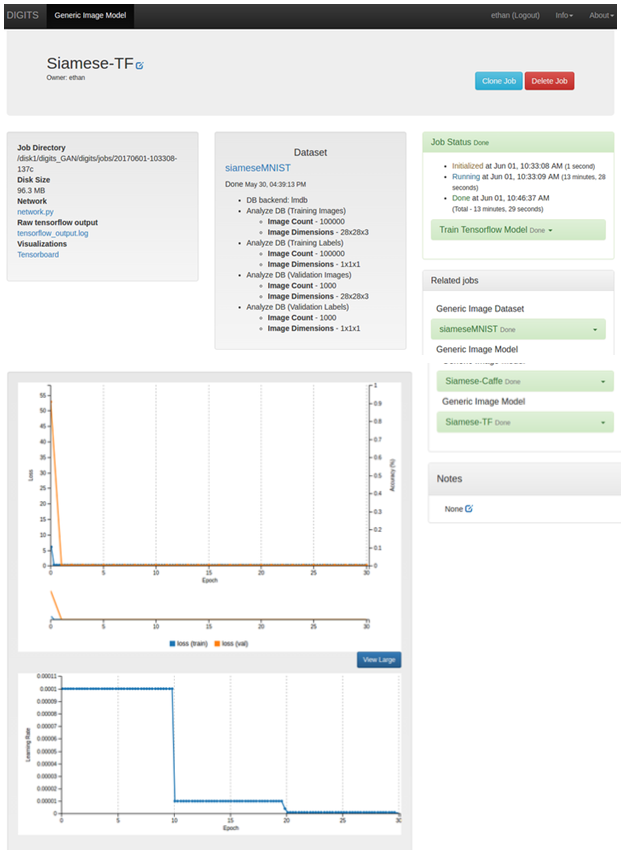
After the model is trained, the graph output should look similar to the following:
- Test an image by uploading one from the same directory location that you specified in the
<where to save results>path.- Select the Show visualization and statistics check box. In order to ensure that the network was trained correctly and everything worked, scroll down to verify the results.

- Near the top, there is an activation result which highlights one of the numbers that exists in the image. In this example, you will see that the number 1 is highlighted.
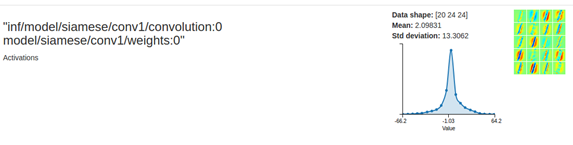
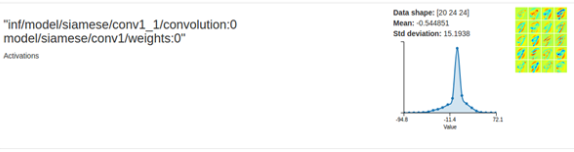
- Scroll down to see another activation result which highlights the other number that exists in the image. In this example, you will see that the number 9 is highlighted.
- Near the top, there is an activation result which highlights one of the numbers that exists in the image. In this example, you will see that the number 1 is highlighted.
- Select the Show visualization and statistics check box. In order to ensure that the network was trained correctly and everything worked, scroll down to verify the results.
For the latest Release Notes, see the DIGITS Release Notes Documentation website: (http://docs.nvidia.com/deeplearning/digits/digits-release-notes/index.html ). For more information about DIGITS, see:
- DIGITS website (https://developer.nvidia.com/digits )
- DIGITS project (https://github.com/NVIDIA/DIGITS/blob/digits-5.0/README.md )
- GitHub documentation (https://github.com/NVIDIA/nvidia-docker/wiki/DIGITS )
Note: There may be slight variations between the NVIDIA-docker images and this image.
Notice
This document is provided for information purposes only and shall not be regarded as a warranty of a certain functionality, condition, or quality of a product. NVIDIA Corporation (“NVIDIA”) makes no representations or warranties, expressed or implied, as to the accuracy or completeness of the information contained in this document and assumes no responsibility for any errors contained herein. NVIDIA shall have no liability for the consequences or use of such information or for any infringement of patents or other rights of third parties that may result from its use. This document is not a commitment to develop, release, or deliver any Material (defined below), code, or functionality.
NVIDIA reserves the right to make corrections, modifications, enhancements, improvements, and any other changes to this document, at any time without notice.
Customer should obtain the latest relevant information before placing orders and should verify that such information is current and complete.
NVIDIA products are sold subject to the NVIDIA standard terms and conditions of sale supplied at the time of order acknowledgement, unless otherwise agreed in an individual sales agreement signed by authorized representatives of NVIDIA and customer (“Terms of Sale”). NVIDIA hereby expressly objects to applying any customer general terms and conditions with regards to the purchase of the NVIDIA product referenced in this document. No contractual obligations are formed either directly or indirectly by this document.
NVIDIA products are not designed, authorized, or warranted to be suitable for use in medical, military, aircraft, space, or life support equipment, nor in applications where failure or malfunction of the NVIDIA product can reasonably be expected to result in personal injury, death, or property or environmental damage. NVIDIA accepts no liability for inclusion and/or use of NVIDIA products in such equipment or applications and therefore such inclusion and/or use is at customer’s own risk.
NVIDIA makes no representation or warranty that products based on this document will be suitable for any specified use. Testing of all parameters of each product is not necessarily performed by NVIDIA. It is customer’s sole responsibility to evaluate and determine the applicability of any information contained in this document, ensure the product is suitable and fit for the application planned by customer, and perform the necessary testing for the application in order to avoid a default of the application or the product. Weaknesses in customer’s product designs may affect the quality and reliability of the NVIDIA product and may result in additional or different conditions and/or requirements beyond those contained in this document. NVIDIA accepts no liability related to any default, damage, costs, or problem which may be based on or attributable to: (i) the use of the NVIDIA product in any manner that is contrary to this document or (ii) customer product designs.
No license, either expressed or implied, is granted under any NVIDIA patent right, copyright, or other NVIDIA intellectual property right under this document. Information published by NVIDIA regarding third-party products or services does not constitute a license from NVIDIA to use such products or services or a warranty or endorsement thereof. Use of such information may require a license from a third party under the patents or other intellectual property rights of the third party, or a license from NVIDIA under the patents or other intellectual property rights of NVIDIA.
Reproduction of information in this document is permissible only if approved in advance by NVIDIA in writing, reproduced without alteration and in full compliance with all applicable export laws and regulations, and accompanied by all associated conditions, limitations, and notices.
THIS DOCUMENT AND ALL NVIDIA DESIGN SPECIFICATIONS, REFERENCE BOARDS, FILES, DRAWINGS, DIAGNOSTICS, LISTS, AND OTHER DOCUMENTS (TOGETHER AND SEPARATELY, “MATERIALS”) ARE BEING PROVIDED “AS IS.” NVIDIA MAKES NO WARRANTIES, EXPRESSED, IMPLIED, STATUTORY, OR OTHERWISE WITH RESPECT TO THE MATERIALS, AND EXPRESSLY DISCLAIMS ALL IMPLIED WARRANTIES OF NONINFRINGEMENT, MERCHANTABILITY, AND FITNESS FOR A PARTICULAR PURPOSE. TO THE EXTENT NOT PROHIBITED BY LAW, IN NO EVENT WILL NVIDIA BE LIABLE FOR ANY DAMAGES, INCLUDING WITHOUT LIMITATION ANY DIRECT, INDIRECT, SPECIAL, INCIDENTAL, PUNITIVE, OR CONSEQUENTIAL DAMAGES, HOWEVER CAUSED AND REGARDLESS OF THE THEORY OF LIABILITY, ARISING OUT OF ANY USE OF THIS DOCUMENT, EVEN IF NVIDIA HAS BEEN ADVISED OF THE POSSIBILITY OF SUCH DAMAGES. Notwithstanding any damages that customer might incur for any reason whatsoever, NVIDIA’s aggregate and cumulative liability towards customer for the products described herein shall be limited in accordance with the Terms of Sale for the product.
VESA DisplayPort
DisplayPort and DisplayPort Compliance Logo, DisplayPort Compliance Logo for Dual-mode Sources, and DisplayPort Compliance Logo for Active Cables are trademarks owned by the Video Electronics Standards Association in the United States and other countries.
HDMI
HDMI, the HDMI logo, and High-Definition Multimedia Interface are trademarks or registered trademarks of HDMI Licensing LLC.
OpenCL
OpenCL is a trademark of Apple Inc. used under license to the Khronos Group Inc.
Trademarks
NVIDIA, the NVIDIA logo, and cuBLAS, CUDA, cuDNN, DALI, DIGITS, DGX, DGX-1, DGX-2, DGX Station, DLProf, Jetson, Kepler, Maxwell, NCCL, Nsight Compute, Nsight Systems, NvCaffe, PerfWorks, Pascal, SDK Manager, Tegra, TensorRT, Triton Inference Server, Tesla, TF-TRT, and Volta are trademarks and/or registered trademarks of NVIDIA Corporation in the U.S. and other countries. Other company and product names may be trademarks of the respective companies with which they are associated.