DIGITS Container User Guide
Abstract
This guide provides a detailed overview about using the DIGITS container. DIGITS is a training platform that can be used with the NVIDIA TensorFlow deep learning framework. Using this framework, DIGITS will train your deep learning models on your dataset.
The Deep Learning GPU Training System™ (DIGITS) puts the power of deep learning into the hands of engineers and data scientists.
DIGITS is not a framework. DIGITS is a wrapper for TensorFlow™ ; which provides a graphical web interface to those frameworks rather than dealing with them directly on the command-line.
DIGITS can be used to rapidly train highly accurate deep neural network (DNNs) for image classification, segmentation, object detection tasks, and more. DIGITS simplifies common deep learning tasks such as managing data, designing and training neural networks on multi-GPU systems, monitoring performance in real time with advanced visualizations, and selecting the best performing model from the results browser for deployment. DIGITS is completely interactive so that data scientists can focus on designing and training networks rather than programming and debugging.
DIGITS can be trained on data that is stored on an S3 endpoint. This can be useful for cases in which data has been stored on a different node and you do not want to manually migrate the data over to the node running DIGITS.
- Load the data into S3. As an example, we will use the following dataset:
python -m digits.download_data mnist ~/mnistThere is a python script called
upload_s3_data.pywhich is provided and can be used to upload these files into a configured S3 endpoint. This script and its accompanying configuration file calledupload_config.cfgis located in thedigits/digits/toolsdirectory.[S3 Config] endpoint = http://your-s3-endpoint.com:80 accesskey = 0123456789abcde secretkey = PrIclctP80KrMi6+UPO9ZYNrkg6ByFeFRR6484qL bucket = digits prefix = mnist
endpoint- Specifies the URL of the endpoint where the S3 data will be stored.accesskey- The access key which will be used to authenticate your access to the endpoint.secretkey- The secret key which will be used to authenticate your access to the endpoint.bucket- The name of the bucket where this data should be stored. If it does not exist, it will be created by the script.prefix- The prefix which will be prepended to all of the key names. This will be used later during the creation of the dataset.
- After the file is configured, run it using:
python upload_s3_data.py ~/mnistNote:Note: The time it takes to complete the upload process depends on your network speed and the computing resources of the S3 endpoint.
After the upload is complete, all of the keys from the dataset will be uploaded into S3 with the appropriate prefix structure to be used during dataset creation later. For example, in the above configuration, the files would be located in the bucket
digitsand prefixed withmnist/train/<0-9>. - Create a dataset within DIGITS.
- On the main screen, click Images > Classification.
- Click the Use S3 tab to specify that you want the data to be accessed from an S3 endpoint.
Note:
Note: The Training Images URL and Bucket Name fields may be filled out from the upload configuration fields endpoint and bucket, respectively. The Training Images Path consists of the prefix specified during the upload appended by
train/. For our example, it would bemnist/train/. The access key and secret key are the credentials which will be used to access the data from the S3 endpoint.Similar to any other dataset, the properties including database backend, image encoding, group name, and dataset name may be specified towards the bottom of the screen. When the dataset has been configured the way you want, click Create.
- If the job processes correctly, then you have successfully created a dataset from data stored in an S3 endpoint. You will see an image similar to the following:
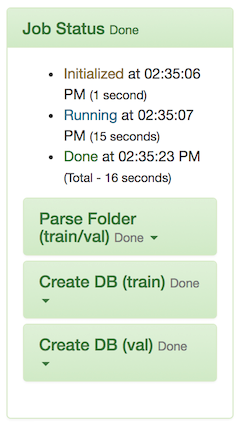
You can now proceed to use this dataset to train your model.
This is a tutorial for writing a DIGITS plugin. This section walks you through the process of adding your own plugin. DIGITS supports ingesting data from a limited number of data sources (list of supported image file formats).
DIGITS data plugins enable a mechanism by which you can extend DIGITS to ingest data from custom sources.
Likewise, DIGITS offers a number of model output visualization types such as Image Classification, Object Detection or Image Segmentation. DIGITS visualization plugins make it possible to visualize the output of non-standard models.
3.1. Reading Data from DICOM Files
In this example, we will implement a data plugin for image segmentation that reads images from DICOM files and their ground-truth from text files. This plugin has already been featured in the medical imaging example. This plugin is referred to as the Sunnybrook plug-in, from the name of the corresponding dataset. The full code is available here. DIGITS may use a data plugin in the following situations:
- when creating a new dataset, in order to create a database
- when performing inference, in order to feed data to a model
Note:
Most of the concepts we need to understand to create a data plugin also apply to writing visualization plugins.
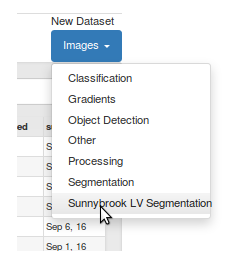
Upon installation of the plugin, DIGITS begins to show a corresponding menu on the main page. For example:
Optionally, if your data module has indicated that it can also ingest data during inference, you will see a Visualization Options menu on the model page.
3.1.1. Data plugin file tree
Below is an example file tree for a data plugin:
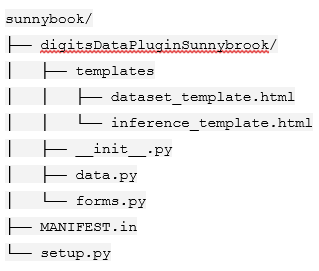
In the following sections, each of the important files are defined which need to be created in order to write a plugin.
3.1.1.1. setup.py
The setup.py file specifies how to install the plugin. The main section of interest here is the invocation of the setup command from setuptools package:
            setup(
    name="digits_sunnybrook_data_plugin",
    version="0.0.1",
    author="Greg Heinrich",
    description=("A data ingestion plugin for the Sunnybrook cardiac dataset"),
    long_description=read('README'),
    license="Apache",
    packages=find_packages(),
    entry_points={
        DIGITS_PLUGIN_GROUP: [
        'class=digitsDataPluginSunnybrook:DataIngestion',
        ]},
    include_package_data=True,
    install_requires=['pydicom'],
)
Upon installation, the Python package will export entry points (entry_points). The sample code is assigning the DataIngestionclass from the digitsDataPluginSunnybrook package to the DIGITS_PLUGIN_GROUP entry point group. This will make it possible for DIGITS to discover installed plugins on startup.
In the install_requires argument we specify the list of Python package dependencies for this plugin. In this case, the plugin requires the pydicom package.
3.1.1.2. MANIFEST.in
The MANIFEST.in file specifies the resource files to include in the plugin package. In this sample, we are recursively including all .html files within the digitsDataPluginSunnybrook folder. If you are writing your own plugin, ensure these files are located inside the package folder.
recursive-include digitsDataPluginSunnybrook *.html
3.1.1.3. init.py
The digitsDataPluginSunnybrook/init.py file indicates that the digitsDataPluginSunnybrook folder is a Python package. In most cases, the digitsDataPluginSunnybrook folder can be left empty. In our case, because we are creating a shortcut to the DataIngestion member of data.py file, we can refer to it as digitsDataPluginSunnybrook:DataIngestion in the setup.py file.
3.1.1.4. data.py
The digitsDataPluginSunnybrook/data.py file implements a DataIngestion class, which implements a DIGITS data extension database (https://github.com/NVIDIA/DIGITS/blob/digits-5.0/digits/extensions/data/interface.py ). Ensure you review the interface API and its docstrings.
The DataIngestion class is the only interface between DIGITS and the Sunnybrook plugin. Familiarize yourself with the interface for details about the required methods to implement in this class. The most important ones are:
get_dataset_form -This is a static method that returns a form (a child offlask.ext.wtf.Form) which contains all the fields required to create a dataset. For example, a form may include text fields to allow users to specify file names or various dataset options.get_dataset_template -This is a static method that returns a Jinja template for the form to display in the DIGITS web user interface; this method also returns a dictionary of context variables that should include all the variables that are referenced in the Jinja template. For example, the Sunnybrook plugin provides the form as context because the Jinja template references this variable to render the form into the web user interface.get_inference_form -This is similar toget_dataset_formbut this is used when showing data ingestion options during inference.Note:Note: This method may return
Noneto indicate that your data plugin cannot be operated during inference. In this case, it is expected that the regular image inference option in DIGITS will work for the model you are training.get_inference_template -This is similar toget_dataset_templatebut this is used during inference.__init__ -This is the initialization routine used to create an instance of the class. During initialization this is provided with two parameters. The first parameter is namedis_inference_dband indicates whether this instance is going to be used during inference. The second parameter is a dictionary that contains all the form fields that were specified by the user either during the dataset creation or when specifying data options for inference.itemize_entries -This method parses form fields in order to generate a list of data sample identifiers. For example, if your data plugin needs to encode all the files in a directory, then the itemized entries could be a list of all the filenames.encode_entry -This method is the core of the data plugin. It reads data associated with one of the identifiers returned initemize_entriesand converts the data into a 3-dimensional NumPy array. This function also returns a label, which may be either a scalar or another 3-dimensional NumPy array. Note: The process of reading an image in a DICOM file is relatively straightforward:f = dicom.read_file(full_path) img = f.pixel_array.astype(np.int)
3.1.1.5. form.py
The digitsDataPluginSunnybrook/form.py file is where we define:
- the
DatasetFormclass to use to specify a dataset - optionally, the
InferenceFormclass to specify inference data
In the Sunnybrook example, instances of these classes are created and returned in DataIngestion:get_dataset_form and DataIngestion:get_inference_form, respectively. These classes are children of flask.ext.wtf.Form. For more information, see WTForms doc .
3.1.1.6. dataset_template.py
The digitsDataPluginSunnybrook/templates/dataset_template.py file is a Jinja template that defines what you will see in the Web user interface. For more information, see Jinja doc .
Note: The Sunnybrook template references the form variable which was given as context in DataIngestion:get_dataset_template. For example:
{{ form.image_folder.label }}
3.1.1.7. inference_template.py
The digitsDataPluginSunnybrook/templates/inference_template.py file is the Jinja template to show inference data options.
3.1.2. Installing the Plugin
In order to install the plugin, you need to run the following command from the directory that includes your data plugin setup.py file.
$ pip install
Next, restart DIGITS for the changes to take effect.
Your plugin is installed.
3.2. Visualization Plugin
Visualization plugins work in a similar way as data plugins. The main difference is that visualization plugins implement the view interface. Refer to the inline docstrings in this file for more information on usage.
For the latest Release Notes, see the DIGITS Release Notes Documentation website: (http://docs.nvidia.com/deeplearning/digits/digits-release-notes/index.html ). For more information about DIGITS, see:
- DIGITS website (https://developer.nvidia.com/digits )
- DIGITS project (https://github.com/NVIDIA/DIGITS/blob/digits-5.0/README.md )
- GitHub documentation (https://github.com/NVIDIA/nvidia-docker/wiki/DIGITS )
Note: There may be slight variations between the NVIDIA-docker images and this image.
Notice
This document is provided for information purposes only and shall not be regarded as a warranty of a certain functionality, condition, or quality of a product. NVIDIA Corporation (“NVIDIA”) makes no representations or warranties, expressed or implied, as to the accuracy or completeness of the information contained in this document and assumes no responsibility for any errors contained herein. NVIDIA shall have no liability for the consequences or use of such information or for any infringement of patents or other rights of third parties that may result from its use. This document is not a commitment to develop, release, or deliver any Material (defined below), code, or functionality.
NVIDIA reserves the right to make corrections, modifications, enhancements, improvements, and any other changes to this document, at any time without notice.
Customer should obtain the latest relevant information before placing orders and should verify that such information is current and complete.
NVIDIA products are sold subject to the NVIDIA standard terms and conditions of sale supplied at the time of order acknowledgement, unless otherwise agreed in an individual sales agreement signed by authorized representatives of NVIDIA and customer (“Terms of Sale”). NVIDIA hereby expressly objects to applying any customer general terms and conditions with regards to the purchase of the NVIDIA product referenced in this document. No contractual obligations are formed either directly or indirectly by this document.
NVIDIA products are not designed, authorized, or warranted to be suitable for use in medical, military, aircraft, space, or life support equipment, nor in applications where failure or malfunction of the NVIDIA product can reasonably be expected to result in personal injury, death, or property or environmental damage. NVIDIA accepts no liability for inclusion and/or use of NVIDIA products in such equipment or applications and therefore such inclusion and/or use is at customer’s own risk.
NVIDIA makes no representation or warranty that products based on this document will be suitable for any specified use. Testing of all parameters of each product is not necessarily performed by NVIDIA. It is customer’s sole responsibility to evaluate and determine the applicability of any information contained in this document, ensure the product is suitable and fit for the application planned by customer, and perform the necessary testing for the application in order to avoid a default of the application or the product. Weaknesses in customer’s product designs may affect the quality and reliability of the NVIDIA product and may result in additional or different conditions and/or requirements beyond those contained in this document. NVIDIA accepts no liability related to any default, damage, costs, or problem which may be based on or attributable to: (i) the use of the NVIDIA product in any manner that is contrary to this document or (ii) customer product designs.
No license, either expressed or implied, is granted under any NVIDIA patent right, copyright, or other NVIDIA intellectual property right under this document. Information published by NVIDIA regarding third-party products or services does not constitute a license from NVIDIA to use such products or services or a warranty or endorsement thereof. Use of such information may require a license from a third party under the patents or other intellectual property rights of the third party, or a license from NVIDIA under the patents or other intellectual property rights of NVIDIA.
Reproduction of information in this document is permissible only if approved in advance by NVIDIA in writing, reproduced without alteration and in full compliance with all applicable export laws and regulations, and accompanied by all associated conditions, limitations, and notices.
THIS DOCUMENT AND ALL NVIDIA DESIGN SPECIFICATIONS, REFERENCE BOARDS, FILES, DRAWINGS, DIAGNOSTICS, LISTS, AND OTHER DOCUMENTS (TOGETHER AND SEPARATELY, “MATERIALS”) ARE BEING PROVIDED “AS IS.” NVIDIA MAKES NO WARRANTIES, EXPRESSED, IMPLIED, STATUTORY, OR OTHERWISE WITH RESPECT TO THE MATERIALS, AND EXPRESSLY DISCLAIMS ALL IMPLIED WARRANTIES OF NONINFRINGEMENT, MERCHANTABILITY, AND FITNESS FOR A PARTICULAR PURPOSE. TO THE EXTENT NOT PROHIBITED BY LAW, IN NO EVENT WILL NVIDIA BE LIABLE FOR ANY DAMAGES, INCLUDING WITHOUT LIMITATION ANY DIRECT, INDIRECT, SPECIAL, INCIDENTAL, PUNITIVE, OR CONSEQUENTIAL DAMAGES, HOWEVER CAUSED AND REGARDLESS OF THE THEORY OF LIABILITY, ARISING OUT OF ANY USE OF THIS DOCUMENT, EVEN IF NVIDIA HAS BEEN ADVISED OF THE POSSIBILITY OF SUCH DAMAGES. Notwithstanding any damages that customer might incur for any reason whatsoever, NVIDIA’s aggregate and cumulative liability towards customer for the products described herein shall be limited in accordance with the Terms of Sale for the product.
VESA DisplayPort
DisplayPort and DisplayPort Compliance Logo, DisplayPort Compliance Logo for Dual-mode Sources, and DisplayPort Compliance Logo for Active Cables are trademarks owned by the Video Electronics Standards Association in the United States and other countries.
HDMI
HDMI, the HDMI logo, and High-Definition Multimedia Interface are trademarks or registered trademarks of HDMI Licensing LLC.
OpenCL
OpenCL is a trademark of Apple Inc. used under license to the Khronos Group Inc.
Trademarks
NVIDIA, the NVIDIA logo, and cuBLAS, CUDA, cuDNN, DALI, DIGITS, DGX, DGX-1, DGX-2, DGX Station, DLProf, Jetson, Kepler, Maxwell, NCCL, Nsight Compute, Nsight Systems, NvCaffe, PerfWorks, Pascal, SDK Manager, Tegra, TensorRT, Triton Inference Server, Tesla, TF-TRT, and Volta are trademarks and/or registered trademarks of NVIDIA Corporation in the U.S. and other countries. Other company and product names may be trademarks of the respective companies with which they are associated.