Cluster Management#
This chapter introduces cluster management with NVIDIA Base Command Manager (BCM). A cluster running the cluster manager exports a cluster management interface to the outside world, which can be used by any application designed to communicate with the cluster.
Concepts#
In this section, some concepts central to cluster management with the cluster manager are introduced.
Devices#
A device in the cluster manager infrastructure represents components of a cluster. A device can be any of the following types:
Head node
Physical node
Chassis
Ethernet switch
InfiniBand switch
Power Distribution unit
Generic device
A device can have several properties (such as rack position, hostname, and switch port) which can be set to configure the device. Using the cluster manager, operations (for example, power on) may be performed on a device. The property changes and operations that can be performed on a device depend on the type of device. For example, it is possible to mount a new filesystem to a node, but not to an Ethernet switch.
Every device that is managed by the cluster manager has a device state associated with it. Table 3 describes the most important states for devices. All have state tracking enabled.
Device status |
Device is |
Monitored by BCM? |
|---|---|---|
[ UP ] |
UP |
monitored |
[ DOWN ] |
DOWN |
monitored |
[ CLOSED ] (UP) |
UP |
mostly ignored |
[ CLOSED ] (DOWN) |
DOWN |
mostly ignored |
These and other states are described in more detail in Section 5.5 of the Bright Cluster Manager Administrator Manual.
[ DOWN ] and [ CLOSED ] (DOWN) states have an important difference. In the case of [ DOWN ], the device is down, but is typically intended to be available, and thus typically indicates a failure. In the case of [ CLOSED ] (DOWN), the device is down, but is intended to be unavailable, and typically indicates that the administrator deliberately brought the device down and would like the device to be ignored.
Software Images#
A software image is a blueprint for the contents of the local filesystems on a compute node. In practice, a software image is a directory on the head node containing a full Linux filesystem.
In the DGX SuperPOD, all nodes managed by (meaning all management and DGX nodes) share the same base operating system (OS), with the DGX nodes including the customizations of DGX Base OS.
When a non-compute node boots, the node provisioning system sets up the node with the software image associated with that node category (Section 2.1.3). Often this is a copy of the default software image, called default-image. DGX nodes are provisioned with a copy of the DGX OS image, identified by the dgx- prefix in the image name.
After the node is fully booted, it is possible to instruct the node to re-synchronize its local filesystems with the software image. This procedure can be used to distribute changes to the software image without rebooting nodes.
It is also possible to lock a software image so that no node is able to pick up the image until the software image is unlocked.
Software images can be changed using regular Linux tools and commands (such as apt and chroot). More details on making changes to software images and doing image package management can be found in Chapter 11 of the Bright Cluster Manage Administrator Manual.
Node Categories#
The collection of settings in the cluster manager that can apply to a node is called the configuration of the node. The administrator usually configures nodes using the Base View or cmsh front-end tools, and the configurations are managed internally with a database.
A node category is a group of compute nodes that share the same configuration. Node categories bring efficiency, enabling an administrator to:
Configure a large group of nodes concurrently. For example, to set up a group of nodes with a particular disk layout.
Operate on a large group of nodes concurrently. For example, to conduct a reboot on an entire category.
The default node categories for BCM installed on a DGX SuperPOD are shown in Table 4.
System Type |
Node Category |
Description |
|---|---|---|
login |
slogin |
login-image |
compute |
dgxnodes |
dgxos-image |
others |
default |
default-image |
The default category can be changed by accessing the base object of partition mode and setting the value of defaultcategory to another, existing, category. System types other than login or compute are automatically placed in the default node category.
Nodes are typically divided into categories based upon its hardware specifications or the task that it is to perform. Whether or not nodes should be placed in a separate category depends on whether the configuration—for example: monitoring setup, disk layout, role assignment—for these nodes differs from the rest of the nodes.
A node inherits values from the category that it is in. Each value is treated as the default property value for a node and can be overruled by specifying the node property value for a particular node.
One configuration property value of a node category is its software image. However, there is no requirement for a one-to-one correspondence between node categories and software images. Multiple node categories may use the same software image, and conversely, one variable image—it is variable because it can be changed by the node setting—may be used in the same node category.
Software images can have their parameters overruled by the category settings. By default, however, the category settings that can overrule the software image parameters are unset.
Node Groups#
A node group consists of nodes that have been grouped together for convenience. The default node group assignments for BCM on a DGX SuperPOD are shown in Table 5.
Node Group |
Members |
|---|---|
su1 |
dgx001..dgx020 |
su2 |
dgx021..dgx040 |
login |
slogin1, slogin2 |
Node groups can consist of any mix of all kinds of nodes, irrespective of whether they are head nodes or compute nodes, and irrespective of what category they are in. A node may be in zero or more node groups at one time. That is, a node may belong to many node groups.
Node groups are used for carrying out operations on an entire group of nodes at a time. Because the nodes inside a node group do not necessarily share the same configuration, configuration changes cannot be conducted using node groups.
One important use for node groups is in the nodegroups property of the provisioning role configuration where a list of node groups that can configure node provisions is specified.
Roles#
A role is a task that can be performed by a node. By assigning a certain role to a node, an administrator activates the functionality that the role represents on this node. For example, a node can be turned into provisioning node, or can be turned into a storage node, by assigning the corresponding roles to the node.
Roles can be assigned to individual nodes or to node categories. Once assigned, a role is implicitly assigned to all nodes inside the category.
A configuration overlay is a group of roles that can be assigned to designated groups of nodes within a cluster. This enables configuration of many configuration parameters in various combinations of nodes.
Some roles allow parameters to be set that influence the behavior of the role. For example, the Slurm client role (which turns a node into a Slurm client) uses parameters to control how the node is configured within Slurm in terms of queues and the number of GPUs.
When a role has been assigned to a node category with a certain set of parameters, it is possible to override those parameters. This can be done by reassigning the role to the individual node with a different set of parameters. Roles that have been thus assigned override roles that have been assigned to a node category.
Roles have a priority setting associated with them. Roles assigned at category level have a fixed priority of 250, while roles assigned at node level have a fixed priority of 750. The configuration overlay priority is variable but is set to 500 by default. For example, roles assigned at the node level override roles assigned at the category level. Roles assigned at the node level also override roles assigned by the default configuration overlay.
A role can be imported from another entity, such as a role, a category, or a configuration overlay. Examples of role assignment are given in Sections 5.2.2 and 5.2.3 of the Bright Cluster Manager Administration Manual.
Authentication#
Changing Administrative Passwords#
Note
How to setup or change regular user passwords is discussed in :ref: user-management.
The cm-change-passwd command is used to administer these:
Head node: allows a root login to the head node.
Software images: allows a root login to a compute node running with that image and is stored in the image file.
Node installer: allows a root login to the node when the node-installer, a stripped-down operating system (OS), is running. The node-installer stage prepares the node for the final OS when the node is booting up. See Section 5.4 of the Bright Cluster Manager Administrator Manual for more information about the node-installer.
MySQL: allows a root login to the MySQL server used by.
It has a dialog prompting the administrator on which of them, if any, should be changed.
 1[root©headnode ~]# cm-change-passwd
 2With this utility you can easily change the following passwords:
 3* root password of head node
 4* root password of slave images
 5* root password of node-installer
 6* root password of mysql
 7
 8Note: if this cluster has a high-availability setup with 2 head
 9    nodes, be sure to run this script on both head nodes.
10
11Change password for root on head node? [y/N]: y
12Changing password for root on head node.
13Changing password for user root.
14New password:
15Retype new password:
16passwd: all authentication tokens updated successfully.
17
18Change password for root in default-image [y/N]: y Changing password for root in default-image.
19Changing password for user root. New password:
20Retype new password:
21passwd: all authentication tokens updated successfully.
22
23Change password for root in node-installer? [y/N]: y
24Changing password for root in node-installer.
25Changing password for user root. New password:
26Retype new password:
27passwd: all authentication tokens updated successfully.
28
29Change password for MYSQL root user? [y/N]: y
30Changing password for MYSQL root user.
31Old password:
32New password:
33Re-enter new password:
For an HA configuration, the passwords are copied over automatically to the other head node when a change is made to the root password of the software image. This allows a root login to a regular node running with that image.
For the remaining password cases (head root password, MySQL root password, and node-installer root password), the passwords are best “copied” to the other head node by rerunning the script on that head node.
Also, for software images passwords used by the compute nodes: the new password that is set for a compute node only works on the node after the image on the node itself has been updated, with, for example, the imageupdate command. Alternatively, the new password can be made to work on the node by rebooting the node to pick up the new image.
The LDAP root password is a random string set during installation. Changing this is not done using cm-change-password. It can be changed as explained in Appendix I of the Bright Cluster Manager Administrator Manual.
If the administrator has stored the password to the cluster in the Base View front-end, then the password should be modified there too (Figure 2).
ssh Logins#
The standard system login root password of the head node, the software image, and the node-installer, can be set using the cm-change-passwd command (2.2.1). In contrast, ssh logins from the head node to the compute nodes are set by default to be passwordless:
For non-root users, an ssh passwordless login works if the /home directory that contains the authorized keys for these users is mounted. The /home directory is mounted by default on the head node as well as on the compute node, so that by default a passwordless login works from the head node to the compute nodes, as well as from the compute nodes to the head node.
For the root user, an ssh passwordless login should always work from the head node to the compute nodes since the authorized keys are stored in /root. Logins from the compute node to the head node are configured by default to request a password, as a security consideration.
Users can be restricted from ssh logins:
On compute nodes using the usernodelogin or User node login settings.
On the head node by modifying the sshd configuration. For example, to allow only root logins, the value of AllowUsers can be set in /etc/ssh/sshd_config to root. See the sshd_config man page for more information.
Certificates#
PEM Certificates and CMDaemon Front-end Authentication#
While nodes in the cluster accept ordinary ssh logins, the cluster manager accepts public key authentication using X509v3 certificates. Public key authentication using X509v3 certificates means that the user authenticating to the cluster manager must present their public certificate, and in addition must have access to the private key that corresponds to the certificate.
The cluster manager uses the PEM format for certificates. In this format, the certificate and private key are stored as plain text in two separate PEM-encoded files, ending in .pem and .key.
Using cmsh and Authenticating to CMDaemon#
By default, one administrator certificate is created for root for the cmsh front-end to interact with the cluster manager. The certificate and corresponding private key are thus found on a newly installed cluster manager cluster on the head node at:
/root/.cm/admin.pem
/root/.cm/admin.key
The cmsh front-end, when accessing the certificate and key pair as user root, uses this pair by default, so that prompting for authentication is then not a security requirement. The logic that is followed to access the certificate and key by default is explained in detail in Section 4.4.2.6.
Using Base View and Authenticating to the Cluster Manager#
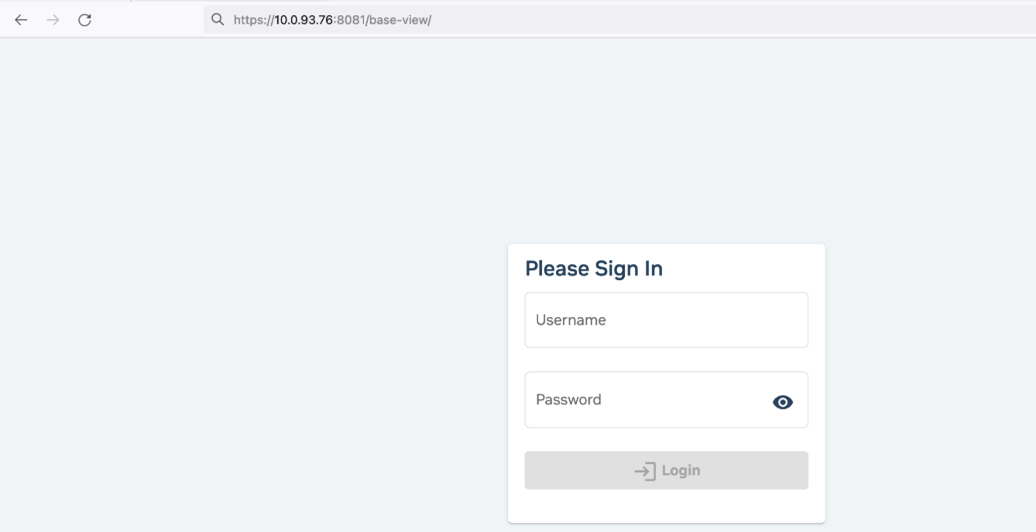
When an administrator uses the Base View front-end, a login to the cluster is conducted with username password authentication (Figure 2) unless the authentication has already been stored in the browser, or unless certificate-based authentication is used.
- Certificate-based authentication can be carried out using a PKCS#12 certificate file. This can be generated from the PEM format certificates. For example, for the root user, an openssl command that can be used to generate the admin.pfx file is:
openssl pkcs12 -export -in ~/.cm/admin.pem -inkey ~/.cm/admin.key -out ~/.cm/admin.pfx
In Chrome, the IMPORT wizard at chrome://settings/certificates can be used to save the file into the browser.
- For Firefox, the equivalent clickpath is
about:preferences#privacy>Certificates>View Certificates>Your>Certificates>Import.
The browser can then access the Base View front-end without a username/password combination.
If the administrator certificate and key are replaced, then any other certificates signed by the original administrator certificate must be generated again using the replacement, because otherwise they will no longer function.
Certificate generation in general, including the generation and use of non-administrator certificates, is described in greater detail in 4.4.
Profiles#
Certificates that authenticate to CMDaemon contain a profile.
A profile determines which cluster management operations that the certificate holder may perform. The administrator certificate is created with the admin profile, which is a built-in profile that enables all cluster management operations to be performed. In this sense, it is like the root account on unix systems. Other certificates may be created with different profiles giving certificate owners access to a predefined subset of the cluster management functionality (4.4).
Base View GUI#
This section introduces the basics of the Base View, which is the web application front end to the cluster manager. Base View is supported to run on the latest two publicly available desktop versions of Firefox, Google Chrome, Edge, and Safari at the time of release of BCM. Browsers that run on mobile devices are not supported.
Cluster Management GUI Service#
In the DGX SuperPOD, the GUI interface is provided as a web service on port 8081 from the head node to the browser. Its direct URL takes the form:
https://<host name or IP address>:8081/base-view
The cluster manager package that provides the service is base-view.
Base View Login Window#
Figure 2 shows the login dialog window for Base View. Use this window to administer that Base View service on the cluster. At the time of DGX SuperPOD deployment, at least one login is available: the root user, with the password selected during DGX SuperPOD installation (often documented on the Site Survey before installation).
Figure 2. Base View login
Base View Default Display on Connection#
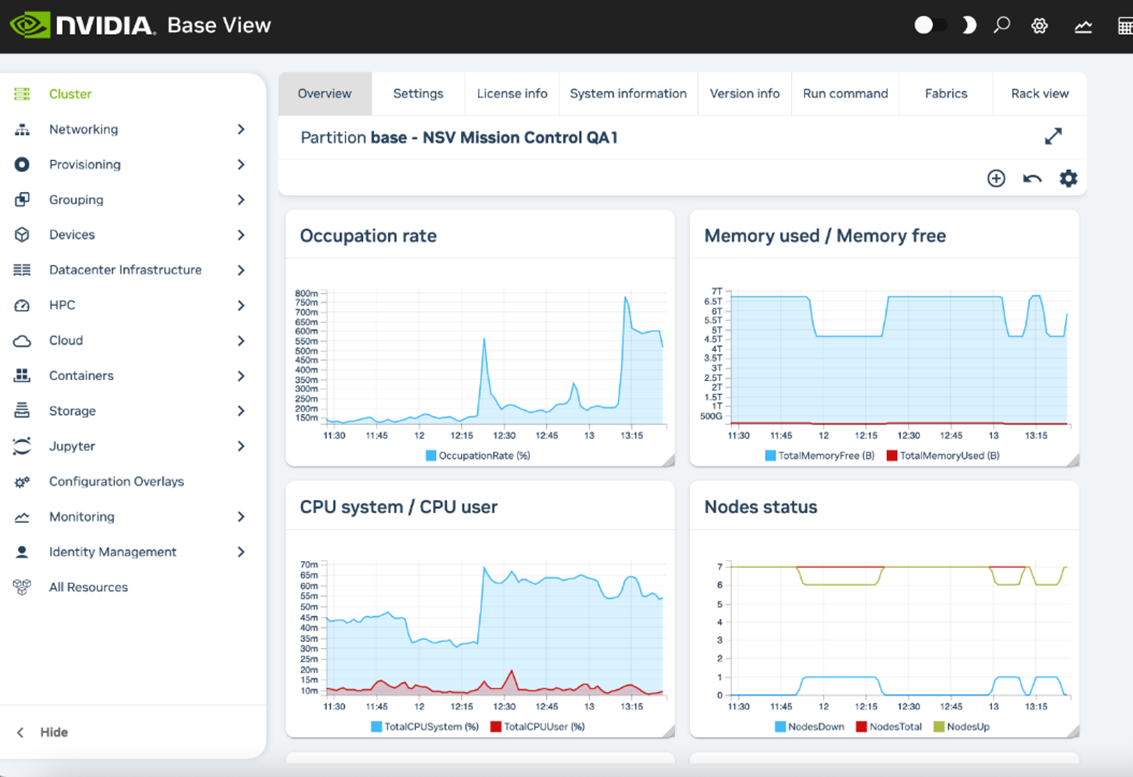
By default, an overview window is displayed (Figure 3). It shows the Occupation rate, memory used, CPU cycles used, node statuses, and other cluster details. It corresponds to clickpath Cluster>Partition base.
Figure 3. Cluster overview
Navigating the Cluster with Base View#
Aspects of the cluster can be managed by administrators using Base View (Figure 3). The resource tree, displayed on the left side of the window, consists of available cluster usage concepts such as Provisioning, Grouping, HPC, Cloud, and Containers. It also has a cluster-centric approach to miscellaneous system concepts such as hardware devices Devices, non-hardware resources such as Identity Management, and Networking.
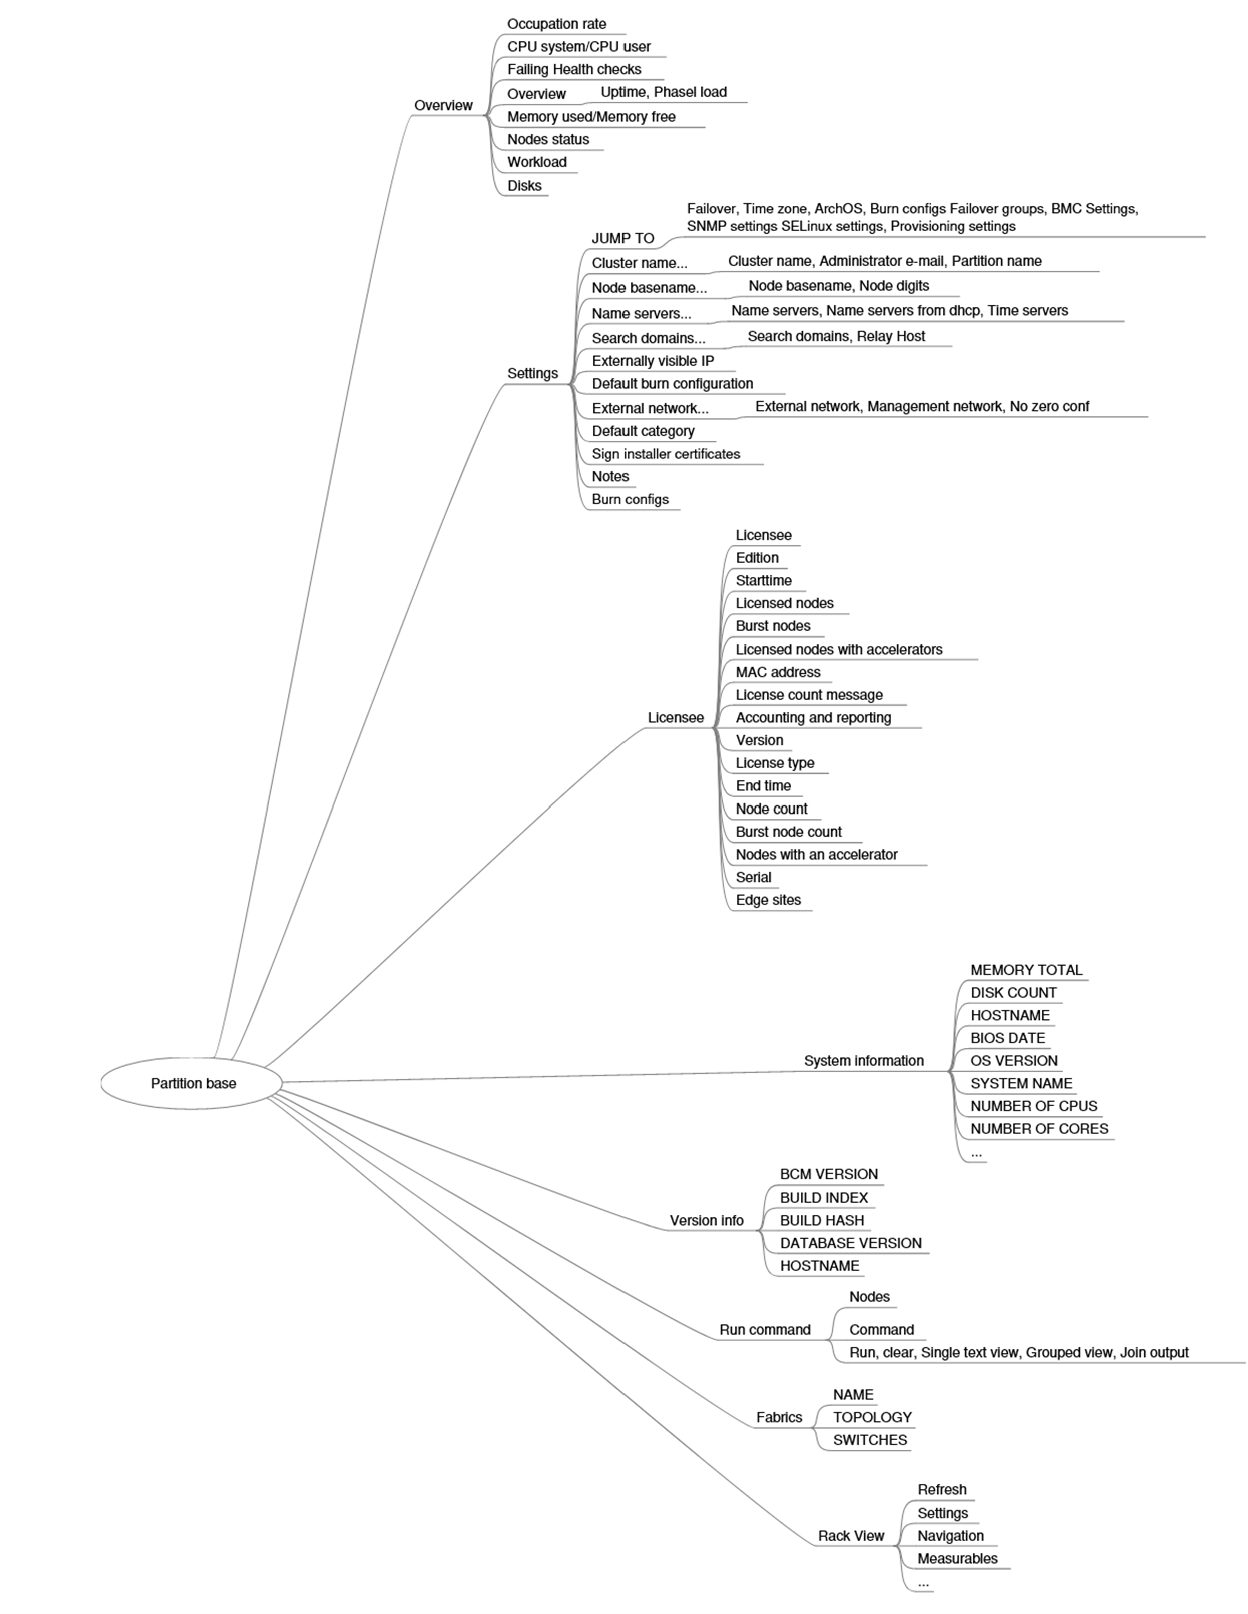
Selecting a resource opens a window that allows parameters related to the resource to be viewed and managed. As an example, the Cluster resource can be selected. This opens the Partition base window, which is a representation of the cluster instance. The tabs within the Partition base window are mapped out in Figure 4 and described next.
Figure 4. Cluster navigation within the Partition base window
Settings#
The Settings tab has several global cluster properties and property groups. These are loosely grouped as follows:
Buttons for jumping to various operational settings.
Cluster name, administrator e-mail, partition name.
Node basename, node digits.
Name servers, time servers.
Search domains, relay host.
Externally visible IP, Provisioning node auto update timeout.
Default burn configuration.
External network, management network.
Default category: sets the default category.
Sign installer certificates.
Notes.
Other Tab Information#
Information about other tabs is shown in Table 6.
Tab |
Description |
|---|---|
System information |
Shows the main hardware specifications of the node (CPU, memory, BIOS), along with the OS version that it runs. |
Version Information |
Shows version information for important cluster software components, such as the CMDaemon database version, and the cluster manager version and builds. |
Run Command |
Allows a specified command to be run on a selected node of the cluster. |
Fabrics |
Displays the topology and switches for the fabrics used. |
Rack View |
Displays a view of the rack as defined by node allocations made by the administrator to racks and chassis. |
Cluster Management Shell#
This section introduces the basics of the cluster management shell, cmsh. This is the command-line interface (CLI) to cluster management. Because cmsh and Base View give access to the same cluster management functionality. The cmsh front-end allows commands to be run with it and can be used in batch mode. Although cmsh commands often use constructs familiar to programmers, it is designed for managing the cluster efficiently rather than for trying to be a good or complete programming language. For programming cluster management, use Python bindings instead of using cmsh in batch mode. Usually, cmsh is invoked from an interactive session (for example, through ssh) on the head node, but it can also be used to manage the cluster from outside.
Invoking cmsh#
From the head node, cmsh can be invoked as follows:
1[root©dgxsuperpod ~]# cmsh
2\[dgxsuperpod]%
By default, it connects to the IP address of the local management network interface using the default cluster manager port. If it fails to connect as in the preceding example, but a connection takes place using cmsh localhost, then the management interface is most probably not up. In that case, bringing the management interface up allows cmsh to connect to CMDaemon. Running cmsh without arguments starts an interactive cluster management session. To go back to the unix shell, enter quit or ctrl-d:
1[dgxsuperpod]% quit
2[root©dgxsuperpod ~]#
Batch Mode and Piping in cmsh#
The -c flag allows cmsh to be used in batch mode. Commands may be separated using semicolons:
1[root©dgxsuperpod ~]# cmsh -c "main showprofile; device status apc01" admin
2apc01 ............... [   UP   ]
3[root©dgxsuperpod ~]#
Alternatively, commands can be piped to cmsh:
1[root©dgxsuperpod ~]# echo device status I cmsh
2device status
3apc01 ............... [   UP   ]
4dgxsuperpod ......... [   UP   ]
5dgx001 .............. [   UP   ]
6dgx002 ...............[   UP   ]
7switch01 .............[   UP   ]
Dotfiles and /etc/cmshrc File for cmsh#
In a similar way to unix shells, cmsh sources dotfiles, if they exist, upon start-up in both batch and interactive mode. In the following list of dotfiles, a setting in the file that is in the shorter path will override a setting in the file with the longer path:
∼/.cm/cmsh/.cmshrc
∼/.cm/.cmshrc
∼/.cmshrc
If there is no dotfile for the user and the file /etc/cmshrc exists, it is sourced, and its settings used. If /etc/cmshrc exists, its settings are used, but the values can be overridden by user dotfiles, which is standard Unix behavior.
Defining Command Aliases in cmsh#
Sourcing settings is convenient when defining command aliases. Command aliases can be used to abbreviate longer commands. For example, putting the following in .cmshrc would allow lv to be used as an alias for device list virtualnode:
1alias lv device list virtualnode
Besides defining aliases in dotfiles, aliases in cmsh can also be created with the alias command. The preceding example can be run within cmsh to create the lv alias. Running the alias command within cmsh lists the existing aliases. Aliases can be exported from within cmsh together with other cmsh dot settings with the help of the export command:
1[dgxsuperpod]% export > /root/mydotsettings
The dot settings can be taken into cmsh by running the run command from within cmsh:
1[dgxsuperpod]% run /root/mydotsettings
Built-in Aliases in cmsh#
The following aliases are built-ins and are not defined in any .cmshrc or cmshrc files:
1[headnode]% alias
2alias - goto -
3alias .. exit
4alias / home
5alias ? help
6alias ds device status
7alias ls list
The meanings are:
goto -: go to previous directory level of cmsh
exit: go up a directory level or leave cmsh if already at top level.
home: go to the top-level directory.
help: show help text for current level.
device status: show status of devices that can be accessed in device mode.
list: list state for all modes.
Automatic Aliases in cmsh#
A cmsh script is a file that has a sequence of cmsh commands that run within a cmsh session.
The directory .cm/cmsh/ can have a cmsh script placed in it with a .cmsh suffix and an arbitrary prefix. The prefix then automatically becomes an alias in cmsh.
In the following example:
The file tablelist.cmsh provides the alias tablelist, to list devices using the
|symbol as a delimiter.The file dfh.cmsh provides the alias dfh to conduct the Linux shell command
df -h.
 1[root©dgxsuperpod ~]# cat /root/.cm/cmsh/tablelist.cmsh
 2list -d "|"
 3[root©dgxsuperpod ~]# cat /root/.cm/cmsh/dfh.cmsh
 4!df -h
 5[root©dgxsuperpod ~]# cmsh
 6[dgxsuperpod]% device
 7[dgxsuperpod->device]% alias | egrep ‘(tablelist|dfh)’
 8alias dfh run /root/.cm/cmsh/dfh.cmsh
 9alias tablelist run /root/.cm/cmsh/tablelist.cmsh
10[dgxsuperpod->device]% list
11Type                                                        Hostname (key)    MAC                  Category  Ip
12---------------------- ---------------- ------------------ ---------------- ---------------
13HeadNode                                            dgxsuperpod       FA:16:3E:B4:39:DB                      10.141.255.254
14PhysicalNode                                dgx001            FA:16:3E:D5:87:71     default          10.141.0.1
15PhysicalNode                                dgx002            FA:16:3E:BE:05:FE     default          10.141.0.2
16[dgxsuperpod->device]% tablelist
17Type                                                 |Hostname (key)  |MAC               |Category        |Ip
18----------------------|----------------|------------------|----------------|---------------
19HeadNode                                     |dgxsuperpod     |FA:16:3E:B4:39:DB |                  |10.141.255.254
20PhysicalNode                         |dgx001                 |FA:16:3E:D5:87:71 |default            |10.141.0.1
21PhysicalNode                         |dgx002                 |FA:16:3E:BE:05:FE |default            |10.141.0.2
22[dgxsuperpod->device]% dfh
23Filesystem  Size  Used Avail        Use%    Mounted on
24devtmpfs            1.8G    0               1.8G    0%      /dev
25tmpfs                       1.9G    0               1.9G    0%      /dev/shm
26tmpfs                       1.9G    33M     1.8G    2%      /run
27tmpfs                       1.9G    0               1.9G    0%      /sys/fs/cgroup
28/dev/vdb1   25G     17G     8.7G  66%       /
29tmpfs                       374M    0               374M    0%      /run/user/0
The cmsh session does not need restarting for the alias to become active.
Default Arguments in cmsh Scripts#
In a cmsh script, the parameters $1, $2, and so on, can be used to pass arguments. If the argument being passed is blank, then the values the parameters take also remain blank. However, if the parameter format has a suffix of the form -<value>, then <value> is the default value that the parameter takes if the argument being passed is blank.
1[root©dgxsuperpod ~]# cat .cm/cmsh/encrypt-node-disk.cmsh home
2device use ${1-dgx001}
3set disksetup /root/my-encrypted-node-disk.xml set revision ${2-test}
4commit
The script can be run without an argument (a blank value for the argument), in which case it takes on the default value of dgx001 for the parameter:
[root©dgxsuperpod ~]# cmsh [dgxsuperpod]% encrypt-node-disk [dgxsuperpod->device[dgx001]]%
The script can be run with an argument (dgx002 here), in which case it takes on the passed value of dgx002 for the parameter:
1[root©dgxsuperpod  ~]#  cmsh
2[dgxsuperpod]% encrypt-node-disk dgx002
3[dgxsuperpod->device[dgx002]]%
cmsh Options#
The options usage information is shown with cmsh –h:
 1Usage:
 2cmsh [options] [hostname[:port]] cmsh [options] -c <command>
 3cmsh [options] -f <filename>
 4Options:
 5--help|-h
 6        Display this help
 7--noconnect|-u
 8        Start unconnected
 9--controlflag| -z
10        ETX in non-interactive mode
11--color <yes/no>
12        Define usage of colors
13--spool <directory>
14        Alternative /var/spool/cmd
15--tty| -t
16        Pretend a TTY is available
17--noredirect| -r
18        Do not follow redirects
19--norc| -n
20        Do not load cmshrc file on start-up
21--noquitconfirmation| -Q
22        Do not ask for quit confirmation
23--echo| -x
24    Echo all commands
25--quit|-q
26    Exit immediately after error
27--disablemultiline|-m
28    Disable multiline support
29--hide-events
30    Hide all events by default
31--disable-events
32    Disable all events by default
33Arguments:
34hostname
35    The hostname or IP to connect to
36command
37    A list of cmsh commands to execute
38filename
39    A file which contains a list of cmsh commands to execute
40Examples:
41cmsh        run  in  interactive  mode
42cmsh -c  device status      run the device status command and exit
43cmsh --hide-events -c  device status        run the device status command and exit, without
44showing any events that arrive during this time cmsh -f some.file -q -x     run and echo the commands from some.file, exit
There is also a main page for cmsh(8), which is a bit more extensive than the help text. It does not however cover the modes and interactive behavior.
Levels, Modes, Help, and Commands Syntax in cmsh#
The top-level of cmsh is the level that cmsh is in when entered without any options.
To avoid overloading a user with commands, cluster management functionality has been grouped and placed in separate cmsh mode levels. Mode levels and associated objects for a level make up a hierarchy available below the top level.
There is an object-oriented terminology associated with managing using this hierarchy. To perform cluster management functions, the administrator descends through cmsh into the appropriate mode and object and conducts actions relevant to the mode or object.
For example, within user mode, an object representing a user instance, userthree, might be added or removed. Within the object userthree, the administrator can manage its properties. The properties can be data such as a password password123, or a home directory /home/userthree.
Typing help at the top level of cmsh shows the top-level commands.
 1alias ......................... Set aliases
 2category ...................... Enter  category  mode
 3cert .......................... Enter cert mode
 4cloud ......................... Enter cloud mode
 5cmjob ......................... Enter cmjob mode
 6color ......................... Manage console text color settings
 7configuration overlay ......... Enter configuration overlay mode
 8connect ....................... Connect to cluster
 9delimiter ..................... Display/set delimiter
10device ........................ Enter  device  mode
11disconnect .................... Disconnect from cluster
12edgesight...................... Enter  edgesight  mode
13etcd .......................... Enter  etcd  mode
14events ........................ Manage events
15exit .......................... Exit from current object or mode
16export ........................ Display list of aliases current list formats
17fspart .......................  Enter fspart mode
18group ......................... Enter group mode
19groupingsyntax ................ Manage the default grouping syntax
20help .......................... Display this help
21hierarchy ....................  Enter  hierarchy  mode
22history ....................... Display command history
23keyvaluestore ................  Enter  keyvaluestore  mode
24kubernetes .................... Enter  kubernetes  mode
25list .......................... List state for all modes
26main .......................... Enter main mode
27modified ...................... List modified objects
28monitoring .................... Enter  monitoring  mode
29network ....................... Enter network mode
30nodegroup ..................... Enter nodegroup mode
31partition ..................... Enter partition mode
32process ....................... Enter  process  mode
33profile ....................... Enter profile mode
34quit .......................... Quit shell
35quitconfirmation .............. Manage the status of quit confirmation
36rack .......................... Enter rack mode
37refresh ....................... Refresh all modes
38run ........................... Execute cmsh commands from specified file
39session ....................... Enter  session  mode
40softwareimage ................. Enter softwareimage mode
41task .......................... Enter task mode
42time .......................... Measure time of executing command
43unalias ....................... Unset aliases
44unmanagednodeconfiguration .... Enter unmanagednodeconfiguration mode
45user .......................... Enter user mode
46watch ......................... Execute a command periodically, showing output
47wlm ........................... Enter wlm mode
All levels inside cmsh provide these top-level commands. Passing a command as an argument to help gets details for it:
1[myheadnode]% help run
2Name:       run - Execute all commands in the given file(s)
3Usage:      run [OPTIONS] <filename> [<filename2> …]
4Options:  -x, --echo
5                    Echo all commands
6                -q, --quit
7                    Exit immediately after error
8[myheadnode]%
In the general case, invoking help at any mode level or within an object, without an argument, provides two lists: #. Under the title of To: a list of top-level commands. #. Under the title of the level it was invoked at: a list of commands that may be used at that level.
For example, entering session mode and then typing in help displays, firstly, output with a title of Top, and secondly, output with a title of session:
 1[myheadnode]% session
 2[myheadnode->session]% help
 3============================ Top =============================
 4alias ......................... Set aliases
 5category ...................... Enter  category  mode
 6ceph .......................... Enter ceph mode
 7...
 8==========================  session  ===========================
 9id ....................... Display current session id
10killsession .............. Kill a session
11list ..................... Provide overview of active sessions
12[myheadnode->session]%
Working with Objects#
Modes in cmsh work with associated groupings of data called objects. For instance, device mode works with device objects, and network mode works with network objects. The commands used to deal with objects have similar behavior in all modes. Not all the commands exist in every mode, and not all the commands function with an explicit object (Table 7).
Command |
Description |
|---|---|
|
Use the specified object. That is: Make the specified object the current object |
|
Create the object and use it |
|
Assign a new object |
|
Unassign an object |
|
Clear the values of the object |
|
Clone the object and use it |
|
Commit local changes, done to an object, to CMDaemon |
|
Undo local changes done to the object |
|
List all objects at current level |
|
Sort the order of display for the list command |
|
Set formatting preferences for list output |
|
Execute a set of commands on several objects |
|
Display all properties of the object |
|
Swap (exchange) the names of two objects |
|
Display specified property of the object |
|
Set a specified property of the object |
|
Set default value for a specified property of the object. |
|
Append a value to a property of the object, for a multi-valued property |
|
Remove a value from a specific property of the object, for a multi-valued property |
|
List objects with uncommitted local changes |
|
List objects that depend on the object |
|
Do a validation check on the properties of the object |
|
Exit from the current object or mode level |
Working with objects with these commands is demonstrated with several examples in this section.
use and exit#
1[dgxsuperpod->device]% use dgx001
2[dgxsuperpod->device[dgx001]]% status
3dgx001 ............. [      UP      ]
4[dgxsuperpod->device[dgx001]]% exit
5[dgxsuperpod->device]%
In the preceding example, use dgx001 issued from within device mode makes dgx001 the current object. The prompt changes accordingly. The status command, without an argument, then returns status information just for dgx001, because making an object the current object makes subsequent commands within that mode level apply only to that object. Finally, the exit command exits the current object level.
add, commit, and remove#
The commands introduced in this section have many implicit concepts associated with them. So an illustrative session is first presented as an example. What happens in the session is then explained to familiarize the reader with the commands and associated concepts.
 1[dgxsuperpod->device]% add physicalnode dgx100 10.141.0.100 [dgxsuperpod->device*[dgx100*]]% commit
 2[dgxsuperpod->device[dgx100]]% category add test-category [dgxsuperpod->category*[test-category*]]% commit
 3[dgxsuperpod->category[test-category]]% remove test-category
 4[dgxsuperpod->category*]% commit
 5Successfully removed 1 Categories
 6Successfully committed 0 Categories
 7[dgxsuperpod->category]% device remove dgx100
 8[dgxsuperpod->category]% device
 9[dgxsuperpod->device*]% commit
10Successfully removed 1 Devices Successfully committed 0 Devices [dgxsuperpod->device]%
add: this command creates an object within its associated mode, and in cmsh the prompt drops into the object level just created. Thus, at the start in the preceding example, within device mode, a new object, named dgx100, is added. For this object, properties such as the type (physicalnode) and IP address (10.141.0.100) can be set. The node object level ([dgx100*]) is automatically dropped into from device mode when the add command is executed. After execution, the state achieved is that the object has been created with some properties. However, it is still in a temporary, modified state, and not yet persistent.
Asterisk tags in the prompt are a useful reminder of a modified state, with each asterisk indicating a tagged object that has an unsaved, modified property. In this case, the unsaved properties are the IP address setting, the node name, and the node type.
The add command—syntax notes:
In most modes the add command takes only one argument, namely the name of the object that is to be created. However, in device mode, an extra object-type, in this case physicalnode, is also required as argument, and an optional extra IP argument may also be specified. The response to help add while in device mode gives details:
1[myheadnode->device]% help add
2Name:
3add - Create a new device of the given type with specified hostname. The IP address may also be set.
4Usage:
5add <type> <hostname> [IP address]
6Arguments:
7type
8chassis, genericdevice, gpuunit, litenode, cloudnode, physicalnode, headnode, powerdistributionunit, racksensor, ethernetswitch, ibswitch, myrinetswitch
commit: this command is a further step that saves any changes made after executing a command. In this case, in the second line, it saves the dgx100 object with its properties. The asterisk tag disappears for the prompt if settings for that mode level and below have been saved.
The top-level modes, such as the category mode, can be accessed directly from within this level if the mode is stated before the command. So, stating the mode category before running the add command allows the specified category test-category to be added. Again, the test-category object level within category mode is automatically dropped into when the add command is executed.
commit -w|--wait: the commit command by default does not wait for a state change to complete. This means that the prompt becomes available right away. This means that it is not obvious that the change has taken place, which causes problems if scripting with cmsh for cloning a software image (2.1.2). The -w|--wait option to the commit command works around this issue by waiting for any associated background task, such as the cloning of a software image, to be completed before making the prompt available.
remove: this command removes a specified object within its associated mode. On successful execution, if the prompt is at the object level, then the prompt moves one level up. The removal is not conducted yet; it is only a proposed removal. This is indicated by the asterisk tag, which remains visible until the commit command is executed, and the test-category removal is saved. The remove command can also remove an object in a non-local mode if the non-local mode is associated with the command. This is illustrated in the example where, from within category mode, the device mode is declared before running the remove command for dgx100. The proposed removal is configured without being made permanent, but in this case no asterisk tag shows up in the category mode, because the change is in device mode. To drop into device mode, the mode command “device” is executed. An asterisk tag appears to remind the administrator that there is still an uncommitted change (the node that is to be removed) for the mode. The commit command would remove the object whichever mode it is in—the non-existence of the asterisk tag does not change the effectiveness of commit.
remove -d|--data: the remove command by default removes an object, and not the represented data. An example is if, in softwareimage mode, a software image is removed with the remove (without options) command. As far as the cluster manager is concerned, the image is removed after running commit. However the data in the directory for that software image is not removed. The -d| --data option to the remove command arranges removal of the data in the directory for the specified image, as well as removal of its associated object.
remove -a|--all: the remove command by default does not remove software image revisions. The -a| --all option to the remove command also removes all software image revisions.
clone, modified, and swap#
The node object dgx100 that was created in the previous example, can be cloned to dgx101 as follows:
 1[dgxsuperpod->device]% clone dgx100 dgx101
 2Warning: The Ethernet switch settings were not cloned, and have to be set manually [dgxsuperpod->device*[dgx101*]]% exit
 3[dgxsuperpod->device*]% modified
 4State  Type                                      Name
 5------ ------------------------ -----------------------------------
 6+             Device                                     dgx101
 7[dgxsuperpod->device*]% commit
 8[dgxsuperpod->device]%
 9[dgxsuperpod->device]% remove dgx100
10[dgxsuperpod->device*]% commit
11[dgxsuperpod->device]%
The modified command is used to check what objects have uncommitted changes, and the new object dgx101 that is seen to be modified, is saved with a commit. The device dgx100 is then removed by using the remove command. A commit executes the removal. The modified command corresponds to the functionality of the Unsaved entities icon Figure 11. The + entry in the State column in the output of the modified command in the preceding example indicates that the object is a newly added one, but not yet committed. Similarly, a ~ entry indicates an object that is to be removed on committing, while a blank entry indicates that the object has been modified without an addition or removal involved. Cloning an object is a convenient method of duplicating a fully configured object. When duplicating a device object, cmsh will attempt to automatically assign a new IP address using several heuristics. In the preceding example, dgx101 is assigned IP address 10.141.0.101. The attempt is a best-effort and does not guarantee a properly configured object. The cluster administrator should therefore inspect the result. Sometimes an object may have been misnamed, or physically swapped. For example, dgx001 exchanged physically with dgx002 in the rack, or the hardware device eth0 is misnamed by the kernel and should be eth1. In that case it can be convenient to swap their names using the cluster manager front-end rather than change the physical device or adjust kernel configurations. This is equivalent to exchanging all the attributes from one name to the other. For example, if the two interfaces on the head node must have their names exchanged, it can be done as follows:
 1[dgxsuperpod->device]% use dgxsuperpod
 2[dgxsuperpod->device[dgxsuperpod]]% interfaces
 3[dgxsuperpod->device[dgxsuperpod]->interfaces]%  list
 4Type                         Network device name  IP                      Network
 5------------ -------------------- ---------------- --------------
 6physical             eth0 [dhcp]        10.150.4.46      externalnet
 7physical             eth1 [prov]        10.141.255.254   internalnet
 8[headnode->device[dgxsuperpod]->interfaces]% swap eth0 eth1; commit [headnode->device[dgxsuperpod]->interfaces]% list
 9Type                         Network device name  IP                      Network
10------------ -------------------- ---------------- --------------
11physical             eth0 [prov]        10.141.255.254   internalnet
12physical             eth1 [dhcp]        10.150.4.46      externalnet
13[dgxsuperpod->device[dgxsuperpod]->interfaces]% exit; exit
get, set, and refresh#
The get command is used to retrieve a specified property from an object, and set is used to set it:
 1[dgxsuperpod->device]% use dgx101
 2[dgxsuperpod->device[dgx101]]% get category test-category
 3[dgxsuperpod->device[dgx101]]% set category default [dgxsuperpod->device*[dgx101*]]% get category default
 4[dgxsuperpod->device*[dgx101*]]% modified
 5State  Type                                           Name
 6------ ------------------------ -------------------------------
 7        Device                                        dgx101
 8[dgxsuperpod->device*[dgx101*]]% refresh
 9[dgxsuperpod->device[dgx101]]% modified
10No modified objects of type device
11[dgxsuperpod->device[dgx101]]% get category test-category
12[dgxsuperpod->device[dgx101]]%
Here, the category property of the dgx101 object is retrieved by using the get command. The property is then changed using the set command. Using get confirms that the value of the property has changed, and the modified command reconfirms that dgx101 has local uncommitted changes. The refresh command undoes the changes made and corresponds to the Revert button in Base View when viewing Unsaved entities (Figure 11). The modified command then confirms that no local changes exist. Finally, the get command reconfirms that no local change took place. Among the possible values a property can take on are strings and Booleans:
A string can be set as a revision label for any object:
1[dgxsuperpod->device[dgx101]]% set revision "changed on 10th May"
2[dgxsuperpod->device*[dgx101*]]% get revision
3[dgxsuperpod->device*[dgx101*]]% changed on 10th May 2011
This can be useful when using shell scripts with an input text to label and track revisions when sending commands to cmsh. How to send commands from the shell to cmsh is introduced in 2.4.1. For Booleans, the values yes, 1, on and true are equivalent to each other, as are their opposites no, 0, off and false. These values are case-insensitive.
clear#
1[dgxsuperpod->device]% set dgx101 mac 00:11:22:33:44:55
2[dgxsuperpod->device*]% get dgx101 mac
300:11:22:33:44:55
4[dgxsuperpod->device*]% clear dgx101 mac
5[dgxsuperpod->device*]% get dgx101 mac
600:00:00:00:00:00
7[dgxsuperpod->device*]%
The get and set commands are used to view and set the MAC address of dgx101 without running the use command to make dgx101 the current object. The clear command then unsets the value of the property. The result of clear depends on the type of the property that it acts on. In the case of string properties, the empty string is assigned, whereas for MAC addresses the special value 00:00:00:00:00:00 is assigned.
list, format, and sort#
The list command is used to list objects in a mode. The command has many options. The ones that are valid for the current mode can be viewed by running help list. The f|–format option is available in all modes and takes a format string as argument. The string specifies what properties are printed for each object, and how many characters are used to display each property in the output line. In the following example, a list of objects is requested for device mode, displaying the hostname, switchports, and ip properties for each device object.
1[headnode->device]% list -f hostname:14,switchports:15,ip
2hostname (key) switchports   ip
3-------------- --------------- --------------------
4apc01                                     10.142.254.1
5headnode          switch01:46        10.142.255.254
6dgx001            switch01:47        10.142.0.1
7dgx002            switch01:45        10.142.0.2
8switch01                               10.142.253.1
9[headnode->device]%
Running the list command with no argument uses the current format string for the mode. Running the format command without arguments displays the current format string, and displays all available properties including a description of each property:
 1[headnode->device]% format
 2Current list printing format:
 3-----------------------------
 4type:22, hostname:[16-32], mac:18, category:[16-32], ip:15, network:[14-32], status:[16-32]
 5Valid fields:
 6-------------
 7activation                 : Date on which node was defined
 8additionalhostnames: List of additional hostnames that should resolve to the interfaces IP address
 9allownetworkingrestart     : Allow node to update ifcfg files and restart networking
10banks                            : Number of banks
11...
The print specification of the format command uses the delimiter: to separate the parameter and the value for the width of the parameter column. For example, a width of ten can be set with:
1[headnode->device]% format hostname:10
2[headnode->device]% list
3hostname (
4----------
5apc01
6headnode
7dgx001
8dgx002
9switch01
A range of widths can be set, from a minimum to a maximum, using square brackets. A single minimum width possible is chosen from the range that fits all the characters of the column. If the number of characters in the column exceeds the maximum, then the maximum value is chosen. For example:
1[headnode->device]% format hostname:[10-14]
2[headnode->device]% list
3hostname (key)
4--------------
5apc01
6headnode
7dgx001
8dgx002
9switch01
The parameters to be viewed can be chosen from a list of valid fields by running the format command without any options, as shown earlier.
The format command can take as an argument a string that is made up of multiple parameters in a comma-separated list. Each parameter takes a colon-delimited width specification.
1[headnode->device]% format hostname:[10-14],switchports:14,ip:20
2[headnode->device]% list
3hostname (key) switchports  ip
4-------------- -------------- --------------------
5apc01                                    10.142.254.1
6headnode       switch01:46  10.142.255.254
7dgx001            switch01:47       10.142.0.1
8dgx002            switch01:45       10.142.0.2
9switch01                              10.142.253.1
The output of the format command without arguments shows the current list printing format string, with spaces.
In general, the string used in the format command can be set with enclosing quotes ("):
1[headnode->device]% format "hostname:[16-32], network:[14-32], status:[16-32]"
Or with the spaces removed:
1[headnode->device]% format hostname:[16-32],network:[14-32],status:[16-32]
The default parameter settings can be restored with the -r|–reset option:
1[headnode->device]% format -r
2[headnode->device]% format I head -3
3Current list printing format:
4-----------------------------
5type:22, hostname:[16-32], mac:18, category:[16-32], ip:15, network:[14-32], status:[16-32]
6[headnode->device]%
The sort command sorts output in alphabetical order for specified parameters when the list command is run. The sort is done according to the precedence of the parameters passed to the sort command:
 1[headnode->device]% sort type mac
 2[headnode->device]% list -f type:15,hostname:15,mac
 3type                  hostname (key)  mac
 4--------------- --------------- --------------------
 5HeadNode           headnode   08:0A:27:BA:B9:43
 6PhysicalNode    dgx002                00:00:00:00:00:00
 7PhysicalNode    log001                52:54:00:DE:E3:6B
 8[headnode->device]% sort type hostname
 9[headnode->device]% list -f type:15,hostname:15,mac
10type                  hostname (key)  mac
11--------------- --------------- --------------------
12HeadNode             headnode         08:0A:27:BA:B9:43
13PhysicalNode         log001          52:54:00:DE:E3:6B
14PhysicalNode         dgx002          00:00:00:00:00:00
15[headnode->device]% sort mac hostname
16[headnode->device]% list -f type:15,hostname:15,mac
17type                  hostname (key)  mac
18--------------- --------------- --------------------
19PhysicalNode         dgx002           00:00:00:00:00:00
20HeadNode           headnode   08:0A:27:BA:B9:43
21PhysicalNode         log001           52:54:00:DE:E3:6B
The preceding sort commands can alternatively be specified with the -s|–sort option to the list command:
1[headnode->device]% list -f type:15,hostname:15,mac --sort type,mac
2[headnode->device]% list -f type:15,hostname:15,mac --sort type,hostname
3[headnode->device]% list -f type:15,hostname:15,mac --sort mac,hostname
append and removefrom#
When dealing with a property of an object that can take more than one value at a time—a list of values—the append and removefrom commands can be used to respectively append to and remove elements from the list. If more than one element is appended, they should be space-separated. The set command may also be used to assign a new list immediately, overwriting the existing list. In the following example, values are appended and removed from the powerdistributionunits properties of device dgx001.
The powerdistributionunits properties represent the list of ports on power distribution units that a particular device is connected to. This information is relevant when power operations are performed on a node.
 1[dgxsuperpod->device]% use dgx001
 2[dgxsuperpod->device[dgx001]]% get powerdistributionunits
 3apc01:1
 4[...device[dgx001]]% append powerdistributionunits apc01:5
 5[...device*[dgx001*]]% get powerdistributionunits
 6apc01:1 apc01:5
 7[...device*[dgx001*]]% append powerdistributionunits apc01:6
 8[...device*[dgx001*]]% get powerdistributionunits
 9apc01:1 apc01:5 apc01:6
10[...device*[dgx001*]]% removefrom powerdistributionunits apc01:5 [...device*[dgx001*]]% get powerdistributionunits
11apc01:1 apc01:6
12[...device*[dgx001*]]% set powerdistributionunits apc01:1 apc 01:02 [...device*[dgx001*]]% get powerdistributionunits
13apc01:1 apc01:2
Chapter 4 of the Bright Cluster Manager Administrator Manual has more information on power settings and operations.
usedby#
Removing a specific object is only possible if other objects do not have references to it. To help the administrator discover a list of objects that depend on (“use”) the specified object, the usedby command may be used. In the following example, objects depending on device apc01 are requested. The usedby property of powerdistributionunits indicates that device objects dgx001 and dgx002 contain references to (“use”) the object apc01. In addition, the apc01 device is itself displayed as being in the up state, indicating a dependency of apc01 on itself. If the device is to be removed, then the two references to it first must be removed, and the device then must be brought to the CLOSED state by using the close command.
1[dgxsuperpod->device]% usedby apc01
2Device used by the following:
3Type                    Name      Parameter
4---------------- ---------- ----------------------
5Device               apc01     Device is up
6Device               dgx001    powerDistributionUnits
7Device               dgx002    powerDistributionUnits
8[dgxsuperpod->device]%
validate#
Whenever committing changes to an object, the cluster management infrastructure checks the object to be committed for consistency. If one or more consistency requirements are not met, then cmsh reports the violations that must be resolved before the changes are committed. The validate command allows an object to be checked for consistency without committing local changes.
 1[dgxsuperpod->device]% use dgx001
 2[dgxsuperpod->device[dgx001]]% clear category
 3[dgxsuperpod->device*[dgx001*]]% commit
 4Code  Field                   Message
 5----- ------------------------ ---------------------------
 61      category                    The category should be set
 7[dgxsuperpod->device*[dgx001*]]% set category default
 8[dgxsuperpod->device*[dgx001*]]% validate
 9All good
10[dgxsuperpod->device*[dgx001*]]% commit
11[dgxsuperpod->device[dgx001]]%
show#
The show command is used to show the parameters and values of a specific object. For example, for the object dgx001, the attributes displayed are:
 1[dgxsuperpod->device[dgx001]]% show
 2Parameter                               Value
 3--------------------------------------- ------------------------------------
 4Activation                              Thu, 03 Aug 2017 15:57:42 CEST
 5BMC Settings                                 <submode>
 6Block devices cleared on next boot
 7Category                                   default
 8...
 9Data node                               no
10Default gateway                           10.141.255.254 (network: internalnet)
11...
12Software image                               default-image
13Static  routes                               <0 in submode>
14...
assign and unassign#
The assign and unassign commands are analogous to add and remove. The difference between assign and add from the system administrator point of view is that assign sets an object with settable properties from a choice of existing names, whereas add sets an object with settable properties that include the name that is to be given. This makes assign suited for cases where multiple versions of a specific object choice cannot be used.
For example:
If a node is going to be configured to run with particular Slurm settings, the node can be assigned an slurmclient role with the assign command. The node cannot be assigned another slurmclient role with other Slurm settings at the same time. Only the settings within the assigned Slurm client role can be changed.
If a node is to be configured to run with added interfaces eth3 and eth4, then the node can have both physical interfaces added to it with the add command.
The only place where the assign command is currently used within cmsh is within the roles submode, available under category mode, configurationoverlay mode, or device mode. Within roles, assign is used for assigning roles objects to give properties associated with that role to the category, configuration overlay, or device.
import#
The import command is an advanced command that works within a role. It is used to clone roles between entities. A node inherits all roles from the category and configuration overlay it is a part of.
1[root©headnode ~]# cmsh
2[headnode]% device roles dgx001
3[headnode->device[dgx001]->roles]% list
4Name (key)
5-------------------------------
6[category:default] cgroupsupervisor
7[category:default] slurmclient
If there is a small change to the default roles to be made, only for dgx001, in slurmclient, then the role can be imported from a category or overlay. Importing the role duplicates the object and assigns the duplicate value to dgx001.
This differs from simply assigning a slurmclient role to dgx001, because importing provides the values from the category or overlay, whereas assigning provides unset values.
After running import, just as for assign, changes to the role made at dgx001 level stay at that node level, and changes made to the category-level or overlay-level slurmclient role are not automatically inherited by the dgx001 slurmclient role.
 1[headnode->device[dgx001]->roles]% import<TAB><TAB>
 2cephmds     cloudgateway    elasticsearch
 3...and other available roles including  slurmclient...
 4[headnode->device[dgx001]->roles]% import --overlay slurm-client slurmclient
 5[headnode->device*[dgx001*]->roles*]% list
 6Name (key)
 7-------------------------------
 8[category:default] cgroupsupervisor
 9slurmclient
10[headnode->device*[dgx001*]->roles*]% set slurmclient queues dgx1q
11[headnode->device*[dgx001*]->roles*]% commit
The preceding shows that a list of roles is prompted for using tab-completion after having typed import, and that the settings from the configuration overlay level are brought into dgx001 for the slurmclient role. The slurmclient values at node level then override any of the overlay-level or category level-settings, as suggested by the new list output. The Slurm client settings are then the same for dgx001 as the settings at the overlay level. The only change made is that a special queue, dgx1q, is configured just for dgx001.
The import command in roles mode can duplicate any role between any two entities. Options can be used to import from a category (-c|--category), a node (-n|--node), or an overlay (-o|--overla``y), as indicated by its help text (``help import).
Advanced cmsh Features#
This section describes some advanced features of cmsh.
CLI Editing#
CLI editing and history features from the readline library are available. http://tiswww.case.edu/php/chet/readline/rluserman.html provides a full list of key-bindings. For users who are familiar with the bash shell running with readline, probably the most useful and familiar features provided by readline within cmsh are:
Tab-completion of commands and arguments.
Being able to select earlier commands from the command history using <ctrl>-r or using the up- and down-arrow keys.
history and timestamps#
The history command within cmsh explicitly displays the cmsh command history as a list.
The --timestamps|-t option to the history command displays the command history with timestamps.
1[headnode->device[dgx001]]% history | tail -3
2use dgx001
3history
4history |  tail -3
5[headnode->device[dgx001]]% history -t | tail -3
6Thu Dec  3 15:15:18 2015 history
7Thu Dec  3 15:15:43 2015 history | tail -3
8Thu Dec  3 15:15:49 2015 history -t | tail -3
This history is saved in the file .cm/.cmshhistory in the cmsh user’s directory. The timestamps in the file are in unix epoch time format and can be converted to human friendly format with the standard date utility.
1[root@dgxsuperpod ~]# tail -2 .cm/.cmshhistory 1615412046
2device list
3[root@dgxsuperpod ~]# date -d ©1615412046
4Wed Mar 10 22:34:06 CET 2021
Mixing cmsh and Unix Shell Commands#
It is often useful for an administrator to be able to execute unix shell commands while conducting cluster management tasks. The cluster manager shell, cmsh, therefore allows users to execute commands in a subshell if the command is prefixed with a ! character:
1[dgxsuperpod]% !hostname -f
2dgxsuperpod.cm.cluster
3[dgxsuperpod]%
Executing the ! command by itself will start an interactive login subshell. By exiting the subshell, the user will return to the cmsh prompt.
Besides simply executing commands from within cmsh, the output of OS shell commands can also be used within cmsh. This is done by using the legacy-style “backtick syntax” available in most unix shells.
1[dgxsuperpod]% device use `hostname`
2[dgxsuperpod->device[dgxsuperpod]]% status
3dgxsuperpod ................ [   UP   ]
4[dgxsuperpod->device[dgxsuperpod]]%
Output Redirection#
Like unix shells, cmsh also supports output redirection to the shell through common operators such as “>”, “”>>”, and “|”.
1[dgxsuperpod]% device list > devices
2[dgxsuperpod]% device status >> devices
3[dgxsuperpod]% device list | grep dgx001
4Type                                Hostname (key) MAC (key)             Category
5-------------- -------------- ------------------- ----------
6PhysicalNode        dgx001          00:E0:81:2E:F7:96   default
Input Redirection#
Input redirection with cmsh is possible. As is usual, the input can be a string or a file. For example, for a file runthis with some commands stored in it:
1[root©dgxsuperpod ~]# cat runthis
2device
3get dgx001 ip
The commands can be run with the redirection operator as:
1[root©dgxsuperpod ~]# cmsh < runthis
2device
3get dgx001 ip
410.141.0.1
Running the file with the -f option avoids echoing the commands:
1[root©dgxsuperpod ~]# cmsh -f runthis
210.141.0.1
ssh#
The ssh command is run from within the device mode of cmsh. If an ssh session is launched from within cmsh, then it clears the screen and is connected to the specified node. Exiting from the ssh session returns the user back to the cmsh launch point.
 1[headnode]% device ssh dgx001
 2<screen is cleared>
 3<some MOTD text and login information is displayed>
 4[root©dgx001 ~]# exit
 5Connection to dgx001 closed.
 6[headnode]% device use headnode
 7[headnode->device[headnode]]% #now let us connect to the head node from the head node object
 8[headnode->device[headnode]]% ssh
 9<screen is cleared>
10<some MOTD text and login information is displayed>
11[root©headnode ~]# exit
12logout
13Connection to headnode closed.
14[headnode->device[headnode]]%
An alternative to running ssh within cmsh is to launch it in a subshell anywhere from within cmsh, by using !ssh.
time#
The time command within cmsh is a simplified version of the standard unix time command. The time command takes as its argument a second command that is to be executed within cmsh. On execution of the time command, the second command is executed. After execution of the time command is complete, the time the second command took to execute is displayed.
1[headnode->device]% time ds dgx001
2dgx001 .................. [   UP   ]
3time: 0.108s
watch#
The watch command within cmsh is a simplified version of the standard unix watch command.
The watch command takes as its argument a second command that is to be executed within cmsh. On execution of the watch command, the second command is executed every two seconds by default, and the output of that second command is displayed.
The repeat interval of the watch command can be set with the --interval|-n option.
A running watch command can be interrupted with a <Ctrl>-c.
1[headnode->device]% watch newnodes
2screen clears
3Every 2.0s: newnodes        Thu Dec 3 13:01:45 2015
4No new nodes currently available.
5[headnode->device]% watch -n 3 status -n dgx001,dgx002
6screen clears
7Every 3.0s: status -n dgx001,dgx002 Thu Jun 30 17:53:21 2016
8dgx001 ...............[ UP ]
9dgx002 ...............[ UP ]
foreach#
It is frequently convenient to be able to execute a cmsh command on several objects in parallel. The foreach command is available in several cmsh modes for this purpose. A foreach command takes a list of space-separated object names (the keys of the object) and a list of commands that must be enclosed by parentheses. The foreach command will then iterate through the objects, executing the list of commands on the iterated object each iteration.
Basic syntax for the foreach command: foreach <object1> <object2> · · · ( <command1>; <command2> · · · )
1[dgxsuperpod->device]% foreach dgx001 dgx002 (get hostname; status)
2dgx001
3dgx001 ............. [  UP  ]
4dgx002
5dgx002 ............. [  UP  ]
6[dgxsuperpod->device]%
With the foreach command, it is possible to perform set commands on groups of objects simultaneously, or to perform an operation on a group of objects. The range command (2.4.4.12) provides an alternative to it in many cases. Advanced options for the foreach command: the foreach command advanced options can be viewed from the help page:
1[root©headnode ~]# cmsh -c "device help foreach"
The options can be classed as: grouping options (list, type), adding options, conditional options, and looping options.
1-n|--nodes,  -g| --group,  -c| --category,  -r| --rack,  -h| --chassis,  -e| --overlay,-l| --role, -m| --image, -u| --union, -i| --intersection
2-t| --type chassis| genericdevice| gpuunit| litenode| cloudnode| node| physicalnode|  headnode| powerdistributionunit| racksensor| ethernetswitch| ibswitch| myrinetswitch| unmanagednode
There are two forms of grouping options shown in the preceding text. The first form uses a list of the objects being grouped, while the second form uses the type of the objects being grouped. These options become available according to the cmsh mode used. In the device mode of cmsh, for example, the foreach command has many grouping options available. If objects are specified with a grouping option, then the specified objects can be looped over.
For example, with the list form, the –-category|-c option takes a node category argument (or several categories), while the –-node|-n option takes a node-list argument. Node-lists (2.4.4.10) can also use the following, more elaborate, syntax:
<node>,…,<node>,<node>..<node>:
1[demo->device]% foreach -c default (status)
2dgx001 ............. [ DOWN ]
3dgx002 ............. [ DOWN ]
4[demo->device]% foreach -g rack8 (status)
5...
6[demo->device]% foreach -n dgx001,dgx008..dgx016,dgx032 (status)
7...
8[demo->device]%
With the type form, using the -t|--type option, the literal value to this option must be one of node, cloudnode, virtualnode, and so on.
If multiple grouping options are used, then the union operation takes place by default.
Both grouping option forms are often used in commands other than foreach for node selection.
clone -o|--clone: this option allows the cloning (2.4.3.3) of objects in a loop. In the following example, from device mode, dgx001 is used as the base object from which other nodes from dgx022 up to dgx024 are cloned:
1[headnode->device]% foreach --clone dgx001 -n dgx022..dgx024 () [headnode->device*]% list | grep node
2Type                 Hostname (key) Ip
3------------        -------------- -----------
4PhysicalNode        dgx001         10.141.0.1
5PhysicalNode        dgx022         10.141.0.22
6PhysicalNode        dgx023         10.141.0.23
7PhysicalNode        dgx024         10.141.0.24
8[headnode->device*]% commit
The cloned objects are placeholder schematics and settings, with different values for some of the settings, such as IP addresses, decided by heuristics. It is not the software disk image of dgx001 that is duplicated by object cloning to the other nodes by this action at this time.
clone -a|--add :this option creates the device for a specified device type if it does not exist. Valid types are shown in the help output, and include physicalnode, headnode, and ibswitch.
Conditional options: -s|--status, -q|--quitonunknown
The –-status|-s option allows nodes to be filtered by the device status (2.1.1).
1[headnode->device]% foreach -n dgx001..dgx004 --status UP (get IP)
210.141.0.1
310.141.0.3
Since the –status option is also a grouping option, the union operation applies to it by default too, when more than one grouping option is being run.
The –-quitonunknown|-q option allows the foreach loop to exit when an unknown command is detected.
Looping options: *, --verbose|-v
The wildcard character * with foreach implies all the objects that the list command lists for that mode. It is used without grouping options:
 1[myheadnode->device]% foreach * (get ip; status)
 210.141.253.1
 3switch01 ............ [  DOWN  ]
 410.141.255.254
 5myheadnode .......... [   UP   ]
 610.141.0.1
 7dgx001 .............. [ CLOSED ]
 810.141.0.2
 9dgx002 .............. [ CLOSED ]
10[myheadnode->device]%
Another example that lists all the nodes per category, by running the listnodes command within category mode:
1[headnode->category]% foreach * (get name; listnodes)
2default
3Type                           Hostname  MAC                       Category  Ip            Network       Status
4-------------  --------- ------------------  --------- ----------  ------------ --------
5PhysicalNode        dgx001     FA:16:3E:79:4B:77    default    10.141.0.1 internalnet  [ UP ]
6PhysicalNode        dgx002     FA:16:3E:41:9E:A8    default    10.141.0.2 internalnet  [ UP ]
7PhysicalNode        dgx003     FA:16:3E:C0:1F:E1    default    10.141.0.3 internalnet  [ UP ]
The –-verbose|-v option displays the loop headers during a running loop with timestamps, which can help in debugging.
Node List Syntax#
Node list specifications, as used in the foreach specification and elsewhere, can be of several types. Here are some examples:
adhoc (with a comma, or a space):
example: dgx001,dgx003,dgx005,dgx006
sequential (with two dots or square brackets):
example: dgx001..dgx004 or equivalently: dgx00[1-4] which is: dgx001,dgx002,dgx003,dgx004
sequential extended expansion (only for square brackets):
example: node[001-002]s[001-005] which is: dgx001s001,dgx001s002,dgx001s003,dgx001s004,dgx001s005,dgx002s001,dgx002s002,dgx002s003,dgx002s004,dgx002s005
rack-based:
This is intended to hint which rack a node is located in. Thus:
example: r[1-2]n[01-03]
which is: r1n01,r1n02,r1n03,r2n01,r2n02,r2n03
This might hint at two racks, r1 and r2, with three nodes each.
example: rack[1-2]dgx0[1-3]
which is: rack1dgx01,rack1dgx02,rack1dgx03,rack2dgx01,rack2dgx02,rack2dgx03
Like the previous one, but for nodes that were named more verbosely.
sequential exclusion (negation):
example: dgx001..dgx005,-dgx002..dgx003 which is: dgx001,dgx004,dgx005
sequential stride (every <stride> steps):
example: dgx00[1..7:2]
which is: dgx001,dgx003,dgx005,dgx007
mixed List
The square brackets and the two dots input specification cannot be used at the same time in one argument. Other than this, specifications can be mixed:
example: r1n001..r1n003,r2n003
which is: r1n001,r1n002,r1n003,r2n003
example: r2n003,r[3-5]n0[01-03]
which is: r2n003,r3n001,r3n002,r3n003,r4n001,r4n002,\
r4n003,r5n001,r5n002,r5n003
example: node[001-100],-node[004-100:4]
which is: every node in the 100 nodes, except for every fourth node.
path to file that contains a list of nodes:
example: ~/some/filepath/<file with list of nodes> The caret sign is a special character in cmsh for node list specifications. It indicates the string that follows is a file path that is to be read.
groupingsyntax#
groupingsyntax refers to usage of dots and square brackets. In other words, it is the syntax of how a grouping is marked so that it is accepted as a list. The list that is specified in this manner can be for input or output purposes. The groupingsyntax command sets the grouping syntax using the following options:
bracket: the square brackets specification.
dot: the two dots specification.
auto: the default. Setting auto means that:
Either the dot or the bracket specifications are accepted as input.
The dot specification is used for output.
The chosen groupingsyntax option can be made persistent by adding it to the .cmshrc dotfiles, or to /etc/cmshrc (2.4.1).
1[root©headnode ~]# cat .cm/cmsh/.cmshrc
2groupingsyntax auto
range#
The range command provides an interactive option to conduct basic foreach commands over a grouping of nodes. When the grouping option has been chosen, the cmsh prompt indicates the chosen range within braces ({}).
1[headnode->device]% range -n dgx0[01-24]
2[headnode->device{-n dgx001..024}]%
In the preceding example, commands applied at device level will be applied to the range of 24 node objects.
Continuing the preceding session—if a category can be selected with the -c option. If the default category just has three nodes, then output displayed could look like:
 1[headnode->device{-n dgx001..024}]% range -c default
 2[headnode->device{-c default}]% ds
 3dgx001      [       UP      ] state flapping
 4dgx002      [       UP      ]
 5dgx003      [       UP      ]
 6Values can be set at device mode level for the selected grouping.
 7[headnode->device{-c default}]% get revision
 8[headnode->device{-c default}]% set revision test
 9[headnode->device{-c default}]% get revision
10test test test
Values can also be set within a submode. However, staying in the submode for a full interaction is not possible. The settings must be done by entering the submode using a semicolon (new command statement continuation on same line) syntax, as follows:
 1[headnode->device{-c default}]% roles; assign pbsproclient; commit
 2The range command can be regarded as a modal way to carry out an implicit foreach on the grouping object. Many administrators should find it easier than a foreach:
 3[headnode->device{-c default}]% get ip
 410.141.0.1
 510.141.0.2
 610.141.0.3
 7[headnode->device{-c default}]% ..
 8[headnode->device]% foreach -c default (get ip)
 910.141.0.1
1010.141.0.2
1110.141.0.3
Commands can be run inside a range. However, running a pexec command inside a range is typically not the intention of the cluster administrator, even though it can be done:
1[headnode->device]% range -n node[001-100]
2[headnode->device{-n node[001-100]]]% pexec -n node[001-100] hostname
The preceding starts 100 pexec commands, each running on each of the 100 nodes.
Further options to the range command can be seen with the help text for the command (output truncated):
1[root©headnode ~]# cmsh -c "device help range"
2Name:       range - Set a range of several devices to execute future commands on
3Usage:      range [OPTIONS] * (command)
4range [OPTIONS] <device> [<device> ...] (command)
5Options:    --show  Show the current range
6--clear     Clear the range
7-v, --verbose  Show header before each element
8...
bookmark#
A bookmark can be:
Set with the bookmark command.
Reached using the goto command.
A bookmark is set with arguments to the bookmark command within cmsh as follows:
The user can set the current location as a bookmark:
By using no argument. This is the same as setting no name for it.
By using an arbitrary argument. This is the same as setting an arbitrary name for it.
Apart from any user-defined bookmark names, cmsh automatically sets the special name: “-”. This is always the previous location in the cmsh hierarchy that the user has just come from.
All bookmarks that have been set can be listed with the -l|--list option.
Reaching a bookmark: a bookmark can be reached with the goto command. The goto command can take the following as arguments: a blank (no argument), any arbitrary bookmark name, or “-”. The bookmark corresponding to the chosen argument is then reached.
The - bookmark does not need to be preceded by a goto.
 1[dgxsuperpod]% device use dgx001
 2[dgxsuperpod->device[dgx001]]% bookmark
 3[dgxsuperpod->device[dgx001]]% bookmark -l
 4Name                    Bookmark
 5----------------  ------------------------
 6                home;device;use dgx001;
 7-                  home;
 8[dgxsuperpod->device[dgx001]]% home
 9[dgxsuperpod]% goto
10[dgxsuperpod->device[dgx001]]% goto -
11[dgxsuperpod]% goto
12[dgxsuperpod->device[dgx001]]% bookmark dn1
13[dgxsuperpod->device[dgx001]]% goto -
14[dgxsuperpod]% goto dn1
15[dgxsuperpod->device[dgx001]]%
16Saving bookmarks, and making them persistent: bookmarks can be saved to a file, such as mysaved, with the -s|--save option, as follows:
17[dgxsuperpod]% bookmark -s mysaved
Bookmarks can be made persistent by setting .cmshrc files (2.4.1.2) to load a previously saved bookmarks file whenever a new cmsh session is started. The bookmark command loads a saved bookmark file using the -x|–load option.
1[rootheadnode ~]# cat .cm/cmsh/.cmshrc
2bookmark -x mysaved
rename#
Nodes can be renamed globally from within partition mode, in the Node basename field associated with the prefix of the node in Base View or in cmsh. However, a more fine-grained batch renaming is also possible with the rename command, and typically avoids having to resort to scripting mechanisms. Using rename is best illustrated by examples:
The examples begin with using the default basename of node and default node digits (padded suffix number length) of 3. A simple rename that is a prefix change, can then be conducted as:
1[headnode->device]% rename dgx001..dgx003 test
2Renamed: dgx001 to test1
3Renamed: dgx002 to test2
4Renamed: dgx003 to test3
The rename starts up its own numbering from 1, independent of the original numbering. The change is committed using the commit command.
Zero-padding occurs if the number of nodes is sufficiently large to need it. For example, if ten nodes are renamed:
1[headnode->device]% rename node[001-010] test
2Renamed: dgx001 to test01
3Renamed: dgx002 to test02
4...
5Renamed: dgx009 to test09
6Renamed: dgx010 to test10
Then two digits are used for each number suffix, to match the size of the last number. String formatting can be used to specify the number of digits in the padded number field:
1[headnode->device]% rename node[001-003] test%04d
2Renamed: dgx001 to test0001
3Renamed: dgx002 to test0002
4Renamed: dgx003 to test0003
The target names can conveniently be specified exactly. It requires an exact name mapping. That is, it assumes the source list size and target list size match:
1[headnode->device]% rename node[001-005] test0[1,2,5-7]
2Renamed: dgx001 to test01
3Renamed: dgx002 to test02
4Renamed: dgx003 to test05
5Renamed: dgx004 to test06
6Renamed: dgx005 to test07
The hostnames are sorted alphabetically before they are applied, with some exceptions based on the listing method used.
A --dry-run option can be used to show how the devices will be renamed. Alternatively, the refresh command can clear a proposed set of changes before a commit command commits the change, although the refresh would also remove other pending changes.
Exact name mapping could be used to allocate individual servers to several people:
1[root©headnode ~]# cmsh
2[headnode]% device
3[headnode->device]% rename node[001-004] userone, usertwo, userthree, userfour
4Renamed: dgx001 to userone
5Renamed: dgx002 to usertwo
6Renamed: dgx003 to userthree
7Renamed: dgx004 to userfour
8[headnode->device]% commit
Skipping by several nodes is possible using a colon (:). An example might be to skip by two so that twin servers can be segregated into left/right.
 1[root©headnode ~]# cmsh
 2[headnode]% device
 3[headnode->device]% rename node[001-100:2] left[001-050]
 4Renamed: dgx001 to left001
 5Renamed: dgx003 to left002
 6...
 7Renamed: dgx097 to left049
 8Renamed: dgx099 to left050
 9[headnode->device]% rename node[002-100:2] right[001-050]
10Renamed: dgx002 to right001
11Renamed: dgx004 to right002
12...
13Renamed: dgx098 to right049
14Renamed: dgx100 to right050
15[headnode->device]% commit
Using CMDaemon Environment Variables in Scripts#
Within device mode, the environment command shows the CMDaemon environment variables that can be passed to scripts for a particular device.
1[dgxsuperpod->device]% environment dgx001
2Key                                                   Value
3---------------------------------------------- ----------------------------------
4CMD_ACTIVE_MASTER_IP                                          10.141.255.254
5CMD_CATEGORY                                          default
6CMD_CLUSTERNAME                                       dgxsuperpod
7CMD_DEVICE_TYPE                                       ComputeNode
8CMD_ENVIRONMENT_CACHE_EPOCH_MILLISECONDS      1615465821582
9...
The environment variables can be prepared for use in Bash scripts with the -—export|-e option:
1[dgxsuperpod->device]% environment -e dgx001
2export CMD_ENVIRONMENT_CACHE_UPDATES=4
3export CMD_CATEGORY=default
4export CMD_SOFTWAREIMAGE=default-image
5export CMD_DEVICE_TYPE=ComputeNode
6export CMD_ROLES=
7export CMD_FSMOUNT__SLASH_home_FILESYSTEM=nfs
8...
Converting Tables to JSON with cmsh#
A list of table entries can be converted to a JSON representation by using the delimiter specification option -d {}.
By default, the indentation value used is 2. Other values can be set by putting the value inside the braces.
 1[headnode->device]% list -f hostname,ip,mac,status
 2hostname (key)           ip                     mac            status
 3-------------------- -------------------- -------------------- --------------------
 4dgx001                  10.141.0.1       FA:16:3E:95:80:9F     [  UP  ]
 5headnode                10.141.255.254           FA:16:3E:D3:56:E0     [  UP  ]
 6[headnode->device]% color off; list -f hostname,ip,mac,status -d
 7[
 8"hostname (key)": "headnode", "ip": "10.141.255.254",
 9"mac": "FA:16:3E:D3:56:E0",
10"status":  "[       UP      ]"
11"hostname (key)": "dgx001",
12"ip": "10.141.0.1",
13"mac": "FA:16:3E:95:80:9F",
14"status":  "[       UP      ]"
15]
16[headnode->device]%
The color off setting is needed to remove the default console coloring. If the command is to run from the bash shell, the same output can be achieved with:
1[root©headnode ~]# cmsh --color=no -c "device; list -f hostname,ip,mac,status -d {}"