Provisioning Nodes#
The action of transferring the software image to the nodes is called node provisioning and is done by special nodes called the provisioning nodes. More complex clusters can have several provisioning nodes configured by the administrator, thereby distributing network traffic loads when many nodes are booting.
Creating provisioning nodes is done by assigning a provisioning role to a node or category of nodes. Similar to how the head node always has a boot role, the head node also always has a provisioning role. A provisioning node keeps a copy of all the images it provisions on its local drive, in the same directory as where the head node keeps such images. The local drive of a provisioning node must therefore have enough space available for these images, which may require changes in its disk layout. Table 13 shows provisioning role parameters.
Parameter |
Description |
|---|---|
allImages |
The following values decide what images that the provisioning node provides: |
Onlocaldisk |
all images on the local disk, regardless of any other parameters set |
Onsharedstorage |
all images on the shared storage, regardless of any other parameters set |
no (the default) |
only images listed in the localimages or sharedimages parameters |
localimages |
A list of software images on the local disk that the provisioning node accesses and provides. The list is used only if allImages is “no” |
sharedimages |
A list of software images on the shared storage that the provisioning node accesses and provides. The list is used only if allImages is “no” |
Provisioning slots |
The maximum number of nodes that can be provisioned in parallel by the provisioning node. The optimum number depends on the infrastructure. The default value is 10, which is safe for typical cluster setups. Setting it lower may sometimes be needed to prevent network and disk overload. |
Nodegroups |
A list of node groups (2.1.4). If set, the provisioning node only provisions nodes in the listed groups. Conversely, nodes in one of these groups can only be provisioned by provisioning nodes that have that group set. Nodes without a group, or nodes in a group not listed in nodegroups, can only be provisioned by provisioning nodes that have no nodegroups values set. By default, the nodegroups list is unset in the provisioning nodes. The nodegroups setting is typically used to set up a convenient hierarchy of provisioning, for example based on grouping by rack and by groups of racks. |
Role Setup with cmsh#
In the following cmsh example, the administrator creates a new category called misc. The default category default already exists in a newly installed cluster. The administrator then assigns the role called provisioning, from the list of available assignable roles to nodes in the misc category. After the assign command has been typed in, but before entering the command, tab-completion prompting can be used to list all the possible roles. Assignment creates an association between the role and the category. When the assign command runs, the shell drops into the level representing the provisioning role. If the role called provisioning were already assigned, then the use provisioning command would drop the shell into the provisioning role, without creating the association between the role and the category. Once the shell is within the role level, the role properties can be edited. For example, the nodes in the misc category assigned the provisioning role can have default-image set as the image that they provision to other nodes, and have 20 set as the maximum number of other nodes to be provisioned simultaneously (some text is elided in the following example):
 1[headnode]% category add misc [headnode->category*[misc*]]% roles
 2[headnode->category*[misc*]->roles]% assign provisioning [headnode...*]->roles*[provisioning*]]% set allimages no [headnode...*]->roles*[provisioning*]]% set localimages default-image [headnode...*]->roles*[provisioning*]]% set provisioningslots 20 [headnode...*]->roles*[provisioning*]]% show
 3Parameter                                                   Value
 4---------------------------------   ---------------------------------
 5All Images                                                  no
 6Include revisions of local images   yes
 7Local images                                                default-image
 8Name                                                                        provisioning
 9Nodegroups
10Provisioning associations           <0 internally used> Revision
11Shared images
12Type                                                                        ProvisioningRole
13Provisioning slots                          20
14[headnode->category*[misc*]->roles*[provisioning*]]% commit
15[headnode->category[misc]->roles[provisioning]]
Assigning a provisioning role can also be done for an individual node instead, if using a category is deemed overkill:
1[headnode]% device use dgx001 [headnode->device[dgx001]]% roles
2[headnode->device[dgx001]->roles]% assign provisioning
3[headnode->device*[dgx001*]->roles*[provisioning*]]%
4...
A role change configures a provisioning node but does not directly update the provisioning node with images. After conducting a role change, the cluster manager runs the updateprovisioners command described in 9.3 automatically, so that regular images are propagated to the provisioners. The propagation can be done by provisioners themselves if they have up-to-date images. CMDaemon tracks the provisioning nodes role changes, as well as which provisioning nodes have up-to-date images available, so that provisioning node configurations and compute node images propagate efficiently. Thus, for example, image update requests by provisioning nodes take priority over provisioning update requests from compute nodes. Other assignable provisional roles include monitoring, storage, and failover.
Role Setup with Base View#
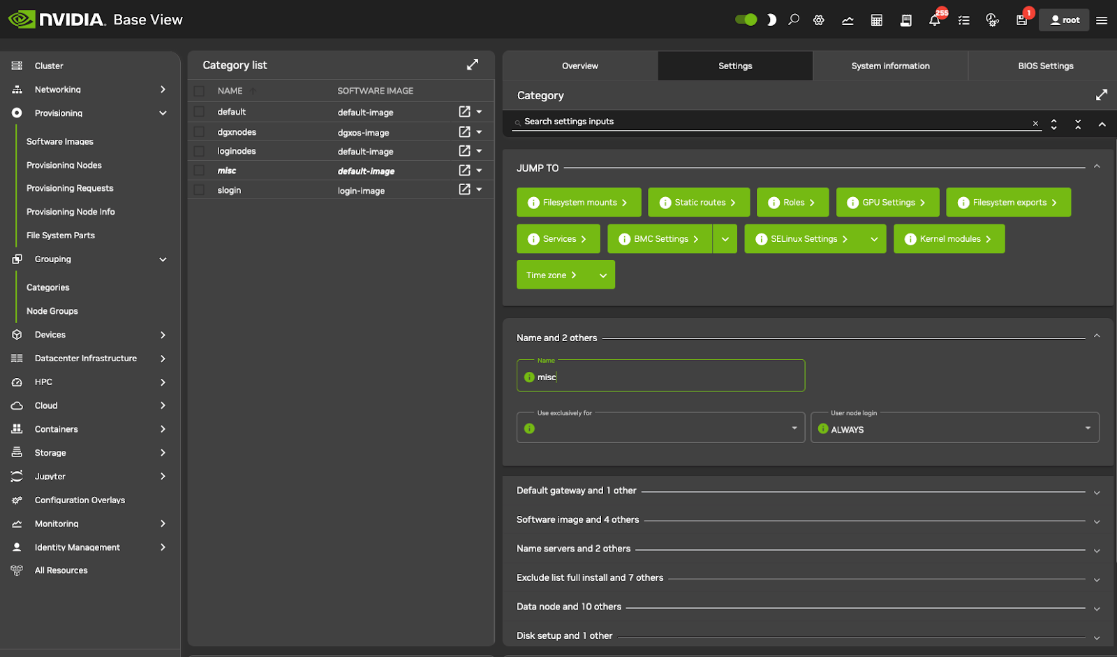
The provisioning configuration outlined in cmsh mode (9.1) can be done using Base View. A misc category can be added using clickpath Grouping>Categories>Add>Settings<name>. Within the Settings tab, the node category should be given a name misc (Figure 15) and saved.
Figure 15. Base View: Adding a misc category
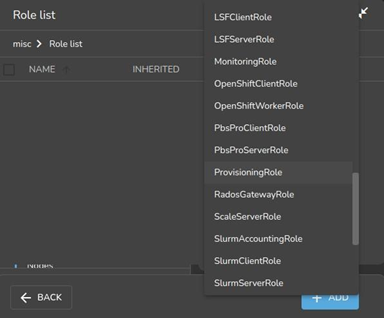
The Roles window can then be opened from within the JUMP TO section of the settings pane. To add a role, select the + Add button in the Roles window. A scrollable list of available roles is then displayed (Figure 16).
Figure 16. Base View: Setting a provisioning role
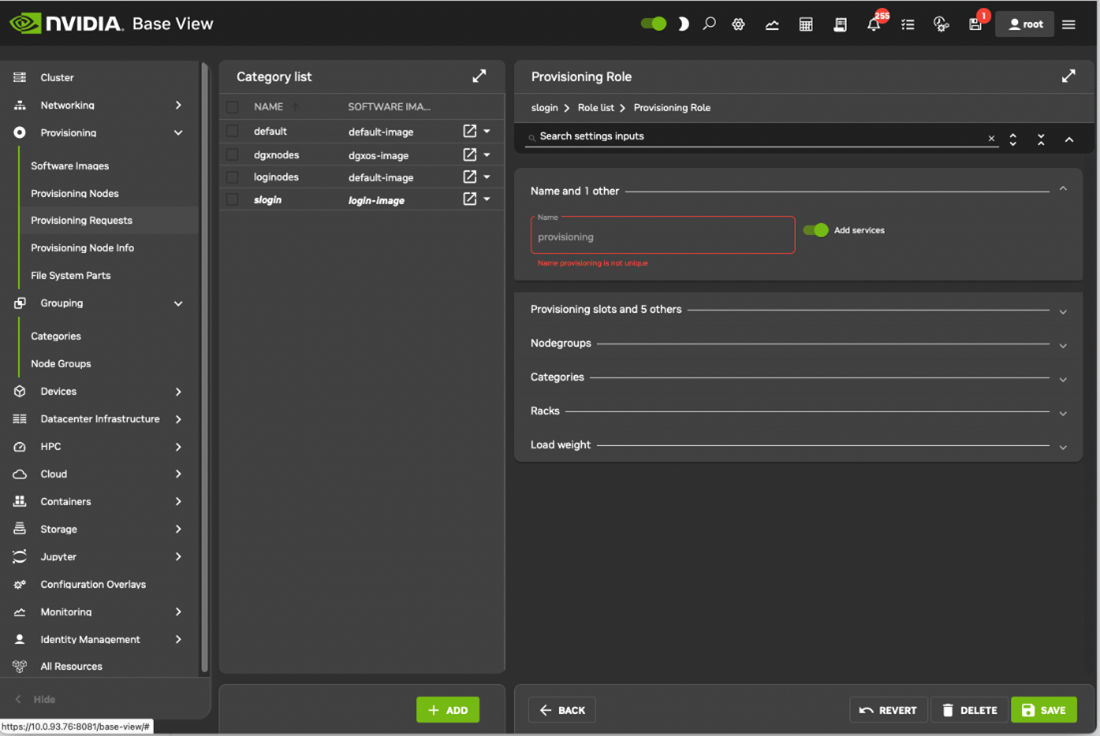
After selecting a role, navigating using the Back buttons to the Settings menu, and select the Save button. The role has properties that can be edited (Figure 17).
Figure 17. Base View: Configuring a Provisioning Role
For example:
The Provisioning slots setting decides how many images can be supplied simultaneously from the provisioning node.
The All images setting decides if the role provides all images.
The Local images setting decides what images the provisioning node supplies from local storage.
The Shared images setting decides what images that the provisioning node supplies shared storage.
The images offered by the provisioning role should not be confused with the software image setting of the misc category itself, which is the image the provisioning node requests for itself from the category.
Housekeeping#
The head node does housekeeping tasks for the entire provisioning system. Provisioning is done on request for all non-head nodes on a first-come, first-serve basis. Since provisioning nodes themselves, too, must be provisioned, it means that to cold boot an entire cluster up quickest, the head node should be booted and be up first, followed by provisioning nodes, and finally by all other non-head nodes. Following this start-up sequence ensures that all provisioning services are available when the other non-head nodes are started up. Some aspects of provisioning housekeeping are discussed next.
Provisioning Node Selection#
When a node requests provisioning, the head node allocates the task to a provisioning node. If there are several provisioning nodes that can provide the image required, then the task is allocated to the provisioning node with the lowest number of already-started provisioning tasks.
Limiting Provisioning Tasks#
Besides limiting how much simultaneous provisioning per provisioning node is allowed with Provisioning slots (9), the head node also limits how many simultaneous provisioning tasks are allowed to run on the entire cluster. This is set using the MaxNumberOfProvisioningThreads directive in the head node’s CMDaemon configuration file, /etc/cmd.conf, as described in Appendix C of the Bright Cluster Manager Administrator Manual.
Provisioning Tasks Deferral and Failure#
A provisioning request is deferred if the head node is not able to immediately allocate a provisioning node for the task. Whenever an ongoing provisioning task has finished, the head node tries to re-allocate deferred requests. A provisioning request fails if an image is not transferred. Five retry attempts at provisioning the image are made in case a provisioning request fails. A provisioning node that loses connectivity while carrying out requests, will have the provisioning requests fail after 180 seconds from the time that connectivity was lost.
Role Change Notification#
The updateprovisioners command can be accessed from the softwareimage mode in cmsh. It can also be accessed from Base View, using clickpath Provisioning>Provisioning requests>Update provisioning nodes.
In the examples in 9.1, changes were made to provisioning role attributes for an individual node as well as for a category of nodes. This automatically ran the updateprovisioners command.
The updateprovisioners command runs automatically if CMDaemon is involved during software image changes or during a provisioning request. If on the other hand, the software image is changed outside of the CMDaemon front-ends, for example by an administrator adding a file by copying it into place from the bash prompt, then updateprovisioners should be run manually to update the provisioners.
In any case, if it is not run manually, it is scheduled to run every midnight by default.
When the default updateprovisioners is invoked manually, the provisioning system waits for all running provisioning tasks to end, and then updates all images located on any provisioning nodes by using the images on the head node. It also re-initializes its internal state with the updated provisioning role properties, i.e. keeps track of what nodes are provisioning nodes.
The default updateprovisioners command, run with no options, updates all images. If run from cmsh with a specified image as an option, then the command only does the updates for that image. A provisioning node undergoing an image update does not provision other nodes until the update is completed.
1[headnode]% software image updateprovisioners Provisioning nodes will be updated in the background.
2Sun Dec 12 13:45:09 2010 headnode: Starting update of software image(s)\ provisioning node(s). (user initiated).
3[headnode]% software image updateprovisioners
4[headnode]%
5Sun Dec 12 13:45:41 2010 headnode: Updating image default-image on provisioning node dgx001.
6[headnode]%
7Sun Dec 12 13:46:00 2010 headnode: Updating image default-image on provisioning node dgx001 completed.
8Sun Dec 12 13:46:00 2010 headnode: Provisioning node dgx001 was updated Sun Dec 12 13:46:00 2010 headnode: Finished updating software image(s) \ on provisioning node(s).
Role Draining and Undraining Nodes#
The drain and undrain commands to control provisioning nodes are accessible from within the softwareimage mode of cmsh.
If a node is put into a drain state, all active provisioning requests continue until they are completed. However, the node is not assigned any further pending requests until the node is put back into an undrain state.
 1[headnode->software image]% drain -n master Nodes drained
 2[headnode->software image]% provisioningstatus Provisioning subsystem status
 3Pending request:    dgx001, dgx002 Provisioning node status:
 4+ headnode
 5Slots:      1 / 10
 6State:      draining
 7Active nodes:       dgx003
 8Up to date images:  default-image [headnode->software image]% provisioningstatus Provisioning subsystem status
 9Pending request:    dgx001, dgx002 Provisioning node status:
10+ headnode
11Slots:      0 / 10
12State:      drained
13Active nodes:       none
14Up to date images:  default-image
Use the --role provisioning option to drain all nodes in parallel. All pending requests then remain in the queue until the nodes are undrained again.
1[headnode->software image]% drain --role provisioning
2...Time passes. Pending
3requests stay in the queue. Then admin undrains it...
4[headnode->software image]% undrain --role provisioning
Provisioning Node Update Safeguards#
The updateprovisioners command is subject to safeguards that prevent it running too frequently. The minimum period between provisioning updates can be adjusted with the parameter provisioningnodeautoupdatetimeout, which has a default value of 300s.
Exceeding the timeout does not by itself trigger an update to the provisioning node.
When the head node receives a provisioning request, it checks if the last update of the provisioning nodes is more than the timeout period. If true, then an update is triggered to the provisioning node. The update is disabled if the timeout is set to zero (false).
The parameter can be accessed and set within cmsh from partition mode:
1[root©brght92 ]# cmsh [headnode]% partition use base
2[headnode->partition[base]]% get provisioningnodeautoupdatetimeout
3[headnode->partition[base]]% 300
4[headnode->partition[base]]% set provisioningnodeautoupdatetimeout 0
5[headnode->partition*[base*]]% commit
Within Base View, the parameter is accessible through clickpath Cluster>Partition[base]>Provisioning Node Auto Update Timeout.
To prevent provisioning an image to the nodes, it can be locked. The provisioning request is then deferred until the image is again unlocked.
Synchronization of fspart Subdirectories to Provisioning Nodes#
In the cluster manager, an fspart is a subdirectory, and it is a filesystem part that can be synced during provisioning. The fsparts can be listed with:
1[root©headnode ]# cmsh [headnode]% fspart [headnode->fspartJ] list
2Path (key)                                           Type             Image
3------------------------------ --------------- ------------------------
4/cm/images/default-image     image            default-image
5/cm/images/default-image/boot  boot           default-image:boot
6/cm/node-installer                   node-installer
7/cm/shared                                           cm-shared
8/tftpboot                                            tftpboot
9/var/spool/cmd/monitoring    monitoring
The updateprovisioners command is used to update image fsparts to all nodes with a provisioning role.
The trigger command is used to update non-image fsparts to off-premises nodes, such as cloud directors and edge directors. The directors have a provisioning role for the nodes that they direct.
All the non-image types can be updated with the --all option:
1[headnode->fspart]% trigger --all
The command help trigger in fspart mode gives further details.
The info command shows the architecture, OS, and the number of inotify watchers that track rsyncs in the fspart subdirectory.
 1[headnode->fspart]% info
 2Path                                                                 Architecture      OS                Inotify watchers
 3------------------------------ ---------------- ---------------- ----------------
 4/cm/images/default-image     x86_64            ubuntu2004        0
 5/cm/images/default-image/boot        -                 -                 0
 6/cm/node-installer                   x86_64            ubuntu2004        0
 7/cm/shared                                           x86_64            ubuntu2004        0
 8/tftpboot                                            -                 -                 0
 9/var/spool/cmd/monitoring    -                 -                 0
10[headnode->fspart]% info -s Path (!#with size, takes longer)
11Path                                                                 Architecture      OS                Inotify watchers Size
12----------------------------   ---------------- ---------------- ---------------- -------------
13/cm/images/default-image       x86_64                  ubuntu2004        0                 4.2 GiB
14/cm/images/default-image/boot  -               -                 0                 179 MiB
15/cm/node-installer                   x86_64            ubuntu2004        0                 2.45 GiB
16/cm/shared                                           x86_64            ubuntu2004        0                 2.49 GiB
17/tftpboot                                            -                 -                 0                 3.3 MiB
18/var/spool/cmd/monitoring    -                 -                 0                 1.02 GiB
The locked, lock, and unlock commands:
The locked command lists fsparts that are prevented from syncing.
1[headnode->fspart]% locked No locked fsparts
The lock command prevents a specific fspart from syncing.
1[headnode->fspart]% lock /var/spool/cmd/monitoring [headnode->fspart]% locked
2/var/spool/cmd/monitoring
The unlock command unlocks a specific locked fspart again.
1[headnode->fspart]% unlock /var/spool/cmd/monitoring [headnode->fspart]% locked
2No locked fsparts
Access to excludelistsnippets
The properties of excludelistsnippets for a specific fspart can be accessed from the excludelistsnippets submode:
 1[headnode->fspart]% excludelistsnippets /tftpboot
 2[headnode->fspart[/tftpboot]->exclude list snippets]% list
 3Name (key)   Lines   Disabled  Mode sync  Mode full  Mode update  Mode grab  Mode grab new
 4------------ ------- --------  ---------  ---------  -----------  ---------  -------------
 5Default         2       no        yes        yes        yes          no       no
 6
 7[headnode->fspart[/tftpboot]->exclude list snippets]% show default
 8Parameter                                           Value
 9----------------------------- ------------------------------------------------------------
10Lines                                                               2
11Name                                                                Default
12Revision
13Exclude list                                        # no need for rescue on nodes with a boot role,/rescue,/rescue/*
14Disabled                                                    no
15No new files                                        no
16Mode sync                                           yes
17Mode full                                           yes
18Mode update                                         yes
19Mode grab                                           no
20Mode grab new                                       no
21[headnode->fspart[/tftpboot]->exclude list snippets]%  get  default  exclude list
22# no need for rescue on nodes with a boot role
23/rescue
24/rescue/*


