User Management#
Users and groups for the DGX SuperPOD are presented to the administrator in a single system paradigm. That is, if the administrator manages them with the cluster manager, then the changes are automatically shared across the cluster (the single system). The cluster manager runs its own LDAP service to manage users, rather than using unix user and group files. In other words, users and groups are managed by the centralizing LDAP database server running on the head node, and not through entries in /etc/passwd or /etc/group files.
Managing Users and Groups with Base View#
Within Base View:
Users can be managed through clickpath Identity Management>Users.
Groups can be managed using clickpath Identity Management>Groups.
For users (Figure 5) the LDAP entries for regular users are displayed. These entries are editable, and each user can then be managed in further detail.
Figure 5. Base View User Management
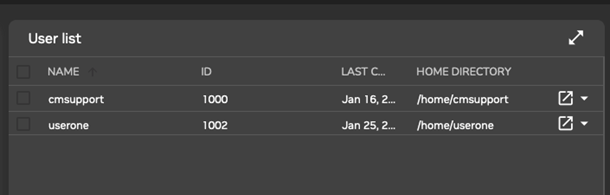
There is one user on a newly installed cluster manager: cmsupport. This user has no password set by default, which means no logins to this account are allowed by default. The cluster manager uses cmsupport to run various diagnostics utilities, so it should not be removed, and the default contents of its home directory should also not be removed. The + ADD button allows users to be added using a User parameters window ((Figure 6)). The changes in parameter values can be committed using the SAVE button in the User parameter window.
Figure 6. Base View User Management: Add
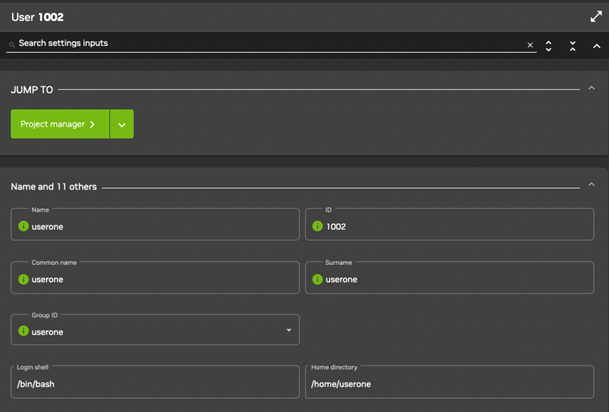
When saving an addition or modification:
User and group ID numbers are automatically assigned from UID and GID 1000 onward.
A home directory is created, and a login shell is set. Users with unset passwords cannot log in. Group management in Base View is conducted using clickpath Identity Management>Groups.
Clickable LDAP object entries for regular groups then show up, like the user entries already covered. Management of these entries is done with the same functions as for user management.
Managing Users and Groups with cmsh#
User management tasks as conducted by Base View can also be done with cmsh. A cmsh session is run here to cover the functions corresponding to the user management functions of Base View.
Note
For the remainder of the document a command executed at # prompt would be run on the linux shell, and a command run executed on % prompt is run inside cmsh.
These functions are run from within the user mode of cmsh.
1[root©headnode ~]# cmsh
2[headnode]% user
3[headnode->user%
Adding a User#
This corresponds to the functionality of the + Add button operation in Base View.
In user mode, the process of adding a user userone to the LDAP directory is started with the add command.
1[headnode->user% add userone
2[headnode->user*[userone*]]%
cmsh drops into the user object just added, and the prompt shows the username to reflect this. Going into the user object would otherwise be done manually by entering user userone at the user mode level.
Asterisks in the prompt are reminders of a modified state, with each asterisk indicating that there is an unsaved, modified property at that asterisk’s level.
The modified command displays a list of modified objects that have not yet been committed.
1[headnode->user*[userone*]]% modified
2State  Type                    Name
3------ ----------------------- ---------------
4+      User                    userone
5+
This corresponds to what is displayed by the Unsaved entities icon in the top-right corner of the Base View standard display.
Running show at this point reveals a username entry, but empty fields for the other properties of userone. So, the account in preparation, while it is modified, is not yet ready for use.
1[headnode->user*[userone*]]% show
2Parameter                         Value
3------------------------------    --------------------------
4Accounts
5Managees
6Name                                    userone
7Primary group
8Revision
9Secondary
Saving the Modified State#
This corresponds to the functionality of the SAVE button operation.
User userone that was added in 4.2.1 now exists as a proposed modification but has not yet been committed to the LDAP database.
Running the commit command now at the userone prompt stores the modified state at the user userone object level:
 1[bright92->user*[userone*]]% commit
 2[bright92->user[userone]]% show
 3Parameter                                            Value
 4------------------------------ ---------------------------
 5Accounts
 6Managees
 7Name                                                                 userone
 8Primary group                                        userone
 9Revision
10Secondary groups
11ID                                                           1001
12Common name                                          userone
13Surname                                                      userone
14Group ID                                             1001
15Login shell                                          /bin/bash
16Home directory                               /home/userone
17Password                                             *********
18Email
19Profile
20Create cmjob certificate     no
21Write ssh proxy config       no
22Shadow min                                           0
23Shadow max                                           999999
24Shadow warning                                       7
25Inactive                                                     0
26Last change                                          2023/1/12
27Expiration date                              2038/1/1
28Project manager                              <submode>
29Notes                                                        <0B>
If, however, commit was to be run at the user mode level without dropping into the userone object level, instead of just that modified user, all modified users would be committed.
When the commit is done, all the empty fields for the user are automatically filled in with defaults. Also, as a security precaution, if an empty field (that is, a “not set”) password entry is committed, then a login to the account is not allowed. So, in the example, the account for user userone exists at this stage, but still cannot be logged into until the password is set. Editing passwords and other properties is covered in 4.2.3.
The default permissions for file and directories under the home directory of the user are defined by the umask settings in /etc/login.defs, as would be expected if the administrator were to use the standard useradd command. Setting a path for the homedirectory parameter for a user sets a default home directory path. By default the path is /home/<username> for a user <username>. If homedirectory is unset, then the default is determined by the HomeRoot directive.
Editing Properties of Users and Groups#
This corresponds to the functionality of the Edit operation in 4.1.
In Saving the Modified State, a user account userone was made, with an unset password as one of its properties. Logins to accounts with an unset password are refused. The password therefore must be set if the account is to function.
Editing Users with set and clear#
The tool used to set user and group properties is the set command. Typing set and then either using tab to see the possible completions, or following it up with the enter key, suggests several parameters that can be set, one of which is password.
 1[headnode->user[userone]]% set
 2Name:
 3set - Set specific user property
 4Usage:
 5set [user] <parameter> <value> [<value> ...] (type 1)
 6set [user] <parameter] [file]       (type 2)
 7Arguments:
 8User
 9    name of the user, omit if current is set
10Parameters: (type 1)
11commonname ........... Full name (e.g. Donald Duck)
12createcmjobcertificate Create a certificate with the cloudjob profile for cmjob
13email................  email
14expirationdate ......  Date on which the user login will be disabled
15groupid .............  Base group of this user
16homedirectory .......  Home directory
17id ..................  User ID number
18inactive ............  Number of days of inactivity allowed for the user
19loginshell ..........  Login shell
20name ................  User login (e.g. donald)
21password ............. Password
22profile .............. Profile for Authorization
23projectmanager ....... Project manager
24revision ............. Entity revision
25shadowmax ............ Maximum number of days for which the user password remains valid.
26shadowmin ............ Minimum number of days required between password changes
27shadowwarning ........ Number of days of advance warning given to the user before the user password expires surname .............
28Surname (e.g. Duck) writesshproxyconfig . Write ssh proxy config
29Parameters: (type 2)
30notes ................. Administrator notes
31[headnode->user[userone]]%
Continuing the session from the end of 4.2.2, the password can be set at the user context prompt like this:
1[headnode->user[Userone]]% set password seteca5tr0n0my
2[headnode->user*[userone*]]% commit
3[headnode->user[Userone]]%
The account userone is now ready for use. The converse of the set command is the clear command, which clears properties.
1[headnode->user[Userone]]% clear password; commit
Setting a password in cmsh is also possible by setting the LDAP hash (the encrypted storage format) that is generated from the password within cmsh. When setting passwords in cmsh, a string starting with {MD5}, {CRYPT}, or {SSHA} is the hash of the password.
 1[root©headnode ~]# #first create the LDAP salted SHA-1 hash of the password:
 2[root©headnode ~]# /cm/local/apps/openldap/sbin/slappasswd -h {SSHA} -s seteca5tr0n0my [root©headnode ~]# {SSHA}sViD+lfSTtlIy0MuGwPGfGd5XKHgEm5d
 3[root©headnode ~]# cmsh [headnode]% user use userone
 4[headnode->user[userone]]% set password
 5enter new password: #here and in the next line {SSHA}sViD+lfSTtlIy0MuGwPGfGd5XKHgEm5d is typed in
 6retype new password:
 7[headnode->user[userone]]%  commit
 8[headnode->user[userone]]%  !ssh  userone©dgx001    #now will test the password that generated the hash
 9userone©dgx001 s password:  #here seteca5tr0n0my is typed in
10Creating ECDSA key for ssh
11[userone©node001  ~]$       #successfully logged in with the password associated with the hash
Managing passwords in cmsh by direct LDAP hash entry should not be done.
Editing Groups with append and removefrom#
While the preceding commands set and clear also work with groups, there are two other commands available which suit the special nature of groups. These supplementary commands are append and removefrom. They are used to add extra users to and remove extra users from a group.
For example, it may be useful to have a printer group so that several users can share access to a printer. For the sake of this example (continuing the session from where it was left off in the preceding), usertwo and userthree are now added to the LDAP directory, along with a group printer:
1[headnode->user[userone]]% add usertwo; add userthree
2[headnode->user*[userthree*]]% exit; group; add printer
3[headnode->group*[printer*]]% commit
4[headnode->group[printer]]% exit; exit; user
5[headnode->user*]%
In the previous example, semicolons are used to chain commands together on the same line.
The context switch that takes place in the preceding session should be noted. The context of user userone was eventually replaced by the context of group printer. As a result, the group printer is committed, but the users usertwo and userthree are not yet committed, which is shown by the asterisk at the user mode level.
To add users to a group, the append command is used. A list of users userone, usertwo, and userthree can be added to the group printer like this:
 1[headnode->user*]% commit
 2Successfully committed 2 Users
 3[headnode->user]% group use printer
 4[headnode->group[printer]]% append members userone usertwo userthree; commit [headnode->group[printer]]% show
 5Parameter                                     Value
 6------------------------ --------------------------
 7ID                                                            1002
 8Revision
 9Name                                                          printer
10Members                                               userone,usertwo,userthree
To remove users from a group, the removefrom command is used. A list of specific users, for example, usertwo and userthree, can be removed from a group like this:
1[headnode->group[printer]]% removefrom members usertwo userthree; commit
2[headnode->group[printer]]% show
3Parameter                                           Value
4------------------------    --------------------------
5ID                                                                  1002
6Revision
7Name                                                                printer
8Members                                                     userone
The clear command can also be used to clear members—but it also clears all the extras from the group:
1[headnode->group[printer]]% clear members [headnode->group*[printer*]]% show
2Parameter                                           Value
3------------------------    --------------------------
4ID                                                                  1002
5Revision
6Name                                                                printer
7Members
The commit command is intentionally left out at this point in the session to illustrate how reversion is used in the next section.
Reverting to the Unmodified State#
This corresponds roughly to the functionality of the Revert operation in 4.1.
This section continues from the state of the session at the end of 4.2.3. There, the state of group printers was cleared so that the extra added members were removed. This state (the state with no group members showing) was however not yet committed.
The refresh command reverts an uncommitted object back to the last committed state.
This happens at the level of the object that it is using. For example, the object that is being handled here is the properties of the group object printer. Running revert at a higher-level prompt—say, in the group mode level—would revert everything at that level and below. So, to affect only the properties of the group object printer, the refresh command is used at the group object printer level prompt. It then reverts the properties of group object printer back to their last committed state, and does not affect other objects:
1[headnode->group*[printer*]]% refresh [headnode->group[printer]]% show
2Parameter                                           Value
3------------------------    --------------------------
4ID                                                                  1002
5Revision
6Name                                                                printer
7Members                                                     userone
Here, the user userone reappears because they were stored in the last save. Also, because only the group object printer has been committed, the asterisk indicates the existence of other uncommitted, modified objects.
Removing a User#
Removing a user using cmsh corresponds roughly to the functionality of the Delete operation in 4.1.
The remove command removes a user or group. The -d|–data flag added to the end of the username removes the user’s home directory as well. For example, within user mode, the command remove user userone -d; commit removes user userone, along with their home directory.
Continuing the session at the end of 4.2.4 from where it was left off, as follows, shows this result:
1[headnode->group[printer]]% user use userone
2[headnode->user[userone]]% remove -d; commit
3Successfully removed 1 Users
4Successfully committed 0 Users
5[headnode->user]% !ls -d /home/*| grep userone      #no userone left behind
6[headnode->user]%
LDAP#
LDAP services are internal to DGX SuperPOD and provided by head node. If the cluster manager is set to high availability configuration, with LDAP running internally on head nodes, LDAP services are provided from both the active and the passive node. The high-availability setting ensures that CMDaemon takes care of any changes needed in the slapd.conf file when a head node changes state from passive to active or vice versa and ensures that the active head node propagates its LDAP database changes to the passive node using a syncprov/syncrepl configuration in slapd.conf.
Tokens and Profiles#
Access to Base View and cmsh is based on user certificates.
Tokens can be assigned by the administrator to users so that users can conduct some of the operations that the administrator does with Base View or cmsh. Every cluster management operation requires that each user, including the administrator, has the relevant tokens in their profile for the operation. DGX SuperPOD configurations default to having the root user of the head node assigned the admin profile.
The tokens for a user are grouped into a profile, and such a profile is typically given a name by the administrator according to the assigned capabilities. For example, the profile might be called readmonitoringonly if it allows the user to read the monitoring data only, or it may be called powerhandler if the user is only allowed to carry out power operations. Each profile thus consists of a set of tokens, typically relevant to the name of the profile, and is typically assigned to several users. The profile is stored as part of the authentication certificate that is generated for running authentication operations to the cluster manager for the certificate owner. Profiles are handled with the profiles mode of cmsh, or from the Profiles window, accessible using clickpath Identity Management>Profiles.
Table 9 shows the preconfigured profiles that are available from cmsh.
Profile name |
Default Tasks Allowed |
nonuser? |
|---|---|---|
admin |
all tasks |
no |
cloudjob |
cloud job submission |
yes |
cmhealth |
health-related prejob tasks |
yes |
cmpam |
the cluster manager PAM tasks |
yes |
litenode |
CMDaemon Lite tasks |
yes |
monitoringpush |
pushing raw monitoring data to CMDaemon through a JSON POST (page 404 of the Bright Cluster Manager Developer Manual) |
yes |
node |
node-related tasks, for example by the node-installer |
yes |
portal |
user portal viewing |
no |
power |
device power |
yes |
readonly |
view-only |
no |
The last column in the preceding table indicates whether the preconfigured profile is a nonuser profile or not. With cmsh this can be used to see profiles, with a command such as:
1[root©headnode ~]# cmsh -c "profile; foreach * (get name; get nonuser)" | paste - -
Most of the preconfigured profiles are nonuser profiles. Such a profile is used by cluster manager clients and should not be modified by the cluster administrator.
The preconfigured profiles that are not nonuser profiles are admin, readonly, and portal. These can be modified by the cluster administrator and used for human users.
The cluster manager services that use the available preconfigured profiles can be viewed in cmsh with the list command in profile mode. The tokens, and other properties of a particular profile can be seen within profile mode as follows:
1[headnode->profile]% show readonly
2Parameter    Value
3-----------  ----------------------------------------------------------------------
4Name                        readonly
5Non user            no
6Revision
7Services            CMDevice CMNet CMPart CMMon CMJob CMAuth CMServ CMUser CMSession CMMain CMGui CMP+
8Tokens              GET_DEVICE_TOKEN GET_CATEGORY_TOKEN GET_NODEGROUP_TOKEN POWER_STATUS_TOKEN GET_DE+
For screens that are not wide enough to view the parameter values, the values can also be listed.
1[headnode->profile]% get readonly tokens
2GET_DEVICE_TOKEN
3GET_CATEGORY_TOKEN
4GET_NODEGROUP_TOKEN
5…
A profile can be set with cmsh for a user within user mode as follows:
1[root©headnode ~]# cmsh
2[headnode]% user use conner
3[headnode->user[conner]]% get profile
4[headnode->user[conner]]% set profile readonly; commit
Only a subset of the predefined profiles are available to users. The ones that are made available to users are readonly, admin, and portal.
Modifying Profiles#
A profile can be modified by adding or removing appropriate tokens to it. For example, the readonly group by default has access to the burn status and burn log results. Removing the appropriate tokens stops users in that group from seeing these results. In cmsh the removal can be done from within profile mode as follows:
1[root©headnode ~]# cmsh
2[headnode]% profile use readonly
3[...[readonly]]% removefrom tokens burn_status_token get_burn_log_token
4[headnode]%->profile*[readonly*]]% commit
Tab-completion after typing in removefrom tokens helps in filling in the tokens that can be removed. In Base View (Figure 7), the same removal action can be conducted using clickpath Identity Management>Profiles>readonly>Edit>Tokens.
Figure 7. Base View profile token management
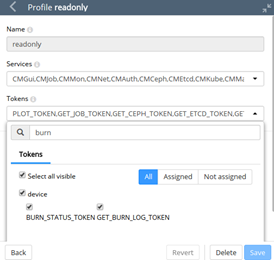
Maximize the window in the resulting display. Run a search for burn to show the relevant tokens, BURN_STATUS_TOKEN and GET_BURN_LOG_TOKEN, as well as the device subgroup they are in. The ticks can be removed from the BURN_STATUS_TOKEN and GET_BURN_LOG_TOKEN checkboxes, and the changed settings can then be saved.
Creation of Custom Certificates with Profiles#
Custom profiles can be created to include a custom collection of capabilities in cmsh and Base View. Cloning of profiles is also possible from cmsh.
A certificate file, with an associated expiry date, can be created based on a profile. Access to Base View and cmsh is based on user certificates. The time of expiry for a certificate cannot be extended after creation. An entirely new certificate is required after expiry of the previous one.
All certificates that have been generated by the cluster are noted by CMDaemon.
The creation of custom certificates is described starting in 4.4.2.4. After creating such a certificate, the openssl utility can be used to examine its structure and properties. Key values in the following example are the expiry date (30 days from the time of generation), the common name (democert), the key size (2048), profile properties (readonly), and system login name (userfour), for such a certificate:
 1[root©headnode]# openssl x509 -in userfourfile.pem -text -noout
 2Data:
 3    ...
 4        Not After : Sep 21 13:18:27 2014 GMT
 5Subject: ... CN=democert
 6        Public-Key: (2048 bit)
 7...
 8X509v3 extensions:
 9        1.3.6.1.4.4324.1:
10            ..readonly
11        1.3.6.1.4.4324.2:
12            ..userfour
13[root©headnode]#
However, using the openssl utility for managing certificates is inconvenient. The cluster manager provides more convenient ways to do so, as described next.
Listing Certificates with cmsh#
Within the cert mode of cmsh, the listcertificates command lists all cluster certificates and their properties:
 1[root©headnode ~]# cmsh
 2[headnode]% cert
 3[headnode-> cert]% listcertificates
 4Serial      Revoked  Time left       Profile           System log in    Name
 5------      -------- ------------ ---------------- ---------------- --------------------
 61                   No                       5214w 1d        admin             root              Administrator
 72                   No                       5214w 1d        cmhealth                            CMHealth
 83                   No                       5214w 1d        cmhealth                            CMHealth
 94                   No                       5214w 1d        power                               Slurm
105                   No                       5214w 1d        bootstrap                           CertificateRequest
116                   No                       5214w 1d        cmpam                               CMPam
127                   No                       5214w 1d        portal                              WebPortal
13...
Listing Certificates with Base View#
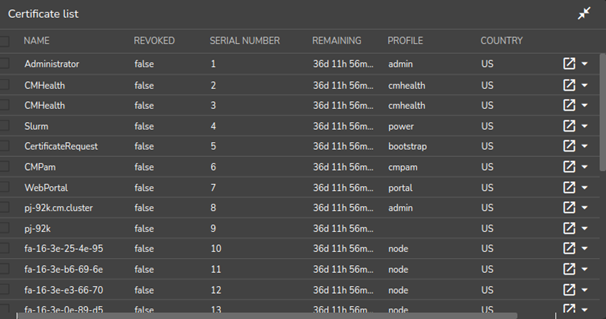
The Base View equivalent for listing certificates is through clickpath Identity Management>Certificates (Figure 8).
Figure 8. Base View Certificates list window
Node Certificates#
In the certificates list, node certificates that are generated by the node-installer for each node for CMDaemon use are listed. These are entries that look like:
 1[headnode-> cert]% listcertificates
 2Serial Revoked  Time left   Profile           System log in    Name
 3------ -------- ------------  ---------------- ---------------- ------------------------------
 4...
 510           No              5214w 1d       node                                fa-16-3e-74-24-dc
 611           No              5214w 1d       node                                fa-16-3e-57-2c-8e
 712           No              5214w 1d       node                                fa-16-3e-b6-c7-4a
 813           No              5214w 1d       node                                fa-16-3e-bd-cd-05
 914           No              5214w 1d       node                                fa-16-3e-0d-ab-ea
10...
Creating a Custom Certificate#
Custom certificates are also listed in the certificates list.
Unlike node certificates, which are normally system-generated, custom certificates are typically generated by a user with the appropriate tokens in their profile, such as root with the admin profile. Such a user can create a certificate containing a specified profile, as discussed in the next section, by using:
cmsh: with the createcertificate operation from within cert mode.
Base View: using clickpath Identity Management>Users>Edit>Profile to set the Profile.
Creating a New Certificate for cmsh Users#
Creating a new certificate in cmsh is done from cert mode using the createcertificate command, which has the following help text:
1[headnode->cert]% help createcertificate Name:
2createcertificate - Create a new certificate
3Usage:
4    createcertificate <key-length> <common-name> <organization> <organizational-unit> <locality> <state> <country> <profile> <sys-login> <days> <key-file> <cert-file>
5Arguments:
6    key-file
7        Path to key file that will be generated
8    cert-file
9        Path to pem file that will be generated
Accordingly, as an example, a certificate file with a readonly profile set to expire in 30 days, to be run with the privileges of user userfour, can be created with:
1[headnode->cert]% createcertificate 2048 democert a b c d ef readonly userfour 30 /home/userfour /userfourfile.key  /home/userfour/userfourfile.pem
2Thu Jan  5 15:13:01 2023 [notice] headnode: New certificate request with ID: 16
3[headnode->cert]% createcertificate 2048 democert a b c d ef readonly pe er 30 /home/userfour /userfourfile.key  /home/userfour/userfourfile.pem
4Certificate key written to file: /home/userfour/userfourfile.key
5Certificate pem written to file: /home/userfour/userfourfile.pem
The certificate list would show it as something like:
1[headnode-> cert]% listcertificates
2Serial Revoked  Time left   Profile          System log in     Name
3------ -------- ------------ ---------------- ---------------- ------------------------------
4...
523           No              4w 1d          readonly         userfour          democert
Setting the ownership of the new custom certificate: The certificates are owned by the owner generating them, so they are root-owned if root was running cmsh. This means that user userfour cannot use them until ownership is changed to that user.
1[root©headnode ~]# cd /home/userfour [root©headnode surefour]# ls -l userfourfile.*
2-rw------- 1 root root 1704 Aug 22 06:18 userfourfile.key
3-rw------- 1 root root 1107 Aug 22 06:18 userfourfile.pem [root©headnode userfour]# chown userfour:userfour userfourfile.*
Other users must have the certificate ownership changed to their own usernames.
Associating Users with Paths to a New Custom Certificate#
Users associated with such a certificate can then conduct cmdaemon tasks that have a readonly profile, and CMDaemon sees such users as being user userfour. Two ways of being associated with the certificate are:
The paths to the pem and key files can be set with the -i and -k options respectively of cmsh. For example, in the home directory of userfour, for the files generated in the preceding session, cmsh can be launched with these keys with:
1[surefour©head node ~] cmsh -i userfourfile.pem -k userfourfile.key
2[headnode]% quit
If the -i and -k options are not used, then cmsh searches for default keys. The default keys for cmsh are under these paths under $HOME, in the following order of priority:
.cm/admin.{pem,key}
.cm/cert.{pem,key}
Creating a Custom Certificate for Base View Users#
As in the case of cmsh, a Base View user having a sufficiently privileged tokens profile, such as the admin profile, can create a certificate and key file for themselves or another user. This is done by associating a value for the Profile from the Add or Edit dialog for the user (Figure 5).
The certificate files, cert.pem and cert.key, are then automatically placed in the following paths and names, under $HOME for the user:
.cm/admin.{pem,key}
.cm/cert.{pem,key}
Users that authenticate with their username and password when running Base View use this certificate for their Base View clients and are then restricted to the set of tasks allowed by their associated profile.
Logging the Actions Of CMDaemon Users#
The following directives allow control over the logging of CMDaemon user actions:
CMDaemonAudit: enables logging.
CMDaemonAuditorFile: sets log location.
DisableAuditorForProfiles: disables logging for profiles.
Details on these directives are given in Appendix C of the Bright Cluster Manager Administrator Manual.
Creation of Certificates for Nodes with cm component-certificate#
The cm-component-certificate utility can be used to generate or update SSL certificates for components of services. The cluster administrator is not expected to use this utility because the cluster manager manages the certificates without bothering the administrator about it during normal operations. If the utility is to be used, then it should be used with caution, to avoid failure in the components that use these certificates.
One of the SSL client components for which this utility works is LDAP.
Options include setting a new CA and creating a new certificate or key for nodes.
Compute Node LDAP PEM and Key creation#
If a compute node that was provisioned has a lost or corrupted LDAP key or certificate, then replacements for these can be made with:
1[root©headnode ~]# cm-component-certificate -n dgx001
2Sending request to recreate certificates for 1 node to cmd on headnode
3[(38654705666, 1)] 1 0 0
41 certificates were successfully recreated Done.
The ldap.{pem,key} files are automatically placed on dgx001, by default at the location specified by the CMDaemon LDAPCertificate and LDAPPrivateKey directives.
The files /cm/node-installer/certificates/<dgx001-mac>/ldap.{pem,key} should be removed on the head node.
The nslcd, sssd, and ldap daemons should be restarted on dgx001, or more simply it can be rebooted if it is not in use. The reboot replaces the ldap.{pem,key} files on the head node with the newly generated ones.