DGX-2 KVM Networking
Introduction
The NVIDIA DGX-2 system supports GPU multi-tenancy through the NVIDIA Kernal-based Virtual Machine solution (based on the Linux Kernel Virtual Machine (https://www.linux-kvm.org). This allows different users to run concurrent deep learning jobs using multiple virtual machines (guest GPU VMs) within a single DGX-2 System.
This chapter describes the standard and most commonly used network configurations for KVM-based guest GPU VMs running on the NVIDIA® DGX-2™ server. All the network configurations described in this document are based on Netplan - the preferred network configuration method for Ubuntu 18.04-based systems such as the DGX-2 server.
Network Configuration Options
The two common network configurations are "Virtual Network" and "Shared Physical Device". The former is identical across all Linux distributions and available out-of-the-box. The latter needs distribution-specific manual configuration.
The type of network configuration suitable for any deployment depends on the following factors:
- Whether the guest VM needs to be accessible by users outside of the DGX-2 KVM host
- Type of network services hosted by the guest VM
- Number of available public IPv4 and IPv6 addresses
- What kind of security is required for the guest VM
- The throughput and latency requirements of the guest VM
The rest of this document describes the following network configurations in detail.
- Virtual Network
- Bridged Network
- SR-IOV
Acronyms
- KVM - Linux Kernel based Virtual Machine
- NAT - Network Address Translation
- DHCP - Dynamic Host Configuration Protocol
- SR-IOV - Single Root IO Virtualization
- QOS - Quality of Service
- MTU - Maximum Transmission Unit
Virtual Networking
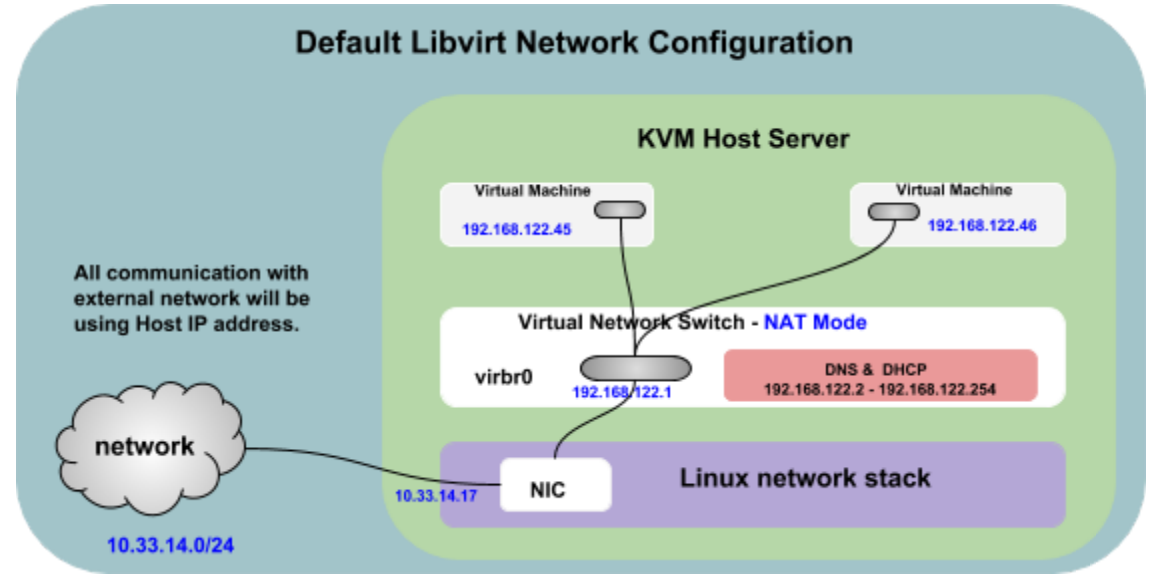
Libvirt virtual networking uses the concept of a virtual network switch, also known as Usermode Networking. A virtual network switch is a software construct that operates on a physical server host to which guest VMs connect. By default, it operates in NAT mode. The network traffic for a guest VM is directed through this switch, and consequently all guest VMs will use the Host IP address of the connected Physical NIC interface when communicating with the external world.
Default Configuration
The Linux host physical server represents a virtual network switch as a network interface. When the libvirtd daemon (libvirtd) is first installed and started, the default network interface representing the virtual network switch is virbr0.
By default, an instance of the dnsmasq server is automatically configured and started by libvirt for each virtual network switch that needs it. It is responsible for running a DHCP server (to decide which IP address to lease to each VM) and a DNS server (to respond to queries from VMs).
In the default virtual network switch configuration, the guest OS will get an IP address in the 192.168.122.0/24 address space and the host OS will be reachable at 192.168.122.1. You should be able to SSH into the host OS (at 192.168.122.1) from inside the guest OS and use SCP to copy files back and forth.
In the default configuration, the guest OS will have access to network services but will not itself be visible to other machines on the network. For example, the guest VM will be able to browse the web, but will not be able to host an accessible web server.
You can create additional virtual networks using the steps described in the latter part of this section except you must use a different range of DHCP IP addresses. For example, 192.168.123.0/24.
The following are limitations of the Virtual Network Configuration when used in NAT mode.
- Guest VMs do not communicate with an external network through a unique address.
- Guest VMs communicate with an external network through the Host IP address of the connected Physical NIC interface.
When used in NAT mode, you may encounter certain restrictions (such as connection timeouts) due to the number of active connections per Host/IP address, especially if all guest VMs are communicating with the same server at the same time. It also depends on the features and restrictions enforced on the server side.
net/http: request canceled while waiting for connection(Client.Timeout exceeded while awaiting headers)
If the default configuration is suitable for your purposes, no other configuration is required.
A couple of advance virtual network configurations can be used for better network performance. Refer to Improving Network Performance for more details.
Verifying the Host Configuration
Every standard libvirt installation provides NAT-based connectivity to virtual machines out of the box. This is referred to as the 'default virtual network'. Verify that it is available with the virsh net-list --all command.
$ virsh net-list --all
Name                 State      Autostart
-----------------------------------------
default              active     yes
If the default network is missing, the following example XML configuration file can be reloaded and activated.
$ virsh net-dumpxml default
<network>
  <name>default</name>
  <uuid>92d49672-3020-40a1-90f5-73fe07216122</uuid>
  <forward mode='nat'>
    <nat>
      <port start='1024' end='65535'/>
    </nat>
  </forward>
  <bridge name='virbr0' stp='on' delay='0'/>
  <mac address='52:54:00:40:cc:23'/>
  <ip address='192.168.122.1' netmask='255.255.255.0'>
    <dhcp>
      <range start='192.168.122.2' end='192.168.122.254'/>
    </dhcp>
  </ip>
</network>
In the above XML contents, “default” is the name of the virtual network, and “virbr0” is the name of the virtual network switch.
$ virsh net-define /etc/libvirt/qemu/networks/default.xml
The default network is defined from /etc/libvirt/qemu/networks/default.xml
Mark the default network to automatically start:
$ virsh net-autostart default
Network default marked as autostarted
Start the default network:
$ virsh net-start defaultNetwork default started
Once the libvirt default virtual network is running, you will see a virtual network switch device. This device does not have any physical interfaces added, since it uses NAT and IP forwarding to connect to the outside world. This virtual network switch will just use whatever Physical NIC interface that is being used by Host. Do not add new interfaces.
$ brctl show
bridge name     bridge id               STP enabled     interfaces
virbr0          8000.000000000000       yes
Once the host configuration is complete, a guest can be connected to the virtual network based on its name or bridge. To connect a guest VM to using virtual bridge name “virbr0”, the following XML can be used in the virsh configuration for the guest VM:
<interface type='bridge'>
  <source bridge='virbr0'/>
  <model type='virtio'/>
</interface>
Using Static IP
You can reserve and allocate static IP addresses for the specific guest VMs from the default DHCP range (192.168.122.2 - 192.168.122.254) of the virtual network switch. Also, you should exclude those reserved/assigned static IP addresses from the DHCP ranges.
Configurations Made from the Host
To use static IP addressing, check the Mac address of the guest VM.
$ virsh edit 1gpu-vm-1g0
<domain type='kvm' id='3'>
  <name>1gpu-vm-1g0</name>
  <uuid>c40f6b9d-ea15-45b0-ac42-83801eef73d4</uuid>
  ……..
   <interface type='bridge'>
    <mac address='52:54:00:e1:28:3e'/>
    <source bridge='virbr0'/>
    <model type='virtio'/>
    <address type='pci' domain='0x0000' bus='0x01' slot='0x00' function='0x0'/>
  </interface>
  ….
</domain>
$ virsh net-edit default
<network>
  <name>default</name>
  <uuid>92d49672-3020-40a1-90f5-73fe07216122</uuid>
  <forward mode='nat'>
    <nat>
      <port start='1024' end='65535'/>
    </nat>
  </forward>
  <bridge name='virbr0' stp='on' delay='0'/>
  <mac address='52:54:00:40:cc:23'/>
  <ip address='192.168.122.1' netmask='255.255.255.0'>
    <dhcp>
      <range start='192.168.122.100' end='192.168.122.254'/>
      <host mac='52:54:00:e1:28:3e' ip='192.168.122.45'/>
    </dhcp>
  </ip>
</network>
$ virsh net-destroy default
$ virsh net-start default
Start/restart the guest VM after updating the “default” virtual network with the guest Mac address.
$ virsh net-dhcp-leases default
Expiry Time         MAC address        Protocol  IP address        Hostname Client ID or DUID
------------------------------------------------------------------------------------------------
2018-08-29 13:18:58 52:54:00:e1:28:3e  ipv4      192.168.122.45/24 1gpu-vm-1g0
Binding the Virtual Network to a Specific Physical NIC
KVM will use virtual network switch as the default networking configuration for all guest VMs and it will operate in NAT mode. The network traffic for a guest is directed through this switch, and consequently all guests will use one of the Host Physical NIC interface while communicating with the external world. By default, it is not bound to any specific physical NIC interface but you can restrict the virtual network switch to use a specific physical NIC interface; for example, you can limit the virtual network to use enp6s0 only.
$ virsh net-edit default
<network>
  <name>default</name>
  <uuid>92d49672-3020-40a1-90f5-73fe07216122</uuid>
  <forward dev='enp6s0'  mode='nat' />
  <bridge name='virbr0' stp='on' delay='0'/>
  <mac address='52:54:00:40:cc:23'/>
  <ip address='192.168.122.1' netmask='255.255.255.0'>
    <dhcp>
      <range start='192.168.122.2' end='192.168.122.254'/>
    </dhcp>
  </ip>
</network>
$ virsh net-destroy default
$ virsh net-start default
Start/restart the guest after updating “default” virtual network configuration.
Bridged Networking
Introduction
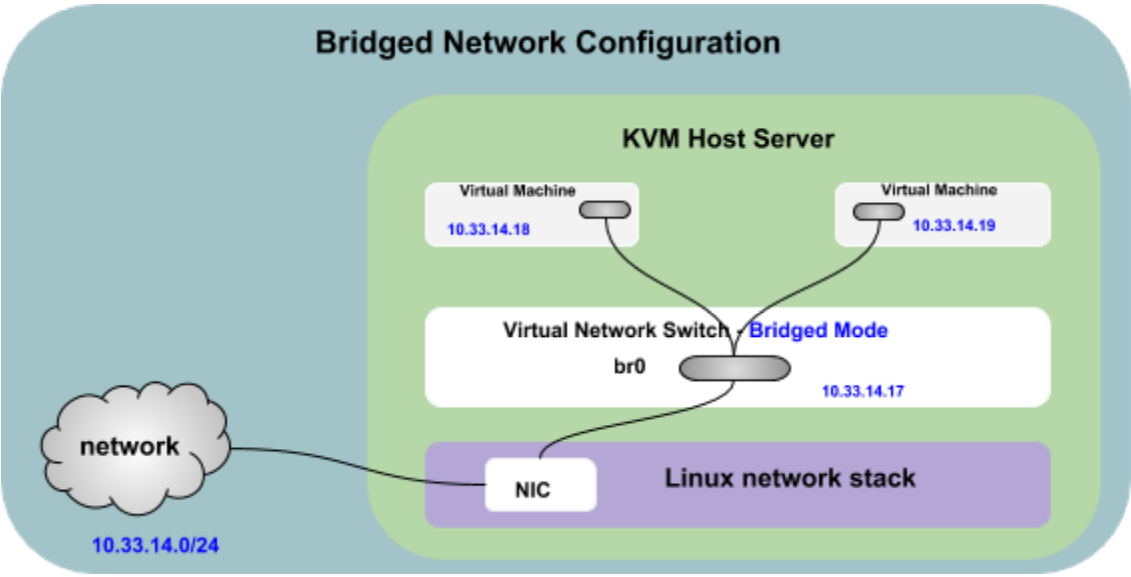
A bridged network shares a real Ethernet device with KVM guest VMs. When using Bridged mode, all the guest virtual machines appear within the same subnet as the host physical machine. All other physical machines on the same physical network are aware of, and can access, the virtual machines. Bridging operates on Layer 2 of the OSI networking model.
Each guest VM can bind directly to any available IPv4 or IPv6 addresses on the LAN, just like a physical server. Bridging offers the best performance with the least complication out of all the libvirt network types. A bridge is only possible when there are enough IP addresses to allocate one per guest VM. This is not a problem for IPv6, as hosting providers usually provide many free IPv6 addresses. However, extra IPv4 addresses are rarely free.
Using DHCP
Configuration from the Host
$ sudo vi /etc/netplan/01-netcfg.yaml
# This file describes the network interfaces available on your system
# For more information, see netplan(5).
network:
  version: 2
  renderer: networkd
  ethernets:
    enp134s0f0:
      dhcp4: yes
  bridges:
    br0:
      dhcp4: yes
      interfaces: [ enp134s0f0 ]
$ sudo netplan apply
Guest VM Configuration
Once the host configuration is complete, a guest can be connected to the bridged network based on its name. To connect a guest to the 'br0' network, the following XML can be used for the guest:
$ virsh edit <VM name or ID>
<interface type='bridge'>
  <source bridge=br0/>
  <model type='virtio'/></interface>
Refer to Getting the Guest VM IP Address for instructions on how to determine the guest VM IP address.
Using Static IP
Host Configuration
$ sudo vi /etc/netplan/01-netcfg.yaml
# This file describes the network interfaces available on your system
# For more information, see netplan(5).
network:
  version: 2
  renderer: networkd
  ethernets:
    enp134s0f0:
      dhcp4: no
  bridges:
    br0:
      dhcp4: no
      addresses: [ 10.33.14.17/24 ]
      gateway4: 10.33.14.1
      nameservers:
          search: [ nvidia.com ]
          addresses: [ 172.16.200.26, 172.17.188.26 ]
      interfaces: [ enp134s0f0 ]
$ sudo netplan apply
Guest VM Configuration
Once the host configuration is complete, a guest VM can be connected to the bridged network based on its name. To connect a guest VM to the 'br0' network, the following XML can be used for the guest VM:
$ virsh edit <VM name or ID>
<interface type='bridge'>
  <source bridge=br0/>
  <model type='virtio'/>
</interface>
Refer to Getting the Guest VM IP Address for instructions on how to determine the guest VM IP address.
Bridged Networking with Bonding
Introduction
Network bonding refers to the combining of multiple physical network interfaces on one host for redundancy and/or increased throughput. Redundancy is the key factor: we want to protect our virtualized environment from loss of service due to failure of a single physical link. This network bonding is the same as Linux network bonding. The bond is added to a bridge and then guest virtual machines are added onto the bridge, similar to bridged mode as discussed in Bridged Networking. However, the bonding driver has several modes of operation, and only a few of these modes work with a bridge where virtual guest machines are in use.

There are three key modes of network bonding:
- Active-Passive: there is one NIC active while another NIC is asleep. If the active NIC goes down, another NIC becomes active.
- Link Aggregation: aggregated NICs act as one NIC which results in a higher throughput.
- Load Balanced: the network traffic is equally balanced over the NICs of the machine.
The following section explains the bonding configuration based on IEEE 802.3 link aggregation. This mode is also known as a Dynamic Link Aggregation mode that creates aggregation groups having the same speed. It requires a switch that supports IEEE 802.3ad Dynamic Link aggregation.
Using DHCP
Configuration from the Host
$ sudo vi /etc/netplan/01-netcfg.yaml
# This file describes the network interfaces available on your system
# For more information, see netplan(5).
network:
  version: 2
  renderer: networkd
  ethernets:
    bond-ports:
      dhcp4: no
      match:
        name: enp134*
  bonds:
    bond0:
      dhcp4: no
      interfaces: [ bond-ports ]
      parameters:
        mode: 802.3ad
  bridges:
    br0:
      dhcp4: yes
      interfaces: [ bond0 ]
$ sudo netplan apply
Guest VM Configuration
Once the host configuration is complete, a guest can be connected to the bridged network based on its name. To connect a guest to the 'br0' network, the following XML can be used in the guest:
$ virsh edit <VM name or ID>
<interface type='bridge'>
  <source bridge=br0/>
  <model type='virtio'/>
</interface>
Refer to Getting the Guest VM IP Address for instructions on how to determine the guest VM IP address.
Using Static IP
Host Configuration
$ sudo vi /etc/netplan/01-netcfg.yaml
# This file describes the network interfaces available on your system
# For more information, see netplan(5).
network:
  version: 2
  renderer: networkd
  ethernets:
    bond-ports:
      dhcp4: no
      match:
        name: enp134*
  bonds:
    bond0:
      dhcp4: no
      interfaces: [ bond-ports ]
      parameters:
        mode: 802.3ad
  bridges:
    br0:
     addresses: [ 10.33.14.17/24 ]
      gateway4: 10.33.14.1
      nameservers:
          search: [ nvidia.com ]
          addresses: [ 172.16.200.26, 172.17.188.26 ]
      interfaces: [ bond0 ]
$ sudo netplan apply
Guest VM Configuration
Once the host configuration is complete, a guest can be connected to the bridged network based on its name. To connect a guest to the 'br0' network, the following XML can be used in the guest:
$ virsh edit <VM name or ID>
<interface type='bridge'>
  <source bridge=br0/>
  <model type='virtio'/>
</interface>
Refer to Getting the Guest VM IP Address for instructions on how to determine the guest VM IP address.
MacVTap
Introduction
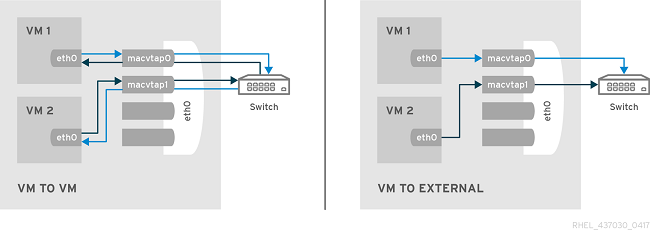
As an alternative to the default NAT connection, you can use the macvtap driver to attach the guest's NIC directly to a specified physical interface of the host machine. Macvtap is a Linux device driver, based upon the combination of Macvlan and a network Terminal Access Point (TAP)(descriptions below), that allows for the creation of virtual (tap-like) interfaces. Each virtual network interface is assigned its own MAC and IP address, then attached to the physical interface (also known as the lower interface),
-
Macvlan - Linux kernel driver that makes it possible to create virtual network interfaces that can be attached to the physical network adapter (aka the lower interface).
-
TAP - A software-only interface that allows user space programs to read and write via TAP device files (/dev/tapN).
A key difference between using a bridge and using macvtap is that macvtap connects directly to the network interface in the KVM host. This direct connection effectively shortens the code path by bypassing much of the code and components in the KVM host associated with connecting to and using a software bridge. This shorter code path usually improves throughput and reduces latencies to external systems.
Macvtap Modes
There are four modes of operation that control how the endpoints communicate with each other - VEPA, Bridge, Private, and Passthrough.
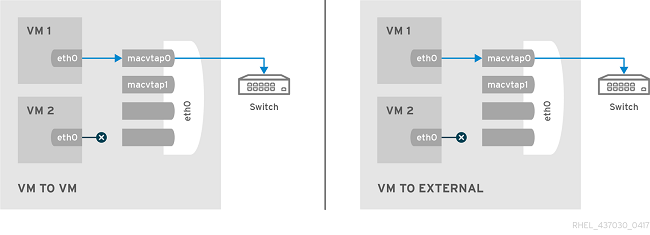
VEPA
Virtual Ethernet Port Aggregator (VEPA) is typically the default mode. Data flows from one endpoint down through the source device in the KVM host out to the external switch. If the switch supports hairpin mode, the data is sent back to the source device in the KVM host and from there sent to the destination endpoint.
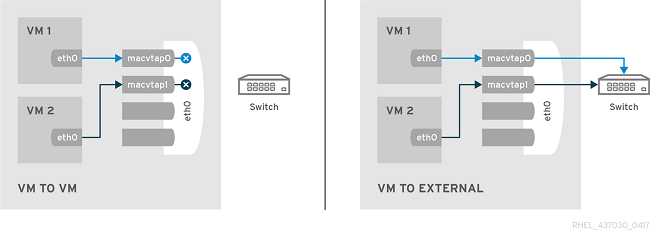
Bridge
In bridged mode, all endpoints are connected directly to each other. Two endpoints that are both in bridge mode can exchange frames directly, without the round trip through the external bridge. This is the most useful mode for setups with classic switches, and when inter-guest communication is performance critical.

Private
All packets are sent to the external switch and are delivered to a target guest on the same host machine only if they are sent through an external router or gateway. The packets are then sent back to the host. Private mode can be used to prevent individual guests on the single host from communicating with each other.
Passthrough
This feature attaches a physical interface device or a SR-IOV Virtual Function (VF) directly to a guest without losing the migration capability. All packets are sent directly to the designated network device. Note that a single network device can only be passed through to a single guest, as a network device cannot be shared between guests in passthrough mode.
Without a switch that supports hairpin mode, KVM guests configured to use VEPA mode will work the same as bridge mode, and will not be able to communicate directly with the KVM host using the KVM host interface. This limitation can be overcome if the KVM host has multiple interfaces using different ethernet segments (subnets).
| MacVTap Modes | VM<->VM | VM<->External | VM<->HOST<->VM | Comment |
|---|---|---|---|---|
| Vepa | YES/NO | YES | YES/NO | YES only if External Switch supports hairpin mode |
| Bridge | YES | YES | NO |
Recommended configuration. |
| Private | NO | YES | NO | External switch without hairpin mode |
| Pass-through | YES | YES | YES? | SR-IOV and Non-SRIOV NICs |
How to Change the Macvtap and Physical NIC Configuration
By default, DGX systems in KVM guests are configured to use a macvtap network in “Bridge” mode. Use the following commands to change the physical NIC and macvtap mode.
- Edit macvtap-net.
$ virsh net-edit macvtap-net<network>
 <name>macvtap-net</name>
 <uuid>8b403750-2ad5-49df-8a7b-26b10053429d</uuid>
 <forward dev='<device-interface>' mode='<macvtap-mode>'
 <interface dev='<device-interface>'/>
 </forward>
</network>
Where
<device-interface> is the name of the network port, such as enp1s0f0.
<macvtap-mode> is the mode you want to set.
- bridge = Bridge mode
- private = Private mode
- vepa = VEPA mode
- passthrough = passthrough mode
- Restart macvtap-net with the following commands.
$ virsh net-destroy macvtap-net
$ virsh net-start macvtap-net
How to Configure the Guest VM Using privateIP
If macvtap is configured in "Bridge" mode but you need Host-to-VM network connectivity, you can configure a privateIP network for the VM as follows.
- Configuring privateIP when creating new guest VMs
Specify --privateIP when creating the VM so that the second virtual network interface will be added based on private-net network for Host-to-VM connectivity.
- Configuring privateIP for existing guest VMs
- Edit the VM (virsh edit <vm-name>) and add
the following line to the <devices> section:
<interface type='network'>
  <source network='private-net'/>
  <model type='virtio'/>
</interface>
- Shutdown and restart the VM.
$ virsh shutdown <vm-name>
$ virsh start <vm-name>
- Edit the VM (virsh edit <vm-name>) and add
the following line to the <devices> section:
SR-IOV
Introduction
The SR-IOV technology is a hardware-based virtualization solution that improves both performance and scalability. The SR-IOV standard enables efficient sharing of PCIe (Peripheral Component Interconnect) Express devices among virtual machines and is implemented in the hardware to achieve I/O performance which is comparable to native performance. The SR-IOV specification defines a new standard wherein the new devices that are created will enable the virtual machine to be directly connected to the I/O device.
The SR-IOV specification is defined and maintained by PCI-SIG at http://www.pcisig.com.
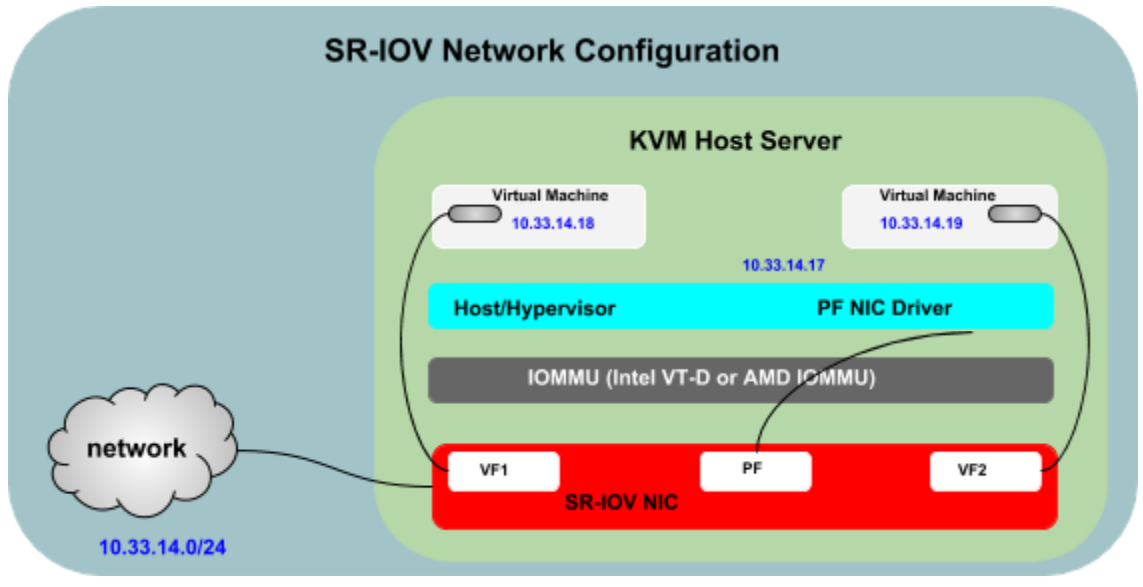
A single I/O resource can be shared by many virtual machines. The shared devices will provide dedicated resources and also utilize shared common resources. In this way, each virtual machine will have access to unique resources. Therefore, a PCIe device, such as an Ethernet Port, that is SR-IOV enabled with appropriate hardware and OS support can appear as multiple, separate physical devices, each with its own configuration space.
The following figure illustrates the SR-IOV technology for PCIe hardware.
Two new function types in SR-IOV are:
Physical Function (PF)
A PCI Function that supports the SR-IOV capabilities as defined in SR-IOV specification. A PF contains the SR-IOV capability structure and is used to manage the SR-IOV functionality. PFs are fully-featured PCIe functions that can be discovered, managed, and manipulated like any other PCIe device. PFs have full configuration resources and can be used to configure or control the PCIe device.
Virtual Function (VF)
A Virtual Function is a function that is associated with a Physical Function. A VF is a lightweight PCIe function that shares one or more physical resources with the Physical Function and with other VFs that are associated with the same PF. VFs are only allowed to have configuration resources for its own behavior.
An SR-IOV device can have hundreds of Virtual Functions (VFs) associating with a Physical Function (PF). The creation of VFs can be dynamically controlled by the PF through registers designed to turn on the SR-IOV capability. By default, the SR-IOV capability is turned off, and the PF behaves as traditional PCIe device.
The following are the advantages and disadvantages of SR-IOV.
- Advantages
- Performance – Direct access to hardware from virtual machines environment and benefits
include:
-
Lower CPU utilization
-
Lower network latency
-
Higher network throughput
-
- Cost Reduction - Capital and operational expenditure savings include:
-
Power savings
-
Reduced adapter count
-
Less cabling
-
Fewer switch ports
-
- Performance – Direct access to hardware from virtual machines environment and benefits
include:
- Disadvantages
- Guest VM Migration - Harder to migrate guest from one physical server to
another
There are several proposals being used or implemented in the industry and each has its own merit/demerits.
- Guest VM Migration - Harder to migrate guest from one physical server to
another
Device Configuration
SR-IOV and VFs are not enabled by default in all devices. For example, the dual port 100GbE Mellanox card in the DGX-2 doesn’t have VFs enabled by default. Follow the instructions in section 5 of the Mellanox SR-IOV NIC Configuration guide to enable the SR-IOV and the desired number of functions in firmware.
Generic Configuration
- Define a network for a pool of VFs.
- Read the supported number of VFs.
$ cat /sys/class/net/enp134s0f0/device/sriov_totalvfs63
- Enable the required number of VFs (Ex: 16).
$ sudo echo 16 > /sys/class/net/enp134s0f0/device/sriov_numvfs
- Create a new SR-IOV network. Generate an XML file with text similar to the following example.
$ sudo vi /etc/libvirt/qemu/networks/iovnet0.xml
<network>
     <name>iovnet0</name>
     <forward mode='hostdev' managed='yes'>
        <pf dev='enp134s0f0'/>
     </forward>
 </network>
Note: Note: Change the value of pf dev to the ethdev (Ex: enp134s0f0) corresponding to you SR-IOV device’s physical function. - Execute the following commands
$ virsh net-define /etc/libvirt/qemu/networks/iovnet0.xml
$ virsh net-autostart iovnet0
$ virsh net-start iovnet0
Guest VM Configuration
After the defining and starting SR-IOV (iovnet0) network, modify the guest XML definition to specify the network.
$ virsh edit <VM name or ID>
<interface type='network'>
    <source network='iovnet0'/>
</interface>
When the guest VM starts, a VF is automatically assigned to the guest VM. If the guest VM is already running, you need to restart it.
After the defining and starting SR-IOV (iovnet0) network, modify the guest XML definition to specify the network.
$ virsh edit <VM name or ID> <interface type='network'> <source network='iovnet0'/> </interface>
When the guest VM starts, a VF is automatically assigned to the guest VM. If the guest VM is already running, you need to restart it.
Using DHCP
Configuration from the Host
$ sudo vi /etc/netplan/01-netcfg.yaml
# This file describes the network interfaces available on your system
# For more information, see netplan(5).
network:
  version: 2
  renderer: networkd
  ethernets:
    enp134s0f0:
      dhcp4: yes
$ sudo netplan apply
Guest VM Configuration
$ sudo vi /etc/netplan/01-netcfg.yaml
# This file describes the network interfaces available on your system
# For more information, see netplan(5).
network:
  version: 2
  renderer: networkd
  ethernets:
    enp8s0:
      dhcp4: yes
$ sudo netplan apply
Refer to Getting the Guest VM IP Address for instructions on how to determine the guest VM IP address.
Using Static IP
Configuration from the Host
$ sudo vi /etc/netplan/01-netcfg.yaml
# This file describes the network interfaces available on your system
# For more information, see netplan(5).
network:
  version: 2
  renderer: networkd
  ethernets:
    enp134s0f0:
      dhcp4: no
      addresses: [ 10.33.14.17/24 ]
      gateway4: 10.33.14.1
      nameservers:
          search: [ nvidia.com ]
          addresses: [ 172.16.200.26, 172.17.188.26 ]
$ sudo netplan apply
Guest VM Configuration
$ sudo vi /etc/netplan/01-netcfg.yaml
# This file describes the network interfaces available on your system
# For more information, see netplan(5).
network:
  version: 2
  renderer: networkd
  ethernets:
    enp8s0:
      dhcp4: no
      addresses: [ 10.33.14.18/24 ]
      gateway4: 10.33.14.1
      nameservers:
          search: [ nvidia.com ]
          addresses: [ 172.16.200.26, 172.17.188.26 ]
$ sudo netplan apply
Refer to Getting the Guest VM IP Address for instructions on how to determine the guest VM IP address.
Getting the Guest VM IP Address
If you are using Bridged and SR-IOV network configurations, use the following steps to determine the guest VM IP address from the Host.
Install and configure QEMU Guest Agent to retrieve the guest VM IP address. The QEMU guest agent runs inside the guest VM and allows the host machine to issue commands to the guest VM operating system using libvirt. The guest VM operating system then responds to those commands asynchronously.
Configuration from the Host
Add the following lines to guest VM XML file under <devices> using
$ virsh edit <VM name or ID>
    <channel type='unix'>
        <target type='virtio' name='org.qemu.guest_agent.0'/>
    </channel>
Guest VM Configuration
$ sudo apt-get install qemu-guest-agent
$ virsh shutdown <VM name or ID>
$ virsh start <VM name or ID>
After these steps, run the following command in the Host to check a specific guest VM IP address.
$ virsh domifaddr <VM name or ID> --source agent
Name       MAC address          Protocol     Address
-----------------------------------------------------------------------
 lo         00:00:00:00:00:00    ipv4        127.0.0.1/8
 -          -                    ipv6        ::1/128
 enp1s0     52:54:00:b2:d9:a7    ipv4        10.33.14.18/24
 -          -                    ipv6        fe80::5054:ff:feb2:d9a7/64
 docker0    02:42:3e:48:87:61    ipv4        172.17.0.1/16
Improving Network Performance
This section describes some ways to improve network performance.
Jumbo Frames
A jumbo frame is an Ethernet frame with a payload greater than the standard maximum transmission unit (MTU) of 1,500 bytes. Jumbo frames are used on local area networks that support at least 1 Gbps and can be as large as 9,000 bytes. Enabling jumbo frames can improve network performance by making data transmissions more efficient. The CPUs on Switches and Routers can only process one frame at a time. By putting a larger payload into each frame, the CPUs have fewer frames to process. Jumbo frames should be enabled only if each link in the network path, including servers and endpoints, is configured to enable jumbo frames at the same MTU. Otherwise, performance may decrease as incompatible devices drop frames or fragment them; the latter which can task the CPU with higher processing requirements.
In the case of a libvirt-managed network (one with forward mode of NAT, Route), this will be the MTU assigned to the bridge device (virbr0) when libvirt creates it, and thereafter also assigned to all tap devices created to connect guest interfaces. If MTU is unspecified, the default setting for the type of device being used is assumed and it is usually set to 1500 bytes.
We can enable jumbo frame configuration for the default virtual network switch using the following commands. All guest virtual network interfaces will inherit jumbo frame or MTU of 9000 Bytes configuration.
$ virsh net-edit default
<network>
  <name>default</name>
  <uuid>a47b420d-608e-499a-96e4-e75fc45e60c4</uuid>
  <forward mode='nat'/>
  <bridge name='virbr0' stp='on' delay='0'/>
  <mtu size='9000'/>
  <mac address='52:54:00:f2:e3:2a'/>
  <ip address='192.168.122.1' netmask='255.255.255.0'>
     <dhcp>
     <range start='192.168.122.2' end='192.168.122.254'/>
     </dhcp>
  </ip>
</network>
$ virsh net-destroy default
$ virsh net-start default
Multi-Queue Support
This section describes multi-queue and, for KVM packages prior to dgx-kvm-image-4-0-3, provides instructions for enabling multi-queue. Starting with dgx-kvm-image-4-0-3, multi-queue is enabled by default.
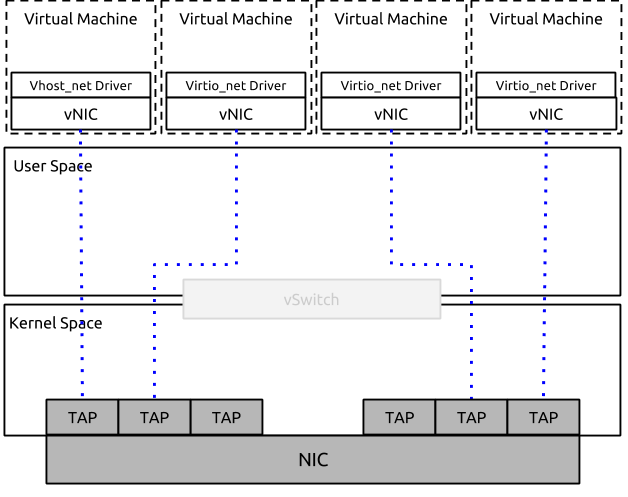
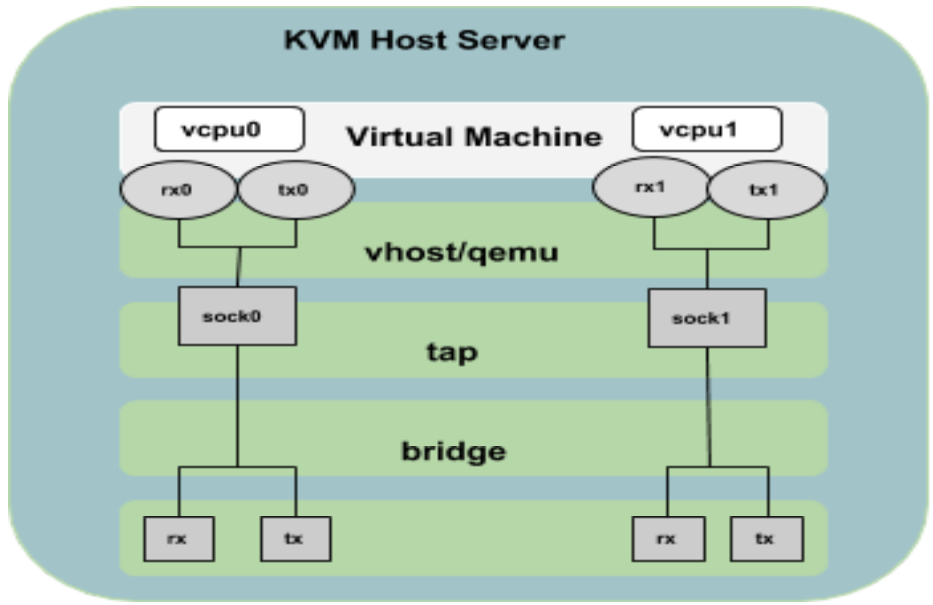
The KVM guest VM will use virtio-net driver when it is using network interface based on Virtual Network Switch either in NAT or Bridged mode. By default, this virtio-net driver will use one pair of TX and RX queues and this can limit the guest network performance, even though it may be configured to use multiple vCPUs and their network interface is bound to 10/100G Host Physical NIC. Multi-queue support in virtio-net driver will
- Enable packet send/receive processing to scale with the number of available virtual CPUs in a guest
- Alow each guest virtual CPU to have its own separate TX and RX queue and interrupts that can be used without influencing other virtual CPUs.
- Provide better application scalability and improved network performance in many cases.
Multi-queue virtio-net provides the greatest performance benefit when:
- Traffic packets are relatively large.
- The guest is active on many connections at the same time, with traffic running between guests, guest to host, or guest to an external system.
- The number of queues is equal to the number of vCPUs. This is because multi-queue support optimizes RX interrupt affinity and TX queue selection in order to make a specific queue private to a specific vCPU.
To use multi-queue virtio-net, enable support in the guest by adding the following to the guest XML configuration (where the value of N is from 1 to 256, as the kernel supports up to 256 queues for a multi-queue tap device). For the best results, match the number of queues with number of vCPU cores configured on the VM.
$ virsh edit <VM name or ID>
<interface type='bridge'>
       <source bridge='virbr0'/>
       <model type='virtio'/>
       <driver name='vhost' queues='N'/
</interface>
When running a virtual machine with N virtio-net queues in the guest VM, you can check the number of enabled queues using
$ ethtool -L <interface>
$ /sys/class/net/<interface>/queues
You can change the number of enabled queues (where the value of M is from 1 to N):
$ ethtool -L <interface> combined M
This is enabled by default on DGX-2 guest VMs for the current release of KVM SW.
QOS
By default, Virtual Network Switch will treat the network traffic from all guests equally and process them order in which it receive the packets. Virtual machine network quality of service is a feature that allows limiting both the inbound and outbound traffic of individual virtual network interface controllers or guests.
Virtual machine network quality of service settings allow you to configure bandwidth limits for both inbound and outbound traffic on three distinct levels.
- Average: The average speed of inbound or outbound traffic. Specifies the desired average bit rate for the interface being shaped (in kilobytes/second).
- Peak: The speed of inbound or outbound traffic during peak times. Optional attribute which specifies the maximum rate at which the bridge can send data (in kilobytes/second). Note the limitation of implementation: this attribute in the outbound element is ignored (as Linux ingress filters don't know it yet).
- Burst: The speed of inbound or outbound traffic during bursts. This is an optional attribute which specifies the number of kilobytes that can be transmitted in a single burst at peak speed.
The libvirt domain specification includes this functionality already. You can specify separate settings for incoming and outgoing traffic. When you open the XML file of your virtual machine, find the block with interface type tag. Try to add the following.
$ virsh edit <VM name or ID>
<bandwidth>
  <inbound average='NNN' peak='NNN' burst='NNN'/>
  <outbound average='NNN' peak='NNN' burst='NNN'/>
</bandwidth>
Where NNN is desired speed in KBS and it can be different for inbound/outbound and also, average/peak/burst can have different values.
This is not enabled by default on DGX-2 guest VMs for the current release of KVM SW.