Installing CentOS
There are several methods for installing CentOS as described in the CentOS Installation Guide.
See the DGX Software for Red Hat Enterprise Linux Release Notes for the Linux distributions that are qualified and tested for use with the DGX Software.
For convenience, this section describes how to install CentOS using the Quick Install method, and shows when to reclaim disk space in the process. It describes a minimal installation. If you have a preferred method for installing CentOS, then you can skip this section but be sure to reclaim disk space occupied by the existing Ubuntu installation.
The interactive method described here installs CentOS on DGX using a connected monitor and keyboard and USB stick with the ISO image, or remotely through the remote console of the BMC.
Obtaining CentOS
Obtain the CentOS ISO image and store on your local disk or create a boot USB drive formatted for UEFI. See Downloading CentOS for instructions.
Booting CentOS ISO Locally
- Plug the USB flash drive containing the CentOS ISO image into the DGX.
- Connect a monitor and keyboard directly to the DGX.
- Boot the system and press F11 when the NVIDIA logo appears to get to the boot menu.
- Select the UEFI volume name that corresponds to the inserted USB flash drive, and boot the system from it.
- Follow the instructions at Installing CentOS
Booting the CentOS ISO Remotely on the DGX-1, DGX-2, or DGX A100
Booting the ISO Image on the DGX-1 Remotely
- For instructions applicable to the NVIDIA DGX-2, see Booting the ISO Image on the DGX-2 Remotely
- For instructions applicable to the NVIDIA DGX A100, see Booting the ISO Image on the DGX A100 Remotely
- Connect to the BMC and change user privileges.
- Open a Java-enabled web browser within your LAN and go to
http://<BMC-ip-address>/, then log
in.
Use Firefox or Internet Explorer. Google Chrome is not officially supported by the BMC.
- From the top menu, click Configuration and then select User Management.
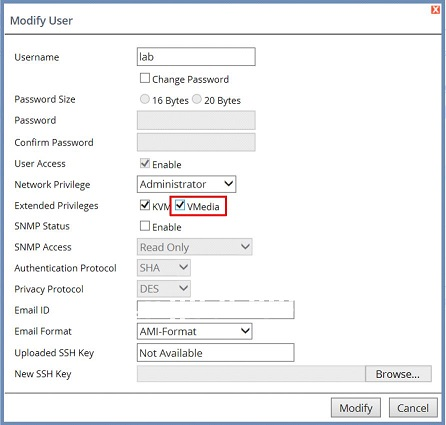
- Select the user name that you created for the BMC, then click Modify User.
- In the Modify User dialog, select the VMedia
checkbox to add it to the extended privileges for the user, then click
Modify.
- Open a Java-enabled web browser within your LAN and go to
http://<BMC-ip-address>/, then log
in.
- Set up the ISO image as virtual media and reboot the system.
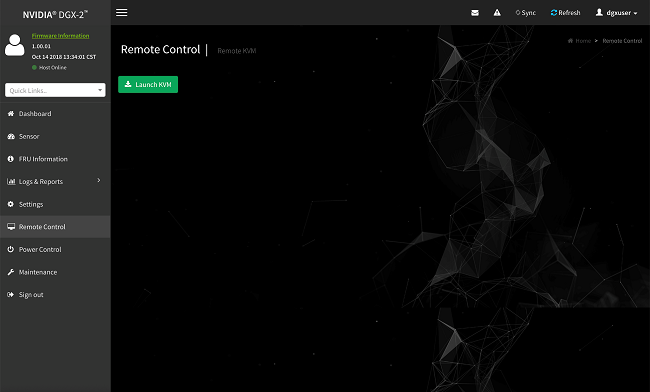
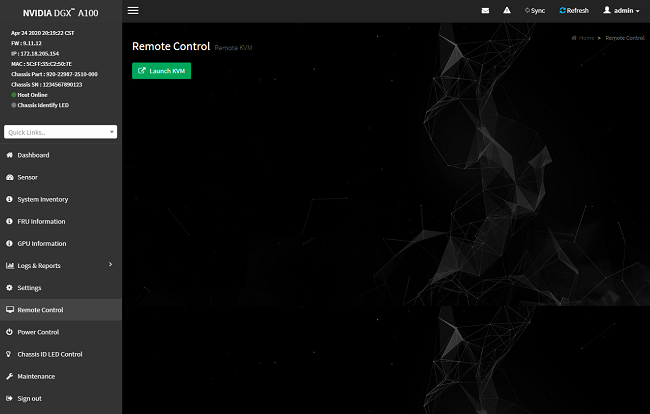
- From the top menu, click Remote Control and select Console Redirection.
- Click Java Console to open the remote JViewer window. Make sure pop-up blockers are disabled for this site.
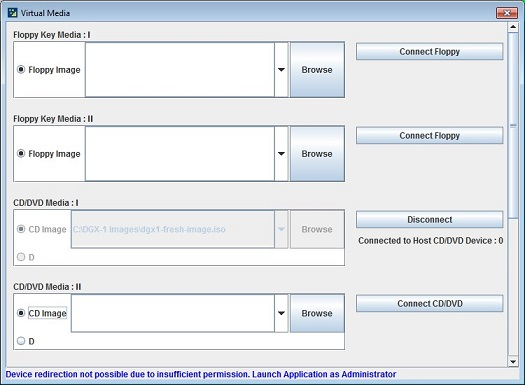
- From the JViewer top menu bar, click Media and then select Virtual Media Wizard.
- From the CD/DVD Media: I section of the Virtual Media dialog, click
Browse and then locate the CentOS ISO file on your system and click
Open.
You can ignore the device redirection warning at the bottom of the Virtual Media wizard as it does not affect the ability to re-image the system.
- Click Connect CD/DVD, then click OK at the
Information dialog.
The Virtual Media window shows that the ISO image is connected.
- Close the window. The CD ROM icon in the menu bar turns green to indicate that the ISO image is attached.

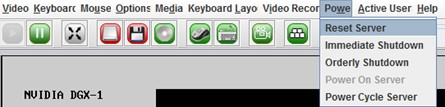
- From the top menu, click Power and then select Reset Server.
- Click Yes and then OK at the Power Control dialogs, then wait for the system to power down and then come back online.
- Boot the CD ROM image.
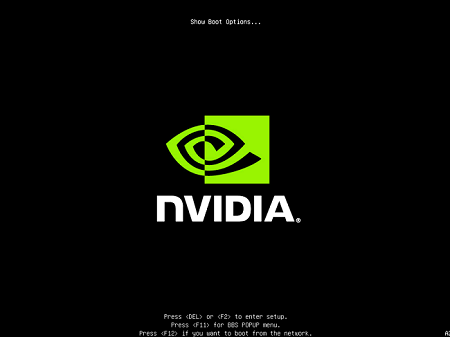
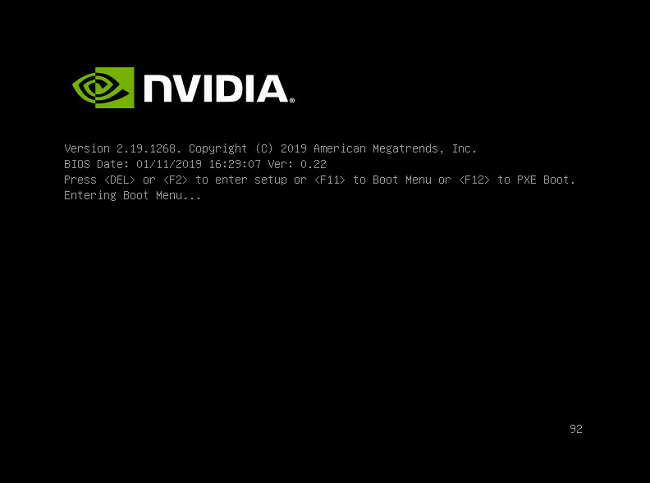
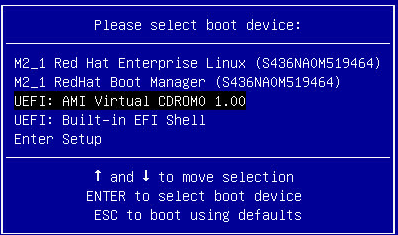
Typically, the default boot order does not boot the CDROM image. This can be changed in the BIOS or as a one-time option in the boot menu. To bring up the boot menu, press F11 at the beginning of the boot process. Pressing F11 will display Show Boot Options at the top of the virtual display before entering the boot menu. Use the ‘soft’ keyboard (Menu → Keyboard Layout → SoftKeyboard → <Language>) to bring up a virtual keyboard if pressing the physical key has no effect.
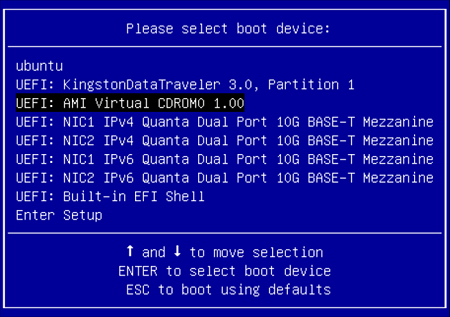
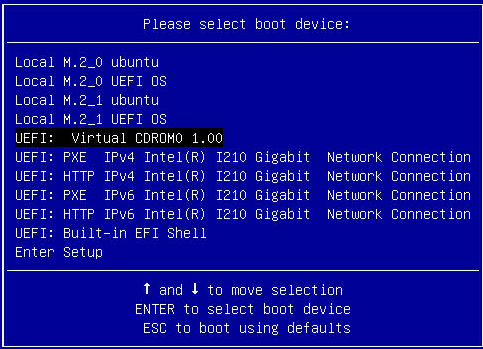
- In the boot menu, select UEFI: AMI Virtual CDROM 1.00 as the boot device and then press ENTER.
- Follow the instructions at Installing CentOS.


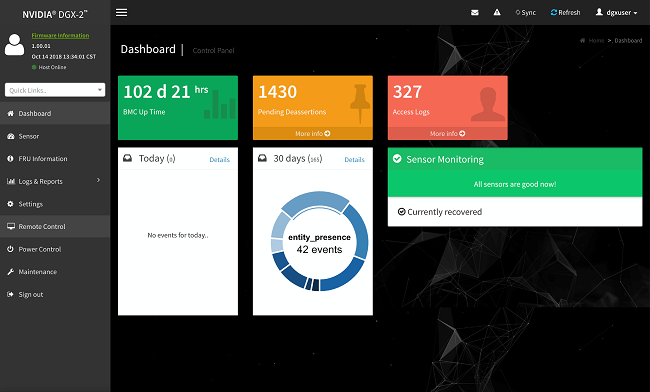
Booting the ISO Image on the DGX-2 Remotely
- Connect to the BMC and ensure the required user privileges are set.
- Open a browser within your LAN and go to https://<BMC-ip-address>/, then log in.
- From the left-side menu, click Settings and then select User Management.
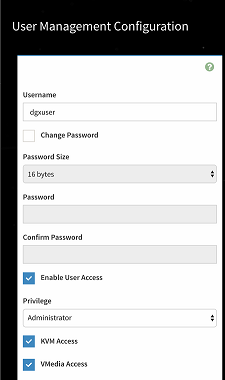
- Click the card with the user name that you created for the BMC.
- In the User Management Configuration dialog, make sure the VMedia Access checkbox is selected, then click Save.
- Set up the ISO image as virtual media.
- Boot from the virtual media.
Typically, the default boot order does not boot the CDROM image. This can be changed in the BIOS or as a one-time option in the boot menu.
- To bring up the boot menu, press F11 at the beginning of the
boot process.
Pressing F11 will display Entering Boot Menu in the virtual display before entering the boot menu.
- In the boot menu, select UEFI: Virtual CDROM 1.00 as the boot device and then press ENTER.
- Follow the instructions at Installing CentOS
- To bring up the boot menu, press F11 at the beginning of the
boot process.


Booting the ISO Image on the DGX A100 Remotely
- Connect to the BMC and ensure the required user privileges are set.
- Open a browser within your LAN and go to https://<BMC-ip-address>/, then log in.
- From the left-side menu, click Settings and then select User Management.
- Click the card with the user name that you created for the BMC.
- In the User Management Configuration dialog, make sure the VMedia Access checkbox is selected, then click Save.
- Set up the ISO image as virtual media.
- Boot from the virtual media.
Typically, the default boot order does not boot the CDROM image. You can change this in the BIOS or as a one-time option in the boot menu.
- To bring up the boot menu, press F11 at the beginning of the
boot process.
Pressing F11 will display Entering Boot Menu in the virtual display before entering the boot menu.
- In the boot menu, select UEFI: AMI Virtual CDROM 1.00 as the boot device and then press ENTER.
- Follow the instructions at Installing CentOS
- To bring up the boot menu, press F11 at the beginning of the
boot process.
Installing CentOS
Installing on the DGX-1, DGX Station, or DGX Station A100
This section assumes you have booted the CentOS ISO image, either locally or remotely for DGX-1, or locally for DGX Station. or DGX Station A100
- For instructions applicable to the DGX-2, see Installing on the DGX-2.
- For instructions applicable to the DGX A100, see Installing on the DGX A100.
The screenshots in these instructions are taken from a DGX-1 system. The DGX Station installation can have slight differences with respect to disk size, disk space available, interface names, etc.
- After booting the ISO image through either the BMC or from the USB drive, start the
installation.
-
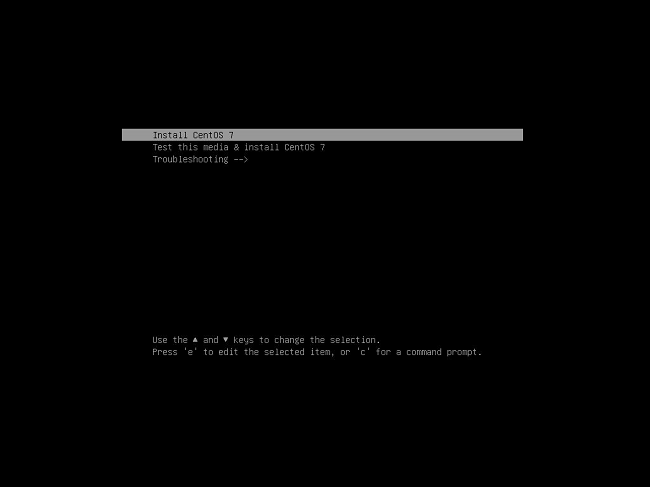
On the DGX-1: Select Install CentOS and then press Enter to start the installation.
-
On the DGX Station: Update the linuxefi parameters to prevent the Nouveau driver in CentOS from being loaded and then start the installation.
The Nouveau driver does not properly support the GPUs in the DGX Station, which may cause display issues. The GPUs in the DGX Station require that drivers that are installed as explained in Installing and Loading the NVIDIA CUDA Drivers.
-
Select Install CentOS and then type e.
-
Append the nomodeset option to the linuxefi parameters.
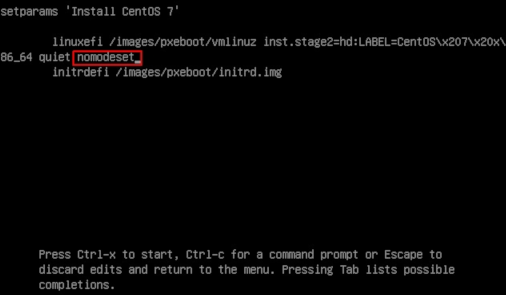
-
Press Ctrl+X to save your changes and start the installation.
-
The CentOS installer starts.
For guidance on using the installer, refer to CentOS Quick Installation Guide.
-
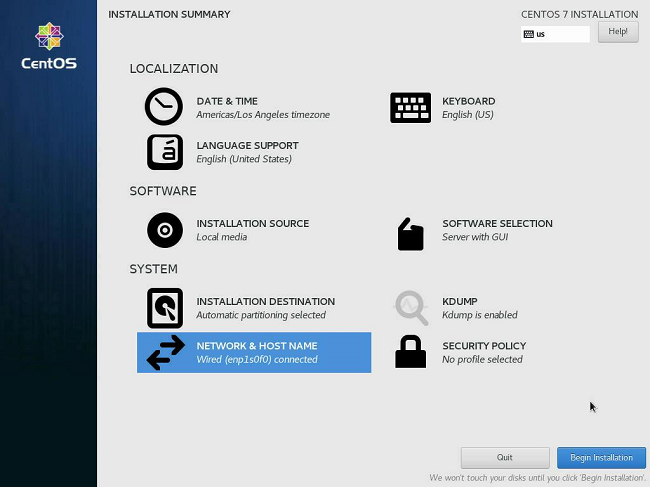
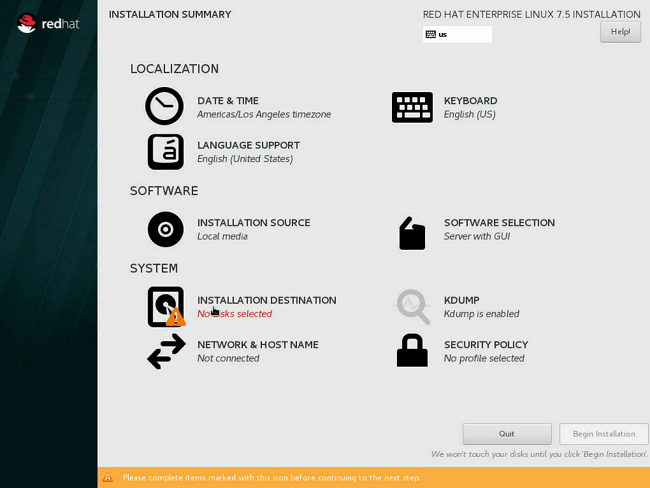
- Configure the language, region, date, time, keyboard, and other configuration options you may need from the Installation Summary screen.
- Select the software packages that you want to install.
For detailed instructions, refer to Software Selection in CentOS Installation Guide.
- Set the Software Selection to the correct value.
- For DGX Station and DGX Station A100: Set to Server with GUI.
- For DGX Servers (DGX 1-1, DGX-2, DGX A100): Set to Minimal Install.
Note: Setting the correct Software Selection is critical for proper operation. - Set up the system drive.
This step removes the Ubuntu installation in order to reclaim space for the CentOS installation.
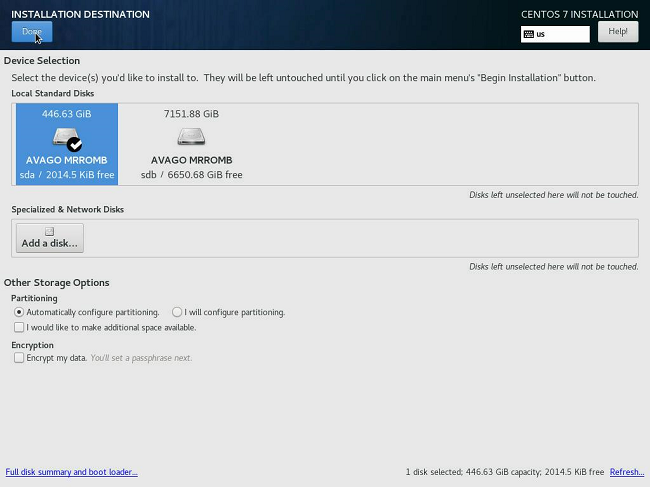
- From the Installation Summary screen, click INSTALLATION
DESTINATION.
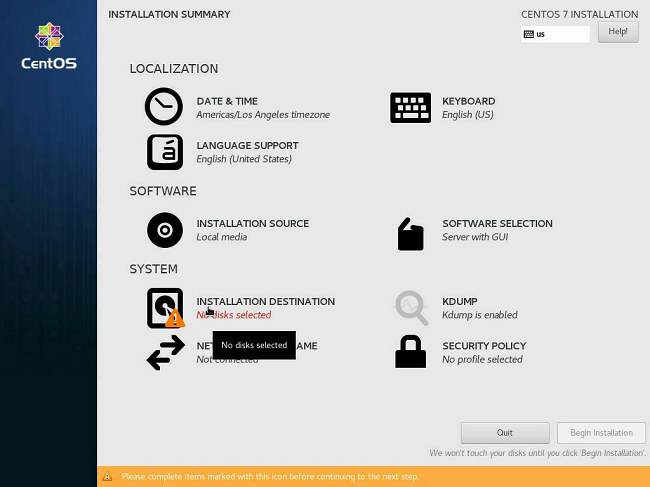
- At the Installation Destination screen, select the first drive (sda) as the installation drive.
- Under Other Storage Options, click the I will
configure partitioning radio button then click
Done.Note: If the software is being installed on the DGX Station, the number of local standard disks, their labels, capacities, and the amount of free space shown may be different than the examples shown in the screen capture.
The Manual Partitioning dialog box appears.
- Expand the Unknown drop-down menu for the device you’ve
selected, select a partition and then click the "-" button to delete the partition.
Repeat for other existing partitions listed in the Unknown drop down until none remain.
- Create a new partition.
Click the "+" button on the bottom left and set the following fields:
- Mount point: /boot/efi
- Desired Capacity: 512 MiB
- Device Type: Standard Partition
Under Devices, ensure only the sda drive you chose is selected, then click Update Settings to confirm your changes.
- Create another partition.
Click the "+" button on the bottom left and set the following fields:
- Mount point: /
- Desired Capacity: [leave empty to let the installer know to use remaining capacity of the disks]
- Device Type: Standard Partition
- File System: XFS
Under Devices, ensure only the sda drive you chose is selected, then click Update Settings to confirm your changes.
- Click Done when finished.
This causes a yellow warning bar to appear on the bottom because no swap partition has been created.
Click Done again and then click Accept Changes to write all the customizations to disk.
- From the Installation Summary screen, click INSTALLATION
DESTINATION.
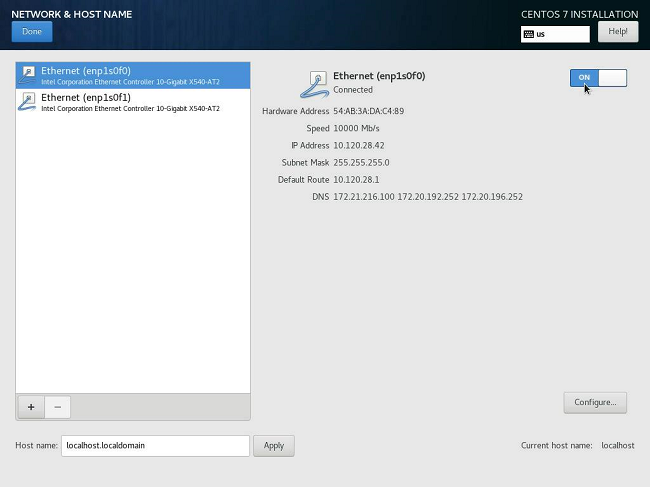
- Configure Ethernet.
Select and enable the Ethernet device. This defaults to DHCP and can be changed for static IP configurations under Configure.
- From the INSTALLATION SUMMARY screen, click Begin installation to start
the installation.
- While the installation process is running, set your password (ROOT PASSWORD) and create a new user (USER CREATION) from the Configuration screen.
- When the installation completes, click Reboot to reboot the system.
Installing on the DGX-2
- After booting the ISO image through either the BMC or from the USB drive, select
Install CentOS and then press Enter to
start the installation.
The CentOS installer starts.
For guidance on using the installer, refer to CentOS Quick Installation Guide.
- Configure the language, region, date, time, keyboard, and other configuration options you may need from the Installation Summary screen.
- Select the software packages that you want to install.
For detailed instructions, refer to Software Selection in CentOS Installation Guide.
- Set the Software Selection to the correct value.
- For DGX Station and DGX Station A100: Set to Server with GUI.
- For DGX Servers (DGX 1-1, DGX-2, DGX A100): Set to Minimal Install.
Note: Setting the correct Software Selection is critical for proper operation. - Set up the boot disks.
The DGX OS, which is installed in the factory before shipping out the DGX-2, creates a RAID-1 array on the two M.2 NVMe boot disks. Therefore, it is necessary to select both boot disks when installing RHEL 7 on a DGX-2.
- From the Installation Summary screen, click INSTALLATION
DESTINATION.
- At the Installation Destination screen, select both M.2 disks (i.e. the 894.25 GB ones) and
the "I will configure partitioning" radio button, then click
Done.
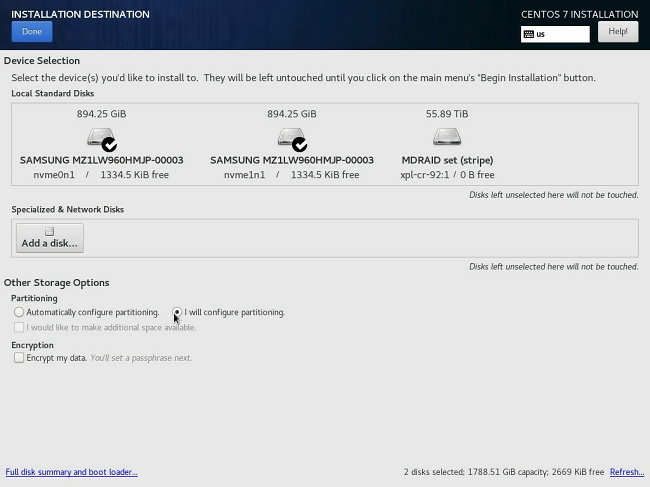
The Manual Partitioning window appears.
- Expand the Unknown drop-down menu.
This shows the disks that CentOS has identified. They will be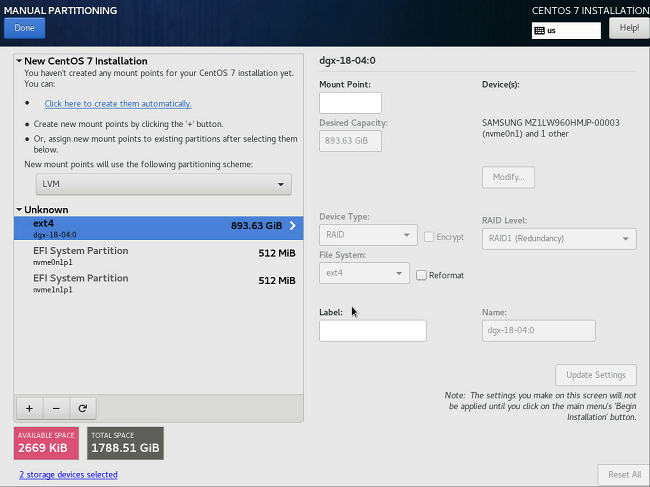
- the RAID-1 root partition (ext4, 893 GB),
- the first EFI system partition (ESP) (nvme0n1p1, 512 MB), and
- the second ESP (nvme1n1p1, 512 MB).
- Select the ext4 partition and reformat it as xfs, then set the mount point to
"/" and label it as "md0"
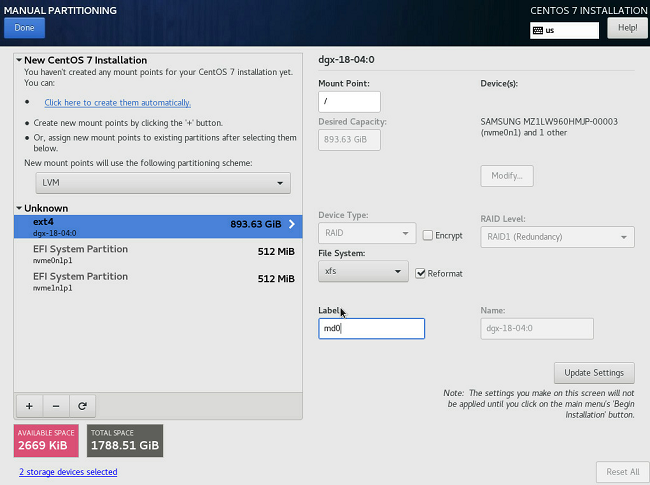
- Click Update Settings.
- From the Installation Summary screen, click INSTALLATION
DESTINATION.
- Create an EFI partition.
- Select the nvme0n1p1 partition and reformat it as an EFI System
Partition, then set the mount point to "/boot/efi" and click
Update Settings.
At this point, the two partitions you configured will be under the New CentOS Installation drop down menu, and the nvme1n1p1 EFI partition will still be in Unknown. We can't create a second ESP because CentOS won't allow you to create two partitions mounted on the same mount point, i.e. /boot/efi, even if they are on different disks. You can replicate the ESP after installing the "DGX System Management" yum group, which provides a tool to accomplish this.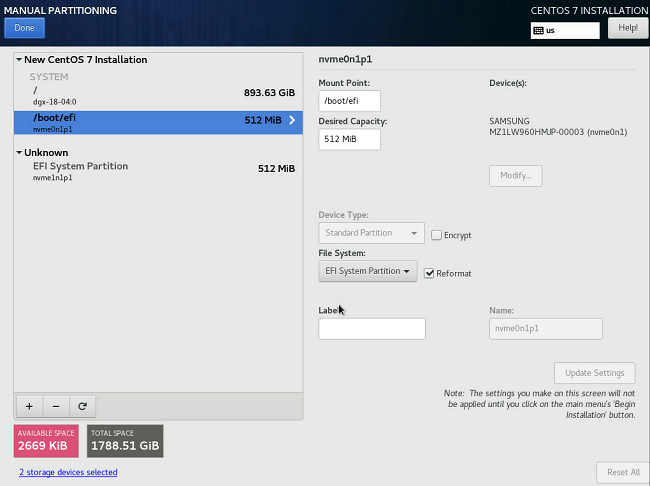
- Click Done.
A yellow-highlighted warning appears on the bottom of the screen.
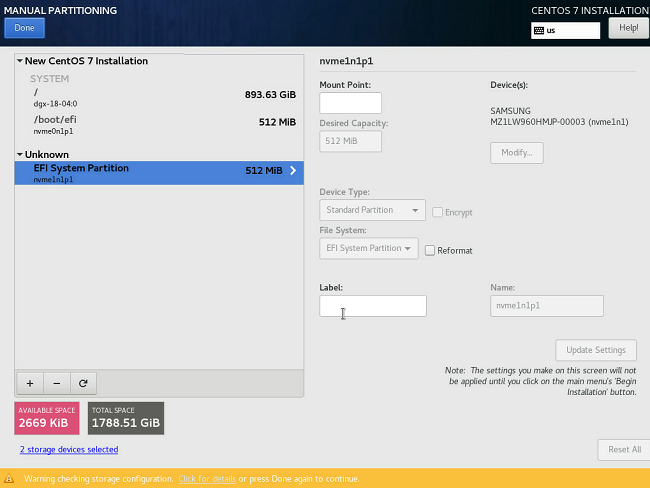
- Click the yellow-highlighted warning message.
The following message appears.
The message appears because the DGX OS from the factory has created a RAID 1 array for the root partition, and has replicated the EFI system partitions.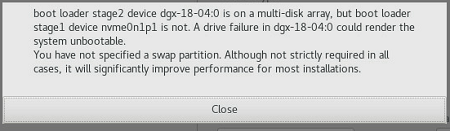
- Close the warning and then press Done.
A summary of the partitioning steps appears.
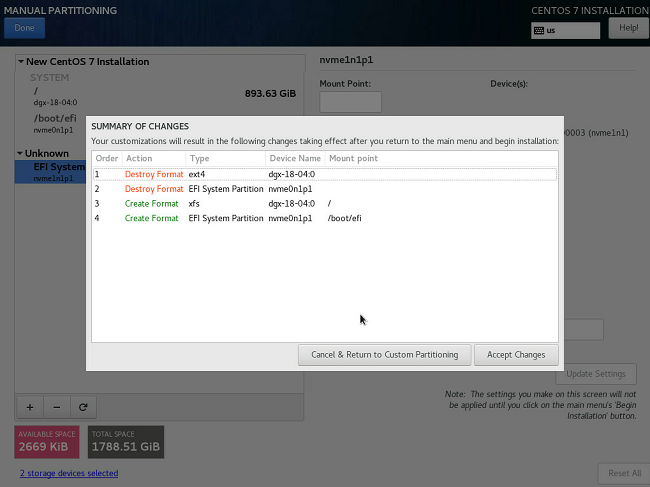
- Click Accept Changes to get back to the main Installation
Summary Screen.
There should no longer be a yellow warning icon on the System: Installation Destination option.
- Select the nvme0n1p1 partition and reformat it as an EFI System
Partition, then set the mount point to "/boot/efi" and click
Update Settings.
- Configure Ethernet.
Select and enable the Ethernet device. This defaults to DHCP and can be changed for static IP configurations under Configure.
- From the INSTALLATION SUMMARY screen, click Begin installation to start
the installation.
- While the installation process is running, set your password (ROOT PASSWORD) and create a new user (USER CREATION) from the Configuration screen.
- When the installation completes, click Reboot to reboot the system.
Installing on the DGX A100
This section assumes you have booted the CentOS ISO image, either locally or remotely.
For instructions applicable to the DGX-1 and the DGX Station, see Installing on the DGX-1, DGX Station, or DGX Station A100.
For instructions applicable to the DGX-2, see Installing on the DGX-2.
- After booting the ISO image through either the BMC or from the USB drive, select
Install CentOS and then press Enter to
start the installation.
The CentOS installer starts.
For guidance on using the installer, refer to CentOS Quick Installation Guide.
- Configure the language, region, date, time, keyboard, and other configuration options you may need from the Installation Summary screen.
- Select the software packages that you want to install.
For detailed instructions, refer to Software Selection in CentOS Installation Guide.
- Set the Software Selection to the correct value.
- For DGX Station and DGX Station A100: Set to Server with GUI.
- For DGX Servers (DGX 1-1, DGX-2, DGX A100): Set to Minimal Install.
Note: Setting the correct Software Selection is critical for proper operation. - Set up the boot disks.
The DGX OS, which is installed in the factory before shipping out the DGX A100, creates a RAID-1 array on the two M.2 NVMe boot disks. Therefore, it is necessary to select both boot disks when installing RHEL 7 on a DGX A100.
- From the Installation Summary screen, click INSTALLATION
DESTINATION.
- At the Installation Destination screen, select both M.2 disks (i.e. 1788 GiB on
DGX A100) and the "I will configure partitioning" radio button,
then click Done.
The Manual Partitioning window appears.
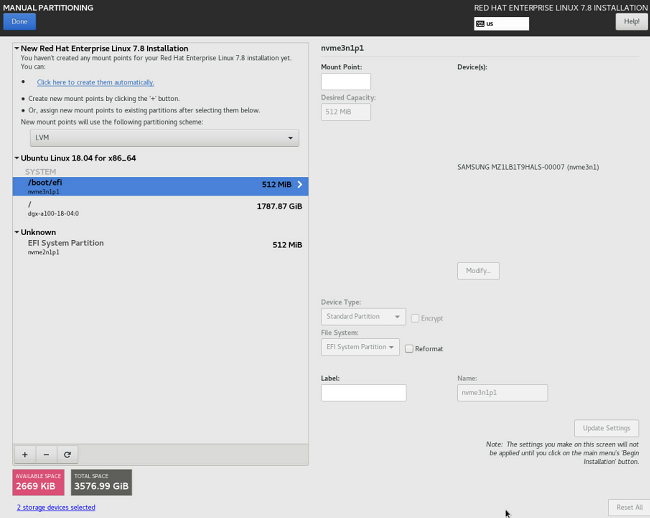
- Expand the Unknown drop-down menu.
This shows the disks that CentOS has identified. They will be
- the RAID-1 root partition (ext4, 1787.87 GB),
- the first EFI system partition (ESP) (nvme3n1p1, 512 MB), and
- the second ESP (nvme2n1p1, 512 MB).
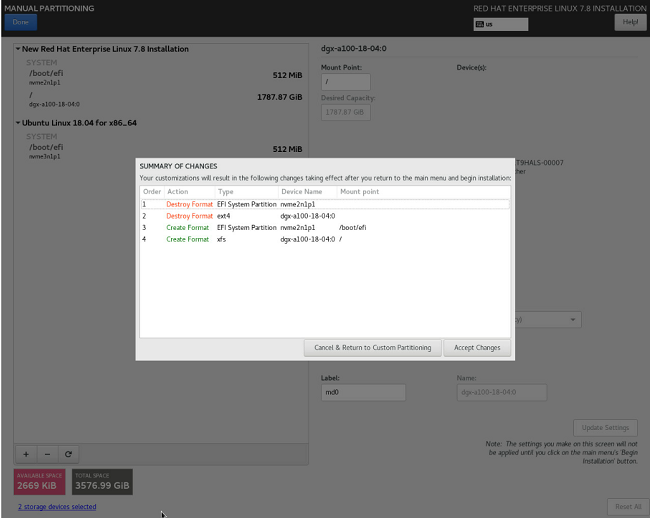
- Select the ext4 partition and reformat it as xfs, then set the mount point to "/" and label it as "md0"
- Click Update Settings.
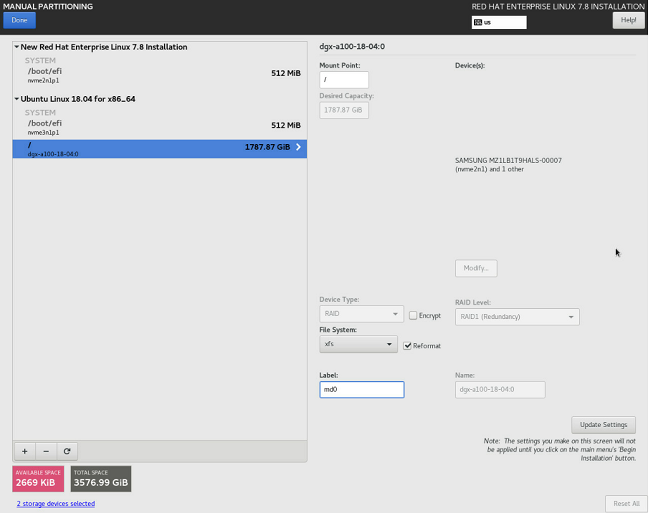
- From the Installation Summary screen, click INSTALLATION
DESTINATION.
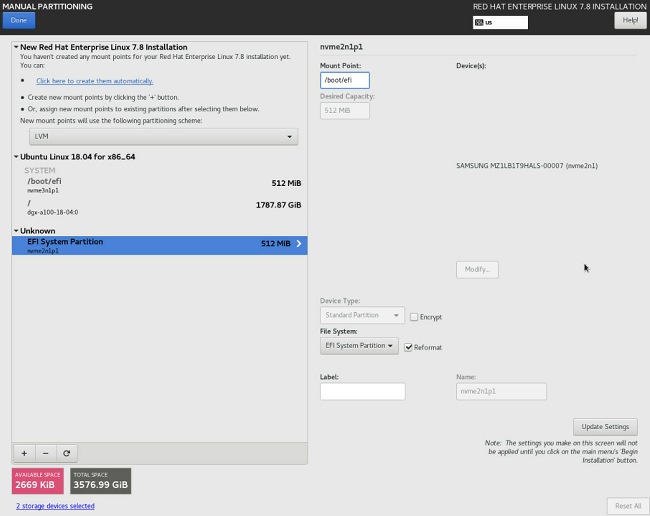
- Create an EFI partition.
- Select the second EFI partition, in the Unknown section (nvme2n1p1 on DGX A100), reformat it as an EFI System Partition, then set the mount point to "/boot/efi" and click Update Settings. At this point, the two partitions you configured will be under the New CentOS Installation drop down menu, and the Ubuntu EFI partition (nvme3n1p1 on DGX A100) will be under Ubuntu. We can't create a second ESP because CentOS won't allow you to create two partitions mounted on the same mount point, i.e. /boot/efi, even if they are on different disks. You can replicate the ESP after installing the "DGX System Management" yum group, which provides a tool to accomplish this.
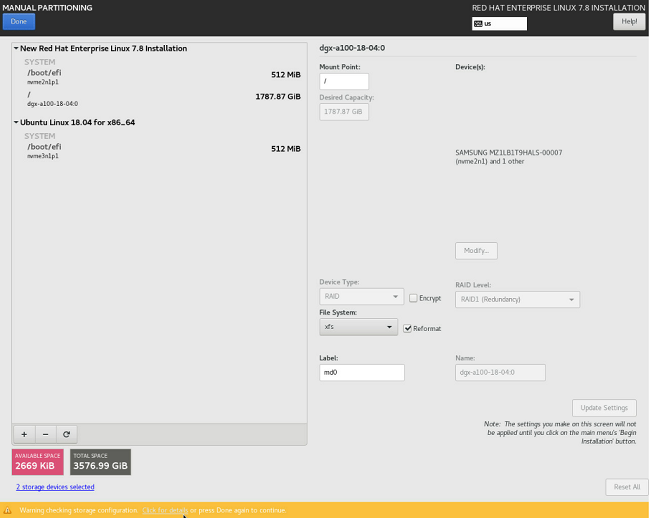
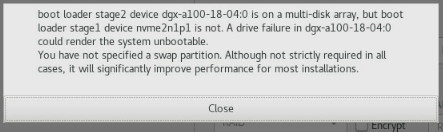
- Click Done. A yellow-highlighted warning appears on the bottom of the screen.
- Click the yellow-highlighted warning message. The following message appears. The message appears because the DGX OS from the factory has created a RAID 1 array for the root partition, and has replicated the EFI system partitions.
- Close the warning and then click Done. A summary of the partitioning steps appears.
- Click Accept Changes to get back to the main Installation
Summary Screen.
There should no longer be a yellow warning icon on the System: Installation Destination option.
- Configure Ethernet.
Select and enable the Ethernet device. This defaults to DHCP and can be changed for static IP configurations under Configure. This screen also lets you set the hostname.
- From the INSTALLATION SUMMARY screen, click Begin installation to start
the installation.
- While the installation process is running, set your password (ROOT PASSWORD) and create a new user (USER CREATION) from the Configuration screen.
- When the installation completes, click Reboot to reboot the system.