Installing the DGX Software
This section requires that you have already installed CentOS" or derived operating system on the DGX server.
Configuring a System Proxy
- Edit the file /etc/yum.conf and make sure the following lines are
present in the [main] section, using the parameters that apply to your
network:
proxy=http://<Proxy-Server-IP-Address>:<Proxy-Port>
proxy_username=<Proxy-User-Name>
proxy_password=<Proxy-Password>
- Make sure that the following domains are not blocked and that the
system can access them.
- cdn.redhat.com
- international.download.nvidia.com
Enabling the Repositories
- Run the following commands to install the DGX software installation
package and enable the NVIDIA DGX software repository.Attention:By running these commands you are confirming that you have read and agree to be bound by the DGX Software License Agreement. You are also confirming that you understand that any pre-release software and materials available that you elect to install in a DGX may not be fully functional, may contain errors or design flaws, and may have reduced or different security, privacy, availability, and reliability standards relative to commercial versions of NVIDIA software and materials, and that you use pre-release versions at your risk.Install the NVIDIA DGX Package for Red Hat Enterprise Linux.
$ sudo yum install -y https://international.download.nvidia.com/dgx/repos/rhel-files/dgx-repo-setup-21.11-1.el7.x86_64.rpm
The next steps describe how to enable new driver branch repositories. Newer versions of other various packages can be made available through newer driver branch repositories. For example, enabling rhel7-updates would make 2.8.3 the highest NCCL version available, and enabling rhel7-r450-cuda11-0 afterward would bump the highest NCCL version to 2.11.4.
- Enable the R450/CUDA 11.0 repository to move to the R450 package.
The step is required for DGX A100 and DGX Station A100, but optional for other DGX platforms.
- Either edit
/etc/yum.repos.d/nvidia-dgx-7.repo and set enabled=1,
[nvidia-dgx-7-r450-cuda11-0]
name=NVIDIA DGX EL7 R450-CUDA11-0
baseurl=https://international.download.nvidia.com/dgx/repos/rhel7-r450-cuda11-0/
enabled=1
gpgcheck=1
gpgkey=file:///etc/pki/rpm-gpg/RPM-GPG-KEY-dgx-cosmos-support
- Or (if you have the yum-utils package
installed), issue the following.
sudo yum-config-manager --enable nvidia-dgx-7-r450-cuda11-0
- Either edit
/etc/yum.repos.d/nvidia-dgx-7.repo and set enabled=1,
- (Optional) Enable the R470/CUDA 11.4 repository to move to the R470 package.
If you are moving from the R418 repo, then enable the R450 repo first as described in the previous step.
- Either edit
/etc/yum.repos.d/nvidia-dgx-7.repo and set enabled=1,
[nvidia-dgx-7-r470-cuda11-4]
name=NVIDIA DGX EL7 R470-CUDA11-4
baseurl=https://international.download.nvidia.com/dgx/repos/rhel7-r470-cuda11-4/
enabled=1
gpgcheck=1
gpgkey=file:///etc/pki/rpm-gpg/RPM-GPG-KEY-dgx-cosmos-support
- Or (if you have the yum-utils package
installed), issue the following.
sudo yum-config-manager --enable nvidia-dgx-7-r470-cuda11-4
If building CUDA 11.4 Samples, install a version of GCC greater than or equal to 5.1.0. For instance, install GCC 9.1.1 by installing Red Hat Developer Tool set 9:sudo yum install -y devtoolset-9
In this example, build CUDA samples using the following command in place of the “make” command:scl enable devtoolset-9 make
- Either edit
/etc/yum.repos.d/nvidia-dgx-7.repo and set enabled=1,
Installing Required Components
Installing DGX Tools and Updating Configuration Files
- Install the kernel development tools.
- Install the kernel-devel package.
The kernel-devel package provides kernel headers required for the NVIDIA CUDA driver. Use the following command to install the kernel headers for the kernel version that is currently running on the system.
sudo yum install -y "kernel-devel-uname-r == $(uname -r)"
- Ensure that you have installed the latest version of gcc
installed, as older versions may not support all of the features required to build the
driver.
sudo yum install -y gcc
- Install the kernel-devel package.
- Install DGX tools and configuration files.
- For DGX-1, install DGX-1 Configurations.
sudo yum group install -y 'DGX-1 Configurations'
- For the DGX-2, install DGX-2 Configurations.
sudo yum group install -y 'DGX-2 Configurations'
- For the DGX A100, install DGX A100 Configurations.
sudo yum group install -y 'DGX A100 Configurations'
- For the DGX Station, install DGX Station Configurations.
sudo yum group install -y 'DGX Station Configurations'
- For the DGX Station A100, install DGX Station A100
Configurations.
sudo yum group install -y 'DGX Station A100 Configurations'
The configuration changes take effect only after rebooting the system, which is covered in the next step.
- For DGX-1, install DGX-1 Configurations.
- Update the kernel.
- Issue the following.
$ sudo yum update
Performing this update also updates the installed Red Hat Enterprise Linux 7 distribution to the latest version. To check the latest Red Hat Enterprise Linux 7 version, visit https://access.redhat.com/articles/3078. - Reboot the server into the updated kernel.
$ sudo reboot
- Issue the following.
Configuring the /raid Partition
Configuring the /raid Partition as an NFS Cache
- Configure the RAID array.
This will create the RAID group, mount it to /raid, and create an appropriate entry in /etc/fstab.
- To configure a RAID 0 array, issue the
following:
sudo configure_raid_array.py -c -f
- To configure a RAID 5 array, issue the
following:
sudo configure_raid_array.py -c -5 -f
Note:The RAID array must be configured before installing dgx-conf-cachefilesd, which places the proper SELinux label on the /raid directory. If you ever need to recreate the RAID array - which will wipe out any labeling on /raid - after dgx-conf-cachefilesd has already been installed, be sure to restore the label manually before restarting cachefilesd.
sudo restorecon /raid
sudo systemctl restart cachefilesd
- To configure a RAID 0 array, issue the
following:
- Install dgx-conf-cachefilesd to update the cachefilesd configuration
to use the /raid partition.
sudo yum install -y dgx-conf-cachefilesd
Configuring the /raid Partition for Local Persistent Storage
If you are using the data SSDs in the DGX Station for local persistent storage, configure these SSDs as a RAID 0 or RAID 5 array, mounted at /raid.
RAID 0 provides the maximum storage capacity, but does not provide any redundancy. If a single SSD in the array fails, all data stored on the array is lost. RAID 5 provides some level of protection against failure of a single SSD but with lower storage capacity than RAID 0.
-
To configure a RAID 0 array, run the following command.
sudo configure_raid_array.py -c -f
-
To configure a RAID 5 array, run the following command.
sudo configure_raid_array.py -c -f -5
These commands will create the RAID group, mount it to /raid, and create an appropriate entry in /etc/fstab.
Installing and Loading the NVIDIA CUDA Drivers
- Install the driver package.
This will build and install the driver kernel modules. The installation of the dkms-nvidia package can take approximately five minutes.
sudo yum install -y cuda-drivers dgx-persistence-mode
- (DGX Station 100 Only): Install additional required Station A100 packages.
These packages must be installed after installing the cuda-drivers package.
sudo yum install -y nvidia-conf-xconfig nv-docker-gpus
- Reboot the system to load the drivers and to update system configurations.
sudo reboot
- After the system has rebooted, verify that the drivers have been loaded and are
handling the NVIDIA devices.
nvidia-smi
The output should show all available GPUs.
Example: Output from a DGX-1 system+-----------------------------------------------------------------------+ | NVIDIA-SMI 450.51.05 Driver Version: 450.51.05 CUDA Version: 11.0 | |----------------------------+-------------------+----------------------+ | GPU Name Persistence-M | Bus-Id Disp.A | Volatile Uncorr. ECC | | Fan Temp Perf Pwr:Usage/Cap| Memory-Usage | GPU-Util Compute M. | |============================+===================+======================| | 0 Tesla V100-SXM2... On | ...00:06:00.0 Off | 0 | | N/A 33C P0 45W / 300W | 0MiB / 32480MiB | 0% Default | +----------------------------+-------------------+----------------------+ | 1 Tesla V100-SXM2... On | ...00:07:00.0 Off | 0 | | N/A 35C P0 44W / 300W | 0MiB / 32480MiB | 0% Default | +----------------------------+-------------------+----------------------+ : : : : +----------------------------+-------------------+----------------------+ | 7 Tesla V100-SXM2... On | ...00:8A:00.0 Off | 0 | | N/A 34C P0 44W / 300W | 0MiB / 32480MiB | 0% Default | +----------------------------+-------------------+----------------------+ +-----------------------------------------------------------------------+ | Processes: GPU Memory | | GPU PID Type Process name Usage | |=======================================================================| | No running processes found | +-----------------------------------------------------------------------+
Installing the NVIDIA Container Runtime
- Install Docker 1.13 from the centos-extras repository.
sudo yum install -y docker
- Install the NVIDIA Container Runtime group.
sudo yum groupinstall -y 'NVIDIA Container Runtime'
- (DGX Station A100 only): Restart the nv-docker-gpus service.
$ sudo systemctl restart nv-docker-gpus
- Run the following command to verify the installation.
- If the R418 driver package is
installed:
sudo docker run --security-opt label=type:nvidia_container_t --rm nvcr.io/nvidia/cuda:10.0-base nvidia-smi
- If the R450 driver package is
installed:
sudo docker run --security-opt label=type:nvidia_container_t --rm nvcr.io/nvidia/cuda:11.0-base nvidia-smi
The output should show all available GPUs.
Example: Output on a DGX -1 system
+-----------------------------------------------------------------------+
| NVIDIA-SMI 450.51.05    Driver Version: 450.51.05 CUDA Version: 11.0  |
|----------------------------+-------------------+----------------------+
| GPU Name     Persistence-M | Bus-Id     Disp.A | Volatile Uncorr. ECC |
| Fan Temp Perf Pwr:Usage/Cap|      Memory-Usage | GPU-Util  Compute M. |
|============================+===================+======================|
|   0 Tesla V100-SXM2...  On | ...00:06:00.0 Off |                    0 |
| N/A  33C   P0   45W / 300W |   0MiB / 32480MiB |      0%      Default |
+----------------------------+-------------------+----------------------+
|   1 Tesla V100-SXM2...  On | ...00:07:00.0 Off |                    0 |
| N/A  35C   P0   44W / 300W |   0MiB / 32480MiB |      0%      Default |
+----------------------------+-------------------+----------------------+
:                            :                   :                      :
+----------------------------+-------------------+----------------------+
|   7 Tesla V100-SXM2...  On | ...00:8A:00.0 Off |                    0 |
| N/A  34C   P0   44W / 300W |   0MiB / 32480MiB |      0%      Default |
+----------------------------+-------------------+----------------------+
+-----------------------------------------------------------------------+
| Processes:                                                 GPU Memory |
|  GPU       PID   Type   Process name                       Usage      |
|=======================================================================|
|  No running processes found                                           |
+-----------------------------------------------------------------------+
See the section Running Containers for more information about this command. For a description of nvcr.io, see the NGC Registry Spaces documentation.
- If the R418 driver package is
installed:
Installing Diagnostic Components
- Install the CentOS Software Collections Repository.
sudo yum install centos-release-scl
- Enable the testing repository.
- Install the yum utilities if
you have not already done so.
sudo yum -y install yum-utils
- Use yum-config-manager to
enable the testing repository.
sudo yum-config-manager –enable centos-sclo-rh-testing
- Install the yum utilities if
you have not already done so.
- Install Python 3.6.
sudo yum install -y rh-python36
Important:The diagnostic components for NVIDIA DGX systems are not supported with the python3 package. Be sure to only install the rh-python36 package. - Install the DGX System Management package group.
sudo yum groupinstall -y 'DGX System Management'
Replicating the EFI System Partition on DGX-2 or DGX A100
- You are installing CentOS on the NVIDIA DGX-2 or DGX A100, and
- You installed CentOS on the RAID 1 array per instructions in the section Installing on DGX-2 or Installing on DGX A100 as appropriate.
- Start the NVSM tool.
sudo nvsm
- Navigate to
/systems/localhost/storage/volumes/md0.
nvsm-> cd /systems/localhost/storage/volumes/md0
- Start the rebuild process.
nvsm(/systems/localhost/storage/volumes/md0)-> start rebuild
- At the first prompt, specify the second M.2
disk.
PROMPT: In order to rebuild this volume, a spare drive
        is required. Please specify the spare drive to
        use to rebuild md0.
Name of spare drive for md0 rebuild (CTRL-C to cancel): nvme1n1
This should be the M.2 disk on which you did NOT install the ESP.- If you followed the instructions in the section Installing on DGX-2, this should be 'nvme1n1'
- If you followed the instructions in the section Installing on DGX A100, this should be 'nvme2n1'
- At the second prompt, confirm that you want to
proceed.
WARNING: Once the volume rebuild process is started, the
         process cannot be stopped.
Start RAID-1 rebuild on md0? [y/n] y
Upon successful completion, the following message should appear indicating that the ESP has been replicated:/systems/localhost/storage/volumes/md0/rebuild started at 2019-03-07 14:40:55.844542 RAID-1 rebuild exit status: ESP_REBUILT
If necessary, the RAID 1 array is rebuilt after the ESP has been replicated.Finished rebuilding RAID-1 on volume md0 100.0% [=========================================] Status: Done
- At the first prompt, specify the second M.2
disk.
Installing Optional Components
- Install the CUDA toolkit.
sudo yum install cuda
- Install the NVIDIA Collectives Communication Library (NCCL) Runtime.
sudo yum groupinstall 'NVIDIA Collectives Communication Library Runtime'
- Install the CUDA Deep Neural Networks (cuDNN) Library Runtime.
sudo yum groupinstall 'CUDA Deep Neural Networks Library Runtime'
- Install NVIDIA TensorRT.
sudo yum install tensorrt
Applying an NVIDIA Look and Feel to the Desktop User Interface
- Install the DGX Desktop Theme package group.
sudo yum groupinstall -y 'DGX Desktop Theme'
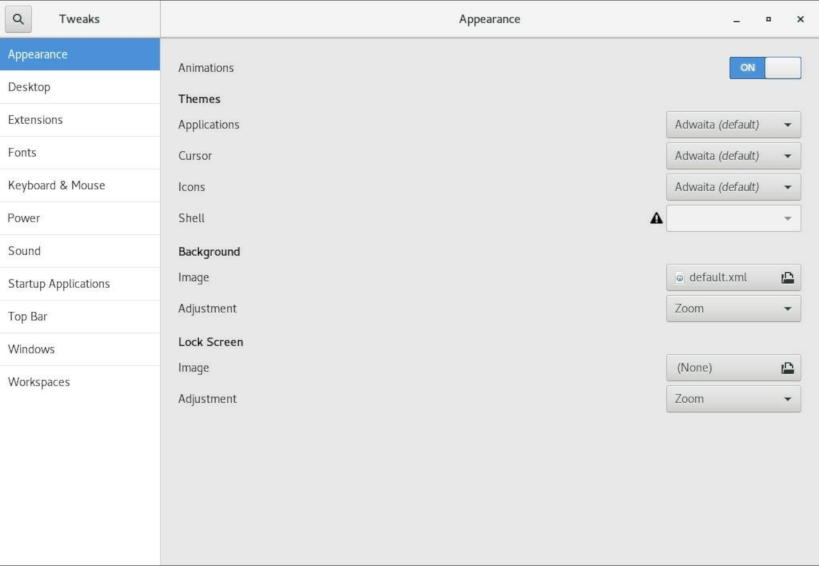
- Start gnome-tweaks.
- In the Appearance window that opens, under
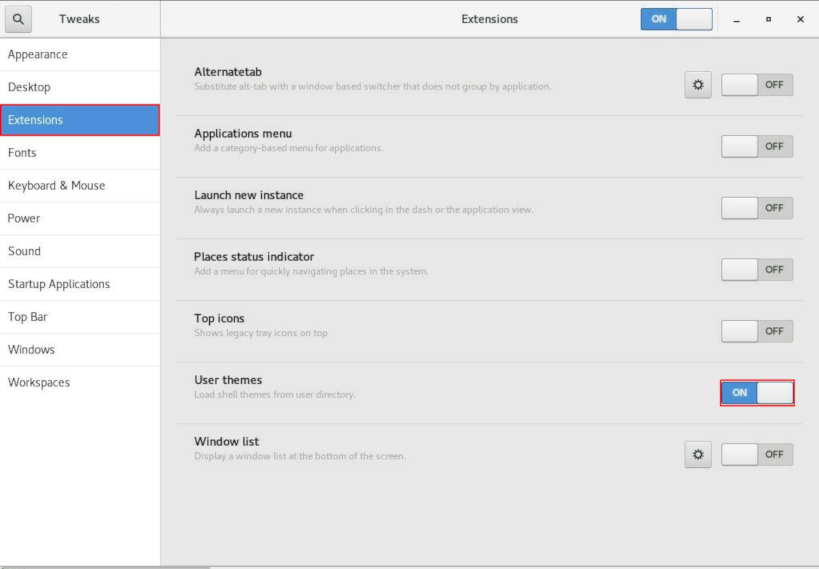
Tweaks, click Extensions.
- In the Extensions window that opens, set
Extensions in the title bar and User
themes to ON.
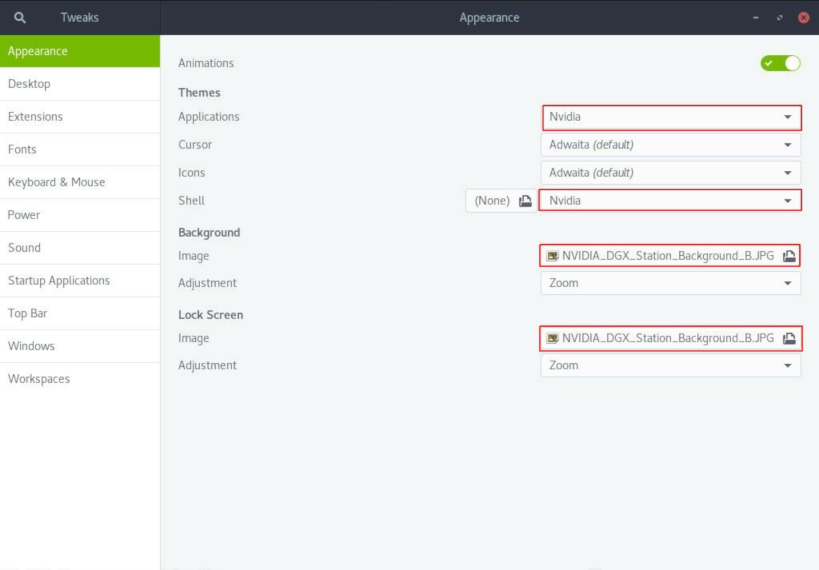
- Stop and restart gnome-tweaks.
- In the Appearance window that opens, apply the NVIDIA theme to
applications and the shell, and use NVIDIA images for the desktop background and lock
screen.
- Under Themes, in the drop-down lists for Applications and Shell, click Nvidia.
- Under Background and Lock Screen, click the Image file selector.
- In the Image window that opens, select an NVIDIA DGX Station background image, for example, NVIDIA_DGX_Station_Background_B.JPG, and click Open.
Managing CPU Mitigations
DGX Software for CentOS includes security updates to mitigate CPU speculative side-channel vulnerabilities. These mitigations can decrease the performance of deep learning and machine learning workloads.
If your installation of DGX systems incorporates other measures to mitigate these vulnerabilities, such as measures at the cluster level, you can disable the CPU mitigations for individual DGX nodes and thereby increase performance. This capability is available starting with DGX Software for CentOSsoftware version EL7-20.02.
Determining the CPU Mitigation State of the DGX System
If you do not know whether CPU mitigations are enabled or disabled, issue the following.
$ cat /sys/devices/system/cpu/vulnerabilities/*
- CPU mitigations are enabled if the output consists of multiple lines
prefixed with Mitigation:.
Example
KVM: Mitigation: Split huge pages
Mitigation: PTE Inversion; VMX: conditional cache flushes, SMT vulnerable
Mitigation: Clear CPU buffers; SMT vulnerable
Mitigation: PTI
Mitigation: Speculative Store Bypass disabled via prctl and seccomp
Mitigation: usercopy/swapgs barriers and __user pointer sanitization
Mitigation: Full generic retpoline, IBPB: conditional, IBRS_FW, STIBP: conditional, RSB filling
Mitigation: Clear CPU buffers; SMT vulnerable
- CPU mitigations are disabled if the output consists of multiple lines
prefixed with Vulnerable.
Example
KVM: Vulnerable
Mitigation: PTE Inversion; VMX: vulnerable
Vulnerable; SMT vulnerable
Vulnerable
Vulnerable
Vulnerable: __user pointer sanitization and usercopy barriers only; no swapgs barriers
Vulnerable, IBPB: disabled, STIBP: disabled
Vulnerable
Disabling CPU Mitigations
- Apply the dgx*-no-mitigations profile.
- On a DGX-2 system,
issue
$ sudo tuned-adm profile dgx2-no-mitigations
- On a DGX-1 system,
issue
$ sudo tuned-adm profile dgx-no-mitigations
- On a DGX Station workstation,
issue
$ sudo tuned-adm profile dgxstation-no-mitigations
- On a DGX-2 system,
issue
- Reboot the system.
- Verify CPU mitigations are disabled.
$ cat /sys/devices/system/cpu/vulnerabilities/*
The output should include several Vulnerable lines. See Determining the CPU Mitigation State of the DGX System for example output.
Re-enabling CPU Mitigations
- Apply the dgx*-performance package.
- On a DGX-2 system,
issue
$ sudo tuned-adm profile dgx2-performance
- On a DGX-1 system,
issue
$ sudo tuned-adm profile dgx-performance
- On a DGX Station workstation,
issue
$ sudo tuned-adm profile dgxstation-performance
- On a DGX-2 system,
issue
- Reboot the system.
- Verify CPU mitigations are enabled.
$ cat /sys/devices/system/cpu/vulnerabilities/*
The output should include several Mitigations lines. See Determining the CPU Mitigation State of the DGX System for example output.