DGX Software Stack Installation Guide
This document descriobes how to install the DGX Software Stack on DGX Servers.
1. Introduction
NVIDIA® DGX™ systems are shipped preinstalled with DGX™ OS, a customized installation of Ubuntu with additional software from NVIDIA to provide a turnkey solution for running AI and analytics workloads. This offers users a fast on-boarding experience for using DGX systems and keeping them updated with the latest software versions.
The additional software, the NVIDIA DGX Software Stack, provides platform-specific configurations, diagnostic and monitoring tools, and drivers that are required for a stable, tested, and supported OS to run AI, machine learning, and analytics applications on DGX systems.
The DGX OS installer is released in the form of an ISO image to reimage a DGX system, but you also have the option to install a vanilla version of Ubuntu 20.04 and the NVIDIA DGX Software Stack on DGX servers (DGX A100, DGX-2, DGX-1) while still benefiting from the advanced DGX features. This installation method supports more flexibility, such as custom partition schemes or using a specific base Ubuntu image. Cluster deployments also benefit from this installation method by taking advantage of Ubuntu’s standardized automated and non-interactive installation process.
This document explains the steps for installing and configuring Ubuntu and the NVIDIA DGX Software Stack on DGX systems. It also provides instructions and examples for an automated installation process. The intended audience are IT professionals managing a cluster of DGX systems and integration partners.
1.1. DGX Software Stack Highlights
-
Support for Ubuntu 20.04 LTS distribution
-
NVIDIA System Management (NVSM)
Provides active health monitoring and system alerts for NVIDIA DGX nodes in a data center. It also provides simple commands for checking the health of the DGX systems from the command line.
-
Data Center GPU Management (DCGM)
This software enables node-wide administration of GPUs and can be used for cluster and data-center level management.
-
DGX system-specific support packages
-
NVIDIA GPU driver, and CUDA toolkit and domain specific libraries
-
Docker Engine and NVIDIA Container Toolkit
-
Caching NFS data using cachefilesd
-
Tools to convert data disks between RAID levels
-
Disk drive encryption and root filesystem encryption
-
Mellanox OpenFabrics Enterprise Distribution for Linux (MOFED) and Mellanox Software Tools (MST) for systems with Mellanox network cards
1.2. Additional Documentation
-
All documentation for DGX products, including product user guides, software release notes, firmware update container information, and best practices documentation.
-
This document describes the NVIDIA® DGX™ OS 5 software for DGX systems.
-
The new Multi-Instance GPU (MIG) feature allows the NVIDIA A100 GPU to be securely partitioned into up to seven separate GPU Instances for CUDA applications.
-
This document describes how to access the NGC container registry for using containerized deep learning GPU-accelerated applications on your DGX system.
-
Contains instructions for using the NVIDIA System Management software.
-
Contains instructions for using the Data Center GPU Manager software.
1.3. Customer Support
NVIDIA Enterprise Support is the support resource for DGX customers and is able to assist with hardware, software, or NGC application issues. For details on how to obtain support, visit the NVIDIA Enterprise Support website (https://www.nvidia.com/en-us/support/enterprise/)
2. Prerequisites
The following prerequisites are required or recommended, where indicated.
Ubuntu Software Requirements
The DGX Software Stack requires the following software versions:
-
Ubuntu 20.04
-
Linux Kernel 5.4 LTS
Access to Software Repositories
The DGX Software Stack is available from repositories that can be accessed from the internet. If your installation does not allow connection to the internet, see the section Installing the Software on Air-Gapped DGX Systems for information about installing and upgrading software on “air-gapped” systems.
If you are using a proxy server, then follow the instructions in the section Network Configuration for setting up a proxy configuration.
3. Installation Considerations
Installing the NVIDIA DGX Software Stack on Ubuntu allows you to select from additional configuration options that would otherwise not be available with the preconfigured DGX OS installer. This includes drive partitioning, filesystem choices, and software selection.
Before you start installing Ubuntu and the NVIDIA DGX Software Stack, you should evaluate the following options. The installation and configuration instructions will be covered in the respective section of this document.
System Drive Mirroring (RAID-1) [recommended]
The DGX A100 and DGX-2 systems embed two system drives for mirroring the OS partitions (RAID-1). This ensures data resiliency if one drive fails. If you want to enable mIrroring, you need to enable it during the drive configuration of the Ubuntu installation. It cannot be enabled after the installation.
Data Drive RAID-0 or RAID-5
DGX systems are equipped with multiple data drives that can be configured as RAID-0 for performance or RAID-5 for resiliency. RAID-0 provides the maximum storage capacity and performance, but does not provide any redundancy. If a single SSD in the array fails, all data stored on the array is lost.
RAID-0 is recommended for data caching. You can use cachefilesd to provide caching for NFS shares. The network file system (NFS) is required to take advantage of the cache file system. RAID-5 should be used for persistent data storage.
You have the option to configure RAID and data caching after the initial Ubuntu installation using the nvidia-config-raid tool or during the Ubuntu installation. The nvidia-config-raid tool is recommended for manual installation.
System Drive Encryption [optional]
Root filesystem encryption is a software-based method to protect the content stored in the system partition(s) from unauthorized access by encrypting the data on-the-fly. It requires users to unlock the filesystem on every boot, either manually by entering a passphrase or automatically using a centralized key server.
System drive encryption can only be enabled during the installation of Ubuntu.
Data Drive Encryption [optional]
Data drive encryption is only supported on the DGX A100 that is equipped with self-encrypting-drives (SED). It can be enabled after Ubuntu is installed using the nv-encrypt tool. It requires either to store the keys in the TPM or external key-management.
System Drive Partitioning
Ubuntu uses only a single partition for the entire filesystem by default. This can be configured during the Ubuntu installation for deployments that require a more faceted partition scheme for security reasons. The recommended partitioning scheme is to use only a single partition for the Linux root partition with the ext4 filesystem.
4. Installing Ubuntu
There are several methods for installing Ubuntu as described in the Ubuntu Server Guide.
For convenience, this section provides additional instructions that are specific to DGX for installing Ubuntu following the Basic Installation. If you have a preferred method for installing Ubuntu, then you can skip this section.
Steps that are covered in this section:
-
Connecting to the DGX system
-
Booting from the install media
-
Running the Ubuntu installer (including network and storage configuration steps)
4.1. Connecting to the DGX System
During the initial installation and configuration steps, you need to connect to the console of the DGX system. There are several ways to connect to the DGX system, such as through a virtual KVM (keyboard, video, and mouse) using the BMC, or a direct connection with a local monitor and keyboard. Refer to the user guide for a list of supported connection methods and the specific product instructions.
4.2. Booting from the Installation Media
Boot the Ubuntu ISO image in one of the following ways:
-
Remotely through the BMC for systems that provide a BMC.
Refer to the Reimaging the System Remotely section in the corresponding DGX user guide listed above for instructions.
-
Locally from a UEFI-bootable USB flash drive or DVD-ROM.
Refer to Installing the DGX OS Image from a USB Flash Drive or DVD-ROM section in the corresponding DGX user guide listed above for instructions.
Running the Ubuntu Installer
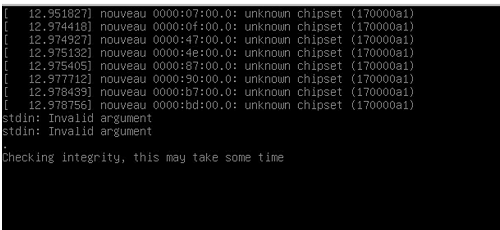
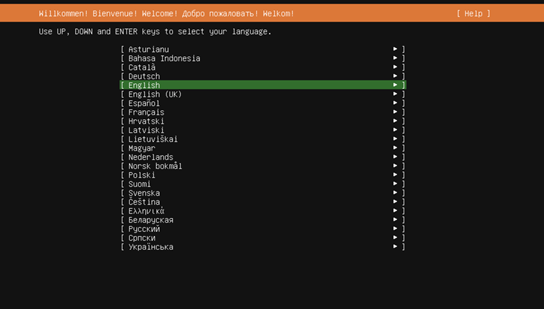
After booting the ISO image, the Ubuntu installer should start and guide you through the installation process.
- Select your language at the welcome screen, then follow the instructions to
select whether to update the installer (if offered) and to choose your
keyboard..
- At the Network connections screen, configure your
network.
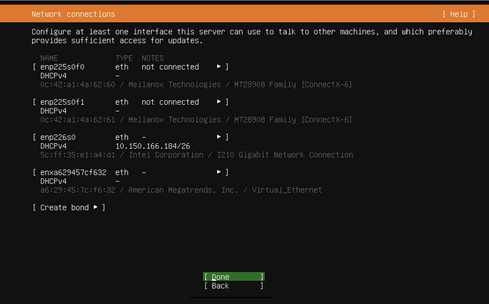
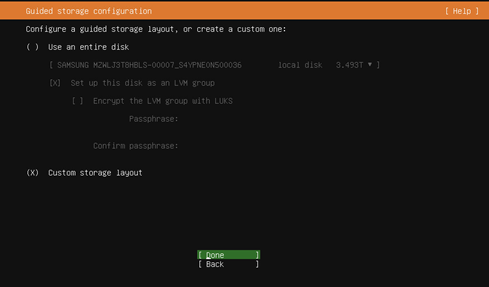
The installer tries to automatically retrieve a DHCP address for all network interfaces, so you should be able to continue without any changes. However, you also have the option to manually configure the interface(s). - At the Guided storage configuration screen, configure
the partitioning and file systems.
All DGX systems are shipped preinstalled with DGX OS. The drives are,
therefore, already partitioned and formatted. DGX OS installer configures a
single ext4 partition for the root partition in addition to the EFI boot
partition.
You have the following options:
- Keep the current partition layout and formatting [recommended]
- Create a custom partition scheme [advanced]
- Use a single disk with the default Ubuntu partition scheme
Note: Note: The RAID level for the data drive can be changed after the installation of Ubuntu.The following instructions describe the steps for keeping the current partition layout. It still requires you to re-create and reformat the partitions.Note: Note: DGX-1 is using a hardware RAID controller and the RAID membership can only be configured in the RAID controller BIOS. The default configuration consists of two virtual devices:- The first virtual device (sda) is a single disk and used as the system drive
- Second virtual device (sdb) consists of the rest of the disks for data.
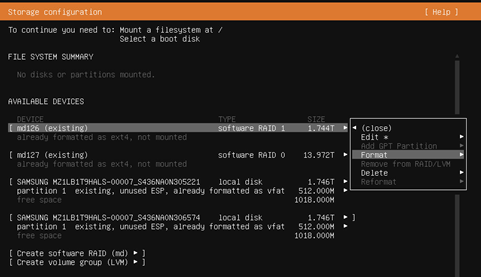
- Select Custom storage layout, then click
Done.
- Identify the system drive.
The system drive on the DGX-2 and DGX A100 is a RAID 1 array and you should find it easily. The DGX-1 has a hardware RAID controller and you will see a single drive as sda.
- Select the system drive and then click
Format.
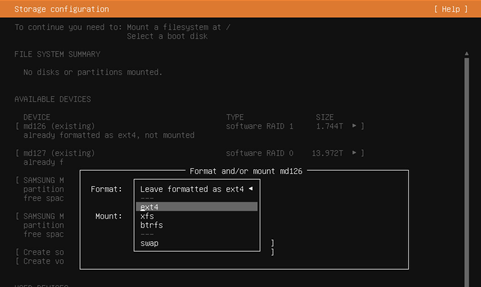
- Set Format to ext4 (do not select “Leave
formatted as <filesystem>”).
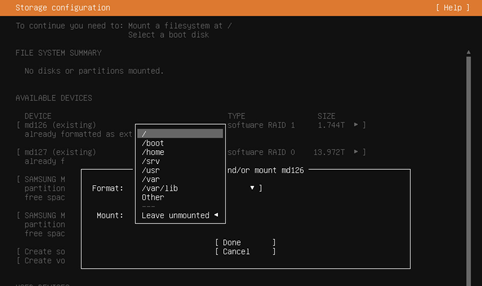
- Set Mount to “/”:
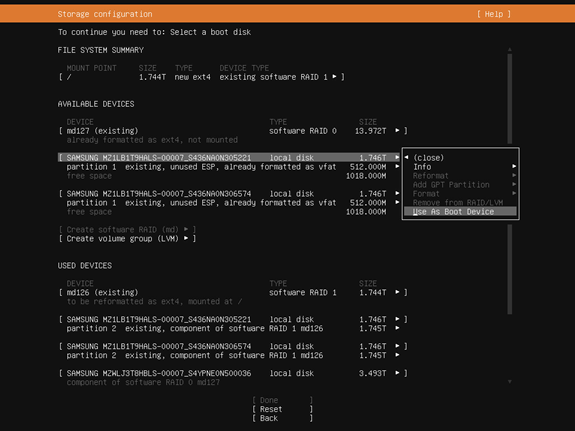
- Set the boot flag on the raw devices.
Identify the system drives under AVAILABLE DEVICES (not the RAID array) and select “Use as Boot Device” for the first device. On DGX-2 and DGX A100 that have two drives, repeat this process for the second drive and select “Use as another Boot Device”.
- Complete the configuration.
- RAID 0 Array: In most cases, the RAID 0 array for the data drives will have already been created from the factory. If it hasn’t been created you can either create them in the Storage configurations dialog or by using the config_raid_array tool after completing the Ubuntu installation.
- (Optional) Enable drive encryption: Note that encryption can only be enabled during the Storage configuration. It cannot be changed after the installation. To change the encryption state again you need to reinstall the OS. To enable drive encryption, you have to create a virtual group and volume. This is out of the scope for this document. Please refer to the Ubuntu documentation for more details.
- Swap Partition: The default installation does not define a swap partition. Linux uses any configured swap partition for temporarily storing data when the system memory is full, incurring a performance hit. With the large memory of DGX systems swapping is not recommended.
The “FILE SYSTEM SUMMARY” at the top of the page should display the root partition on the RAID 1 drive for and a boot/efi partition (the two drives will only show up as a single entry). On DGX-1 with the hardware RAID controller, it will show the root partition on sda.
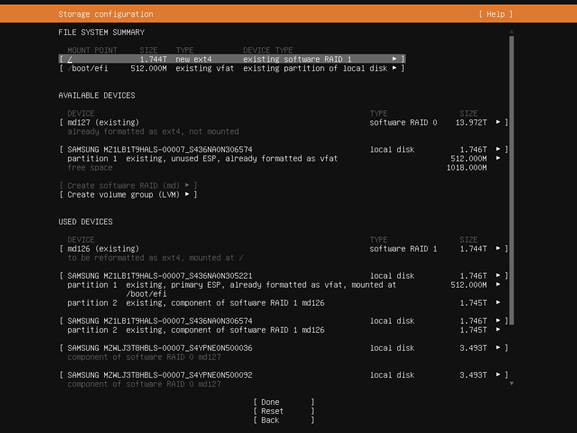
Select Done and accept all changes.
- Follow the instructions for the remaining tasks.
Create a default user in the Profile setup dialog and choose any additional SNAP package you want to install in the Featured Server Snaps screen.
- Wait for the installation to complete.
Log messages are presented while the installation is running.
- Select Reboot Now when the installation is complete to restart the
system.
After reboot, you can log in using the username and password for the user you have created above.
When using LVM, Ubuntu’s default partitioning scheme, DGX-2 users may run into https://bugs.launchpad.net/ubuntu/+source/lvm2/+bug/1834250. The “/dev/sda: open failed: No medium found” messages are harmless, and can be avoided by updating /etc/lvm/lvm.conf with the following filter: "global_filter = ["r|/dev/sda|"]":
5. Installing the DGX Software Stack
This section requires that you have already installed Ubuntu on the DGX and rebooted the system.
 |
Attention:
By installing the DGX Software Stack you are confirming that you have read and agree to be bound by the DGX Software License Agreement. You are also confirming that you understand that any pre-release software and materials available that you elect to install in a DGX may not be fully functional, may contain errors or design flaws, and may have reduced or different security, privacy, availability, and reliability standards relative to commercial versions of NVIDIA software and materials, and that you use pre-release versions at your risk. |
5.1. Installing DGX System Configurations and Tools
The NVIDIA DGX Software Stack includes system-specific configurations and tools to take advantage of the advanced DGX features. They are provided from NVIDIA repositories in the form of software packages that can be installed on top of a typical Ubuntu installation.
All system-specific software components are bundled into meta packages specific to a system:
-
system-configurations
-
system-tools
-
system-tools-ext
For details about the content of these packages, refer to the DGX OS Release Notes.
To enable the NVIDIA repositories and install the system specific packages:
- Enable the NVIDIA repositories by extracting the repository information.
This step adds the URIs and configuration preferences to control the package versions that will be installed to the /etc/apt directory and the GPG keys for the NVIDIA repositories in the /usr/share/keyrings directory.
curl https://repo.download.nvidia.com/baseos/ubuntu/focal/dgx-repo-files.tgz | sudo tar xzf - -C /
- Update the internal APT database with the latest version information of all
packages.
sudo apt update
- Recommended: Upgrade all software packages with the latest
versions.
sudo apt upgrade
- Install the DGX system tools and configurations.
- For DGX-1, install the DGX-1 configurations and DGX-1 system
tools:
sudo apt install -y dgx1-system-configurations dgx1-system-tools dgx1-system-tools-extra
- For DGX-2, install the DGX-2 configurations and DGX-2 system
tools:
sudo apt install -y dgx2-system-configurations dgx2-system-tools dgx2-system-tools-extra
- For DGX A100, install DGX A100 configurations and DGX A100 system
tools:
sudo apt install -y dgx-a100-system-configurations dgx-a100-system-tools dgx-a100-system-tools-extra
- For DGX-1, install the DGX-1 configurations and DGX-1 system
tools:
- Disable the ondemand governor to set the governor to performance mode.
sudo systemctl disable ondemand
- Recommended: Disable unattended upgrades.
Ubuntu periodically checks for security and other bug fixes and automatically installs updates software packages typically overnight. Because this may be disruptive, you should regularly check for updates and install them manually.
sudo apt purge -y unattended-upgrades
- Recommended: Enable serial-over-lan console output. Note: If you have boot drive encryption enabled, the prompt for entering the passphrase and input will be over the serial console if you install this package.
sudo apt install -y nvidia-ipmisol
- Optional: Modify the logrotate policy to collect more
logging information (but size-limited):
sudo apt install -y nvidia-logrotate
The configuration changes will take effect only after rebooting the system. To minimize extra reboots, you can defer this step until after the drivers have been installed later in this document.
5.2. Configuring Data Drives
The data drives in the DGX systems can be configured as RAID 0 or RAID 5. RAID 0 provides the maximum storage capacity and performance, but does not provide any redundancy.
RAID 0 is often used for data caching. You can use cachefilesd to provide a cache for NFS shares.
Except for the DGX-1, the RAID configuration can be configured during the Ubuntu installations. If you have already configured the RAID array during the Ubuntu installation, you can skip the first step and go to step 2.
- Configure the /raid partition.
All DGX systems support RAID 0 and RAID 5 arrays.
- To create a RAID 0 array:
sudo /usr/bin/configure_raid_array.py -c -f
- To create a RAID 5 array:
sudo /usr/bin/configure_raid_array.py -c -f -5
- To create a RAID 0 array:
- Optional: Install tools for managing the self-encrypting drives (SED)
for the data drives on the DGX A100.
This requires to store the keys in the TPM or use external key servers. Refer to the “Managing Self-Encrypting Drives” section in the DGX A100 User Guide for usage information.
- Install the nv-disk-encrypt package.
sudo apt install -y nv-disk-encrypt
- Reboot the system.
sudo reboot
- Install the nv-disk-encrypt package.
- Optional: If you wish to use your RAID array for read caching of NFS
mounts, you can install cachefilesd and set the cachefs option
for an NFS share.
- Install cachefilesd and
nvidia-conf-cachefilesd.
This will update the cachefilesd configuration to use the /raid partition.
sudo apt install -y cachefilesd nvidia-conf-cachefilesd
- Enable caching on all NFS shares you want to cache by setting the
fsc flag.
Edit /etc/fstab and add the fsc flag to the mount options as shown in this example.
<nfs_server>:<export_path> /mnt nfs rw,noatime,rsize=32768,wsize=32768,nolock,tcp,intr,fsc,nofail 0 0
- Mount the NFS share.
If the share is already mounted, use the remount option.
mount <mount-point> -o,remount
- To validate that caching is enabled, issue the following.
cat /proc/fs/nfsfs/volumes
Look for the text FSC=yes in the output of the command. The NFS will be mounted with caching enabled upon subsequent reboot cycles.
- Install cachefilesd and
nvidia-conf-cachefilesd.
5.3. Installing NVIDIA CUDA Drivers
You have the option to choose between different NVIDIA CUDA driver releases for your DGX system. The latest driver release includes new features but might not provide the same support duration as an older release.
Consult the Data Center Driver Release Notes for more details and the minimum required driver release for the GPU architecture.
Use the following command to display a list of installed drivers.
- Ensure to have the latest version of the package database.
sudo apt update
- Display a list of all available drivers.
sudo apt list nvidia-driver*server
Example Output:nvidia-driver-418-server/focal-updates,focal-security 418.226.00-0ubuntu0.20.04.2 amd64 nvidia-driver-440-server/focal-updates,focal-security 450.156.00-0ubuntu0.20.04.2 amd64 . . .
The following steps install the NVIDIA CUDA driver and configure the system. Replace the release version used as an example (450) with the release you want to install. Ensure that the driver release you intend to install is supported by the GPU in the system. - Ensure to have the latest version of the package database.
sudo apt update
- Ensure you have the latest kernel version installed.
The driver package has a dependency to the kernel and updating the database might have updated the version information.
sudo apt install -y linux-generic
- Install NVIDIA CUDA driver.
- For non-NVswitch systems like
DGX-1:
sudo apt install -y nvidia-driver-470-server linux-modules-nvidia-470-server-generic libnvidia-nscq-470 nvidia-modprobe datacenter-gpu-manager nv-persistence-mode
- For NVswitch systems like DGX-2 and DGX A100, be sure to also install
the fabric-manager package:
sudo apt install -y nvidia-driver-470-server linux-modules-nvidia-470-server-generic libnvidia-nscq-470 nvidia-modprobe nvidia-fabricmanager-470 datacenter-gpu-manager nv-persistence-mode
- For non-NVswitch systems like
DGX-1:
- Enable the persistenced daemon and other services:
- For non-NVswitch systems, such as
DGX-1:
sudo systemctl enable nvidia-persistenced nvidia-dcgm
- For NVswitch systems like DGX-2 and DGX A100, be sure to also enable the
NVIDIA fabric manager service:
sudo systemctl enable nvidia-fabricmanager nvidia-persistenced nvidia-dcgm
- For non-NVswitch systems, such as
DGX-1:
- Reboot the system to load the drivers and to update system configurations.
- Issue reboot.
sudo reboot
- After the system has rebooted, verify that the drivers have been loaded
and are handling the NVIDIA devices.
nvidia-smi
The output should show all available GPUs and show the Persistence-Mode ‘On’:+-----------------------------------------------------------------------------+ | NVIDIA-SMI 450.119.04 Driver Version: 450.119.04 CUDA Version: 11.4 | |----------------------------+----------------------+-----------------------+ | GPU Name Persistence-M| Bus-Id Disp.A | Volatile Uncorr. ECC | | Fan Temp Perf Pwr:Usage/Cap| Memory-Usage | GPU-Util Compute M. | | | | MIG M. | |============================+======================+=======================| | 0 Tesla V100-SXM2... On | 00000000:06:00.0 Off | 0 | | N/A 35C P0 42W / 300W | 0MiB / 16160MiB | 0% Default | | | | N/A | +----------------------------+----------------------+-----------------------+ | 1 Tesla V100-SXM2... On | 00000000:07:00.0 Off | 0 | | N/A 35C P0 44W / 300W | 0MiB / 16160MiB | 0% Default | | | | N/A | +----------------------------+----------------------+-----------------------+ ... +----------------------------+----------------------+-----------------------+ | 7 Tesla V100-SXM2... On | 00000000:8A:00.0 Off | 0 | | N/A 35C P0 43W / 300W | 0MiB / 16160MiB | 0% Default | | | | N/A | +----------------------------+----------------------+-----------------------+ +---------------------------------------------------------------------------+ | Processes: | | GPU GI CI PID Type Process name GPU Memory | | ID ID Usage | |===========================================================================| | No running processes found | +---------------------------------------------------------------------------+
- Issue reboot.
5.4. Installing the Mellanox OpenFabrics Enterprise Distribution (MLNX_OFED)
DGX systems include high-performance network cards to connect to other systems over Infiniband or Ethernet. You have the option between the driver included in Ubuntu and the Mellanox OpenFabrics Enterprise Distribution (Mellanox OFED or MOFED). MOFED provides the necessary drivers and system software required for multi-node GPU applications, allowing the system to transfer data between GPUs of different systems directly (RDMA) without having to copy the data to the system memory. This also requires the nv-peer-memory module.
The following steps install MOFED and all the required additional software.
- Install the MOFED Driver
sudo apt install -y mlnx-ofed-all nvidia-mlnx-ofed-misc
- Enable and start the openibd service:
sudo systemctl enable --now openibd
- Enable nv-peer-mem. This service loads the peer-mem module on every boot.
sudo update-rc.d nv_peer_mem defaults
5.5. Installing Docker and the NVIDIA Container Toolkit
Containers provide isolated environments with a full filesystem of the required software for specific applications. To use the NVIDIA provided containers for AI and other frameworks on the DGX and GPUs, you need to install Docker and the NVIDIA Container Toolkit. It takes care of providing access to the GPUs to the software running inside the container.
Note that these tools are also required by the Firmware Update Containers for upgrading the system firmware.
- Install docker-ce, NVIDIA Container Toolkit, and optimizations for typical DL
workload.
sudo apt install -y docker-ce nvidia-container-toolkit nv-docker-options
- Restart the docker daemon.
sudo systemctl restart docker
To validate the installation, run a container and check that it can access the GPUs. The following instructions assume that the NVIDIA GPU driver has been installed and loaded.
- Execute the following command start a container and run the nvidia-smi tool
inside the container:
sudo docker run --gpus=all --rm nvcr.io/nvidia/cuda:11.0-base nvidia-smi
Example Output+-----------------------------------------------------------------------------+ | NVIDIA-SMI 450.102.04 Driver Version: 450.102.04 CUDA Version: 11.0 | |-------------------------------+----------------------+----------------------+ | GPU Name Persistence-M| Bus-Id Disp.A | Volatile Uncorr. ECC | | Fan Temp Perf Pwr:Usage/Cap| Memory-Usage | GPU-Util Compute M. | | | | MIG M. | |===============================+======================+======================| | 0 Tesla V100-SXM2... On | 00000000:06:00.0 Off | 0 | | N/A 35C P0 42W / 300W | 0MiB / 16160MiB | 0% Default | | | | N/A | +-------------------------------+----------------------+----------------------+ | 1 Tesla V100-SXM2... On | 00000000:07:00.0 Off | 0 | | N/A 35C P0 44W / 300W | 0MiB / 16160MiB | 0% Default | | | | N/A | +-------------------------------+----------------------+----------------------+ ... +-------------------------------+----------------------+----------------------+ | 7 Tesla V100-SXM2... On | 00000000:8A:00.0 Off | 0 | | N/A 35C P0 43W / 300W | 0MiB / 16160MiB | 0% Default | | | | N/A | +-------------------------------+----------------------+----------------------+ +-----------------------------------------------------------------------------+ | Processes: | | GPU GI CI PID Type Process name GPU Memory | | ID ID Usage | |=============================================================================| | No running processes found | +-----------------------------------------------------------------------------+
- Verify that the output shows all available GPUs and has Persistence-Mode set to On.
5.6. Installing the NVIDIA System Management (NVSM) Tool [Recommended]
The NVIDIA System Management (NVSM) is a software framework for monitoring NVIDIA DGX nodes in a data center. It allows customers to get a quick health report of the system and is typically required by the NVIDIA support team to resolve issues.
The following steps install and configure NVSM.
- Install the NVIDIA System Management tool (NVSM):
sudo apt install -y nvsm
- Optional: Modify message-of-the-day (MOTD) to display NVSM health monitoring
alerts and release information.
sudo apt install -y nvidia-motd
6. Installing Additional Software
The Ubuntu and the NVIDIA repositories provide many additional software packages for a variety of applications. The DGX OS Installer, for example, installs several additional software packages to aid system administration and developers that are not installed by default.
The following steps install the additional software packages that get installed by the DGX OS Installer:
- Install additional software for system administration tasks:
sudo apt install -y chrpath cifs-utils fping gdisk iperf ipmitool lsscsi net-tools nfs-common quota rasdaemon pm-utils samba-common samba-libs sysstat vlan
- Install additional software for development tasks:
sudo apt install -y build-essential automake bison cmake dpatch flex gcc-multilib gdb g++-multilib libelf-dev libltdl-dev linux-tools-generic m4 swig
The NVIDIA CUDA Developer repository provides an easy mechanism to deploy NVIDIA tools and libraries, such as the CUDA toolkit, cuDNN, or NCCL.
Refer also to Installing Additional Software for more information about installing and upgrading software packages.
7. Additional Software and Configuration Options
A. Third-Party License Notices
This NVIDIA product contains third party software that is being made available to you under their respective open source software licenses. Some of those licenses also require specific legal information to be included in the product. This section provides such information.
A.1. Mellanox (OFED)
Copyright (c) 2006 Mellanox Technologies.
All rights reserved.

Redistribution and use in source and binary forms, with or without modification, are permitted provided that the following conditions are met:

1. Redistributions of source code must retain the above copyright notice, this list of conditions and the following disclaimer.
2. Redistributions in binary form must reproduce the above copyright notice, this list of conditions and the following disclaimer in the documentation and/or other materials provided with the distribution.

THIS SOFTWARE IS PROVIDED BY THE COPYRIGHT HOLDERS AND CONTRIBUTORS "AS IS" AND ANY EXPRESS OR IMPLIED WARRANTIES, INCLUDING, BUT NOT LIMITED TO, THE IMPLIED WARRANTIES OF MERCHANTABILITY AND FITNESS FOR A PARTICULAR PURPOSE ARE DISCLAIMED.
IN NO EVENT SHALL THE COPYRIGHT HOLDER OR CONTRIBUTORS BE LIABLE FOR ANY DIRECT, INDIRECT, INCIDENTAL, SPECIAL, EXEMPLARY, OR CONSEQUENTIAL DAMAGES (INCLUDING, BUT NOT LIMITED TO, PROCUREMENT OF SUBSTITUTE GOODS OR SERVICES; LOSS OF USE, DATA, OR PROFITS; OR BUSINESS INTERRUPTION) HOWEVER CAUSED AND ON ANY THEORY OF LIABILITY, WHETHER IN CONTRACT, STRICT LIABILITY, OR TORT (INCLUDING NEGLIGENCE OR OTHERWISE) ARISING IN ANY WAY OUT OF THE USE OF THIS SOFTWARE, EVEN IF ADVISED OF THE POSSIBILITY OF SUCH DAMAGE.Concept definition.
A.2. msecli
Micron Technology, Inc. Software License Agreement
PLEASE READ THIS LICENSE AGREEMENT ("AGREEMENT") FROM MICRON TECHNOLOGY, INC. ("MTI") CAREFULLY: BY INSTALLING, COPYING OR OTHERWISE
USING THIS SOFTWARE AND ANY RELATED PRINTED MATERIALS ("SOFTWARE"), YOU ARE ACCEPTING AND AGREEING TO THE TERMS OF THIS AGREEMENT. IF YOU DONOT AGREE WITH THE TERMS OF THIS AGREEMENT, DO NOT INSTALL THE
SOFTWARE. LICENSE: MTI hereby grants to you the following rights: You may use and make one

(1) backup copy the Software subject to the terms of this Agreement. You must maintain all copyright notices on all copies of the Software. You agree not to modify, adapt, decompile, reverse engineer, disassemble, or otherwise
translate the Software. MTI may make changes to the Software at any time
without notice to you. In addition MTI is under no obligation whatsoever to update, maintain, or provide new versions or other support for the Software.
OWNERSHIP OF MATERIALS: You acknowledge and agree that the Software is proprietary property of MTI (and/or its licensors) and is protected by
United States copyright law and international treaty provisions. Except as expressly provided herein, MTI does not grant any express or implied right
to you under any patents, copyrights, trademarks, or trade secret information. You further acknowledge and agree that all right, title, and
interest in and to the Software, including associated proprietary rights, are and shall remain with MTI (and/or its licensors). This Agreement does not convey to you an interest in or to the Software, but only
a limited right to use and copy the Software in accordance with the terms of this Agreement. The Software is licensed to you and not sold.
DISCLAIMER OF WARRANTY: THE SOFTWARE IS PROVIDED "AS IS" WITHOUT WARRANTY OF ANY KIND. MTI EXPRESSLY DISCLAIMS ALL WARRANTIES EXPRESS ORmIMPLIED, INCLUDING BUT NOT LIMITED TO, NONINFRINGEMENT OF THIRD PARTY
RIGHTS, AND ANY IMPLIED WARRANTIES OF MERCHANTABILITY OR FITNESS FOR ANY PARTICULAR PURPOSE. MTI DOES NOT WARRANT THAT THE SOFTWARE WILL MEET YOUR
REQUIREMENTS, OR THAT THE OPERATION OF THE SOFTWARE WILL BE UNINTERRUPTED OR ERROR-FREE. FURTHERMORE, MTI DOES NOT MAKE ANY
REPRESENTATIONS REGARDING THE USE OR THE RESULTS OF THE USE OF THE SOFTWARE IN TERMS OF ITS CORRECTNESS, ACCURACY, RELIABILITY, OR
OTHERWISE. THE ENTIRE RISK ARISING OUT OF USE OR PERFORMANCE OF THE SOFTWARE REMAINS WITH YOU. IN NO EVENT SHALL MTI, ITS AFFILIATED
COMPANIES OR THEIR SUPPLIERS BE LIABLE FOR ANY DIRECT, INDIRECT, CONSEQUENTIAL, INCIDENTAL, OR SPECIAL DAMAGES (INCLUDING, WITHOUT
LIMITATION, DAMAGES FOR LOSS OF PROFITS, BUSINESS INTERRUPTION, OR LOSS OF INFORMATION) ARISING OUT OF YOUR USE OF OR INABILITY TO USE THE
SOFTWARE, EVEN IF MTI HAS BEEN ADVISED OF THE POSSIBILITY OF SUCH DAMAGES. Because some jurisdictions prohibit the exclusion or limitation ofliability for consequential or incidental damages, the above limitation may
not apply to you.

TERMINATION OF THIS LICENSE: MTI may terminate this license at any time if you are in breach of any of the terms of this Agreement. Upon termination,
you will immediately destroy all copies the Software.

GENERAL: This Agreement constitutes the entire agreement between MTI and you
regarding the subject matter hereof and supersedes all previous oral or written communications between the parties. This Agreement shall be governed
by the laws of the State of Idaho without regard to its conflict of laws rules.

CONTACT: If you have any questions about the terms of this Agreement, please contact MTI's legal department at (208) 368-4500.
By proceeding with the installation of the Software, you agree to the terms of this Agreement. You must agree to the terms in order to install and use
the Software.
Notices
VESA DisplayPort
DisplayPort and DisplayPort Compliance Logo, DisplayPort Compliance Logo for Dual-mode Sources, and DisplayPort Compliance Logo for Active Cables are trademarks owned by the Video Electronics Standards Association in the United States and other countries.