

Deploy the RAG Ingestion Pipeline#
For multimodal enterprise data with tables, charts and images deploy the NeMo Retriever (NV-Ingest) NIM microservices with Multi-Instance GPU (MIG) using supported GPU profiles or Run:ai (timeslicing) GPU Fractions on Kubernetes. The Nemo Retriever (NV-Ingest) data extraction workloads are more CPU intensive and NIM microservices require only a slice or fraction of GPU at time.
The RAG ingestion pipeline requires a minimum of 3 nodes in order to deploy NeMo Retriever (NV-Ingest) (with Embedding and Extraction NIM microservices) and Milvus (Distributed) vector DB installed separately. Milvus (Distributed) requires a minimum of 3X etcd nodes with fast local NVME disks. The RAG ingestion pipeline requires nodes with sufficient compute, both GPU and CPU/Memory (RAM):
Minimum 2 GPUs; Total: 4-8 GPUs for ingestion scaling and benchmarking
Per node CPU / Memory (RAM): 64 cores (vCPUs)/ 256GB RAM.
For an Enterprise RA 2-8-5-200 cluster of RTX PRO 6000 or H200 NVL with 16 nodes, 128 GPUs, carve out 3 worker nodes with a maximum of 4-8 GPUs for RAG ingestion scaling and benchmarking. RAG ingestion workloads are more CPU/Memory bound than GPU bound. On these 3 nodes, carve out a subset of 4-8 GPUs and configure MIG profiles or Run:ai GPU fractions. Deploy NeMo Retriever Embedding NIM, Extraction NIM and Milvus Vector DB indexing services are deployed on MIG instances or Run:ai GPU fractions with Bin packing.
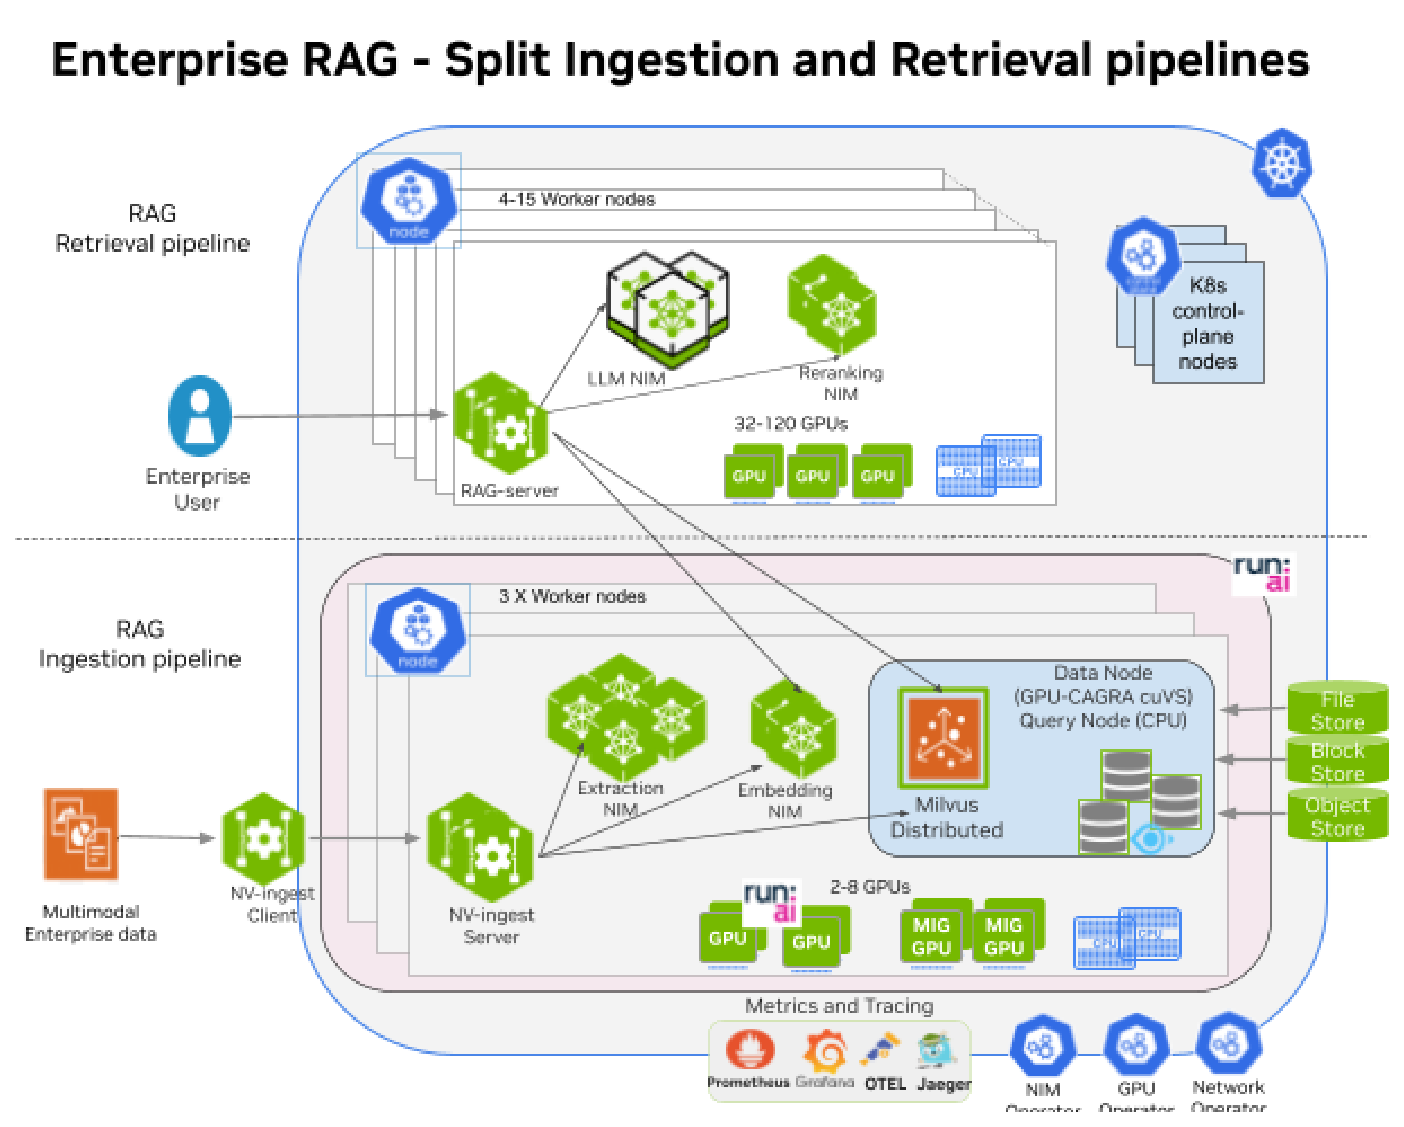
Figure 9 Enterprise RAG Deployment splitting ingestion and retrieval pipelines#
Deploy the NeMo Retriever (NV-Ingest) with Helm with Embedding and Extraction NIM microservices using either MIG profiles or Run:ai GPU fractions as defined below. Deploy Milvus (Distributed) with data node using MIG profile or Run:ai GPU fraction defined below:
NIM or service |
MIG RTX PRO 6K |
MIG H200 NVL |
Run:ai GPU |
CPU/Mem |
|---|---|---|---|---|
llama-nemotron-embed-1b-v2 |
mig-2g.48gb |
mig-4g.71gb |
0.5 GPU |
4 vCPU, 8 GiB |
nemotron-ocr-v1 |
mig-2g.48gb |
mig-3g.71gb |
0.4 GPU |
3 vCPU, 4 GiB |
nemotron-page-elements-v3 |
mig-1g.24gb |
mig-2g.35gb |
0.3 GPU |
1 vCPU, 2 GiB |
nemotron-table-structure-v1 |
mig-1g.24gb |
mig-1g.18gb |
0.2 GPU |
0.5 vCPU, 3.5 GiB |
nemotron-graphic-elements-v1 |
mig-1g.24gb |
mig-1g.18gb |
0.1 GPU |
0.5 vCPU, 3 GiB |
Milvus data node |
mig-1g.24gb |
mig-1g.18gb |
0.25 GPU |
4 vCPU, 8 GiB |
Then use NV-Ingest client to perform RAG ingestion benchmarking and/or accuracy evaluation with multimodal enterprise dataset e.g. digital corpora (bo767 dataset). Increase document concurrency and scale out NIM microservices on additional MIG instances or Run:ai GPU fractions to increase the document ingestion rate.
Configure MIG#
The Enterprise RA 2-8-5-200 cluster of RTX PRO 6000 or H200 NVL consists of 1 to 8 scalable units (SUs) of 4 nodes with 32 GPUs each. For a single SU (4 nodes) enable MIG on a single node: 3 nodes full GPUs and 1 node MIG.
To enable MIG on a single node with multiple RTX PRO 6000 in a Kubernetes cluster, use or create a custom MIG configuration by following steps below (similar to RAG blueprint MIG deployment guide):
Step 1: Set GPU Operator MIG strategy#
When installing or upgrading the GPU Operator set the MIG strategy to mixed to support a
subset of GPUs with MIG enabled on the node.
single: (default) same MIG config is enabled on all GPUs on the node.mixed: different MIG config is enabled on GPUs on the node.
helm upgrade --install gpu-operator --wait  -n gpu-operator  nvidia/gpu-operator \
--version=v25.10.0  --set mig.strategy=mixed
Update or patch an existing GPU operator’s ClusterPolicy MIG strategy to mixed:
kubectl patch clusterpolicies.nvidia.com/cluster-policy --type='json' \
-p='[{"op":"replace", "path":"/spec/mig/strategy", "value":"mixed"}]'
Step 2a: Create custom MIG configMap and apply#
To enable mixed MIG config on only 4 X RTX PRO 6000 in a Kubernetes cluster, create a custom MIG configuration by following steps below (similar to RAG blueprint MIG deployment guide).
Create a custom MIG configuration configMap for RTX PRO 6000 => mig-config-rtx6k.yaml as shown below:
apiVersion: v1
kind: ConfigMap
metadata:
  name: rtx6k-mig-config # define a new configMap for the MIG manager
data:
  config.yaml: |
    version: v1
    mig-configs:
      all-disabled:
        - devices: all
          mig-enabled: false

      mig-rtx6k-4x1g24-2x1g24:
        - devices: [0]
          mig-enabled: true
          mig-devices:
            "1g.24gb": 4
        - devices: [1]
          mig-enabled: true
          mig-devices:
            "2g.48gb": 2
        - devices: [2]
          mig-enabled: true
          mig-devices:
            "1g.24gb": 4
        - devices: [3]
          mig-enabled: true
          mig-devices:
            "2g.48gb": 2
Apply the configMap mig-config-rtx6k.yaml in the GPU operator namespace.
Then patch the clusterPolicy so that the MIG manager uses the new configMap
rtx6k-mig-config:
kubectl apply -n gpu-operator -f mig-config-rtx6k.yaml
kubectl patch clusterpolicies.nvidia.com/cluster-policy --type='json' \
  -p='[{"op":"replace", "path":"/spec/migManager/config/name", "value":"rtx6k-mig-config"}]'
Step 2b: Use a predefined mixed MIG configMap profile#
MIG Manager uses the default-mig-parted-config config map in the GPU Operator
namespace to identify supported MIG profiles.
Choose an existing mixed MIG profile e.g. [all-balanced](https://docs.nvidia.com/datacenter/cloud-native/gpu-operator/latest/gpu-operator-mig.html#example-mixed-mig-strategy) that can be applied to all 8 X RTX
PRO 6000 on the node:
apiVersion: v1
kind: ConfigMap
metadata:
  name: default-mig-parted-config # default MIG Manager configMap
data:
  config.yaml: |
    version: v1
    mig-configs:
      all-disabled:
        - devices: all
          mig-enabled: false
      ...
      all-balanced:
      # RTX-PRO-6000-96GB\n
        - device-filter: ["0x2BB510DE"]
        - devices: all
          mig-enabled: true
          mig-devices:
            "1g.24gb": 2
            "2g.48gb": 1
Step 3a: Label the node with the custom MIG config label#
Cordon and drain the node before updating the MIG config label, to ensure the GPUs are not in use when apply the MIG config:
kubectl cordon  <node-name>
kubectl drain  <node-name> --ignore-daemonsets --delete-emptydir-data --force
Label the node with the MIG config label nvidia.com/mig-rtx6k-4x1g24-2x1g24:
kubectl label nodes <node-name> nvidia.com/mig.config=mig-rtx6k-4x1g24-2x1g24 --overwrite
Verify that the MIG config was applied to the node:
kubectl get node <node-name> -o=jsonpath='{.metadata.labels}' | jq . | grep mig
kubectl get node <node-name> -o=jsonpath='{.metadata.labels}' | jq . | grep mig
..
  "nvidia.com/mig-1g.24gb.count": "8",
..
  "nvidia.com/mig-2g.48gb.count": "4",
..
  "nvidia.com/mig.config": "mig-rtx6k-4x1g24-2x1g24",
  "nvidia.com/mig.config.state": "success",
  "nvidia.com/mig.strategy": "mixed",
Step 3b: Label the node with the predefined MIG config label#
Label the node with the MIG config label nvidia.com/all-balanced:
kubectl label nodes <node-name> nvidia.com/mig.config=all-balanced --overwrite
Verify that the MIG config was applied to the node:
kubectl get node <node-name> -o=jsonpath='{.metadata.labels}' | jq . | grep mig
kubectl get node <node-name> -o=jsonpath='{.metadata.labels}' | jq . | grep mig
..
  "nvidia.com/mig-1g.24gb.count": "16",
..
  "nvidia.com/mig-2g.48gb.count": "8",
..
  "nvidia.com/mig.config": "all-balanced",
  "nvidia.com/mig.config.state": "success",
  "nvidia.com/mig.strategy": "mixed",
Verify MIG configuration with nvidia-smi:
ssh era-worker16 nvidia-smi
Sat Mar 21 02:19:42 2026
+-----------------------------------------------------------------------------------------+
| NVIDIA-SMI 580.95.05              Driver Version: 580.95.05      CUDA Version: 13.0     |
+-----------------------------------------+------------------------+----------------------+
| GPU  Name                 Persistence-M | Bus-Id          Disp.A | Volatile Uncorr. ECC |
| Fan  Temp   Perf          Pwr:Usage/Cap |           Memory-Usage | GPU-Util  Compute M. |
|                                         |                        |               MIG M. |
|=========================================+========================+======================|
|   0  NVIDIA RTX PRO 6000 Blac...    Off |   00000000:03:00.0 Off |                   On |
| N/A   27C    P8             32W /  600W |     256MiB /  97887MiB |     N/A      Default |
|                                         |                        |              Enabled |
+-----------------------------------------+------------------------+----------------------+
|   1  NVIDIA RTX PRO 6000 Blac...    Off |   00000000:04:00.0 Off |                   On |
| N/A   27C    P8             32W /  600W |     256MiB /  97887MiB |     N/A      Default |
|                                         |                        |              Enabled |
+-----------------------------------------+------------------------+----------------------+
|   2  NVIDIA RTX PRO 6000 Blac...    Off |   00000000:73:00.0 Off |                   On |
| N/A   27C    P8             32W /  600W |     256MiB /  97887MiB |     N/A      Default |
|                                         |                        |              Enabled |
+-----------------------------------------+------------------------+----------------------+
|   3  NVIDIA RTX PRO 6000 Blac...    Off |   00000000:74:00.0 Off |                   On |
| N/A   26C    P8             34W /  600W |     256MiB /  97887MiB |     N/A      Default |
|                                         |                        |              Enabled |
+-----------------------------------------+------------------------+----------------------+
|   4  NVIDIA RTX PRO 6000 Blac...    Off |   00000000:83:00.0 Off |                   On |
| N/A   26C    P8             32W /  600W |     256MiB /  97887MiB |     N/A      Default |
|                                         |                        |              Enabled |
+-----------------------------------------+------------------------+----------------------+
|   5  NVIDIA RTX PRO 6000 Blac...    Off |   00000000:84:00.0 Off |                   On |
| N/A   26C    P8             34W /  600W |     256MiB /  97887MiB |     N/A      Default |
|                                         |                        |              Enabled |
+-----------------------------------------+------------------------+----------------------+
|   6  NVIDIA RTX PRO 6000 Blac...    Off |   00000000:F3:00.0 Off |                   On |
| N/A   27C    P8             33W /  600W |     256MiB /  97887MiB |     N/A      Default |
|                                         |                        |              Enabled |
+-----------------------------------------+------------------------+----------------------+
|   7  NVIDIA RTX PRO 6000 Blac...    Off |   00000000:F4:00.0 Off |                   On |
| N/A   26C    P8             33W /  600W |     256MiB /  97887MiB |     N/A      Default |
|                                         |                        |              Enabled |
+-----------------------------------------+------------------------+----------------------+

+-----------------------------------------------------------------------------------------+
| MIG devices:                                                                            |
+------------------+----------------------------------+-----------+-----------------------+
| GPU  GI  CI  MIG |              Shared Memory-Usage |        Vol|        Shared         |
|      ID  ID  Dev |                Shared BAR1-Usage | SM     Unc| CE ENC  DEC  OFA  JPG |
|                  |                                  |        ECC|                       |
|==================+==================================+===========+=======================|
|  0    1   0   0  |             128MiB / 48512MiB    | 94      0 |  2   2    2    0    2 |
|                  |               0MiB / 16654MiB    |           |                       |
+------------------+----------------------------------+-----------+-----------------------+
|  0    5   0   1  |              64MiB / 24192MiB    | 46      0 |  1   1    1    0    1 |
|                  |               0MiB /  8327MiB    |           |                       |
+------------------+----------------------------------+-----------+-----------------------+
|  0    6   0   2  |              64MiB / 24192MiB    | 46      0 |  1   1    1    0    1 |
|                  |               0MiB /  8327MiB    |           |                       |
+------------------+----------------------------------+-----------+-----------------------+
|  1    1   0   0  |             128MiB / 48512MiB    | 94      0 |  2   2    2    0    2 |
|                  |               0MiB / 16654MiB    |           |                       |
+------------------+----------------------------------+-----------+-----------------------+
|  1    5   0   1  |              64MiB / 24192MiB    | 46      0 |  1   1    1    0    1 |
|                  |               0MiB /  8327MiB    |           |                       |
+------------------+----------------------------------+-----------+-----------------------+
|  1    6   0   2  |              64MiB / 24192MiB    | 46      0 |  1   1    1    0    1 |
|                  |               0MiB /  8327MiB    |           |                       |
+------------------+----------------------------------+-----------+-----------------------+
|  2    1   0   0  |             128MiB / 48512MiB    | 94      0 |  2   2    2    0    2 |
|                  |               0MiB / 16654MiB    |           |                       |
+------------------+----------------------------------+-----------+-----------------------+
|  2    5   0   1  |              64MiB / 24192MiB    | 46      0 |  1   1    1    0    1 |
|                  |               0MiB /  8327MiB    |           |                       |
+------------------+----------------------------------+-----------+-----------------------+
|  2    6   0   2  |              64MiB / 24192MiB    | 46      0 |  1   1    1    0    1 |
|                  |               0MiB /  8327MiB    |           |                       |
+------------------+----------------------------------+-----------+-----------------------+
|  3    1   0   0  |             128MiB / 48512MiB    | 94      0 |  2   2    2    0    2 |
|                  |               0MiB / 16654MiB    |           |                       |
+------------------+----------------------------------+-----------+-----------------------+
|  3    5   0   1  |              64MiB / 24192MiB    | 46      0 |  1   1    1    0    1 |
|                  |               0MiB /  8327MiB    |           |                       |
+------------------+----------------------------------+-----------+-----------------------+
|  3    6   0   2  |              64MiB / 24192MiB    | 46      0 |  1   1    1    0    1 |
|                  |               0MiB /  8327MiB    |           |                       |
+------------------+----------------------------------+-----------+-----------------------+
|  4    1   0   0  |             128MiB / 48512MiB    | 94      0 |  2   2    2    0    2 |
|                  |               0MiB / 16654MiB    |           |                       |
+------------------+----------------------------------+-----------+-----------------------+
|  4    5   0   1  |              64MiB / 24192MiB    | 46      0 |  1   1    1    0    1 |
|                  |               0MiB /  8327MiB    |           |                       |
+------------------+----------------------------------+-----------+-----------------------+
|  4    6   0   2  |              64MiB / 24192MiB    | 46      0 |  1   1    1    0    1 |
|                  |               0MiB /  8327MiB    |           |                       |
+------------------+----------------------------------+-----------+-----------------------+
|  5    1   0   0  |             128MiB / 48512MiB    | 94      0 |  2   2    2    0    2 |
|                  |               0MiB / 16654MiB    |           |                       |
+------------------+----------------------------------+-----------+-----------------------+
|  5    5   0   1  |              64MiB / 24192MiB    | 46      0 |  1   1    1    0    1 |
|                  |               0MiB /  8327MiB    |           |                       |
+------------------+----------------------------------+-----------+-----------------------+
|  5    6   0   2  |              64MiB / 24192MiB    | 46      0 |  1   1    1    0    1 |
|                  |               0MiB /  8327MiB    |           |                       |
+------------------+----------------------------------+-----------+-----------------------+
|  6    1   0   0  |             128MiB / 48512MiB    | 94      0 |  2   2    2    0    2 |
|                  |               0MiB / 16654MiB    |           |                       |
+------------------+----------------------------------+-----------+-----------------------+
|  6    5   0   1  |              64MiB / 24192MiB    | 46      0 |  1   1    1    0    1 |
|                  |               0MiB /  8327MiB    |           |                       |
+------------------+----------------------------------+-----------+-----------------------+
|  6    6   0   2  |              64MiB / 24192MiB    | 46      0 |  1   1    1    0    1 |
|                  |               0MiB /  8327MiB    |           |                       |
+------------------+----------------------------------+-----------+-----------------------+
|  7    1   0   0  |             128MiB / 48512MiB    | 94      0 |  2   2    2    0    2 |
|                  |               0MiB / 16654MiB    |           |                       |
+------------------+----------------------------------+-----------+-----------------------+
|  7    5   0   1  |              64MiB / 24192MiB    | 46      0 |  1   1    1    0    1 |
|                  |               0MiB /  8327MiB    |           |                       |
+------------------+----------------------------------+-----------+-----------------------+
|  7    6   0   2  |              64MiB / 24192MiB    | 46      0 |  1   1    1    0    1 |
|                  |               0MiB /  8327MiB    |           |                       |
+------------------+----------------------------------+-----------+-----------------------+
+-----------------------------------------------------------------------------------------+
| Processes:                                                                              |
|  GPU   GI   CI              PID   Type   Process name                        GPU Memory |
|        ID   ID                                                               Usage      |
|=========================================================================================|
|  No running processes found                                                             |
+-----------------------------------------------------------------------------------------+
Step 4: Remove MIG config on the node#
By default, nodes are labeled with nvidia.com/mig.config:all-disabled.
To disable MIG on the node update the label:
kubectl label nodes <node-name> nvidia.com/mig.config=all-disabled --overwrite
Configure Run:ai#
To deploy Run:ai along with Kubernetes on the Enterprise RA using the guide below or follow Run:ai installation on self hosted cluster using Helm:
NVIDIA Software Reference Stack and automation for Enterprise RA - Run:ai on Vanilla Kubernetes: NVOnline: 1142319
Once Run:ai is deployed on the Enterprise RA 285-200 Kubernetes cluster, configure Run:ai for RAG deployment using the following steps.
Step 1: Connect to the Run:ai user interface (UI)#
Connect to the run:ai user interface by opening the browser to the Run:ai DNS resolvable Fully Qualified Domain Name (FQDN) used when installing the control plane and login using the cluster admin credentials defined at installation.
For example: [https://runai.era285.nvidia.com/](https://runai.era285.nvidia.com/)
Step 2: Label Run:ai worker nodes#
Label Run:ai worker nodes to be used for RAG ingestion workloads with a custom label e.g.
runai=rag-ingest:
kubectl label nodes <node-name> runai=rag-ingest
kubectl label nodes era-worker1 era-worker2 era-worker3 runai=rag-ingest
To remove a node from Run:ai worker pool, unset the label on the node:
kubectl label nodes <node-name> runai-
kubectl label nodes era-worker3 runai-
Step 3: Create a NodePool#
By default all nodes in the Run:ai cluster are allocated to the default nodepool and available for AI workload deployment.
Create a new NodePool “rag-ingest” using the API or UI. Set the NodePool Label to the
Label Key and Value, runai=rag-ingest, defined in the previous step to label the 3
worker nodes that will be used to deploy the ingestion workloads.
For the rag-ingest nodepool use the placement strategy as Bin Packing instead of Spread to ensure the GPUs are efficiently packed and workloads are not spread across multiple GPUs resulting in additional spare capacity.
More nodes can be added to the nodepool by setting the node label runai=rag-ingest.
In the UI navigate to Resources>Nodepools and click +NEW NODEPOOL as shown below:
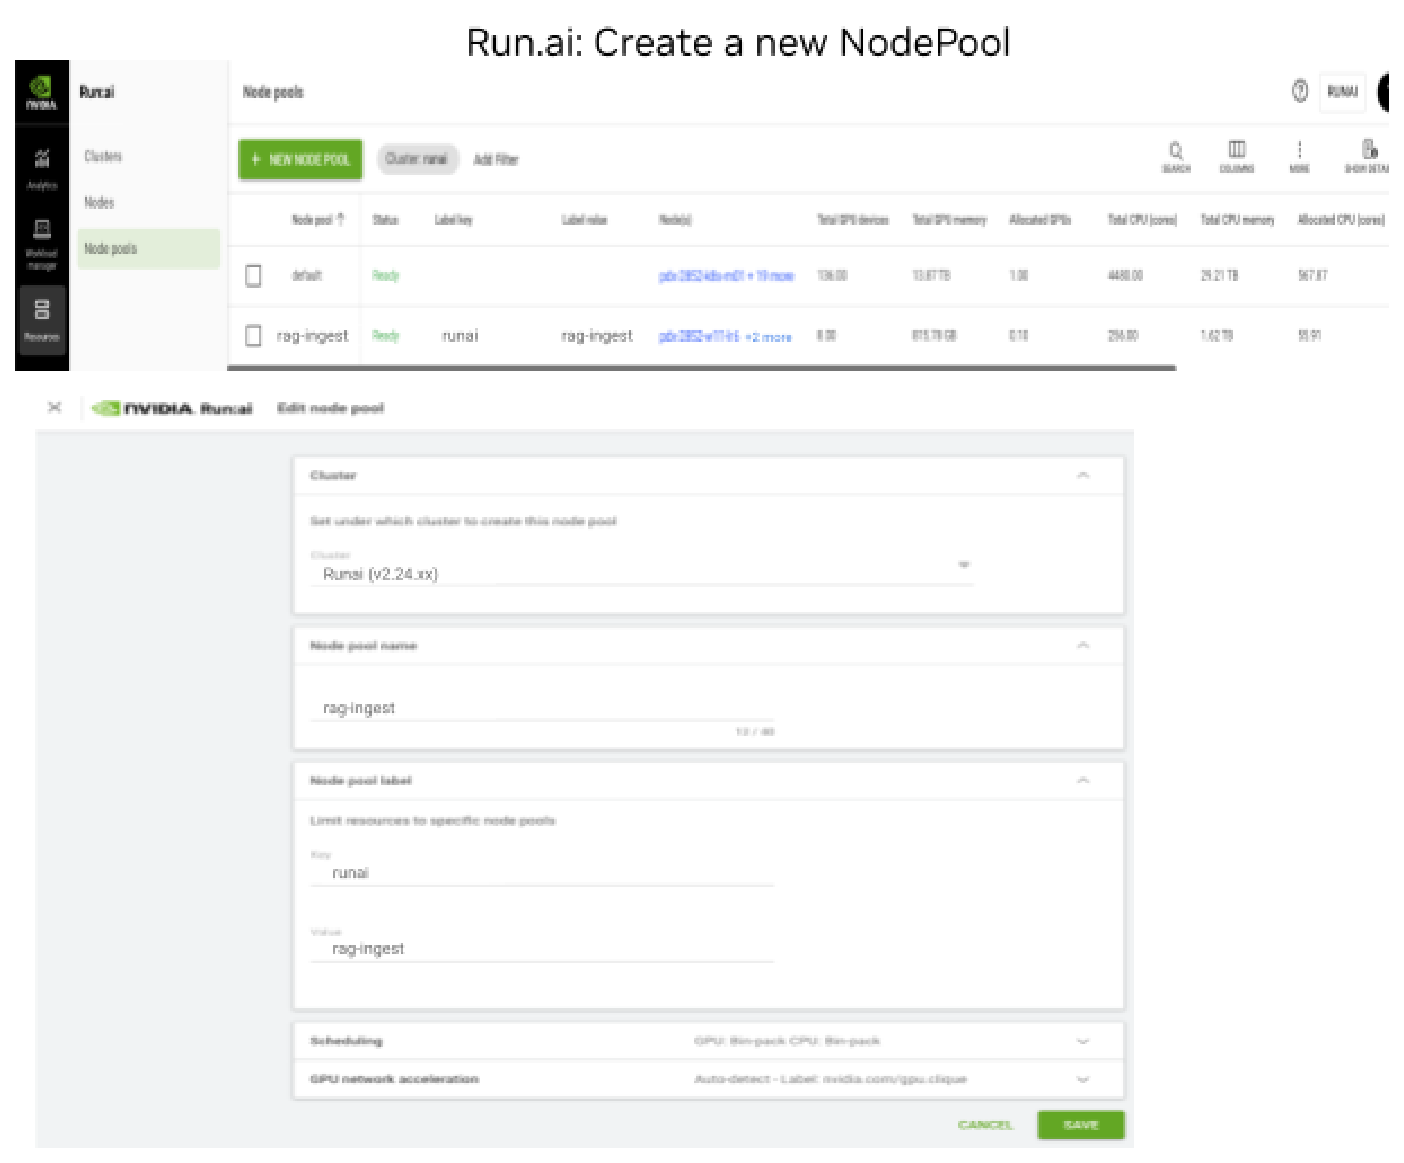
Figure 10 Create a Run:ai NodePool in the UI#
Step 4: Create a Project#
Create new project ‘rag’ which creates a new namespace runai-rag.
And assign the rag-ingest nodepool with a Quota of 2-8 GPUs. For benchmarking purposes,
disabled Over Quota to avoid NIM microservices getting additional Fairshare (Over Quota)
capacity if available.
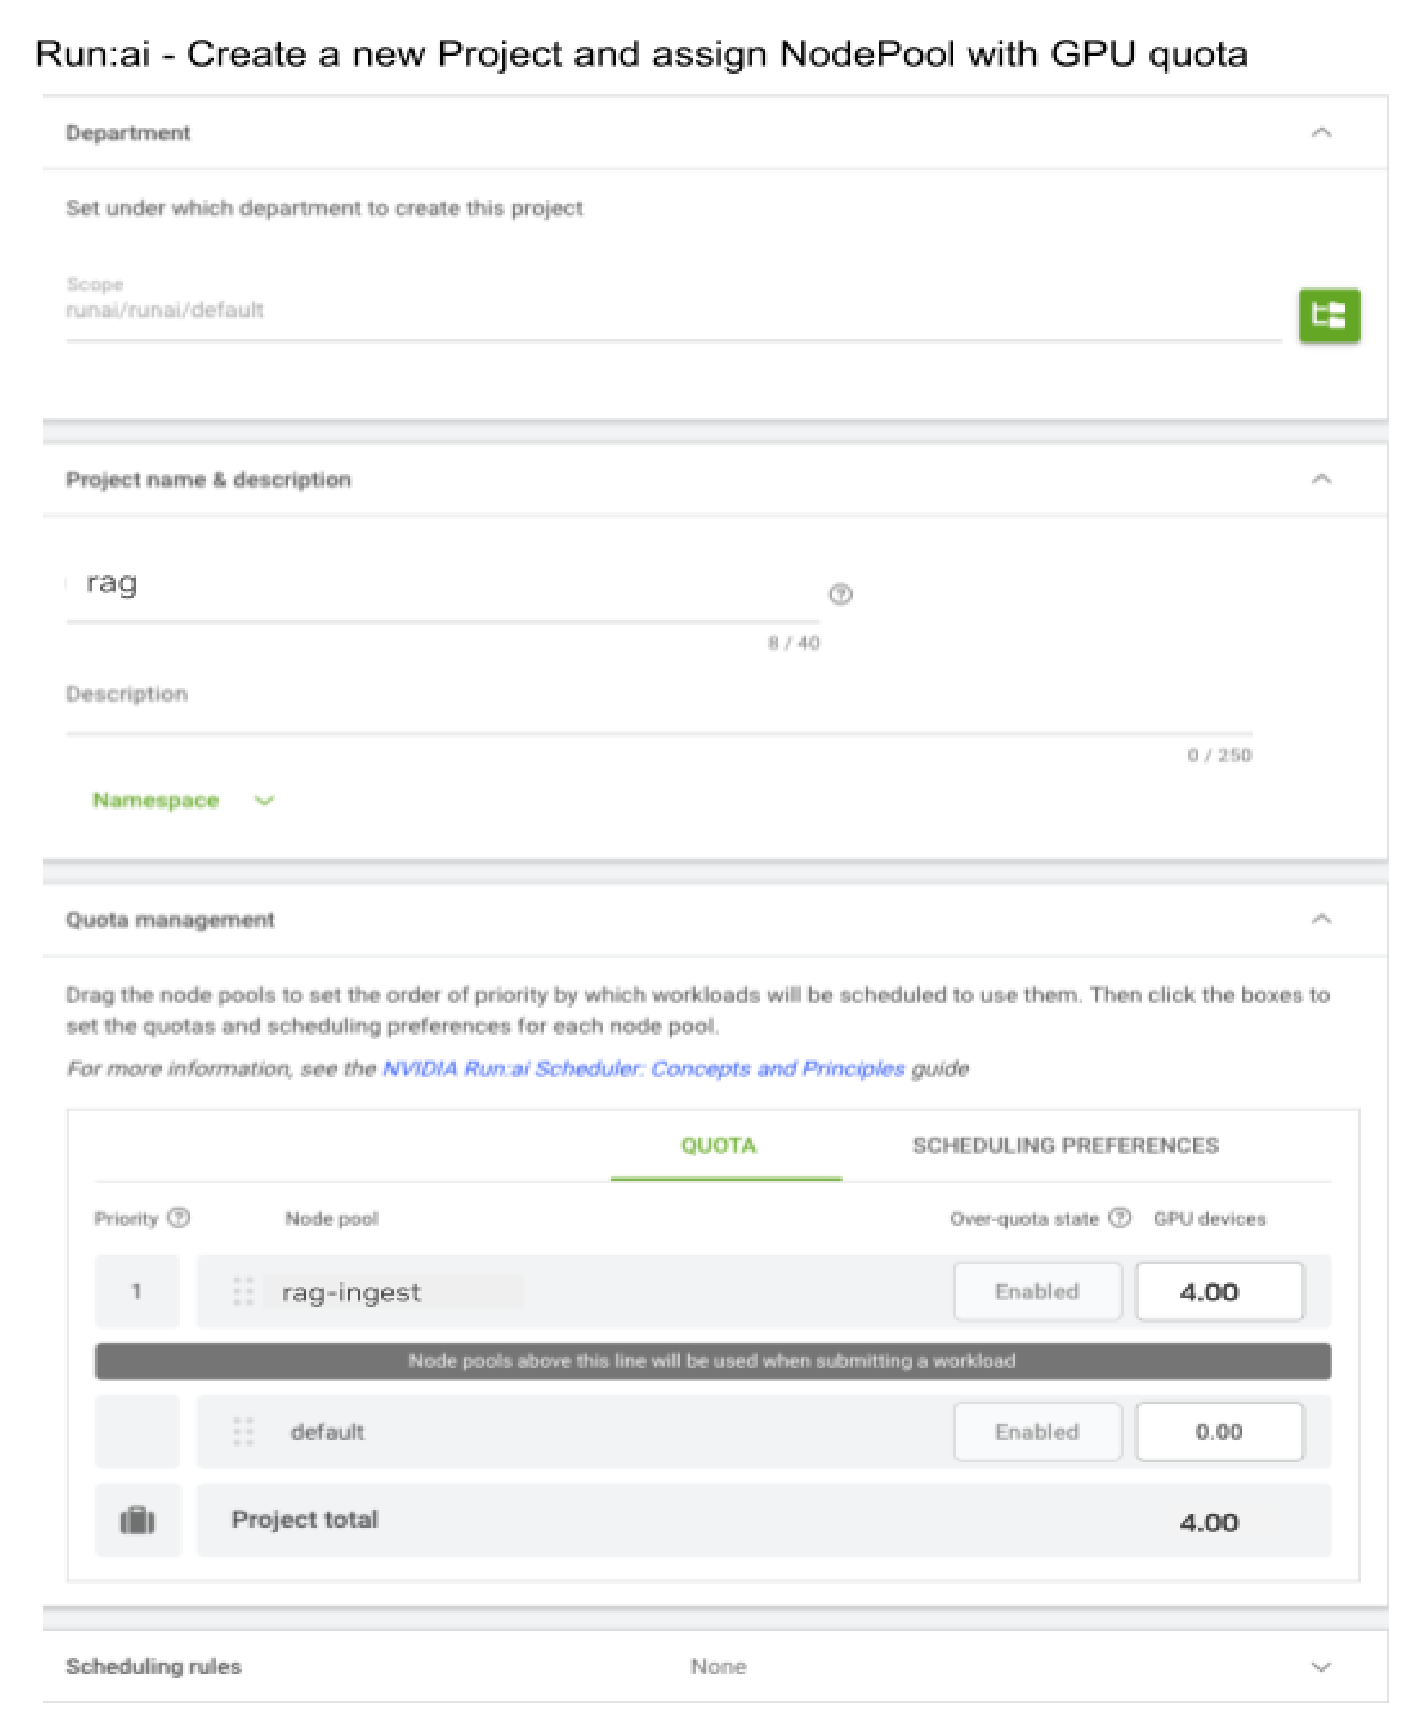
Figure 11 Create a Run:ai project in the UI#
Step 5: Create Credentials or user secrets#
For the Run:ai Project ‘rag’ (namespace ‘runai-rag’) create docker registry secret ‘ngc-secret’ for NGC catalog authentication and the NGC API secret for pulling container images from NGC catalog using the Run:ai UI or API.
Create a docker registry secret ngc-secret for Authentication to NGC catalog.
Create the nvcr.io docker registry secret (can be done via run:ai UI):
URL=nvcr.io
username=’$oauthtoken’
password=$NGC_API_KEY (Get key here)
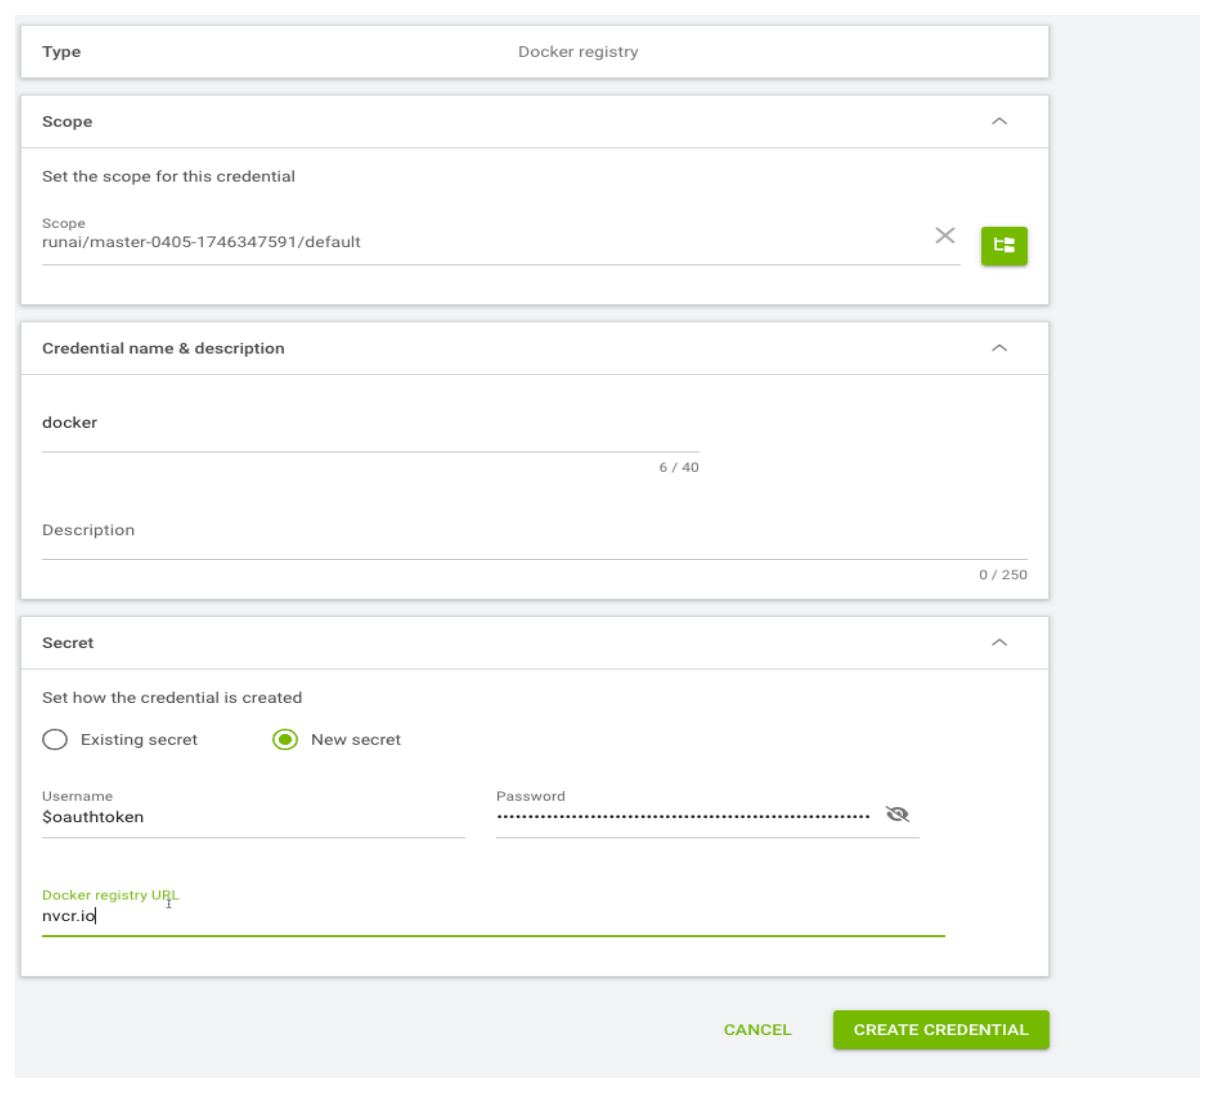
Figure 12 Create a Run:ai docker registry secret in the UI#
Create generic secret ngc-api to pull images from specific Orgs
With KEY-VALUE pairs for NGC_API_KEY and NVIDIA_API_KEY
As shown below using NVIDIA Org key:
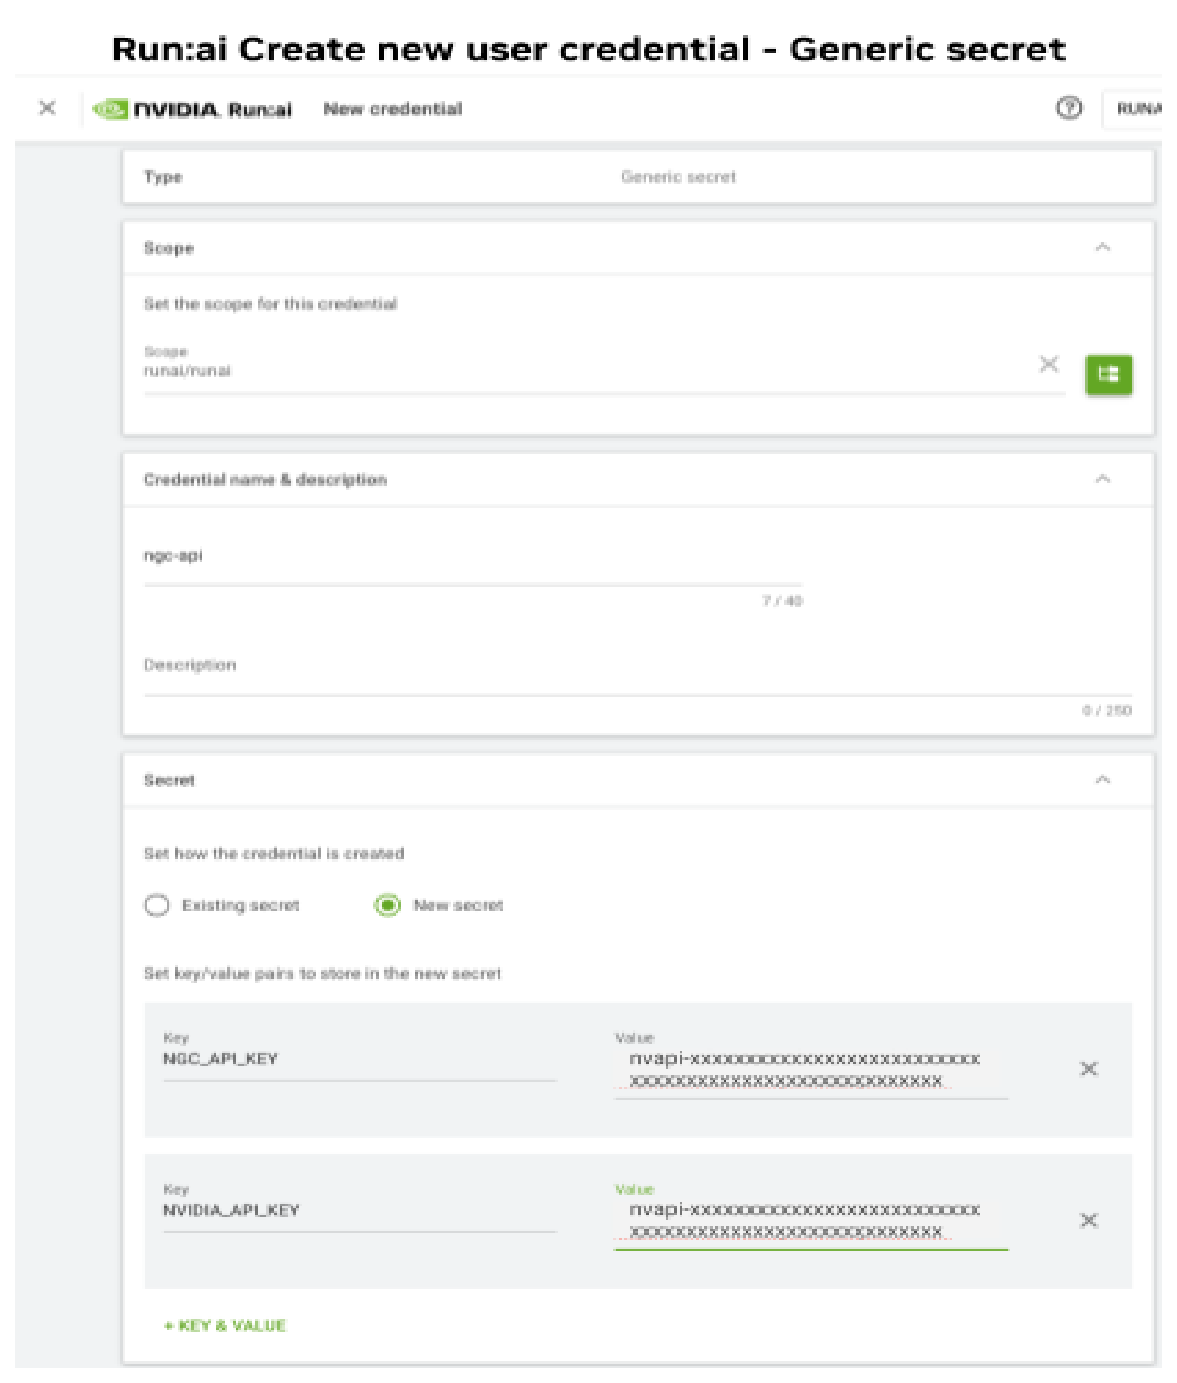
Figure 13 Create a Run:ai generic secret in the UI#
MIG: NeMo Retriever (NV-Ingest) with MIG Profiles#
Deploy NeMo Retriever Helm chart with custom MIG values files using MIG profiles for RTX PRO 6000 or H200 NVL configured on a subset of nodes in the cluster in the previous section. Nemo Retriever (NV-Ingest) Helm chart deploys all NIM microservices using NIM Service and NIM Cache. Use a custom MIG Helm values file with MIG profiles for each NIM as shown below.
Later deploy the Milvus Helm chart with data node on MIG profiles as shown below:
NIM or service |
MIG RTX PRO 6K |
MIG H200 NVL |
CPU/Mem |
|---|---|---|---|
llama-nemotron-embed-1b-v2 |
mig-2g.48gb |
mig-4g.71gb |
4 vCPU, 8 GiB |
nemotron-ocr-v1 |
mig-2g.48gb |
mig-3g.71gb |
3 vCPU, 4 GiB |
nemotron-page-elements-v3 |
mig-1g.24gb |
mig-2g.35gb |
1 vCPU, 2 GiB |
nemotron-table-structure-v1 |
mig-1g.24gb |
mig-1g.18gb |
1 vCPU, 3.5 GiB |
nemotron-graphic-elements-v1 |
mig-1g.24gb |
mig-1g.18gb |
0.5 vCPU, 3 GiB |
Milvus data node |
mig-1g.24gb |
mig-1g.18gb |
4 vCPU, 8 GiB |
Deploy NeMo Retriever (NV-Ingest) pipeline with RTX PRO 6000 MIG profiles as shown below and scale out NV-Ingest server and NIM microservices when increasing NV-Ingest client document ingestion concurrency = 32, 64, 96,128:
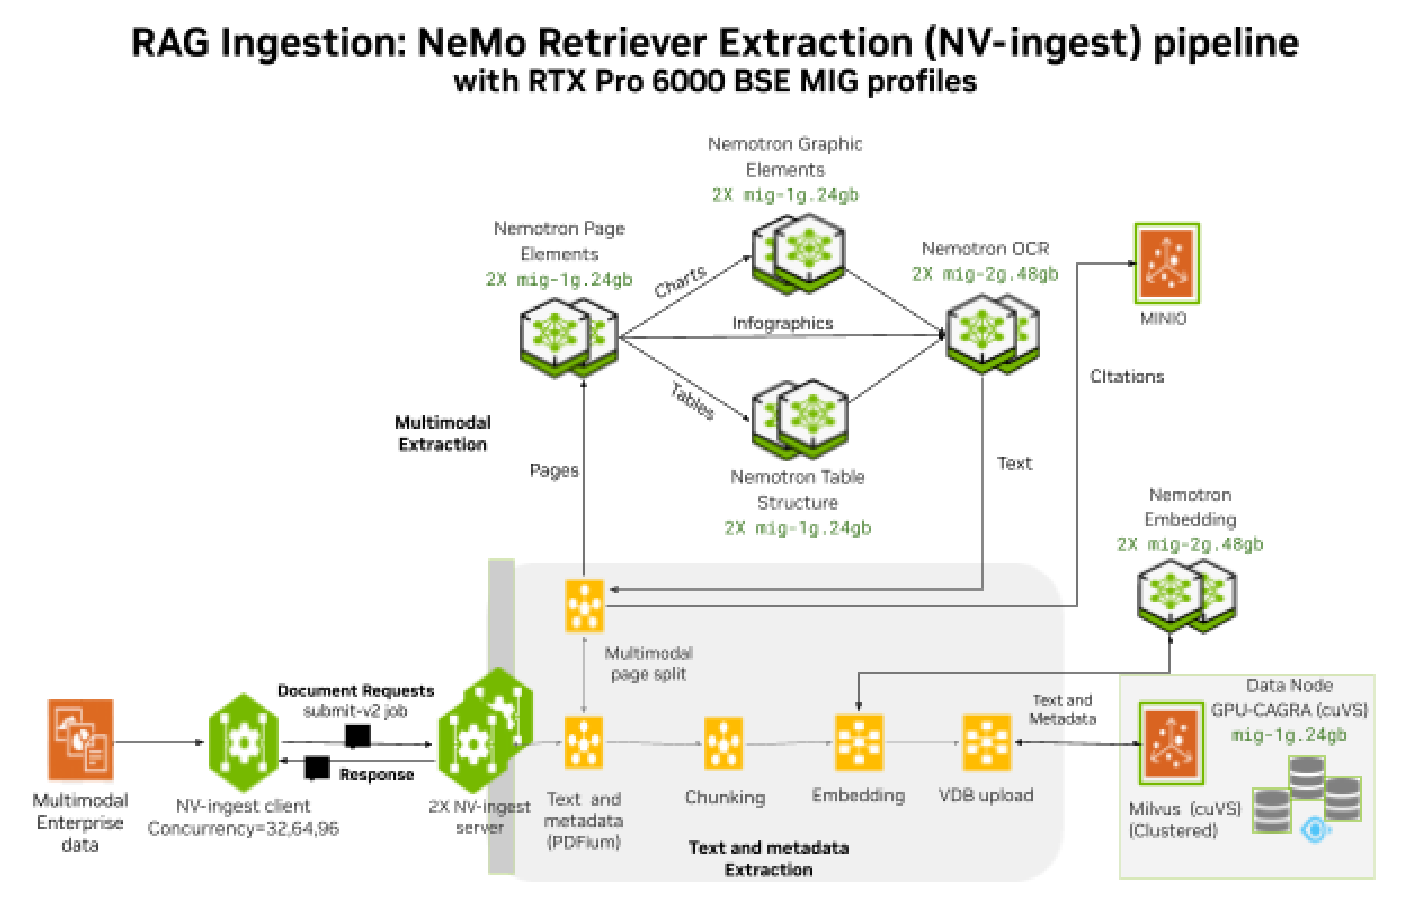
Figure 14 RAG ingestion: NeMo Retriever (NV-Ingest) pipeline with RTX PRO 6000 MIG profiles#
Deploy NeMo Retriever (NV-Ingest) pipeline with H200 NVL MIG profiles as shown below and scale out NV-Ingest server and NIM microservices when increasing NV-Ingest client document ingestion concurrency = 32, 64, 96,128:
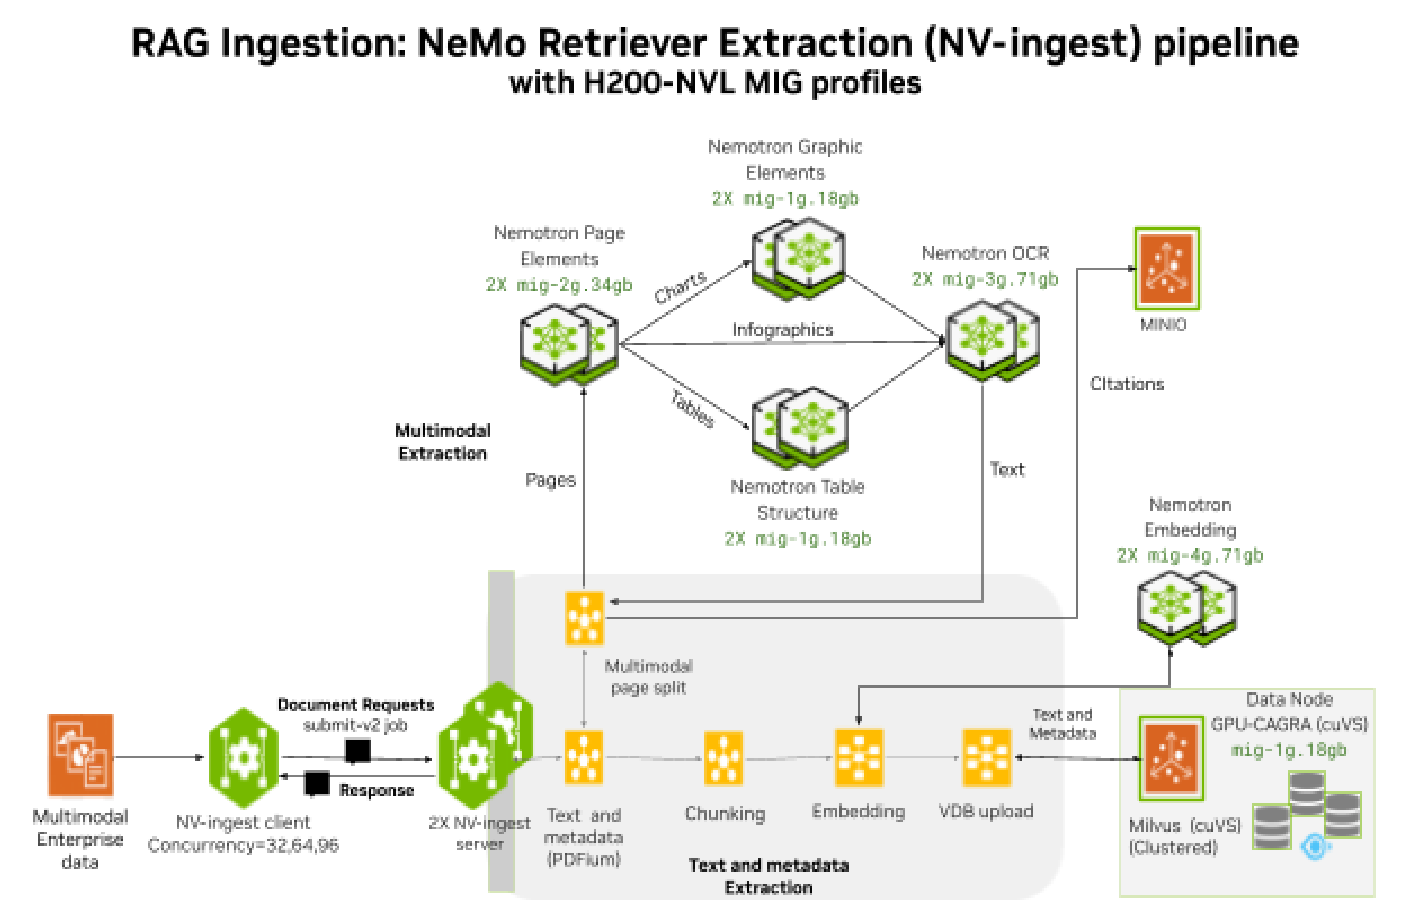
Figure 15 RAG ingestion: NeMo Retriever (NV-Ingest) pipeline with H200 NVL MIG profiles#
Step 1: Create a custom MIG values file#
To deploy with MIG create a custom MIG values file for RTX PRO 6000 (or H200 NVL) to
deploy Embedding NIM and Extraction NIM microservices with MIG profiles and CPU/Memory
allocation as shown below => nvingest-mig-values.yaml:
NIM or service |
MIG RTX PRO 6K |
CPU/Mem |
|---|---|---|
llama-nemotron-embed-1b-v2 |
mig-2g.48gb |
1 vCPU, 8 GiB |
nemotron-ocr-v1 |
mig-2g.48gb |
3 vCPU, 4 GiB |
nemotron-page-elements-v3 |
mig-1g.24gb |
1 vCPU, 2 GiB |
nemotron-table-structure-v1 |
mig-1g.24gb |
1 vCPU, 3.5 GiB |
nemotron-graphic-elements-v1 |
mig-1g.24gb |
0.5 vCPU, 3 GiB |
The NIM Service by default creates a Kubernetes ClusterIP service for every NIM deployment
that enables only internal (within cluster) access to the NIM instance or pod. This works fine
for the extraction of NIM microservices, since they are only invoked by the NV-Ingest server.
For Embedding NIM, expose the service as service.type: LoadBalancer; this assigns an
external IP to the service. The Enterprise RA Kubernetes cluster uses MetalLB to provide a
LoadBalancer service IP for the NIM Services.
For the NIM service enable metrics to create a serviceMonitor for each NIM service and
send metrics to Prometheus. For the serviceMonitor set the appropriate release label
to match the Prometheus deployment: release: kube-prometheus-stack.
Enable tracing by setting Open Telemetry (OTEL) endpoint to the Jaeger collector
(http://rag-opentelemetry-collector:4318) deployed in the cluster.
For Nemotron Embedding, expose the metricsPort: 8002 in addition to the API port 8000.
For extraction NIM microservices expose the grpcPort: 8001.
For extractions NIM microservices, ensure that the OMP_NUM_THREADS and
NIM_TRITON_MAX_BATCH_SIZE: 32 are configured as defined in the Helm values file for each
NIM.
For NV-Ingest, set the environment variables (envVars) for defining the number of workers
and CPU/Memory resources allocated: MAX_INGEST_PROCESS_WORKERS: 32,
NV_INGEST_MAX_UTIL: 32. Define endpoints for Milvus(Distributed) and MinIO installed
independently. Verify endpoints for extraction & embedding NIM microservices. Enable
LoadBalancer service so NV-Ingest service IP can be externally accessed. Specify the MinIO
bucket name (NV-Ingest) used for holding embeddings for bulk ingestion. Increase the
ephemeral disk size to 64GiB (tmpDirSize: 64Gi) to store temporary data to avoid pod
eviction if exceeded during scale benchmarking with high concurrency.
For Redis (master and replica statefulSet) verify endpoint and port used, as well as allocate
sufficient memory (12GiB) for handling large document batch sizes >100 to avoid Kubernetes
OOM-kill. Enable sufficient persistence storage for faster access use fast block storage like
longhorn.io storageClass: longhorn.
Enable OpenTelemetry collector for Jaeger and/or Zipkin.
See example nvingest-rtx-mig-values.yaml in Appendix: MIG - NeMo Retriever
(NV-Ingest) with MIG custom Helm values file.
Step 2: Deploy Nemo Retriever (NV-Ingest) with Helm#
Deploy NeMo Retriever (NV-Ingest) with Helm using custom MIG values file
nvingest-mig-values.yaml:
helm repo add nemo-microservices https://helm.ngc.nvidia.com/nvidia/nemo-microservices
helm repo update
helm upgrade --install nvingest nemo-microservices/NV-Ingest \
 --version=26.3.0 -f nvingest-mig-values.yaml -n rag
To uninstall Nemo Retriever (NV-Ingest) using Helm:
helm uninstall nvingest -n rag
Step 3: Verify NIM microservices deployed on MIG#
Verify NIM microservices are deployed and running using kubectl get pods.
Verify NIM microservices with MIG profiles on RTX PRO 6000 using nvidia-smi:
kubectl get pods  -n rag | grep -E "NV-Ingest|nemo|embed|node"
llama-nemotron-embed-1b-v2-7675dfb48f-2vvlv          1/1     Running   0             25h
milvus-datanode-767589d54b-pzcnj                     1/1     Running   0             116s
milvus-querynode-86d9cb6c97-llt9q                    1/1     Running   1 (11d ago)   11d
milvus-streamingnode-749cc8cff-7qgm2                 1/1     Running   0             6d8h
nemotron-graphic-elements-v1-6b8c978f76-4h9kb        1/1     Running   0             2d
nemotron-ocr-v1-66889ff6c8-m6vbr                     1/1     Running   0             2d19h
nemotron-page-elements-v3-76556bf6b7-684tl           1/1     Running   0             2d18h
nemotron-table-structure-v1-65f48dd6dd-krxrj         1/1     Running   0             2d
nvingest-NV-Ingest-78bcbbcb98-95ghv                  1/1     Running   0             17m
RTX PRO6K profile mig-2g-48gb => GID= 1
RTX PRO6K profile mig-1g-24gb => GID= 5 or 6
+-----------------------------------------------------------------------------------------+
| Processes:                                                                              |
|  GPU   GI   CI              PID   Type   Process name                        GPU Memory |
|        ID   ID                                                               Usage      |
|=========================================================================================|
|    0    1    0          3934923      C   tritonserver                           3292MiB | Embed
|    0    5    0          1274735      C   tritonserver                           3442MiB | table
|    0    5    0          1275388      C   ...on/triton_python_backend_stub       1906MiB |
|    0    6    0          4018571      C   milvus                                 1178MiB | data
|    1    1    0          1479557      C   tritonserver                          10942MiB | OCR
|    1    1    0          1480606      C   ...on/triton_python_backend_stub       8326MiB |
|    1    5    0          1495247      C   tritonserver                           3446MiB | graphic
|    1    5    0          1495832      C   ...on/triton_python_backend_stub       1920MiB |
|    1    6    0          1281512      C   tritonserver                           3456MiB | page
|    1    6    0          1283252      C   ...on/triton_python_backend_stub       1756MiB |
+-----------------------------------------------------------------------------------------+
Step 4: Scale NIM microservices and NV-Ingest on MIG#
To scale out NV-Ingest microservice or NIM deployment pods use kubectl scale and specify
number of replica pods. When scaling out Extraction and Embedding NIM microservices, roll out all NV-Ingest pods.
kubectl scale deployment llama-nemotron-embed-1b-v2 --replicas=4 -n rag

kubectl scale deployment nvingest-NV-Ingest --replicas=4 -n rag
Limitation: NV-Ingest gRPC reset#
Currently, NV-Ingest uses gRPC long lived TCP connections to connect the NIM services. When scaling out new NIM microservices, NV-Ingest uses old existing gRPC connections to services and new NIM microservices are not used at all or only used by newly scaled-out NV-Ingest replicas/pods.
To reset the gRPC connections, restart all pods in the NV-Ingest deployment when scaling out NIM microservices. This issue will be addressed in a future release of Nemo Retriever (NV-Ingest).
kubectl rollout restart deployment nvingest-NV-Ingest -n rag
Run:ai: NeMo Retriever (NV-Ingest) with GPU Fractions#
Deploy NeMo Retriever Helm chart with custom Run:ai values files in the Project rag in
runai-rag namespace using the rag-ingest nodePool nodes configured in the
previous section. Configure GPU fractions for each NIM as shown below.
Later deploy the Milvus Helm chart with data node in the Project rag in runai-rag
namespace with 0.25 GPU fraction as shown below:
NIM or service |
Run:ai GPU Fraction |
CPU/Mem |
|---|---|---|
llama-nemotron-embed-1b-v2 |
0.5 GPU |
4 vCPU, 8 GiB |
nemotron-ocr-v1 |
0.4 GPU |
3 vCPU, 4 GiB |
nemotron-page-elements-v3 |
0.3 GPU |
1 vCPU, 2 GiB |
nemotron-table-structure-v1 |
0.2 GPU |
1 vCPU, 3.5 GiB |
nemotron-graphic-elements-v1 |
0.1 GPU |
0.5 vCPU, 3 GiB |
Milvus data node |
0.25 GPU |
4 vCPU, 8 GiB |
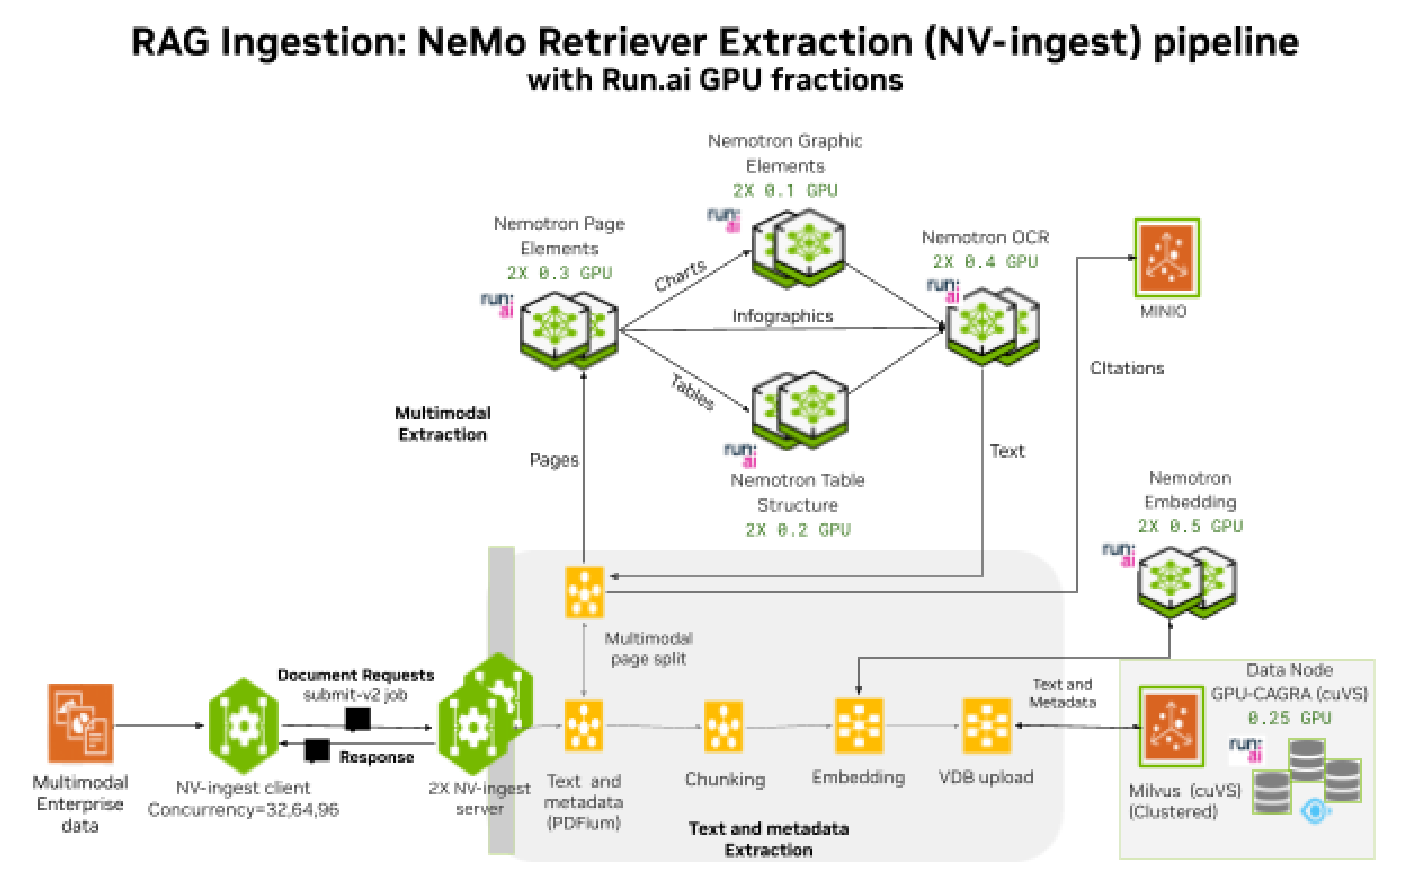
Figure 16 RAG ingestion: NeMo Retriever (NV-Ingest) pipeline with Run:ai GPU fractions#
Run:ai v2.24 supports deploying Helm charts with resource requests or limits for GPU Fractions in Run:ai enabled namespaces.
For example, the Milvus Helm chart with data node request for 0.25 GPU can be deployed
directly in the run:ai Project ‘rag’, namespace runai-rag created in the previous section.
The Milvus dataNode deployment will be scheduled on one of the Run:ai nodes in
rag-ingest nodePool using the runai-scheduler (timeslicing):
dataNode:
  enabled: true
  replicas: 1
  resources:
    requests:
      nvidia.com/gpu: "0.25"
    limits:
      nvidia.com/gpu: "0.25"
Deploy NeMo Retriever (NV-Ingest) in the runai-rag namespace defined in the previous
section.
Limitation: Run:ai with NIM Operator#
NeMo Retriever (NV-ingest) Helm chart deploys NIM microservices using NIM Operator with
NIM Service and NIM Cache, which does not enable Run:ai deployment annotations required for
Run:ai scheduler. Run:ai support for Helm charts with NIM service is planned for a future
release. In the interim, manually deploy NIM microservices using Kubernetes manifest
(kubectl apply).
For Run:ai v2.25, deploy NeMo Retriever (NV-Ingest) in the runai-rag namespace with NIM
microservices deployment disabled (skip NIM service for NIM microservices). Then use
kubectl apply to deploy a custom Run:ai NIM deployment manifest file. In the pod
template add:
labels for the project:
ragandannotations for
runai-nodepools: rag-ingestandgpu-fraction: "0.5"set
runai-scheduler(schedulerName: runai-scheduler) in thepod template.spec
apiVersion: apps/v1
kind: Deployment
metadata:
  name: nemotron-embed # NIM deployment name
  namespace: runai-rag # set the runai namespace for the project
spec:
  template:
    metadata:
      labels:
        app.kubernetes.io/name: nemotron-embed
        priorityClassName: very-high
        project: rag # define the Runai project name
      annotations:
        runai-nodepools: rag-ingest # define the Runai nodepool name
        gpu-fraction: "0.5" # NIM Runai GPU fraction to allocate
        gpu-fraction-num-devices: "1"
    spec:
      schedulerName: runai-scheduler # use the Runai scheduler
      priorityClassName: very-high
Step 1: Create a custom Run:ai values file and deploy#
To deploy with Run:ai create a NeMo Retriever (NV-Ingest) custom Helm values file to deploy
NV-Ingest and Redis but disable deploying Embedding NIM and Extraction NIM microservices
with NIM service => nvingest-runai-values.yaml.
Set the NIM endpoints to match the service names defined in the NIM manifest file.
See example nvingest-runai-values.yaml in Appendix: Run:ai 1 - NeMo Retriever
(NV-Ingest) with custom Helm values file.
Deploy NV-Ingest and Redis with nvingest-runai-values.yaml:
helm repo add nemo-microservices https://helm.ngc.nvidia.com/nvidia/nemo-microservices
helm repo update

helm upgrade --install nvingest nemo-microservices/NV-Ingest \
 --version=26.3.0 -f nvingest-runai-values.yaml -n runai-rag

# deploy and create the credentials in the runai-rag namespace
helm upgrade --install nvingest nvnemo/NV-Ingest --version=26.3.0 -f \
nvingest-runai-values.yaml -n runai-rag \
 --username '$oauthtoken' \
 --password "${NGC_API_KEY}" \
 --set ngcImagePullSecret.create=true \
 --set ngcImagePullSecret.password="${NGC_API_KEY}" \
 --set ngcApiSecret.create=true \
 --set ngcApiSecret.password="${NGC_API_KEY}"
To uninstall NV-Ingest using Helm:
helm uninstall nvingest -n runai-rag
Step 2: Manually deploy NIM microservices using manifest file#
To deploy NIM microservices create a custom Kubernetes manifest file for Embedding NIM
and Extraction NIM microservices => nvingest-runai-NIM-microservices-manifest.yaml.
For NIM deployment additional entities need to be created manually:
Service using ClusterIP or LoadBalancer (external access)
ServiceMonitor to send metrics to Prometheus/Grafana
Enable OTEL tracing for Jaeger collector endpoint
Enable autoscaling using the Horizontal Pod Autoscaler (HPA) when needed
See example nvingest-runai-NIM-microservices-manifest.yaml in Appendix:
Run:ai - NeMo Retriever (NV-Ingest) NIM manifest file.
To deploy NIM manifest file:
kubectl apply -f nvingest-runai-NIM-microservices-manifest.yaml -n runai-rag
To delete/uninstall the NIM microservices and other entities in the NIM manifest file:
kubectl delete -f nvingest-runai-NIM-microservices-manifest.yaml -n runai-rag
Step 3: Verify NIM microservices deployed on Run:ai#
Run:ai UI Workload Dashboard shows all NIM microservices running.
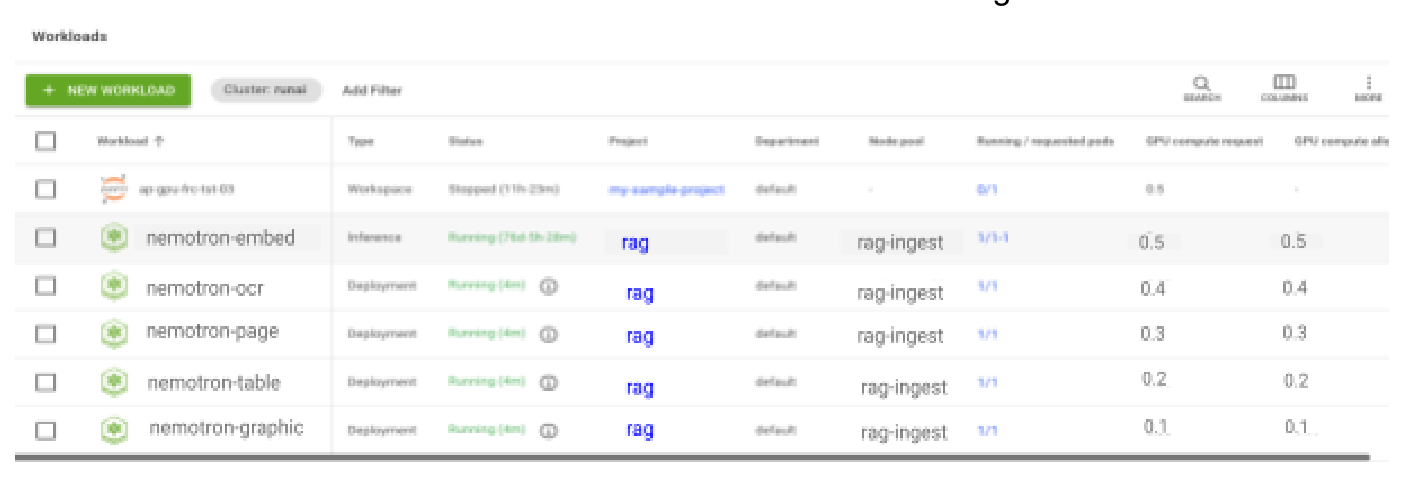
Figure 17 Run:ai Workloads dashboard showing all NIM microservices running in the rag-ingest nodePool with their assigned GPU fractions: nemotron-embed (0.5 GPU), nemotron-ocr (0.4 GPU), nemotron-page (0.3 GPU), nemotron-table (0.2 GPU), nemotron-graphic (0.1 GPU).#
Verify Run:ai scheduling with Bin Packing for NIM microservices using nvidia-smi:
ssh era-worker11 nvidia-smi
Thu Feb 26 19:50:20 2026
+-----------------------------------------------------------------------------------------+
| NVIDIA-SMI 580.95.05              Driver Version: 580.95.05      CUDA Version: 13.0     |
+-----------------------------------------+------------------------+----------------------+
| GPU  Name                 Persistence-M | Bus-Id          Disp.A | Volatile Uncorr. ECC |
| Fan  Temp   Perf          Pwr:Usage/Cap |           Memory-Usage | GPU-Util  Compute M. |
|                                         |                        |               MIG M. |
|=========================================+========================+======================|
|   0  NVIDIA RTX PRO 6000 Blac...    Off |   00000000:03:00.0 Off |                    0 |
| N/A   26C    P8             34W /  600W |       3MiB /  97887MiB |      0%      Default |
|                                         |                        |             Disabled |
+-----------------------------------------+------------------------+----------------------+
...
|   6  NVIDIA RTX PRO 6000 Blac...    Off |   00000000:F3:00.0 Off |                    0 |
| N/A   26C    P8             85W /  600W |    3205MiB /  97887MiB |      0%      Default |
|                                         |                        |             Disabled |
+-----------------------------------------+------------------------+----------------------+
|   7  NVIDIA RTX PRO 6000 Blac...    Off |   00000000:F4:00.0 Off |                    0 |
| N/A   34C    P0             85W /  600W |   20468MiB /  97887MiB |      0%      Default |
|                                         |                        |             Disabled |
+-----------------------------------------+------------------------+----------------------+

nemotron-embed-1-v2:1.13.0 PID 1721311 3.29GiB allocated 50% GPU gpu_fraction:0.5
nemotron-ocr-v1:1.3.0 PID 1752221 10.9GiB allocated 40% GPU gpu_fraction:0.4
nemotron-page-elements-v3:1.8.0 PID 2721308 3.46GiB allocated 30% GPU gpu_fraction:0.3
nemotron-table-structure-v1:1.8.0 PID 2719155 3.44GiB allocated 20% GPU gpu_fraction:0.2
nwmotron-graphic-elements-v1:1.8.0 PID 2717287 3.45GiB allocated 10% GPU gpu_fraction:0.1
+-----------------------------------------------------------------------------------------+
| Processes:                                                                              |
|  GPU   GI   CI              PID   Type   Process name                        GPU Memory |
|        ID   ID                                                               Usage      |
|=========================================================================================|
|    6   N/A  N/A         1721311      C   tritonserver                           3292MiB | Embed
|    7   N/A  N/A         1752221      C   tritonserver                          10942MiB | OCR
|    7   N/A  N/A         1752562      C   ...on/triton_python_backend_stub        560MiB |
|    7   N/A  N/A         2717287      C   tritonserver                           3446MiB | graphic
|    7   N/A  N/A         2719155      C   tritonserver                           3456MiB | page
|    7   N/A  N/A         2721308      C   tritonserver                           3442MiB | table
+-----------------------------------------------------------------------------------------+
Step 4: Scale NIM microservices and NV-Ingest on Run:ai#
To scale out NV-Ingest or NIM deployment pods use kubectl scale and specify number of
replica pods:
kubectl scale  deploy -n runai-rag  nemotron-embed  --replicas 2
kubectl scale deployment nvingest-NV-Ingest --replicas=2 -n runai-rag
When scaling out Extraction and Embedding NIM microservices, roll out all NV-Ingest pods:
kubectl rollout restart deployment nvingest-NV-Ingest -n runai-rag
Currently, NV-Ingest uses gRPC long lived TCP connections to connect the NIM services. When scaling out new NIM microservices, NV-Ingest uses old existing gRPC connections to services and new NIM microservices are not used at all or only used by newly scaled-out NV-Ingest pods which will use the new scaled out NIM pods. To reset the gRPC connections, restart all pods in the NV-Ingest deployment. (This issue will be addressed in a future release of NV-Ingest):
kubectl scale  deploy -n runai-rag  nemotron-embed  --replicas 2
deployment.apps/nemotron-embed scaled
kubectl scale  deploy -n runai-rag  nemotron-ocr  --replicas 2
deployment.apps/nemotron-ocr scaled
kubectl scale  deploy -n runai-rag  nemotron-table  --replicas 2
deployment.apps/nemotron-table scaled
kubectl scale  deploy -n runai-nvingest nemotron-page  --replicas 2
deployment.apps/nemotron-page scaled
kubectl scale  deploy -n runai-rag  nemotron-graphic  --replicas 2
deployment.apps/nemotron-graphic scaled

kubectl get deployments -n runai-rag | grep nemotron
NAME               READY   UP-TO-DATE   AVAILABLE   AGE
nemotron-embed     2/2     2            2           3d
nemotron-graphic   2/2     2            2           3d
nemotron-ocr       2/2     2            2           3d3h
nemotron-page      2/2     2            2           3d
nemotron-table     2/2     2            2           3d
nvidia-smi output showing scaled deployment:
ssh era-worker11 nvidia-smi
+-----------------------------------------------------------------------------------------+
| Processes:                                                                              |
|  GPU   GI   CI              PID   Type   Process name                        GPU Memory |
|        ID   ID                                                               Usage      |
|=========================================================================================|
|    5   N/A  N/A         1758921      C   tritonserver                          10942MiB | OCR
|    5   N/A  N/A         1752562      C   ...on/triton_python_backend_stub        560MiB |
|    5   N/A  N/A         2717287      C   tritonserver                           3446MiB | graphic
|    5   N/A  N/A         2720506      C   ...on/triton_python_backend_stub        972MiB |
|    5   N/A  N/A         2719155      C   tritonserver                           3456MiB | page
|    5   N/A  N/A         2710506      C   ...on/triton_python_backend_stub        550MiB |
|    5   N/A  N/A         2721308      C   tritonserver                           3442MiB | table
|    6   N/A  N/A         1722311      C   tritonserver                           3292MiB | Embed
|    6   N/A  N/A         1721311      C   tritonserver                           3292MiB | Embed
|    7   N/A  N/A         1752221      C   tritonserver                          10942MiB | OCR
|    7   N/A  N/A         1752562      C   ...on/triton_python_backend_stub        560MiB |
|    7   N/A  N/A         2720648      C   ...on/triton_python_backend_stub        550MiB |
|    7   N/A  N/A         2717287      C   tritonserver                           3446MiB | graphic
|    7   N/A  N/A         2719155      C   tritonserver                           3456MiB | page
|    7   N/A  N/A         2720716      C   ...on/triton_python_backend_stub        964MiB |
|    7   N/A  N/A         2721308      C   tritonserver                           3442MiB | table
+-----------------------------------------------------------------------------------------+
Install NV-Ingest client#
For performance benchmarking the RAG ingestion pipeline use the NV-Ingest client directly from the NeMo Retriever extraction library. Install the NeMo Retriever extraction (NV-Ingest) application for enterprise data ingestion including: NV-Ingest server, Redis message broker, extraction NIM, Embedding NIM and Milvus Vector DB in the Kubernetes cluster using instructions provided in the Enterprise RAG deployment guide. The Embedding NIM, Extraction NIM microservices and Milvus data nodes can be deployed using either MIG profiles or Run:ai GPU fractions to enable efficient use of GPU resources.
For RAG ingestion benchmarking use the NV-Ingest client API to communicate with NV-Ingest server to upload enterprise documents for data extraction and ingestion into the vector DB. NV-Ingest client uses Ingestor python API to manage vector DB collections, create document request jobs to the NV-Ingest server (and Redis) and finally upload embeddings to vector DB.
NV-Ingest client can be installed from the NeMo Retriever extraction library; on the benchmarking server (outside the Kubernetes cluster) that will be used for sending dataset documents to the NV-Ingest server.
Setup the python environment and install the NV-Ingest client library on benchmarking server:
uv venv rag --python 3.12
source rag/bin/activate
uv pip install nemo-retriever==26.3.0 NV-Ingest-client==26.3.0 NV-Ingest-api==26.3.0
The benchmarking server needs sufficient CPU and Memory capacity to run high document concurrency using client workers= 96,192,128:
Benchmarking server specs: CPU: 128 vCPU/cores, RAM Memory: 256GiB
Dataset - Download Enterprise dataset#
To get started with the RAG data ingestion, download a multimodal enterprise dataset e.g digital_corpora bo767. The document source must be accessible from the benchmarking server.
More options of datasets for ingestion benchmarking and accuracy evaluation:
Text-only: Wikipedia dataset (parquet files) => 5.9 M documents, 38M vector embeddings (chunk size 256/50, 2048dim X FP32)
PDF text-only: Shakespeare Complete Works dataset => 44 documents, 9K embeddings
PDF Multimodal dataset with text, table, charts, images: digital corpora (download bo767 ids) => 767 PDFs; 77K embeddings (pages: 54730, tables: 23323, total_charts: 7835, elements: 85,888)
Follow instructions in the ingestion notebook to download bo767 document ids and prepare for benchmarking ingestion.
Deploy Vector database (Milvus)#
RAG blueprint deploys Milvus as the Vector DB in standalone mode with GPU acceleration for indexing and search. This is a single standalone node with single GPU that services both ingest and search requests. This may be fine for developer demos and small amounts of data (<50K vectors) but will not scale for enterprise usecases; where large amounts of data needs to be ingested and where hundreds of active users query the Enterprise RAG service simultaneously.
For Enterprise RAG, deploy Milvus Vector Database in Distributed mode, where ingest and search services can be scaled independently; and then add the endpoints to the RAG blueprint helm chart. Enable Milvus in hybrid GPU-CPU mode with GPU for index (cuVS) and CPU for search.
This guide focuses on deploying Milvus (Distributed) with Helm using GPU CAGRA (cuVS) for index and convert to CPU (HNSW) at load time for Search. Scale the Data (index) and Query (search) nodes based on ingestion and retrieval load. The nodes can scale independently based on Enterprise data ingestion rate and RAG Retrieval request rate (Vector DB queries per second). Data nodes are responsible for data index building and ingest, while the Query nodes are responsible for search and retrieval in response to user queries. Milvus’ high level architecture diagram is shown below.
During data ingestion, Index nodes are responsible for building the indexes before the data can be ingested and written to storage (MinIO object store or disk). Data nodes preprocess data and get it ready for Index nodes to build the indexing.
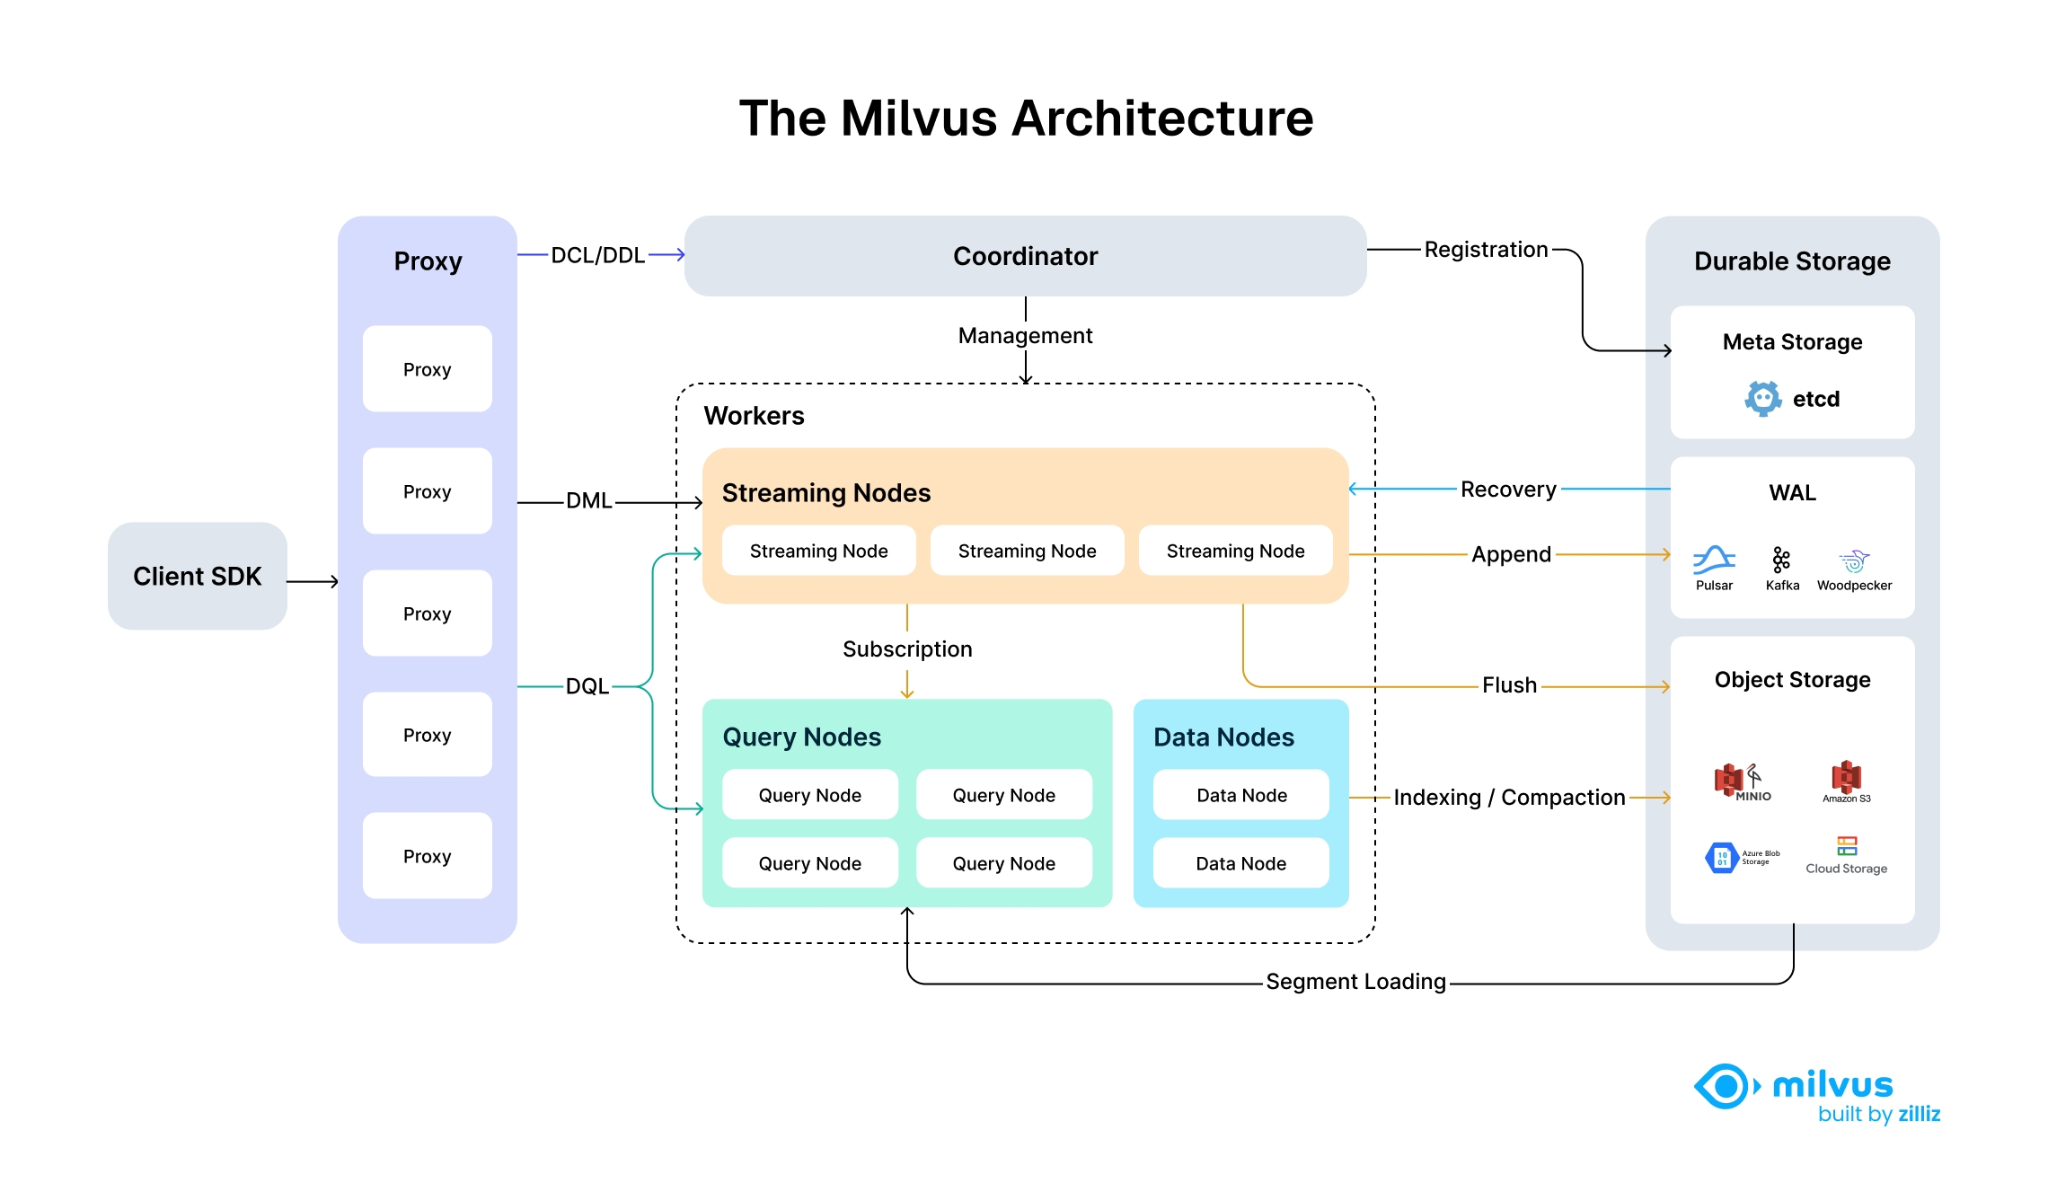
Figure 18 Milvus Vector DB High Level Architecture#
Deploy Milvus (Distributed) with GPU index and CPU search using MIG or Run:ai#
Milvus chart version 2.6.10
image repo milvusdb/milvus:v2.6.5-gpu
data node:
mig-1g.24gb
data node:
mig-1g.18gb
Run:ai GPU fraction: 0.25 GPU
For baseline enterprise data of 1M vectors, allocate sufficient CPU/Memory for data and query nodes:
Data node: Run:ai 0.25 GPU or MIG RTX PRO6K
mig-1g.24gb, 8 vCPU, 8 GiB RAMQuery node: 8vCPU, 10GiB RAM
scale out query nodes to support more data, 10GiB RAM per 1M vectors (2048 di. X FP32)
For large enterprise with higher data scale of 10-20M vectors, scale up the data nodes and query nodes and added redundancy:
1-2 X Data node: 0.25 GPU (
mig-1g.24gb), [16 vCPU, 32 GiB RAM]3-5 X Query node: [16 vCPU / 40GiB RAM]
Enable HPA to scale out query nodes to support more data, ~40GiB per 4M tokens (2048 di. X FP32)
Step 1: Create Helm custom values file#
Create a custom Milvus Helm values file milvus-distributed-values.yaml with GPU
accelerated image v2.6.5-gpu.
Enable service as LoadBalancer to enable external access for Milvus and MinIO.
For MINIO define the credentials and bucket name ‘NV-Ingest’ for storing vector
embeddings for bulk upload to Milvus vector DB.
For Milvus ETCD update the storageClass for ETCD to use fast Block storage using CSI
longhorn.io and use default StorageClass nfs-client for all other components.
Enable metrics and tracing for the Milvus by setting Open Telemetry (OTEL) endpoint to the
Jaeger OTEL collector (http://rag-opentelemetry-collector:4318) deployed in the cluster.
Enable Milvus frontend ATTU deployment using NGINX ingress with FQDN and DNS
resolution e.g http://vdb.era285.nvidia.com. Use the web console to quickly check
Milvus status, number of nodes, collections and what is loaded.
Deploy Milvus (distributed) for large enterprise data of up to ~10-20M vectors. Configure resources for Milvus Data Node, responsible for GPU accelerated index building (GPU_CAGRA cuVS) and data ingestion, using Run:ai GPU fractions or MIG profiles for RTX PRO 6000 or H200 NVL, as shown below:
# Run:ai GPU fraction
dataNode:
  replicas: 1
  resources:
    requests:
      cpu: 16
      memory: 32Gi
      nvidia.com/gpu: "0.25"

# MIG RTX PRO 6K or H200 NVL
dataNode:
  resources:
  replicas: 1 # scale out replicas >10M vectors
    requests:
      cpu: 16
      memory: 32Gi
      nvidia.com/gpu: "0" # disable full GPU allocation
      nvidia.com/mig-1g.24gb: "1" # MIG RTX PRO 6000
      OR
      nvidia.com/mig-1g.18gb: "1" # MIG H200 NVL
Configure sufficient resources for Milvus Query Node, responsible for Search and RAG retrieval, using CPU only (no GPU) to support Search for large enterprise data of up to ~20M vectors (2048 dim. X FP32). Enable HPA for autoscaling the Query node (CPU only), use 80% CPU and Memory utilization metrics to trigger autoscaling:
queryNode:
  replicas: -1 # set -1 if using hpa to autoscale
  resources:
    requests:
    # baseline 4vCPU / 10Gi for up to ~1M vectors,
    # scale up to 8vCPU / 40Gi for large enterprise data ~100M vectors
      cpu: 16
      memory: 40Gi
  hpa:
    enabled: true
    minReplicas: 1
    maxReplicas: 8
    cpuUtilization: 80 # autoscale at 80% CPU utilization
    memoryUtilization: 80 # autoscale at 80% Memory utilization
See Appendix MIG - Milvus distributed Helm custom values file => milvus-distributed-values.yaml.
Step 2: Deploy Milvus Distributed with Helm#
Deploy Milvus distributed using custom Helm values file milvus-distributed-values.yaml.
Add the Milvus Helm repo and use Helm install to deploy:
# add Milvus repo and update repo to get latest versions
helm repo add milvus https://zilliztech.github.io/milvus-helm
helm update repo milvus

# Check Milvus chart version and default values.yaml
helm search repo milvus/milvus --versions
helm show values milvus/milvus

# deploy with MIG profile for RTX PRO6k or H200 NVL in the rag namespace
helm upgrade --install milvus milvus/milvus -f  \
milvus-distributed-values.yml  -n rag

# deploy with Run:ai GPU fraction in runai-rag namespace (project:rag)
helm upgrade --install milvus milvus/milvus -f  \
milvus-distributed-values.yml  -n runai-rag

# upgrade to new version or new values file update
helm upgrade --install milvus milvus/milvus --reuse-values \
-f  milvus-distributed-values.yml  -n rag \
--set image.all.tag=v2.6.5-gpu
Uninstall Milvus and remove all components. PVCs are not removed and need to be removed manually. Milvus can be uninstalled and ingested data is not lost. These can be reloaded from PVCs into Milvus when it is reinstalled.
helm uninstall milvus -n rag
Step 3: Verify Milvus Distributed deployment#
Verify Milvus services and data, query and streaming nodes are up and running:
kubectl get pods -n rag | grep milvus
NAME                                 READY   STATUS              RESTARTS      AGE
milvus-attu-69755f97b-xhvsg          1/1     Running             0             11d
milvus-datanode-5dfc6d8b65-w7m8l     1/1     Running             1 (11d ago)   11d
milvus-etcd-0                        1/1     Running             0             11d
milvus-etcd-1                        1/1     Running             0             11d
milvus-etcd-2                        1/1     Running             0             11d
milvus-minio-0                       1/1     Running             0             11d
milvus-minio-1                       1/1     Running             0             11d
milvus-minio-2                       1/1     Running             0             11d
milvus-minio-3                       1/1     Running             0             11d
milvus-mixcoord-58f566fd5b-2hmdn     1/1     Running             1 (11d ago)   11d
milvus-proxy-6547df4f5-ml8cp         1/1     Running             1 (11d ago)   11d
milvus-pulsarv3-bookie-0             1/1     Running             0             11d
milvus-pulsarv3-bookie-1             1/1     Running             0             11d
milvus-pulsarv3-bookie-2             1/1     Running             0             11d
milvus-pulsarv3-bookie-init-j22g6    0/1     Completed           0             11d
milvus-pulsarv3-broker-0             1/1     Running             0             11d
milvus-pulsarv3-broker-1             1/1     Running             0             11d
milvus-pulsarv3-proxy-0              1/1     Running             0             11d
milvus-pulsarv3-proxy-1              1/1     Running             0             11d
milvus-pulsarv3-pulsar-init-nfvq8    0/1     Completed           0             11d
milvus-pulsarv3-recovery-0           1/1     Running             0             11d
milvus-pulsarv3-zookeeper-0          1/1     Running             0             11d
milvus-pulsarv3-zookeeper-1          1/1     Running             0             11d
milvus-pulsarv3-zookeeper-2          1/1     Running             0             11d
milvus-streaming-node-b5dcfbf5-6f6bk 1/1     Running             1 (11d ago)   11d
milvus-querynode-dd79599dc-tnfhb     1/1     Running             1 (11d ago)   11d
Step 4: View Vector DB status in dashboard or frontend console#
Once Milvus is deployed successfully, run the NeMo Retriever (NV-Ingest) pipeline => use the NV-Ingest client to ingest test.pdf data and verify data ingestion in the Milvus web console.
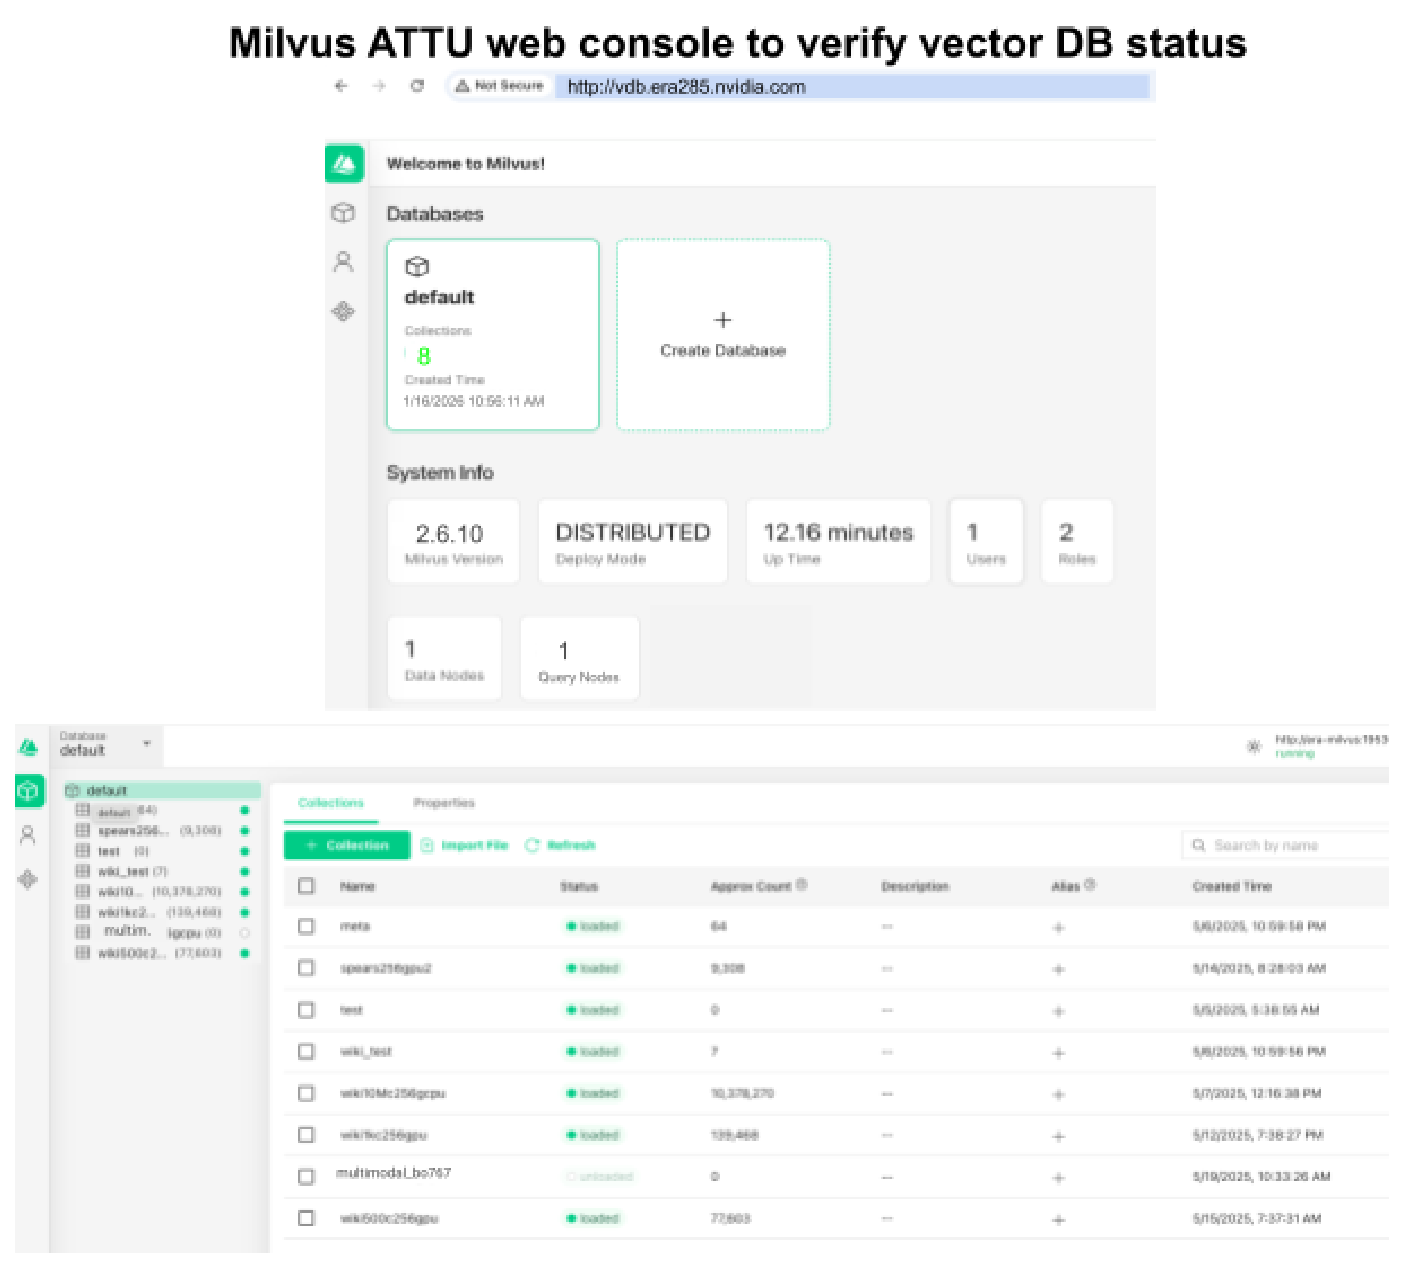
Figure 19 Milvus ATTU web console showing vector DB status#
Step 5: Scaling the Data/Index node#
With enterprise document scale (>100K docs, >10M vectors) using high concurrency (Concurrent Requests CR > 500), scale Milvus Data Node manually to provide redundancy and parallel data upload and indexing.
Perform the following command increasing the number of replicas to the desired state. As the pods increase, they will consume a GPU from the underlying cluster nodes.
kubectl scale deployments dataNode --replicas=2 -n rag
Deploy RAG Retrieval pipeline#
The RAG Langchain server along with LLM NIM and Reranking NIM are deployed as part of the RAG Retrieval pipeline. The Reranking NIM needs to be scaled out with high concurrent requests (CR) or high query rates - requests per second (RPS) to the Retrieval pipeline. Reranking NIM typically requires full GPU allocation and needs to be scaled along with the LLM NIM with a ratio of Reranker:LLM as 1:8 or 1:4 (Summarization) to provide linear scaling efficiency.
Use NIM Cache and Service to deploy LLM NIM and Reranking NIM independently from the RAG blueprint and add the endpoints to the RAG blueprint.
This provides flexibility to upgrade NIM and RAG blueprint (RAG server Langchain server) independently. It provides ability to use multiple LLM models with the RAG pipeline and dynamically update the RAG server with new endpoints if needed.
Step 1: Create NIM Cache for Retrieval NIM microservices#
Create NIM Cache for Retrieval NIM microservices including LLM, Reranking. NIM Cache stores the model in cache (default NFS storage) and enables faster scaling and autoscaling. A single cache can serve multiple pods of NIM Model. NIM cache enables scaling NIM microservices quickly since the models are already locally cached in a PVC in the cluster. It reduces the time for NIM microservices to be ready and available for service by 50-75% based on NIM model size.
Deploy the following YAML with kubectl, use the same Storage class name as created in the
Kubernetes Cluster. Configure NIM Cache config file for all NIM microservices
nimcache-retrieval.yaml.
Create NIM Cache for RAG Retrieval NIM microservices: LLM and reranking NIM microservices using full GPUs:
llama-3.3-nemotron-super-49b-v1.5:1.15.5llama-nemotron-rerank-1b-v2:1.11.0
For LLM NIM, NIM Cache needs to specify the model gpus.product name or profile to
match the GPU deployed in the cluster, along with engine, precision, tensor parallelism:
RTX PRO 6000:
"RTX6000_BLACKWELL_SV", vLLM, NVFP4, TP1H200 NVL:
"H200_NVL", vLLM, FP8, TP1
NIM Cache for LLM NIM with model parameters for RTX PRO 6000 and H200 NVL:
LLM NIM on RTX PRO 6000:
spec:
  source:
    ngc:
      modelPuller: nvcr.io/nim/nvidia/llama-3.3-nemotron-super-49b-v1.5:1.15.5
      model:
        engine: vllm
        lora: false
        gpus:
        - product: RTX6000_BLACKWELL_SV
        precision: nvfp4
        qosProfile: throughput
        tensorParallelism: "1"
LLM NIM on H200 NVL:
spec:
  source:
    ngc:
      modelPuller: nvcr.io/nim/nvidia/llama-3.3-nemotron-super-49b-v1.5:1.15.5
      model:
        engine: vllm
        lora: false
        gpus:
        - product: H200_NVL
        precision: fp8
        qosProfile: throughput
        tensorParallelism: "1"
Allocate sufficient storage (20GB - 120GB) to cache the model parameters.
See Appendix NIM Cache for Retrieval NIM microservices for examples of NIM Cache for
LLM and Embedding NIM microservices => nimcache-retrieval.yaml.
Apply the nimcache-retrieval.yaml in the rag namespace:
kubectl apply -f nimcache-retrieval.yaml -n rag
This will take ~15 - 25 minutes to complete based on the size of the model, check the status when the caching service is ready by checking the pods status:
kubectl get nimcache -n rag
NAME                                STATUS   PVC                                     AGE
nemotron-graphic-elements-v1        Ready    nemotron-graphic-elements-v1-pvc        7d
nemotron-ocr-v1                     Ready    nemotron-ocr-v1-pvc                     7d
nemotron-page-elements-v3           Ready    nemotron-page-elements-v3-pvc           7d
nemotron-table-structure-v1         Ready    nemotron-table-structure-v1-pvc         7d
nimcache-nemotron-embed             Ready    nimcache-nemotron-embed-pvc             9d
nimcache-nemo49b-trtllm-fp8-tp1     Ready    nimcache-nemo49b-trtllm-fp8-tp1-pvc     9d
nimcache-nemo49b-trtllm-fp8-tp2     Ready    nimcache-nemo49b-trtllm-fp8-tp2-pvc     9d
nimcache-nemo49b-vllm-fp8-tp2       Ready    nimcache-nemo49b-vllm-fp8-tp2-pvc       5d
nimcache-nemo49b-vllm-nvfp4-tp1     Ready    nimcache-nemo49b-vllm-nvfp4-tp1-pvc     5d
nimcache-nemotron-rerank            Ready    nimcache-nemotron-rerank-pvc            9d
Once the NIM Cache is ready, the model is now available to deploy using a NIM Service.
Example below of NIM Cache config for NIM LLM when cache is ready and available for use with NIM Service, it shows the downloaded profile name with vLLM engine, NVFP4, TP1:
kubectl get nimcache nimcache-nemo49b-vllm-nvfp4-tp1 -o yaml -n rag
apiVersion: apps.nvidia.com/v1alpha1
kind: NIMCache
metadata:
  name: nimcache-nemo49b-vllm-nvfp4-tp1
  namespace: rag
spec:
  source:
    ngc:
      authSecret: ngc-api
      pullSecret: ngc-secret
      model:
        engine: vllm
        gpus:
        - product: RTX6000_BLACKWELL_SV
        lora: false
        precision: nvfp4
        profiles:
        - e9cc0c5ea49283a493a0b18a05a97eb9b15a82a0d6acbb967e35609ddeb767fa
        qosProfile: throughput
        tensorParallelism: "1"
      modelPuller: nvcr.io/nim/nvidia/llama-3.3-nemotron-super-49b-v1.5:1.15.5
  storage:
    pvc:
      create: true
      size: 80Gi
      storageClass: nfs-client
      volumeAccessMode: ReadWriteMany
To delete the NIM Cache use kubectl delete nimcache. It deletes NIMCache CRD but
does not remove the PVCs attached:
# Delete the NIM Cache for LLM in the rag namespace
kubectl delete nimcache nimcache-nemo49b-vllm-nvfp4-tp1 -n rag

# Delete all NIM Cache in the rag namespace
kubectl delete nimcache --all -n rag
Step 2: Deploy NIM Service for NIM microservices#
NIM service will deploy a NIM pod, service, metrics monitoring and autoscaling (using HPA horizontal pod autoscaler) leveraging the NIM Cache downloaded in step above. NIM service is the actual inference service against which users can query the model.
Configure NIM Service NIMService-retrieval.yaml for all the NIM
microservices and provide the NIM Cache name to pull from when deploying the NIM Service.
Create the NIM Service for all NIM microservices to be deployed with RAG including LLM, embedding and reranking NIM microservices and Extraction NIM microservices and set resource requirements as full GPU or MIG as shown below:
llama-3.3-nemotron-super-49b-v1.5:1.15.5(full GPU)llama-nemotron-rerank-1b-v2:1.11.0(full GPU)
The NIM Service by default creates a Kubernetes ClusterIP service for every NIM deployment that enables only internal (within cluster) access to the NIM instance or pod; this is all that is needed for the extraction of NIM microservices, since they are only invoked by NV-Ingest server.
To provide external access to a NIM service:
create an Ingress service with an external URL and DNS record (
http://chat.era285.nvidia.com/v1/chat/collections) and use NGINX Ingress provider to route to the NIM serviceexpose the service using the MetalLB Load Balancer and use the LoadBalancer IP
For LLM NIM and Embedding NIM, expose the service as service.type: LoadBalancer;
this assigns an external IP to the service. The Enterprise RA Kubernetes cluster uses
MetalLB to provide a LoadBalancer service IP for the NIM Services.
For the NIM service enable metrics to create a serviceMonitor for each NIM service and
send metrics to Prometheus. For the serviceMonitor set the appropriate release label
to match the Prometheus deployment: release: kube-prometheus-stack.
To enable auto-scaling using the Horizontal Pod Autoscaler (HPA) for RAG services configure
scale.hpa and define the metric to use for autoscaling:
LLM KV-cache utilization:
gpu_cache_usage_percEmbedding and Reranking GPU utilization:
gpu_utilization
Enable tracing for the NIM service by setting Open Telemetry (OTEL) endpoint to the Jaeger
collector (http://rag-opentelemetry-collector:4318) deployed in the cluster.
For Nemotron Embedding, Reranking NIM microservices, expose the metricsPort: 8002 in
addition to the API port 8000. For extraction NIM microservices expose the grpcPort: 8001.
For extractions NIM microservices, set the OMP_NUM_THREADS and
NIM_TRITON_MAX_BATCH_SIZE: 32 as defined in the Helm values file for each NIM.
For LLM NIM, the NIM Service needs to limit context length: NIM_MAX_MODEL_LENGTH: 16384;
to fit model on a single RTX PRO 6000 GPU and specify the profile name (if multiple are
downloaded) to deploy which can be taken from the NIM Cache.
See Appendix NIM Service for Retrieval NIM microservices for examples of NIM service for
LLM and Embedding NIM microservices => NIMService-retrieval.yaml.
Apply the NIMService-retrieval.yaml file to rag namespace:
kubectl apply -f NIMService-retrieval.yaml -n rag
It will take ~3-12 minutes for LLM NIM and Reranking NIM to be READY for service. Time taken depends on the size of the model, check the status of the NIM service:
kubectl get NIMService -n rag
NAME                  STATUS   AGE
nim-llm-nemotron49b   Ready    1d
nemotron-rerank       Ready    1d
To delete the NIM service use kubectl delete NIMService. It deletes the
NIM deployment, pods and all services:
# Delete the NIM LLM service in the rag namespace
kubectl delete NIMService nim-llm-nemotron49b -n rag

# Delete all NIM Service in the rag namespace
kubectl delete NIMService --all -n rag
Step 3: Expose NIM Service with a Load Balancer#
The NIM service can be exposed for external access by using the Ingress provider installed when building the Kubernetes Cluster or via MetalLB Load Balancer, here is an example of how to expose the service using the MetalLB Load Balancer.
If a NIM Service pod has been deployed using the default ClusterIP service, expose the service using a LoadBalancer service. Since the cluster is configured with MetalLB, Kubernetes will use this to create a service IP for the NIM Service:
kubectl expose deployment nim-llm-nemotron49b --port=8000 --target-port=8000  \
--name=nim-llm-nemotron49b --type=LoadBalancer -n rag
Verify Kubernetes service in the rag namespace:
kubectl get svc -n rag
NAME                        TYPE           CLUSTER-IP       EXTERNAL-IP     PORT(S)                           AGE
milvus                      LoadBalancer   10.150.204.242   10.xx.203.23    19530:32065/TCP,9091:31240/TCP    10d
milvus-attu                 ClusterIP      10.150.174.87    <none>          3000/TCP                          10d
milvus-datanode             ClusterIP      None             <none>          9091/TCP                          10d
milvus-etcd                 ClusterIP      10.150.166.103   <none>          2379/TCP,2380/TCP                 10d
milvus-etcd-headless        ClusterIP      None             <none>          2379/TCP,2380/TCP                 10d
milvus-minio                ClusterIP      10.150.161.18    <none>          9000/TCP                          10d
milvus-minio-svc            ClusterIP      None             <none>          9000/TCP                          10d
milvus-mixcoord             ClusterIP      10.150.58.229    <none>          9091/TCP                          10d
milvus-pulsarv3-bookie      ClusterIP      None             <none>          3181/TCP,8000/TCP                 10d
milvus-pulsarv3-broker      ClusterIP      None             <none>          8080/TCP,6650/TCP                 10d
milvus-pulsarv3-proxy       ClusterIP      10.150.49.206    <none>          80/TCP,6650/TCP                   10d
milvus-pulsarv3-recovery    ClusterIP      None             <none>          8000/TCP                          10d
milvus-pulsarv3-zookeeper   ClusterIP      None             <none>          8000/TCP,2888/TCP,3888/TCP        10d
milvus-querynode            ClusterIP      None             <none>          9091/TCP                          10d
nemotron-embed              LoadBalancer   10.150.221.208   10.xx.203.26    8000:31527/TCP                    42s
nim-llm-nemotron49b         LoadBalancer   10.150.124.155   10.xx.203.24    8000:32728/TCP                    43s
nemotron-rerank             ClusterIP      10.150.190.40    <none>          8000/TCP                          42s
Step 4: Scaling the NIM Service#
The NIM service deployment pods backing the NIM Service can be scaled manually or automatically using Horizontal Pod Autoscaler (HPA) to autoscale RAG services using NIM metrics.
To scale pods manually, run the following command increasing the number of replicas to the desired state. As the pods increase, they will consume a GPU from the underlying cluster nodes.
kubectl scale deployments nim-llm-nemotron49b --replicas=4 -n rag
Deploy RAG Blueprint#
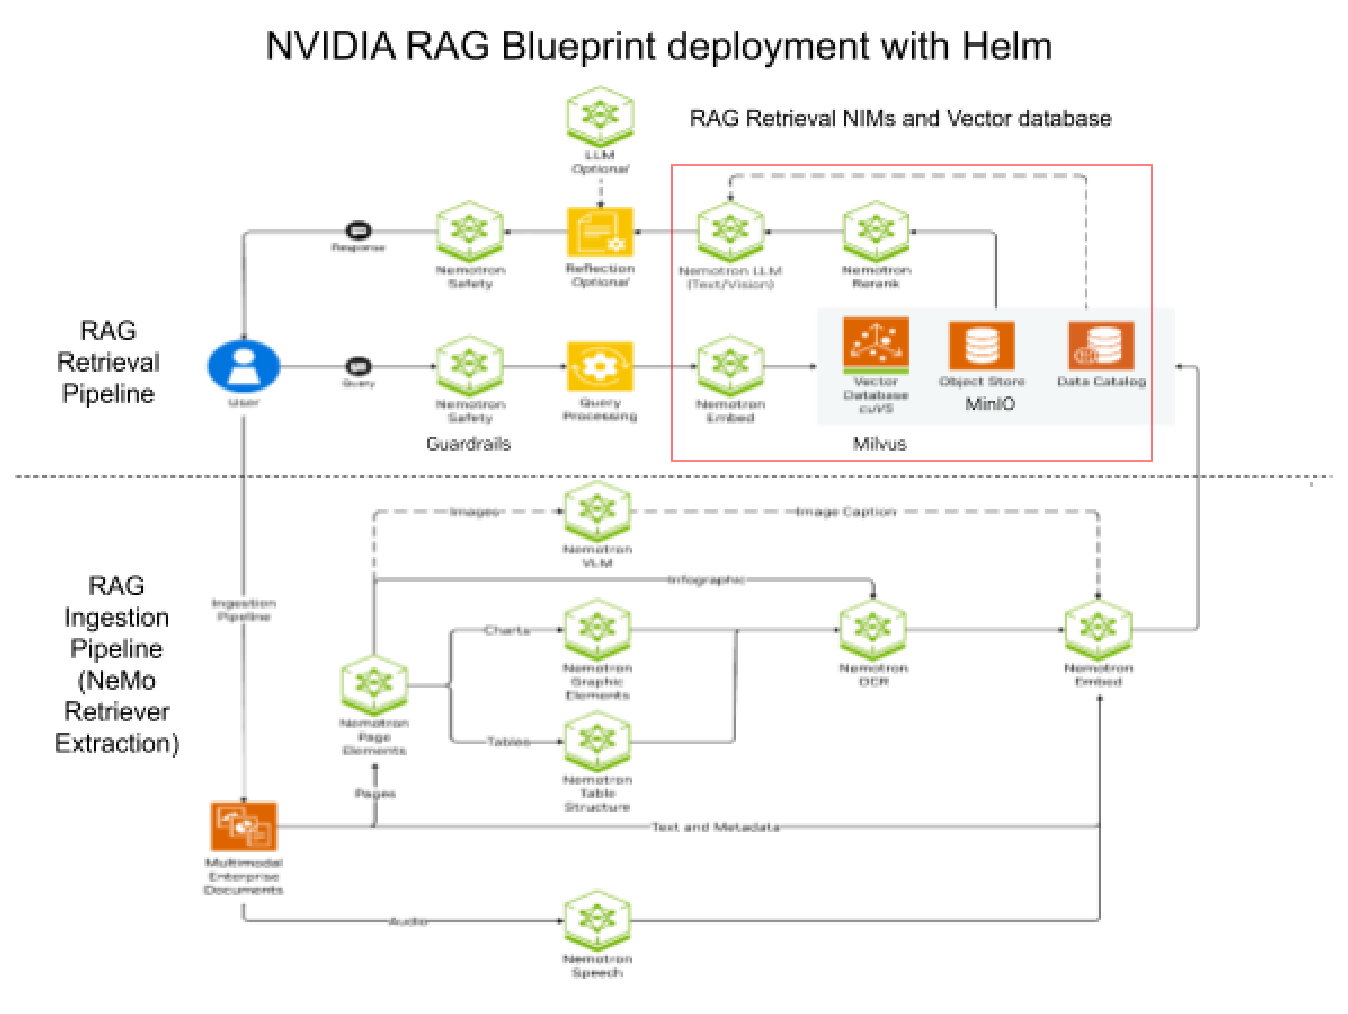
Figure 20 RAG Blueprint Components#
The RAG ingestion pipeline including NeMo Retriever (NV-Ingest), Extraction NIM microservices and Embedding NIM are deployed using either MIG profiles or Run:ai GPU fractions. The Milvus Vector DB has been deployed with GPU-Index (MIG or Run:ai) and CPU-Search. The RAG Retrieval NIM microservices; LLM NIM and Reranking NIM have been deployed in the cluster using NIMCache/NIM Service.
Step 1: Create the RAG Blueprint custom Helm values file#
All that’s left to deploy is the RAG blueprint with Helm charts using a custom value files
rag-values.yaml in the rag namespace.
Image repo: nvcr.io/nvidia/blueprint/rag-server tag: v2.5.0
This will deploy the RAG server (rag-server), which is the Langchain server that acts as
the data orchestrator for managing the sequence of all the requests and responses between
user and RAG services.
For the RAG retrieval pipeline, the RAG-server will need to have sufficient resources: CPU/Memory and worker threads, to support enterprise level user traffic with thousands of concurrent requests (CR) running simultaneous RAG queries and high request rates of several hundred requests per second (RPS).
Baseline rag-server - 32 workers; 8 vCPU, 32 GiB
High Performance for Scale and Benchmarking
rag-server - 64 workers; 16 vCPU, 64 GiB
image:
  repository: nvcr.io/nvidia/blueprint/rag-server
  tag: "2.5.0"

replicaCount: 1

server:
  workers: 64
resources:
  limits:
    cpu: "20"
    memory: "80Gi"
  requests:
    cpu: "16"
    memory: "64Gi"
Scale out the RAG server (rag-server) replicas with high load; high concurrency and high
request rates. It is typically recommended to scale out rag-server microservice along with
LLM, using rag-server:LLM ratio of 1:2 or 1:4 to handle high request rates.
Enable Ingress/GatewayAPI or Load Balancer service for rag-server, to enable access from outside the cluster.
In the RAG blueprint, disable all NIM microservices and Milvus deployments since these have been independently deployed already to provide better flexibility and customization to use MIG or Run:ai.
Define the endpoints for core services being called by the pipeline; including LLM NIM, Embedding NIM, Reranking NIM, Milvus Vector DB service and MinIO object store.
For NIM microservices and services deployed in a different namespace use FQDN DNS service name to define the endpoint:
<nim-service-name>.<namespace>.svc.cluster.local:<service-port>
For Run:ai deployment, the Embedding NIM, Milvus vector DB, MinIO object store and
NV-Ingest services are deployed in a different namespace runai-rag from the rag-server
(rag namespace) then when defining the endpoints, the DNS FQDN name including the
namespace must be provided:
APP_EMBEDDINGS_SERVERURL: "nemotron-embed.runai-rag.svc.cluster.local:8000"
MINIO_ENDPOINT: "milvus-minio.runai-rag.svc.cluster.local:9000"
REDIS_HOST: "nvingest-redis-master.runai-rag.svc.cluster.local"
APP_VECTORSTORE_URL: "http://milvus.runai-rag.svc.cluster.local:19530"
APP_NVINGEST_MESSAGECLIENTHOSTNAME: "nvingest-NV-Ingest.runai-rag.svc.cluster.local"
For Milvus vector DB enable GPU-Index and CPU-Search hybrid mode. In this mode, Milvus
collections are created with GPU_CAGRA for indexing then at collection load time converted
(adapt_for_cpu) to CPU search (HNSW like). This requires the RAG server to set the EF
parameter for the Vector DB search query. EF Parameter controls query time/accuracy
trade-off. Higher EF leads to more accurate but slower search. EF needs to be >= Vector DB
topK (VDB_TOPK) search value:
APP_VECTORSTORE_ENABLEGPUSEARCH: "False"
APP_VECTORSTORE_EF: "20"
Enable prometheus metrics and OpenTelemetry OTEL collector for collecting tracing data to send to Jaeger and/or zipkin.
For benchmarking purposes this guide uses the NeMo Retriever (NV-Ingest) to deploy the RAG ingestion pipeline. Hence disable deploying the ingestion pipeline from the RAG blueprint, disable NV-Ingest deployment in the RAG blueprint Helm chart.
Enable ingestor-server and frontend for basic validation and demo purposes not used for ingestion or retrieval benchmarking.
See Appendix RAG blueprint Helm custom values file for example RAG blueprint values file
=> rag-blueprint-values.yaml.
Step 2: Tuning for Performance and Scale#
Performance benchmarking for Retrieval focuses on fine tuning and scaling the core elements (i.e. LLM NIM, Embedding NIM, Reranking NIM and Milvus Vector DB) in the RAG pipeline that are most responsible for delivering context-aware grounded responses. Non-core elements and parameters need to be disabled or turned off.
Disable citations for performance and scaling - Enabling citations adds additional overhead on the RAG server (and Ingestor Server) to include data on document chunks that were provided to the LLM and this increases the output response generated. Citations are required for Accuracy benchmarking to measure relevance and groundedness of the response from LLM but can be disabled for performance and scale validation. Enabling citations can adversely affect AI-perf performance benchmarking since the responses get very large and split into multiple files that cannot be parsed by the tool.
Disable Query Re-writer - Query-rewriter can improve accuracy to ensure that the user query is well defined, formatted correctly and has no extraneous characters but it adds overhead of an additional call to the LLM which almost double the latency given that LLM account for ~90% of the overall e2e request latency.
Turn-off multi-turn conversations - enabling multi-turn conversation adds more context overhead with context from the previous turn included in the next query, with up to 5 turns of data being included. This requires validation with the genAI-perf tool using user session mode and can include conversation from the last 2-5 turns. This can increase the User Query (prompt) ISL by up to 5 times and will be looked into for future Enterprise RAG benchmarking usecases. For this guide, the focus is single turn request-response for performance benchmarking.
Disable LLM Thinking and Reasoning - For LLM performance benchmarking, it is recommended to disable thinking and reasoning and filter out thinking tokens to avoid overhead from additional output tokens. LLM Llama-3.3-Nemotron-Super-49B is capable of more complex chain of thought reasoning but for performance benchmarking, disable thinking and use one-shot response to validate accuracy. Reasoning improves accuracy for complex queries but it will also generate additional thinking tokens and provide multiple solution options; increasing the output throughput but also increasing the e2e request latency for each user and this will limit the number of Concurrent Requests that can be supported.
Disable Reflection and Evaluator agent - Evaluator agent or Reflection agent is only used with Accuracy benchmarking to validate that the response from the LLM is accurate, grounded and relevant to the context provided.
Disable Guardrails - NeMo Retriever guardrails serve an important task to ensure content safety, topic control, PII detection, RAG enforcement (avoid hallucinations), and jailbreak prevention and enforce any policies. Guardrails are a must have for Enterprise-grade RAG applications. However for performance benchmarking NeMo Guardrails add overhead of an additional NIM call.
envVars:
  ENABLE_CITATIONS: "False" #"True"
  # Choose whether to enable/disable guardrails
  ENABLE_GUARDRAILS: "False"
  # Log level for server, supported level NOTSET, DEBUG, INFO, WARN, ERROR, CRITICAL
  LOGLEVEL: "INFO"
  # enable multi-turn conversation in the rag chain - this controls conversation history usage
  # while doing query rewriting and in LLM prompt
  ENABLE_MULTITURN: "False" #"True"
  # enable query rewriting for multiturn conversation in the rag chain.
  # This will improve accuracy of the retriever pipeline but increase latency due to an additional LLM call
  ENABLE_QUERYREWRITER: "False"
  # number of last n chat messages to consider from the provided conversation history
  # === Reflection ===
  # enable reflection (context relevance and response groundedness checking) in the rag chain
  ENABLE_REFLECTION: "False"
  # Choose whether to enable source metadata in document content during generation
  ENABLE_SOURCE_METADATA: "true"
  # Whether to filter content within <think></think> tags in model responses
  FILTER_THINK_TOKENS: "true"
  # Whether to enable thinking in the rag chain for llama-3.3-nemotron-super-49b model
  ENABLE_THINKING: "false"
Disable citations, guardrails and query rewriting dynamically when sending HTTP POST API
requests to the RAG server API: /v1/chat/completions as option in the JSON payload:
"enable_query_rewriting": false,
"enable_citations": false,
"enable_guardrails": false
Reranker ON/OFF - It is recommended to disable the Reranking NIM for improved performance when querying from a single collection. If querying from multiple collections or data sources; enable the Reranking NIM to filter out data chunks and send the LLM only the most relevant chunks.
envVars:
  ENABLE_RERANKER: "True"
Enable/disable Reranking dynamically when sending HTTP POST API requests to the RAG
server API: /v1/chat/completions as option in the JSON payload: "enable_reranker": false.
Step 3: Deploy RAG blueprint Distributed with Helm#
Deploy RAG Blueprint using custom Helm values file rag-blueprint-values.yaml.
Add the NVIDIA blueprint Helm repo and use Helm install to deploy:
# add NVIDIA blueprint repo and update repo to get latest versions
helm repo add nvidia-blueprint https://helm.ngc.nvidia.com/nvidia/blueprint/

# Check RAG Blueprint chart version and default values.yaml
helm search repo nvidia-blueprint/nvidia-blueprint-rag --versions
helm show values nvidia-blueprint/nvidia-blueprint-rag

# deploy RAG blueprint with custom values in the rag namespace
helm upgrade --install rag-bp nvidia-blueprint/nvidia-blueprint-rag \
-f  rag-blueprint-values.yml  -n rag \

# deploy RAG blueprint with custom values with NGC_API_KEY
export NGC_API_KEY="nvapi-XXXXXXXXXXXXXXXXXXXXXXXXXXXXX"
helm upgrade --install rag-bp nvidia-blueprint/nvidia-blueprint-rag \
-f  rag-blueprint-values.yml  -n rag \
--username '$oauthtoken' --password "${NGC_API_KEY}" \
--set imagePullSecret.password=$NGC_API_KEY \
--set ngcApiSecret.password=$NGC_API_KEY

# upgrade to new or specific version or update values file update
helm upgrade --install rag-bp nvidia-blueprint/nvidia-blueprint-rag \
--reuse-values -f  rag-blueprint-values.yml  -n rag --version=v2.5.0
Uninstall RAG blueprint and remove all components:
helm uninstall rag-bp -n rag
Step 4: Verify RAG Blueprint deployment#
Verify Milvus services and data, query and streaming nodes are up and running:
kubectl get pods -n rag | grep rag|nim|nvingest|nemo
NAME                                           READY  STATUS   RESTARTS   AGE
ingestor-server-6ff99997d7-5r8pz               1/1    Running  0          2d
rag-frontend-56ccb8f749-plqmh                  1/1    Running  0          2d
nemotron-table-structure-v1-84c4cd857f-bh8mc   1/1    Running  0          2d
nemotron-page-elements-v3-67d1cd2936f-ce1sc    1/1    Running   0         2d
nemotron-graphic-elements-v1-98d1ac1936f-d214c 1/1    Running   0         2d
nemotron-ocr-v1-52cgcd883f-wd8xc               1/1    Running   0         2d
nim-llm-nemotron49b-8684987986-mfndw           1/1    Running   0         2d
nvingest-NV-Ingest-8469fb4b86-xknqs            1/1    Running   0         2d
llama-nemotron-embed-1b-v2-56485cb6fc-rbdnh    1/1    Running   0         2d
rag-opentelemetry-collector-5784987986-mfndw   1/1    Running   0         2d
nvingest-redis-master-0                        1/1    Running   0         2d
nvingest-redis-replicas-0                      1/1    Running   0         2d
rag-server-77457ddf79-xmfxl                    1/1    Running   0         2d
nemotron-rerank-5c466746dc-6v5gx               1/1    Running   0         2d
Install AI-Perf benchmarking tool#
To benchmark the RAG Retrieval service install NVIDIA AIPerf benchmarking tool.
AIPerf creates multiple concurrent user requests using synthetic or user defined input prompts and these are sent to the RAG server service endpoint. AIPerf will process the responses received to calculate the metrics defined above for each user request.
For generating the user prompts it is important to use the right tokenizer to match the LLM model otherwise the metrics reported by AIPerf may be incorrect e.g. input ISL sent and OSL received may not match the configured ISL/OSL.
For LLM model nvidia/llama-3.3-nemotron-super-49b-v1, use the matching
tokenizer nvidia/Llama-3_3-Nemotron-Super-49B-v1 from Hugging Face.
AIPerf client can be installed by downloading the Triton server from NGC and deployed in a docker container. Triton Inference Server has the AI Perf tool in it.
Install the AIPerf client in Python venv (3.10+) on Ubuntu 24.04 server using pip. Install AI perf on Ubuntu 24.04 node in python venv and run from outside cluster:
# Create and activate a virtual environment
python3 -m venv venv
source venv/bin/activate

# Install aiperf
pip install aiperf
The benchmarking server needs sufficient CPU and Memory capacity to run high concurrency, thousands of concurrent users:
Benchmarking server specs: CPU: 128 vCPU/cores, RAM Memory: 256GiB
Run AI-Perf Benchmarking tool#
Run a sample script below with synthetic data. Add prompt.jsonl with valid questions to append to synthetic data.
See sample GenAI-perf command below and basic script:
#Sample AI perf command and script

NIM_MODEL_NAME="nvidia/llama-3.3-nemotron-super-49b-v1.5"
# RAG and non RAG services (service:port) to sweep over
RAG_SERVICE="rag-server:8081" # DNS name or rag-server LB IP and port
LLM_SERVICE="nim-llm-nemotron49b:8000" #DNS name for nim-llm or LB IP and port
SERVICE=$RAG_SERVICE
ISL="128" # Input Sequence Length (ISL) inputs to sweep over
OSL="128" # Output Sequence Length (OSL) inputs to sweep over
CR="1"
CONCURRENCY_RANGE="1 5 10 20 50"
TOP_K_RANGE="10" # The number of documents/embeddings chunks to retrieve from the Vector Database, only relevant for RAG services
OUTPUT_DIR="./aiperf/results"
COLLECTION="wiki500c256gpu"
EXPORT_FILE=chat_SVC-${SVC}_CR-${CR}_ISL-${ISL}_OSL-${OSL}_TOPK-4-$(date +"%Y-%m-%d-%H_%M_%S").json
PROMPT_FILE=prompt.jsonl
TOKENIZER="nvidia/Llama-3_3-Nemotron-Super-49B-v1_5"
aiperf profile \
  -m $NIM_MODEL_NAME \
  --endpoint-type chat \
  --streaming -url $SERVICE \
  --request-count 50 \
  --num-prompts 100 \
  --synthetic-input-tokens-mean $ISL \
  --synthetic-input-tokens-stddev 0 \
  --num-dataset-entries 150 \
  --input-file $PROMPT_FILE \
  --num-prefix-prompts 150 \
  --prefix-prompt-length 111 \ # 128 - 17 (tokens for questions)
  --concurrency $CR \
  --output-tokens-mean $OSL \
  --extra-inputs max_tokens:$OSL \
  --extra-inputs min_tokens:$OSL \
  --extra-inputs ignore_eos:true \
  --extra-inputs collection_name:$COLLECTION \
  --extra-inputs enable_reranker:true \
  --extra-inputs enable_citations:false \
  --extra-inputs enable_query_rewriting:false \
  --extra-inputs vdb_top_k:10 \
  --extra-inputs reranker_top_k:4 \
  --artifact-dir $OUTPUT_DIR \
  --tokenizer $TOKENIZER \
  --profile-export-file $EXPORT_FILE \
  -- -v --max-threads=$CR

echo USECASE Chat SVC:${SVC} CR:${CR} ISL:${ISL} OSL:${OSL} Retriever-TOPK:4 Scale-1X