OSMO Helm Charts#
OSMO is now open source: NVIDIA/OSMO
With public documentation: https://nvidia.github.io/OSMO/main/user_guide/index.html
Infra Code: https://nvidia.github.io/OSMO/main/deployment_guide/install_backend/create_backend/onprem_setup.html
OSMO Architecture#
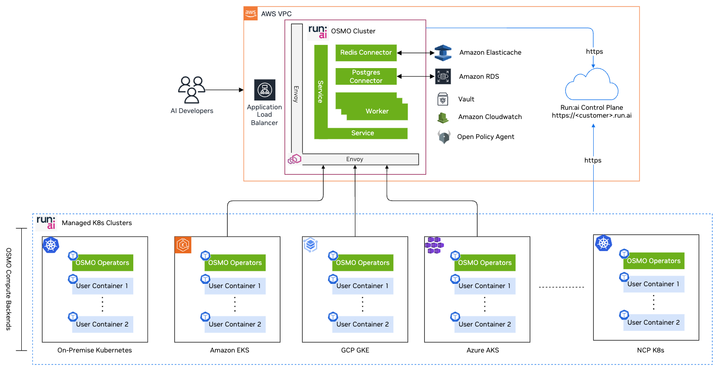
Figure 11 Run:ai and OSMO architecture showing the control plane managing OSMO and compute backends across on-premise Kubernetes, Amazon EKS, GCP GKE, Azure AKS, and NCP K8s clusters#
Run AI cluster manages infra (i.e., OSMO compute backends) across CSPs and NCPs.
OSMO is deployed inside a Run AI cluster.
Run AI control plane manages both Run AI clusters (OSMO + OSMO compute backends).
Registering Backend#
Install the OSMO CLI and login to the OSMO Control Plane:
curl -fsSL https://us-west-2-aws.osmo.nvidia.com/client/install.sh | bash
osmo login <YOUR_RUNAI_CONTROL_PLANE_URL>
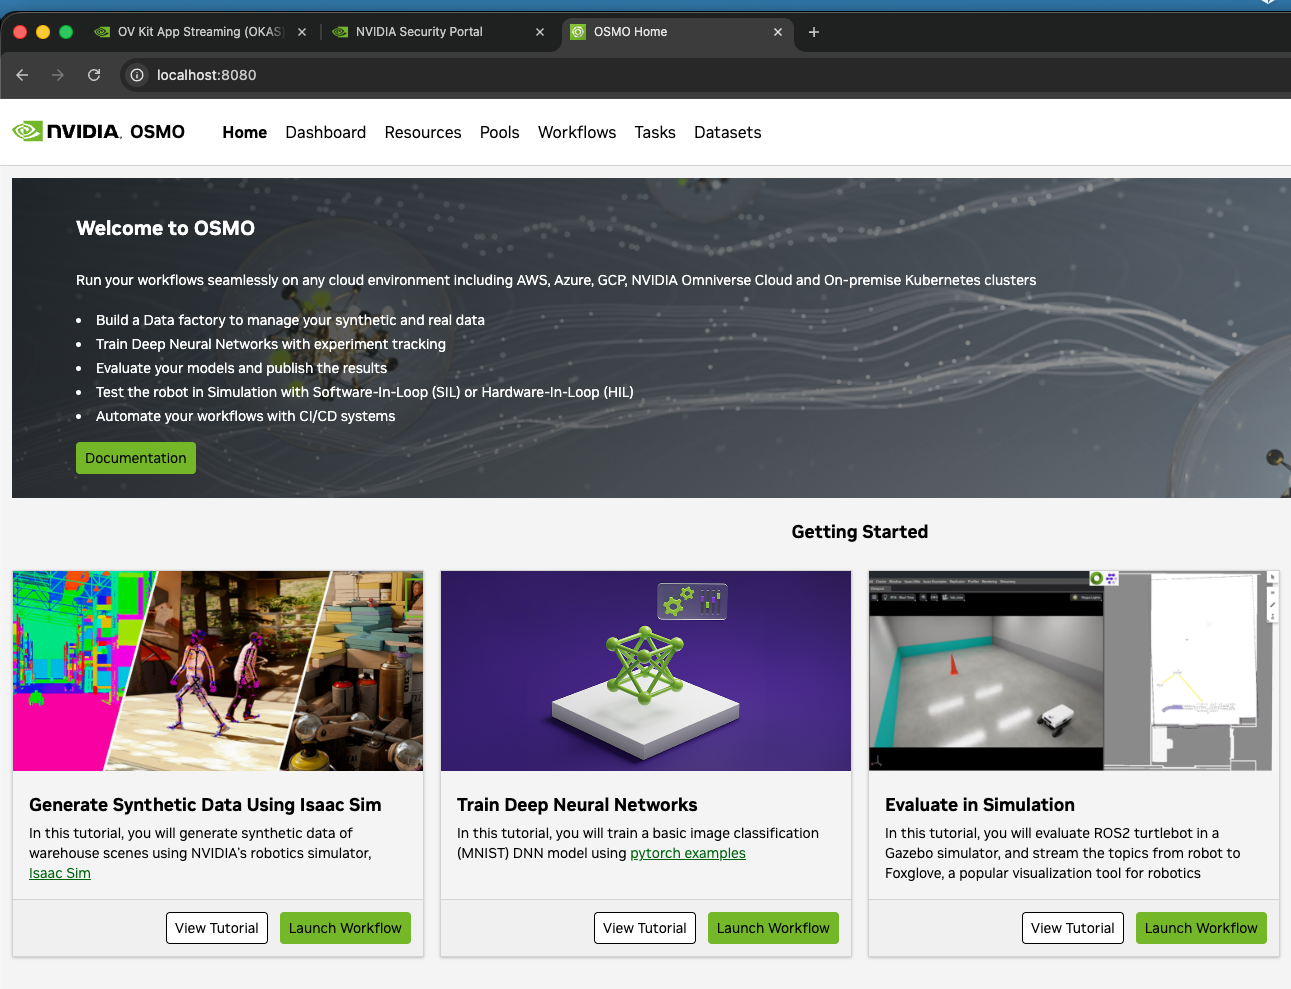
Figure 12 OSMO UI home screen showing the dashboard with workflow tutorials for synthetic data generation, neural network training, and simulation evaluation#
Get an NGC API token and set docker registry secret in the osmo-operator namespace to be
able to pull the images:
kubectl create secret docker-registry imagepullsecret -n osmo-operator \
  --docker-server="nvcr.io" \
  --docker-username='$oauthtoken' \
  --docker-password=<YOUR_NGC_API_TOKEN>
Add the OSMO Helm Repo to your local system (NGC API KEY REQUIRED):
helm repo add osmo https://helm.ngc.nvidia.com/nvidia/osmo \
  --username \$oauthtoken \
  --password <YOUR_NGC_API_TOKEN>
Identify the Version Tag you will use with a helm search command:
helm search repo osmo/backend-operator --versions
Get an OSMO backend Token and set it to an Environmental Variable:
export OSMO_SERVICE_TOKEN=$(osmo token set backend-token \
  --expires-at <YYYY-MM-DD> \
  --description "Backend Operator Token" \
  --service --roles osmo-backend \
  -t json | jq -r '.token')
Create a generic secret in the osmo-operator namespace that will set the token to be used:
kubectl create secret generic osmo-operator-token -n osmo-operator \
  --from-literal=token=$OSMO_SERVICE_TOKEN
Create the backend values file to be used in the Helm install and save this file as
osmo_be_values.yaml:
global:
 osmoImageLocation: nvcr.io/nvidia/osmo
 osmoImageTag: 6.2 # insert osmo image tag here
 imagePullSecret: imagepullsecret
 serviceUrl: <YOUR_RUNAI_CONTROL_PLANE_URL>
 agentNamespace: osmo-operator
 backendNamespace: osmo-workflows
 backendName: default # update to reflect the name of your backend
 accountTokenSecret: osmo-operator-token
 loginMethod: token

 services:
  backendListener:
    resources:
      requests:
          cpu: "1"
          memory: "1Gi"
      limits:
          memory: "1Gi"
  backendWorker:
    resources:
      requests:
          cpu: "1"
          memory: "1Gi"
      limits:
          memory: "1Gi"
Using helm, install the osmo-operator into the Kubernetes cluster:
helm upgrade --install osmo-operator osmo/backend-operator \
  -f ./osmo_be_values.yaml \
  --version 1.2.1 \
  --namespace osmo-operator \
  --create-namespace
Create the scheduler_settings.json file with the following settings:
{
  "scheduler_settings": {
    "scheduler_type": "kai",
    "scheduler_name": "runai-scheduler",
    "coscheduling": true,
    "scheduler_timeout": 30
  }
}
Apply the scheduler settings to the OSMO deployment:
osmo config update BACKEND default --file ./scheduler_settings.json
Create the workflow_config.json file with the following settings:
{
  "backend_images": {
    "credential": {
      "registry": "nvcr.io",
      "username": "$oauthtoken",
      "auth": "<YOUR NGC API KEY>"
    }
  }
}
Apply the workflow config file to OSMO:
osmo config update WORKFLOW --file ./workflow_config.json
Map Run:ai Project to the osmo-workflows Namespace#
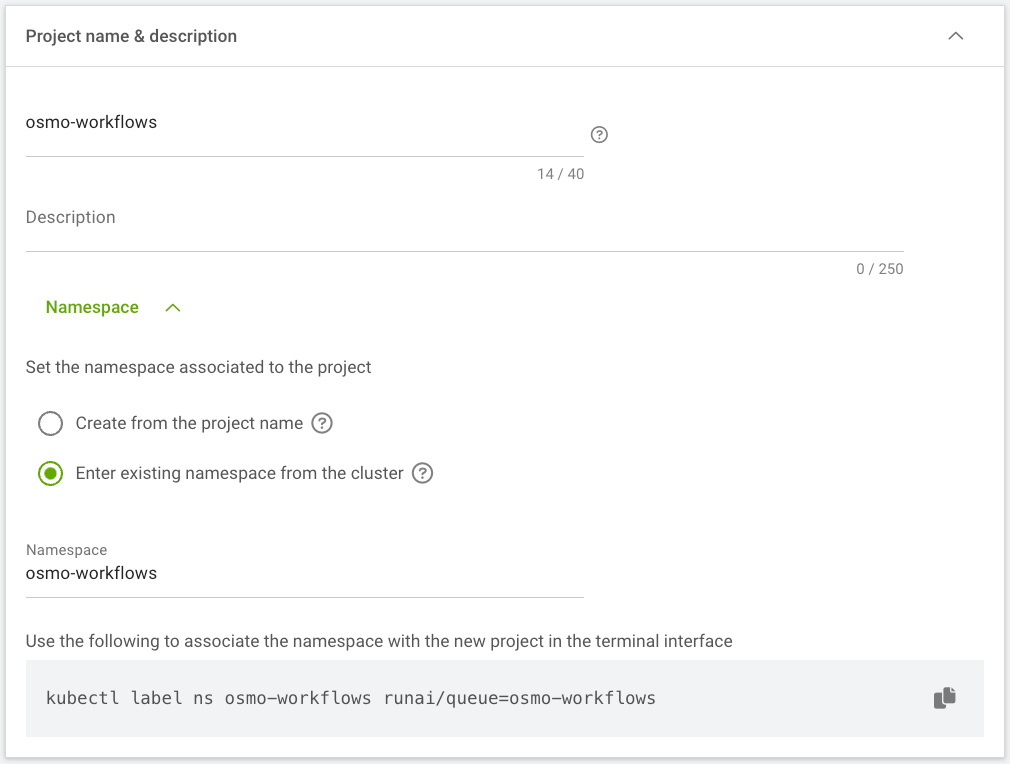
Figure 13 Run:ai project configuration showing namespace mapping to osmo-workflows and quota management with GPU allocation#
Login to the Run:ai UI.
Navigate to Organization → Projects.
Click on New Project.
Name the Project
osmo-workflows.Click on the Namespace sub-menu.
Select Enter existing namespace from the cluster.
In the namespace line, enter in
osmo-workflows.In the Quota Management box, assign all GPUs in the cluster to the Project.
Click Create Project.