Run:ai Install and Configuration#
In the previous steps, we have configured all of the required requirements for a Run:ai Self Hosted Install. The most up to date documentation can be found here: https://run-ai-docs.nvidia.com/self-hosted/getting-started/installation
Run:ai Control Plane Install#
Create the runai-backend namespace:
kubectl create ns runai-backend
Create a kubernetes tls secret to present the certificate for secure communications:
kubectl create secret tls runai-backend-tls -n runai-backend \
  --cert ./fullchain.pem \
  --key ./private-key.pem
Create a kubernetes docker-registry secret that will be used to pull the Run:ai Images from the private repository:
export RUNAI_TOKEN=<JWT Token>
kubectl create secret docker-registry runai-reg-creds \
  --docker-server=https://runai.jfrog.io \
  --docker-username=self-hosted-image-puller-prod \
  --docker-password=$RUNAI_TOKEN \
  --docker-email=support@run.ai \
  --namespace=runai-backend
Using helm, add the Run:ai Control Plane repository to the local helm chart repositories, update the repo contents, and deploy the Run:ai Control Plane:
helm repo add runai-backend https://runai.jfrog.io/artifactory/cp-charts-prod
helm repo update

helm upgrade -i runai-backend -n runai-backend \
  runai-backend/control-plane \
  --set global.domain=<YOUR_RUNAI_CONTROL_PLANE_URL> \
  --set global.management.user=<YOUR_RUN_AI_USERNAME> \
  --set global.management.password=<YOUR_RUN_AI_PASSWORD>
Wait for deployment to complete and then using a browser navigate to
https://<YOUR_RUNAI_CONTROL_PLANE_URL> and login with the initial credentials of
User: <YOUR_RUN_AI_USERNAME> (e.g. test@run.ai) and Password: <YOUR_RUN_AI_PASSWORD>.
Run:ai Cluster Setup#
Upon logging into the GUI for the first time, you will be greeted with a wizard that will walk you through the initial cluster deployment process. In the wizard fill in the following:
Cluster Name — A way to identify the cluster when working with multiple clusters.
Run:ai Version — Generally select the default unless there is a specific need for a specific version.
Cluster Location: Same as control plane — Only select Remote Control Plane if the Control Plane and cluster are not hosted on the same server.
Click Continue.
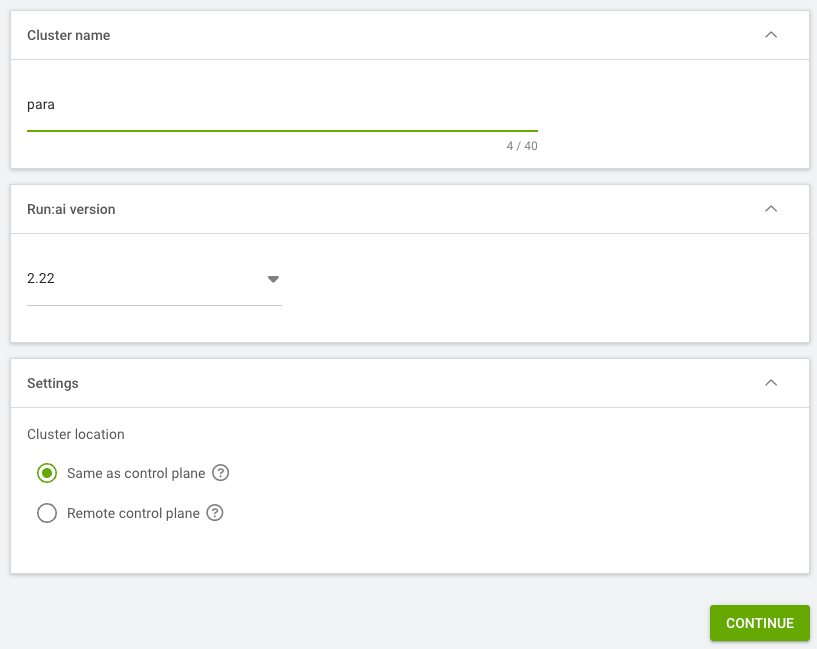
Figure 10 Run:ai cluster setup wizard showing cluster name, version, and location fields#
A summary screen will appear next. Copy the command text to your clipboard and continue with the following steps.
Create the runai namespace:
kubectl create ns runai
Create the ingress secret for secure communications with the FQDN for HTTPS access:
kubectl create secret tls runai-cluster-domain-tls-secret -n runai \
  --cert ./fullchain.pem \
  --key ./private-key.pem
Now we will paste the command from our clipboard into the terminal to add the Run:ai Cluster repo to our local Helm repos, update it to get the latest chart definitions and then install the Run:ai Cluster.
Note
Your secrets, URLs, and UIDs will be specific to your control plane.
helm repo add runai \
  https://runai.jfrog.io/artifactory/api/helm/run-ai-charts \
  --force-update
helm repo update

helm upgrade -i runai-cluster runai/runai-cluster -n runai \
  --set controlPlane.url=<YOUR_RUNAI_CONTROL_PLANE_URL> \
  --set controlPlane.clientSecret=<YOUR_CLIENT_SECRET> \
  --set cluster.uid=<YOUR_CLUSTER_UID> \
  --set cluster.url=<YOUR_RUNAI_CONTROL_PLANE_URL> \
  --version="2.22.52" \
  --create-namespace
Wait for the process to complete and in the Run:ai UI, click done on the wizard and then you will be taken to the Clusters screen in Run:ai. Once the cluster shows a Status of “Connected” the install is complete.
Run:ai Cluster — Optional Additional Components#
Distributed Training Install#
If you have a need to run TensorFlow, PyTorch, XGBoost, MPI v2, or JAX distributed workloads, run these commands to install the necessary Custom Resource Definitions into the cluster.
kubectl apply --server-side -k \
  "github.com/kubeflow/training-operator.git/manifests/overlays/standalone?ref=v1.9.2"

kubectl patch deployment training-operator -n kubeflow --type='json' \
  -p='[{"op": "add", "path": "/spec/template/spec/containers/0/args", "value": ["--enable-scheme=tfjob","--enable-scheme=pytorchjob","--enable-scheme=xgboostjob","--enable-scheme=jaxjob"]}]'

kubectl delete crd mpijobs.kubeflow.org

kubectl apply --server-side -f \
  https://raw.githubusercontent.com/kubeflow/mpi-operator/v0.6.0/deploy/v2beta1/mpi-operator.yaml
Inference Install#
For inference, we will leverage Knative-Serving and Kourier. If you have a need for a different networking option with Knative-Serving, please refer to the Knative-Serving installation documentation to see your options.
Run these commands to install and configure the Knative-Serving and Kourier CRDs:
kubectl apply -f https://github.com/knative/serving/releases/download/knative-v1.19.6/serving-crds.yaml
kubectl apply -f https://github.com/knative/serving/releases/download/knative-v1.19.6/serving-core.yaml
kubectl apply -f https://github.com/knative-extensions/net-kourier/releases/download/knative-v1.19.5/kourier.yaml

kubectl patch configmap/config-network \
  --namespace knative-serving \
  --type merge \
  --patch '{"data":{"ingress-class":"kourier.ingress.networking.knative.dev"}}'

kubectl apply -f https://github.com/knative/serving/releases/download/knative-v1.19.6/serving-hpa.yaml

kubectl patch configmap/config-autoscaler \
  --namespace knative-serving \
  --type merge \
  --patch '{"data":{"enable-scale-to-zero":"true"}}' && \
kubectl patch configmap/config-features \
  --namespace knative-serving \
  --type merge \
  --patch '{"data":{"kubernetes.podspec-schedulername":"enabled","kubernetes.podspec-nodeselector":"enabled","kubernetes.podspec-affinity":"enabled","kubernetes.podspec-tolerations":"enabled","kubernetes.podspec-volumes-emptydir":"enabled","kubernetes.podspec-securitycontext":"enabled","kubernetes.containerspec-addcapabilities":"enabled","kubernetes.podspec-persistent-volume-claim":"enabled","kubernetes.podspec-persistent-volume-write":"enabled","multi-container":"enabled","kubernetes.podspec-init-containers":"enabled","kubernetes.podspec-fieldref":"enabled"}}'
If enabling external access to the Inferencing Endpoints, you will need to configure Knative-Serving to use your domain by running this command:
# Replace <runai-inference.mycorp.local> with your FQDN for Inference
kubectl patch configmap/config-domain \
  --namespace knative-serving \
  --type merge \
  --patch '{"data":{"<runai-inference.mycorp.local>":""}}'
Next you will need the External IP address of the Kourier Ingress service:
kubectl --namespace kourier-system get service kourier
Finally you will need to setup a wildcard DNS record that points to the IP address you obtained
in the previous step. The DNS record should be in the following format:
*.<k8s-namespace>.<runai-inference.mycorp.local>. You may need to hold off on this step
until after you identify the namespace that will be used to host workloads.
Distributed Inference Setup#
If you have a need for distributed inference, you will need to run these commands to install the Leader Worker Set CRDs.
CHART_VERSION=0.6.2
helm install lws oci://registry.k8s.io/lws/charts/lws \
  --version=$CHART_VERSION \
  --namespace lws-system \
  --create-namespace \
  --wait --timeout 300s
User Access#
The default Admin account should not be used for general access to the Run:ai system. Please create individual accounts for Local Administrators that could need access by following these instructions:
Run:ai does have the option to integrate into an Identity Provider via either OIDC or SAML 2.0. Please refer to the official documentation to configure:
https://run-ai-docs.nvidia.com/self-hosted/infrastructure-setup/authentication/sso
Run:ai Install Complete#
The Run:ai installation is now complete. At this point we need to await the installation of OSMO to configure the Run:ai Cluster and associated Run:ai Projects. This will be covered in the OSMO installation section.