Secure Boot
Applies to the Jetson Orin NX and Nano series, Jetson AGX Orin series, the Jetson Xavier NX series, and the Jetson AGX Xavier series.
NVIDIA® Jetson™ Linux provides boot security. Secure Boot prevents execution of unauthorized boot codes through the chain of trust. The root-of-trust is an on-die BootROM code that authenticates boot codes such as BCT, Bootloader, and warm boot vector using Public Key Cryptography (PKC) keys stored in write-once-read-multiple fuse devices. On Jetson platforms that support Secure Boot Key (SBK), you can use it to encrypt Bootloader images.
NVIDIA SoCs contain multiple fuses that control different items for security and boot.
The Jetson BSP package contains program scripts/tools and instructions to provide security services during the booting.
The root-of-trust that uses the NVIDIA SoCs fuses to authenticate boot codes ends at the Bootloader. After this, the current Bootloader (UEFI) will use UEFI’s Security Keys scheme to authenticate its payloads
To enable UEFI Secureboot, refer to UEFI Secureboot.
Overall Fusing and Signing Binaries Flow
The Secure Boot process with PKC and SBK requires you to:
Generate a PKC key pair.
Prepare an SBK key.
Prepare KEK keys.
Prepare the Fuse Configuration file.
Burn fuses using
odmfuse.shscript with a Fuse Configuration file.Flash the device with secured images (using
flash.shwith-u-voptions).
Prerequisites Secure Boot
An X86 host running Ubuntu 18.04 LTS, or 20.04 LTS.
libftdi-devfor USB debug port support.openssh-serverpackage for OpenSSL.Full installation of the latest Jetson Linux release on the host.
A USB cable connecting the Jetson device to the host.
If necessary, a USB cable that connects the Jetson device’s debug serial port to the host.
Fuses and Security
NVIDIA SoCs contain multiple fuses that control different items for security and boot. Once a fuse bit is set to 1, you cannot change its value back to 0. For example, a fuse value of 1 (0x01) can be changed to 3 (0x03) or 5 (0x05), but not to 4 (0x4) because bit 0 is already programmed to 1.
After the SecurityMode (also known as odm_production_mode) fuse is burned with a value of 0x1, all additional fuse write requests will be blocked.
However, some of the ODM fuses are still writable. For more details, refer to the specific SoC fuses documents.
To burn fuses, you can use the odmfuse.sh script with a fuse configuration file.
The fuse configuration file is an XML file that contains the fuse data to be burned.
Fuse Configuration File
The fuse configuration file, which is an XML file, contains the fuse data, a list of fuses, and the value to be burned in each fuse.
The odmfuse.sh tool uses this XML file to program the fuses.
A fuse configuration file contains a <genericfuse> </genericfuse> tag pair, which contains one <fuse/> tag for each fuse to be burned.
The following template shows the format of the file:
<genericfuse MagicId="0x45535546" version="1.0.0">
    <fuse name="<name>" size="<size>" value="<value>"/>
    <fuse name="<name>" size="<size>" value="<value>"/>
    . . .
</genericfuse>
Where:
<name>is the name of a fuse. Supported fuse names are listed in the SoC’s Reference Fuse Configuration File.
For Orin SoC, refer to Orin Reference Fuse Configuration File
For Xavier SoC, refer to Xavier Reference Fuse Configuration File
<size>is the size of the fuse in bytes.
<value>is the value to be burned into the fuse, with two hexadecimal digits per byte.
MagicId of “0x45535546” is used by the target-binary and must not be changed.
odmfuse.sh script burns fuses in the order that they appear in the fuse configuration file. If two or more fuses’ values are interdependent, the independent fuses must be specified before the dependent one so that they are burned first. That is, if the values that can be burned into fuse Y depend on the value of fuse X, the fuse configuration file must specify fuse X first and then Y. This way, the odmfuse.sh script will burn fuse X first.
Caution
The odmfuse.sh fuse burning tool does not check for dependencies, so specifying a dependent fuse before the fuse it depends on might render the target device inoperable. Check the fuse list’s order carefully before you burn the fuses.
Note
Although the fuse configuration file contains XML tags, it does not need the “<?xml… ?>” prolog defined by the XML standard. Fuse configurations might not have a prolog. If you want to run general purpose XML utilities on such a file, you might have to add a prolog.
Each SoC has its own specific fuses and fuse names.
For details on fuses and fuse names for each SoC, refer to the following documents:
For Jetson Orin series: Jetson Orin Series Fuse Specification Application Note
For Jetson Xavier series: Jetson Xavier Series Fuse Programming Application Note
Note
These Application Note documents can be found in the following page:
https://developer.nvidia.com/embedded/downloads#?search=fuse
The following sections describe the Fuse Configuration Files for each SoC.
For Jetson Orin SoC, refer to Orin Reference Fuse Configuration File.
For Jetson Xavier SoC. refer to Xavier Reference Fuse Configuration File.
Jetson Orin Fuse Configuration File
Refer to Jetson Orin Series (AGX, NX, Nano) Fuse Programming Application Note for the details on fuses and fuse names for Orin SoC.
Example Orin Fuse Configuration File to Program an RSA-3K Key
Example fuse configuration file to enable Secure Boot with an RSA-3K key:
<genericfuse MagicId="0x45535546" version="1.0.0">
    <fuse name="PublicKeyHash" size="64" value="0x18e984f7d79f7a185039ec413ed2ff86227c8f0be639edde0cf23ab1f7910b759ede8fb0c20d02c68deb04a75226d632f9fe24c71dad4b302acdba13db658130"/>
    <fuse name="BootSecurityInfo" size="4" value="0x201"/>
    <fuse name="SecurityMode" size="4" value="0x1"/>
</genericfuse>
Note
Jetson Orin series targets support RSA-3K key only.
Note
The value above for “PublicKeyHash” is for demonstrations only.
Refer to Generate PublicKeyHash value from a PKC key pair for more information about generating the PublicKeyHash fuse value.
Example Orin Fuse Configuration File to Program an ECDSA P-256 Key
Example fuse configuration file to enable Secure Boot with an ECDSA P-256 key:
<genericfuse MagicId="0x45535546" version="1.0.0">
    <fuse name="PublicKeyHash" size="64" value="0x3c67c6446176bab0a35c09fa77c77c14f2c690dad4f5afcbc6a5ac3c39a0231e192eea1aab469e086ffd42eded658d2317583d6b39bedb2e2ca3c5d0d09bcbea"/>
    <fuse name="BootSecurityInfo" size="4" value="0x202"/>
    <fuse name="SecurityMode" size="4" value="0x1"/>
</genericfuse>
Note
The value above for “PublicKeyHash” is for demonstrations only.
Refer to Generate PublicKeyHash value from a PKC key pair for more information about generating the PublicKeyHash fuse value.
Example Orin Fuse Configuration File to Program an ECDSA P-521 Key + SBK Key + OemK1 Key
The following sample configuration file is used to enable the Secure Boot with an ECDSA P-521 key, an SBK key, and an OemK1 key:
<genericfuse MagicId="0x45535546" version="1.0.0">
    <fuse name="PublicKeyHash" size="64" value="0x9f0ebf0aec1e2bb30c0838096a6d9de5fb86b1277f182acf135b081e345970167a88612b916128984564086129900066255a881948ab83bebf78c7d627f8fe84"/>
    <fuse name="SecureBootKey" size="32" value="0x123456789abcdef0fedcba987654321000112233445566778899aabbccddeeff"/>
    <fuse name="OemK1" size="32" value="0xf3bedbff9cea44c05b08124e8242a71ec1871d55ef4841eb4e59a56b5f88fb2b"/>
    <fuse name="BootSecurityInfo" size="4" value="0x20b"/>
    <fuse name="SecurityMode" size="4" value="0x1"/>
</genericfuse>
Note
The values of PublicKeyHash, SecureBootKey, and OemK1 above are for demonstrations only.
Refer to Generate PublicKeyHash value from a PKC key pair for more information about generating the PublicKeyHash fuse value.
Refer to Prepare an SBK key for more information about generating the SecureBootKey fuse value.
Refer to Prepare K1/K2/KEK keys for more information about generating the OemK1 fuse value.
Orin Reference Fuse Configuration File
The Orin Reference Fuse Configuration file lists all fuses that are supported by the Orin SoC.
All fuse values in the reference configuration file are enclosed in XML comments. To adapt the reference file for fusing, uncomment them and replace their “0xFFFF” placeholder values with the actual values for your target.
Here is the Reference Fuse Configuration File for Jetson Orin devices:
<genericfuse MagicId="0x45535546" version="1.0.0">
    <!-- <fuse name="OdmId" size="8" value="0xFFFFFFFFFFFFFFFF"/> -->
    <!-- <fuse name="OdmInfo" size="2" value="0xFFFF"/> -->
    <!-- <fuse name="ArmJtagDisable" size="4" value="0x1"/> -->
    <!-- <fuse name="Apb2JtagDisable" size="4" value="0x1"/> -->
    <!-- <fuse name="DebugAuthentication" size="4" value="0x1"/> -->
    <!-- <fuse name="CcplexDfdAccessDisable" size="4" value="0x1"/> -->
    <!-- <fuse name="ReservedOdm0" size="4" value="0xFFFFFFFF"/> -->
    <!-- <fuse name="ReservedOdm1" size="4" value="0xFFFFFFFF"/> -->
    <!-- <fuse name="ReservedOdm2" size="4" value="0xFFFFFFFF"/> -->
    <!-- <fuse name="ReservedOdm3" size="4" value="0xFFFFFFFF"/> -->
    <!-- <fuse name="OdmLock" size="4" value="0xF"/> -->
    <!-- <fuse name="ReservedOdm4" size="4" value="0xFFFFFFFF"/> -->
    <!-- <fuse name="ReservedOdm5" size="4" value="0xFFFFFFFF"/> -->
    <!-- <fuse name="ReservedOdm6" size="4" value="0xFFFFFFFF"/> -->
    <!-- <fuse name="ReservedOdm7" size="4" value="0xFFFFFFFF"/> -->
    <!-- <fuse name="SecureProvisionInfo" size="4" value="0x1"/> -->
    <!-- <fuse name="OptInEnable" size="4" value="0x1"/> -->
    <!-- <fuse name="SwReserved" size="4" value="0xFFFFFFFF"/> -->
    <!-- <fuse name="BootDevInfo" size="4" value="0xFFFFFFFF"/> -->
    <!-- <fuse name="SecuritySwOdm" size="4" value="0xFFFFFFFF"/> -->
    <!-- <fuse name="ZeroizeDis" size="4" value="0xFFFFFFFF"/> -->
    <!-- <fuse name="PublicKeyHash" size="64" value="0xFFFFFFFFFFFFFFFFFFFFFFFFFFFFFFFFFFFFFFFFFFFFFFFFFFFFFFFFFFFFFFFFFFFFFFFFFFFFFFFFFFFFFFFFFFFFFFFFFFFFFFFFFFFFFFFFFFFFFFFFFFFFFFFFFF"/> -->
    <!-- <fuse name="PkcPubkeyHash1" size="64" value="0xFFFFFFFFFFFFFFFFFFFFFFFFFFFFFFFFFFFFFFFFFFFFFFFFFFFFFFFFFFFFFFFFFFFFFFFFFFFFFFFFFFFFFFFFFFFFFFFFFFFFFFFFFFFFFFFFFFFFFFFFFFFFFFFFFF"/> -->
    <!-- <fuse name="PkcPubkeyHash2" size="64" value="0xFFFFFFFFFFFFFFFFFFFFFFFFFFFFFFFFFFFFFFFFFFFFFFFFFFFFFFFFFFFFFFFFFFFFFFFFFFFFFFFFFFFFFFFFFFFFFFFFFFFFFFFFFFFFFFFFFFFFFFFFFFFFFFFFFF"/> -->
    <!-- <fuse name="EndorseKey" size="68" value="0xFFFFFFFFFFFFFFFFFFFFFFFFFFFFFFFFFFFFFFFFFFFFFFFFFFFFFFFFFFFFFFFFFFFFFFFFFFFFFFFFFFFFFFFFFFFFFFFFFFFFFFFFFFFFFFFFFFFFFFFFFFFFFFFFFFF"/> -->
    <!-- <fuse name="SecureBootKey" size="32" value="0xFFFFFFFFFFFFFFFFFFFFFFFFFFFFFFFFFFFFFFFFFFFFFFFFFFFFFFFFFFFFFFFF"/> -->
    <!-- <fuse name="Kdk0" size="32" value="0xFFFFFFFFFFFFFFFFFFFFFFFFFFFFFFFFFFFFFFFFFFFFFFFFFFFFFFFFFFFFFFFF"/> -->
    <!-- <fuse name="PscOdmStatic" size="4" value="0xFFFFFFFF"/> -->
    <!-- <fuse name="OemK1" size="32" value="0xFFFFFFFFFFFFFFFFFFFFFFFFFFFFFFFFFFFFFFFFFFFFFFFFFFFFFFFFFFFFFFFF"/> -->
    <!-- <fuse name="OemK2" size="32" value="0xFFFFFFFFFFFFFFFFFFFFFFFFFFFFFFFFFFFFFFFFFFFFFFFFFFFFFFFFFFFFFFFF"/> -->
    <!-- <fuse name="RevokePkH0" size="4" value="0x1"/> -->
    <!-- <fuse name="RevokePkH1" size="4" value="0x1"/> -->
    <!-- <fuse name="BootSecurityInfo" size="4" value="0xFFFFFFFF"/> -->
    <!-- <fuse name="SecurityMode" size="4" value="0x1"/> -->
</genericfuse>
Jetson Xavier NX and Jetson AGX Xavier Fuse Configuration Files
For details on hardware fuses and fuse names, refer to the following documents:
For Jetson Xavier NX series: Jetson Xavier NX Fuse Specification Application Note
For Jetson AGX Xavier series: Jetson AGX Xavier Series Fuse Programming Application Note
Example Xavier Fuse Configuration File to Program the RSA-2K Key
The following sample configuration file is used to enable Secure Boot with RSA-2K key:
 <genericfuse MagicId="0x45535546" version="1.0.0">
     <fuse name="PublicKeyHash" size="32" value="0x3cd0ac90ca94ca6edf8b131befa93799022e8bb5edd0a523ce78d46a3b4ce433"/>
     <fuse name="BootSecurityInfo" size="4" value="0x01"/>
     <fuse name="SecurityMode" size="4" value="0x1"/>
</genericfuse>
Note
Jetson AGX Xavier series and Jetson Xavier NX series targets support both RSA-2K and RSA-3K key.
Note
The value above for PublicKeyHash is for demonstrations only.
Refer to Generate PublicKeyHash value from a PKC key pair for more information about generating the PublicKeyHash fuse value.
Example Xavier Fuse Configuration File to Program the RSA-3K Key + SBK Key + KEK Key
The following sample configuration file is used to enable Secure Boot with RSA-3K key, SBK key and KEK keys:
<genericfuse MagicId="0x45535546" version="1.0.0">
    <fuse name="PublicKeyHash" size="32" value="0x999585e628c285a5dfdd2bd201fa878d8e62e6c4eb842d81d1a026b22cd6e8f0"/>
    <fuse name="Kek0" size="16" value="0x112233445566778899AABBCCDDEEFF00"/>
    <fuse name="Kek1" size="16" value="0x123456789ABCDEF0FEDCBA9876543210"/>
    <fuse name="SecureBootKey" size="16" value="0x123456789ABCDEF0FEDCBA9876543210"/>
    <fuse name="BootSecurityInfo" size="4" value="0x06"/>
    <fuse name="SecurityMode" size="4" value="0x1"/>
</genericfuse>
Note
The values above of PublicKeyHash, SecureBootKey, Kek0 and Kek1 are for demonstrations only.
Refer to Generate PublicKeyHash value from a PKC key pair for more information about generating the PublicKeyHash fuse value.
Refer to Prepare an SBK key for more information about generating the SecureBootKey fuse value.
Refer to Prepare K1/K2/KEK keys for more information about generating the Kek0 and Kek1 fuse values.
Xavier Reference Fuse Configuration File
The Xavier Reference Fuse Configuration file lists all fuses that are supported by Xavier SoC.
All fuse values in the reference configuration file are enclosed in XML comments. To adapt the reference file for fusing, uncomment them and replace their “0xFFFF” placeholder values with the actual values for your target.
Following shows the Xavier Reference Fuse Configuration file for Jetson Xavier NX and Jetson AGX Xavier devices:
<genericfuse MagicId="0x45535546" version="1.0.0">
    <!-- <fuse name="OdmId" size="8" value="0xFFFFFFFFFFFFFFFF"/> -->
    <!-- <fuse name="Odm_info" size="2" value="0xFFFF"/> -->
    <!-- <fuse name="ReservedOdm0" size="4" value="0xFFFFFFFF"/> -->
    <!-- <fuse name="ReservedOdm1" size="4" value="0xFFFFFFFF"/> -->
    <!-- <fuse name="ReservedOdm2" size="4" value="0xFFFFFFFF"/> -->
    <!-- <fuse name="ReservedOdm3" size="4" value="0xFFFFFFFF"/> -->
    <!-- <fuse name="OdmLock" size="4" value="0xFFFFFFFF"/> -->
    <!-- <fuse name="ReservedOdm4" size="4" value="0xFFFFFFFF"/> -->
    <!-- <fuse name="ReservedOdm5" size="4" value="0xFFFFFFFF"/> -->
    <!-- <fuse name="ReservedOdm6" size="4" value="0xFFFFFFFF"/> -->
    <!-- <fuse name="ReservedOdm7" size="4" value="0xFFFFFFFF"/> -->
    <!-- <fuse name="JtagDisable" size="4" value="0xFFFFFFFF"/> -->
    <!-- <fuse name="ReservedSw" size="4" value="0xFFFFFFFF"/> -->
    <!-- <fuse name="BootDevSelect" size="4" value="0xFFFFFFFF"/> -->
    <!-- <fuse name="BootDevInfo" size="4" value="0xFFFFFFFF"/> -->
    <!-- <fuse name="SecureProvisionInfo" size="4" value="0xFFFFFFFF"/> -->
    <!-- <fuse name="EndorsementKey" size="32" value="0xFFFFFFFFFFFFFFFFFFFFFFFFFFFFFFFFFFFFFFFFFFFFFFFFFFFFFFFFFFFFFFFF"/> -->
    <!-- <fuse name="DebugAuthentication" size="4" value="0xFFFFFFFF"/> -->
    <!-- <fuse name="CcplexDfdAccessDisable" size="4" value="0xFFFFFFFF"/> -->
    <!-- <fuse name="Kek0" size="16" value="0xFFFFFFFFFFFFFFFFFFFFFFFFFFFFFFFF"/> -->
    <!-- <fuse name="Kek1" size="16" value="0xFFFFFFFFFFFFFFFFFFFFFFFFFFFFFFFF"/> -->
    <!-- <fuse name="Kek2" size="16" value="0xFFFFFFFFFFFFFFFFFFFFFFFFFFFFFFFF"/> -->
    <!-- <fuse name="Kek256" size="32" value="0xFFFFFFFFFFFFFFFFFFFFFFFFFFFFFFFFFFFFFFFFFFFFFFFFFFFFFFFFFFFFFFFF"/> -->
    <!-- <fuse name="PublicKeyHash" size="32" value="0xFFFFFFFFFFFFFFFFFFFFFFFFFFFFFFFFFFFFFFFFFFFFFFFFFFFFFFFFFFFFFFFF"/> -->
    <!-- <fuse name="SecureBootKey" size="16" value="0xFFFFFFFFFFFFFFFFFFFFFFFFFFFFFFFF"/> -->
    <!-- <fuse name="BootSecurityInfo" size="4" value="0xFFFFFFFF"/> -->
    <!-- <fuse name="SecurityMode" size="4" value="0x1"/> -->
</genericfuse>
Generate A PKC Key Pair
Jetson Orin series targets support the PKC of RSA 3K, ECDSA P-256, and ECDSA P-521.
Jetson Xavier series targets support the PKC of RSA 2K and RSA 3K keys.
Note
The 2048-bit RSA key option is no longer supported on Jetson Orin series.
Enter one of the following commands to generate a PKC key pair:
To generate an ECDSA P-256 key:
$ openssl ecparam -name prime256v1 -genkey -noout -out ecp256.pem
To generate an ECDSK P-521 key:
$ openssl ecparam -name secp521r1 -genkey -noout -out ecp521.pem
To generate an RSA 2K key:
$ openssl genrsa -out rsa_priv.pem 2048
To generate an RSA 3K key:
$ openssl genrsa -out rsa_priv.pem 3072
Rename and save the key file.
The key file is used to burn fuses and sign boot files for Jetson devices.
Caution
The security of your device depends on how securely you keep the key file.
Note
To generate a truly random number key, use the Hardware Security Module (HSM).
Generate PublicKeyHash value from a PKC key pair
Instead of fusing the public key of a PKC key pair, only the hash of the public key is burned to the PublicKeyHash fuse field.
To generate the PublicKeyHash value, use the tegrasign_v3.py program:
$ ./tegrasign_v3.py --pubkeyhash <pkc.pubkey> <pkc.hash> --key <pkc.pem>
Where:
<pkc.pem>is the input pkc key pair (.pem file) file.
<pkc.pubkey> is the output public key of the ``<pkc.pem>key pair
<pkc.hash> is the output public key hash of the ``<pkc.pem>key pair
The hexadecimal value shown on the screen after tegra-fuse format (big-endian): can be used directly as the PublicKeyHash fuse data of a Fuse Configuration file.
Here are some sample outputs after running tegrasign_v3.py to generate PublicKeyHash for an ECDSA P-521 key:
$ ./tegrasign_v3.py --pubkeyhash ecp521.pubkey ecp521.hash --key ecp521.pem
  Valid ECC key. Key size is 521
  Valid ECC key. Key size is 521
  Saving public key in ecp521.pubkey for ECC
  Sha saved in pcp.sha
  tegra-fuse format (big-endian): 0x9f0ebf0aec1e2bb30c0838096a6d9de5fb86b1277f182acf135b081e345970167a88612b916128984564086129900066255a881948ab83bebf78c7d627f8fe84
Here are some sample outputs after running tegrasign_v3.py to generate PublicKeyHash for an RSA 3k key:
$ ./tegrasign_v3.py --pubkeyhash rsa3k.pubkey rsa3k.hash --key rsa3k.pem
Key size is 384 bytes
Key size is 384 bytes
Saving pkc public key in foo.pubkey
Sha saved in pcp.sha
tegra-fuse format (big-endian): 0xad2474627c14e3f7f4944a832bd15d0640938a3dc162f558692458f3d12f9453e11bea2ec75df3f83e8b29c47fc3d2483d528d3e94a5469c4ba1ec61f1584b23
For an RSA key, you can also use tegrakeyhash program to generate PublicKeyHash value:
./tegrakeyhash --pkc <pkc.pem> --chip <chip_id>
Where:
<pkc.pem>is the RSA key pair (.pem file) file.
<chip_id>is 0x23 for the Jetson Orin series and is 0x19 for the Jetson Xavier series.
The hexadecimal value shown on the screen after tegra-fuse format (big-endian): can be used directly as PublicKeyHash fuse data of a Fuse Configuration file.
Note
tegrakeyhash program generates 64 bytes of PublicKeyHash value for Orin SoC (chip_id of 0x23).
tegrakeyhash program generates 32 bytes of PublicKeyHash value for Xavier SoC (chip_id of 0x19).
Here are some sample outputs after running tegrakeyhash to generate PublicKeyHash:
$ ./tegrakeyhash --pkc rsa_priv-3k.pem --chip 0x23
Key size is 384 bytes
sha512 hash:
bytes:
0x18, 0xe9, 0x84, 0xf7, 0xd7, 0x9f, 0x7a, 0x18,
0x50, 0x39, 0xec, 0x41, 0x3e, 0xd2, 0xff, 0x86,
0x22, 0x7c, 0x8f, 0x0b, 0xe6, 0x39, 0xed, 0xde,
0x0c, 0xf2, 0x3a, 0xb1, 0xf7, 0x91, 0x0b, 0x75,
0x9e, 0xde, 0x8f, 0xb0, 0xc2, 0x0d, 0x02, 0xc6,
0x8d, 0xeb, 0x04, 0xa7, 0x52, 0x26, 0xd6, 0x32,
0xf9, 0xfe, 0x24, 0xc7, 0x1d, 0xad, 0x4b, 0x30,
0x2a, 0xcd, 0xba, 0x13, 0xdb, 0x65, 0x81, 0x30,

tegra-fuse format (big-endian):
0x18e984f7d79f7a185039ec413ed2ff86227c8f0be639edde0cf23ab1f7910b759ede8fb0c20d02c68deb04a75226d632f9fe24c71dad4b302acdba13db658130

fuse bypass format:
FAB_ENTRY(PUBLIC_KEY0, PUBLIC_KEY0, 0xf784e918),
FAB_ENTRY(PUBLIC_KEY1, PUBLIC_KEY1, 0x187a9fd7),
FAB_ENTRY(PUBLIC_KEY2, PUBLIC_KEY2, 0x41ec3950),
FAB_ENTRY(PUBLIC_KEY3, PUBLIC_KEY3, 0x86ffd23e),
FAB_ENTRY(PUBLIC_KEY4, PUBLIC_KEY4, 0x0b8f7c22),
FAB_ENTRY(PUBLIC_KEY5, PUBLIC_KEY5, 0xdeed39e6),
FAB_ENTRY(PUBLIC_KEY6, PUBLIC_KEY6, 0xb13af20c),
FAB_ENTRY(PUBLIC_KEY7, PUBLIC_KEY7, 0x750b91f7),
FAB_ENTRY(PUBLIC_KEY8, PUBLIC_KEY8, 0xb08fde9e),
FAB_ENTRY(PUBLIC_KEY9, PUBLIC_KEY9, 0xc6020dc2),
FAB_ENTRY(PUBLIC_KEY10, PUBLIC_KEY10, 0xa704eb8d),
FAB_ENTRY(PUBLIC_KEY11, PUBLIC_KEY11, 0x32d62652),
FAB_ENTRY(PUBLIC_KEY12, PUBLIC_KEY12, 0xc724fef9),
FAB_ENTRY(PUBLIC_KEY13, PUBLIC_KEY13, 0x304bad1d),
FAB_ENTRY(PUBLIC_KEY14, PUBLIC_KEY14, 0x13bacd2a),
FAB_ENTRY(PUBLIC_KEY15, PUBLIC_KEY15, 0x308165db),
Prepare an SBK key
An SBK key is used to encrypt Bootloader components. The same SBK key has to be fused to the Jetson’s SoC fuses, so the key can be used to decrypt the Bootloader components when the Jetson device boots up.
Note
You can only use the SBK key with the PKC key. The encryption mode that uses these two keys together is called SBKPKC.
The Orin SoC requires an SBK key be of eight 32-bit words (32 bytes). The Xavier SoC requires an SBK key be four 32-bit words (16 bytes).
The SBK key file is stored in big-endian hexadecimal format.
Here is an example of a 16-byte SBK key file:
0x12345678 0x9abcdef0 0xfedcba98 0x76543210
This type of file format is used in flash.sh command with -v option.
The same SBK representation used in the “SecureBootKey” fuse value field of a Fuse Configuration XML file is:
0x123456789abcdef0fedcba9876543210
Note
Hexadecimal numbers must be presented in big-endian format. The leading 0x or 0X can be omitted. The Jetson Secure Boot software converts the big-endian hexadecimal format to the format that the Jetson device expects. All standard OpenSSL utilities output in big-endian format.
We recommend that you use the Hardware Security Module (HSM) to generate a truly random number for an SBK key.
Caution
The security of your device depends on how securely you keep the key file.
Prepare K1/K2/KEK keys
The K1/K2/KEK keys are used for other security application, such as disk encryption/decryption, you must prepare these keys and other ODM fuse bits as described in the documentation for the other security application.
For Jetson Orin SoC, the fuse key names are OemK1 and OemK2, and the key length is 32 bytes.
For Jetson Xavier SoC, the fuse key names are Kek0, Kek1, Kek2, for which the key length is 16 bytes. Kek256 is a combination of Kek0 and Kek1 with a key length of 32 bytes.
These keys must be presented in Hexadecimal numbers and must be in the big-endian format.
Note
The leading 0x or 0X of a hexadecimal number can be omitted. The Jetson Secure Boot software converts the big-endian hexadecimal format to the format that the Jetson device expects.
These keys consist of eight (or four) 32-bit words stored in a file in the big-endian hexadecimal format.
Here is an example of an OemK1 key file:
0x11223344 0x55667788 0x99aabbcc 0xddeeff00 0xffeeddcc 0xbbaa9988 0x77665544 0x33221100
The same key representation in the OemK1 fuse value field in the Fuse Configuration XML file is:
0x112233445566778899aabbccddeeff00ffeeddccbbaa99887766554433221100
Note
We recommend that you use the HSM to generate a truly random number for KEK keys.
Caution
The security of your device depends on how securely you keep these key files.
Prepare the Fuse Configuration file
To modify the SoC’s Reference Fuse Configuration file, uncomment the fuses you need, and enter information in the correct fuse data fields for your target Jetson device.
The next section provides information about how to burn fuses with the prepared Fuse Configuration file.
Caution
The security of your device depends on how securely you keep the Fuse Configuration file.
Burn Fuses with the Fuse Configuration file
After the Fuse Configuration file is prepared, you can burn fuses using odmfuse.sh (-X option) script with the Fuse Configuration file:
sudo ./odmfuse.sh -X <fuse_config> -i <chip_id> <target_config>
If a Jetson board was previously burned with a PKC key <pkc.pem>, and the board needs to have additional fuses burned, run the following odmfuse.sh command with -k option:
sudo ./odmfuse.sh -X <fuse_config> -i <chip_id> -k <pkc.pem> <target_config>
Where:
<fuse_config>is the fuse configuration XML file.
<chip_id>is 0x23 for Jetson Orin and is 0x19 for Jetson Xavier.
<pkc.pem>is the RSA key pair (.pem file) that was fused to the board before.
<target_config>is the name of the configuration for your Jetson device and carrier board; see the table in Jetson Modules and Configurations.
Note
Fuse burning operations are high-risk because they cannot be reversed. NVIDIA strongly recommends that you use the --test option to verify fuse burning operations before you perform them.
When you add --test to an odmfuse.sh command, the command performs pre-burn processing and verification, but it does not actually burn the fuse. If the command reports the results you want, you can re-enter the command without --test and burn the fuse with greater confidence that you are doing it correctly.
Sign and Flash Secured Images
The procedures described in this section use the following placeholders in their commands:
<pkc_keyfile>is an RSA 2K or 3K key file.<sbk_keyfile>is an SBK key file.<target_config>is the name of the configuration for your Jetson device and carrier board; see the table in Jetson Modules and Configurations.
Sign and Flash Secured Images in One Step
For Jetson Orin and Xavier series
Navigate to the directory where you installed Jetson Linux.
Place the Jetson device into Recovery mode.
Enter the following command:
$ sudo ./flash.sh -u <pkc_keyfile> [-v <sbk_keyfile>] <target_config> mmcblk0p1
Note
If the -v command option is specified, the -u command option also must be specified.
If the -v command option is omitted, all images flashed to the Jetson device are not encrypted.
If the -u command option is omitted, all images flashed to the Jetson device are not signed.
Caution
None of the PKC key file and SBK key file can be placed under the bootloader directory.
For example,
To flash a PKC-fused Jetson AGX Orin target:
$ sudo ./flash.sh -u <pkc_keyfile> jetson-agx-orin-devkit mmcblk0p1To flash an SBKPKC-fused Jetson AGX Orin target:
$ sudo ./flash.sh -u <pkc_keyfile> -v <sbk_keyfile> jetson-agx-orin-devkit mmcblk0p1To flash an SBKPKC-fused Jetson AGX Xavier target:
$ sudo ./flash.sh -u <pkc_keyfile> -v <sbk_keyfile> jetson-agx-xavier-devkit mmcblk0p1
Sign and Flash Secured Images in Separate Steps
Sign/encrypt the boot files:
$ sudo ./flash.sh --no-flash -u <pkc_keyfile> [-v <sbk_keyfile>] <target_config> mmcblk0p1
Note
If
-vcommand option is specified,-ucommand option must be specified also.If
-vcommand option is omitted, all images flashed to the Jetson device are not encrypted.If
-ucommand option is omitted, all images flashed to the Jetson device are not signed.Flash the generated encrypted/signed images:
$ cd bootloader
$ sudo bash ./flashcmd.txt
Note
Ensure that you place the Jetson device into Recovery mode before executing flashcmd.txt command.
Legacy Support of Secure Boot for Xavier SoC
Applies to the Jetson Xavier NX series and the Jetson AGX Xavier series only.
The following sections describe the legacy support for the Jetson Xavier NX and the Jetson AGX Xavier series only.
The following table describes user-programmable fuses that are related to Secure Boot for Xavier Soc.
Software and configuration fuses related to Secure Boot for NVIDIA® Jetson Xavier™ NX series and NVIDIA® Jetson AGX Xavier™ series |
||
|---|---|---|
Bit size |
Name |
Default value set by
|
1 |
odm_production_mode |
0x1. |
256 |
public_key_hash |
RSA public key hash. |
128 |
secure_boot_key* |
Secure Boot Key (SBK): AES encryption key for encrypting bootloader. |
128 |
KEK0* |
Four 32-bit register named KEK00 through KEK03. |
128 |
KEK1* |
Four 32-bit registers named KEK10 through KEK13. |
256 |
KEK256 |
Not a distinct fuse; addresses KEK0 and KEK1 as a single 256-bit fuse. |
128 |
KEK2* |
Four 32-bit registers named KEK20 through KEK23. |
* You can use |
||
Here are the fuses that are handled by the user:
Bit size |
Name |
Default value set by odmfuse.sh |
|---|---|---|
1 |
jtag_disable |
0x0: JTAG is enabled (the default). 0x1: JTAG is disabled. |
256 |
odm_reserved |
Reserved fuses for the customer use.
They are organized as 8 consecutive
32-bit fuses, |
4 |
odm_lock |
Each bit set disables the write for the corresponding 32-bit odm_reserved fuses. For example: 0x2 locks bits 32−63 of
|
8 |
sec_boot_dev_cfg |
Depending on |
24 |
sw_reserved |
A bit map of configuration options. Bits not described here are reserved. Bits 2-0: Bit 3: Bit 5: Bit 23: 1=disable RCM mode |
For details on hardware fuses and fuse names, refer to the following documents:
For Jetson Xavier NX series: Jetson Xavier NX Fuse Specification Application Note
For Jetson AGX Xavier series: Jetson AGX Xavier Series Fuse Programming Application Note
The following table describes the fuse name aliases that are recognized by tegraflash..
Fuse Name Aliases Recognized by tegraflash for Jetson Xavier NX series and Jetson AGX Xavier series |
|
|---|---|
Name |
tegraflash Alias and Notes |
odm_production_mode |
SecurityMode |
public_key_hash |
PublicKeyHash |
secure_boot_key |
Secure BootKey |
Security_info |
BootSecurityInfo |
Key_encryption_key_0 |
Kek0 |
Key_encryption_key_1 |
Kek1 |
Key_encryption_key_256 |
Kek256 |
Key_encryption_key_2 |
Kek2 |
jtag_disable |
JtagDisable |
odm_reserved0, odm_reserved1,… odm_reserved7 |
Customer programmable fuses;
remain programmable after
Default value (when no reserved ODM fuses have been programmed) is all zeros. One intended application of these fuses is software version revocation. You may use them for other purposes at your discretion. |
odm_reserved8,… odm_reserved11 |
Reserved for use by NVIDIA. Do not use these fuses. Customer programming of these can result in boot failures and unexpected behavior. |
odm_lock |
Each bit disables further
changes to one of the
|
sec_boot_dev_cfg |
|
sw_reserved |
|
Burning PKC, KEK, and SBK Fuses
To burn the PKC, KEK and SBK fuses by using a private key file PEM format:
Navigate to the host directory where you installed Jetson Linux.
Put the Jetson device into Force Recovery Mode.
Burn the fuse using the script
odmfuse.sh. See odmfuse.sh Option Usage for illustrations of common operations.
Note
odmfuse.sh uses OpenSSL to burn PKC fuses.
odmfuse.sh Options
For fuses other than PKC key and odm_production_mode fuses,
odmfuse.sh allows you to program ODM fuses that are completely at
your discretion. Skip this topic if you do not plan to modify these
fuses.
These are the odmfuse.sh command line options that blow ODM fuses:
Option |
Description |
|---|---|
-d 0xXXXX |
Sets |
-disable-jtag |
Disables JTAG. Use this option to block use of the JTAG debugger. |
-l 0xX |
Sets For example, setting |
–odm_reserved[0:7] |
Sets |
-p |
Sets production mode. |
-r 0xXX |
Sets Bits 7-6: Reserved. Bit 5: Enable_watchdog. Bit 4: Reserved. Bit 3: Bits 2-0: |
-S <SBK_file> |
Sets the Secure Boot key used to
encrypt Bootloader and the TOS. The
content of This key must be used along with PKC key. |
–noburn |
Prepares the fuse blob to be used repeatedly on the factory floor. This option generates
After |
–KEK0 –KEK1 –KEK2 <path> |
Pathname of the key encryption key file that other security applications are to use to encrypt and decrypt keys. The content of the file must be a single 128-bit big-endian number in hexadecimal format. |
–KEK256 <path> |
Pathname of the 256-bit Key Encryption Key file that the high-level security application will use to encrypt the application keys. The content of the file must be a single 256-bit big-endian number in hexadecimal format. |
–auth <status> |
Indicates the board’s current authentication status. Possible <status> values are:
This option is only used when running To run
Examples:
|
–test |
Prevents the script from actually burning fuses. Pre-burn processing and tests are performed as usual. This option is normally used for fuse burning tests, since fuse values cannot be changed once they are burned. |
Non-Destructive Testing for Fuse Burning Operations
Fuse burning operations are high-risk because they cannot be reversed.
NVIDIA strongly recommends that you use the --test option to verify fuse
burning operations before you perform them.
When you add --test to an odmfuse.sh command, the command performs
pre-burn processing and verification, but it does not actually burn the
fuse. If the command reports the results you want, you can enter the command
again without --test and burn the fuse with greater confidence that
you are doing it correctly.
odmfuse.sh Option Usage
To fuse PKC HASH from the .pem file with JTAG enabled:
$ sudo ./odmfuse.sh -i <chip_id> -p -k <key.pem> --KEK[0-2] <KEK file> -S <SBK_file> <target_config>
To fuse PKC HASH from the .pem file with JTAG disabled:
$ sudo ./odmfuse.sh -i <chip_id> -p -k <key.pem> --KEK[0-2] <KEK file> -S <SBK_file> --disable-jtag <target_config>
To burn a secure fuse with PKC, SBK, and KEK2:
$ sudo ./odmfuse.sh -i <chip_id> -p -k <PKC file> -S <SBK file> --KEK2 <KEK2 file> <target_config>
To burn a secure fuse with PKC and KEK2:
$ sudo ./odmfuse.sh -i <chip_id> -p -k <PKC file> --KEK2 <KEK2 file> <target_config>
Where:
<chip_id>is 0x19<target_config>is the name of the configuration for the Jetson device and carrier board you are using, as shown in the Jetson Modules and Configurations table.
Signing and Flashing with initrd Using the l4t_initrd_flash.sh Script
Place the Jetson device into Force Recovery mode.
To sign the image, run the command:
$ sudo ./tools/kernel_flash/l4t_initrd_flash.sh --no-flash -u <pkc_keyfile> [-v <sbk_keyfile>] <target_config> <rootdev>
Where (in addition to the placeholders described in Placeholders Used in the Procedures):
<target_config>is the name of the configuration for that Jetson device and carrier board, specified by the environment variableBOARD. (See the table in Jetson Modules and Configurations<rootdev>specifies the device on which the root file system is located, as described in the topic Basic Flashing Script Usage.
To flash the target device, run the following command:
$ sudo ./tools/kernel_flash/l4t_initrd_flash.sh --flash-only -u <pkc_keyfile> [-v <sbk_keyfile>] <board_name> <rootdev>
Where
<board_name>and<rootdev>are the same as in step 2, above.
UEFI Secureboot
UEFI Secureboot uses digital signatures (RSA) to validate the authenticity and integrity of the codes that it loads.
UEFI Secureboot implementations use PK, KEK, and db keys:
Platform Key (PK) : Top-level key, is used to sign KEK.
Key Exchange Key (KEK) : Keys used to sign Signatures Database.
Signature Database (db) : Contains keys to sign UEFI payloads.
Before enabling UEFI Secureboot, users have to prepare their own PK, KEK and db keys.
Then, users can enable Secureboot either:
At flashing time; Or,
At the target from Ubuntu prompt.
The following diagram illustrates how PK/KEK/db keys are used to sign and validate UEFI’s payloads:
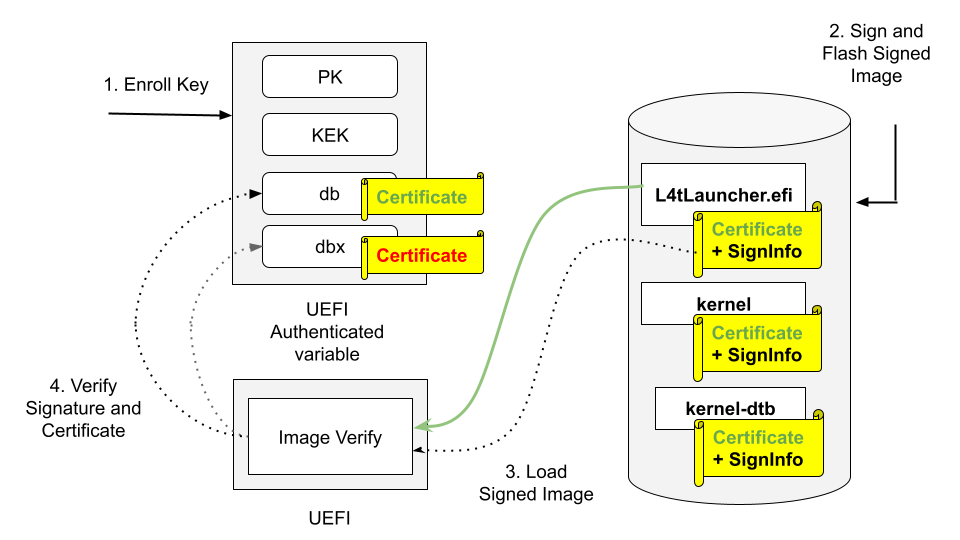
Enroll PK, KEK, and db keys in the form of UEFI authenticated variable.
Sign UEFI payloads such as L4tLauncher (as OS Loader), kernel, kernel-dtb with private key and flash signed images (on Host).
UEFI loads signed images.
UEFI Verifies image signature by using the associated certificate/public key, and verifies the certificate/public key existing in db but not in dbx.
Here is a high-level process to enable UEFI Secureboot:
Prepare the PK, KEK, and db keys on the host
Generate the PK, KEK, db keypairs and the certificates.
Create a UEFI keys config file.
Run
gen_uefi_default_keys_dts.shscript to generate UefiDefaultSecurityKeys.dtbo and all key’s auth files.
Generate signed UEFI payloads on the host
If you are enabling Secureboot at flashing time, the flashing utility will automatically generate signed UEFI payloads.
If you are enabling Secureboot at running time from Ubuntu prompt, you have to manually generate the signed UEFI payloads.
Enable UEFI Secureboot at flashing time
Use option –uefi-keys <keys_conf> to provide signing keys and enable UEFI secure boot.
Enable UEFI Secureboot through UEFI utilities running from Ubuntu prompt
Download the PK, KEK and db auth files from the host.
Enroll the KEK, db keys.
Download and write the signed UEFI payloads.
Enroll the PK key.
Note
For security reasons, after the UEFI Secureboot is enabled, unless you flash again, Secureboot cannot be disabled.
Prerequisite
- Ensure that the following utilities are installed in your host:
openssl
device-tree-compiler
efitools
uuid-runtime
References
Prepare the PK, KEK, db Keys
Generate the PK, KEK, db RSA keypairs and certificates
To generate the PK, KEK, and db RSA keypairs and certificates, run the following commands:
$ cd to <LDK_DIR>
$ mkdir uefi_keys
$ cd uefi_keys

### Generate PK RSA keypair and certificate
$ openssl req -newkey rsa:2048 -nodes -keyout PK.key  -new -x509 -sha256 -days 3650 -subj "/CN=my Platform Key/" -out PK.crt

### Generate KEK RSA keypair and certificate
$ openssl req -newkey rsa:2048 -nodes -keyout KEK.key  -new -x509 -sha256 -days 3650 -subj "/CN=my Key Exchange Key/" -out KEK.crt

### Generate db_1 RSA keypair and certificate
$ openssl req -newkey rsa:2048 -nodes -keyout db_1.key  -new -x509 -sha256 -days 3650 -subj "/CN=my Signature Database key/" -out db_1.crt

### Generate db_2 RSA keypair and certificate
$ openssl req -newkey rsa:2048 -nodes -keyout db_2.key  -new -x509 -sha256 -days 3650 -subj "/CN=my another Signature Database key/" -out db_2.crt
Caution
The generated .crt files are self-signed certificates and are used for demonstration purposes only. For production, follow your official certificate generation procedure.
Create a UEFI Keys Config File
To create a UEFI keys config file with the generated keys, run the following command:
$ vim uefi_keys.conf
Insert the following lines to uefi_keys.conf file:
UEFI_PK_KEY_FILE="PK.key";
UEFI_PK_CERT_FILE="PK.crt";
UEFI_KEK_KEY_FILE="KEK.key";
UEFI_KEK_CERT_FILE="KEK.crt";
UEFI_DB_1_KEY_FILE="db_1.key";
UEFI_DB_1_CERT_FILE="db_1.crt";
UEFI_DB_2_KEY_FILE="db_2.key";
UEFI_DB_2_CERT_FILE="db_2.crt";
Note
UEFI_DB_2_XXX entries are optional
Generate UefiDefaultSecurityKeys.dtbo and the Auth Files
To enable UEFI Secureboot at flashing time, the UEFI default security keys need to be flashed to target. The UEFI default security keys are embedded in UefiDefaultSecurityKeys.dtbo and are used during flashing.
Also, the PK, KEK and db’s auth files are used to enroll the PK, KEK and db Keys from target when enabling UEFI Secureboot through UEFI utilities running from Ubuntu prompt.
UefiDefaultSecurityKeys.dtbo and the auth files are generated by using the gen_uefi_default_keys_dts.sh script.
Run the following commands:
$ cd ..
$ sudo tools/gen_uefi_default_keys_dts.sh uefi_keys/uefi_keys.conf
$ sudo chmod 644 uefi_keys/_out/*.auth
Generate Signed UEFI Payloads
All UEFI payloads have to be signed using UEFI security keys. If the –uefi-keys option is specified during flashing, the UEFI payloads are signed automatically by the flash.sh script. To enable UEFI Secureboot at runtime from Ubuntu prompt, the UEFI payloads have to be signed from the host and then you can download the signed payloads to target.
- The UEFI payloads are:
extlinux.conf
initrd
kernel images (in rootfs, and in kernel and recovery partitions)
kernel-dtb images (in rootfs, and in kernel-dtb and recovery-dtb partitions), and
BOOTAA64.efi.
Note
The following steps assume that you have copied the required unsigned UEFI payloads to the uefi_keys/ folder. Also, db.crt and db.key can be replaced with db_1.* or db_2.* key.
To sign extlinux.conf using db:
$ openssl cms -sign -signer db.crt -inkey db.key -binary -in extlinux.conf -outform der -out extlinux.conf.sig
To sign initrd using db:
$ openssl cms -sign -signer db.crt -inkey db.key -binary -in initrd -outform der -out initrd.sig
To sign Image (the kernel) of rootfs using db:
$ cp Image Image.unsigned
$ sbsign --key db.key --cert db.crt --output Image Image
To sign kernel-dtb of rootfs using db:
$ openssl cms -sign -signer db.crt -inkey db.key -binary -in kernel_tegra234-p3701-0004-p3737-0000.dtb -outform der -out kernel_tegra234-p3701-0004-p3737-0000.dtb.sig
Note
The command above uses Concord’s SKU 4 kernel-dtb filename and should be replaced with the appropriate kernel-dtb filename of your target.
To sign boot.img of kernel partition using db:
$ ../bootloader/mkbootimg --kernel Image --ramdisk initrd --board <rootdev> --output boot.img --cmdline <cmdline_string>
$ cp boot.img boot.img.unsigned
$ openssl cms -sign -signer db.crt -inkey db.key -binary -in boot.img -outform der -out boot.img.sig
$ truncate -s %2048 boot.img
$ cat boot.img.sig >> boot.img
- where <cmdline_string> is (when generated in flash.sh):
- Xavier Series:
“root=/dev/mmcblk0p1 rw rootwait rootfstype=ext4 console=ttyTCU0,115200n8 console=tty0 fbcon=map:0 net.ifnames=0”
- Orin Series:
“root=/dev/mmcblk0p1 rw rootwait rootfstype=ext4 mminit_loglevel=4 console=ttyTCU0,115200 console=ttyAMA0,115200 firmware_class.path=/etc/firmware fbcon=map:0 net.ifnames=0”
Note
The
Imageinsideboot.imgmust also be signed. Use theImagesigned by the step 3 above.
To sign kernel-dtb of kernel-dtb partition using db:
$ cp tegra234-p3701-0004-p3737-0000.dtb tegra234-p3701-0004-p3737-0000.dtb.unsigned
$ openssl cms -sign -signer db.crt -inkey db.key -binary -in tegra234-p3701-0004-p3737-0000.dtb -outform der -out tegra234-p3701-0004-p3737-0000.dtb.sig
$ truncate -s %2048 tegra234-p3701-0004-p3737-0000.dtb
$ cat tegra234-p3701-0004-p3737-0000.dtb.sig >> tegra234-p3701-0004-p3737-0000.dtb
Note
The commands above use Concord’s SKU 4 kernel-dtb filename and should be replaced with the appropriate kernel-dtb filename of your target.
To sign recovery.img of recovery partition using db:
$ ../bootloader/mkbootimg --kernel Image --ramdisk ../bootloader/recovery.ramdisk --output recovery.img --cmdline <rec_cmdline_string>
$ cp recovery.img recovery.img.unsigned
$ openssl cms -sign -signer db.crt -inkey db.key -binary -in recovery.img -outform der -out recovery.img.sig
$ truncate -s %2048 recovery.img
$ cat recovery.img.sig >> recovery.img
- where <rec_cmdline_string> is:
- Xavier Series:
“root=/dev/initrd rw rootwait console=ttyTCU0,115200n8 fbcon=map:0 net.ifnames=0 video=tegrafb no_console_suspend=1 earlycon=tegra_comb_uart,mmio32,0x0c168000 sdhci_tegra.en_boot_part_access=1”
- Orin Series:
“root=/dev/initrd rw rootwait mminit_loglevel=4 console=ttyTCU0,115200 firmware_class.path=/etc/firmware fbcon=map:0 net.ifnames=0”
Note
The
Imageinsiderecovery.imgmust also be signed. Use theImagesigned by the step 3 above.
To sign recovery kernel-dtb of recovery-dtb partition using db:
$ cp tegra234-p3701-0004-p3737-0000.dtb.rec tegra234-p3701-0004-p3737-0000.dtb.rec.unsigned
$ openssl cms -sign -signer db.crt -inkey db.key -binary -in tegra234-p3701-0004-p3737-0000.dtb.rec -outform der -out tegra234-p3701-0004-p3737-0000.dtb.rec.sig
$ truncate -s %2048 tegra234-p3701-0004-p3737-0000.dtb.rec
$ cat tegra234-p3701-0004-p3737-0000.dtb.rec.sig >> tegra234-p3701-0004-p3737-0000.dtb.rec
Note
The commands above use Concord’s SKU 4 kernel-dtb filename and should be replaced with the appropriate kernel-dtb filename of your target. The commands in steps 5 to 8 above sign images that are stored in partition. The signing appends certificate and signature to the original image (after first being aligned to 2K boundary).
To sign BOOTAA64.efi using db:
$ cp BOOTAA64.efi BOOTAA64.efi.unsigned
$ sbsign --key db.key --cert db.crt --output BOOTAA64.efi BOOTAA64.efi
Enabling UEFI Secureboot at Flashing Time
Using option –uefi-keys <keys_conf> to Provide Signing Keys and Enabling UEFI Secure Boot
Issue flash.sh command with --uefi-keys <keys.conf> option:
$ sudo ./flash.sh --uefi-keys uefi_keys/uefi_keys.conf <target> mmcblk0p1
Once flashing is finished, your target has UEFI Secureboot enabled.
Enabling UEFI Secureboot through UEFI Utilities by Running from an Ubuntu Prompt
Applies to the Jetson Orin series and the Jetson Xavier NX series.
This section is for the targets that were not flashed with UEFI Secureboot enabled.
Prerequisites
Install UEFI utilities: efitools and efivar:
$ apt update
$ apt install efitools
$ apt install efivar
Ensure that Secureboot is not enabled:
$ efivar -n 8be4df61-93ca-11d2-aa0d-00e098032b8c-SecureBootNote
The above command should return with a value of 0. If it returns with a value of 1, you cannot continue.
- Outline of steps (all steps are performed in the target):
Download the PK, KEK and db auth files from the host
Enroll the KEK, db keys
Download and write the signed UEFI payloads
Enroll the PK key
Detail steps
Download the PK, KEK and db auth files from the host
To get the PK, KEK, and db auth files, run the following commands:
$ mkdir /uefi_keys
$ cd /uefi_keys
$ scp <host_ip>:<LDK_DIR>/uefi_keys/_out/*.auth .
Enroll the KEK, db keys
To enroll the KEK and db, run the following commands:
$ efi-updatevar -f /uefi_keys/db.auth db
$ efi-updatevar -f /uefi_keys/KEK.auth KEK
Download and write the signed UEFI payloads
Download the signed UEFI payloads from the host to the payloads’ corresponding target’s folder as per the following table
Filename from host’s <LDK_DIR>/uefi_keys/ folder |
Target’s folder |
Type |
|---|---|---|
extlinux.conf and extlinux.conf.sig |
/boot/extlinux/ |
rootfs |
initrd and initrd.sig |
/boot/ |
rootfs |
|
/boot/dtb/ |
rootfs |
Image |
/boot/ |
rootfs |
BOOTAA64.efi |
/uefi_keys/ |
esp partition |
boot.img |
/uefi_keys/ |
A/B_kernel partition |
tegra234-p3701-0004-p3737-0000.dtb (for Concord SKU 4) |
/uefi_keys/ |
A/B_kernel-dtb partition |
recovery.img |
/uefi_keys/ |
recovery partition |
tegra234-p3701-0004-p3737-0000.dtb.rec (for Concord SKU 4) |
/uefi_keys/ |
recovery-dtb partition |
Note
You might want to save copies of the original files.
For the UEFI payload files with the rootfs type, the target’s folder listed in the table are their final destinations. The other files need to be copied to their destination partitions. To copy a file to its destination partition, copy the file to a block device that is mapped to that partition.
To find out a block device mapped to a particular partition, use blkid:
$ sudo blkid | grep <part_name>

where <part_name> is:

   - esp
   - A_kernel
   - B_kernel
   - A_kernel-dtb
   - B_kernel-dtb
   - recovery
   - recovery-dtb
Note
If there are multiple block devices mapped to a partition, choose the one that is the boot device.
3.1 To write the signed BOOTAA64.efi to esp partition:
### Ex: esp partition is mapped to /dev/mmcblk0p10
$ mount /dev/mmcblk0p10 /mnt
$ cp /uefi_keys/BOOTAA64.efi /mnt/EFI/BOOT/BOOTAA64.efi
$ sync
$ umount /mnt
3.2 To write the signed boot.img to A_kernel partition:
### Ex: A_kernel partition is mapped to /dev/mmcblk0p2
$ dd if=/uefi_keys/boot.img of=/dev/mmcblk0p2 bs=64k
3.3 To write the signed boot.img to B_kernel partition:
### Ex: B_kernel partition is mapped to /dev/mmcblk0p5
$ dd if=/uefi_keys/boot.img of=/dev/mmcblk0p5 bs=64k
3.4 To write the signed kernel-dtb to A_kernel-dtb partition:
### Ex: A_kernel-dtb partition is mapped to /dev/mmcblk0p3
$ dd if=/uefi_keys/tegra234-p3701-0004-p3737-0000.dtb of=/dev/mmcblk0p3 bs=64k
3.5 To write the signed kernel-dtb to B_kernel-dtb partition:
### Ex: B_kernel-dtb partition is mapped to /dev/mmcblk0p6
$ dd if=/uefi_keys/tegra234-p3701-0004-p3737-0000.dtb of=/dev/mmcblk0p6 bs=64k
3.6 To write the signed recovery.img to recovery partition:
### Ex: recovery partition is mapped to /dev/mmcblk0p8
$ dd if=/uefi_keys/recovery.img of=/dev/mmcblk0p8 bs=64k
3.7 To write the signed recovery kernel-dtb to recovery-dtb partition:
### Ex: recovery-dtb partition is mapped to /dev/mmcblk0p9
$ dd if=/uefi_keys/tegra234-p3701-0004-p3737-0000.dtb.rec of=/dev/mmcblk0p9 bs=64k
Enroll the PK key
To enroll the PK key last to enable UEFI Secureboot:
$ efi-updatevar -f /uefi_keys/PK.auth PK
Check if UEFI Secureboot is enabled
Reboot the target and run the efivar command to verify:
$ efivar -n 8be4df61-93ca-11d2-aa0d-00e098032b8c-SecureBoot

.. note::
   The command above should return with a value of 01.