Tao Toolkit Overview
At the end of this lab, you will fully understand how to finetune and deploy an end-to-end custom Object detection model using NVIDIA AI Enterprise frameworks and applications.
Applications used in this lab:
NVIDIA TAO toolkit
NVIDIA Deepstream SDK
Tensorboard for training visualization
Lab Workflow:
Download open images dataset.
Preprocess dataset to convert it into a format TAO toolkit can consume.
Fine-tune one of the many NVIDIA pretrained (YOLO-v4) models on the dataset.
Visualize training on Tensorboard.
Prune and retrain model to increase the inference speed.
Visualize model inferences.
Export model to run on Tensor cores (mixed precision) format for Deepsteam
Deploy YOLO-v4 model to Deepstream
What is Object detection?
Object detection is a computer vision task for classifying and putting bounding boxes around images or frames of videos etc. Object detection can be used in many real world applications like self checkout in retail, self driving cars etc. In this lab, you will detect automobiles.
Challenges with Object detection
Training a deep learning model for object detection from scratch requires a deep understanding of neural network architectures and clustering algorithms while carefully tuning hyperparameters. Also, training from scratch usually requires a huge amount of data for the model to start showing accurate results. A software engineer with no data science experience, who wants to integrate such a model into his application might find this to be a challenging task. NVIDIA has developed the TAO toolkit to solve these challenges.
With NVIDIA TAO toolkit, software engineers with no expertise in data science and deep learning can take one of the many NVIDIA enterprise supported pretrained models, fine-tune them on a smaller dataset and get accurate results for various Computer Vision and Conversational AI tasks.
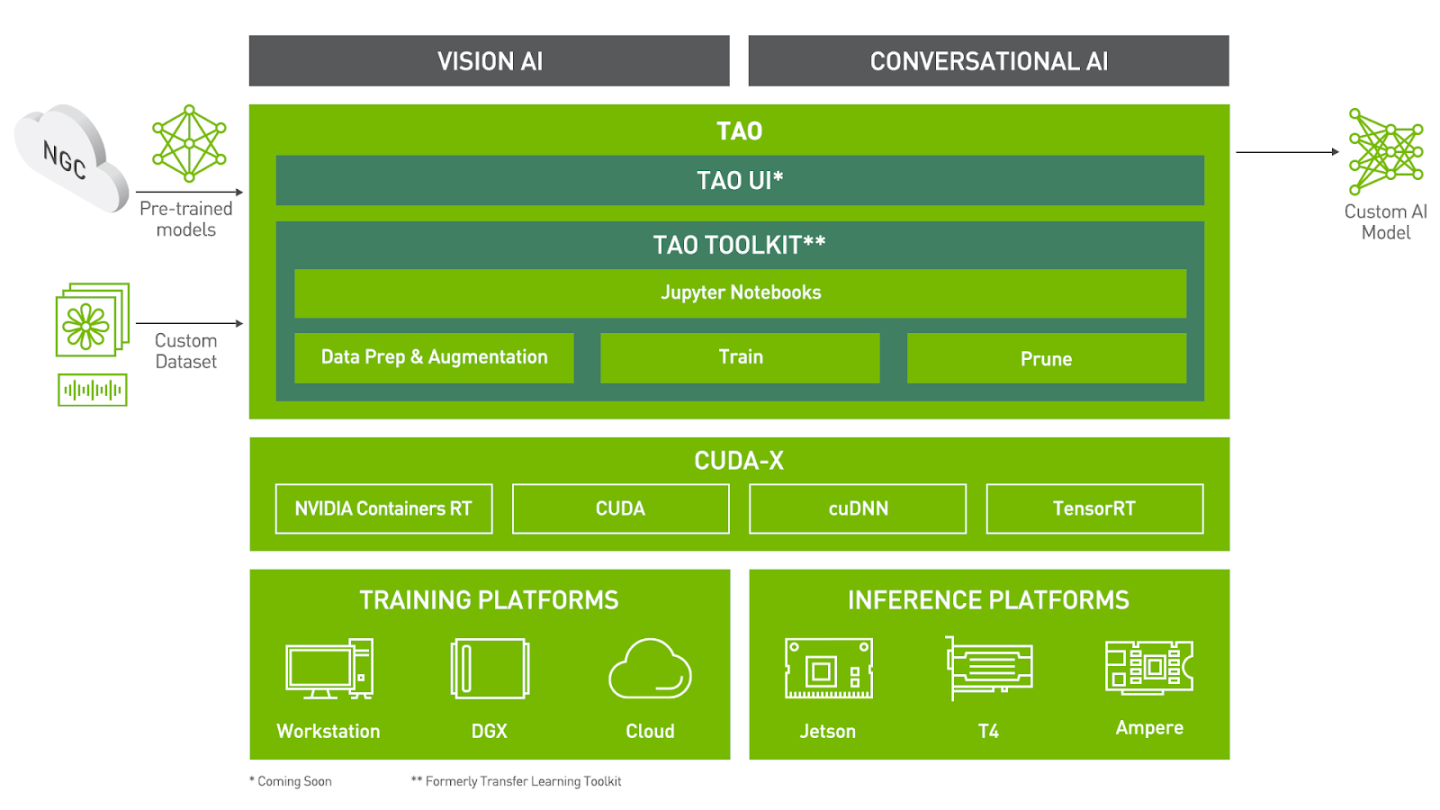
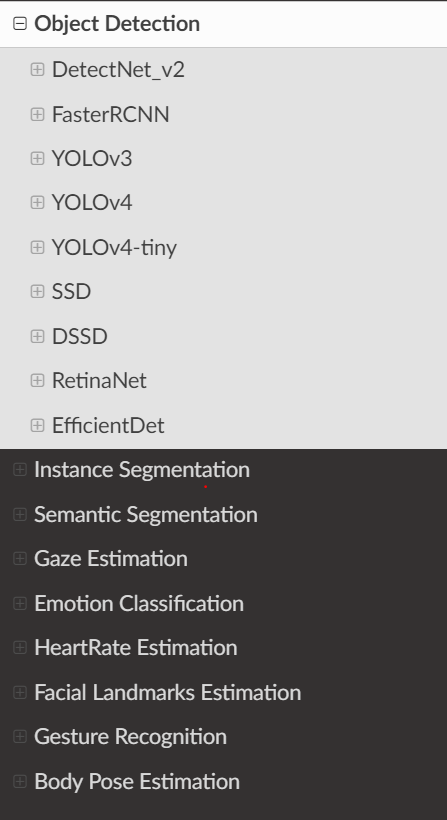
The TAO toolkit comes with a plethora of pretrained models for every task. TAO toolkit has pretrained models for a variety of Computer Vision like Object detection, Image Segmentation, Gaze estimation, Gesture recognition, Body Pose estimation and many more. It also has models for Conversation AI tasks such as Automatic Speech recognition and Text to Speech. The complete list of models is available here. You can use these models out of the box or finetune it for your specific purposes.
For Object detection, you have options to download out of the box use case specific models like:
PeopleNet (Detects people)
DashcamNet (Detects objects generally seen from the dashcam of a car)
TrafficCamNet (Detects objects generally seen from the traffic camera)
Pretrained Object detection backbone networks for custom object detection.
and many more
In this Launchpad Lab, we will use a custom pretrained yolo-v4 model with a resnet-18 backbone for custom object detection.
The TAO toolkit is already pre installed in your launchpad environment. But installing TAO is quick and easy. TAO is available as a pip package (pip3 install nvidia-tao). Prior to installing in an environment outside of the launchpad, ensure the requirements are met.
After the pip package is installed, the tao command can be used to preprocess data and train models. TAO commands have the following format.
tao <task> <sub-task> <args>
The tasks are broadly divided into computer vision and conversational AI. For example, YOLOV4 is a computer vision task for object detection in TAO Toolkit, which supports subtasks such as train, prune, evaluate, export. An example command which can be executed by the user is tao yolov4 train --help.
Internally, TAO launches a container for each of the tasks and maps appropriate directories for reading the datasets and saving the models. So the end user doesn’t have to interact with docker commands.
Entire workflow is explained in detail here <https://docs.nvidia.com/tao/tao-toolkit/text/tao_launcher.html>.
Mounting directories
As mentioned above, TAO toolkit launches containers for each of the tasks (dataset conversion, training, pruning and inference etc). All these tasks require access to storage directories to read the datasets and then write the models back to. TAO toolkit asks the users to create a json config that maps the directories on the host machine to the directories inside the container. These are delineated as Source and Destination directories. That way, for example, the training container can point to the “in container” mount path to read the dataset that is mounted from host directory that actually has the dataset.
            {
    "Mounts": [
        {
            "source": "/path/to/your/experiments",
            "destination": "/workspace/tao-experiments"
        },
        {
            "source": "/path/to/config/files",
            "destination": "/workspace/tao-experiments/specs"
        }
    ]
}
The “source” is the path on your machine and “destination” is the path that it will be mounted on inside the container.
In an upcoming step, you will execute the Object detection workflow by using the TAO toolkit, use Tensorboard to visualize training and then deploy the model to Deep Stream. Prior to doing so, let’s review each of the steps within the workflow more closely.
Step 1: Data Input format
For Object detection tasks, TAO toolkit expects the annotation labels to be in KITTI dataset format, below is the dataset organization structure:
            |--dataset root
|-- images
    |-- 000000.jpg
    |-- 000001.jpg
            .
            .
    |-- xxxxxx.jpg
|-- labels
    |-- 000000.txt
    |-- 000001.txt
            .
            .
    |-- xxxxxx.txt
KITTI labels need to be annotated in a specific way as well. A space separated text file for each image, indicated in red below. Each row in the text file has information about one of the objects in the image.
            car 0.00 0 -1.58 587.01 173.33 614.12 200.12 1.65 1.67 3.64 -0.65 1.71 46.70 -1.59
cyclist 0.00 0 -2.46 665.45 160.00 717.93 217.99 1.72 0.47 1.65 2.45 1.35 22.10 -2.35
pedestrian 0.00 2 0.21 423.17 173.67 433.17 224.03 1.60 0.38 0.30 -5.87 1.63 23.11 -0.03
Each row has the following fields.
Num Elements |
Parameter Name |
Description |
Type |
Range |
Example |
|---|---|---|---|---|---|
1 |
Class names |
The class to which the object belongs. |
String |
N/A |
Person, car, Road_Sign |
1 |
Truncation |
How much of the object has left image boundaries. |
Float |
0.0, 0.1 |
0.0 |
1 |
Occlusion |
Occlusion state [ 0 = fully visible, 1 = partly visible, 2 = largely occluded, 3 = unknown]. |
Integer |
[0,3] |
2 |
1 |
Alpha |
Observation Angle of object |
Float |
[-pi, pi] |
0.146 |
4 |
Bounding box coordinates: [xmin, ymin, xmax, ymax] |
Location of the object in the image |
Float(0 based index) |
[0 to image width],[0 to image_height], [top_left, image_width], [bottom_right, image_height] |
100 120 180 160 |
3 |
3-D dimension |
Height, width, length of the object (in meters) |
Float |
N/A |
1.65, 1.67, 3.64 |
3 |
Location |
3-D object location x, y, z in camera coordinates (in meters) |
Float |
N/A |
-0.65,1.71, 46.7 |
1 |
Rotation_y |
Rotation ry around the Y-axis in camera coordinates |
Float |
[-pi, pi] |
-1.59 |
Only the classnames and the bounding box fields are mandatory, the rest of them can be set to 0. For this lab, we are using the openimages dataset and it is not in KITTI format. Therefore, you will convert it to KITTI format for training as part of the preprocessing step of this lab.
            car 0.00 0 0.00 587.01 173.33 614.12 200.12 0.00 0.00 0.00 0.00 0.00 0.00 0.00
cyclist 0.00 0 0.00 665.45 160.00 717.93 217.99 0.00 0.00 0.00 0.00 0.00 0.00 0.00
pedestrian 0.00 0 0.00 423.17 173.67 433.17 224.03 0.00 0.00 0.00 0.00 0.00 0.00 0.00
Step 2: Dataset Conversion and Augmentation
The next part of the TAO pipeline is dataset conversion. With a single command, you will convert the data into tfrecords format. This will allow for faster training after the conversion is done. This command,ingests the data to a dataset converter, which can then augment the data to introduce variations in the dataset. This is very important in training, as data variation improves the overall quality of the model and prevents overfitting
Step 3: Training the model and visualizing with Tensorboard
Now that the dataset is prepared and augmented, the next step is to start training. You will use a spec file to choose the training hyperparameters.
Visualization is also a very important part of training a Deep Neural Network (DNN). Training a DNN involves designing complex neural networks with models. These have millions parameters which can be tuned by iterating over large datasets. Therefore visualizing the structure of the model graph allows us to understand how the training is progressing over time, and what statistics of the model weights are of significant importance.
TAO Toolkit 3.22.04 introduced the integration of computer vision networks with Tensorboard.
Step 4: Model Pruning
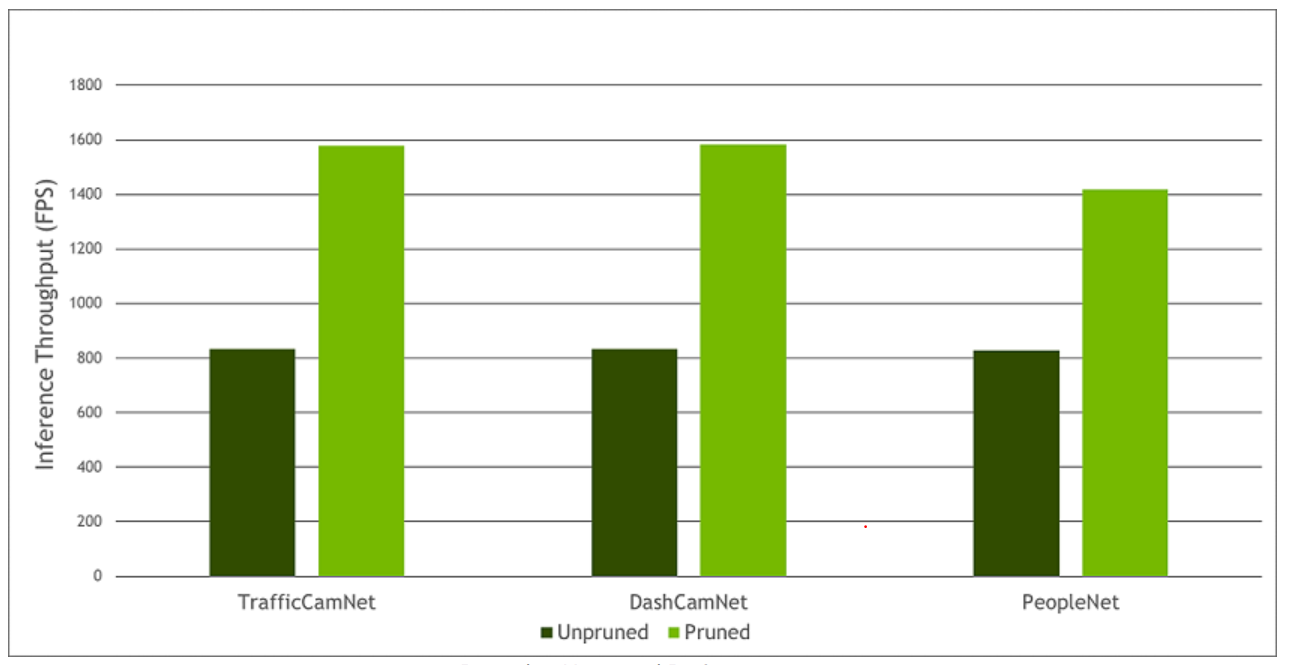
For the purpose of model deployment, pruning the model removes parameters from the model which reduce the model size without compromising the integrity of the model. TAO has the option to prune the fine tuned model before deploying them to Deepstream or RIVA.
Model pruning is one of the key differentiators for TAO Toolkit. Pruning involves removing from the neural network nodes that contribute less to the overall accuracy of the model. This reduces the overall size of the model, significantly reducing the memory footprint, and increasing inference throughput–all factors that are very important for edge deployment. The following graph illustrates inference throughput when a model is pruned vs unpruned.
Step 5: Model Export
The exported model will be in .etlt format, which can be deployed directly on any NVIDIA GPU using DeepStream and TensorRT. During the export step, you can optionally generate an INT8 calibration cache that quantizes the floating-point weights to integer values. Running inference at INT8 precision can achieve more than double the performance when compared to FP16 or FP32 precision, without sacrificing the accuracy of the model.
NVIDIA® TensorRT™, an SDK for high-performance deep learning inference, includes a deep learning inference optimizer and runtime that delivers low latency and high throughput for inference applications. It creates optimized engines (TensorRT native model files) that are optimized for running on GPUs.
Now, with deepstream you can either send the etlt file you discussed above or the engine file that you will create as the first part of the lab. The engine file makes optimizations for the GPU it’s being run on so it’s the favorable option.
Quantization is the process of transforming deep learning models to use parameters and computations at a lower precision. Traditionally, DNN training and inference have relied on the IEEE single-precision floating-point format, using 32 bits to represent the floating-point model weights and activation tensors.
TAO toolkit provides a specification file for each step of the pipeline. The specification file contains all required options to run a specific step in the pipeline. The dataset conversion spec file for example has options like the image format (jpg, png etc), the dataset path, testing and validation split etc. The training spec file for example for YOLO-v4 contains options for tuning parameters such as learning rate, specifying anchor box sizes, providing dataset path tuning NMS threshold etc.