Google Cloud Platform Setup Guide
Overview
In this guide, we will go through the steps needed to:
Understand the architecture of the infrastructure we will be setting up to host the Metropolis Application on the Google Cloud Platform (GCP).
Perform the necessary steps to procure the pre-requisite access and information to use the automated deployment scripts.
Create one or more deployments of the Metropolis Application using the automated deployment scripts.
Verify the deployment.
Tear down the created infrastructure when no longer required.
Infrastructure Layout
Metropolis Applications setup on GCP requires several GCP resources to be created such as Instances, Security Groups, Application load balancer, CDN for hosting UI content, etc., While there are several patterns that can be followed to bring up infrastructure needed for Metropolis, here is one way we will be working to achieve.
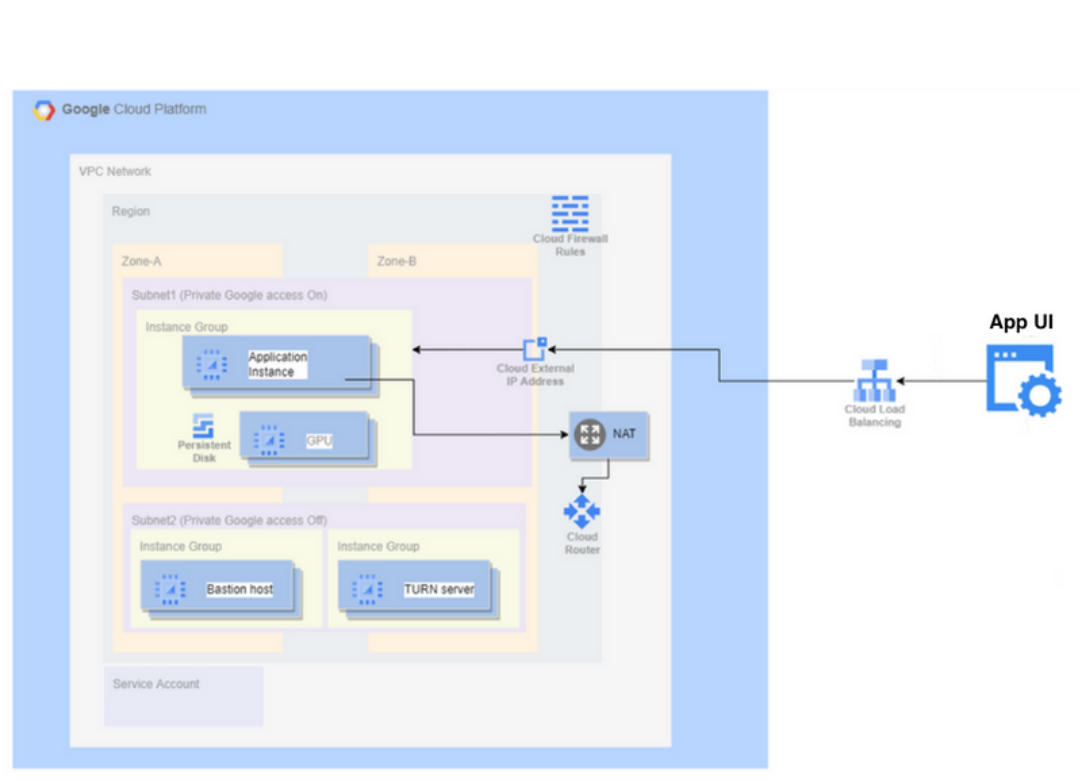
In addition to bringing up GCP resources, we also will have to work on downloading Metropolis application and its dependency artifacts, configure them and install.
These automation scripts will help you simplify that by abstracting out the complexity and allowing user to work with majorly 2 files viz., deploy-template.yml and secrets.sh.
deploy-template.yml is an abstraction of infra specification we need for bringing up Metropolis Application. At a high level, we define the base infrastructure specifications (e.g. VPC); then add COTURN infrastructure (e.g. EC2 instance) and Application infrastructure specifications (e.g. GPU instance).
COTURN infrastructure and Application infrastructure will be established on base infrastructure specified on this deploy-template.yml.
To manage multiple environments with single deploy-template.yml, you could add multiple base infrastructure elements and respective COTURN and application infrastructure elements for each base. However, need to map each of COTURN and Application infrastructure elements to base using correct reference mapping as discussed in later part of documentation.
secrets.sh will be used as mechanism for user to provide secrets of two categories.
Secrets such as ‘GCP credentials’ so that automation program can interact with GCP project.
It also takes in secrets needed for application configuration such as twilio auth token etc., and use them while installing application.
Note
We will skip some optional features such as Auto Scaling in this reference setup.
Important
Many of the resources in this setup may not fall in Free tier, you can check AWS billing reference pages for understanding cost implications.
Prerequisites
This setup guide assumes you have the following conditions met:
GCP service account access keys
On your GCP project, create a service account with Owner permissions.
Reference GCP documentation to create service account.
Obtain (download) an access key for the service account for programmatic access to your GCP resources.
GCP Bucket for Backend state
This script uses GCS bucket to store references of the resources spun up during installation process.
Create a GCS bucket to be used to store the deployment state.
Ensure that public access prevention is enforced for the bucket.
Reference GCP documentation to create bucket.
Access to an Ubuntu 20.04 based machine, on a user with sudo privileges to run the automated deployment scripts.
Setup Nvidia GPU Cloud (NGC) API Key by following instructions here.
SSH key pair to access the instances we are going to setup.
You may use existing SSH Key pair for this access or create a new pair.
Reference documentation to create a public private ssh key pair is available here.
Note
The same pre-requisites provisioned here can be used for multiple projects, and can be considered as a one time setup for most scenarios unless the parameters are not acceptable for any deployment.
Prepare deployment config
Download & extract deployment artifact
Setting up NGC CLI
Setup ngc cli tool on Ubuntu 20.04 machine by following instructions from this page.
Select ‘AMD64 Linux Install’ tab for Ubuntu installation.
During ngc config set command, select ‘nfgnkvuikvjm’ as Org and ‘mdx-v2-0’ as team.
Download Oneclick Setup Scripts
Using below commands, download and extract the contents of deployment artifact and navigate to the deployment directory:
# download the artifact
$ ngc registry resource download-version "nfgnkvuikvjm/mdx-v2-0/metropolis-gcp-one-click-script:0.0.5"

$ cd metropolis-gcp-one-click-script_v0.0.5/


# verify necessary files required for Installing Infra on GCP CSP
$ ls
README.md                              deploy-spec          examples         modules     working-deploy-template.yml
deploy-template.yml  mtmc-app-deploy  secrets.sh
$
Download & extract application helm values
Refer to this section to download and extract the contents of reference application helm values & sample data.
Prepare secrets
The file secrets.sh can be setup as below so as not have to commit and push sensitive data as part of deploy-template.yml.
secrets.sh
#!/bin/bash

# SPDX-FileCopyrightText: Copyright (c) 2024 NVIDIA CORPORATION & AFFILIATES. All rights reserved.
# SPDX-License-Identifier: LicenseRef-NvidiaProprietary
#
# NVIDIA CORPORATION, its affiliates and licensors retain all intellectual
# property and proprietary rights in and to this material, related
# documentation and any modifications thereto. Any use, reproduction,
# disclosure or distribution of this material and related documentation
# without an express license agreement from NVIDIA CORPORATION or
# its affiliates is strictly prohibited.

# _ssh_public_key -> Your public ssh key's content
export _ssh_public_key='<replace_content_between_quotes_with_your_value>'
# _ngc_api_key -> Your ngc api key value
export _ngc_api_key='<replace_content_between_quotes_with_your_value>'
# _turnserver_password -> Password for turn server
# This is not required if you are using 'use_twilio: true' in deploy-template.yml
export _turnserver_password='<replace_content_between_quotes_with_your_value>'
Important
You may want to be careful on whether or not to commit this file to your version control system as it contains secrets.
Prepare deploy template
Deploy Template Schema & Configuration:
Deploy template
deploy-template.ymlis used to compile the infrastructure needed to setup your project/environment(s). It has separate sections to capture details for different needs such as provider config, coturn-infra etc. As shown in below layout diagram, you can choose to create one or more environments and infrastructure(s) under single project name.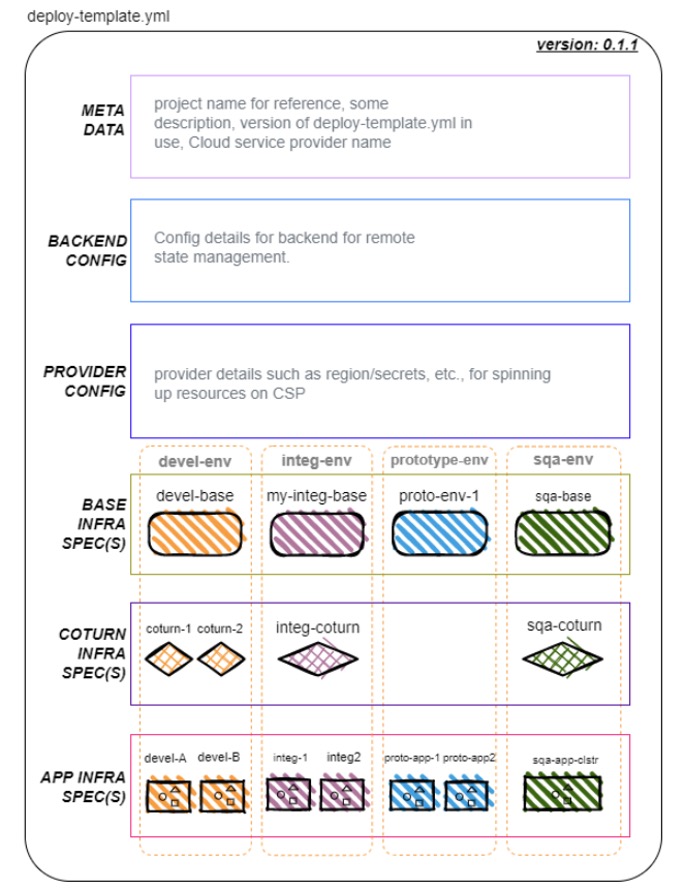
Override the content of
deploy-template.ymlfile with your environment/application specific values. This will drive the configuration of Infrastructure and application being installed.deploy-template.yml
# SPDX-FileCopyrightText: Copyright (c) 2024 NVIDIA CORPORATION & AFFILIATES. All rights reserved.
# SPDX-License-Identifier: LicenseRef-NvidiaProprietary
#
# NVIDIA CORPORATION, its affiliates and licensors retain all intellectual
# property and proprietary rights in and to this material, related
# documentation and any modifications thereto. Any use, reproduction,
# disclosure or distribution of this material and related documentation
# without an express license agreement from NVIDIA CORPORATION or
# its affiliates is strictly prohibited.

# NOTE: Refer to examples for various configuration options

project_name: '<replace-with-unique-name-to-identify-your-project>'
description: '<add-a-brief-description-about-this-project>'
template_version: '0.1.1'
csp: 'gcp'
backend:
  bucket: '<replace-with-pre-created-deployment-state-bucket-name>'
  credentials: '<replace-with-absolute-path-to-service-account-key-with-access-to-the-deployment-state-bucket>'
provider:
  project: '<replace-with-the-name-of-the-gcp-project-to-create-resources-in>'
  credentials: '<replace-with-absolute-path-to-service-account-key-with-admin-access-to-the-project>'
base_infra:
  # NOTE: Repeat below section for as many base setups as necessary
  <your-base-env-name>:
    spec:
      location: '<replace-with-gcp-location-to-create-resources-in>'
      region: '<replace-with-gcp-region-to-create-resources-in>'
      zone: '<replace-with-gcp-zone-to-create-resources-in>'
      network_cidr_range: '<replace-with-an-available-cidr-range>'
      ssh_public_key: '${_ssh_public_key}'
      dev_access_cidrs:
        - '<replace-with-list-of-dev-ip-cidrs>'
      user_access_cidrs:
        - '<replace-with-list-of-user-ip-cidrs>'
coturn_infra: # set as {} in case no COTURN environment is needed
  # NOTE: Repeat below section for as many COTURN environments as necessary
  <your-coturn-env-name>:
    base_ref: '<replace-with-your-base-env-name>' # NOTE: should match the name of a base env defined in the above section
    spec:
      turnserver_realm: '<replace-with-a-realm-to-use-for-the-turnserver>'
      turnserver_username: '<replace-with-a-username-to-use-for-the-turnserver>'
      turnserver_password: '${_turnserver_password}' # NOTE: value of _turnserver_password assumed to be provided in secrets.sh
app_infra:
  # NOTE: Repeat below section for as many app environments as necessary
  <your-application-env-name>:
    base_ref: '<replace-with-your-base-env-name>' # NOTE: should match the name of a base env defined in the above section
    # NOTE: Uncomment below line in case app environment should use one of the setup COTURN environments
    #coturn_ref: '<replace-with-your-coturn-env-name>' # NOTE: should match the name of a COTURN env with same base ref defined in the above section
    spec:
      ngc_api_key: '${_ngc_api_key}' # NOTE: value of _ngc_api_key assumed to be provided in secrets.sh
      # NOTE: Uncomment any of the below lines based on the need to override
      # --- OPTIONAL CONFIGURATION START ---
      #api_instance_machine_type: 'n1-standard-32'
      #api_instance_data_disk_size_gb: 1024
      additional_ports:
        - port: "31560"                 #### Kibana Port
          health_port: "31080"
          health_path: "/elastic"
          health_status_codes: ["200"]
        - port: "32300"                 #### Grafana Monitoring Port
          health_port: "32300"
          health_path: "/api/health"
          health_status_codes: ["200"]
      foundational_chart:
        org: "nfgnkvuikvjm"
        team: "mdx-v2-0"
        name: "mdx-foundation-sys-svcs"
        version: "v1.3"
      app_chart:
        org: "nfgnkvuikvjm"
        team: "mdx-v2-0"
        name: "mdx-mtmc-app"
        version: "1.0.36"
      app_override_values_file: /<abs_path_to_file>/mtmc_app_values.yaml
      nvstreamer_app_chart:
        org: "rxczgrvsg8nx"
        team: "vst-1-0"
        name: "nvstreamer"
        version: "0.2.23"
      nvstreamer_app_override_values_file: </abs_path_to_file>/nvstreamer_app_values.yaml
      vst_app_chart:
        org: "rxczgrvsg8nx"
        team: "vst-1-0"
        name: "vst"
        version: "1.0.24"
      vst_app_override_values_file: /<abs_path_to_file>/vst_app_values.yaml
      ds_app_chart:
        org: "nfgnkvuikvjm"
        team: "mdx-v2-0"
        name: "mdx-wdm-ds-app"
        version: "0.0.32"
      wdm_ds_app_override_values_file: /<abs_path_to_file>/wdm_ds_app_values.yaml
      # ---- OPTIONAL CONFIGURATION END ----
Explanation of every entry of this yml file are explained in below table:
Deploy Template Parameter name
Type
Optional
Description
project_name
string
A unique name to identify the project. This is important to tear down resources later.
description
string
A brief description of the project.
backend
map
Backend configuration.
backend > bucket
string
Name of the GCS bucket in which state of the resources provisioned is stored.
backend > credentials
string
Absolute path of the GCP service account key with access to state bucket.
provider
map
Provider configuration.
provider > project
string
GCP project where resources will be provisioned.
provider > credentials
string
Absolute path of the GCP service account key with access to provision resources.
base_infra
map
Base for app configuration.
base_infra > KEY
map
An instance of base configuration. There can be 1 or more instances.
base_infra > KEY > spec
map
Configuration specifications of this base instance.
base_infra > KEY > spec > location
string
GCP location where resources will be created.
base_infra > KEY > spec > region
string
GCP region where resources will be created.
base_infra > KEY > spec > alternate_region
string
GCP additional region where resources that need dual region will be created.
base_infra > KEY > spec > zone
string
GCP zone where resources will be created.
base_infra > KEY > spec > network_cidr_range
string
Private CIDR range in which base coturn and app resources will be created.
base_infra > KEY > spec > ssh_public_key
string
Content of the public key of the ssh key-pair used for instance access. Prefer to provide via variable in secrets.sh.
base_infra > KEY > spec > dev_access_cidrs
array
CIDR ranges from where SSH access should be allowed.
base_infra > KEY > spec > user_access_cidrs
array
CIDR ranges from where application UI and API will be allowed access.
coturn_infra
map
COTURN instance used in app configuration.
coturn_infra > KEY
map
An instance of COTURN configuration. Coturn Instance is must for Metropolis App since Application UI uses WebRTC connections for playing video snippets.
coturn_infra > KEY > base_ref
string
The key name of the base instance that should be used to set up this COTURN instance.
coturn_infra > KEY > spec > turnserver_realm
string
Realm name used during COTURN setup.
coturn_infra > KEY > spec > turnserver_username
string
Username used to connect to COTURN server.
coturn_infra > KEY > spec > turnserver_password
string
Password used to connect to COTURN server. Prefer to provide via variable in secrets.sh.
app_infra
map
Application configuration.
app_infra > KEY
map
An instance of application configuration. There can be 1 or more instances.
app_infra > KEY > base_ref
string
The key name of the base instance that should be used to set up this app instance.
app_infra > KEY > coturn_ref
string
yes
The key name of the COTURN instance that should be used to set up this app instance. Not required if using Twilio.
app_infra > KEY > spec > ngc_api_key
string
NGC API key with access to deployment artifacts. Prefer to provide via variable in secrets.sh.
app_infra > KEY > spec > api_instance_machine_type
string
yes
The GCP instance machine type on which the API would run. Defaults to n1-standard-32.
app_infra > KEY > spec > api_instance_data_disk_size_gb
number
yes
The data disk size in GB on which the API would run. Defaults to 1024.
app_infra > KEY > spec > foundational_chart
map
yes
Configuration to change the default APP chart used
app_infra > KEY > spec > foundational_chart > org
string
NGC Org of the foundational_chart to be used
app_infra > KEY > spec > foundational_chart > team
string
NGC Team of the foundational_chart to be used
app_infra > KEY > spec > foundational_chart > name
string
NGC Resource Name of the foundational_chart to be used
app_infra > KEY > spec > foundational_chart > version
string
NGC Resource Version of the foundational_chart to be used
app_infra > KEY > spec > foundational_override_values_file
string
absolute path to foundational_override_values_file
app_infra > KEY > spec > app_chart
map
yes
Configuration to change the default APP chart used
app_infra > KEY > spec > app_chart > org
string
NGC Org of the APP chart to be used
app_infra > KEY > spec > app_chart > team
string
NGC Team of the APP chart to be used
app_infra > KEY > spec > app_chart > name
string
NGC Resource Name of the APP chart to be used
app_infra > KEY > spec > app_chart > version
string
NGC Resource Version of the APP chart to be used
app_infra > KEY > spec > app_override_values_file
string
absolute path to app_override_values_file
app_infra > KEY > spec > nvstreamer_app_chart
map
yes
Configuration to change the default NvStreamer App Chart used
app_infra > KEY > spec > nvstreamer_app_chart > org
string
NGC Org of the NvStreamer App Chart to be used
app_infra > KEY > spec > nvstreamer_app_chart > team
string
NGC Team of the NvStreamer App Chart to be used
app_infra > KEY > spec > nvstreamer_app_chart > name
string
NGC Resource Name of the NvStreamer App Chart to be used
app_infra > KEY > spec > nvstreamer_app_chart > version
string
NGC Resource Version of the NvStreamer App Chart to be used
app_infra > KEY > spec > nvstreamer_app_override_values_file
string
absolute path to nvstreamer_app_override_values_file
app_infra > KEY > spec > vst_app_chart
map
yes
Configuration to change the default VST App chart used
app_infra > KEY > spec > vst_app_chart > org
string
NGC Org of the VST App chart to be used
app_infra > KEY > spec > vst_app_chart > team
string
NGC Team of the VST App chart to be used
app_infra > KEY > spec > vst_app_chart > name
string
NGC Resource Name of the VST App chart to be used
app_infra > KEY > spec > vst_app_chart > version
string
NGC Resource Version of the VST App chart to be used
app_infra > KEY > spec > vst_app_override_values_file
string
absolute path to vst_app_override_values_file
app_infra > KEY > spec > app_chart
map
yes
Configuration to change the default WDM-DS App chart used
app_infra > KEY > spec > app_chart > org
string
NGC Org of the WDM-DS App chart to be used
app_infra > KEY > spec > app_chart > team
string
NGC Team of the WDM-DS App chart to be used
app_infra > KEY > spec > app_chart > name
string
NGC Resource Name of the WDM-DS App chart to be used
app_infra > KEY > spec > app_chart > version
string
NGC Resource Version of the WDM-DS App chart to be used
app_infra > KEY > spec > wdm_ds_app_override_values_file
string
absolute path to wdm_ds_app_override_values_file
app_infra > KEY > spec > additional_ports
map
yes
Additional Ports for app-gw for different app specific dashboard
app_infra > KEY > spec > additional_ports > port
string
additional node-port for app-gw backend settings
app_infra > KEY > spec > additional_ports > health_port
string
Health Check Port for additional app-gw
app_infra > KEY > spec > additional_ports > health_path
string
Health probe path for healthcheck for additional port
app_infra > KEY > spec > additional_ports > health_status_codes
string
Health Probe status Code
Setup logs backup
Audit logs for any changes made via the script will be captured in a directory named logs at the same level as the deploy-template.yml. Take necessary measures to ensure these are backed up in the event they are needed for debugging.
Note
Any values defined in secrets.sh will be masked in the logs.
Deploy infrastructure and application
Use the below commands to Install / Update / Uninstall Metropolis application along with its infrastructure as per specs provided in deploy-template.
# To view available options
bash mtmc-app-deploy

# To preview changes based on deploy-template.yml without actually applying the changes
bash mtmc-app-deploy preview

# To install changes showed in preview option based on deploy-template.yml
bash mtmc-app-deploy install

# To show results/information about the project installed
bash mtmc-app-deploy show-results

# To uninstall the deployed infra and application
bash mtmc-app-deploy uninstall
Important
Both install and uninstall Options needs to be run with care. We recommend preview option to see the changes before install.
If you are looking for an option to print the details of your past installation, use show-results option.
Warning
Any attempts to suspend Ctrl + Z the running deployment will result in an inability to make changes to the project via the scripts as well as the need to manually cleanup resources created via the web console. Prefer terminating the process using Ctrl + C in case it has to absolutely be exited.
Verify Deployment
On successful deployment of Infra, you will be displayed output in a format as shown below.
Apply complete! Resources: <nn> added, <nn> changed, <nn> destroyed.

Outputs:

app_infra = {
  "<app_infra key>" = {
    "additional_ports_app_gw_public_ips" = {
    "additional_ports" = "<app-gw_public_ip>"
    "additional_ports" = "<app-gw_public_ip>"
    }
    "app_gw_public_ip" = "<app-gw_public_ip>"
    "private_ips" = [
      "<private_ip_of_app_instace>",
    ]
  }
}
bastion_infra = {
  "<bastion_infra key>" = {
    "private_ip" = "<bastion_instance_private_ip>"
    "public_ip" = "<bastion_instance_public_ip>"
  }
}
coturn_infra = {
  "<coturn_infra key" = {
    "port" = 3478
    "private_ip" = "<coturn_instance_private_ip>"
    "public_ip" = "<coturn_instance_public_ip>"
  }
}
Use ssh command in below format to log into Application instance.
Replace content between '<' and '>' with its appropriate values.
#pem file refered here must the key associated to the public key used in initial steps of setup.
ssh -i <path-to-pem-file> -o StrictHostKeyChecking=no -o ProxyCommand="ssh -i <path-to-pem-file> -W %h:%p -o StrictHostKeyChecking=no ubuntu@<bastion-vm-public-ip>" ubuntu@<app-vm-private-ip>
Once logged into the terminal, run below command to see the Kubernetes Pods’ statuses. All the pods should turn into Running state eventually.
$ kubectl get pods

## If, for some reason, pods are failing to start or run healthily, please check the logs to identify failure or pod crash issues. The `-f` flag can be used to follow the logs.

$ kubectl logs <pod-name> or kubectl logs -f <pod-name>
Note
Based on several conditions, Pods may take up to 30-40 mins to turn into
Runningstate.To check the logs for pods that are not in the
Runningstate, usekubectl logs <pod-name>.
Once all the pods are in Running state, try accessing the App UI with the help of printed output attribute for app_gw_public_ip. App UI can be available at http://<app_gw_public_ip>/ui/<app-name>/ (supported app names are mtmc, rtls and people-analytics).
When you try your URL on browser, you should be able to see Metropolis application coming up at this point.

Teardown infrastructure and application
To teardown all the infrastructure along with application that we created thru above scripts, run bash mtmc-app-deploy uninstall command.
Important
Both install and uninstall Options needs to be run with care. We recommend preview option to see the changes before install.
If you are looking for an option to print the details of your past installation, use show-results option.