Virtualization
Single Root IO Virtualization (SR-IOV) is a technology that allows a physical PCIe device to present itself multiple times through the PCIe bus. This technology enables multiple virtual instances of the device with separate resources. Mellanox adapters are capable of exposing in ConnectX-4 onward adapter cards up to 63/127 virtual instances called Virtual Functions (VFs) depending on the firmware capabilities. These virtual functions can then be provisioned separately. Each VF can be seen as an addition device connected to the Physical Function. It shares the same resources with the Physical Function.
SR-IOV is commonly used in conjunction with an SR-IOV enabled hypervisor to provide virtual machines direct hardware access to network resources hence increasing its performance.
In this chapter we will demonstrate setup and configuration of SR-IOV in a ESXi environment using Mellanox ConnectX® adapter cards family.
System Requirements
To set up an SR-IOV environment, the following is required:
nmlx5_core Driver
A server/blade with an SR-IOV-capable motherboard BIOS
Mellanox ConnectX® Adapter Card family with SR-IOV capability
Hypervisor that supports SR-IOV such as: ESXi
Setting Up SR-IOV
For further information, see https://docs.vmware.com/en/VMware-vSphere/7.0/com.vmware.vsphere.networking.doc/GUID-CC021803-30EA-444D-BCBE-618E0D836B9F.html
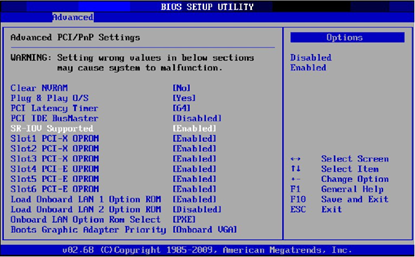
Depending on your system, perform the steps below to set up your BIOS. The figures used in this section are for illustration purposes only. For further information, please refer to the appropriate BIOS User Manual:
Enable "SR-IOV" in the system BIOS.
Configuring SR-IOV for ConnectX-4 Onward Adapter Cards
To configure SR-IOV ConnectX-4 Onward Adapter Cards, do the following steps:
Install the MLNX-NATIVE-ESX-<adapter card> driver for ESXi that supports SR-IOV.
Download the MFT package. Go to:
www.mellanox.com → Products → Software → InfiniBand/VPI Drivers → MFT (http://www.mellanox.com/page/management_tools)Install MFT.
            # esxcli software vib install -v <MST Vib>
# esxcli software vib install -v <MFT Vib>
Reboot system.
Start the mst driver.
# /opt/mellanox/bin/mst start
Check if SR-IOV is enabled in the firmware.
/opt/mellanox/bin/mlxconfig -d /dev/mst/mt4115_pciconf0 q Device #
1: ---------- Device type: ConnectX4 PCI device: /dev/mst/mt4115_pciconf0 Configurations: Current SRIOV_EN1NUM_OF_VFS8FPP_EN1If not, use mlxconfig to enable it.
mlxconfig -d /dev/mst/mt4115_pciconf0 set SRIOV_EN=
1NUM_OF_VFS=16Power cycle the server.
Set the number of Virtual Functions you need to create for the PF using the max_vfs module parameter.
esxcli system module parameters set -m nmlx5_core -p
"max_vfs=8"WarningThe number of max_vf is set per port. See the “nmlx5_core Module Parameters” table in the introduction, for more information.
Assigning a Virtual Function to a Virtual Machine in the vSphere Web Client
After you enable the Virtual Functions on the host, each of them becomes available as a PCI device.

To assign Virtual Function to a Virtual Machine in the vSphere Web Client:
Locate the Virtual Machine in the vSphere Web Client.
Select a data center, folder, cluster, resource pool, or host and click the Related Objects tab.
Click Virtual Machines and select the virtual machine from the list.
Power off the Virtual Machine.
On the Manage tab of the Virtual Machine, select Settings > VM Hardware.
Click Edit and choose the Virtual Hardware tab.
From the New Device drop-down menu, select Network and click Add.
Expand the New Network section and connect the Virtual Machine to a port group.
The virtual NIC does not use this port group for data traffic. The port group is used to extract the networking properties, for example VLAN tagging, to apply on the data traffic.From the Adapter Type drop-down menu, select SR-IOV passthrough.
From the Physical Function drop-down menu, select the Physical Adapter to back the passthrough Virtual Machine adapter.
[Optional] From the MAC Address drop-down menu, select Manual and type the static MAC address.
Use the Guest OS MTU Change drop-down menu to allow changes in the MTU of packets from the guest operating system.
Note: This step is applicable only if this feature is supported by the driver.
Expand the Memory section, select Reserve all guest memory (All locked) and click OK.
I/O memory management unit (IOMMU) must reach all Virtual Machine memory so that the passthrough device can access the memory by using direct memory access (DMA).Power on the Virtual Machine.
Install nmlx5 driver version 4.16.10-3 or above.
Install MFT version 4.7.0-42 or above
# esxcli software vib install -d MLNX-NMFT-ESX_4.
7.0.42-10EM-650.0.0.4598673.zip # rebootQuery the firmware configuration to locate the device.
            # cd /opt/mellanox/bin
# ./mlxconfig q
Device type:    ConnectX4
PCI device:     mt4115_pciconf0
Use MFT to burn the latest firmware version.
# flint -d mt4115_pciconf0 -i fw-ConnectX4-rel-12_20_1010-MCX456A-ECA_Ax-FlexBoot-
3.5.210.bin b # rebootSet the link type of one or both ports to InfiniBand.
# cd /opt/mellanox/bin # ./mlxconfig -d mt4115_pciconf0 set LINK_TYPE_P1=
1(LINK_TYPE_P2=1)WarningOne InfiniBand port per subnet must be dedicated to running the Subnet Manager (SM). Since the SM can only run on PFs, that port must be passthroughed to a VM.
Enable Ethernet PCI subclass override.
# ./mlxconfig -d mt4115_pciconf0 set ADVANCED_PCI_SETTINGS=
1# ./mlxconfig -d mt4115_pciconf0 set FORCE_ETH_PCI_SUBCLASS=1Set the "max_vfs" module parameter to the preferred number of VFs.
# esxcfg-module nmlx5_core -s
"max_vfs=2"# rebootWarningThe example above refers to a single port HBA. In case of dual port, then the "max_vfs" parameter should be “max_vfs=2,2”.
WarningInfiniBand ports are displayed on the ESXi host as “downed” uplinks and have no data path. The data path exists only for Guest OS.
Assign the InfiniBand SR-IOV VFs to the VMs.For further information on how to assign the VFs, see “Assigning a Virtual Function to a Virtual Machine in the vSphere Web Client” section.
When ESXi sets the MAC for an InfiniBand VF, the formula used to convert it to GUID is adding "FF:FE" between the 3rd and the 4th octet: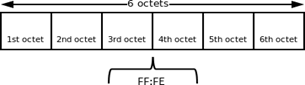
For example: null 0000018a-4dd1-d38a-adbe-fdf1cffb0000
Configure the Subnet Manager.
Passthrough an InfiniBand PF to a VM.
Create an OpenSM config file
opensm --create-config /etc/opensm.conf
Add to the opensm.conf file “virt_enabled 2”
Run OpenSM.
opensm --config /etc/opensm.conf
If configured correctly, the link state of the VFs should be “Active”.
Please refer to the Mellanox OFED User Manual for further information.
http://www.mellanox.com/related-docs/prod_software/Mellanox_OFED_Linux_Us er_Manual_v4.1.pdfWarningDo not forget to enable virtualization in the Subnet Manager configuration (see section "Configuring SR-IOV for ConnectX-4/Connect-IB (InfiniBand) "Step 7" in Mellanox OFED User Manual).
WarningCommunication of InfiniBand VFs is GID based only, and requires every message to include GRH header. Thus, when using ib_write_*/ib_send_* tools, "-x 0" option must be specified explicitly.