Advanced Features
SR-IOV configuration depends on the kernel version:
Optimal configuration may be achieved with a new kernel in which the sriov_drivers_autoprobe sysfs entry exists in /sys/bus/pci/devices/<BDF>/
Otherwise, the minimal requirement may be met if the sriov_totalvfs sysfs entry exists in /sys/bus/pci/devices/<BDF>/
After configuration is finished, no disk is expected to be exposed in the hypervisor. The disk only appears in the VM after the PCIe VF is assigned to it using the virtualization manager. If users want to use the device from the hypervisor, they must bind the PCIe VF manually.
If hot-plug is needed, the max number of VFs is limited to 250. If hot-plug is not needed then set PCI_SWITCH_EMULATION_ENABLE=0.
Hot-plug PFs do not support SR-IOV.
It is recommended to add pci=assign-busses to the boot command line when creating more than 127 VFs.
Without this option, the following errors may appear from host and the virtio driver will not probe these devices.
            pci 0000:84:00.0: [1af4:1041] type 7f class 0xffffff
pci 0000:84:00.0: unknown header type 7f, ignoring device
Zero-copy is supported on SPDK 21.07 and higher.
SNAP-direct allows SNAP applications to transfer data directly from the host memory to remote storage without using any staging buffer inside the DPU.
SNAP enables the feature according to the SPDK BDEV configuration only when working against an SPDK NVMe-oF RDMA block device.
To enable zero copy, set the environment variable (as it is enabled by default):
SNAP_RDMA_ZCOPY_ENABLE=1
For more info refer to the section SNAP Environment Variables.
NVMe/TCP Zero Copy is implemented as a custom NVDA_TCP transport in SPDK NVMe initiator and it is based on a new XLIO socket layer implementation.
The implementation is different for Tx and Rx:
The NVMe/TCP Tx Zero Copy is similar between RDMA and TCP in that the data is sent from the host memory directly to the wire without an intermediate copy to Arm memory
The NVMe/TCP Rx Zero Copy allows achieving partial zero copy on the Rx flow by eliminating copy from socket buffers (XLIO) to application buffers (SNAP). But data still must be DMA'ed from Arm to host memory.
To enable NVMe/TCP Zero Copy, use SPDK v22.05.nvda --with-xlio (v22.05.nvda or higher).
For more information about XLIO including limitations and bug fixes, refer to the NVIDIA Accelerated IO (XLIO) Documentation.
To enable the SNAP TCP XLIO Zero Copy, set the environment variables and resources in the YAML file:
            resources:
  requests:
    memory: "4Gi"
    cpu: "8"
  limits:
    hugepages-2Mi: "4Gi"
    memory: "6Gi"
    cpu: "16"

## Set according to the local setup
env:
  - name: APP_ARGS
    value: "--wait-for-rpc"
  - name: SPDK_XLIO_PATH
    value: "/usr/lib/libxlio.so"
NVMe/TCP XLIO requires DPU OS hugepage size of 4G (i.e., 2G more hugepages than non-XLIO). For information on configuring the hugepages, refer to sections "Step 1: Allocate Hugepages" and "Adjusting YAML Configuration".
At high scale, it is required to use the global variable XLIO_RX_BUFS=4096 even though it leads to high memory consumption. Using XLIO_RX_BUFS=1024 requires lower memory consumption but limits the ability to scale the workload.
For more info refer to the section SNAP Environment Variables.
Expose an NVMe-oF subsystem with one namespace by using a TCP transport type on the remote SPDK target.
            [dpu] spdk_rpc.py sock_set_default_impl -i xlio
[dpu] spdk_rpc.py framework_start_init
[dpu] spdk_rpc.py bdev_nvme_attach_controller -b nvme0 -t nvda_tcp -a 3.3.3.3 -f ipv4 -s 4420 -n nqn.2023-01.io.nvmet
[dpu] snap_rpc.py spdk_bdev_create nvme0n1
[dpu] snap_rpc.py nvme_subsystem_create --nqn nqn.2023-01.com.nvda:nvme:0
[dpu] snap_rpc.py nvme_namespace_create -b nvme0n1 -n 1 --nqn nqn. 2023-01.com.nvda:nvme:0
[dpu] snap_rpc.py nvme_controller_create --nqn nqn.2023-01.com.nvda:nvme:0 --pf_id 0 --num_queues 16
[dpu] snap_rpc.py nvme_controller_attach_ns -c NVMeCtrl2 -n 1

[host] modprobe -v nvme
[host] fio --filename /dev/nvme0n1 --rw randrw --name=test-randrw --ioengine=libaio --iodepth=64 --bs=4k --direct=1 --numjobs=1 --runtime=63 --time_based --group_reporting --verify=md5
For more information on XLIO, please refer to XLIO documentation.
Live migration is a standard process supported by QEMU which allows system administrators to pass devices between virtual machines in a live running system. For more information, refer to QEMU VFIO Device Migration documentation.
Live migration is supported for SNAP virtio-blk devices. It can be activated using a driver with proper support (e.g., NVIDIA's proprietary vDPA-based Live Migration Solution).
snap_rpc.py virtio_blk_controller_create --dbg_admin_q …
Live upgrade allows upgrading the SNAP image a container is using without SNAP container downtime.
Live Upgrade Prerequisites
To enable live upgrade, perform the following modifications:
Allocate resources:
Allocate additional 2Gi hugepages.
Make sure the requested amount of CPU cores is available.
The default YAML configuration sets the container to request a CPU core range of 8-16. This means that the container is not deployed if there are fewer than 8 available cores, and if there are 16 free cores, the container utilizes all 16.
For instance, if a container is currently using all 16 cores and, during a live upgrade, an additional SNAP container is deployed. In this case, each container uses 8 cores during the upgrade process. Once the source container is terminated, the destination container starts utilizing all 16 cores.
WarningFor 8-core DPUs, the .yaml must be edited to the range of 4-8 CPU cores.
Change the name of the doca_snap.yaml file that describes the destination container (e.g., doca_snap_new.yaml ) so as to not overwrite the running container .yaml.
Change the name of the new .yaml pod in line 16 (e.g., snap-new).
Live Upgrade Flow
The way to live upgrade the SNAP image is to move the SNAP controllers and SPDK block devices between different containers while minimizing the duration of the host VMs impact.
Source container – the running container before live upgrade
Destination container – the running container after live upgrade
SNAP Container Live Upgrade Procedure
Follow the steps in section "Live Upgrade Prerequisites" and deploy the destination SNAP container using the modified yaml file.
Query the source and destination containers:
crictl ps -r
Query the active SPDK bdevs and SNAP objects in the source container using SPDK and SNAP RPCs. To post RPCs use the crictl tool:
            crictl exec -it <container-id X> snap_rpc.py <RPC-method>
crictl exec -it <container-id Y> spdk_rpc.py <RPC-method>
Run the live upgrade algorithm to move all active objects from the source container to the destination container.
Delete the source container.
WarningTo automate the SNAP configuration (e.g., following failure or reboot) as explained in section "Automate SNAP Configuration (Optional)", spdk_rpc_init.conf and snap_rpc_init.conf must not include any configs as part of the live upgrade. Then, once the transition to the new container is done, spdk_rpc_init.conf and snap_rpc_init.conf can be modified with the desired configuration.
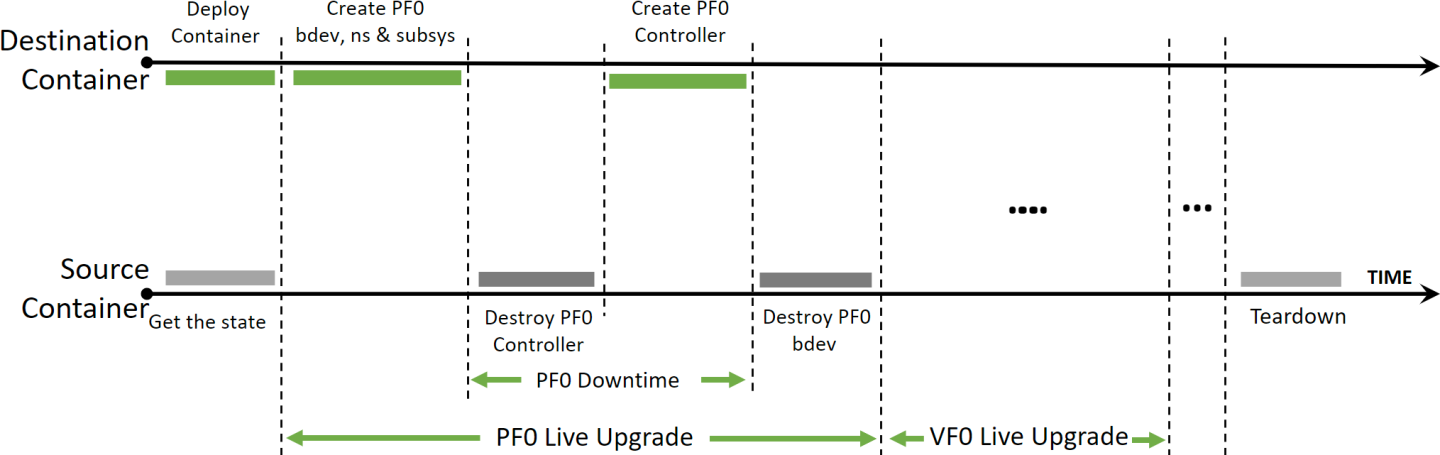
SNAP Container Live Upgrade Algorithm
The goal is to shorten the downtime between each emulation function.
Downtime is the period when the controller is deleted in the source container until it is recreated in the destination container. The fact that each function can be linked to only one controller at a time across all containers on the DPU, mandates that the deletion and creation operations are performed serially.
The rest of the objects (i.e., subsystems, namespaces, and bdevs) do not have this limitation. Therefore, several instances can be opened for each object at the same time.
A hot-plugged PCIe function remains persistent through different SNAP containers, until it is either explicitly unplugged or the system goes through a cold reboot. Therefore, Live Upgrade for Hotplug emulation functions is the same as physical emulation functions.
If shared SNAP objects (subsystems and namespaces) and BDEVs are used:
The simple approach is to create the objects in the destination container before running the algorithm, and to delete them in source container after running the algorithm
A more advanced solution is to create the objects in the destination container at first appearance and to delete them when they are no longer used in the source container
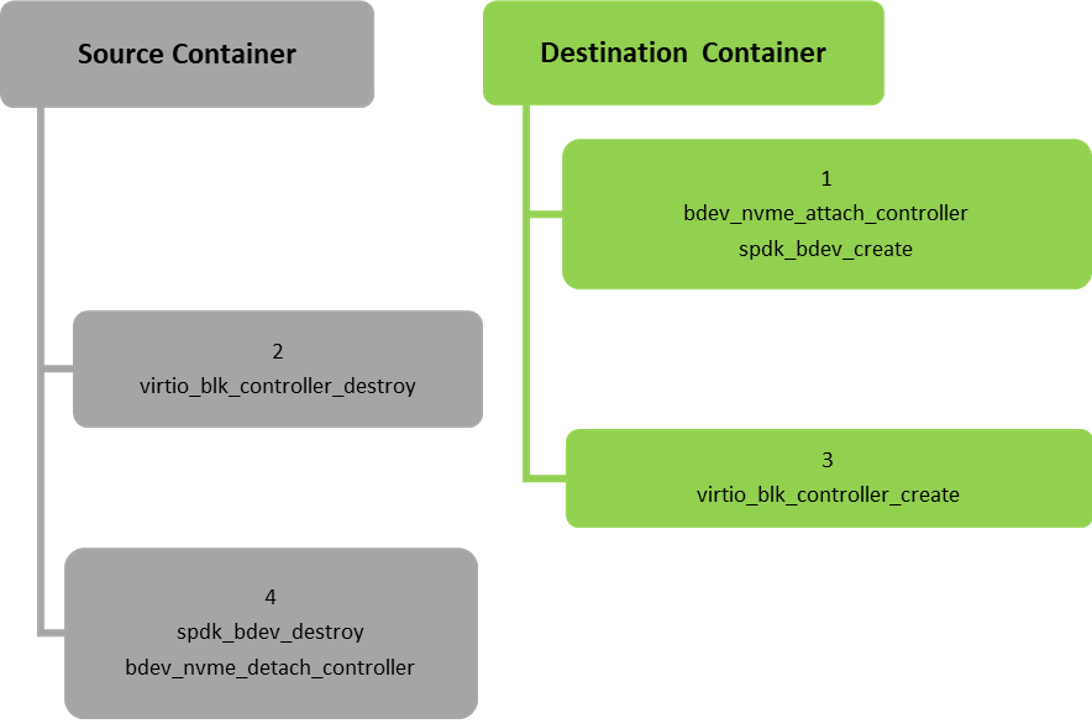
Live Upgrade Algorithm for Virtio-blk Emulation Functions
Iterate over the virtio-blk physical emulation functions (PF), for each PF:
If the PF's controller is attached to a bdev, create in advance the same bdev in the destination container. This does not impact the source PF but shortens down time for the specific function.
Destroy the PF's virtio-blk controller in the source container.
Create the same virtio-blk controller in the destination container. Once this step is complete, the down time of the function ends.
Delete the bdev in the source container if one exists.
For each of the virtio-blk virtual emulation functions of the PFs, perform steps 1-4 but for VFs instead of PFs.
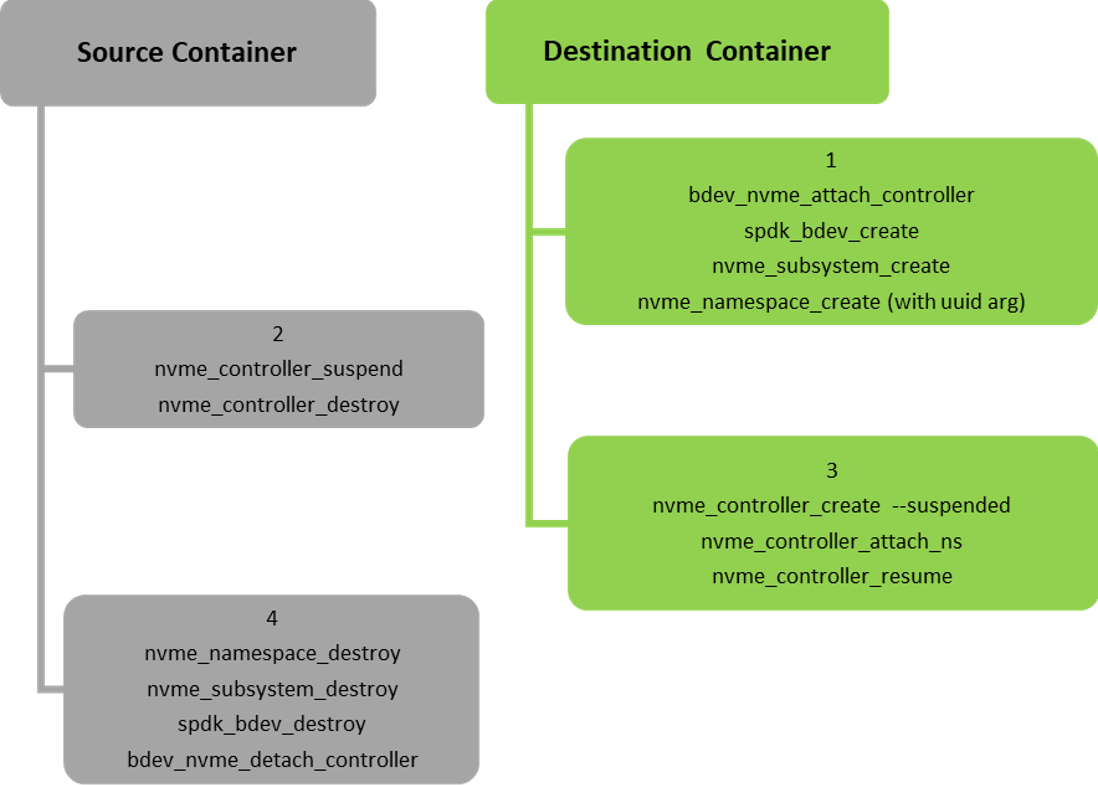
Live Upgrade Algorithm for NVMe Emulation Functions
Iterate over the NVMe physical emulation functions (PF), for each PF:
Create in advance the subsystem, bdevs and namespaces (with the same uuid in the source container namespace) to be used by the PF's controller in destination container. This does not impact the source container or the source PF but shortens the down time for the specific function.
Suspend the PF's NVMe controller in the source container then destroy it.
Create the PF's NVMe controller in the destination container with the suspended flag and attach it to the namespaces and resume it. Once this step is complete, the down time of the function ends.
Clean up the unused objects in source container.
For each of the NVMe virtual emulation functions of the PFs, perform steps 1-4 but for VFs instead of PFs.
Message Signaled Interrupts eXtended (MSIX) is an interrupt mechanism that allows devices to use multiple interrupt vectors, providing more efficient interrupt handling than traditional interrupt mechanisms such as shared interrupts. In Linux, MSIX is supported in the kernel and is commonly used for high-performance devices such as network adapters, storage controllers, and graphics cards. MSIX provides benefits such as reduced CPU utilization, improved device performance, and better scalability, making it a popular choice for modern hardware.
However, proper configuration and management of MSIX interrupts can be challenging and requires careful tuning to achieve optimal performance, especially in a multi-function environment as SR-IOV.
By default, BlueField distributes MSIX vectors evenly between all virtual PCI functions (VFs). This approach is not optimal as users may choose to attach VFs to different VMs, each with a different number of resources. Dynamic MSIX management allows the user to manually control of the number of MSIX vectors provided per each VF independently.
Configuration and behavior are similar for all emulation types, and specifically NVMe and virtio-blk.
Dynamic MSIX management is built from several configuration steps:
PF controller must be opened with dynamic MSIX management enabled.
At this point, and in any other time in the future when no VF controllers are opened (sriov_numvfs=0), all PF-related MSIX vectors can be reclaimed from the VFs to the PF's free MSIX pool.
User must take some of the MSIX from the free pool and give them to a certain VF during VF controller creation.
When destroying a VF controller, the user may choose to release its MSIX back to the pool.
Once configured, the MSIX link to the VFs remains persistent and may change only in the following scenarios:
User explicitly requests to return VF MSIXs back to the pool during controller destruction.
PF explicitly reclaims all VF MSIXs back to the pool.
Arm reboot (FE reset/cold boot) has occurred.
To emphasize, the following scenarios do not change MSIX configuration:
Application restart/crash.
Closing and reopening PF/VFs without dynamic MSIX support.
The following is an NVMe example of dynamic MSIX configuration steps (similar configuration also applies for virtio-blk):
Open controller on PF with dynamic MSIX capability:
snap_rpc.py nvme_controller_create_ --dynamic_msix …
Reclaim all MSIX from VFs to PF's free MSIX pool:
snap_rpc.py nvme_controller_vfs_msix_reclaim <CtrlName>
Query controllers list to get information about how many MSIX are returned to the pool:
            # snap_rpc.py nvme_controller_list -c <CtrlName>
…     'num_free_msix': N,
…
Set SR-IOV on the host driver:
# echo <N> > /sys/bus/pci/devices/<BDF>/sriov_numvfs
Distribute MSIX between VFs during their creation process:
snap_rpc.py nvme_controller_create_ --vf_num_msix <n> …
Upon VF teardown, release MSIX back to the free pool:
snap_rpc.py nvme_controller_destroy_ --release_msix …
WarningIt is highly advised to open all VF controllers in SNAP in advance before binding VFs to the host/guest driver. That way, for example in case of a configuration mistake which does not leave enough MSIX for all VFs, the configuration remains reversible as MSIX is still modifiable. Otherwise, the driver may try to use the already-configured VFs before all VF configuration has finished but will not be able to use all of them (due to lack of MSIX). The latter scenario may result in host deadlock which, at worst, can be recovered only with cold boot.
WarningThere are several ways to configure dynamic MSIX safely (without VF binding):
Disable kernel driver automatic VF binding to kernel driver:
# echo 0 > /sys/bus/pci/devices/sriov_driver_autoprobe
After finishing MSIX configuration for all VFs, they can then be bound to VMs, or even back to the hypervisor:
echo "0000:01:00.0" > /sys/bus/pci/drivers/nvme/bind
Use VFIO driver (instead of kernel driver) for SR-IOV configuration.
For example:
            # echo 0000:af:00.2 > /sys/bus/pci/drivers/vfio-pci/bind				# Bind PF to VFIO driver
# echo 1 >  /sys/module/vfio_pci/parameters/enable_sriov
# echo <N> > /sys/bus/pci/drivers/vfio-pci/0000:af:00.2/sriov_numvfs	# Create VFs device for it
With Linux environment on host OS, additional kernel boot parameters may be required to support SNAP related features:
To use SR-IOV:
For Intel, "intel_iommu=on iommu=on" must be added
For AMD, "amd_iommu=on iommu=on" must be added
To use PCIe hotplug, pci=realloc must be added
modprobe.blacklist=virtio_blk for non-built in virtio-blk driver
To view boot parameter values, use the command cat /proc/cmdline.
It is recommended to use the following with virtio-blk:
[dpu] cat /proc/cmdline BOOT_IMAGE … pci=realloc modprobe.blacklist=virtio_blk
To enable VFs (virtio_blk/NVMe):
echo 125 > /sys/bus/pci/devices/0000\:27\:00.4/sriov_numvfs
Intel Server Performance Optimizations
            cat /proc/cmdline
BOOT_IMAGE=(hd0,msdos1)/vmlinuz-5.15.0_mlnx root=UUID=91528e6a-b7d3-4e78-9d2e-9d5ad60e8273 ro crashkernel=auto resume=UUID=06ff0f35-0282-4812-894e-111ae8d76768 rhgb quiet iommu=pt intel_iommu=on pci=realloc modprobe.blacklist=virtio_blk
AMD Server Performance Optimizations
            cat /proc/cmdline
cat /proc/cmdline BOOT_IMAGE=(hd0,msdos1)/vmlinuz-5.15.0_mlnx root=UUID=91528e6a-b7d3-4e78-9d2e-9d5ad60e8273 ro crashkernel=auto resume=UUID=06ff0f35-0282-4812-894e-111ae8d76768 rhgb quiet iommu=pt amd_iommu=on pci=realloc modprobe.blacklist=virtio_blk