Appendix – Software Upgrade Provisioning Flow
This appendix details the steps for provisioning software components on the NVIDIA® BlueField®-3 DPU.
The procedure for DPU BMC software upgrade is agnostic to the version of the software. Once upgraded, however, the procedure assumes you to be running the latest BMC software.
This workflow guarantees the most current software to be installed on various components of the BlueField-3 DPU. This includes:
DPU BMC
CEC
Arm ATF
Arm UEFI
Arm OS
NIC firmware
The process aims to ensure that all these components are up to date.
The following high-level flow diagram outlines the expected steps to be followed throughout the process:
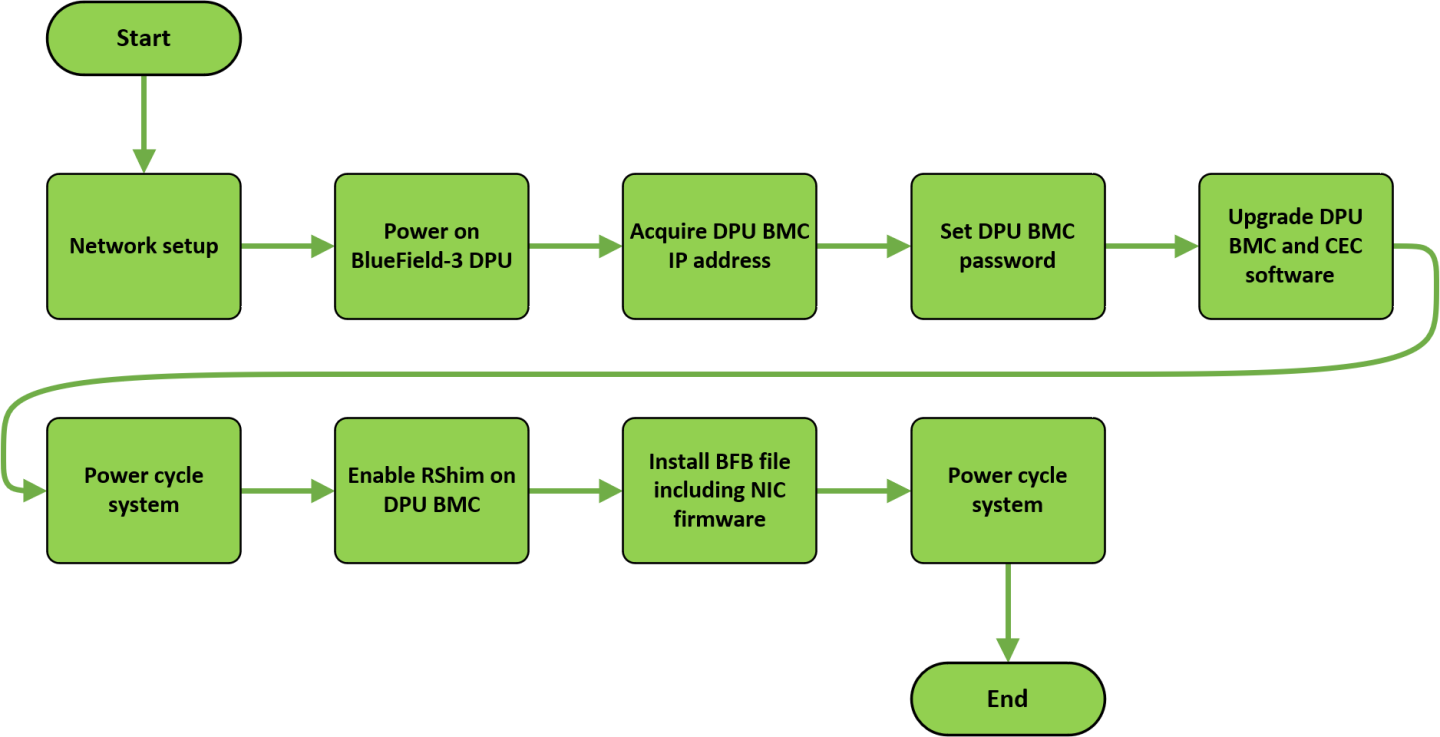
Establish a connection between the onboard RJ-45 network interface and the management network. Refer to section "Network Protocol Support" for detailed instructions on network connectivity.
Power on the BlueField DPU. This can be accomplished manually or by utilizing either ipmitool or Redfish commands directed at the host's BMC.
IPMItool example:
ipmitool -H <bmc_ip_or_hostname> -U <username> -P <password> power on
Replace the parameters with the information relevant for your host BMC.
Redfish example:
curl -X POST -k -u root:<password> -H "Content-Type: application/json" -d '{"ResetType": "On"}' https://<bmc_ip>/redfish/v1/Systems/<System_ID>/Actions/ComputerSystem.Reset
Replace the parameters with the information relevant for your host BMC.
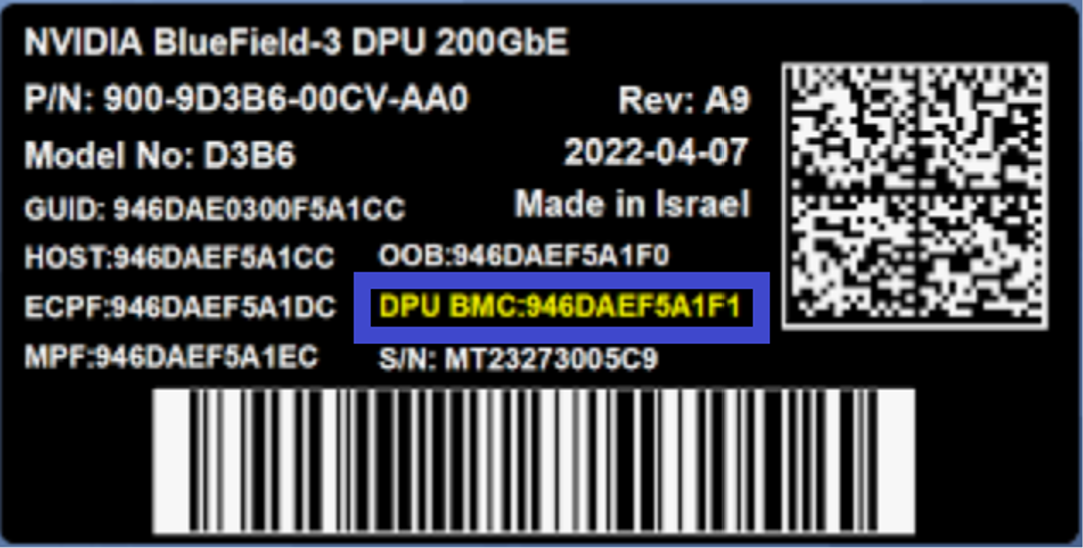
Acquire the DPU BMC's MAC address from the label affixed to the DPU (highlighted in the image). Use the DPU BMC's MAC address to retrieve the assigned IP address from the DHCP server to enable communication with the DPU BMC over the network.
If the BlueField-3 DPU is a new device which has not yet been provisioned, the DPU BMC comes from the factory with a default password (0penBmc). To establish communication with the DPU BMC, you must change the default password. Refer to section "Changing Default Password" for instructions on changing the default password of the DPU-BMC.
Upgrade DPU BMC and CEC software. This step is crucial for guaranteeing that all new features and functionalities are available on your device. Refer to section "BMC and CEC Firmware Update" for instructions on how to do that.
Power cycle the host. This can be accomplished by utilizing either ipmitool or Redfish commands directed at the host's BMC:
IPMItool example:
ipmitool -H <bmc_ip_or_hostname> -U <username> -P <password> power cycle
Replace the parameters with the information relevant for your host BMC.
Redfish example:
curl -k -u root:<password> -X POST "https://<host_bmc_ip>/redfish/v1/Systems/1/Actions/ComputerSystem.Reset" -d '{"ResetType": "ForceRestart"}'
Replace the parameters with the information relevant for your host BMC.
Ensure that the RShim is disconnected from the host to enable the DPU BMC to take ownership of it. To achieve this, follow the following steps in section "Enabling RShim on BMC" under "Installing BFB".
Install the BFB file and NIC firmware.
            # echo WITH_NIC_FW_UPDATE=yes > bf.cfg
# cat <path_to_bfb> bf.cfg > new.bfb
Follow the instructions provided in the BFB image transfer guidelines provided in section "Transferring BFB Image" under "Installing BFB" while utilizing the newly created BFB file, new.bfb.
To ensure that the new NIC firmware takes effect, perform a final power cycle of the system as detailed in step 6.