Live Migration
Virtio VF PCIe devices can be attached to the guest VM using vhost acceleration software stack. This enables performing live migration of guest VMs.
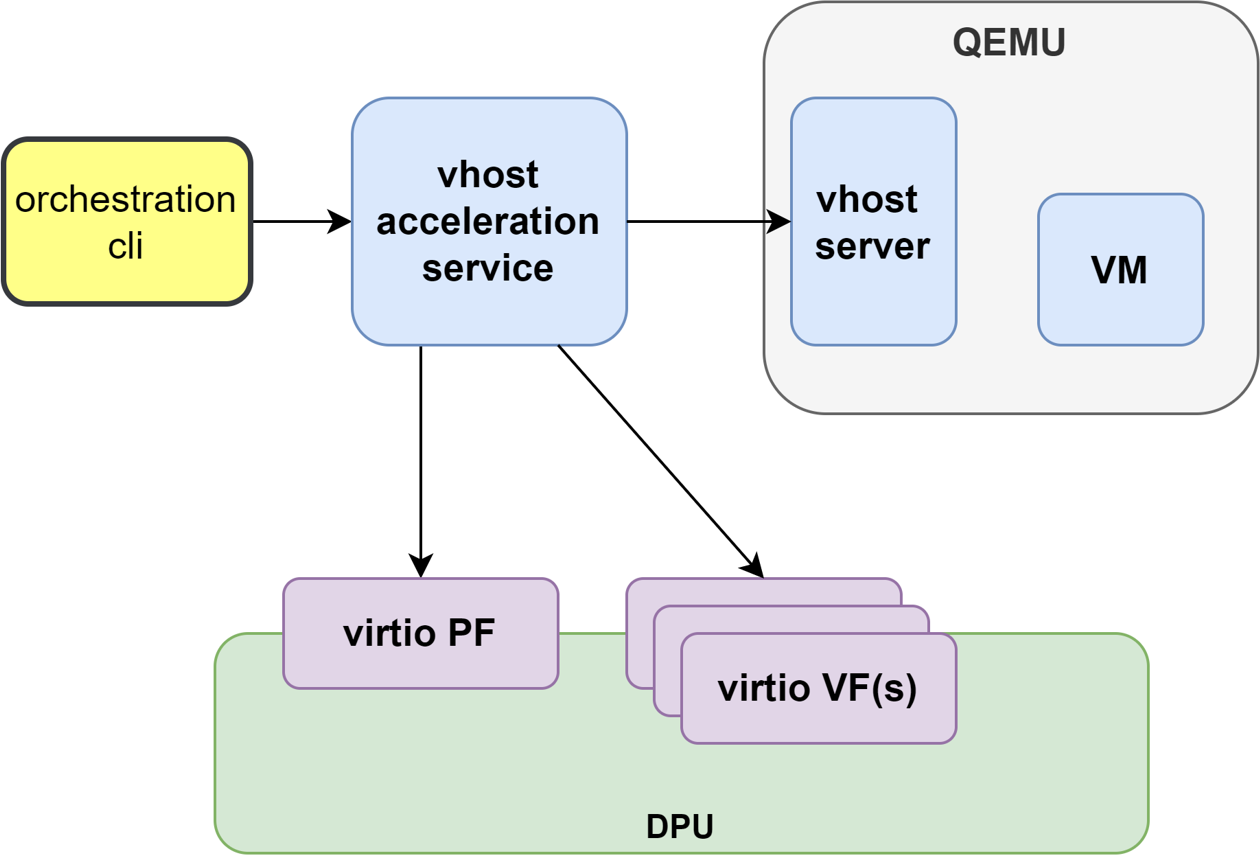
This section describes the steps to enable VM live migration using virtio VF PCIe devices along with vhost acceleration software.
Virtio VF PCIe devices can be attached to the guest VM using the vhost acceleration software stack. This enables performing live migration of guest VMs.

This section provides the steps to enable VM live migration using virtio VF PCIe devices along with vhost acceleration software.

Prerequisites
Minimum hypervisor kernel version – Linux kernel 5.7 (for VFIO SR-IOV support)
To use high-availability (the additional vfe-vhostd-ha service which can persist datapath when vfe-vhostd crashes), this kernel patch must be applied.
Install vHost Acceleration Software Stack
Vhost acceleration software stack is built using open-source BSD licensed DPDK.
To install vhost acceleration software:
Clone the software source code:
[host]# git clone https://github.com/Mellanox/dpdk-vhost-vfe
InfoThe latest release tag is vfe-1.2.
Build software:
            [host]# apt-get install libev-dev
[host]# yum install -y numactl-devel libev-devel
[host]# meson build --debug -Denable_drivers=vdpa/virtio,common/virtio,common/virtio_mi,common/virtio_ha
[host]# ninja -C build install
To install QEMU:
InfoUpstream QEMU later than 8.1 can be used or the following NVIDIA QEMU.
Clone NVIDIA QEMU sources.
[host]# git clone https://github.com/Mellanox/qemu -b stable-8.1-presetup
InfoLatest release tag is vfe-0.6.
Build NVIDIA QEMU.
            [host]# mkdir bin
[host]# cd bin
[host]# ../configure --target-list=x86_64-softmmu --enable-kvm
[host]# make -j24
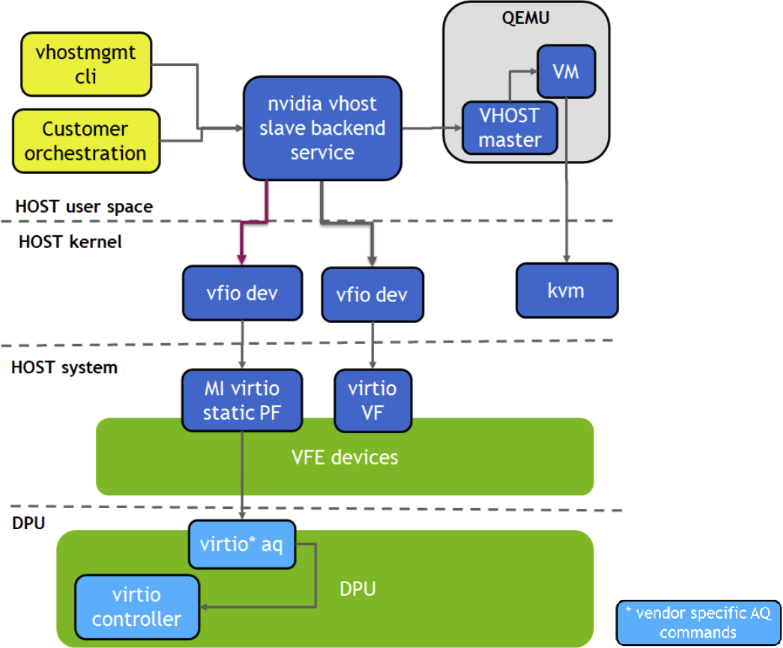
Configure vHost and DPU System
Configure BlueField for virtio-net. Please refer to Virtio-net Deployment for reference of mlxconfig.
Set up the hypervisor system:
Configure hugepages and libvirt VM XML. See OVS-Kernel Hardware Offloads for information on doing that.
Enable qemu:commandline in VM XML by adding the xmlns:qemu option:
<
domaintype='kvm'xmlns:qemu='http://libvirt.org/schemas/domain/qemu/1.0'>Enable 1GB hugepage in VM XML by adding memoryBacking and numa sections:
<
currentMemoryunit='KiB'>8388608</currentMemory> <memoryBacking> <hugepages> <pagesize='1048576'unit='KiB'/> </hugepages> </memoryBacking> <vcpuplacement='static'>16</vcpu> <!-- ...... --> <cpumode='host-passthrough'check='none'migratable='on'> <numa> <cellid='0'cpus='0-15'memory='8388608'unit='KiB'memAccess='shared'/> </numa> </cpu>Add a virtio-net interface in VM XML.
<
qemu:commandline> <qemu:argvalue='-chardev'/> <qemu:argvalue='socket,id=char0,path=/tmp/vhost-net0,server=on'/> <qemu:argvalue='-netdev'/> <qemu:argvalue='type=vhost-user,id=vdpa,chardev=char0,queues=4'/> <qemu:argvalue='-device'/> <qemu:argvalue='virtio-net-pci,netdev=vdpa,mac=00:00:00:00:33:00,vectors=10,page-per-vq=on,rx_queue_size=1024,tx_queue_size=1024,mq=on,bus=pci.0,addr=0x9'/> </qemu:commandline>
Run vHost Acceleration Service
Bind the virtio PF devices to the vfio-pci driver:
            [host]# modprobe vfio vfio_pci
[host]# echo 1 > /sys/module/vfio_pci/parameters/enable_sriov
[host]# echo 0x1af4 0x1041 > /sys/bus/pci/drivers/vfio-pci/new_id
[host]# echo 0x1af4 0x1042 > /sys/bus/pci/drivers/vfio-pci/new_id
[host]# echo <pf_bdf> > /sys/bus/pci/drivers/vfio-pci/bind
[host]# echo <vf_bdf> > /sys/bus/pci/drivers/vfio-pci/bind
[host]# lspci -vvv -s <pf_bdf> | grep "Kernel driver"
Kernel driver in use: vfio-pci
[host]# lspci -vvv -s <vf_bdf> | grep "Kernel driver"
Kernel driver in use: vfio-pci
InfoExample of <pf_bdf> or <vf_bdf> format: 0000:af:00.3
Enable SR-IOV and create a VF(s):
            [host]# echo 1 > /sys/bus/pci/devices/<pf_bdf>/sriov_numvfs
[host]# echo 1 > /sys/bus/pci/devices/<vf_bdf>/sriov_numvfs
[host]# lspci | grep Virtio <vf_bdf>
0000:af:00.1 Ethernet controller: Red Hat, Inc. Virtio network device
0000:af:00.3 Ethernet controller: Red Hat, Inc. Virtio network device
Add a VF representor to the OVS bridge on the BlueField:
            [DPU]# virtnet query -p 0 -v 0 | grep sf_rep_net_device
"sf_rep_net_device": "en3f0pf0sf3000",
[DPU]# ovs-vsctl add-port ovsbr1 en3f0pf0sf3000
Run the vhost acceleration software service:
            [host]# cd dpdk-vhost-vfe
[host]# sudo ./build/app/dpdk-vfe-vdpa -a 0000:00:00.0 --log-level=.,8 --vfio-vf-token=cdc786f0-59d4-41d9-b554-fed36ff5e89f -- --client
Or start the vfe-vhostd service:
[host]# systemctl start vfe-vhostd
InfoA log of the service can be viewed by running the following:
[host]# journalctl -u vfe-vhostd
Provision the virtio-net PF and VF:
            [host]# cd dpdk-vhost-vfe
[host]# python ./app/vfe-vdpa/vhostmgmt mgmtpf -a <pf_bdf>
# Wait on virtio-net-controller finishing handle PF FLR

# On DPU, change VF MAC address or other device options
[DPU]# virtnet modify -p 0 -v 0 device -m 00:00:00:00:33:00

# Add VF into vfe-dpdk
[host]# python ./app/vfe-vdpa/vhostmgmt vf -a 0000:af:04.5 -v /tmp/vhost-net0
NoteIf the SR-IOV is disabled and reenabled, the user must re-provision the VFs. 00:00:00:00:33:00 is a virtual MAC address used in VM XML.
Start the VM
[host]# virsh start <vm_name>
HA Service
Running the vfe-vhostd-ha service allows the datapath to persist should vfe-vhostd crash:
[host]# systemctl start vfe-vhostd-ha
Simple Live Migration
Prepare two identical hosts and perform the provisioning of the virtio device to DPDK on both.
Boot the VM on one server:
[host]# virsh migrate --verbose --live --persistent <vm_name> qemu+ssh://<dest_node_ip_addr>/system --unsafe
Remove Device
When finished with the virtio devices, use following commands to remove them from DPDK:
            [host]# python ./app/vfe-vdpa/vhostmgmt vf -r <vf_bdf>
[host]# python ./app/vfe-vdpa/vhostmgmt mgmtpf -r <pf_bdf>