RDG for Accelerated K8s Cluster over NVIDIA DGX A100 Servers and 200Gbps Ethernet Network Fabric
Created on May 15, 2022.
Scope
The following Reference Deployment Guide (RDG) guides you through setting up a highly available GPU and Network accelerated Kubernetes (K8s) cluster over 200Gb/s NVIDIA network. A high availability cluster consists of multiple control plane nodes (K8s master nodes), multiple worker nodes (DGX A100 servers) and a load balancer application (HAProxy). This guide provides examples on how-to run ML/DL applications over NVIDIA DGX A100 server platform with Kubeflow training operators.
Abbreviations and Acronyms
|
Term |
Definition |
Term |
Definition |
|
CNI |
Container Network Interface |
NFD |
Node Feature Discovery |
|
CR |
Custom Resources |
NCCL |
NVIDIA Collective Communication Library |
|
CRD |
Custom Resources Definition |
OCI |
Open Container Initiative |
|
CRI |
Container Runtime Interface |
PF |
Physical Function |
|
DHCP |
Dynamic Host Configuration Protocol |
QSG |
Quick Start Guide |
|
DNS |
Domain Name System |
RDG |
Reference Deployment Guide |
|
DL |
Deep Learning |
RDMA |
Remote Direct Memory Access |
|
DP |
Device Plugin |
RoCE |
RDMA over Converged Ethernet |
|
IPAM |
IP Address Management |
SR-IOV |
Single Root Input Output Virtualization |
|
K8s |
Kubernetes |
TF |
TensorFlow |
|
LLDP |
Link Layer Discovery Protocol |
VF |
Virtual Function |
|
ML |
Machine Learning |
Introduction
Provisioning the highly available Kubernetes cluster to run ML/DL applications workloads may become an extremely complicated task.
This guide provides a complete solution cycle of K8s cluster deployment including technology overview, design, component selection, deployment steps and ML/DL workload examples.
The solution will be delivered on top of standard servers for control plane and DGX A100 servers as K8s worker nodes. The
NVIDIA 200Gb/s end-to-end Ethernet infrastructure is used to handle the workload while 100Gb/s network is used as a primary network.
In this guide, we use the NVIDIA GPU Operator and the NVIDIA Network Operator, who are responsible for deploying and configuring GPU and Network components in the K8s cluster. These components allow you to accelerate ML/DL tasks using CUDA, RDMA and GPUDirect technologies.
A Greenfield deployment is assumed for this guide.
This guide shows the design of a K8s cluster with two to eight Worker Nodes and
supplies detailed instructions for deploying a four K8s Worker Nodes cluster.
References
Solution Architecture
Key Components and Technologies
- NVIDIA DGX™ A100 is the universal system for all AI workloads, offering unprecedented compute density, performance, and flexibility in the world’s first 5 petaFLOPS AI system. NVIDIA DGX A100 features the world’s most advanced accelerator, the NVIDIA A100 Tensor Core GPU, enabling enterprises to consolidate training, inference, and analytics into a unified, easy-to-deploy AI infrastructure that includes direct access to NVIDIA AI experts.
NVIDIA ConnectX SmartNICs
10/25/40/50/100/200 and 400G Ethernet Network Adapters
The industry-leading NVIDIA® ConnectX® family of smart network interface cards (SmartNICs) offer advanced hardware offloads and accelerations.
NVIDIA Ethernet adapters enable the highest ROI and lowest Total Cost of Ownership for hyperscale, public and private clouds, storage, machine learning, AI, big data, and telco platforms.
The NVIDIA® LinkX® product family of cables and transceivers provides the industry’s most complete line of 10, 25, 40, 50, 100, 200, and 400GbE in Ethernet and 100, 200 and 400Gb/s InfiniBand products for Cloud, HPC, hyperscale, Enterprise, telco, storage and artificial intelligence, data center applications.
NVIDIA Spectrum Ethernet Switches
Flexible form-factors with 16 to 128 physical ports, supporting 1GbE through 400GbE speeds.
Based on a ground-breaking silicon technology optimized for performance and scalability, NVIDIA Spectrum switches are ideal for building high-performance, cost-effective, and efficient Cloud Data Center Networks, Ethernet Storage Fabric, and Deep Learning Interconnects.
NVIDIA combines the benefits of NVIDIA Spectrum™ switches, based on an industry-leading application-specific integrated circuit (ASIC) technology, with a wide variety of modern network operating system choices, including NVIDIA Cumulus® Linux , SONiC and NVIDIA Onyx®.
NVIDIA® Cumulus® Linux is the industry's most innovative open network operating system that allows you to automate, customize, and scale your data center network like no other.
Kubernetes
Kubernetes is an open-source container orchestration platform for deployment automation, scaling, and management of containerized applications.
Kubespray
Kubespray is a composition of Ansible playbooks, inventory, provisioning tools, and domain knowledge for generic OS/Kubernetes clusters configuration management tasks and provides:A highly available cluster
Composable attributes
Support for most popular Linux distributions
The NVIDIA GPU Operator uses the operator framework within Kubernetes to automate the management of all NVIDIA software components needed to provision GPU. These components include the NVIDIA drivers (to enable CUDA), Kubernetes device plugin for GPUs, the NVIDIA Container Runtime, automatic node labelling, DCGM-based monitoring, and more.
An analog to the NVIDIA GPU Operator, the NVIDIA Network Operator simplifies scale-out network design for Kubernetes by automating aspects of network deployment and configuration that would otherwise require manual work. It loads the required drivers, libraries, device plugins, and CNIs on any cluster node with an NVIDIA network interface. Paired with the NVIDIA GPU Operator, the Network Operator enables GPUDirect RDMA, a key technology that accelerates cloud-native AI workloads by orders of magnitude. The NVIDIA Network Operator uses Kubernetes CRD and the Operator Framework to provision the host software needed for enabling accelerated networking.
CUDA® is a parallel computing platform and programming model developed by NVIDIA for general computing on graphical processing units (GPUs). With CUDA, developers can dramatically speed up computing applications by harnessing the power of GPUs. In GPU-accelerated applications, the sequential part of the workload runs on the CPU – which is optimized for single-threaded performance – while the compute-intensive portion of the application runs on thousands of GPU cores in parallel.
RDMA is a technology that allows computers in a network to exchange data without involving the processor, cache or operating system of either computer.
Like locally based DMA, RDMA improves throughput and performance and frees up compute resources.
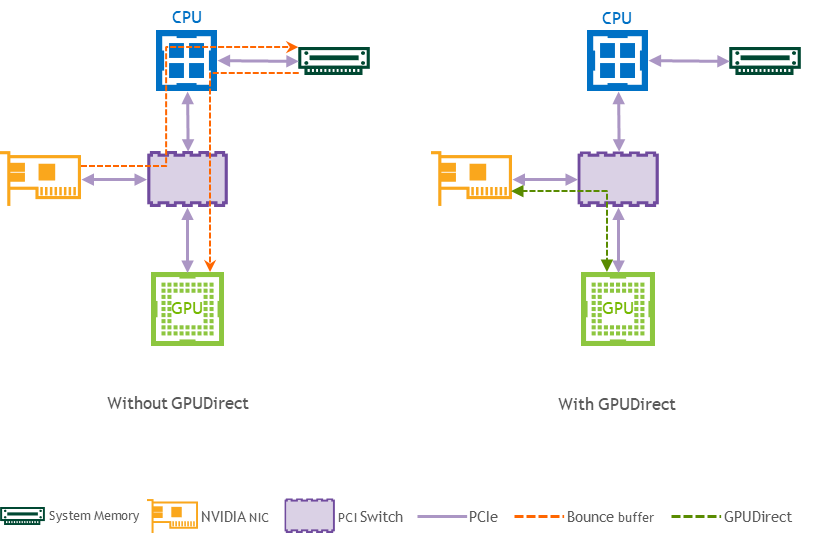
GPUDirect (GDR) RDMA provides a direct P2P (Peer-to-Peer) data path between the GPU memory directly to and from NVIDIA HCA devices. This reduces GPU-to-GPU communication latency and completely offloads the CPU, removing it from all GPU-to-GPU communications across the network.
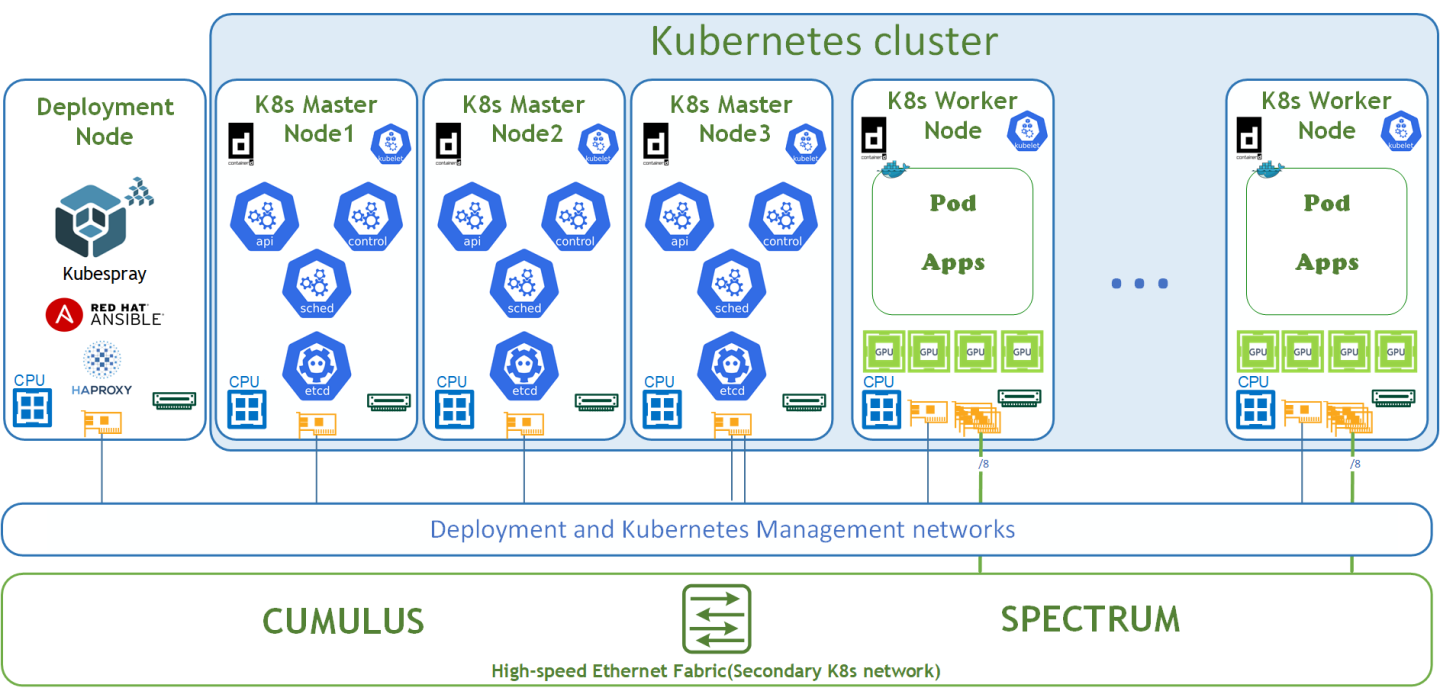
Logical Design
The logical design includes the following parts:
Deployment node running Kubespray that deploys Kubernetes clusters and HAProxy load-balancer
K8s Master nodes running all Kubernetes management components
NVIDIA DGX A100 K8s Worker nodes
High-speed Ethernet fabric (Secondary K8s network with RoCE support)
Deployment and K8s Management networks
Network / Fabric Design
The high-performance network is a secondary network for Kubernetes cluster and requires the L2 network topology.
This RDG describes two options with multiple K8s Worker Nodes:
Design for 2-4 Worker Nodes
In this solution, all K8s Worker Nodes are connected to a single switch, which provides a K8s secondary network.Design for 5-8 Worker Nodes
In this solution, all K8s Worker Nodes are connected to two independent switches, which provide a K8s secondary network.
The Deployment and Kubernetes Management networks are parts of the IT infrastructure and are beyond the scope of this document.
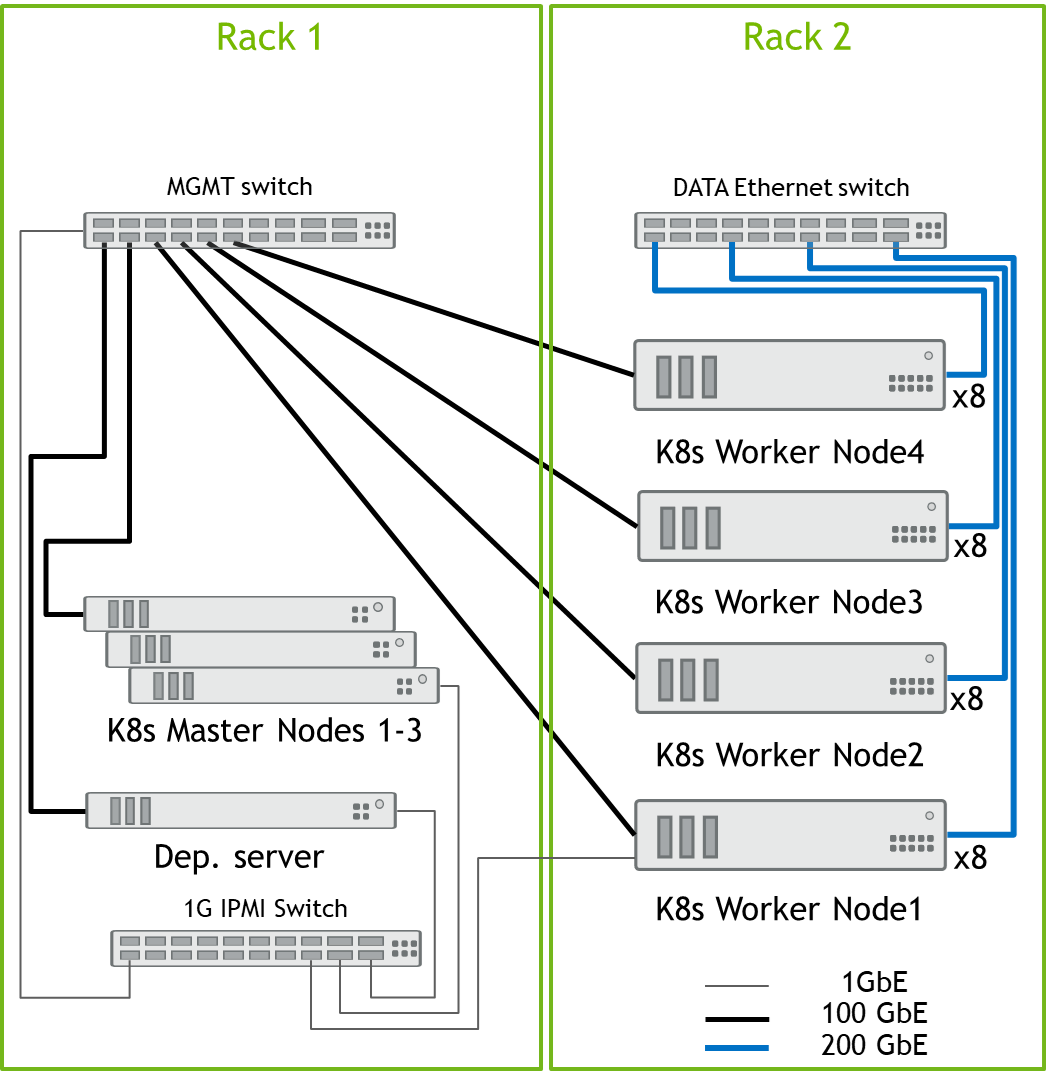
Design for K8s Cluster of 2-4 Worker Nodes
All Nodes are connected to the MGMT switch by a single 100GbE cable, and all Data port from the K8s worker nodes are connected to Data switch by 200GbE cables. All server remote management ports and switch management ports are connected to 1GbE switch.
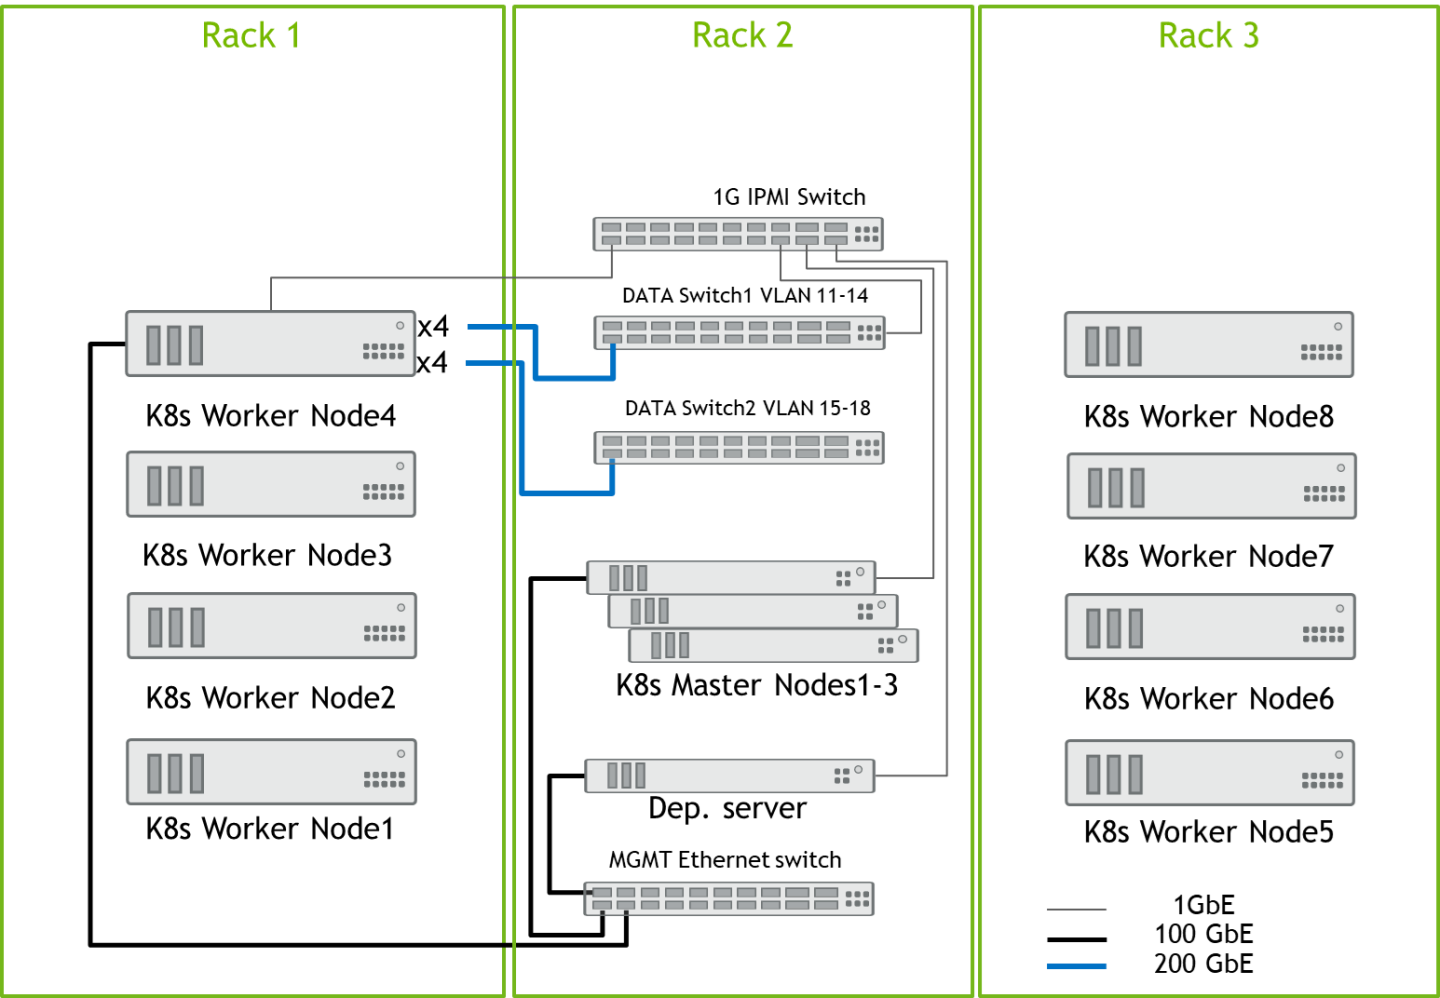
Design for K8s Cluster of 5-8 Worker Nodes
All Nodes are connected to the MGMT switch by a single 100GbE cable, and all Data port from the K8s worker nodes are connected to both Data switches by 200GbE cables: the first four data ports are connected to Data Switch1, and the remaining four data ports are connected to Data Switch2. See the Worker Node4 connections as an example. All server remote management ports and switch management ports are connected to 1GbE switch.
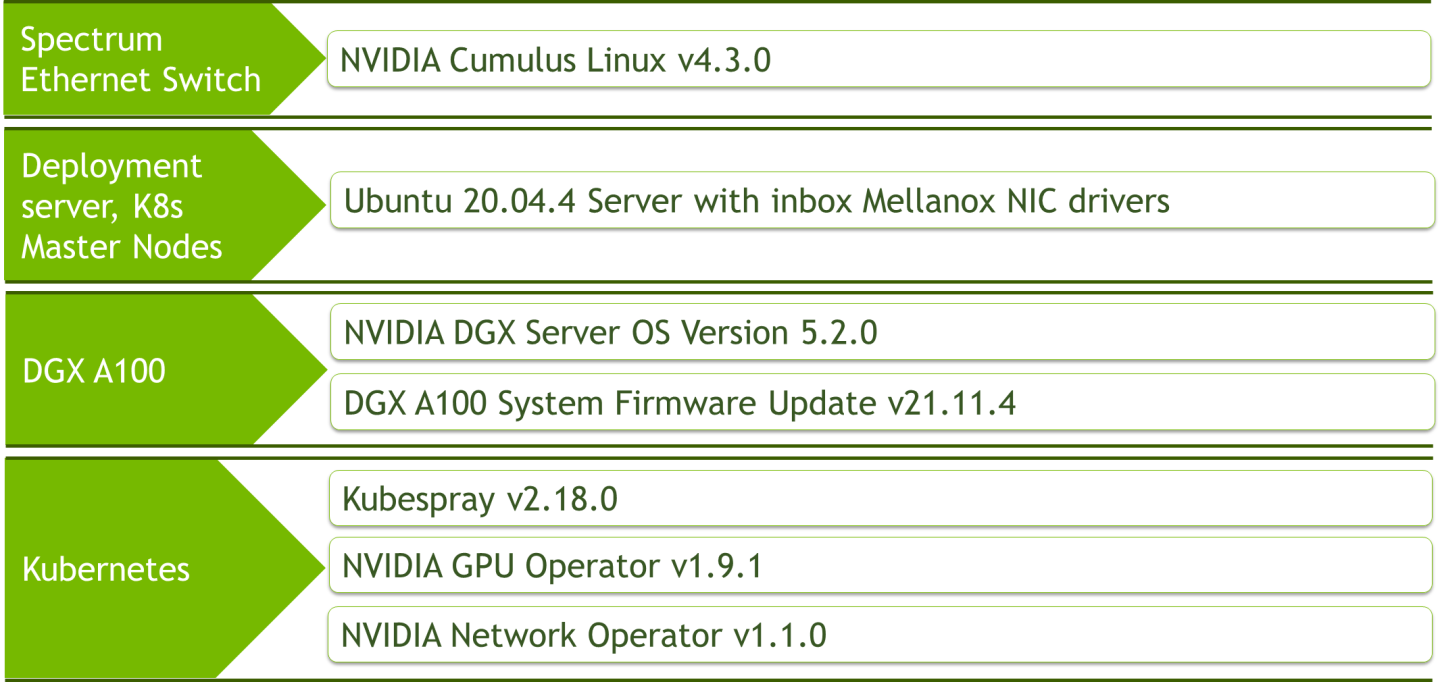
Software Stack Components
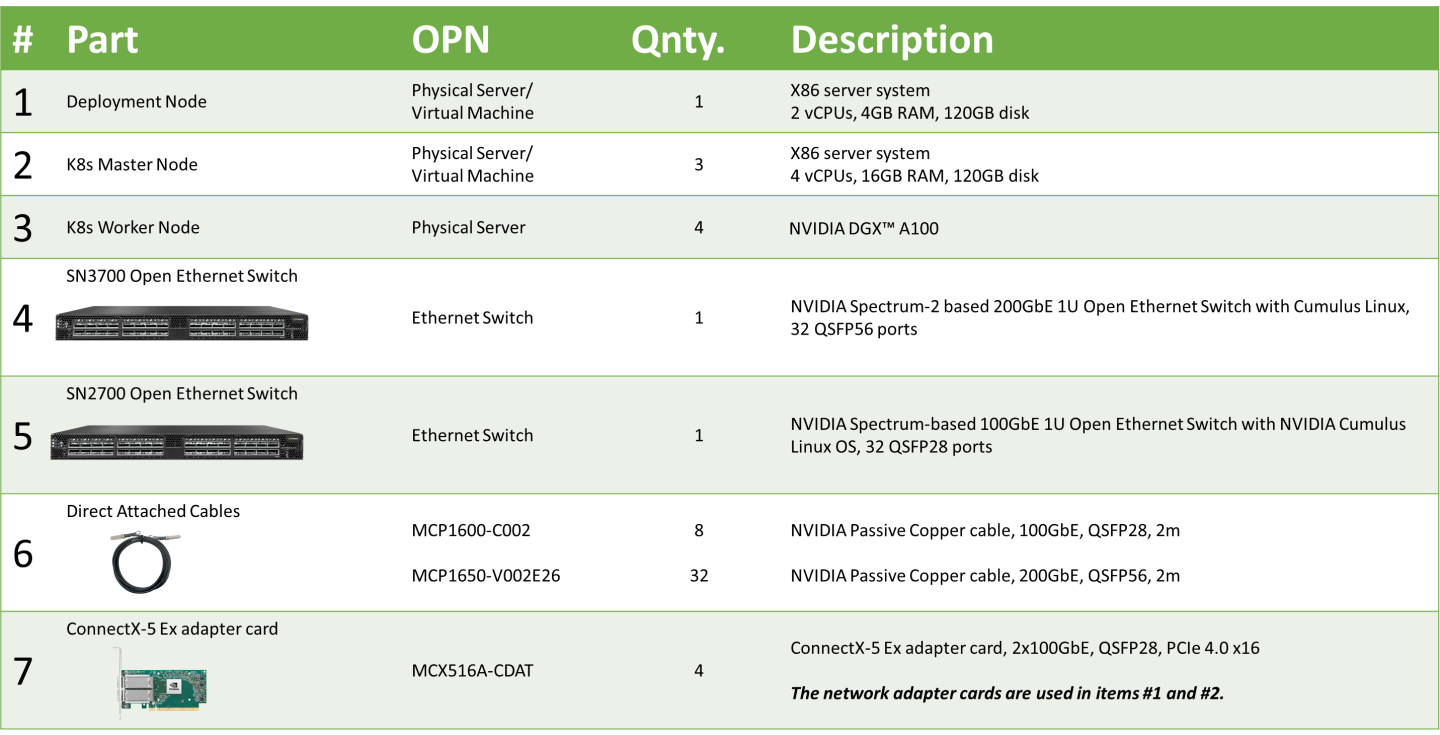
Bill of Materials
The following hardware setup is utilized in this guide to build K8s cluster with 4 K8s Worker nodes.
The following hardware setup is utilized in this guide to build a K8s cluster with 8 K8s Worker nodes.
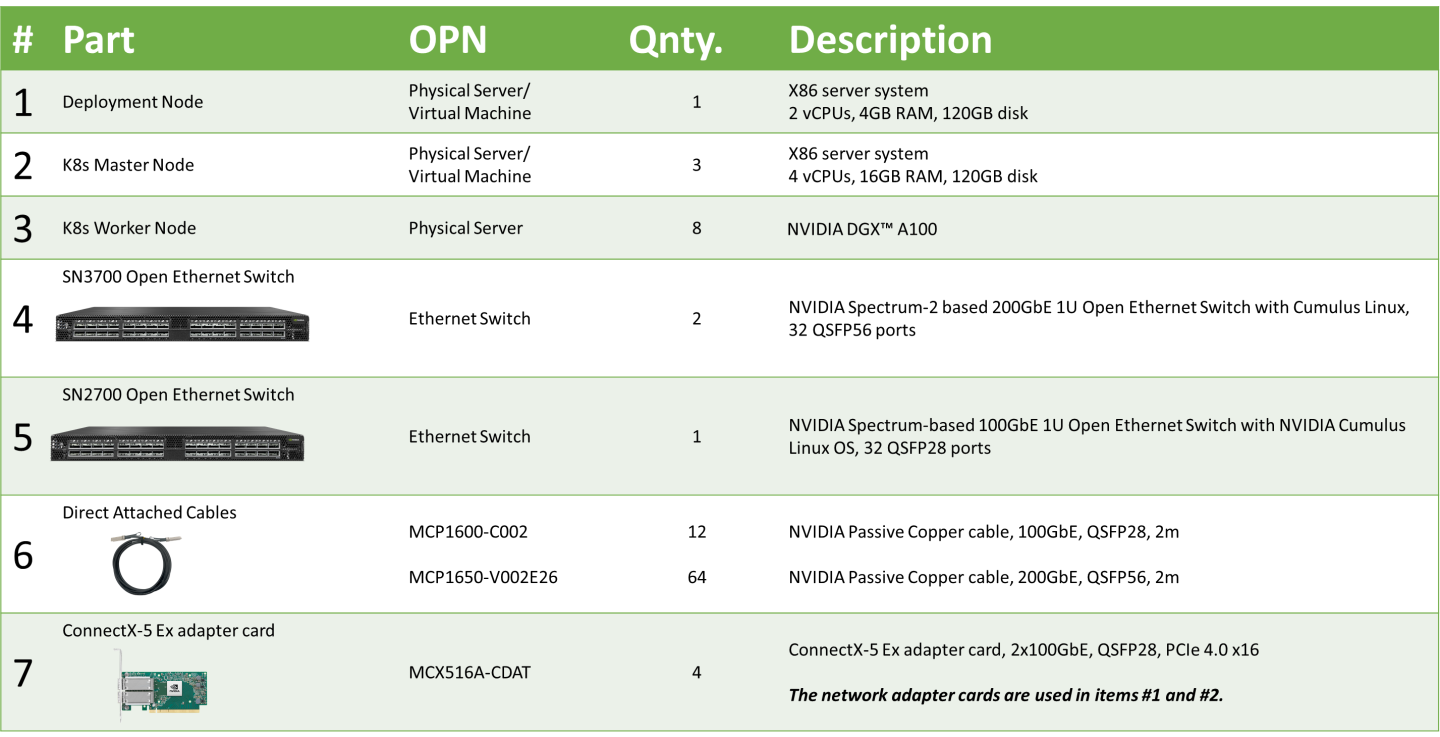
Server remote management and switch management BOM for 1GbE network is beyond the scope of this document.
Deployment and Configuration
Wiring
On each K8s Worker Node, all the networking ports of each NVIDIA Network Adapter is wired to an NVIDIA switch in high-performance fabric using NVIDIA LinkX DAC cables.
The below figure illustrates the required wiring for building a K8s cluster with 4 K8s Worker nodes.
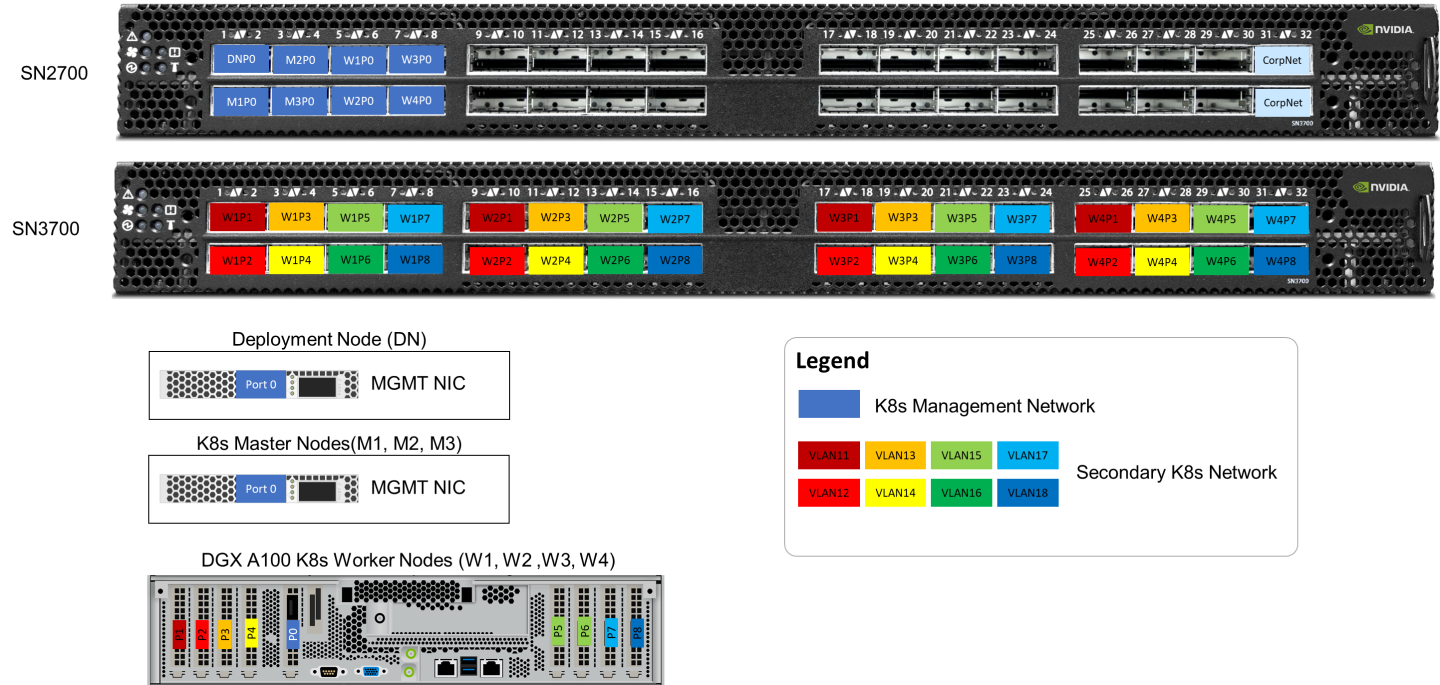
The below figure illustrates the required wiring for b uilding a K8s cluster with 8 K8s Worker nodes.

Server remote management and switch management wiring over 1GbE network is beyond the scope of this document.
Network / Fabric
General Prerequisites
Deployment/Management network topology and DNS/DHCP network services are part of the IT infrastructure. The components installation procedure and configuration are not covered in this guide.
Network and Fabric Configuration for Clusters up to 4 DGX A100 Worker Nodes
Prerequisites
High-performance Ethernet fabric
Single switch - NVIDIA SN3700
Switch OS - Cumulus Linux v4.3 and above
Network Configuration
Below are the server names with their relevant network configurations.
|
Server/Switch Type |
Server/Switch Name |
IP and NICS |
|
|
High-Speed Network 200GbE |
Management Network 100GbE |
||
|
Deployment node |
depserver |
N/A |
eth0: DHCP 192.168.222.110 |
|
Master node1 |
Node1 |
N/A |
eth0: DHCP 192.168.222.111 |
|
Master node2 |
Node2 |
N/A |
eth0: DHCP 192.168.222.112 |
|
Master node3 |
Node3 |
N/A |
eth0: DHCP 192.168.222.113 |
|
Worker node1 |
clx-host-081 |
enp12s0: no IP set enp18s0: no IP set enp75s0: no IP set enp84s0: no IP set enp141s0: no IP set enp148s0: no IP set enp186s0: no IP set enp204s0: no IP set |
enp225s0f0: DHCP 192.168.222.101 |
|
Worker node2 |
clx-host-082 |
enp12s0: no IP set enp18s0: no IP set enp75s0: no IP set enp84s0: no IP set enp141s0: no IP set enp148s0: no IP set enp186s0: no IP set enp204s0: no IP set |
enp225s0f0: DHCP 192.168.222.102 |
|
Worker node3 |
clx-host-083 |
enp12s0: no IP set enp18s0: no IP set enp75s0: no IP set enp84s0: no IP set enp141s0: no IP set enp148s0: no IP set enp186s0: no IP set enp204s0: no IP set |
enp225s0f0: DHCP 192.168.222.103 |
|
Worker node4 |
clx-host-084 |
enp12s0: no IP set enp18s0: no IP set enp75s0: no IP set enp84s0: no IP set enp141s0: no IP set enp148s0: no IP set enp186s0: no IP set enp204s0: no IP set |
enp225s0f0: DHCP 192.168.222.104 |
|
High-speed switch |
hs-sw01 |
N/A |
mgmt0: DHCP 192.168.222.201 |
enpXXXs0 high-speed network interfaces do not require additional configuration.
Fabric Configuration
This solution is based on Cumulus Linux v4.3 switch operation system.
A Greenfield deployment is assumed for this guide.
As a best practice, make sure to use the latest released Cumulus Linux NOS version. Please see this guide on how to upgrade Cumulus Linux.
Ensure that your Cumulus Linux switch has passed its initial configuration stages (please see the Quick-Start Guide for version 4.3 for more information):
Fabric configuration steps:
Administratively enable all physical ports
Create a bridge and configure front panel ports as members of the bridge
Create VLANs
Add VLANs to bridge
Commit configuration
Switch configuration steps:
            Linux hs-sw01 4.19.0-cl-1-amd64 #1 SMP Cumulus 4.19.149-1+cl4.3u1 (2021-01-28) x86_64

Welcome to NVIDIA Cumulus (R) Linux (R)

For support and online technical documentation, visit
http://www.cumulusnetworks.com/support

The registered trademark Linux (R) is used pursuant to a sublicense from LMI,
the exclusive licensee of Linus Torvalds, owner of the mark on a world-wide
basis.
cumulus@hs-sw01:mgmt:~$ net show version
NCLU_VERSION=1.0-cl4.3.0u4
DISTRIB_ID="Cumulus Linux"
DISTRIB_RELEASE=4.3.0
DISTRIB_DESCRIPTION="Cumulus Linux 4.3.0"
cumulus@hs-sw01:mgmt:~$ net add interface swp1-32
cumulus@hs-sw01:mgmt:~$ net add bridge bridge ports swp1-32
cumulus@hs-sw01:mgmt:~$ net add vlan 11 vlan-id 11
cumulus@hs-sw01:mgmt:~$ net add vlan 12 vlan-id 12
cumulus@hs-sw01:mgmt:~$ net add vlan 13 vlan-id 13
cumulus@hs-sw01:mgmt:~$ net add vlan 14 vlan-id 14
cumulus@hs-sw01:mgmt:~$ net add vlan 15 vlan-id 15
cumulus@hs-sw01:mgmt:~$ net add vlan 16 vlan-id 16
cumulus@hs-sw01:mgmt:~$ net add vlan 17 vlan-id 17
cumulus@hs-sw01:mgmt:~$ net add vlan 18 vlan-id 18
cumulus@hs-sw01:mgmt:~$ net add bridge bridge vids 11-18
cumulus@hs-sw01:mgmt:~$ net commit
To view link status, use the net show interface all command. The following examples show the output of ports in admin down , down , and up modes.
            cumulus@hs-sw01:mgmt:~$ net show interface

State  Name     Spd   MTU    Mode       LLDP                                Summary
-----  -------  ----  -----  ---------  ----------------------------------  ------------------------
UP     lo       N/A   65536  Loopback                                       IP: 127.0.0.1/8
       lo                                                                   IP: ::1/128
UP     eth0     1G    1500   Mgmt                                           Master: mgmt(UP)
       eth0                                                                 IP: 192.168.222.201/24(DHCP)
UP     swp1     200G  9216   Trunk/L2   clx-host-081                        Master: bridge(UP)
UP     swp2     200G  9216   Trunk/L2   clx-host-082                        Master: bridge(UP)
UP     swp3     200G  9216   Trunk/L2   clx-host-081                        Master: bridge(UP)
UP     swp4     200G  9216   Trunk/L2   clx-host-082                        Master: bridge(UP)
UP     swp5     200G  9216   Trunk/L2   clx-host-081                        Master: bridge(UP)
UP     swp6     200G  9216   Trunk/L2   clx-host-082                        Master: bridge(UP)
UP     swp7     200G  9216   Trunk/L2   clx-host-081                        Master: bridge(UP)
UP     swp8     200G  9216   Trunk/L2   clx-host-082                        Master: bridge(UP)
UP     swp9     200G  9216   Trunk/L2   clx-host-083                        Master: bridge(UP)
UP     swp10    200G  9216   Trunk/L2   clx-host-084                        Master: bridge(UP)
UP     swp11    200G  9216   Trunk/L2   clx-host-083                        Master: bridge(UP)
UP     swp12    200G  9216   Trunk/L2   clx-host-084                        Master: bridge(UP)
UP     swp13    200G  9216   Trunk/L2   clx-host-083                        Master: bridge(UP)
UP     swp14    200G  9216   Trunk/L2   clx-host-084                        Master: bridge(UP)
UP     swp15    200G  9216   Trunk/L2   clx-host-083                        Master: bridge(UP)
UP     swp16    200G  9216   Trunk/L2   clx-host-084                        Master: bridge(UP)
UP     swp17    200G  9216   Trunk/L2   clx-host-083                        Master: bridge(UP)
UP     swp18    200G  9216   Trunk/L2   clx-host-084                        Master: bridge(UP)
UP     swp19    200G  9216   Trunk/L2   clx-host-083                        Master: bridge(UP)
UP     swp20    200G  9216   Trunk/L2   clx-host-084                        Master: bridge(UP)
UP     swp21    200G  9216   Trunk/L2   clx-host-083                        Master: bridge(UP)
UP     swp22    200G  9216   Trunk/L2   clx-host-084                        Master: bridge(UP)
UP     swp23    200G  9216   Trunk/L2   clx-host-083                        Master: bridge(UP)
UP     swp24    200G  9216   Trunk/L2   clx-host-084                        Master: bridge(UP)
UP     swp25    200G  9216   Trunk/L2   clx-host-081                        Master: bridge(UP)
UP     swp26    200G  9216   Trunk/L2   clx-host-082                        Master: bridge(UP)
UP     swp27    200G  9216   Trunk/L2   clx-host-081                        Master: bridge(UP)
UP     swp28    200G  9216   Trunk/L2   clx-host-082                        Master: bridge(UP)
UP     swp29    200G  9216   Trunk/L2   clx-host-081                        Master: bridge(UP)
UP     swp30    200G  9216   Trunk/L2   clx-host-082                        Master: bridge(UP)
UP     swp31    200G  9216   Trunk/L2   clx-host-081                        Master: bridge(UP)
UP     swp32    200G  9216   Trunk/L2   clx-host-082                        Master: bridge(UP)
UP     bridge   N/A   9216   Bridge/L2
UP     mgmt     N/A   65536  VRF                                            IP: 127.0.0.1/8
       mgmt                                                                 IP: ::1/128
UP     vlan11   N/A   9216   Default
UP     vlan12   N/A   9216   Default
UP     vlan13   N/A   9216   Default
UP     vlan14   N/A   9216   Default
UP     vlan15   N/A   9216   Default
UP     vlan16   N/A   9216   Default
UP     vlan17   N/A   9216   Default
UP     vlan18   N/A   9216   Default
Nodes Configuration
General Prerequisites
Deployment Server and K8s Master Nodes
Ubuntu Server 20.04 operating system should be installed on all servers with OpenSSH server packages.K8s Worker Nodes
All the K8s Worker Nodes have the same hardware specification (see BoM for details).
Verify that an SR-IOV supported server platform is being used and review the BIOS settings in the server platform vendor documentation to enable SR-IOV in the BIOS.
For AMD processors, NUMA Nodes per Socket (NPS) should be configured in NPS1.
All high-speed 200Gb/s ConnectX-6 single-port Adapter Cards should be configured in Ethernet mode.
Host OS Prerequisites
Ensure that the Ubuntu Server 20.04 operating system is installed on all servers with OpenSSH server packages, and create a non-root depuser account with sudo privileges without password.
Update the Ubuntu software packages by running the following commands:
            sudo apt-get update
sudo apt-get upgrade -y
sudo reboot
In this solution we added the following line to the EOF /etc/sudoers:
            sudo vim /etc/sudoers
#includedir /etc/sudoers.d
#K8s cluster deployment user with sudo privileges without password
depuser ALL=(ALL) NOPASSWD:ALL
NVIDIA DGX A100 Server Firmware Update
It is recommended to update the DGX A100 server firmware to the latest GA release.
If you are unfamiliar with server firmware update procedure, please contact the NVIDIA Support team or visit DGX System Documentation page.
Deployment External Load-Balancer
In this deployment, t he topology of the high-available (HA) Kubernetes clusters is configured with stacked control plane nodes, where ETCD nodes are collocated with control plane nodes. More information about the HA topology options to use in Kubernetes cluster deployment can be found here.
The high availability cluster is built across multiple K8s control plane nodes (K8s master nodes), multiple Worker Nodes and a load balancer.
Adding load balancer to K8s cluster deployment makes the system more robust, since any K8s master node can fail without the application going offline or data being lost.
An illustration of this setup is shown below.
The ETCD cluster ensures that all data is synchronized across the master nodes, and that the load balancer regulates the traffic distribution. The cluster can therefore be accessed through one single entry point (the load balancer and the request are passed to an arbitrary node.
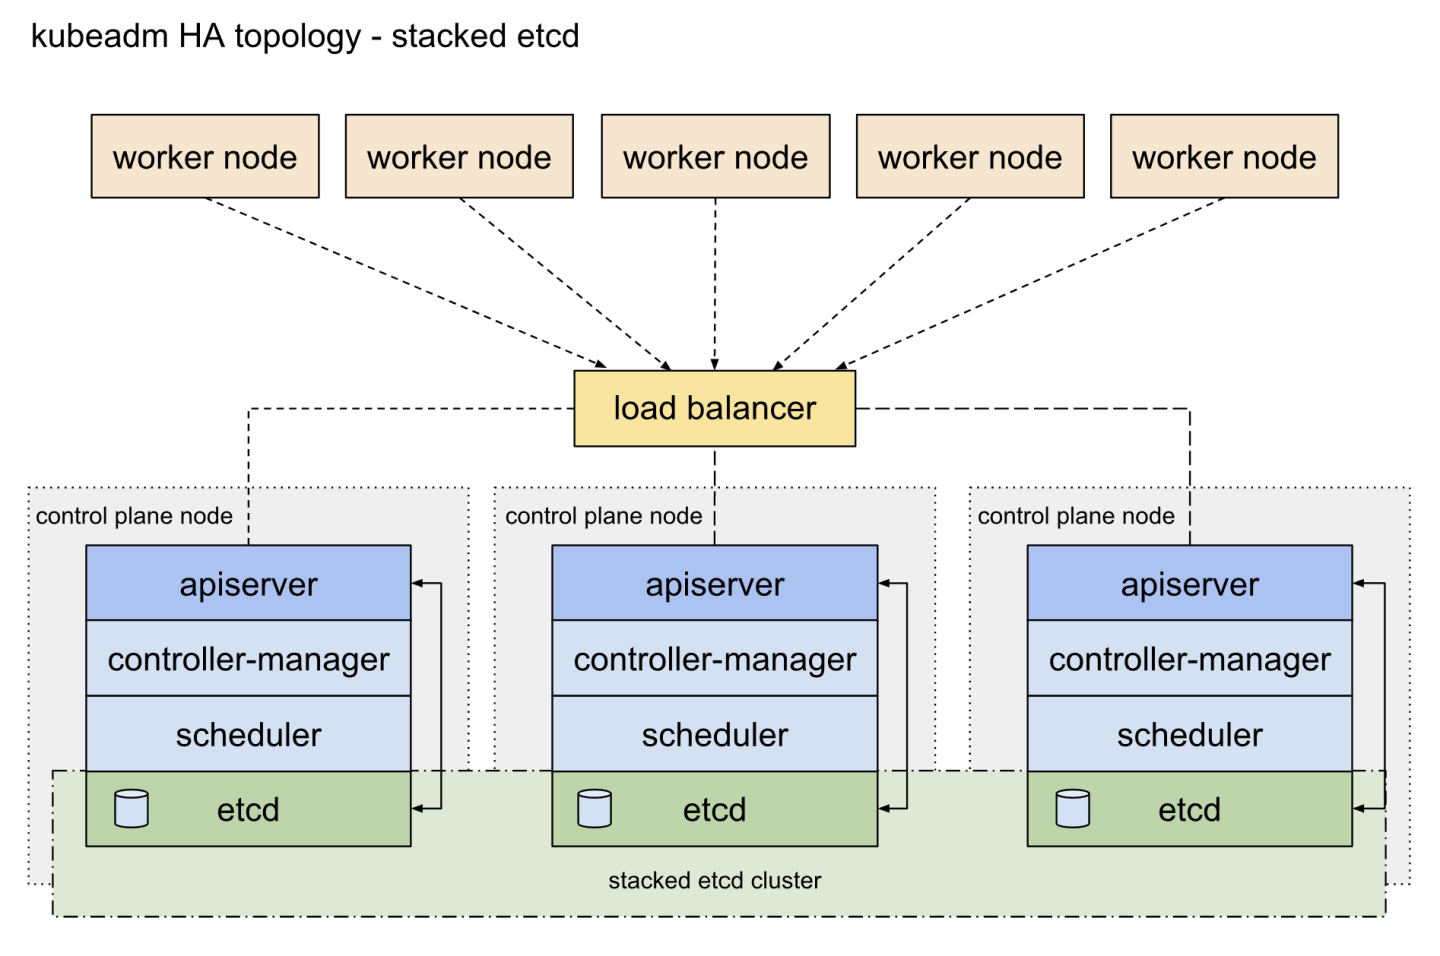
Reference: https://kubernetes.io/docs/setup/independent/ha-topology/#stacked-etcd-topology
An HAProxy standard package is used.
Installation steps on Deployment Node with root user account:
apt-get -y install haproxy
Update /etc/haproxy/haproxy.cfg with following:
            global
	log /dev/log	local0
	log /dev/log	local1 notice
	chroot /var/lib/haproxy
	stats socket /run/haproxy/admin.sock mode 660 level admin expose-fd listeners
	stats timeout 30s
	user haproxy
	group haproxy
	daemon

	# Default SSL material locations
	ca-base /etc/ssl/certs
	crt-base /etc/ssl/private

	# See: https://ssl-config.mozilla.org/#server=haproxy&server-version=2.0.3&config=intermediate
        ssl-default-bind-ciphers ECDHE-ECDSA-AES128-GCM-SHA256:ECDHE-RSA-AES128-GCM-SHA256:ECDHE-ECDSA-AES256-GCM-SHA384:ECDHE-RSA-AES256-GCM-SHA384:ECDHE-ECDSA-CHACHA20-POLY1305:ECDHE-RSA-CHACHA20-POLY1305:DHE-RSA-AES128-GCM-SHA256:DHE-RSA-AES256-GCM-SHA384
        ssl-default-bind-ciphersuites TLS_AES_128_GCM_SHA256:TLS_AES_256_GCM_SHA384:TLS_CHACHA20_POLY1305_SHA256
        ssl-default-bind-options ssl-min-ver TLSv1.2 no-tls-tickets

defaults
	log	global
	mode	http
	option	httplog
	option	dontlognull
        timeout connect 5000
        timeout client  50000
        timeout server  50000
	errorfile 400 /etc/haproxy/errors/400.http
	errorfile 403 /etc/haproxy/errors/403.http
	errorfile 408 /etc/haproxy/errors/408.http
	errorfile 500 /etc/haproxy/errors/500.http
	errorfile 502 /etc/haproxy/errors/502.http
	errorfile 503 /etc/haproxy/errors/503.http
	errorfile 504 /etc/haproxy/errors/504.http

frontend stats
    bind *:8404
    stats enable
    stats uri /stats
    stats refresh 10s
    stats admin if LOCALHOST

listen kubernetes-apiserver-https
  bind 192.168.222.110:6443
  mode tcp
  option log-health-checks
  timeout client 3h
  timeout server 3h
  server node1 192.168.222.111:6443 check check-ssl verify none inter 10000
  server node2 192.168.222.112:6443 check check-ssl verify none inter 10000
  server node3 192.168.222.113:6443 check check-ssl verify none inter 10000
  balance roundrobin
After updating the configuration file, restart the haproxy service.
service haproxy restart
K8s Cluster Deployment and Configuration
The Kubernetes cluster in this solution is installed using Kubespray with a non-root depuser account from the Deployment Node.
SSH Private Key and SSH Passwordless Login
Log in to the Deployment Node as a deployment user (in this case, depuser) and create an SSH private key for configuring the passwordless authentication on your computer by running the following commands:
            ssh-keygen

Generating public/private rsa key pair.
Enter file in which to save the key (/home/depuser/.ssh/id_rsa):
Created directory '/home/depuser/.ssh'.
Enter passphrase (empty for no passphrase):
Enter same passphrase again:
Your identification has been saved in /home/depuser/.ssh/id_rsa
Your public key has been saved in /home/depuser/.ssh/id_rsa.pub
The key fingerprint is:
SHA256:IfcjdT/spXVHVd3n6wm1OmaWUXGuHnPmvqoXZ6WZYl0 depuser@depserver
The key's randomart image is:
+---[RSA 3072]----+
|                *|
|               .*|
|      . o . .  o=|
|       o + . o +E|
|        S o  .**O|
|         . .o=OX=|
|           . o%*.|
|             O.o.|
|           .*.ooo|
+----[SHA256]-----+
Copy your SSH private key, such as ~/.ssh/id_rsa, to all nodes in the deployment by running the following command (example):
            ssh-copy-id depuser@192.168.222.111

/usr/bin/ssh-copy-id: INFO: Source of key(s) to be installed: "/home/depuser/.ssh/id_rsa.pub"
The authenticity of host '192.168.222.111 (192.168.222.111)' can't be established.
ECDSA key fingerprint is SHA256:6nhUgRlt9gY2Y2ofukUqE0ltH+derQuLsI39dFHe0Ag.
Are you sure you want to continue connecting (yes/no/[fingerprint])? yes
/usr/bin/ssh-copy-id: INFO: attempting to log in with the new key(s), to filter out any that are already installed
/usr/bin/ssh-copy-id: INFO: 1 key(s) remain to be installed -- if you are prompted now it is to install the new keys
depuser@192.168.222.111's password:

Number of key(s) added: 1

Now try logging into the machine, with:   "ssh 'depuser@192.168.222.111'"
and check to make sure that only the key(s) you wanted were added.
Verify that you have a passwordless SSH connectivity to all nodes in your deployment by running the following command (example):
$ ssh depuser@192.168.222.111
Kubespray Deployment and Configuration
General Setting
To install dependencies for running Kubespray with Ansible on the Deployment Node, run the following commands:
            cd ~
sudo apt -y install python3-pip jq
wget https://github.com/kubernetes-sigs/kubespray/archive/refs/tags/v2.18.0.tar.gz
tar -zxf v2.18.0.tar.gz
cd kubespray-2.18.0
sudo pip3 install -r requirements.txt
The default folder for subsequent commands is ~/kubespray-2.18.0.
Deployment Customization
Create a new cluster configuration and
host configuration file
.
Replace the IP addresses below with your nodes' IP addresses:
            cp -rfp inventory/sample inventory/mycluster
declare -a IPS=(192.168.222.111 192.168.222.112 192.168.222.113 192.168.222.101 192.168.222.102 192.168.222.103 192.168.222.104)
CONFIG_FILE=inventory/mycluster/hosts.yaml python3 contrib/inventory_builder/inventory.py ${IPS[@]}
As a result, the
inventory/mycluster/hosts.yaml
file will be created.
Review and change the host configuration in the file. Below is an example for this deployment:
inventory/mycluster/hosts.yaml
            all:
  hosts:
    node1:
      ansible_host: 192.168.222.111
      ip: 192.168.222.111
      access_ip: 192.168.222.111
    node2:
      ansible_host: 192.168.222.112
      ip: 192.168.222.112
      access_ip: 192.168.222.112
    node3:
      ansible_host: 192.168.222.113
      ip: 192.168.222.113
      access_ip: 192.168.222.113
    clx-host-081:
      ansible_host: 192.168.222.101
      ip: 192.168.222.101
      access_ip: 192.168.222.101
    clx-host-082:
      ansible_host: 192.168.222.102
      ip: 192.168.222.102
      access_ip: 192.168.222.102
    clx-host-083:
      ansible_host: 192.168.222.103
      ip: 192.168.222.103
      access_ip: 192.168.222.103
    clx-host-084:
      ansible_host: 192.168.222.104
      ip: 192.168.222.104
      access_ip: 192.168.222.104
  children:
    kube_control_plane:
      hosts:
        node1:
        node2:
        node3:
    kube_node:
      hosts:
        clx-host-081:
        clx-host-082:
        clx-host-083:
        clx-host-084:
    etcd:
      hosts:
        node1:
        node2:
        node3:
    k8s_cluster:
      children:
        kube_control_plane:
        kube_node:
    calico_rr:
      hosts: {}
Review and change cluster installation parameters in the files:
inventory/mycluster/group_vars/all/all.yml
In inventory/mycluster/group_vars/all/all.yml, set the following settings to use an External loadbalancer and disable internally:
inventory/mycluster/group_vars/all/all.yml
            ...

## External LB example config
apiserver_loadbalancer_domain_name: "ha-k8s.clx.labs.mlnx"
loadbalancer_apiserver:
  address: 192.168.222.110
  port: 6443

## Internal loadbalancers for apiservers
loadbalancer_apiserver_localhost: false

...
Deploying the Cluster Using KubeSpray Ansible Playbook
Run the following line to start the deployment process:
ansible-playbook -i inventory/mycluster/hosts.yaml --become --become-user=root cluster.yml
It takes a while for this deployment to complete, please make sure no errors are encountered.
A successful result should look something like the following:
            ... PLAY RECAP ***********************************************************************************************************************************************************************************
clx-host-081               : ok=401  changed=31   unreachable=0    failed=0    skipped=718  rescued=0    ignored=1
clx-host-082               : ok=401  changed=31   unreachable=0    failed=0    skipped=718  rescued=0    ignored=1
clx-host-083               : ok=401  changed=31   unreachable=0    failed=0    skipped=718  rescued=0    ignored=1
clx-host-084               : ok=401  changed=30   unreachable=0    failed=0    skipped=718  rescued=0    ignored=1
localhost                  : ok=4    changed=0    unreachable=0    failed=0    skipped=0    rescued=0    ignored=0
node1                      : ok=556  changed=62   unreachable=0    failed=0    skipped=1235 rescued=0    ignored=3
node2                      : ok=505  changed=74   unreachable=0    failed=0    skipped=1080 rescued=0    ignored=2
node3                      : ok=507  changed=53   unreachable=0    failed=0    skipped=1078 rescued=0    ignored=2

Thursday 17 February 2022  23:11:54 +0000 (0:00:00.265)       0:29:39.691 *****
===============================================================================
kubernetes/control-plane : Joining control plane node to the cluster. --------------------------------------------------------------------------------------------------------------- 810.38s
kubernetes/control-plane : kubeadm | Initialize first master ------------------------------------------------------------------------------------------------------------------------- 41.98s
kubernetes/control-plane : Master | wait for kube-scheduler -------------------------------------------------------------------------------------------------------------------------- 21.27s
kubernetes-apps/ansible : Kubernetes Apps | Start Resources -------------------------------------------------------------------------------------------------------------------------- 15.54s
policy_controller/calico : Start of Calico kube controllers -------------------------------------------------------------------------------------------------------------------------- 14.76s
kubernetes/control-plane : Master | Remove controller manager container containerd/crio ---------------------------------------------------------------------------------------------- 11.30s
kubernetes/control-plane : Master | Remove scheduler container containerd/crio ------------------------------------------------------------------------------------------------------- 11.25s
kubernetes/preinstall : Update package management cache (APT) ------------------------------------------------------------------------------------------------------------------------ 10.33s
kubernetes/node : install | Copy kubelet binary from download dir --------------------------------------------------------------------------------------------------------------------- 9.83s
network_plugin/calico : Start Calico resources ---------------------------------------------------------------------------------------------------------------------------------------- 8.96s
download : download | Download files / images ----------------------------------------------------------------------------------------------------------------------------------------- 8.52s
kubernetes/kubeadm : Join to cluster -------------------------------------------------------------------------------------------------------------------------------------------------- 8.39s
container-engine/crictl : extract_file | Unpacking archive ---------------------------------------------------------------------------------------------------------------------------- 8.35s
container-engine/runc : download_file | Download item --------------------------------------------------------------------------------------------------------------------------------- 8.17s
container-engine/crictl : download_file | Download item ------------------------------------------------------------------------------------------------------------------------------- 7.84s
container-engine/containerd : download_file | Download item --------------------------------------------------------------------------------------------------------------------------- 7.80s
container-engine/nerdctl : extract_file | Unpacking archive --------------------------------------------------------------------------------------------------------------------------- 7.63s
network_plugin/calico : Calico | Create Calico Kubernetes datastore resources --------------------------------------------------------------------------------------------------------- 7.57s
container-engine/nerdctl : extract_file | Unpacking archive --------------------------------------------------------------------------------------------------------------------------- 7.55s
container-engine/nerdctl : download_file | Download item ------------------------------------------------------------------------------------------------------------------------------ 7.51s
K8s Cluster Customization and Verification
Now that the K8S cluster is deployed, connection to the K8s cluster can be done from any K8S Master Node with the root user account or from another server with installed KUBECTL command and configured KUBECONFIG=<path-to-config-file> to customize deployment.
In our guide we continue the deployment from depserver with the root user account:
            ## Install KUBECTL
snap install kubectl --channel=1.22/stable --classic
To start using your cluster, you need to run the following command as a regular user:
            mkdir -p $HOME/.kube
scp -i depuser@node1:/etc/kubernetes/admin.conf $HOME/.kube/config
sudo chown $(id -u):$(id -g) $HOME/.kube/config
Label the Worker Nodes:
Master Node console
            kubectl label nodes clx-host-081 node-role.kubernetes.io/worker=
kubectl label nodes clx-host-082 node-role.kubernetes.io/worker=
kubectl label nodes clx-host-083 node-role.kubernetes.io/worker=
kubectl label nodes clx-host-084 node-role.kubernetes.io/worker=
K8s Worker Node labeling is required for a proper installation of the NVIDIA Network Operator.
Below is an output example of the K8s cluster deployment information using the Calico CNI plugin.
To ensure that the Kubernetes cluster is installed correctly, run the following commands:
            ## Get cluster node status

kubectl get node -o wide

NAME           STATUS   ROLES                  AGE   VERSION   INTERNAL-IP       EXTERNAL-IP   OS-IMAGE             KERNEL-VERSION      CONTAINER-RUNTIME
clx-host-081   Ready    worker                 26h   v1.22.5   192.168.222.101   <none>        Ubuntu 20.04.4 LTS   5.4.0-100-generic   containerd://1.5.8
clx-host-082   Ready    worker                 26h   v1.22.5   192.168.222.102   <none>        Ubuntu 20.04.4 LTS   5.4.0-100-generic   containerd://1.5.8
clx-host-083   Ready    worker                 26h   v1.22.5   192.168.222.103   <none>        Ubuntu 20.04.4 LTS   5.4.0-100-generic   containerd://1.5.8
clx-host-084   Ready    worker                 26h   v1.22.5   192.168.222.104   <none>        Ubuntu 20.04.4 LTS   5.4.0-100-generic   containerd://1.5.8
node1          Ready    control-plane,master   26h   v1.22.5   192.168.222.111   <none>        Ubuntu 20.04.4 LTS   5.4.0-100-generic   containerd://1.5.8
node2          Ready    control-plane,master   26h   v1.22.5   192.168.222.112   <none>        Ubuntu 20.04.3 LTS   5.4.0-100-generic   containerd://1.5.8
node3          Ready    control-plane,master   26h   v1.22.5   192.168.222.113   <none>        Ubuntu 20.04.3 LTS   5.4.0-100-generic   containerd://1.5.8

## Get system pods status

kubectl -n kube-system get pods -o wide
NAME                                      READY   STATUS    RESTARTS      AGE   IP                NODE           NOMINATED NODE   READINESS GATES
calico-kube-controllers-5788f6558-d9zcd   1/1     Running   6             26h   192.168.222.103   clx-host-083   <none>           <none>
calico-node-7gdzm                         1/1     Running   1             26h   192.168.222.104   clx-host-084   <none>           <none>
calico-node-f6wz4                         1/1     Running   1             26h   192.168.222.103   clx-host-083   <none>           <none>
calico-node-fgtl7                         1/1     Running   1             26h   192.168.222.102   clx-host-082   <none>           <none>
calico-node-tb7hg                         1/1     Running   1             26h   192.168.222.113   node3          <none>           <none>
calico-node-v2hwz                         1/1     Running   1             26h   192.168.222.101   clx-host-081   <none>           <none>
calico-node-v7w7m                         1/1     Running   0             26h   192.168.222.111   node1          <none>           <none>
calico-node-vh984                         1/1     Running   1             26h   192.168.222.112   node2          <none>           <none>
coredns-8474476ff8-5rkrd                  1/1     Running   0             26h   10.233.74.1       clx-host-082   <none>           <none>
coredns-8474476ff8-crqh5                  1/1     Running   0             26h   10.233.112.1      clx-host-084   <none>           <none>
coredns-8474476ff8-n567s                  1/1     Running   0             26h   10.233.111.1      clx-host-081   <none>           <none>
coredns-8474476ff8-vr2ls                  1/1     Running   0             26h   10.233.90.1       node1          <none>           <none>
coredns-8474476ff8-wmcgv                  1/1     Running   0             26h   10.233.78.1       clx-host-083   <none>           <none>
dns-autoscaler-5ffdc7f89d-7fx8d           1/1     Running   0             26h   10.233.90.2       node1          <none>           <none>
etcd-node1                                1/1     Running   2             26h   192.168.222.111   node1          <none>           <none>
etcd-node2                                1/1     Running   1             26h   192.168.222.112   node2          <none>           <none>
etcd-node3                                1/1     Running   1             26h   192.168.222.113   node3          <none>           <none>
kube-apiserver-node1                      1/1     Running   4             26h   192.168.222.111   node1          <none>           <none>
kube-apiserver-node2                      1/1     Running   1             26h   192.168.222.112   node2          <none>           <none>
kube-apiserver-node3                      1/1     Running   1             26h   192.168.222.113   node3          <none>           <none>
kube-controller-manager-node1             1/1     Running   4             26h   192.168.222.111   node1          <none>           <none>
kube-controller-manager-node2             1/1     Running   3             26h   192.168.222.112   node2          <none>           <none>
kube-controller-manager-node3             1/1     Running   3             26h   192.168.222.113   node3          <none>           <none>
kube-proxy-7hrqw                          1/1     Running   0             26h   192.168.222.101   clx-host-081   <none>           <none>
kube-proxy-9n5lh                          1/1     Running   0             26h   192.168.222.111   node1          <none>           <none>
kube-proxy-b8mxv                          1/1     Running   1             26h   192.168.222.113   node3          <none>           <none>
kube-proxy-bq6zs                          1/1     Running   1             26h   192.168.222.112   node2          <none>           <none>
kube-proxy-cz7pz                          1/1     Running   0             26h   192.168.222.104   clx-host-084   <none>           <none>
kube-proxy-jrrw2                          1/1     Running   0             26h   192.168.222.103   clx-host-083   <none>           <none>
kube-proxy-rnt6g                          1/1     Running   0             26h   192.168.222.102   clx-host-082   <none>           <none>
kube-scheduler-node1                      1/1     Running   2             26h   192.168.222.111   node1          <none>           <none>
kube-scheduler-node2                      1/1     Running   2             26h   192.168.222.112   node2          <none>           <none>
kube-scheduler-node3                      1/1     Running   2             26h   192.168.222.113   node3          <none>           <none>
nodelocaldns-jf62n                        1/1     Running   0             26h   192.168.222.104   clx-host-084   <none>           <none>
nodelocaldns-lpmn7                        1/1     Running   1             26h   192.168.222.113   node3          <none>           <none>
nodelocaldns-pkhht                        1/1     Running   0             26h   192.168.222.103   clx-host-083   <none>           <none>
nodelocaldns-rr6b2                        1/1     Running   1             26h   192.168.222.112   node2          <none>           <none>
nodelocaldns-s2vnx                        1/1     Running   0             26h   192.168.222.102   clx-host-082   <none>           <none>
nodelocaldns-sngtb                        1/1     Running   0             26h   192.168.222.111   node1          <none>           <none>
nodelocaldns-x8nsf                        1/1     Running   0             26h   192.168.222.101   clx-host-081   <none>           <none>
NVIDIA GPU Operator Installation
The NVIDIA GPU Operator uses the operator framework within the Kubernetes to automate the management of all NVIDIA software components needed to provision the GPU. These components include the NVIDIA drivers (to enable CUDA), Kubernetes device plugin for the GPUs, the NVIDIA Container Runtime, automatic node labelling, DCGM based monitoring and others. For information on platform support and getting started, visit the official documentation repository .
Helm is required for the GPU Operator deployment:
            ## Install HELM
snap install helm --classic
Add the NVIDIA Helm repository:
            ## Add REPO
helm repo add nvidia https://nvidia.github.io/gpu-operator \
  && helm repo update
GPU Operator installation command in K8s cluster over DGX server platform:
            ## Install GPU Operator
helm install --wait --generate-name -n gpu-operator --create-namespace nvidia/gpu-operator --set driver.enabled=false --set dcgm.enabled=false

## Review installation
helm ls -n gpu-operator
NAME                   	NAMESPACE   	REVISION	UPDATED                                	STATUS  	CHART              	APP VERSION
gpu-operator-1646920855	gpu-operator	1       	2022-03-10 14:01:05.942790618 +0000 UTC	deployed	gpu-operator-v1.9.1	v1.9.1
Once the Helm chart is installed, check the status of the pods to ensure all the containers are running and the validation is complete:
            kubectl -n gpu-operator get pod -o wide
NAME                                                              READY   STATUS      RESTARTS   AGE     IP              NODE           NOMINATED NODE   READINESS GATES
gpu-feature-discovery-25csp                                       1/1     Running     0          2m14s   10.233.74.5     clx-host-082   <none>           <none>
gpu-feature-discovery-4j5x2                                       1/1     Running     0          2m14s   10.233.78.7     clx-host-083   <none>           <none>
gpu-feature-discovery-dthsq                                       1/1     Running     0          2m14s   10.233.112.4    clx-host-084   <none>           <none>
gpu-feature-discovery-p7spz                                       1/1     Running     0          2m14s   10.233.111.4    clx-host-081   <none>           <none>
gpu-operator-1646920855-node-feature-discovery-master-58cdc4vsk   1/1     Running     0          4m2s    10.233.96.2     node2          <none>           <none>
gpu-operator-1646920855-node-feature-discovery-worker-24ws8       1/1     Running     0          4m2s    10.233.92.4     node3          <none>           <none>
gpu-operator-1646920855-node-feature-discovery-worker-4xhkb       1/1     Running     0          4m2s    10.233.78.3     clx-host-083   <none>           <none>
gpu-operator-1646920855-node-feature-discovery-worker-ct6r7       1/1     Running     0          4m2s    10.233.111.2    clx-host-081   <none>           <none>
gpu-operator-1646920855-node-feature-discovery-worker-pf2bx       1/1     Running     0          4m2s    10.233.74.2     clx-host-082   <none>           <none>
gpu-operator-1646920855-node-feature-discovery-worker-ppwq7       1/1     Running     0          4m2s    10.233.90.3     node1          <none>           <none>
gpu-operator-1646920855-node-feature-discovery-worker-qv8k9       1/1     Running     0          4m2s    10.233.96.3     node2          <none>           <none>
gpu-operator-1646920855-node-feature-discovery-worker-sqgww       1/1     Running     0          4m3s    10.233.112.2    clx-host-084   <none>           <none>
gpu-operator-84b88fc49c-98wb7                                     1/1     Running     0          4m2s    10.233.92.3     node3          <none>           <none>
nvidia-container-toolkit-daemonset-4mtwz                          1/1     Running     0          2m13s   10.233.74.3     clx-host-082   <none>           <none>
nvidia-container-toolkit-daemonset-h9xzm                          1/1     Running     0          2m13s   10.233.112.3    clx-host-084   <none>           <none>
nvidia-container-toolkit-daemonset-kqnsr                          1/1     Running     0          2m13s   10.233.78.4     clx-host-083   <none>           <none>
nvidia-container-toolkit-daemonset-zwvd9                          1/1     Running     0          2m12s   10.233.111.3    clx-host-081   <none>           <none>
nvidia-cuda-validator-c5lmr                                       0/1     Completed   0          110s    10.233.112.8    clx-host-084   <none>           <none>
nvidia-cuda-validator-qlj4z                                       0/1     Completed   0          100s    10.233.78.9     clx-host-083   <none>           <none>
nvidia-cuda-validator-rfdsd                                       0/1     Completed   0          98s     10.233.111.8    clx-host-081   <none>           <none>
nvidia-cuda-validator-xqh28                                       0/1     Completed   0          104s    10.233.74.8     clx-host-082   <none>           <none>
nvidia-dcgm-exporter-9rjqv                                        1/1     Running     0          2m16s   10.233.111.5    clx-host-081   <none>           <none>
nvidia-dcgm-exporter-bl24c                                        1/1     Running     0          2m16s   10.233.112.6    clx-host-084   <none>           <none>
nvidia-dcgm-exporter-nbn8z                                        1/1     Running     0          2m15s   10.233.74.7     clx-host-082   <none>           <none>
nvidia-dcgm-exporter-trclg                                        1/1     Running     0          2m16s   10.233.78.5     clx-host-083   <none>           <none>
nvidia-device-plugin-daemonset-72b9c                              1/1     Running     0          2m14s   10.233.112.7    clx-host-084   <none>           <none>
nvidia-device-plugin-daemonset-cz89s                              1/1     Running     0          2m15s   10.233.111.6    clx-host-081   <none>           <none>
nvidia-device-plugin-daemonset-nfrsr                              1/1     Running     0          2m14s   10.233.78.8     clx-host-083   <none>           <none>
nvidia-device-plugin-daemonset-rrpxg                              1/1     Running     0          2m14s   10.233.74.4     clx-host-082   <none>           <none>
nvidia-device-plugin-validator-2n686                              0/1     Completed   0          89s     10.233.78.10    clx-host-083   <none>           <none>
nvidia-device-plugin-validator-bt55c                              0/1     Completed   0          87s     10.233.111.9    clx-host-081   <none>           <none>
nvidia-device-plugin-validator-dczfx                              0/1     Completed   0          103s    10.233.112.9    clx-host-084   <none>           <none>
nvidia-device-plugin-validator-kssds                              0/1     Completed   0          93s     10.233.74.9     clx-host-082   <none>           <none>
nvidia-mig-manager-2wtr9                                          1/1     Running     0          79s     10.233.78.11    clx-host-083   <none>           <none>
nvidia-mig-manager-49vpk                                          1/1     Running     0          83s     10.233.74.10    clx-host-082   <none>           <none>
nvidia-mig-manager-4dktw                                          1/1     Running     0          79s     10.233.112.10   clx-host-084   <none>           <none>
nvidia-mig-manager-kh8qd                                          1/1     Running     0          80s     10.233.111.10   clx-host-081   <none>           <none>
nvidia-operator-validator-6dnpw                                   1/1     Running     0          2m16s   10.233.74.6     clx-host-082   <none>           <none>
nvidia-operator-validator-gztcz                                   1/1     Running     0          2m15s   10.233.112.5    clx-host-084   <none>           <none>
nvidia-operator-validator-vk98p                                   1/1     Running     0          2m16s   10.233.111.7    clx-host-081   <none>           <none>
nvidia-operator-validator-wdz79                                   1/1     Running     0          2m16s   10.233.78.6     clx-host-083   <none>           <none>
NVIDIA Network Operator Installation
The NVIDIA Network Operator leverages Kubernetes CRDs and Operator SDK to manage networking-related components in order to enable fast networking and RDMA for workloads in K8s cluster. The Fast Network is a secondary network of the K8s cluster for applications that require high bandwidth or low latency.
To make it work, several components need to be provisioned and configured. The Helm is required for the Network Operator deployment.
Add the NVIDIA Network Operator Helm repository:
            ## Add REPO
helm repo add mellanox https://mellanox.github.io/network-operator \
  && helm repo update
Create the values.yaml file to customize the Network Operator deployment (e xample):
values.yaml
            nfd:
  enabled: true

sriovNetworkOperator:
  enabled: true

deployCR: true
ofedDriver:
  deploy: false

nvPeerDriver:
  deploy: false

rdmaSharedDevicePlugin:
  deploy: false

sriovDevicePlugin:
  deploy: false

secondaryNetwork:
  deploy: true
  cniPlugins:
    deploy: true
  multus:
    deploy: true
  ipamPlugin:
    deploy: true
Deploy the operator:
            helm install -f ./values.yaml -n network-operator --create-namespace --wait mellanox/network-operator --generate-name

NAME: network-operator-1646925670
LAST DEPLOYED: Thu Mar 10 15:21:22 2022
NAMESPACE: network-operator
STATUS: deployed
REVISION: 1
TEST SUITE: None
NOTES:
Get Network Operator deployed resources by running the following commands:

$ kubectl -n network-operator get pods
$ kubectl -n nvidia-network-operator-resources get pods
Once the Helm chart is installed, check the status of the pods to ensure all the containers are running:
            ## POD status in namespace - network-operator
kubectl -n network-operator get pods -o wide
NAME                                                              READY   STATUS    RESTARTS   AGE     IP              NODE           NOMINATED NODE   READINESS GATES
network-operator-1646925670-68d8f875f9-bzl4t                      1/1     Running   0          3m36s   10.233.90.5     node1          <none>           <none>
network-operator-1646925670-node-feature-discovery-master-mrzvc   1/1     Running   0          3m36s   10.233.96.5     node2          <none>           <none>
network-operator-1646925670-node-feature-discovery-worker-2hszv   1/1     Running   0          3m36s   10.233.78.12    clx-host-083   <none>           <none>
network-operator-1646925670-node-feature-discovery-worker-4xtct   1/1     Running   0          3m36s   10.233.96.4     node2          <none>           <none>
network-operator-1646925670-node-feature-discovery-worker-62lhk   1/1     Running   0          3m36s   10.233.112.11   clx-host-084   <none>           <none>
network-operator-1646925670-node-feature-discovery-worker-8vbhk   1/1     Running   0          3m36s   10.233.74.11    clx-host-082   <none>           <none>
network-operator-1646925670-node-feature-discovery-worker-8vrqt   1/1     Running   0          3m36s   10.233.111.11   clx-host-081   <none>           <none>
network-operator-1646925670-node-feature-discovery-worker-cv9rc   1/1     Running   0          3m36s   10.233.90.4     node1          <none>           <none>
network-operator-1646925670-node-feature-discovery-worker-hbr7k   1/1     Running   0          3m36s   10.233.92.5     node3          <none>           <none>
network-operator-1646925670-sriov-network-operator-6b75fd8ng66c   1/1     Running   0          3m36s   10.233.90.6     node1          <none>           <none>
sriov-network-config-daemon-85dq5                                 3/3     Running   0          3m30s   192.168.222.103 clx-host-083   <none>           <none>
sriov-network-config-daemon-8hn6g                                 3/3     Running   0          3m20s   192.168.222.104 clx-host-084   <none>           <none>
sriov-network-config-daemon-9jb2j                                 3/3     Running   0          3m20s   192.168.222.101 clx-host-081   <none>           <none>
sriov-network-config-daemon-kd6bp                                 3/3     Running   0          3m10s   192.168.222.102 clx-host-082   <none>           <none>

## POD status in namespace - nvidia-network-operator-resources
kubectl -n nvidia-network-operator-resources get pods -o wide
NAME                   READY   STATUS    RESTARTS   AGE     IP                NODE           NOMINATED NODE   READINESS GATES
cni-plugins-ds-9mg2g   1/1     Running   0          3m27s   192.168.222.101   clx-host-081   <none>           <none>
cni-plugins-ds-lwzkn   1/1     Running   0          3m26s   192.168.222.103   clx-host-083   <none>           <none>
cni-plugins-ds-w4pvx   1/1     Running   0          3m26s   192.168.222.104   clx-host-084   <none>           <none>
cni-plugins-ds-w5hm8   1/1     Running   0          3m26s   192.168.222.102   clx-host-082   <none>           <none>
kube-multus-ds-2xwws   1/1     Running   0          3m26s   192.168.222.102   clx-host-082   <none>           <none>
kube-multus-ds-85cxw   1/1     Running   0          3m27s   192.168.222.101   clx-host-081   <none>           <none>
kube-multus-ds-vk6hq   1/1     Running   0          3m26s   192.168.222.103   clx-host-083   <none>           <none>
kube-multus-ds-xjx6x   1/1     Running   0          3m26s   192.168.222.104   clx-host-084   <none>           <none>
whereabouts-6ftfb      1/1     Running   0          3m25s   192.168.222.103   clx-host-083   <none>           <none>
whereabouts-89f2h      1/1     Running   0          3m25s   192.168.222.101   clx-host-081   <none>           <none>
whereabouts-k6w4s      1/1     Running   0          3m24s   192.168.222.102   clx-host-082   <none>           <none>
whereabouts-nqlb9      1/1     Running   0          3m25s   192.168.222.104   clx-host-084   <none>           <none>
High-Speed Network Configuration
After installing the operator, please check the SriovNetworkNodeState CRs to see all SR-IOV-enabled devices in your node.
In this deployment, the network interfaces have been chosen with the following names: enp12s0, enp18s0, enp75s0, enp84s0, enp141s0, enp141s0, enp186s0 and enp204s0
.
To review the interface status please use the following command:
NICs status
            ## NIC status
kubectl -n network-operator get sriovnetworknodestates.sriovnetwork.openshift.io clx-host-081 -o yaml

 ...
status:
  interfaces:
  - deviceID: 101b
    driver: mlx5_core
    linkSpeed: 200000 Mb/s
    linkType: ETH
    mac: 04:3f:72:b1:f4:fc
    mtu: 1500
    name: enp12s0
    pciAddress: 0000:0c:00.0
    totalvfs: 4
    vendor: 15b3
  - deviceID: 101b
    driver: mlx5_core
    linkSpeed: 200000 Mb/s
    linkType: ETH
    mac: 04:3f:72:c0:02:b2
    mtu: 1500
    name: enp18s0
    pciAddress: "0000:12:00.0"
    totalvfs: 4
    vendor: 15b3
  - deviceID: 101b
    driver: mlx5_core
    linkSpeed: 200000 Mb/s
    linkType: ETH
    mac: 04:3f:72:b1:f6:c8
    mtu: 1500
    name: enp75s0
    pciAddress: 0000:4b:00.0
    totalvfs: 4
    vendor: 15b3
  - deviceID: 101b
    driver: mlx5_core
    linkSpeed: 200000 Mb/s
    linkType: ETH
    mac: 04:3f:72:b1:f5:08
    mtu: 1500
    name: enp84s0
    pciAddress: "0000:54:00.0"
    totalvfs: 4
    vendor: 15b3
  - deviceID: 101b
    driver: mlx5_core
    linkSpeed: 200000 Mb/s
    linkType: ETH
    mac: 04:3f:72:b1:f2:d4
    mtu: 1500
    name: enp141s0
    pciAddress: 0000:8d:00.0
    totalvfs: 4
    vendor: 15b3
  - deviceID: 101b
    driver: mlx5_core
    linkSpeed: 200000 Mb/s
    linkType: ETH
    mac: 04:3f:72:c0:00:e2
    mtu: 1500
    name: enp148s0
    pciAddress: 0000:94:00.0
    totalvfs: 4
    vendor: 15b3
  - deviceID: 101b
    driver: mlx5_core
    linkSpeed: 200000 Mb/s
    linkType: ETH
    mac: 04:3f:72:b1:f6:f0
    mtu: 1500
    name: enp186s0
    pciAddress: 0000:ba:00.0
    totalvfs: 4
    vendor: 15b3
  - deviceID: 101b
    driver: mlx5_core
    linkSpeed: 200000 Mb/s
    linkType: ETH
    mac: 04:3f:72:b1:f6:bc
    mtu: 1500
    name: enp204s0
    pciAddress: 0000:cc:00.0
    totalvfs: 4
    vendor: 15b3
  - deviceID: 101b
    driver: mlx5_core
    linkSpeed: 100000 Mb/s
    linkType: ETH
    mac: 04:3f:72:c1:cb:f0
    mtu: 1500
    name: enp225s0f0
    pciAddress: 0000:e1:00.0
    vendor: 15b3
  - deviceID: 101b
    driver: mlx5_core
    linkType: ETH
    mac: 04:3f:72:c1:cb:f1
    mtu: 1500
    name: enp225s0f1
    pciAddress: 0000:e1:00.1
    vendor: 15b3
  - deviceID: "1533"
    driver: igb
    linkType: ETH
    mac: 5c:ff:35:e2:1e:41
    mtu: 1500
    name: enp226s0
    pciAddress: 0000:e2:00.0
    vendor: "8086"
  syncStatus: Succeeded
Create SriovNetworkNodePolicy CR for each chosen network interface - policy.yaml file, by specifying the chosen interface in the 'nicSelector' (in this example, for the enp12s0 interface):
policy.yaml
            apiVersion: sriovnetwork.openshift.io/v1
kind: SriovNetworkNodePolicy
metadata:
  name: mlnxnics-sw1
  namespace: network-operator
spec:
  nodeSelector:
    feature.node.kubernetes.io/custom-rdma.capable: "true"
  resourceName: roce_sw1
  priority: 99
  mtu: 9000
  numVfs: 8
  nicSelector:
    pfNames: [ "enp12s0" ]
  deviceType: netdevice
  isRdma: true

---
apiVersion: sriovnetwork.openshift.io/v1
kind: SriovNetworkNodePolicy
metadata:
  name: mlnxnics-sw2
  namespace: network-operator
spec:
  nodeSelector:
    feature.node.kubernetes.io/custom-rdma.capable: "true"
  resourceName: roce_sw2
  priority: 99
  mtu: 9000
  numVfs: 8
  nicSelector:
    pfNames: [ "enp18s0" ]
  deviceType: netdevice
  isRdma: true


---
apiVersion: sriovnetwork.openshift.io/v1
kind: SriovNetworkNodePolicy
metadata:
  name: mlnxnics-sw3
  namespace: network-operator
spec:
  nodeSelector:
    feature.node.kubernetes.io/custom-rdma.capable: "true"
  resourceName: roce_sw3
  priority: 99
  mtu: 9000
  numVfs: 8
  nicSelector:
    pfNames: [ "enp75s0" ]
  deviceType: netdevice
  isRdma: true

---
apiVersion: sriovnetwork.openshift.io/v1
kind: SriovNetworkNodePolicy
metadata:
  name: mlnxnics-sw4
  namespace: network-operator
spec:
  nodeSelector:
    feature.node.kubernetes.io/custom-rdma.capable: "true"
  resourceName: roce_sw4
  priority: 99
  mtu: 9000
  numVfs: 8
  nicSelector:
    pfNames: [ "enp84s0" ]
  deviceType: netdevice
  isRdma: true

---
apiVersion: sriovnetwork.openshift.io/v1
kind: SriovNetworkNodePolicy
metadata:
  name: mlnxnics-sw5
  namespace: network-operator
spec:
  nodeSelector:
    feature.node.kubernetes.io/custom-rdma.capable: "true"
  resourceName: roce_sw5
  priority: 99
  mtu: 9000
  numVfs: 8
  nicSelector:
    pfNames: [ "enp141s0" ]
  deviceType: netdevice
  isRdma: true

---
apiVersion: sriovnetwork.openshift.io/v1
kind: SriovNetworkNodePolicy
metadata:
  name: mlnxnics-sw6
  namespace: network-operator
spec:
  nodeSelector:
    feature.node.kubernetes.io/custom-rdma.capable: "true"
  resourceName: roce_sw6
  priority: 99
  mtu: 9000
  numVfs: 8
  nicSelector:
    pfNames: [ "enp148s0" ]
  deviceType: netdevice
  isRdma: true

---
apiVersion: sriovnetwork.openshift.io/v1
kind: SriovNetworkNodePolicy
metadata:
  name: mlnxnics-sw7
  namespace: network-operator
spec:
  nodeSelector:
    feature.node.kubernetes.io/custom-rdma.capable: "true"
  resourceName: roce_sw7
  priority: 99
  mtu: 9000
  numVfs: 8
  nicSelector:
    pfNames: [ "enp186s0" ]
  deviceType: netdevice
  isRdma: true

---
apiVersion: sriovnetwork.openshift.io/v1
kind: SriovNetworkNodePolicy
metadata:
  name: mlnxnics-sw8
  namespace: network-operator
spec:
  nodeSelector:
    feature.node.kubernetes.io/custom-rdma.capable: "true"
  resourceName: roce_sw8
  priority: 99
  mtu: 9000
  numVfs: 8
  nicSelector:
    pfNames: [ "enp204s0" ]
  deviceType: netdevice
  isRdma: true
Deploy policy.yaml:
            kubectl apply -f policy.yaml
sriovnetworknodepolicy.sriovnetwork.openshift.io/mlnxnics-sw1 created
sriovnetworknodepolicy.sriovnetwork.openshift.io/mlnxnics-sw2 created
sriovnetworknodepolicy.sriovnetwork.openshift.io/mlnxnics-sw3 created
sriovnetworknodepolicy.sriovnetwork.openshift.io/mlnxnics-sw4 created
sriovnetworknodepolicy.sriovnetwork.openshift.io/mlnxnics-sw5 created
sriovnetworknodepolicy.sriovnetwork.openshift.io/mlnxnics-sw6 created
sriovnetworknodepolicy.sriovnetwork.openshift.io/mlnxnics-sw7 created
sriovnetworknodepolicy.sriovnetwork.openshift.io/mlnxnics-sw8 created
This step takes a while. This depends on the amount of K8s Worker Nodes to apply the configuration, and the number of VFs for each selected network interface.
Create an SriovNetwork CR for each chosen network interface - network.yaml file which refers to the 'resourceName' defined in SriovNetworkNodePolicy (in this example, reference the roce_swX resources and set the CIDR range for the high-speed network):
network.yaml
            apiVersion: sriovnetwork.openshift.io/v1
kind: SriovNetwork
metadata:
  name: network-sw1
  namespace: network-operator
spec:
  ipam: |
    {
      "datastore": "kubernetes",
      "kubernetes": {
        "kubeconfig": "/etc/cni/net.d/whereabouts.d/whereabouts.kubeconfig"
      },
      "log_file": "/tmp/whereabouts.log",
      "log_level": "debug",
      "type": "whereabouts",
      "range": "192.168.101.0/24"
    }
  networkNamespace: default
  resourceName: roce_sw1
  vlan: 11

---
apiVersion: sriovnetwork.openshift.io/v1
kind: SriovNetwork
metadata:
  name: network-sw2
  namespace: network-operator
spec:
  ipam: |
    {
      "datastore": "kubernetes",
      "kubernetes": {
        "kubeconfig": "/etc/cni/net.d/whereabouts.d/whereabouts.kubeconfig"
      },
      "log_file": "/tmp/whereabouts.log",
      "log_level": "debug",
      "type": "whereabouts",
      "range": "192.168.102.0/24"
    }
  networkNamespace: default
  resourceName: roce_sw2
  vlan: 12

---
apiVersion: sriovnetwork.openshift.io/v1
kind: SriovNetwork
metadata:
  name: network-sw3
  namespace: network-operator
spec:
  ipam: |
    {
      "datastore": "kubernetes",
      "kubernetes": {
        "kubeconfig": "/etc/cni/net.d/whereabouts.d/whereabouts.kubeconfig"
      },
      "log_file": "/tmp/whereabouts.log",
      "log_level": "debug",
      "type": "whereabouts",
      "range": "192.168.103.0/24"
    }
  networkNamespace: default
  resourceName: roce_sw3
  vlan: 13

---
apiVersion: sriovnetwork.openshift.io/v1
kind: SriovNetwork
metadata:
  name: network-sw4
  namespace: network-operator
spec:
  ipam: |
    {
      "datastore": "kubernetes",
      "kubernetes": {
        "kubeconfig": "/etc/cni/net.d/whereabouts.d/whereabouts.kubeconfig"
      },
      "log_file": "/tmp/whereabouts.log",
      "log_level": "debug",
      "type": "whereabouts",
      "range": "192.168.104.0/24"
    }
  networkNamespace: default
  resourceName: roce_sw4
  vlan: 14

---
apiVersion: sriovnetwork.openshift.io/v1
kind: SriovNetwork
metadata:
  name: network-sw5
  namespace: network-operator
spec:
  ipam: |
    {
      "datastore": "kubernetes",
      "kubernetes": {
        "kubeconfig": "/etc/cni/net.d/whereabouts.d/whereabouts.kubeconfig"
      },
      "log_file": "/tmp/whereabouts.log",
      "log_level": "debug",
      "type": "whereabouts",
      "range": "192.168.105.0/24"
    }
  networkNamespace: default
  resourceName: roce_sw5
  vlan: 15

---
apiVersion: sriovnetwork.openshift.io/v1
kind: SriovNetwork
metadata:
  name: network-sw6
  namespace: network-operator
spec:
  ipam: |
    {
      "datastore": "kubernetes",
      "kubernetes": {
        "kubeconfig": "/etc/cni/net.d/whereabouts.d/whereabouts.kubeconfig"
      },
      "log_file": "/tmp/whereabouts.log",
      "log_level": "debug",
      "type": "whereabouts",
      "range": "192.168.106.0/24"
    }
  networkNamespace: default
  resourceName: roce_sw6
  vlan: 16

---
apiVersion: sriovnetwork.openshift.io/v1
kind: SriovNetwork
metadata:
  name: network-sw7
  namespace: network-operator
spec:
  ipam: |
    {
      "datastore": "kubernetes",
      "kubernetes": {
        "kubeconfig": "/etc/cni/net.d/whereabouts.d/whereabouts.kubeconfig"
      },
      "log_file": "/tmp/whereabouts.log",
      "log_level": "debug",
      "type": "whereabouts",
      "range": "192.168.107.0/24"
    }
  networkNamespace: default
  resourceName: roce_sw7
  vlan: 17

---
apiVersion: sriovnetwork.openshift.io/v1
kind: SriovNetwork
metadata:
  name: network-sw8
  namespace: network-operator
spec:
  ipam: |
    {
      "datastore": "kubernetes",
      "kubernetes": {
        "kubeconfig": "/etc/cni/net.d/whereabouts.d/whereabouts.kubeconfig"
      },
      "log_file": "/tmp/whereabouts.log",
      "log_level": "debug",
      "type": "whereabouts",
      "range": "192.168.108.0/24"
    }
  networkNamespace: default
  resourceName: roce_sw8
  vlan: 18
Deploy network.yaml:
            kubectl apply -f network.yaml
sriovnetwork.sriovnetwork.openshift.io/network-sw1 created
sriovnetwork.sriovnetwork.openshift.io/network-sw2 created
sriovnetwork.sriovnetwork.openshift.io/network-sw3 created
sriovnetwork.sriovnetwork.openshift.io/network-sw4 created
sriovnetwork.sriovnetwork.openshift.io/network-sw5 created
sriovnetwork.sriovnetwork.openshift.io/network-sw6 created
sriovnetwork.sriovnetwork.openshift.io/network-sw7 created
sriovnetwork.sriovnetwork.openshift.io/network-sw8 created
Validating the Deployment
Check the deployed network:
            kubectl get network-attachment-definitions.k8s.cni.cncf.io
NAME          AGE
network-sw1   33m
network-sw2   33m
network-sw3   33m
network-sw4   33m
network-sw5   33m
network-sw6   33m
network-sw7   33m
network-sw8   33m
Check the Worker Node resources:
            kubectl get node clx-host-081 -o json | jq '.status.allocatable'
{
  "cpu": "255900m",
  "ephemeral-storage": "1698708802820",
  "hugepages-1Gi": "0",
  "hugepages-2Mi": "0",
  "memory": "1056271380Ki",
  "nvidia.com/gpu": "8",
  "nvidia.com/roce_sw1": "8",
  "nvidia.com/roce_sw2": "8",
  "nvidia.com/roce_sw3": "8",
  "nvidia.com/roce_sw4": "8",
  "nvidia.com/roce_sw5": "8",
  "nvidia.com/roce_sw6": "8",
  "nvidia.com/roce_sw7": "8",
  "nvidia.com/roce_sw8": "8",
  "pods": "110"
}

kubectl get node clx-host-082 -o json | jq '.status.allocatable'
{
  "cpu": "255900m",
  "ephemeral-storage": "1698708802820",
  "hugepages-1Gi": "0",
  "hugepages-2Mi": "0",
  "memory": "1056271428Ki",
  "nvidia.com/gpu": "8",
  "nvidia.com/roce_sw1": "8",
  "nvidia.com/roce_sw2": "8",
  "nvidia.com/roce_sw3": "8",
  "nvidia.com/roce_sw4": "8",
  "nvidia.com/roce_sw5": "8",
  "nvidia.com/roce_sw6": "8",
  "nvidia.com/roce_sw7": "8",
  "nvidia.com/roce_sw8": "8",
  "pods": "110"
}

kubectl get node clx-host-083 -o json | jq '.status.allocatable'
{
  "cpu": "255900m",
  "ephemeral-storage": "1698708802820",
  "hugepages-1Gi": "0",
  "hugepages-2Mi": "0",
  "memory": "1056275120Ki",
  "nvidia.com/gpu": "8",
  "nvidia.com/roce_sw1": "8",
  "nvidia.com/roce_sw2": "8",
  "nvidia.com/roce_sw3": "8",
  "nvidia.com/roce_sw4": "8",
  "nvidia.com/roce_sw5": "8",
  "nvidia.com/roce_sw6": "8",
  "nvidia.com/roce_sw7": "8",
  "nvidia.com/roce_sw8": "8",
  "pods": "110"
}

kubectl get node clx-host-084 -o json | jq '.status.allocatable'
{
  "cpu": "255900m",
  "ephemeral-storage": "1698708802820",
  "hugepages-1Gi": "0",
  "hugepages-2Mi": "0",
  "memory": "1056270348Ki",
  "nvidia.com/gpu": "8",
  "nvidia.com/roce_sw1": "8",
  "nvidia.com/roce_sw2": "8",
  "nvidia.com/roce_sw3": "8",
  "nvidia.com/roce_sw4": "8",
  "nvidia.com/roce_sw5": "8",
  "nvidia.com/roce_sw6": "8",
  "nvidia.com/roce_sw7": "8",
  "nvidia.com/roce_sw8": "8",
  "pods": "110"
}
Run synthetic RDMA benchmark tests with ib_write_bw between two pods that are running on different K8s Worker Nodes.
This step includes the following:
Create a container image and push it your repository
Deploy K8s deployment apps
Run test
RDMA benchmark Dockerfile:
            FROM ubuntu:20.04
# Ubuntu 20.04 docker container with inbox Mellanox drivers

# LABEL about the custom image
LABEL maintainer=vitaliyra@nvidia.com
LABEL description="This is custom Container Image with inbox perftest package."

WORKDIR /tmp/
ENV DEBIAN_FRONTEND=noninteractive
RUN apt-get clean -y && apt-get -y update && apt-get install -y apt-utils udev vim bash && apt-get -y upgrade
RUN apt-get install -y iproute2 rdma-core libibmad5 ibutils ibverbs-utils infiniband-diags perftest \
            mstflint strace iputils-ping
RUN ln -fs /usr/share/zoneinfo/America/New_York /etc/localtime
RUN dpkg-reconfigure --frontend noninteractive tzdata && apt-get clean all -y
CMD bash
Please use your favorite container building tools (docker, podman, etc.) to create a container image from Dockerfile for use in the below Deployment.
After creating the image, push it to the container registry.
Create a sample deployment test-deployment.yaml (container image should include InfiniBand userspace drivers and performance tools):
test-deployment.yaml
            apiVersion: apps/v1
kind: Deployment
metadata:
  name: mlnx-inbox-pod
  labels:
    app: sriov
spec:
  replicas: 2
  selector:
    matchLabels:
      app: sriov
  template:
    metadata:
      labels:
        app: sriov
      annotations:
        k8s.v1.cni.cncf.io/networks: network-sw1
    spec:
      containers:
      - image: < Container image >
        name: mlnx-inbox-ctr
        securityContext:
          capabilities:
            add: [ "IPC_LOCK" ]
        resources:
          requests:
            cpu: 4
            nvidia.com/roce_sw1: 1
          limits:
            cpu: 4
            nvidia.com/roce_sw1: 1
        command:
        - sh
        - -c
        - sleep inf
Deploy the sample deployment.
            kubectl apply -f test-deployment.yaml
deployment.apps/mlnx-inbox-pod created

kubectl get pod -o wide
NAME                              READY   STATUS    RESTARTS   AGE     IP              NODE           NOMINATED NODE   READINESS GATES
mlnx-inbox-pod-6586dcc7b9-2b9nm   1/1     Running   0          2m14s   10.233.112.35   clx-host-084   <none>           <none>
mlnx-inbox-pod-6586dcc7b9-xs7wx   1/1     Running   0          2m14s   10.233.111.34   clx-host-081   <none>           <none>
Check available network interfaces in each POD.
            ## First POD
kubectl exec -it mlnx-inbox-pod-6586dcc7b9-2b9nm -- ip a s
1: lo: <LOOPBACK,UP,LOWER_UP> mtu 65536 qdisc noqueue state UNKNOWN group default qlen 1000
    link/loopback 00:00:00:00:00:00 brd 00:00:00:00:00:00
    inet 127.0.0.1/8 scope host lo
       valid_lft forever preferred_lft forever
    inet6 ::1/128 scope host
       valid_lft forever preferred_lft forever
2: tunl0@NONE: <NOARP> mtu 1480 qdisc noop state DOWN group default qlen 1000
    link/ipip 0.0.0.0 brd 0.0.0.0
4: eth0@if95: <BROADCAST,MULTICAST,UP,LOWER_UP> mtu 1480 qdisc noqueue state UP group default
    link/ether 26:1f:c8:a8:e2:8d brd ff:ff:ff:ff:ff:ff link-netnsid 0
    inet 10.233.112.35/32 brd 10.233.112.35 scope global eth0
       valid_lft forever preferred_lft forever
    inet6 fe80::241f:c8ff:fea8:e28d/64 scope link
       valid_lft forever preferred_lft forever
36: net1: <BROADCAST,MULTICAST,UP,LOWER_UP> mtu 9000 qdisc mq state UP group default qlen 1000
    link/ether e6:5a:bd:85:35:15 brd ff:ff:ff:ff:ff:ff
    inet 192.168.101.1/24 brd 192.168.101.255 scope global net1
       valid_lft forever preferred_lft forever
    inet6 fe80::e45a:bdff:fe85:3515/64 scope link
       valid_lft forever preferred_lft forever

## Second POD
kubectl exec -it mlnx-inbox-pod-6586dcc7b9-xs7wx -- ip a s
1: lo: <LOOPBACK,UP,LOWER_UP> mtu 65536 qdisc noqueue state UNKNOWN group default qlen 1000
    link/loopback 00:00:00:00:00:00 brd 00:00:00:00:00:00
    inet 127.0.0.1/8 scope host lo
       valid_lft forever preferred_lft forever
    inet6 ::1/128 scope host
       valid_lft forever preferred_lft forever
2: tunl0@NONE: <NOARP> mtu 1480 qdisc noop state DOWN group default qlen 1000
    link/ipip 0.0.0.0 brd 0.0.0.0
4: eth0@if94: <BROADCAST,MULTICAST,UP,LOWER_UP> mtu 1480 qdisc noqueue state UP group default
    link/ether 52:76:f4:e7:a2:9b brd ff:ff:ff:ff:ff:ff link-netnsid 0
    inet 10.233.111.34/32 brd 10.233.111.34 scope global eth0
       valid_lft forever preferred_lft forever
    inet6 fe80::5076:f4ff:fee7:a29b/64 scope link
       valid_lft forever preferred_lft forever
28: net1: <BROADCAST,MULTICAST,UP,LOWER_UP> mtu 9000 qdisc mq state UP group default qlen 1000
    link/ether 72:72:6d:1d:84:5a brd ff:ff:ff:ff:ff:ff
    inet 192.168.101.2/24 brd 192.168.101.255 scope global net1
       valid_lft forever preferred_lft forever
    inet6 fe80::7072:6dff:fe1d:845a/64 scope link
       valid_lft forever preferred_lft forever
Run synthetic RDMA benchmark tests.
|
Server |
ib_write_bw -a -F -d $IB_DEV_NAME --report_gbits |
|
Client |
ib_write_bw -a -F $SERVER_IP -d $IB_DEV_NAME --report_gbits |
Please console sessions to each POD - one for the server apps side, and the second for the client apps side.
In a first console (on the server side), run the following commands:
            kubectl exec -it mlnx-inbox-pod-6586dcc7b9-2b9nm -- bash
root@mlnx-inbox-pod-6586dcc7b9-2b9nm:/tmp# rdma link | grep net1
link mlx5_13/1 state ACTIVE physical_state LINK_UP netdev net1
root@mlnx-inbox-pod-6586dcc7b9-2b9nm:/tmp# ib_write_bw -a -F -d mlx5_13 --report_gbits

************************************
* Waiting for client to connect... *
************************************
---------------------------------------------------------------------------------------
                    RDMA_Write BW Test
 Dual-port       : OFF		Device         : mlx5_13
 Number of qps   : 1		Transport type : IB
 Connection type : RC		Using SRQ      : OFF
 CQ Moderation   : 100
 Mtu             : 4096[B]
 Link type       : Ethernet
 GID index       : 2
 Max inline data : 0[B]
 rdma_cm QPs	 : OFF
 Data ex. method : Ethernet
---------------------------------------------------------------------------------------
 local address: LID 0000 QPN 0x0069 PSN 0xaa30eb RKey 0x010e00 VAddr 0x007fb3a9d52000
 GID: 00:00:00:00:00:00:00:00:00:00:255:255:192:168:101:01
 remote address: LID 0000 QPN 0x00e9 PSN 0x32bd22 RKey 0x030e00 VAddr 0x007ff245361000
 GID: 00:00:00:00:00:00:00:00:00:00:255:255:192:168:101:02
---------------------------------------------------------------------------------------
 #bytes     #iterations    BW peak[Gb/sec]    BW average[Gb/sec]   MsgRate[Mpps]
 8388608    5000             185.70             185.44 		   0.002763
---------------------------------------------------------------------------------------
In a second console (on the client side ) , run the following commands:
            root@node1:~/YAMLs/8port/example# kubectl exec -it mlnx-inbox-pod-6586dcc7b9-xs7wx -- bash
root@mlnx-inbox-pod-6586dcc7b9-xs7wx:/tmp# rdma link | grep net1
link mlx5_15/1 state ACTIVE physical_state LINK_UP netdev net1
root@mlnx-inbox-pod-6586dcc7b9-xs7wx:/tmp# ib_write_bw -a -F 192.168.101.1 -d mlx5_15 --report_gbits
---------------------------------------------------------------------------------------
                    RDMA_Write BW Test
 Dual-port       : OFF		Device         : mlx5_15
 Number of qps   : 1		Transport type : IB
 Connection type : RC		Using SRQ      : OFF
 TX depth        : 128
 CQ Moderation   : 100
 Mtu             : 4096[B]
 Link type       : Ethernet
 GID index       : 2
 Max inline data : 0[B]
 rdma_cm QPs	 : OFF
 Data ex. method : Ethernet
---------------------------------------------------------------------------------------
 local address: LID 0000 QPN 0x00e9 PSN 0x32bd22 RKey 0x030e00 VAddr 0x007ff245361000
 GID: 00:00:00:00:00:00:00:00:00:00:255:255:192:168:101:02
 remote address: LID 0000 QPN 0x0069 PSN 0xaa30eb RKey 0x010e00 VAddr 0x007fb3a9d52000
 GID: 00:00:00:00:00:00:00:00:00:00:255:255:192:168:101:01
---------------------------------------------------------------------------------------
 #bytes     #iterations    BW peak[Gb/sec]    BW average[Gb/sec]   MsgRate[Mpps]
 2          5000           0.044858            0.044364            2.772772
 4          5000           0.089829            0.089793            2.806042
 8          5000             0.18               0.18   		   2.788396
 16         5000             0.36               0.36   		   2.801705
 32         5000             0.72               0.72   		   2.801529
 64         5000             1.10               1.05   		   2.056373
 128        5000             2.17               2.16   		   2.107263
 256        5000             4.32               4.32   		   2.110149
 512        5000             8.65               8.64   		   2.110166
 1024       5000             17.29              17.24  		   2.104959
 2048       5000             34.32              34.23  		   2.089381
 4096       5000             68.14              65.74  		   2.006262
 8192       5000             170.15             139.82 		   2.133420
 16384      5000             188.33             169.84 		   1.295812
 32768      5000             190.95             180.36 		   0.688024
 65536      5000             191.23             181.41 		   0.327763
 131072     5000             192.34             190.78 		   0.181938
 262144     5000             191.26             185.41 		   0.083644
 524288     5000             191.15             183.44 		   0.043735
 1048576    5000             190.31             187.27 		   0.022325
 2097152    5000             187.04             185.88 		   0.011079
 4194304    5000             189.42             185.82 		   0.005538
 8388608    5000             185.70             185.44 		   0.002763
---------------------------------------------------------------------------------------
Kubeflow Training Operator
Kubeflow is a machine learning toolkit for Kubernetes.
Kubeflow training operators are part of Kubeflow, and a group of Kubernetes operators that add support to Kubeflow for distributed training of Machine Learning models using different frameworks.
The training operator provides Kubernetes CR that makes it easy to run distributed or non-distributed TensorFlow/PyTorch/Apache MXNet/XGBoost/MPI jobs on Kubernetes.
In the example below we deploy the Kubeflow training operators stable release v1.4.0:
            kubectl apply -k "github.com/kubeflow/training-operator/manifests/overlays/standalone?ref=v1.4.0"
namespace/kubeflow created
customresourcedefinition.apiextensions.k8s.io/mpijobs.kubeflow.org created
customresourcedefinition.apiextensions.k8s.io/mxjobs.kubeflow.org created
customresourcedefinition.apiextensions.k8s.io/pytorchjobs.kubeflow.org created
customresourcedefinition.apiextensions.k8s.io/tfjobs.kubeflow.org created
customresourcedefinition.apiextensions.k8s.io/xgboostjobs.kubeflow.org created
serviceaccount/training-operator created
clusterrole.rbac.authorization.k8s.io/training-operator created
clusterrolebinding.rbac.authorization.k8s.io/training-operator created
service/training-operator created
deployment.apps/training-operator created
Appendix
Job Testing Results
Below are Dockerfile and MPIJob examples with different network configurations.
Dockerfile
Dockerfile example for using MPIJob:
            FROM nvcr.io/nvidia/tensorflow:21.10-tf1-py3
RUN apt-get update && apt-get install -y --no-install-recommends openssh-client openssh-server && \
    mkdir -p /var/run/sshd

# Allow OpenSSH to talk to containers without asking for confirmation
# by disabling StrictHostKeyChecking.
# mpi-operator mounts the .ssh folder from a Secret. For that to work, we need
# to disable UserKnownHostsFile to avoid write permissions.
# Disabling StrictModes avoids directory and files read permission checks.

RUN sed -i 's/[ #]\(.*StrictHostKeyChecking \).*/ \1no/g' /etc/ssh/ssh_config && \
    echo "    UserKnownHostsFile /dev/null" >> /etc/ssh/ssh_config && \
    sed -i 's/#\(StrictModes \).*/\1no/g' /etc/ssh/sshd_config

RUN mkdir /tensorflow
WORKDIR "/tensorflow"
RUN git clone https://github.com/tensorflow/benchmarks
WORKDIR "/tensorflow/benchmarks"

CMD ["/bin/bash"]
This Dockerfile is based on the TensorFlow NGC Container image. The TensorFlow NGC Container is optimized for GPU acceleration and contains a validated set of libraries that enable and optimize GPU performance. This container may also contain modifications to the TensorFlow source code in order to maximize performance and compatibility. This container also contains software for accelerating ETL (DALI , RAPIDS ), training ( cuDNN , NCCL ), and inference ( TensorRT ) workloads.
For supported versions, see the Framework Containers Support Matrix and the NVIDIA Container Toolkit Documentation.
Please use your favorite container building tools (docker, podman, etc.) to create a container image from Dockerfile for use in the below deployment.
After creating the image, push it to the container registry.
MPIJob Examples
Below is an MPIJob example with network configuration over K8s management network:
            # TF MPIJob over MGMT network
apiVersion: kubeflow.org/v1
kind: MPIJob
metadata:
  name: tensorflow-benchmarks
spec:
  slotsPerWorker: 8
  runPolicy:
    cleanPodPolicy: Running
  mpiReplicaSpecs:
    Launcher:
      replicas: 1
      template:
        spec:
          containers:
          - image: < Container image >
            name: tensorflow-benchmarks
            command:
              - mpirun
              - --allow-run-as-root
              - -np
              - "32"
              - -bind-to
              - none
              - -map-by
              - slot
              - -x
              - NCCL_DEBUG=INFO
              - -x
              - LD_LIBRARY_PATH
              - -x
              - PATH
              - -mca
              - pml
              - ob1
              - -mca
              - btl
              - ^openib
              - python
              - scripts/tf_cnn_benchmarks/tf_cnn_benchmarks.py
              - --batch_size=64
              - --model=resnet152
              - --variable_update=horovod
              - --xla=true
              - --use_fp16=true
    Worker:
      replicas: 4
      template:
        spec:
          containers:
          - image: < Container image >
            name: tensorflow-benchmarks
            resources:
              limits:
                nvidia.com/gpu: 8
The below is an MPIJob example with network configuration over secondary K8s network:
            # TF MPIJob over high-perf TCP network
apiVersion: kubeflow.org/v1
kind: MPIJob
metadata:
  name: tensorflow-benchmarks
spec:
  slotsPerWorker: 8
  runPolicy:
    cleanPodPolicy: Running
  mpiReplicaSpecs:
    Launcher:
      replicas: 1
      template:
        spec:
          containers:
          - image: < Container image >
            name: tensorflow-benchmarks
            command:
              - mpirun
              - --allow-run-as-root
              - -np
              - "32"
              - -bind-to
              - none
              - -map-by
              - slot
              - -x
              - NCCL_DEBUG=INFO
              - -x
              - NCCL_IB_DISABLE=1
              - -x
              - NCCL_NET_GDR_LEVEL=0
              - -x
              - NCCL_NET_PLUGIN=none
              - -x
              - LD_LIBRARY_PATH
              - -x
              - PATH
              - -mca
              - pml
              - ob1
              - -mca
              - btl
              - ^openib
              - python
              - scripts/tf_cnn_benchmarks/tf_cnn_benchmarks.py
              - --batch_size=64
              - --model=resnet152
              - --variable_update=horovod
              - --xla=true
              - --use_fp16=true
    Worker:
      replicas: 4
      template:
        metadata:
          annotations:
            k8s.v1.cni.cncf.io/networks: network-sw1,network-sw2,network-sw3,network-sw4,network-sw5,network-sw6,network-sw7,network-sw8
        spec:
          containers:
          - image: < Container image >
            name: tensorflow-benchmarks
            resources:
              limits:
                nvidia.com/gpu: 8
                nvidia.com/roce_sw1: 1
                nvidia.com/roce_sw2: 1
                nvidia.com/roce_sw3: 1
                nvidia.com/roce_sw4: 1
                nvidia.com/roce_sw5: 1
                nvidia.com/roce_sw6: 1
                nvidia.com/roce_sw7: 1
                nvidia.com/roce_sw8: 1
The below is an MPIJob example with network configuration over RDMA enabled secondary K8s network:
            # TF MPIJob over RDMA network
apiVersion: kubeflow.org/v1
kind: MPIJob
metadata:
  name: tensorflow-benchmarks
spec:
  slotsPerWorker: 8
  runPolicy:
    cleanPodPolicy: Running
  mpiReplicaSpecs:
    Launcher:
      replicas: 1
      template:
        spec:
          containers:
          - image: < Container image >
            name: tensorflow-benchmarks
            command:
              - mpirun
              - --allow-run-as-root
              - -np
              - "32"
              - -bind-to
              - none
              - -map-by
              - slot
              - -x
              - NCCL_DEBUG=INFO
              - -x
              - NCCL_IB_DISABLE=0
              - -x
              - NCCL_NET_GDR_LEVEL=2
              - -x
              - TF_ALLOW_IOLIBS=1
              - -x
              - LD_LIBRARY_PATH
              - -x
              - PATH
              - -mca
              - pml
              - ob1
              - -mca
              - btl
              - ^openib
              - python
              - scripts/tf_cnn_benchmarks/tf_cnn_benchmarks.py
              - --batch_size=64
              - --model=resnet152
              - --variable_update=horovod
              - --xla=true
              - --use_fp16=true
    Worker:
      replicas: 4
      template:
        metadata:
          annotations:
            k8s.v1.cni.cncf.io/networks: network-sw1,network-sw2,network-sw3,network-sw4,network-sw5,network-sw6,network-sw7,network-sw8
        spec:
          containers:
          - image: < Container image >
            name: tensorflow-benchmarks
            securityContext:
              capabilities:
                add: [ "IPC_LOCK" ]
            resources:
              limits:
                nvidia.com/gpu: 8
                nvidia.com/roce_sw1: 1
                nvidia.com/roce_sw2: 1
                nvidia.com/roce_sw3: 1
                nvidia.com/roce_sw4: 1
                nvidia.com/roce_sw5: 1
                nvidia.com/roce_sw6: 1
                nvidia.com/roce_sw7: 1
                nvidia.com/roce_sw8: 1
Test Results

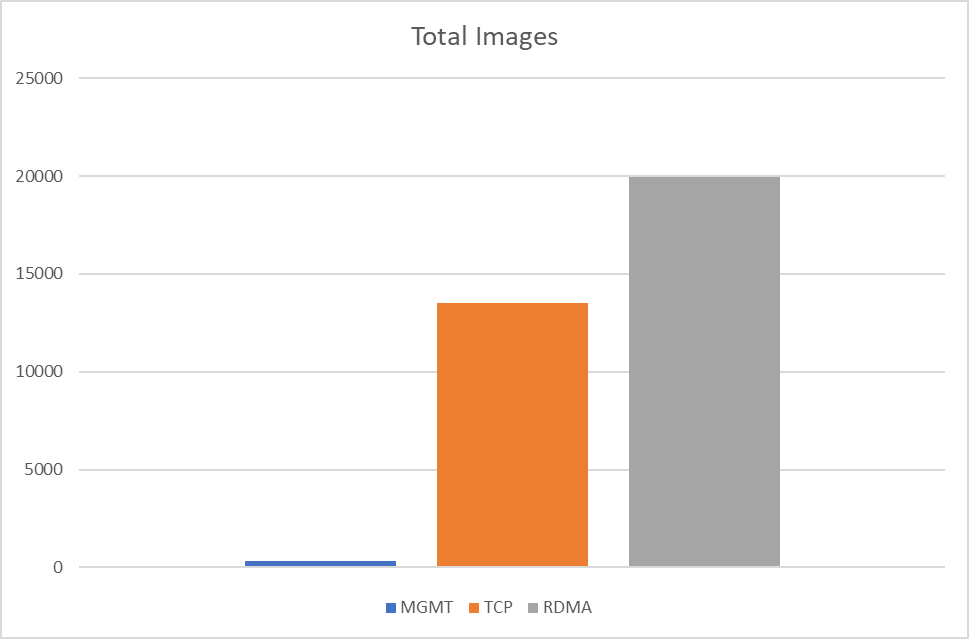
The performance results listed in this document are indicative and should not be considered as formal performance targets for NVIDIA products.
Authors

|
Vitaliy Razinkov Over the past few years, Vitaliy Razinkov has been working as a Solutions Architect on the NVIDIA Networking team, responsible for complex Kubernetes/OpenShift and Microsoft's leading solutions, research and design. He previously spent more than 25 years in senior positions at several companies. Vitaliy has written several reference designs guides on Microsoft technologies, RoCE/RDMA accelerated machine learning in Kubernetes/OpenShift, and container solutions, all of which are available on the NVIDIA Networking Documentation website. |
Related Documents