RDG for Accelerating AI Workloads in Red Hat OCP with NVIDIA DGX A100 Servers and NVIDIA InfiniBand Fabric
Created Oct 24, 2022.
Scope
The following Reference Deployment Guide (RDG) demonstrates the deployment process of a Red Hat OpenShift Container Platform (RH OCP v4.10.x) over NVIDA DGX A100 servers and NVIDIA HDR InfiniBand fabric for accelerated AI-applications.
Abbreviations and Acronyms
|
Term |
Definition |
Term |
Definition |
|
AI |
Artificial Intelligence |
ML |
Machine Learning |
|
CNI |
Container Network Interface |
NFD |
Node Feature Discovery |
|
CR |
Custom Resources |
NCCL |
NVIDIA Collective Communication Library |
|
CRD |
Custom Resources Definition |
OCI |
Open Container Initiative |
|
CRI |
Container Runtime Interface |
OCP |
OpenShift Container Platform |
|
DHCP |
Dynamic Host Configuration Protocol |
PF |
Physical Function |
|
DNS |
Domain Name System |
QSG |
Quick Start Guide |
|
DL |
Deep Learning |
RDG |
Reference Deployment Guide |
|
DP |
Device Plugin |
RDMA |
Remote Direct Memory Access |
|
HDR |
InfiniBand High Data Rate (200Gb/s) |
SR-IOV |
Single Root Input Output Virtualization |
|
IPAM |
IP Address Management |
TF |
TensorFlow |
|
K8s |
Kubernetes |
VF |
Virtual Function |
Introduction
Preparing a Red Hat OpenShift Container Platform (OCP) infrastructure to run AI workloads efficiently is challenging.
This document provides a complete reference deployment guide for such a system including technology overview, design, component selection, deployment steps and AI workload examples. The solution will be deployed on NVIDIA DGX A100 servers for OCP worker nodes and on X86 standard servers for OCP control plane nodes. The NVIDIA end-to-end HDR (200Gb/s) InfiniBand fabric is used to handle the workload networking needs, while a 100Gb/s Ethernet network is used as a Deployment/Management network.
In this guide, we use the OpenShift operators, the NVIDIA GPU Operator and the NVIDIA Network Operator, which are responsible for deploying and configuring GPU and Network components in the OCP cluster. These components accelerate AI tasks using CUDA, RDMA and GPUDirect technologies.
A Greenfield deployment is assumed for this guide.
References
Solution Architecture
Key Components and Technologies
- NVIDIA DGX™ A100 is the universal system for all AI workloads, offering unprecedented compute density, performance, and flexibility in the world’s first 5 petaFLOPS AI system. NVIDIA DGX A100 features the world’s most advanced accelerator, the NVIDIA A100 Tensor Core GPU, enabling enterprises to consolidate training, inference, and analytics into a unified, easy-to-deploy AI infrastructure that includes direct access to NVIDIA AI experts.
NVIDIA ConnectX InfiniBand adapters provide ultra-low latency, extreme throughput, and innovative NVIDIA In-Network Computing engines to deliver the acceleration, scalability, and feature-rich technology needed for today's modern workloads.
The NVIDIA® LinkX® product family of cables and transceivers provides the industry’s most complete line of 10, 25, 40, 50, 100, 200, and 400GbE in Ethernet and 100, 200 and 400Gb/s InfiniBand products for Cloud, HPC, hyperscale, Enterprise, telco, storage and artificial intelligence, data center applications.
NVIDIA Quantum InfiniBand switch systems deliver the highest performance and port density available. Innovative capabilities such as NVIDIA Scalable Hierarchical Aggregation and Reduction Protocol (SHARP)™ and advanced management features such as self-healing network capabilities, quality of service, enhanced virtual lane mapping, and NVIDIA In-Network Computing acceleration engines provide a performance boost for industrial, AI, and scientific applications.
Red Hat OpenShift Container Platform is an enterprise-ready Kubernetes container platform with full-stack automated operations to manage hybrid cloud and multi-cloud deployments. It helps you deliver applications faster and makes developers more productive. Automate life-cycle management to get increased security, tailored operations solutions, easy-to-manage cluster operations, and application portability.
The NVIDIA GPU Operator uses the operator framework within Kubernetes to automate the management of all NVIDIA software components needed to provision GPU. These components include the NVIDIA drivers (to enable CUDA), Kubernetes device plugin for GPUs, the NVIDIA Container Runtime, automatic node labelling, DCGM-based monitoring, and more.
CUDA® is a parallel computing platform and programming model developed by NVIDIA for general computing on graphical processing units (GPUs). With CUDA, developers can dramatically speed up computing applications by harnessing the power of GPUs. In GPU-accelerated applications, the sequential part of the workload runs on the CPU – which is optimized for single-threaded performance – while the compute-intensive portion of the application runs on thousands of GPU cores in parallel.
An analog to the NVIDIA GPU Operator, the NVIDIA Network Operator simplifies scale-out network design for Kubernetes by automating aspects of network deployment and configuration that would otherwise require manual work. It loads the required drivers, libraries, device plugins, and CNIs on any cluster node with an NVIDIA network interface. Paired with the NVIDIA GPU Operator, the Network Operator enables GPUDirect RDMA, a key technology that accelerates cloud-native AI workloads by orders of magnitude. The NVIDIA Network Operator uses Kubernetes CRD and the Operator Framework to provision the host software needed for enabling accelerated networking.
RDMA is a technology that allows computers in a network to exchange data without involving the processor, cache or operating system of either computer.
Like locally based DMA, RDMA improves throughput and performance and frees up compute resources.
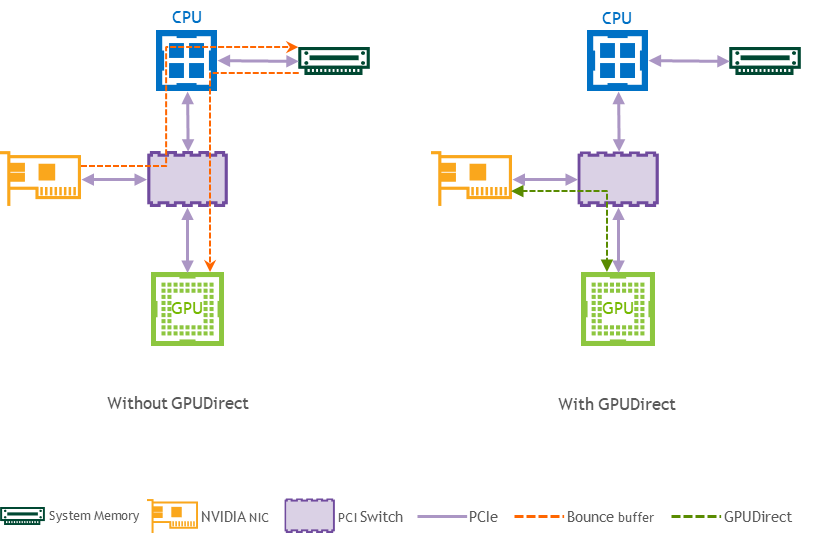
GPUDirect (GDR) RDMA provides a direct P2P (Peer-to-Peer) data path between the GPU memory directly to and from NVIDIA HCA devices. This reduces GPU-to-GPU communication latency and completely offloads the CPU, removing it from all GPU-to-GPU communications across the network.
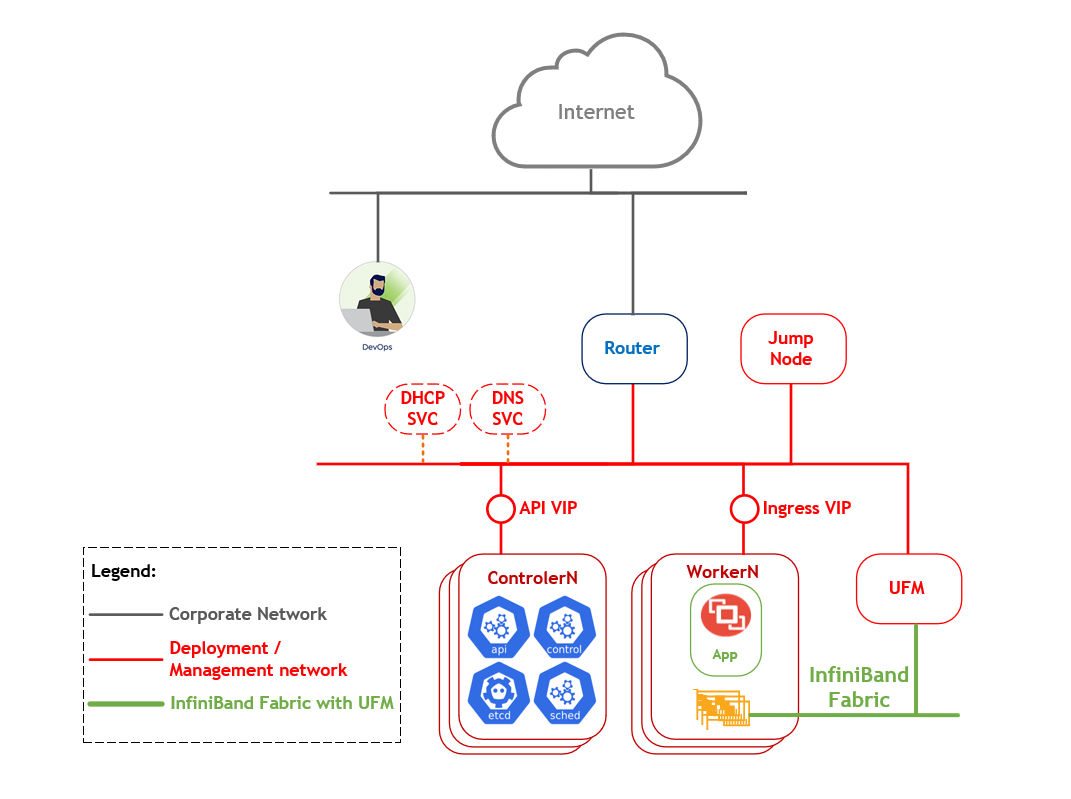
Logical Design
The logical design includes the following parts:
Jump node used for initial deployment and debugging
OCP control plane nodes
NVIDIA DGX A100 servers - OCP worker nodes
NVIDIA Quantum InfiniBand fabric
UFM Enterprise Node
Deployment and OCP management networks

OpenShift Container Platform Networking
In this guide, an OCP cluster is deployed in a Non-Air Gap environment, and Internet access is required.
The OCP cluster is deployed on a dedicated Deployment/Management network (CIDR 192.168.77.0/24) that is part of the IT infrastructure which also includes DNS/DHCP services.
The installation and configuration procedures for these components are not covered in this guide.
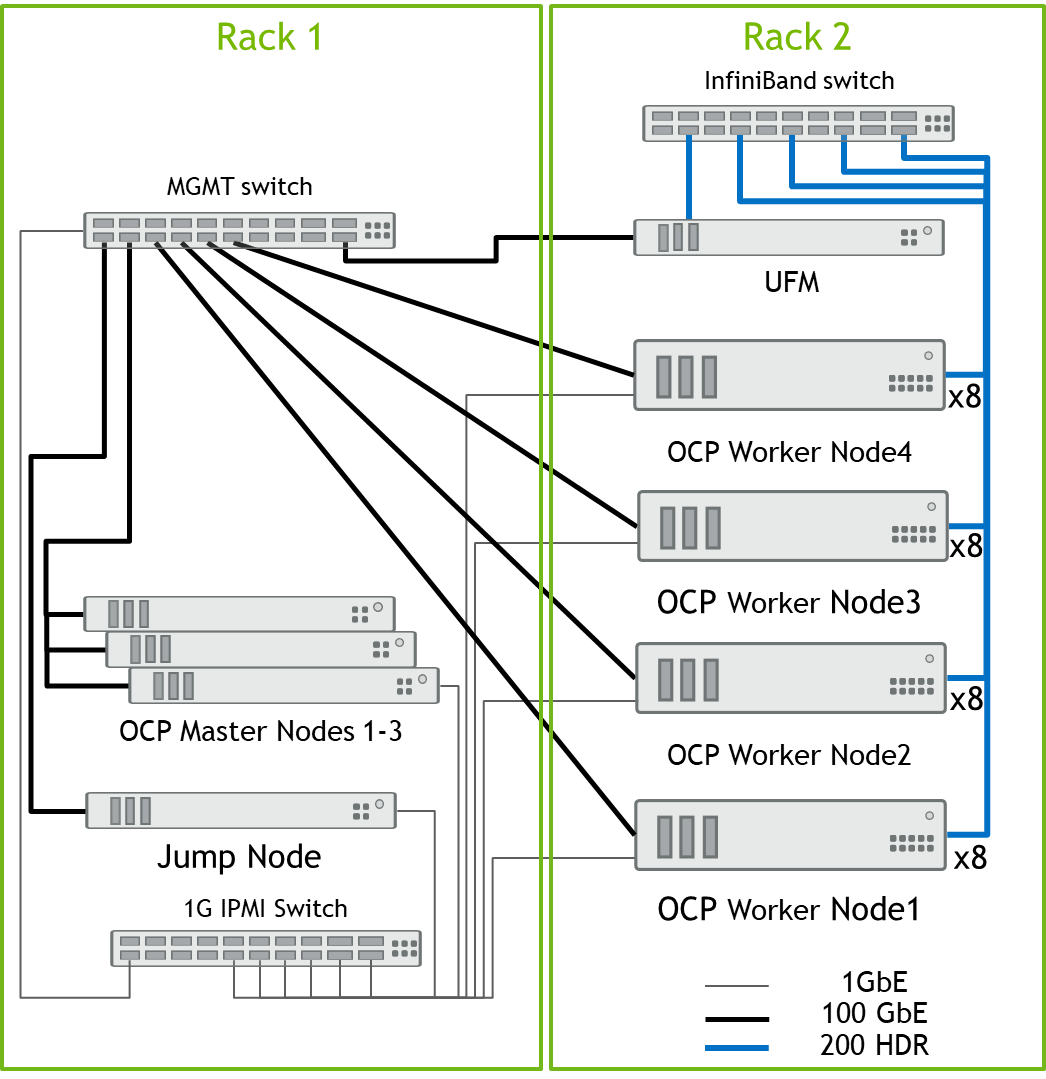
Network/Fabric Diagram
In this RDG we will describe a small-scale solution with only one InfiniBand switch.
All OCP cluster Nodes are connected to the MGMT switch by a single 100GbE cable.
A ll InfiniBand ports of the DGX A100 server are connected to a single NVIDIA Quantum HDR 200Gb/s InfiniBand Smart Edge Switch with NVIDIA LinkX HDR 200Gb/s QSFP56 DAC cables.
In addition, we used a UFM Enterprise Node with a similar connectivity.
All server remote management ports and switch management ports are connected to a 1GbE switch.
The setup diagram is presented in the picture below.
For assistance in designing the scaled InfiniBand topology, use the InfiniBand Topology Generator, an online cluster configuration tool that offers flexible cluster configurations and sizes.
Software Stack Components
In this guide, the following software components have been used to deploy the system:
Red Hat OCP 4.10.30
AlmaLinux v8.5 for Jump-Node. Installation mode "Server with GUI"
Ubuntu server 18.04 for UFM Enterprise node
NVIDIA GPU Operator v1.11.1
NVIDIA Network Operator v1.3.0
Red Hat OpenShift Data Foundation
Red Hat SR-IOV Network Operator
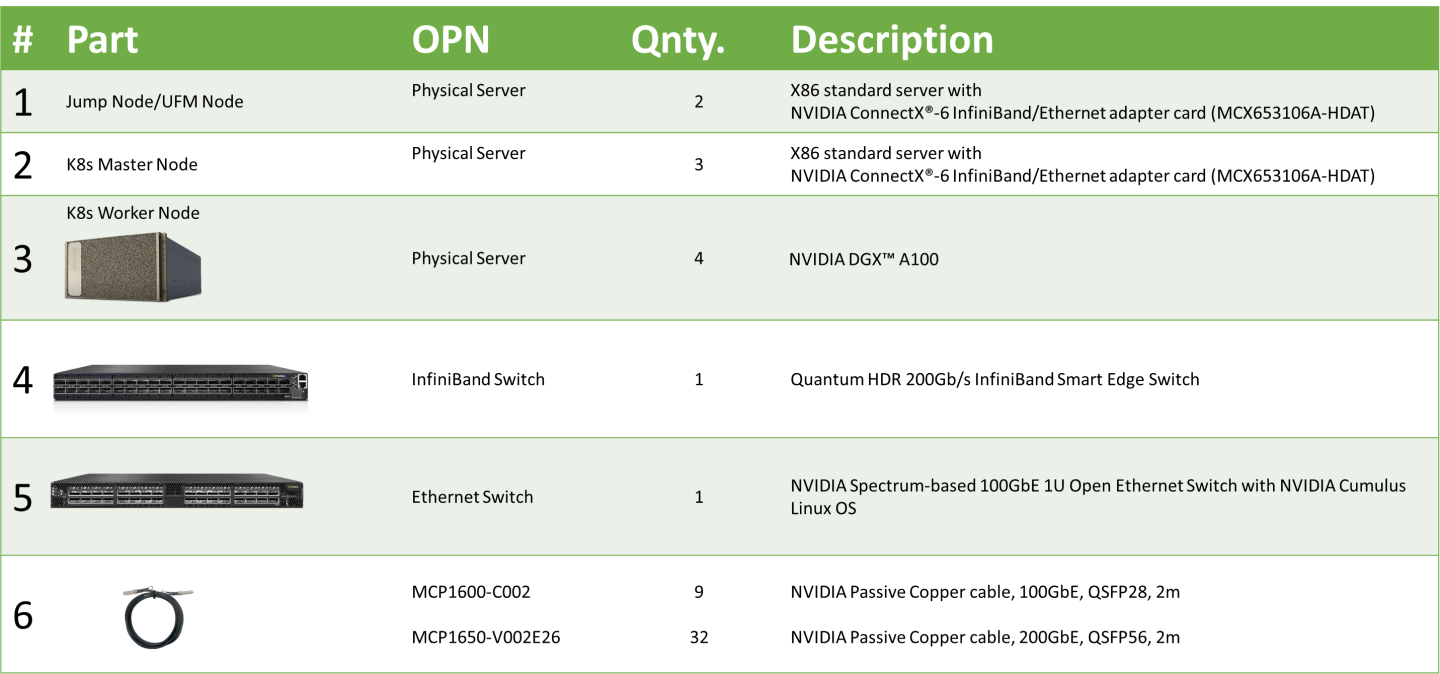
Bill of Materials
The following hardware setup is utilized in this guide to build an OCP cluster with four Worker nodes.
Deployment and Configuration
Network and Fabric Configuration for an OCP Cluster
Below are the server names with their relevant network configurations.
|
Server/Switch Type |
Server/Switch Name |
IP and NICS |
|
|
InfiniBand Network |
Management Network |
||
|
Jump node |
ocp4-jump |
N/A |
eth0: DHCP 192.168.77.201 |
|
OCP Master node1 |
control1 |
N/A |
eth0: DHCP 192.168.77.11 |
|
OCP Master node2 |
control2 |
N/A |
eth0: DHCP 192.168.77.12 |
|
OCP Master node3 |
control3 |
N/A |
eth0: DHCP 192.168.77.13 |
|
OCP Worker node1 |
worker1 |
ib0: no IP set ib4: no IP set ib1: no IP set ib5: no IP set ib2: no IP set ib6: no IP set ib3: no IP set ib7: no IP set |
enp225s0f0: DHCP 192.168.77.21 |
|
OCP Worker node2 |
worker2 |
ib0: no IP set ib4: no IP set ib1: no IP set ib5: no IP set ib2: no IP set ib6: no IP set ib3: no IP set ib7: no IP set |
enp225s0f0: DHCP 192.168.77.22 |
|
OCP Worker node3 |
worker3 |
ib0: no IP set ib4: no IP set ib1: no IP set ib5: no IP set ib2: no IP set ib6: no IP set ib3: no IP set ib7: no IP set |
enp225s0f0: DHCP 192.168.77.23 |
|
OCP Worker node4 |
worker4 |
ib0: no IP set ib4: no IP set ib1: no IP set ib5: no IP set ib2: no IP set ib6: no IP set ib3: no IP set ib7: no IP set |
enp225s0f0: DHCP 192.168.77.24 |
|
InfiniBand switch |
ib-sw01 |
N/A |
mgmt0: DHCP 192.168.77.222 |
|
UFM |
ufm |
ib0: no IP set |
eth0: DHCP 192.168.77.223 |
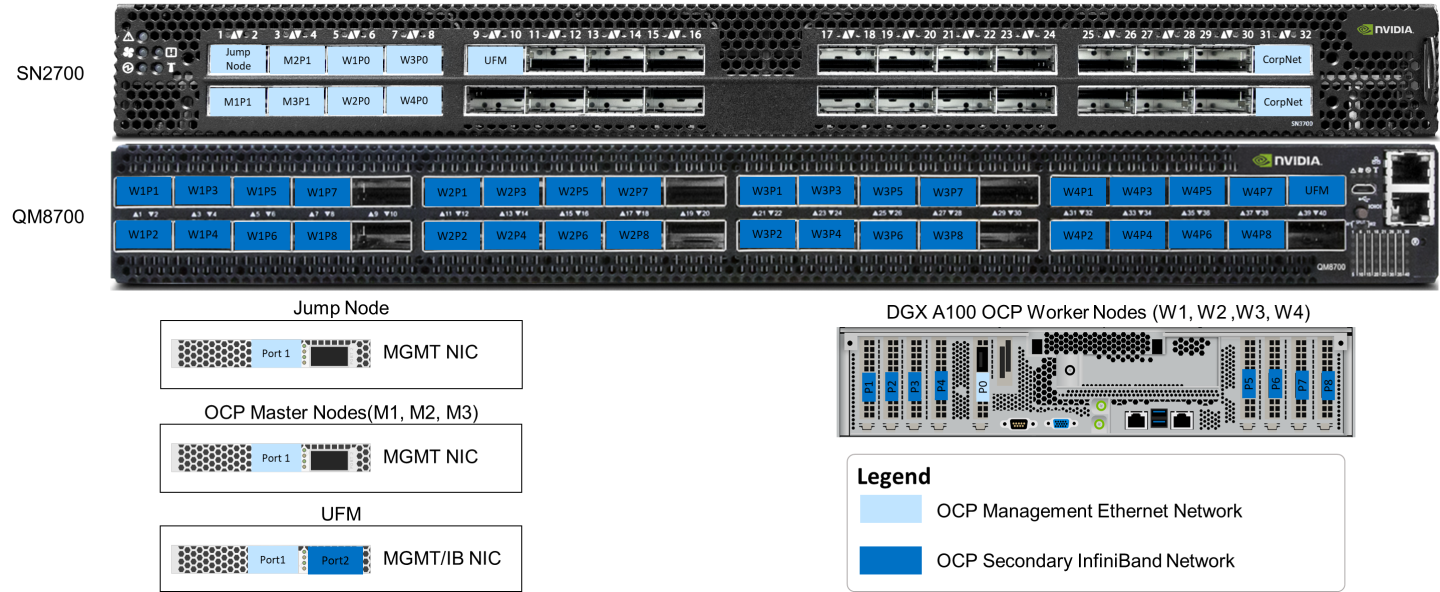
Wiring
On each OCP Worker Node, all the networking ports of each NVIDIA Network Adapter are wired to the Ethernet (SN2700) and InfiniBand (QM8700) NVIDIA switch using NVIDIA LinkX DAC cables.
The below figure illustrates the required wiring for building an OCP cluster with four Worker nodes and a UFM Enterprise Node.
InfiniBand Fabric Configuration
Overview
Below is a list of recommendations and prerequisites that are important for the configuration process:
Refer to the NVIDIA MLNX-OS User Manual to become familiar with the switch software (located at enterprise-support.nvidia.com/s/)
Upgrade the switch software to the latest NVIDIA MLNX-OS version
An InfiniBand Subnet Manager (SM) is required to configure the InfiniBand fabric properly
There are three ways to run an InfiniBand SM in the InfiniBand fabric:
Start the SM on one or more managed switches. This is a very convenient and quick operation which allows for easier InfiniBand ‘plug & play'.
Run an OpenSM daemon on one or more servers by executing the /etc/init.d/opensmd command.
Use a Unified Fabric Manager (UFM®).
UFM is a powerful platform for scale-out computing, which eliminates the complexity of fabric management, provides deep visibility into traffic and optimizes fabric performance.
Below are the configuration steps for method #1 and method #3.
This guide provides instructions for launching the InfiniBand SM with a Unified Fabric Manager (Method #3).
Enable the SM on the Managed Switch
Login to the switch and enter the next configuration commands (swx-mld-ib67 is our switch name):
IB switch configuration
            NVIDIA MLNX-OS Switch Management

switch login: admin
Password:

ib-sw01 [standalone: master] > enable
ib-sw01 [standalone: master] # configure terminal
ib-sw01 [standalone: master] (config) # ib smnode ib-sw01 enable
ib-sw01 [standalone: master] (config) # ib smnode ib-sw01 sm-priority 0

ib-sw01 [standalone: master] (config) # ib sm virt enable
ib-sw01 [standalone: master] (config) # write memory
ib-sw01 [standalone: master] (config) # reload
Once the switch reboots, check the switch configuration. It should look like the following:
Switch config example
            NVIDIA MLNX-OS Switch Management

switch login: admin
Password:

ib-sw01 [standalone: master] > enable
ib-sw01 [standalone: master] # configure terminal
ib-sw01 [standalone: master] (config) # show running-config
##
## Running database "initial"
## Generated at 2022/11/16 17:40:41 +0000
## Hostname: ib-sw01
## Product release: 3.9.1600
##

##
## Running-config temporary prefix mode setting
##
no cli default prefix-modes enable

##
## Subnet Manager configuration
##
   ib sm virt enable

##
## Other IP configuration
##
   hostname ib-sw01

##
## Other IPv6 configuration
##
no ipv6 enable

##
## Local user account configuration
##
   username admin password 7 $6$6GZ8Q0RF$FZW9pc23JJkwwOJTq85xZe1BJgqQV/m6APQNPkagZlTEUgKMWLr5X3Jq2hsUyB.K5nrGdDNUaSLiK2xupnIJo1
   username monitor password 7 $6$z1.r4Kl7$TIwaNf7uXNxZ9UdGdUpOO9kVug0shRqGtu75s3dSrY/wY1v1mGjrqQLNPHvHYh5HAhVuUz5wKzD6H/beYeEqL.

##
## AAA remote server configuration
##
# ldap bind-password ********
# radius-server key ********
# tacacs-server key ********

##
## Network management configuration
##
# web proxy auth basic password ********

##
## X.509 certificates configuration
##
#
# Certificate name system-self-signed, ID 12d0989d8623825b71bc25f9bc02de813fc9fe2a
# (public-cert config omitted since private-key config is hidden)


##
## IB nodename to GUID mapping
##
   ib smnode ib-sw01 create
   ib smnode ib-sw01 enable
   ib smnode ib-sw01 sm-priority 0
##
## Persistent prefix mode setting
##
cli default prefix-modes enable
UFM Deployment and Configuration
NVIDIA® UFM® is a host-based solution, providing all management functionality required for managing InfiniBand fabrics.
In this guide, a UFM will be deployed as a Stand Alone UFM Enterprise application container. High Availability deployment is possible, yet not covered.
For the UFM Enterprise User Manual, refer to this link.
For the UFM Enterprise Docker Container Installation Guide, refer to this link.
Using the NVIDIA UFM Enterprise Software requires a license. To download the UFM software and license, please visit NVIDIA's Licensing Portal.
If you do not have a valid license, please fill out the NVIDIA Enterprise Account Registration form to get a UFM evaluation license.
UFM Node OS
Install the OS on the UFM Node (in this solution we have used Ubuntu 18.04 OS).
Install the NVIDIA MLNX_OFED network drivers. For further information refer to this link.
Install and enable Docker service—Ubuntu Docker Installation.
Use the "ibstat" command to make sure that the UFM Node is connected to the InfiniBand Fabric, and the link is up.
Make sure that the UFM Node is connected to the OpenShift Management network and allocate an IP Address. In our example we have assigned IP 192.168.77.223 to this node.
Set a dummy IP address on the InfiniBand ib0 interface, and make sure it is in the "up" state. This step is a prerequisite for UFM application installation.
Infoib0 is the default fabric interface used by the UFM installer. If you have connected ib1 to the InfiniBand fabric, make sure to specify the interface during UFM installer execution.
Make sure that access to the Internet is available, as it will be used to pull the UFM application container. It is also possible to use local images without Internet connectivity.
UFM Stand-alone installation
Create a directory on the host to mount and sync the UFM Enterprise files with read/write permissions. For example: / opt/ufm/files/.
Copy only your UFM license file(s) to a temporary directory which we are going to use in the installation command. For example: /tmp/license_file/
Run the UFM installation command according to the following example, which will also configure UFM fabric interface to be ib0:
            docker run -it --name=ufm_installer --rm \
-v /var/run/docker.sock:/var/run/docker.sock \
-v /etc/systemd/system/:/etc/systemd_files/ \
-v /opt/ufm/files/:/installation/ufm_files/ \
-v /tmp/license_file/:/installation/ufm_licenses/ \
mellanox/ufm-enterprise:latest \
--install \
--fabric-interface ib0
The values below can be updated in the command per your needs:
/opt/ufm/files/
/tmp/license_file/
For example, if you want UFM files to be mounted in another location on your server, create that directory and replace the path in the command.
Reload the system:
systemctl daemon-reload
Configure general settings in the /opt/ufm/files/conf/gv.cfg file to enable Virtualization.
This allows supporting virtual ports in UFM.
            [Virtualization]
# By enabling this flag, UFM will discover all the virtual ports assigned for all hypervisors in the fabric
enable = true
# Interval for checking whether any virtual ports were changed in the fabric
interval = 60
WarningThis step is required and cannot be skipped!
To start the UFM Enterprise service, run:
systemctl start ufm-enterprise
Connect from any web browser to the UFM WebUI. Use the following URL - https://192.168.77.223/ufm/
InfoDefault Login Credentials: admin/123456

OCP Cluster Installation
General Prerequisites
DHCP and DNS services are required for OCP installation.
The OCP cluster installation requires two VIP addresses:
The API address is used to access the cluster API.
The Ingress address is used for cluster ingress traffic.
These IP addresses must be provided to the installation program when installing the OCP Container Platform cluster.
In our environment, we use the following IPs and DNS records:
|
Component |
IP |
Record |
Description |
|
Kubernetes API |
192.168.77.211 |
api.ocp4.clx.labs.mlnx |
A DNS A/AAAA or CNAME record and a DNS PTR record, to identify the API load balancer. These records must be resolvable by both clients external to the cluster and from all the nodes within the cluster. |
|
Ingress |
192.168.77.212 |
*.apps.ocp4.clx.labs.mlnx |
A wildcard DNS A/AAAA or CNAME record that refers to the application ingress load balancer. The application ingress load balancer targets the machines that run the Ingress Controller PODs. The Ingress Controller PODs run on the compute machines by default. These records must be resolvable by both clients external to the cluster and from all the nodes within the cluster. For example, console-openshift-console.apps.ocp4.clx.labs.mlnx is used as a wildcard route to the OCP console. |
OpenShift Container Platform nodes in the cluster should have access to an NTP server. OpenShift Container Platform nodes use NTP to synchronize their clocks.
NTP synchronization servers can be configured as a specific option of the DHCP service.
DNS/DHCP network services are part of the IT infrastructure. The components installation procedure and configuration are not covered in this guide. For more information, see Networking Requirements for User-provisioned Infrastructure.
Jump Node Prerequisites
In this guide, a Jump Node is used for CLI and GUI access to an OCP cluster.
A standard X86 server has been used for the Jump Node. AlmaLinux OS 8.6 is installed on the server in a "Server with GUI" mode.
Generating an SSH Public Key for Discovery ISO
"Discovery ISO" is part of the OCP Assisted installed procedure. Instructions for the generation of "Discovery ISO" are provided below.
To generate a key, please run the following command on the Jump Node:
[root@jump-node ~]# ssh-keygen
For all prompts, please push "ENTER" to use default values. Your public key has been saved in /root/.ssh/id_rsa.pub.
OCP Cluster Deployment with Assisted Installer
Installer-provisioned installation on bare metal nodes deploys and configures the infrastructure that an OpenShift Container Platform cluster runs on.
This guide provides a methodology to achieve a successful installer-provisioned bare-metal installation.
Follow the steps outlined in the section to install an OCP cluster.
Open a web browser on the Jump Node (in our case, AlmaLinux with UI is used), connect to the Red Hat Hybrid Cloud site and log into the console with your credentials.

Using the left menu bar, select OpenShift :

Click on Create Cluster .

Select Datacenter , and click on "Bare Metal (x86_64)" in "Infrastructure provider".

Select the Assisted Installer installation type.

In the Cluster details open window, provide a Cluster Name and a Base Domain. From the drop list, select the OpenShift version that you wish to install, and click on Next. Example:

Add an OpenShift Data Foundation operator to use DGX server local storage.

In the Host discovery window, click on Add hosts.

In the Add hosts window, select the Full Image file option, paste your ssh public key in the "SSH public key" window (the key was generated in the Jump Node - /root/.ssh/id_rsa.pub ) and click on Generate Discovery ISO.

In the opened window, click on Download Discovery ISO.

Boot all servers in your cluster from the downloaded Discovery.ISO.
Go back to the RedHat Hybrid Cloud Console web page. After a few minutes, you will be able to see all your hosts in "Ready" status.
Review the CPU, Memory and Disk hosts configuration.
Select a Role for each Host. Example:

In each Worker Node, please choose "Installation disk" and click Next. Example:

In the Networking opened window, provide the Machine network, API IP and Ingress IP. Click Next. Example:

Review the configuration and click on Install cluster.

The OCP Installation process will start and will take a while.

Once the installation process is complete, you will be able to Download the kubeconfig file and Web Console URL, Username and Password. Example:

In our case, we copied the kubeconfig file on your Jump Node to the /root/.kube/config file.
To ensure that the OCP cluster is installed properly, verify it via a CLI or a Web Console.
Via CLI:
            [root@jump-node ~]# oc get nodes
NAME                          STATUS   ROLES                 AGE   VERSION
control1.ocp4.clx.labs.mlnx   Ready    master                 1d   v1.23.5+012e945
control2.ocp4.clx.labs.mlnx   Ready    master                 1d   v1.23.5+012e945
control3.ocp4.clx.labs.mlnx   Ready    master                 1d   v1.23.5+012e945
worker1.ocp4.clx.labs.mlnx    Ready    worker                 1d   v1.23.5+012e945
worker2.ocp4.clx.labs.mlnx    Ready    worker                 1d   v1.23.5+012e945
worker3.ocp4.clx.labs.mlnx    Ready    worker                 1d   v1.23.5+012e945
worker4.ocp4.clx.labs.mlnx    Ready    worker                 1d   v1.23.5+012e945
NoteTo interact with the OpenShift Container Platform from a command-line interface, the OpenShift CLI (oc) should be installed. You can install oc on Linux, Windows or macOS. For OpenShift CLI installation guide, please refer to this link.
Via Web Console:
Please open a web browser on the Infra Node with the provided Web Console URL, Username and Password.

Make sure that the Cluster Status is ok.

Using the left menu bar, expand the Compute section and select the Nodes Status.

By clicking on each node, you can see the Node status with detailed information. Example:

Additional status information is available via the OpenShift CLI. Example:
            [root@jump-node ~]# oc get nodes -o wide
NAME                          STATUS   ROLES                 AGE   VERSION           INTERNAL-IP     EXTERNAL-IP   OS-IMAGE                                                        KERNEL-VERSION                 CONTAINER-RUNTIME
control1.ocp4.clx.labs.mlnx   Ready    master                1d    v1.23.5+012e945   192.168.77.11   <none>        Red Hat Enterprise Linux CoreOS 410.84.202208161501-0 (Ootpa)   4.18.0-305.57.1.el8_4.x86_64   cri-o://1.23.3-15.rhaos4.10.git6af791c.el8
control2.ocp4.clx.labs.mlnx   Ready    master                1d    v1.23.5+012e945   192.168.77.12   <none>        Red Hat Enterprise Linux CoreOS 410.84.202208161501-0 (Ootpa)   4.18.0-305.57.1.el8_4.x86_64   cri-o://1.23.3-15.rhaos4.10.git6af791c.el8
control3.ocp4.clx.labs.mlnx   Ready    master                1d    v1.23.5+012e945   192.168.77.13   <none>        Red Hat Enterprise Linux CoreOS 410.84.202208161501-0 (Ootpa)   4.18.0-305.57.1.el8_4.x86_64   cri-o://1.23.3-15.rhaos4.10.git6af791c.el8
worker1.ocp4.clx.labs.mlnx    Ready    worker                1d    v1.23.5+012e945   192.168.77.21   <none>        Red Hat Enterprise Linux CoreOS 410.84.202208161501-0 (Ootpa)   4.18.0-305.57.1.el8_4.x86_64   cri-o://1.23.3-15.rhaos4.10.git6af791c.el8
worker2.ocp4.clx.labs.mlnx    Ready    worker                1d    v1.23.5+012e945   192.168.77.22   <none>        Red Hat Enterprise Linux CoreOS 410.84.202208161501-0 (Ootpa)   4.18.0-305.57.1.el8_4.x86_64   cri-o://1.23.3-15.rhaos4.10.git6af791c.el8
worker3.ocp4.clx.labs.mlnx    Ready    worker                1d    v1.23.5+012e945   192.168.77.23   <none>        Red Hat Enterprise Linux CoreOS 410.84.202208161501-0 (Ootpa)   4.18.0-305.57.1.el8_4.x86_64   cri-o://1.23.3-15.rhaos4.10.git6af791c.el8
worker4.ocp4.clx.labs.mlnx    Ready    worker                1d    v1.23.5+012e945   192.168.77.24   <none>        Red Hat Enterprise Linux CoreOS 410.84.202208161501-0 (Ootpa)   4.18.0-305.57.1.el8_4.x86_64   cri-o://1.23.3-15.rhaos4.10.git6af791c.el8
            [root@jump-node ~]# oc get co
NAME                                       VERSION   AVAILABLE   PROGRESSING   DEGRADED   SINCE   MESSAGE
authentication                             4.10.30   True        False         False      20m
baremetal                                  4.10.30   True        False         False      1d
cloud-controller-manager                   4.10.30   True        False         False      1d
cloud-credential                           4.10.30   True        False         False      1d
cluster-autoscaler                         4.10.30   True        False         False      1d
config-operator                            4.10.30   True        False         False      1d
console                                    4.10.30   True        False         False      1d
csi-snapshot-controller                    4.10.30   True        False         False      1d
dns                                        4.10.30   True        False         False      1d
etcd                                       4.10.30   True        False         False      1d
image-registry                             4.10.30   True        False         False      1d
ingress                                    4.10.30   True        False         False      1d
insights                                   4.10.30   True        False         False      1d
kube-apiserver                             4.10.30   True        False         False      1d
kube-controller-manager                    4.10.30   True        False         False      1d
kube-scheduler                             4.10.30   True        False         False      1d
kube-storage-version-migrator              4.10.30   True        False         False      1d
machine-api                                4.10.30   True        False         False      1d
machine-approver                           4.10.30   True        False         False      1d
machine-config                             4.10.30   True        False         False      1d
marketplace                                4.10.30   True        False         False      1d
monitoring                                 4.10.30   True        False         False      1d
network                                    4.10.30   True        False         False      1d
node-tuning                                4.10.30   True        False         False      1d
openshift-apiserver                        4.10.30   True        False         False      1d
openshift-controller-manager               4.10.30   True        False         False      1d
openshift-samples                          4.10.30   True        False         False      1d
operator-lifecycle-manager                 4.10.30   True        False         False      1d
operator-lifecycle-manager-catalog         4.10.30   True        False         False      1d
operator-lifecycle-manager-packageserver   4.10.30   True        False         False      1d
service-ca                                 4.10.30   True        False         False      1d
storage                                    4.10.30   True        False         False      1d
Post-installation Configuration
In the OpenShift 4.x environment, each running container will be limited to the default maximum PID value of 1024 . To properly run an AI application on the OCP cluster, more than 1024 processes are required within a single container.
The OCP cluster operator is required to adjust the default maximum PID value to a higher number - 4096. It can be done as part of the "Day 2 operation for OCP". For additional information about post-installation configuration, please refer to "Day 2 operation for OCP".Create ContainerRuntimeConfig custom resource in order to configure the cri-o pidsLimit - mco-pidup.yaml:
            apiVersion: machineconfiguration.openshift.io/v1
kind: ContainerRuntimeConfig
metadata:
  name: 01-worker-scale-increase-pid-limit
spec:
  containerRuntimeConfig:
    pidsLimit: 4096
  machineConfigPoolSelector:
    matchLabels:
      pools.operator.machineconfiguration.openshift.io/worker: ""
Apply the following configuration:
oc create -f mco-pidup.yaml
Please verify by checking that the latest rendered-worker machine-config has been rolled out to the pools successfully:
            [root@jump-node ~]# oc get mcp
NAME     CONFIG                                             UPDATED   UPDATING   DEGRADED   MACHINECOUNT   READYMACHINECOUNT   UPDATEDMACHINECOUNT   DEGRADEDMACHINECOUNT   AGE
master   rendered-master-dc4c25c725418932d2678b0a174057b6   True      False      False      3              3                   3                     0                      1d
worker   rendered-worker-0f6b49419faed3fb46a74259d570896f   True      False      False      4              4                   4                     0                      1d
Once all Worker Nodes are rebooted, you may login and confirm the current setting:
            [root@jump-node ~]# oc debug node/worker1.ocp4.clx.labs.mlnx
Starting pod/worker1ocp4clxlabsmlnx-debug ...
To use host binaries, run `chroot /host`
Pod IP: 192.168.77.21
If you don't see a command prompt, try pressing enter.
sh-4.4# chroot /host
sh-4.4# cat /etc/crio/crio.conf.d/01-ctrcfg-pidsLimit
[crio]
  [crio.runtime]
    pids_limit = 4096
Installing OpenShift Operators
To run AI applications on the OCP cluster, the following operators are required:
Node Feature Discovery Operator (installed as part of the initial cluster deployment)
Local Storage (installed as part of the initial cluster deployment)
OpenShift Data Foundation (installed as part of the initial cluster deployment)
NVIDIA Network Operator
NVIDIA GPU Operator
SRI-OV Network Operator
For additional information about adding Operators to a cluster, see the Red Hat OpenShift Container Platform documentation.
Installing NVIDIA Network Operator
NVIDIA Network Operator is required to be installed on the OCP cluster in order to enable the compilation and installation of the RDMA GPUDirect module as part of the NVIDIA GPU Operator.
For the NVIDIA Network Operator Installation Guide for OCP Cluster, please refer to this link.
Cluster-wide entitlement is required to be applied before NVIDIA Network Operator installation. This step is described here.
NVIDIA Network Operator installation and configuration steps via Web Console:
Expand the Operators section in the left menu bar and select the OperatorHub.
Search for "NVIDIA" in the search bar. Two items should appear as results.
Select the operator that is tagged as "NVIDIA Network Operator". This is the version supported by NVIDIA.

In the opened pop-up window, click "Install" .

Following the completed installation, in the left menu bar go to the Operators section and click on "Installed Operators". Then, select the "NVIDIA Network Operator".
On the NVIDIA Network Operator details screen click on "Create instance" in the "NicClusterPolicy" section.

In the "NicClusterPolicy" tab, set the desired values in the "Ofed Driver" section, or leave the default values. In the "RDMA Shared Device Plugin" section please remove all values in the following subsections: "Config", "Image", "Repository" and "Version", then click on the "Create" button.

 Info
InfoApplying the "NicClusterPolicy" is dependent on the server platform hardware configuration and may take some time.
To ensure that the NVIDIA Network Operator is deployed properly, please run the following commands:
            [root@jump-node ~]# oc -n nvidia-network-operator get pod -o wide
NAME                                                          READY   STATUS    RESTARTS      AGE   IP              NODE                         NOMINATED NODE   READINESS GATES
mofed-rhcos4.10-ds-gwt6w                                      1/1     Running   0             48m   192.168.77.21   worker1.ocp4.clx.labs.mlnx   <none>           <none>
mofed-rhcos4.10-ds-qrn2b                                      1/1     Running   0             48m   192.168.77.24   worker4.ocp4.clx.labs.mlnx   <none>           <none>
mofed-rhcos4.10-ds-tj695                                      1/1     Running   0             48m   192.168.77.23   worker3.ocp4.clx.labs.mlnx   <none>           <none>
mofed-rhcos4.10-ds-z742t                                      1/1     Running   0             48m   192.168.77.22   worker2.ocp4.clx.labs.mlnx   <none>           <none>
nvidia-network-operator-controller-manager-86bdf7bdd5-tc5s5   2/2     Running   7 (41m ago)   72m   10.129.2.35     worker1.ocp4.clx.labs.mlnx   <none>           <none>
Installing the NVIDIA GPU Operator
The NVIDIA GPU Operator uses the operator framework within Kubernetes to automate the management of all NVIDIA software components needed to provision GPU. These components include the NVIDIA drivers (to enable CUDA), Kubernetes device plugin for GPUs, the NVIDIA Container Toolkit , automatic node labelling using GFD , DCGM based monitoring and others.
NVIDIA GPU Operator installation and configuration steps via Web Console:
In the OpenShift Container Platform web console from the side menu, navigate to Operators > OperatorHub, and select All Projects.
In Operators > OperatorHub, search for the NVIDIA GPU Operator.
Select the NVIDIA GPU Operator and click Install in the subsequent screen.
Once the installation is completed, in the left menu bar go to the Operators section, and click on "Installed Operators", then select the "NVIDIA GPU Operator".
On the NVIDIA GPU Operator details screen click on "Create instance" in the "ClusterPolicy".

In the "ClusterPolicy" tab, please open the subsection "NVIDIA GPU/VGPU Driver Config" and scroll down. Mark the checkbox "Enabled" in the "RDMA" subsection and click on the "Create" button.


For deep-drive step-by-step installation instructions, please visit GPU Operator on OpenShift.
To ensure that the NVIDIA GPU Operator is deployed properly, please run the following commands:
GPU Operator deployment pod's status
            [root@jump-node ~]# oc -n nvidia-gpu-operator get pod -o wide
NAME                                                  READY   STATUS      RESTARTS      AGE    IP              NODE                         NOMINATED NODE   READINESS GATES
gpu-feature-discovery-2dzjv                           1/1     Running     0             39m    10.130.0.36     worker3.ocp4.clx.labs.mlnx   <none>           <none>
gpu-feature-discovery-lk4jz                           1/1     Running     0             165m   10.130.2.3      worker2.ocp4.clx.labs.mlnx   <none>           <none>
gpu-feature-discovery-ndpbw                           1/1     Running     0             165m   10.131.0.14     worker4.ocp4.clx.labs.mlnx   <none>           <none>
gpu-feature-discovery-wl5fs                           1/1     Running     0             165m   10.129.2.15     worker1.ocp4.clx.labs.mlnx   <none>           <none>
gpu-operator-66bd74b4f4-q2c9q                         1/1     Running     3 (42m ago)   62m    10.129.2.48     worker1.ocp4.clx.labs.mlnx   <none>           <none>
nvidia-container-toolkit-daemonset-5vjrk              1/1     Running     0             165m   10.130.2.9      worker2.ocp4.clx.labs.mlnx   <none>           <none>
nvidia-container-toolkit-daemonset-jh2xf              1/1     Running     0             165m   10.129.2.12     worker1.ocp4.clx.labs.mlnx   <none>           <none>
nvidia-container-toolkit-daemonset-s4pbf              1/1     Running     0             165m   10.131.0.2      worker4.ocp4.clx.labs.mlnx   <none>           <none>
nvidia-container-toolkit-daemonset-tdkns              1/1     Running     0             39m    10.130.0.37     worker3.ocp4.clx.labs.mlnx   <none>           <none>
nvidia-cuda-validator-fqbxg                           0/1     Completed   0             37m    10.131.0.36     worker4.ocp4.clx.labs.mlnx   <none>           <none>
nvidia-cuda-validator-kdbbh                           0/1     Completed   0             35m    10.130.0.44     worker3.ocp4.clx.labs.mlnx   <none>           <none>
nvidia-cuda-validator-nv7vz                           0/1     Completed   0             36m    10.129.2.68     worker1.ocp4.clx.labs.mlnx   <none>           <none>
nvidia-dcgm-27ghv                                     1/1     Running     0             39m    192.168.77.23   worker3.ocp4.clx.labs.mlnx   <none>           <none>
nvidia-dcgm-2tz55                                     1/1     Running     0             165m   192.168.77.22   worker2.ocp4.clx.labs.mlnx   <none>           <none>
nvidia-dcgm-exporter-hkzxw                            1/1     Running     0             165m   192.168.77.21   worker1.ocp4.clx.labs.mlnx   <none>           <none>
nvidia-dcgm-exporter-kk4lp                            1/1     Running     0             165m   192.168.77.24   worker4.ocp4.clx.labs.mlnx   <none>           <none>
nvidia-dcgm-exporter-nk5j7                            1/1     Running     0             165m   192.168.77.22   worker2.ocp4.clx.labs.mlnx   <none>           <none>
nvidia-dcgm-exporter-vgjr6                            1/1     Running     0             39m    192.168.77.23   worker3.ocp4.clx.labs.mlnx   <none>           <none>
nvidia-dcgm-nqj7s                                     1/1     Running     0             165m   192.168.77.24   worker4.ocp4.clx.labs.mlnx   <none>           <none>
nvidia-dcgm-tlf2p                                     1/1     Running     0             165m   192.168.77.21   worker1.ocp4.clx.labs.mlnx   <none>           <none>
nvidia-device-plugin-daemonset-7cvps                  1/1     Running     0             165m   10.129.2.16     worker1.ocp4.clx.labs.mlnx   <none>           <none>
nvidia-device-plugin-daemonset-bjjdv                  1/1     Running     0             165m   10.131.0.10     worker4.ocp4.clx.labs.mlnx   <none>           <none>
nvidia-device-plugin-daemonset-qndb6                  1/1     Running     0             165m   10.130.2.14     worker2.ocp4.clx.labs.mlnx   <none>           <none>
nvidia-device-plugin-daemonset-t7t5t                  1/1     Running     0             39m    10.130.0.39     worker3.ocp4.clx.labs.mlnx   <none>           <none>
nvidia-device-plugin-validator-gphhw                  0/1     Completed   0             36m    10.131.0.39     worker4.ocp4.clx.labs.mlnx   <none>           <none>
nvidia-device-plugin-validator-mqc82                  0/1     Completed   0             34m    10.130.0.45     worker3.ocp4.clx.labs.mlnx   <none>           <none>
nvidia-device-plugin-validator-vw92q                  0/1     Completed   0             35m    10.129.2.69     worker1.ocp4.clx.labs.mlnx   <none>           <none>
nvidia-driver-daemonset-410.84.202208161501-0-r6dwb   3/3     Running     4 (38m ago)   165m   10.131.0.11     worker4.ocp4.clx.labs.mlnx   <none>           <none>
nvidia-driver-daemonset-410.84.202208161501-0-r9gzw   3/3     Running     3 (36m ago)   165m   10.130.0.11     worker3.ocp4.clx.labs.mlnx   <none>           <none>
nvidia-driver-daemonset-410.84.202208161501-0-vgwrz   3/3     Running     4 (37m ago)   165m   10.129.2.8      worker1.ocp4.clx.labs.mlnx   <none>           <none>
nvidia-driver-daemonset-410.84.202208161501-0-zzb58   3/3     Running     2 (38m ago)   165m   10.130.2.12     worker2.ocp4.clx.labs.mlnx   <none>           <none>
nvidia-mig-manager-4grl2                              1/1     Running     0             39m    10.130.0.40     worker3.ocp4.clx.labs.mlnx   <none>           <none>
nvidia-mig-manager-nhbh5                              1/1     Running     0             165m   10.129.2.10     worker1.ocp4.clx.labs.mlnx   <none>           <none>
nvidia-mig-manager-v852l                              1/1     Running     0             165m   10.130.2.10     worker2.ocp4.clx.labs.mlnx   <none>           <none>
nvidia-mig-manager-xkjxf                              1/1     Running     0             165m   10.131.0.6      worker4.ocp4.clx.labs.mlnx   <none>           <none>
nvidia-node-status-exporter-pmtfw                     1/1     Running     1             165m   10.130.2.7      worker2.ocp4.clx.labs.mlnx   <none>           <none>
nvidia-node-status-exporter-r7m4j                     1/1     Running     3             165m   10.130.0.3      worker3.ocp4.clx.labs.mlnx   <none>           <none>
nvidia-node-status-exporter-szzsg                     1/1     Running     1             165m   10.131.0.8      worker4.ocp4.clx.labs.mlnx   <none>           <none>
nvidia-node-status-exporter-zwgld                     1/1     Running     2             165m   10.129.2.4      worker1.ocp4.clx.labs.mlnx   <none>           <none>
nvidia-operator-validator-52z9h                       1/1     Running     0             39m    10.130.0.38     worker3.ocp4.clx.labs.mlnx   <none>           <none>
nvidia-operator-validator-7gnwz                       1/1     Running     0             41m    10.131.0.24     worker4.ocp4.clx.labs.mlnx   <none>           <none>
nvidia-operator-validator-ndhll                       1/1     Running     0             41m    10.130.2.33     worker2.ocp4.clx.labs.mlnx   <none>           <none>
nvidia-operator-validator-zvsgc                       1/1     Running     0             40m    10.129.2.58     worker1.ocp4.clx.labs.mlnx   <none>           <none>
Installing the SR-IOV Network Operator
The SR-IOV Network Operator is generally responsible for configuring the SR-IOV components in an OpenShift cluster.
SR-IOV Network Operator installation and configuration steps via Web Console and CLI:
In the OpenShift Container Platform web console from the side menu, navigate to Operators > OperatorHub, and select All Projects.
In Operators > OperatorHub, search for the NVIDIA GPU Operator.
Select the SR-IOV Network Operator and click Install on the subsequent screen.

To configure the InfiniBand network, the following components should be created: "SR-IOV Network Node Policies" and "SriovIBNetworks". Both components were created via YAML configuration files and applied vis CLI.
To configure "SR-IOV Network Node Policies", use - policy.yaml.
Multi policy configuration YAML file - policy.yaml
            apiVersion: sriovnetwork.openshift.io/v1
kind: SriovNetworkNodePolicy
metadata:
  name: policy-ib0
  namespace: openshift-sriov-network-operator
spec:
  nodeSelector:
    feature.node.kubernetes.io/network-sriov.capable: 'true'
  nicSelector:
    pfNames:
      - ib0
  deviceType: netdevice
  numVfs: 8
  priority: 99
  resourceName: ib0
  isRdma: true
  linkType: ib
---
apiVersion: sriovnetwork.openshift.io/v1
kind: SriovNetworkNodePolicy
metadata:
  name: policy-ib1
  namespace: openshift-sriov-network-operator
spec:
  nodeSelector:
    feature.node.kubernetes.io/network-sriov.capable: 'true'
  nicSelector:
    pfNames:
      - ib1
  deviceType: netdevice
  numVfs: 8
  priority: 99
  resourceName: ib1
  isRdma: true
  linkType: ib
---
apiVersion: sriovnetwork.openshift.io/v1
kind: SriovNetworkNodePolicy
metadata:
  name: policy-ib2
  namespace: openshift-sriov-network-operator
spec:
  nodeSelector:
    feature.node.kubernetes.io/network-sriov.capable: 'true'
  nicSelector:
    pfNames:
      - ib2
  deviceType: netdevice
  numVfs: 8
  priority: 99
  resourceName: ib2
  isRdma: true
  linkType: ib
---
apiVersion: sriovnetwork.openshift.io/v1
kind: SriovNetworkNodePolicy
metadata:
  name: policy-ib3
  namespace: openshift-sriov-network-operator
spec:
  nodeSelector:
    feature.node.kubernetes.io/network-sriov.capable: 'true'
  nicSelector:
    pfNames:
      - ib3
  deviceType: netdevice
  numVfs: 8
  priority: 99
  resourceName: ib3
  isRdma: true
  linkType: ib
---
apiVersion: sriovnetwork.openshift.io/v1
kind: SriovNetworkNodePolicy
metadata:
  name: policy-ib4
  namespace: openshift-sriov-network-operator
spec:
  nodeSelector:
    feature.node.kubernetes.io/network-sriov.capable: 'true'
  nicSelector:
    pfNames:
      - ib4
  deviceType: netdevice
  numVfs: 8
  priority: 99
  resourceName: ib4
  isRdma: true
  linkType: ib
---
apiVersion: sriovnetwork.openshift.io/v1
kind: SriovNetworkNodePolicy
metadata:
  name: policy-ib5
  namespace: openshift-sriov-network-operator
spec:
  nodeSelector:
    feature.node.kubernetes.io/network-sriov.capable: 'true'
  nicSelector:
    pfNames:
      - ib5
  deviceType: netdevice
  numVfs: 8
  priority: 99
  resourceName: ib5
  isRdma: true
  linkType: ib
---
apiVersion: sriovnetwork.openshift.io/v1
kind: SriovNetworkNodePolicy
metadata:
  name: policy-ib6
  namespace: openshift-sriov-network-operator
spec:
  nodeSelector:
    feature.node.kubernetes.io/network-sriov.capable: 'true'
  nicSelector:
    pfNames:
      - ib6
  deviceType: netdevice
  numVfs: 8
  priority: 99
  resourceName: ib6
  isRdma: true
  linkType: ib
---
apiVersion: sriovnetwork.openshift.io/v1
kind: SriovNetworkNodePolicy
metadata:
  name: policy-ib7
  namespace: openshift-sriov-network-operator
spec:
  nodeSelector:
    feature.node.kubernetes.io/network-sriov.capable: 'true'
  nicSelector:
    pfNames:
      - ib7
  deviceType: netdevice
  numVfs: 8
  priority: 99
  resourceName: ib7
  isRdma: true
  linkType: ib
Deploy policy.yaml:
oc apply -f policy.yaml
WarningThis step may take a while to complete, depending on the amount of Worker Nodes used to apply the configuration, and the number of VFs for each selected network interface.
To configure "SR-IOV Network Node Policies", ib-net.yaml has been used.
Multi SriovIBNetwork configuration YAML file - ib-net.yaml
            apiVersion: sriovnetwork.openshift.io/v1
kind: SriovIBNetwork
metadata:
  name: net-ib0
  namespace: openshift-sriov-network-operator
spec:
  resourceName: "ib0"
  networkNamespace: default
  linkState: enable
  ipam: |-
    {
        "type": "whereabouts",
        "range": "192.168.0.0/24"
    }

---
apiVersion: sriovnetwork.openshift.io/v1
kind: SriovIBNetwork
metadata:
  name: net-ib1
  namespace: openshift-sriov-network-operator
spec:
  resourceName: "ib1"
  networkNamespace: default
  linkState: enable
  ipam: |-
    {
        "type": "whereabouts",
        "range": "192.168.1.0/24"
    }

---
apiVersion: sriovnetwork.openshift.io/v1
kind: SriovIBNetwork
metadata:
  name: net-ib2
  namespace: openshift-sriov-network-operator
spec:
  resourceName: ib2
  networkNamespace: default
  linkState: enable
  ipam: |-
    {
        "type": "whereabouts",
        "range": "192.168.2.0/24"
    }

---
apiVersion: sriovnetwork.openshift.io/v1
kind: SriovIBNetwork
metadata:
  name: net-ib3
  namespace: openshift-sriov-network-operator
spec:
  resourceName: ib3
  networkNamespace: default
  linkState: auto
  ipam: |-
    {
        "type": "whereabouts",
        "range": "192.168.3.0/24"
    }

---
apiVersion: sriovnetwork.openshift.io/v1
kind: SriovIBNetwork
metadata:
  name: net-ib4
  namespace: openshift-sriov-network-operator
spec:
  resourceName: ib4
  networkNamespace: default
  linkState: auto
  ipam: |-
    {
        "type": "whereabouts",
        "range": "192.168.4.0/24"
    }

---
apiVersion: sriovnetwork.openshift.io/v1
kind: SriovIBNetwork
metadata:
  name: net-ib5
  namespace: openshift-sriov-network-operator
spec:
  resourceName: ib5
  networkNamespace: default
  linkState: auto
  ipam: |-
    {
        "type": "whereabouts",
        "range": "192.168.5.0/24"
    }

---
apiVersion: sriovnetwork.openshift.io/v1
kind: SriovIBNetwork
metadata:
  name: net-ib6
  namespace: openshift-sriov-network-operator
spec:
  resourceName: ib6
  networkNamespace: default
  linkState: auto
  ipam: |-
    {
        "type": "whereabouts",
        "range": "192.168.6.0/24"
    }

---
apiVersion: sriovnetwork.openshift.io/v1
kind: SriovIBNetwork
metadata:
  name: net-ib7
  namespace: openshift-sriov-network-operator
spec:
  resourceName: ib7
  networkNamespace: default
  linkState: auto
  ipam: |-
    {
        "type": "whereabouts",
        "range": "192.168.7.0/24"
    }
Deploy ib-net.yaml:
oc apply -f ib-net.yaml
Validating the Operators Deployment
Check the deployed InfiniBand networks:
            oc get network-attachment-definitions.k8s.cni.cncf.io
NAME      AGE
net-ib0   1d
net-ib1   1d
net-ib2   1d
net-ib3   1d
net-ib4   1d
net-ib5   1d
net-ib6   1d
net-ib7   1d
Check the Worker Node resources:
            oc get node worker1.ocp4.clx.labs.mlnx -o json | jq '.status.allocatable'
{
  "cpu": "255500m",
  "ephemeral-storage": "1727851483143",
  "hugepages-1Gi": "0",
  "hugepages-2Mi": "0",
  "memory": "1054987908Ki",
  "nvidia.com/gpu": "8",
  "openshift.io/ib0": "8",
  "openshift.io/ib1": "8",
  "openshift.io/ib2": "8",
  "openshift.io/ib3": "8",
  "openshift.io/ib4": "8",
  "openshift.io/ib5": "8",
  "openshift.io/ib6": "8",
  "openshift.io/ib7": "8",
  "pods": "250"
}

oc get node worker2.ocp4.clx.labs.mlnx -o json | jq '.status.allocatable'
{
  "cpu": "255500m",
  "ephemeral-storage": "1727851483143",
  "hugepages-1Gi": "0",
  "hugepages-2Mi": "0",
  "memory": "1054987908Ki",
  "nvidia.com/gpu": "8",
  "openshift.io/ib0": "8",
  "openshift.io/ib1": "8",
  "openshift.io/ib2": "8",
  "openshift.io/ib3": "8",
  "openshift.io/ib4": "8",
  "openshift.io/ib5": "8",
  "openshift.io/ib6": "8",
  "openshift.io/ib7": "8",
  "pods": "250"
}

oc get node worker3.ocp4.clx.labs.mlnx -o json | jq '.status.allocatable'
{
  "cpu": "255500m",
  "ephemeral-storage": "1727851483143",
  "hugepages-1Gi": "0",
  "hugepages-2Mi": "0",
  "memory": "1054987908Ki",
  "nvidia.com/gpu": "8",
  "openshift.io/ib0": "8",
  "openshift.io/ib1": "8",
  "openshift.io/ib2": "8",
  "openshift.io/ib3": "8",
  "openshift.io/ib4": "8",
  "openshift.io/ib5": "8",
  "openshift.io/ib6": "8",
  "openshift.io/ib7": "8",
  "pods": "250"
}

oc get node worker4.ocp4.clx.labs.mlnx -o json | jq '.status.allocatable'
{
  "cpu": "255500m",
  "ephemeral-storage": "1727851483143",
  "hugepages-1Gi": "0",
  "hugepages-2Mi": "0",
  "memory": "1054987908Ki",
  "nvidia.com/gpu": "8",
  "openshift.io/ib0": "8",
  "openshift.io/ib1": "8",
  "openshift.io/ib2": "8",
  "openshift.io/ib3": "8",
  "openshift.io/ib4": "8",
  "openshift.io/ib5": "8",
  "openshift.io/ib6": "8",
  "openshift.io/ib7": "8",
  "pods": "250"
}
Synthetic RDMA Benchmark
Run synthetic RDMA benchmark tests with ib_write_bw between two pods that are running on different Worker Nodes.
This step includes the following:
Create a container image and push it to your repository
Deploy test deployment apps
Run test
Create a container image from Dockerfile:
            FROM ubuntu:20.04
# Ubuntu 20.04 docker container with inbox Mellanox drivers

# LABEL about the custom image
LABEL maintainer=vitaliyra@nvidia.com
LABEL description="This is custom Container Image with inbox perftest package."

WORKDIR /tmp/
ENV DEBIAN_FRONTEND=noninteractive
RUN apt-get clean -y && apt-get -y update && apt-get install -y apt-utils udev vim bash && apt-get -y upgrade
RUN apt-get install -y iproute2 rdma-core libibmad5 ibutils ibverbs-utils infiniband-diags perftest \
            mstflint strace iputils-ping
RUN ln -fs /usr/share/zoneinfo/America/New_York /etc/localtime
RUN dpkg-reconfigure --frontend noninteractive tzdata && apt-get clean all -y
CMD bash
InfoPlease use your favorite container building tools (docker, podman, etc.) to create a container image from Dockerfile for use in the below deployment.
After creating the image, push it to the container registry.
Create a sample deployment test-deployment.yaml (the container image should include InfiniBand userspace drivers and performance tools):
test-deployment.yaml
            apiVersion: apps/v1
kind: Deployment
metadata:
  name: mlnx-inbox-pod
  labels:
    app: sriov
spec:
  replicas: 2
  selector:
    matchLabels:
      app: sriov
  template:
    metadata:
      labels:
        app: sriov
      annotations:
        k8s.v1.cni.cncf.io/networks: net-ib0
    spec:
      containers:
      - image: < Container image >
        name: mlnx-inbox-ctr
        securityContext:
          capabilities:
            add: [ "IPC_LOCK" ]
        resources:
          requests:
            openshift.io/ib0: 1
          limits:
            openshift.io/ib0: 1
        command:
        - sh
        - -c
        - sleep inf
Deploy the sample deployment.
            oc apply -f test-deployment.yaml
deployment.apps/mlnx-inbox-pod created

oc get pod -o wide
NAME                              READY   STATUS      RESTARTS   AGE   IP             NODE                         NOMINATED NODE   READINESS GATES
mlnx-inbox-pod-6948fd6d54-9s66q   1/1     Running     0          36s   10.130.2.231   worker2.ocp4.clx.labs.mlnx   <none>           <none>
mlnx-inbox-pod-6948fd6d54-t4hpx   1/1     Running     0          37s   10.131.1.33    worker4.ocp4.clx.labs.mlnx   <none>           <none>
Check available network interfaces in each POD.
## First PODocexec-it mlnx-inbox-pod-6948fd6d54-9s66q --bashroot@mlnx-inbox-pod-6948fd6d54-9s66q:/tmp# ip a s1: lo: <LOOPBACK,UP,LOWER_UP> mtu 65536 qdisc noqueue state UNKNOWN group default qlen 1000 link/loopback 00:00:00:00:00:00 brd 00:00:00:00:00:00 inet 127.0.0.1/8 scope host lo valid_lft forever preferred_lft forever inet6 ::1/128 scope host valid_lft forever preferred_lft forever 3: eth0@if645: <BROADCAST,MULTICAST,UP,LOWER_UP> mtu 1450 qdisc noqueue state UP group default link/ether 0a:58:0a:82:02:e7 brd ff:ff:ff:ff:ff:ff link-netnsid 0 inet 10.130.2.231/23 brd 10.130.3.255 scope global eth0 valid_lft forever preferred_lft forever inet6 fe80::c4e:5fff:feb1:c036/64 scope link valid_lft forever preferred_lft forever 430: net1: <BROADCAST,MULTICAST,UP,LOWER_UP> mtu 2044 qdisc mq state UP group default qlen 256 link/infiniband 00:00:00:88:fe:80:00:00:00:00:00:00:39:71:61:ca:7b:e2:c4:3b brd 00:ff:ff:ff:ff:12:40:1b:ff:ff:00:00:00:00:00:00:ff:ff:ff:ff inet 192.168.0.2/24 brd 192.168.0.255 scope global net1 valid_lft forever preferred_lft forever inet6 fe80::3b71:61ca:7be2:c43b/64 scope link valid_lft forever preferred_lft forever root@mlnx-inbox-pod-6948fd6d54-9s66q:/tmp# ibv_devinfohca_id: mlx5_29 transport: InfiniBand (0) fw_ver: 20.31.2006 node_guid: 3971:61ca:7be2:c43b sys_image_guid: 043f:7203:009c:6800 vendor_id: 0x02c9 vendor_part_id: 4124 hw_ver: 0x0 board_id: MT_0000000223 phys_port_cnt: 1 port: 1 state: PORT_ACTIVE (4) max_mtu: 4096 (5) active_mtu: 4096 (5) sm_lid: 1 port_lid: 376 port_lmc: 0x00 link_layer: InfiniBand## Second PODocexec-it mlnx-inbox-pod-6948fd6d54-t4hpx --bashroot@mlnx-inbox-pod-6948fd6d54-t4hpx:/tmp# ibv_devinfohca_id: mlx5_11 transport: InfiniBand (0) fw_ver: 20.31.2006 node_guid: 19aa:44e1:73a8:70c1 sys_image_guid: 043f:7203:00c0:017e vendor_id: 0x02c9 vendor_part_id: 4124 hw_ver: 0x0 board_id: MT_0000000223 phys_port_cnt: 1 port: 1 state: PORT_ACTIVE (4) max_mtu: 4096 (5) active_mtu: 4096 (5) sm_lid: 1 port_lid: 474 port_lmc: 0x00 link_layer: InfiniBandRun synthetic RDMA benchmark tests.
Server
ib_write_bw -F -d $IB_DEV_NAME --report_gbits
Client
ib_write_bw -D 20 -F $SERVER_IP -d $IB_DEV_NAME --report_gbits
Please console sessions to each POD - one for the server apps side, and the second for the client apps side.
On the first console (on the server side), run the following commands:
oc
exec-it mlnx-inbox-pod-6948fd6d54-9s66q --bashroot@mlnx-inbox-pod-6948fd6d54-9s66q:/tmp# ib_write_bw -d mlx5_29 -F --report_gbits************************************ * Waitingforclient to connect... * ************************************ --------------------------------------------------------------------------------------- RDMA_Write BW Test Dual-port : OFF Device : mlx5_29 Number of qps : 1 Transporttype: IB Connectiontype: RC Using SRQ : OFF PCIe relax order: ON ibv_wr* API : ON CQ Moderation : 1 Mtu : 4096[B] Linktype: IB Max inline data : 0[B] rdma_cm QPs : OFF Data ex. method : Ethernet ---------------------------------------------------------------------------------------localaddress: LID 0x178 QPN 0x007d PSN 0x1347c5 RKey 0x01053c VAddr 0x007f287d861000 remote address: LID 0x1da QPN 0x00bd PSN 0x1347c5 RKey 0x02053c VAddr 0x007fd8c7404000 ---------------------------------------------------------------------------------------#bytes #iterations BW peak[Gb/sec] BW average[Gb/sec] MsgRate[Mpps]65536 3728317 0.00 195.47 0.372828 ---------------------------------------------------------------------------------------On the second console (on the client side ) , run the following commands:
oc
exec-it mlnx-inbox-pod-6948fd6d54-t4hpx --bashroot@mlnx-inbox-pod-6948fd6d54-t4hpx:/tmp# ib_write_bw -d mlx5_11 -F 10.130.2.231 --report_gbits -D 20--------------------------------------------------------------------------------------- RDMA_Write BW Test Dual-port : OFF Device : mlx5_11 Number of qps : 1 Transporttype: IB Connectiontype: RC Using SRQ : OFF PCIe relax order: ON ibv_wr* API : ON TX depth : 128 CQ Moderation : 1 Mtu : 4096[B] Linktype: IB Max inline data : 0[B] rdma_cm QPs : OFF Data ex. method : Ethernet ---------------------------------------------------------------------------------------localaddress: LID 0x1da QPN 0x00bd PSN 0x1347c5 RKey 0x02053c VAddr 0x007fd8c7404000 remote address: LID 0x178 QPN 0x007d PSN 0x1347c5 RKey 0x01053c VAddr 0x007f287d861000 ---------------------------------------------------------------------------------------#bytes #iterations BW peak[Gb/sec] BW average[Gb/sec] MsgRate[Mpps]65536 3728317 0.00 195.47 0.372828 ---------------------------------------------------------------------------------------For the Synthetic RDMA Benchmark with ib_write_bw we got 195Gbps which is the expected line rate for IB HDR.
Kubeflow Training Operator
Kubeflow is a machine learning toolkit for Kubernetes.
Kubeflow training operators are part of Kubeflow, and a group of Kubernetes operators that add support to Kubeflow for distributed training of Machine Learning models using different frameworks.
The training operator provides Kubernetes CR that makes it easier to run distributed or non-distributed TensorFlow/PyTorch/Apache MXNet/XGBoost/MPI jobs on Kubernetes.
In the example below we deploy the latest stable release of the Kubeflow training operators:
            kubectl apply -k "github.com/kubeflow/training-operator/manifests/overlays/standalone"
namespace/kubeflow created
customresourcedefinition.apiextensions.k8s.io/mpijobs.kubeflow.org created
customresourcedefinition.apiextensions.k8s.io/mxjobs.kubeflow.org created
customresourcedefinition.apiextensions.k8s.io/pytorchjobs.kubeflow.org created
customresourcedefinition.apiextensions.k8s.io/tfjobs.kubeflow.org created
customresourcedefinition.apiextensions.k8s.io/xgboostjobs.kubeflow.org created
serviceaccount/training-operator created
clusterrole.rbac.authorization.k8s.io/training-operator created
clusterrolebinding.rbac.authorization.k8s.io/training-operator created
service/training-operator created
deployment.apps/training-operator created
Configuration of the namespace, to allow the default service account to run pods as a root:
# oc new-project $MY_PROJECT# oc adm policy add-scc-to-user privileged -z default # (from $MY_PROJECT namespace)
# oc adm policy add-scc-to-user anyuid -z default # (from $MY_PROJECT namespace)
Appendix
Job Testing Results
Below are the Dockerfile and MPIJob examples with different network configurations.
Dockerfile
Dockerfile example for using MPIJob:
            FROM nvcr.io/nvidia/tensorflow:22.08-tf2-py3
RUN apt-get update && apt-get install -y --no-install-recommends openssh-client openssh-server && \
    mkdir -p /var/run/sshd

# Allow OpenSSH to talk to containers without asking for confirmation
# by disabling StrictHostKeyChecking.
# mpi-operator mounts the .ssh folder from a Secret. For that to work, we need
# to disable UserKnownHostsFile to avoid write permissions.
# Disabling StrictModes avoids directory and files read permission checks.

RUN sed -i 's/[ #]\(.*StrictHostKeyChecking \).*/ \1no/g' /etc/ssh/ssh_config && \
    echo "    UserKnownHostsFile /dev/null" >> /etc/ssh/ssh_config && \
    sed -i 's/#\(StrictModes \).*/\1no/g' /etc/ssh/sshd_config

RUN mkdir /tensorflow
WORKDIR "/tensorflow"
RUN git clone https://github.com/tensorflow/benchmarks
WORKDIR "/tensorflow/benchmarks"

CMD ["/bin/bash"]
This Dockerfile is based on the TensorFlow NGC Container image. The TensorFlow NGC Container is optimized for GPU acceleration, and contains a validated set of libraries that enable and optimize GPU performance. This container may also contain modifications to the TensorFlow source code in order to maximize performance and compatibility. It also contains software for accelerating ETL (DALI , RAPIDS ), training ( cuDNN , NCCL ) and inference ( TensorRT ) workloads.
For supported versions, see the Framework Containers Support Matrix and the NVIDIA Container Toolkit Documentation.
Please use your favorite container building tools (docker, podman, etc.) to create a container image from Dockerfile for use in the below deployment.
After creating the image, push it to the container registry.
MPIJob Examples
The below is an MPIJob example with network configuration over InfiniBand. It is based on OCP secondary network without GPUDirect options:
MPIJOB with disabled GDR
            apiVersion: kubeflow.org/v1
kind: MPIJob
metadata:
  name: tensorflow-benchmarks
spec:
  slotsPerWorker: 8
  runPolicy:
    cleanPodPolicy: Running
  mpiReplicaSpecs:
    Launcher:
      replicas: 1
      template:
        spec:
          containers:
          - image: < container image >
            name: tensorflow-benchmarks
            command:
              - mpirun
              - --allow-run-as-root
              - -np
              - "32"
              - -bind-to
              - none
              - -map-by
              - slot
              - -x
              - NCCL_DEBUG=INFO
              - -x
              - NCCL_IB_DISABLE=0
              - -x
              - NCCL_NET_GDR_LEVEL=0
              - -x
              - TF_ALLOW_IOLIBS=1
              - -x
              - LD_LIBRARY_PATH
              - -x
              - PATH
              - -mca
              - pml
              - ob1
              - -mca
              - btl
              - ^openib
              - -mca
              - btl_tcp_if_include
              - eth0
              - python
              - scripts/tf_cnn_benchmarks/tf_cnn_benchmarks.py
              - --batch_size=64
              - --model=resnet152
              - --variable_update=horovod
              - --use_fp16=true
    Worker:
      replicas: 4
      template:
        metadata:
          annotations:
            k8s.v1.cni.cncf.io/networks: net-ib0,net-ib1,net-ib2,net-ib3,net-ib4,net-ib5,net-ib6,net-ib7
        spec:
          containers:
          - image: < container image>
            name: tensorflow-benchmarks
            securityContext:
              capabilities:
                add: [ "IPC_LOCK" ]
            resources:
              limits:
                nvidia.com/gpu: 8
                openshift.io/ib0: 1
                openshift.io/ib1: 1
                openshift.io/ib2: 1
                openshift.io/ib3: 1
                openshift.io/ib4: 1
                openshift.io/ib5: 1
                openshift.io/ib6: 1
                openshift.io/ib7: 1
The below is an MPIJob example with network configuration over InfiniBand. It is based on OCP secondary network with enabled GPUDirect options:
MPIJOB with enabled GDR
            apiVersion: kubeflow.org/v1
kind: MPIJob
metadata:
  name: tensorflow-benchmarks
spec:
  slotsPerWorker: 8
  runPolicy:
    cleanPodPolicy: Running
  mpiReplicaSpecs:
    Launcher:
      replicas: 1
      template:
        spec:
          containers:
          - image: < container image >
            name: tensorflow-benchmarks
            command:
              - mpirun
              - --allow-run-as-root
              - -np
              - "32"
              - -bind-to
              - none
              - -map-by
              - slot
              - -x
              - NCCL_DEBUG=INFO
              - -x
              - NCCL_IB_DISABLE=0
              - -x
              - NCCL_NET_GDR_LEVEL=2
              - -x
              - TF_ALLOW_IOLIBS=1
              - -x
              - LD_LIBRARY_PATH
              - -x
              - PATH
              - -mca
              - pml
              - ob1
              - -mca
              - btl
              - ^openib
              - -mca
              - btl_tcp_if_include
              - eth0
              - python
              - scripts/tf_cnn_benchmarks/tf_cnn_benchmarks.py
              - --batch_size=64
              - --model=resnet152
              - --variable_update=horovod
              - --use_fp16=true
    Worker:
      replicas: 4
      template:
        metadata:
          annotations:
            k8s.v1.cni.cncf.io/networks: net-ib0,net-ib1,net-ib2,net-ib3,net-ib4,net-ib5,net-ib6,net-ib7
        spec:
          containers:
          - image: < container image>
            name: tensorflow-benchmarks
            securityContext:
              capabilities:
                add: [ "IPC_LOCK" ]
            resources:
              limits:
                nvidia.com/gpu: 8
                openshift.io/ib0: 1
                openshift.io/ib1: 1
                openshift.io/ib2: 1
                openshift.io/ib3: 1
                openshift.io/ib4: 1
                openshift.io/ib5: 1
                openshift.io/ib6: 1
                openshift.io/ib7: 1
Test Results
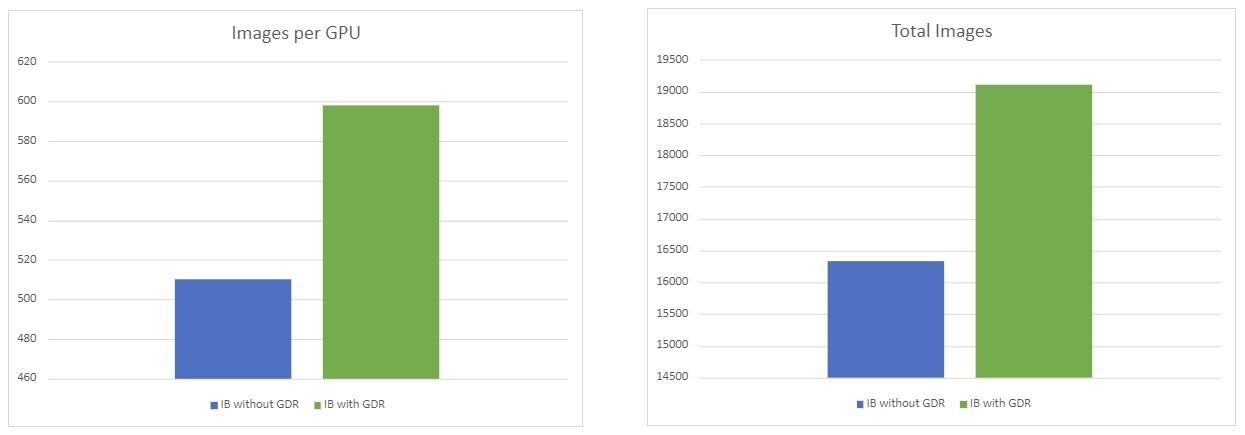
Summary
From the tests above, it can be seen that using GPUDirect resulted in a ~17% usage advantage in our setup.
The number of processed images depends on the chosen model and batch size in the TF benchmark .
The performance results listed in this document are indicative and should not be considered as formal performance targets for NVIDIA products.
Authors

|
Vitaliy Razinkov Over the past few years, Vitaliy Razinkov has been working as a Solutions Architect on the NVIDIA Networking team, responsible for complex Kubernetes/OpenShift and Microsoft's leading solutions, research and design. He previously spent more than 25 years in senior positions at several companies. Vitaliy has written several reference designs guides on Microsoft technologies, RoCE/RDMA accelerated machine learning in Kubernetes/OpenShift, and container solutions, all of which are available on the NVIDIA Networking Documentation website. |
Related Documents