General Capabilities
General supported capabilities:
The capabilities described below are applicable to both Ethernet and InfiniBand networks.
For retrieving the port types, perform one of the following:
Run mlx5cmd -stat from the "Command Prompt", and check the link_layer from the output.
See the Port Type in the Information tab in the Device Manager window (see Displaying Adapter Related Information)
To configure the port types to Ethernet/InfiniBand mode on a device, use the mlxconfig.exe utility, which is a part of the MFT package for Windows, and is available at https://network.nvidia.com/products/adapter-software/firmware-tools/.
Install the WinMFT package.
Retrieve the device name:
In command prompt, run "mst status -v":
mst status -v MST devices: ------------ mt4099_pci_cr0 bus:dev.fn=
04:00.0mt4099_pciconf0 bus:dev.fn=04:00.0mt4103_pci_cr0 bus:dev.fn=21:00.0mt4103_pciconf0 bus:dev.fn=21:00.0mt4115_pciconf0 bus:dev.fn=24:00.0Identify the desired device by its "bus:dev.fn" PCIe address.
Configure the port type to either InfiniBand or Ethernet:
Ethernet, execute the following command with the appropriate device name:
mlxconfig -d mt4115_pciconf0 set LINK_TYPE_P1=
2InfiniBand, execute the following command with the appropriate device name:
mlxconfig -d mt4115_pciconf0 set LINK_TYPE_P1=
1WarningTo set the type of the second port, set the parameter LINK_TYPE_P2.
Reboot the system.
WarningChanging the port type will change some of the registry keys to the default values of the new port type.
For further information, please refer to the MFT User Manual.
By default, your machine is configured to obtain an automatic IP address via a DHCP server. In some cases, the DHCP server may require the MAC address of the network adapter installed in your machine.
Open a CMD console-> Click Start-> Task Manager-> File-> Run new task-> and enter CMD.
Display the MAC address as “Physical Address”.
ipconfig /all
Open the Network Connections window. Locate Local Area Connections with NVIDIA® devices.

Right-click a NVIDIA® Local Area Connection and left-click Properties.
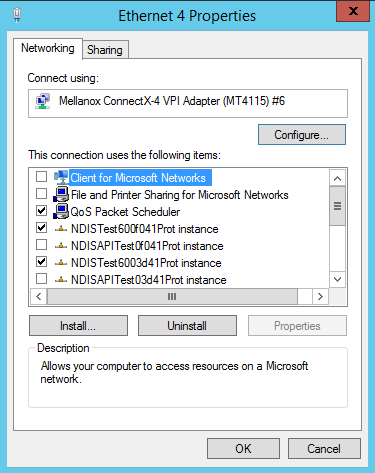
Select Internet Protocol Version 4 (TCP/IPv4) from the scroll list and click Properties.
Select the “Use the following IP address:” radio button and enter the desired IP information.

Click OK.
Close the Local Area Connection dialog.
Verify the IP configuration by running ‘ipconfig’ from a CMD console.
ipconfig ... Ethernet adapter Local Area Connection
4: Connection-specific DNS Suffix . : IP Address. . . . . . . . . . . . :11.4.12.63Subnet Mask . . . . . . . . . . . :255.255.0.0Default Gateway . . . . . . . . . : ...
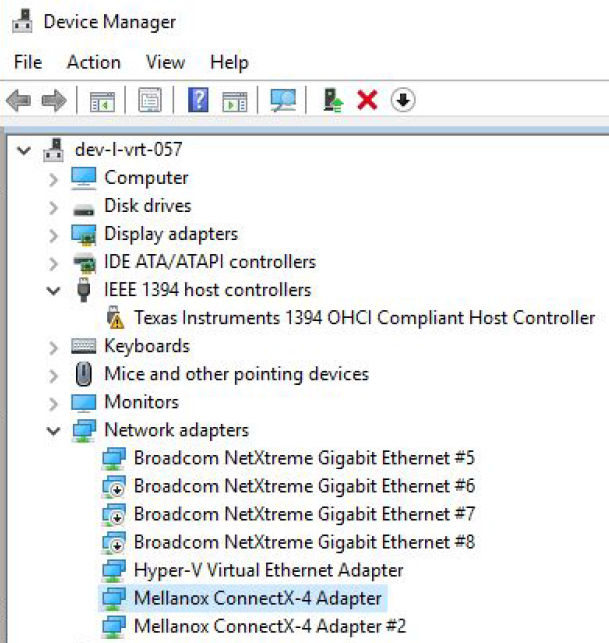
Open Device Manager and expand Network Adapters in the device display pane.
Right-click the NVIDIA® ConnectX adapter entry and left-click Properties.
Click the Advanced tab and modify the desired properties.
WarningThe IPoIB network interface is automatically restarted once you finish modifying IPoIB parameters. Consequently, it might affect any running traffic.
Important Notes:
- For help on a specific parameter/option, check the help button at the bottom of the dialog.
- If you select one of the entries Offload Options, Performance Options, or Flow Control Options, you’ll need to click the Properties button to modify parameters via a pop-up dialog.
RSS settings can be set per individual adapters as well as globally using the Registry Keys below.
It is recommended that the RSS base processor is core #1 and above as usually processor 0 is very utilized.
For instructions on how to find interface index in registry <nn>, please refer to section Finding the Index Value of the Network Interface.
|
Sub-key |
Description |
|
HKLM\SYSTEM\CurrentControlSet\Control\Class\{4d36e972-e325-11ce-bfc1-08002be10318}\<nn>\*MaxRSSProcessors |
Maximum number of CPUs allotted. Sets the desired maximum number of processors for each interface. The number can be different for each interface. Note: Restart the network adapter after you change this registry key. |
|
HKLM\SYSTEM\CurrentControlSet\Control\Class\{4d36e972-e325-11ce-bfc1-08002be10318}\<nn>\*RssBaseProcNumber |
Base CPU number. Sets the desired base CPU number for each interface. The number can be different for each interface. This allows partitioning of CPUs across network adapters. Note: Restart the network adapter when you change this registry key. |
|
HKLM\SYSTEM\CurrentControlSet\Control\Class\{4d36e972-e325-11ce-bfc1-08002be10318}\<nn>\*NumaNodeID |
NUMA node affinitization |
|
HKLM\SYSTEM\CurrentControlSet\Control\Class\{4d36e972-e325-11ce-bfc1-08002be10318}\<nn>\*RssBaseProcGroup |
Sets the RSS base processor group for systems with more than 64 processors. |
|
HKLM\SYSTEM\CurrentControlSet\Control\Class\{4d36e972-e325-11ce-bfc1-08002be10318}\<nn>\RssV2 |
Enables the RSS V2 feature. |
|
HKLM\SYSTEM\CurrentControlSet\Control\Class\{4d36e972-e325-11ce-bfc1-08002be10318}\<nn>\ValidateRssV2 |
Enable strict argument validation for upper layer testing. Set along with RssV2 key to enable the RSSv2 feature. |
To display a summary of network adapter software, firmware and hardware related information, perform the following steps:
Display the Device Manager.
Select the Information tab from the Properties sheet.
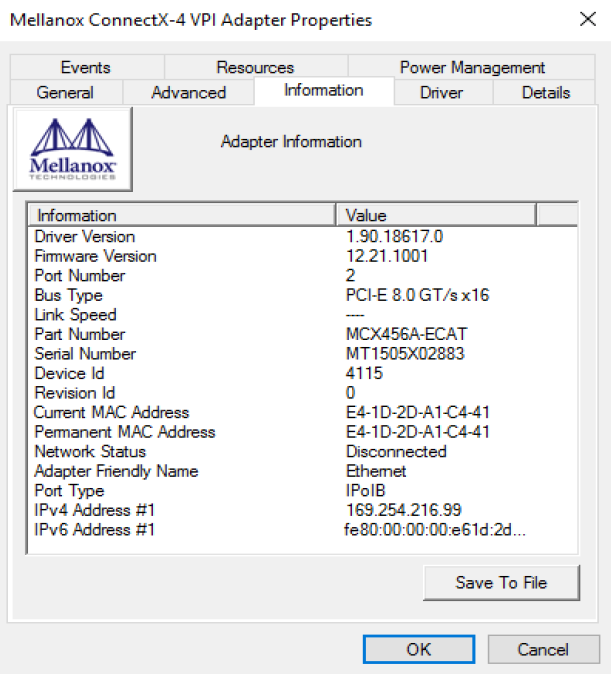 Warning
Click Save to File and provide the output file name to save this information for debug purposes,
DSCP Sanity Testing
To verify that all QoS and DSCP settings are correct, you can capture the incoming and outgoing traffic by using the mlx5cmd sniffer tool. The tool allows you to see the DSCP value in the captured packets, as displayed in the figure below.

Live Firmware Patch allows ConnectX adapter cards family firmware update (upgrade or downgrade) while the driver, the network ports, and the PCI link remain functional. It is supported only between two firmware versions that support Live Firmware Patch.
To check this capability is available in both firmware versions, burn a new firmware (e.g. using mlxburn) and use “mlxfwreset -d <device> q” command to check if Live Firmware Patch is supported. If Live Firmware Patch feature is supported between two firmware versions, it will be the default reset option.
For example:
mlxfwreset -d <device> r
This command will perform Live Firmware Patch if it is possible.
Upon a successful Live Firmware Patch update, the following Event Log message will be generated:
            <Adapter name>: Firmware version was updated from version %3 to version %4 as a result of the firmware live patch update.
Log Name: System
Source: mlx5
Event ID: 400
Level: Warning