UNET
UNet is a semantic segmentation model that supports the following tasks:
trainpruneevaluateinferenceexport
These tasks may be invoked from the TLT launcher by following this convention from the command line:
tlt unet <sub_task> <args_per_subtask>
where args_per_subtask are the command line arguments required for a given subtask. Each of
these subtasks is explained in detail below.
See the Data Annotation Format page for more information about the data format for UNet.
To perform training, evaluation, pruning, and inference for Unet, you will need to configure
several components, each with their own parameters. The train, evaluate,
prune, and inference tasks for a UNet experiment share the same configuration file.
The specification file for Unet training configures these components for the training pipeline:
Model
Trainer
Dataset
Model Config
The segmentation model can be configured using the model_config option in the spec file.
The following is a sample model config to instantiate a resnet18 model with blocks 0 and 1 frozen and all shortcuts set to projection layers:
            # Sample model config for to instantiate a resnet18 model freeze blocks 0, 1
# with all shortcuts having projection layers.

model_config {
  num_layers: 18
  all_projections: true
  arch: "resnet"
  freeze_blocks: 0
  freeze_blocks: 1
  use_batch_norm: true
  training_precision {
    backend_floatx: FLOAT32
  }
  model_input_height: 320
  model_input_width: 320
  model_input_channels: 3
}
The following table describes the model_config parameters:
Parameter |
Datatype |
Default |
Description |
Supported Values |
|---|---|---|---|---|
all_projections |
bool |
False |
For templates with shortcut connections, this parameter defines whether or not all shortcuts should be instantiated with 1x1 projection layers, irrespective of whether there is a change in stride across the input and output. |
True/False (only to be used in resnet templates) |
arch |
string |
resnet |
The architecture of the backbone feature extractor to be used for training |
resnet, vgg, vanilla_unet, efficientnet_b0, vanilla_dynamic |
num_layers |
int |
18 |
The depth of the feature extractor for scalable templates |
|
use_pooling |
Boolean |
False |
A Boolean value that determines whether to use strided convolutions or MaxPooling while downsampling. When True, MaxPooling is used to downsample; however, for an object detection network, we recommend setting this to False and using strided convolutions. |
False/True |
use_batch_norm |
Boolean |
False |
A Boolean value that determines whether to use batch normalization layers or not |
True/False |
training precision |
Proto Dictionary |
– |
Contains a nested parameter that sets the precision of the back-end training framework |
backend_floatx: FLOAT32 |
load_graph |
Boolean |
False |
For a pruned model, set this parameter as True. Pruning modifies the original graph, hence both the pruned model graph and the weights need to be imported. |
True/False |
freeze_blocks |
float (repeated) |
– |
This parameter defines which blocks may be frozen from the instantiated feature extractor template, and is different for different feature extractor templates. |
|
freeze_bn |
Boolean |
False |
You can choose to freeze the Batch Normalization layers in the model during training. |
True/False |
model_input_height |
int |
– |
The model input height dimension of the model, which should be a multiple of 16. |
>100 |
model_input_width |
int |
– |
The model input width dimension of the model, which should be a multiple of 16. |
>100 |
model_input_channels |
int |
– |
The model-input channels dimension of the model, which should be set to 3 for a Resnet/VGG backbone. It can be set to 1 or 3 for vanilla_unet based on the image input channel dimensions. If the input image channel is 1 and the model-input channels is set to 3 for standard UNet, the input grayscale image is converted to RGB. |
1/3 |
The vanilla_unet model was originally proposed in this paper:
U-Net: Convolutional Networks for Biomedical Image Segmentation.
This model is recommended for the Binary Segmentation use case. The input dimesions for
standard UNet is fixed at 572 x 572.
Training
This section outlines how to configure the training parameters. The following is an example
training_config element:
            training_config {
  batch_size: 2
  epochs: 3
  log_summary_steps: 10
  checkpoint_interval: 1
  loss: "cross_dice_sum"
  learning_rate:0.0001
  regularizer {
    type: L2
    weight: 3.00000002618e-09
  }
  optimizer {
    adam {
      epsilon: 9.99999993923e-09
      beta1: 0.899999976158
      beta2: 0.999000012875
    }
  }
}
The following table describes the parameters for training_config.
Parameter |
Datatype |
Default |
Description |
Supported Values |
|---|---|---|---|---|
batch_size |
int |
1 |
The number of images per batch per gpu |
>= 1 |
epochs |
int |
None |
The number of epochs to train the model. One epoch represents one iteration of training through the entire dataset. |
> 1 |
log_summary_steps |
int |
1 |
The summary-steps interval at which train details are printed to stdout |
1 - steps per epoch |
checkpoint_interval |
int |
1 |
The number of epochs interval at which the checkpoint is saved |
1 - total number of epochs |
loss |
string |
cross_entropy |
The loss to be used for segmentation. The supported losses for tasks are as follows:
|
cross_entropy, cross_dice_sum, dice |
learning_rate |
float |
0.0001 |
The learning-rate initialization value. |
0 - 1 |
regularizer |
regularizer proto config |
– |
This parameter configures the type and weight of the regularizer to be used during training. The two parameters include:
|
The supported values for type are:
|
optimizer |
optimizer proto config |
This parameter defines which optimizer to use for training, and the parameters to configure it, namely:
|
Dice loss is currently supported only for binary segmentation. Generic Dice loss for multi-class segmentation is not supported.
Dataset
This section describes how to configure the dataset_config function.
You can feed the input images and corresponding masks either as folders or from text files.
The following is an example dataset_config element using folders as inputs:
              dataset_config {
    dataset: "custom"
    augment: true
    augmentation_config {
      spatial_augmentation {
        hflip_probability : 0.5
        vflip_probability : 0.5
        crop_and_resize_prob : 0.5
      }
      brightness_augmentation {
        delta: 0.2
      }
    }

    input_image_type: "grayscale"
    train_images_path:"/workspace/tlt-experiments/data/unet/isbi/images/train"
    train_masks_path:"/workspace/tlt-experiments/data/unet/isbi/masks/train"
    val_images_path:"/workspace/tlt-experiments/data/unet/isbi/images/val"
    val_masks_path:"/workspace/tlt-experiments/data/unet/isbi/masks/val"
    test_images_path:"/workspace/tlt-experiments/data/unet/isbi/images/test"
    data_class_config {
      target_classes {
      name: "foreground"
      mapping_class: "foreground"
      label_id: 0
    }
    target_classes {
      name: "background"
      mapping_class: "background"
      label_id: 1
    }
  }
}
Please refer Structured Images and Masks Folders that provides the description of the contents of images and masks paths.
The following is an example dataset_config element using text files as inputs:
            dataset_config {
  dataset: "custom"
  augment: true
  augmentation_config {
    spatial_augmentation {
      hflip_probability : 0.5
      vflip_probability : 0.5
      crop_and_resize_prob : 0.5
    }
    brightness_augmentation {
      delta: 0.2
    }
  }
  input_image_type: "color"
  train_data_sources: {
    data_source: {
      image_path: "/workspace/images_train/images_source1.txt"
      masks_path: "/workspace/labels_train/labels_source1.txt"
    }
    data_source: {
      image_path: "/workspace/images_train/images_source2.txt"
      masks_path: "/workspace/labels_train/labels_source2.txt"
    }
  }
  val_data_sources: {
    data_source: {
      image_path: "/workspace/images_val/images_source1.txt"
      masks_path: "/workspace/labels_val/labels_source1.txt"
    }
    data_source: {
      image_path: "/workspace/images_val/images_source2.txt"
      masks_path: "/workspace/labels_val/labels_source2.txt"
    }
  }
  test_data_sources: {
    data_source: {
      image_path: "/workspace/images_test/images_source1.txt"
      masks_path: "/workspace/labels_test/labels_source1.txt"
    }
    data_source: {
      image_path: "/workspace/images_test/images_source2.txt"
      masks_path: "/workspace/labels_test/labels_source2.txt"
    }
  }
  data_class_config {
    target_classes {
      name: "foreground"
      mapping_class: "foreground"
      label_id: 0
    }
    target_classes {
      name: "background"
      mapping_class: "background"
      label_id: 1
    }
  }
}
Please refer Image and Mask Text files that provides description of the contents of text files.
The following table describes the parameters used to configure dataset_config:
Parameter |
Datatype |
Default |
Description |
Supported Values |
|---|---|---|---|---|
dataset |
string |
custom |
The input type dataset used. The currently supported dataset is custom to the user. Open source datasets will be added in the future. |
custom |
augment |
bool |
False |
If the input should augmented online while training, the following augmentations are done at a probability of 0.5 The augmentation config can modified to change the probability for each type of augmentation.
|
true / false |
augmentation_config |
Proto Message |
None |
Contains the spatial_augmentation proto and brightness_augmentation proto to configure the probability of corresponding augmentations. |
|
spatial_augmentation |
Proto Dictionary |
None
|
Contains the following configurable fields. Set to default value if augment arument is set to True.
|
|
brightness_augmentation |
Proto Dictionary |
0.2 |
Configure following parameter: delta: Adjust brightness using delta value. |
Non-negative integer |
input_image_type |
string |
color |
The input image type to indicate if input image is grayscale or color (RGB) |
color/ grayscale |
train_images_path |
string |
None |
The input train images path |
UNIX path string |
train_masks_path |
string |
None |
The input train masks path |
UNIX path string |
val_images_path |
string |
None |
The input validation images path |
UNIX path string |
val_masks_path |
string |
None |
The input validation masks path |
UNIX path string |
test_images_path |
string |
None |
The input test images path |
UNIX path string |
train_data_sources |
Proto Message |
None |
The input training data_source proto that contain text file for training sequences |
|
val_data_sources |
Proto Message |
None |
The input training data_source proto that contain text file for validation sequences |
|
test_data_sources |
Proto Message |
None |
The input training data_source proto that contain text file for testing sequences |
|
data_source |
Proto Dictionary |
– |
The repeated field for every text file corresponding to a sequence. The following are the parameters of data_source config:
|
|
data_class_config |
Proto Dictionary |
None |
Proto dictionary that contains information of training classes as part of target_classes proto which is described below. |
|
target_classes |
Proto Dictionary |
– |
The repeated field for every training class. The following are required parameters for the target_classes config:
|
The supported image extension formats for training images are “.png”, “.jpg”, “.jpeg”, “.PNG”, “.JPG”, and “.JPEG”.
After preparing input data as per these instructions and setting up a spec file. You are now ready to start training a semantic segmentation network.
The following is the UNet training command:
            tlt unet train [-h] -k <key>
                    -r <result directory>
                    -e <spec_file>
                    [-m <Pre-trained weights to initialize>]
                    [-n <name of the model>
                    [--gpus <num GPUs>]
                    [--gpu_index <space separate gpu indices>]
                    [--use_amp]
Required Arguments
-r, --results_dir: The path to a folder where experiment outputs should be written.-k, –key: A user-specific encoding key to save or load a.tltmodel.-e, --experiment_spec_file: The path to the spec file.
Optional Arguments
-m, --pretrained_model_file: The path to a pre-trained model to initialize. This parameter defaults toNone. This parameter is configured to prune model for re-training.-n, --model_name: The name that the final checkpoint will be saved as in the weights directory. The default value ismodel.tlt.--gpus: The number of GPUs to use and processes to launch for training. The default value is 1.--gpu_index: The indices of the GPUs to use for training. The GPU indices are described in the./deviceQueryCUDA samples.--use_amp: A flag that enables Automatic Mixed Precision mode-h, --help: Prints this help message.
Input Requirement
Input size: C * W * H (where C = 3 or 1, W = 572, H = 572 for vanilla unet and W >= 128, H >= 128 and W, H are multiples of 32 for other archs).
Image format: JPG, JPEG, PNG, BMP
Label format: Image/Mask pair
The images and masks need not be equal to model input size. The images/ masks will be resized to the model input size during training.
Sample Usage
Here is an example of a command for two-GPU training:
            tlt unet train -e </path/to/spec/file>
               -r </path/to/experiment/output>
               -k <key_to_load_the_model>
               -n <name_string_for_the_model>
               -m <Pre-trained weights to initialize the model>
               --gpus 2
UNet supports resuming training from intermediate checkpoints. If a previously running training experiment is stopped prematurely, you can restart the training from the last checkpoint by simply re-running the UNet training command with the same command-line arguments as before. The trainer for UNet finds the last saved checkpoint in the results directory and resumes the training from there. The interval at which the checkpoints are saved are defined by the checkpoint_interval parameter under the “training_config” for UNet. Do not use a pre-trained weights argument when resuming training.
Pruning removes parameters from the model to reduce the model size without compromising the
integrity of the model itself using the prune command.
The prune task includes these parameters:
            tlt unet prune [-h] -m <pretrained_model>
                    -e <spec_file>
                    -o <output_file>
                    -k <key>
                    [-n <normalizer>]
                    [-eq <equalization_criterion>]
                    [-pg <pruning_granularity>]
                    [-pth <pruning threshold>]`
                    [-nf <min_num_filters>]
                    [-el [<excluded_list>]
Required Arguments
-m, --pretrained_model: The path to the model to be pruned. Usually, the last epoch model is used.-e, --experiment_spec_file: The path to the spec file.-o, --output_file: The path to the pruned model.-k, --key: The key to load a .tlt model.
Optional Arguments
-h, --help: Show this help message and exit.-n, –normalizer: Specifymaxto normalize by dividing each norm by the maximum norm within a layer; specifyL2to normalize by dividing by the L2 norm of the vector comprising all kernel norms. The default value ismax.-eq, --equalization_criterion: Criteria to equalize the stats of inputs to an element-wise op layer or depth-wise convolutional layer. This parameter is useful for resnets and mobilenets. The options arearithmetic_mean,geometric_mean,union, andintersection(default:union).-pg, -pruning_granularity: The number of filters to remove at a time (default: 8)-pth: The threshold to compare the normalized norm against (default :0.1)-nf, --min_num_filters: The minimum number of filters to keep per layer (default:16)-el, --excluded_layers: A list of excluded_layers (e.g.-i item1 item2) (default: [])
After pruning, the model needs to be retrained. See Re-training the Pruned Model for more details.
Using the Prune Command
Here’s an example of using the prune task:
            tlt unet prune -e </path/to/spec/file>
               -m </path/to/weights to be pruned>
               -o </path/to/pruned weights>
               -eq union
               -pth 0.7
               -k $KEY
Once the model has been pruned, there might be a slight decrease in accuracy
because some previously useful weights may have been removed. To regain the accuracy,
we recommend that you retrain this pruned model over the same dataset using
the train command, as documented in the Training the model
section, with the -m, --pretrained_model argument pointing to the newly pruned model as the
pretrained model file.
We recommend setting the regularizer weight to zero in the training_config for UNet to
recover the accuracy when retraining a pruned model. All other parameters may be retained in the
spec file from the previous training.
To load the pruned model, as well as for re-training, set the load_graph flag under
model_config to true.
Execute evaluate on a UNet model as follows:
            tlt unet evaluate [-h] -e <experiment_spec>
                       -m <model_file>
                       -o <output folder>
                       -k <key>
                       [--gpu_index]
Required Arguments
-e, --experiment_spec_file: The experiment spec file for setting up the evaluation experiment. This should be the same as training spec file.-m, --model_path: The path to the model file to use for evaluation. This could be a.tltmodel file or a tensorrt engine generated using theexporttool.-o, --output_dir: The output dir where the evaluation metrics are saved as a JSON file. TLT inference is saved tooutput_dir/results_tlt.jsonand TRT inference is saved tooutput_dir/results_trt.json. The results JSON file has the precision, recall, f1-score, and IOU for every class. It also provides the weighted average, macro average and micro average for these metrics. For more information on the averaging metric, see the classification report.-k, -–key: The encryption key to decrypt the model. This argument is only required
with a
.tltmodel file.
Optional Arguments
-h, --help: Show this help message and exit.--gpu_index: The index of the GPU to run evaluation on
If you have followed the example in Training a Unet Model, you may now evaluate the model using the following command:
Sample Usage
Here is an example of a command for evaluating the model:
            tlt unet evaluate -e </path/to/training/spec/file>
                  -m </path/to/the/model>
                  -o </path/to/evaluation/output>
                  -k <key to load the model>
This command runs evaluation using the images and masks that are provided to
val_images_path and val_masks_path or text files provided under the
val_data_sources`in :code:`dataset_config.
The inference task for UNet may be used to visualize segmentation and
generate frame-by-frame PNG format labels on a directory of images. An
example of the command for this task is shown below:
            tlt unet inference [-h] -e <experiment_spec>
                        -m <model_file>
                        -o <output folder to save inference images>
                        -k <key>
                        [--gpu_index]
Required Parameters
-e, --experiment_spec_file: The path to an inference spec file.-o, --output_dir: The directory to the output annotated images and labels. The annotated images are invis_overlay_tltand labels are inmask_labels_tlt. The annotated images are saved invis_overlay_trtand predicted labels inmask_labels_trtif the TRT engine is used for inference.-k, --enc_key: The key to load the model.
The tool automatically generates segmentation overlayed images in output_dir/vis_overlay_tlt.
The labels will be generated in output_dir/mask_labels_tlt. The annotated, segmented images
and labels for trt inference are saved in output_dir/vis_overlay_trt and
output_dir/mask_labels_trt respectively.
The UNet model application in the Transfer Learning Toolkit includes an export sub-task
to export and prepare a trained UNet model for Deploying to DeepStream.
The export sub-task optionally generates the calibration cache for TensorRT INT8 engine
calibration.
Exporting the model decouples the training process from deployment and allows conversion to
TensorRT engines outside the TLT environment. TensorRT engines are specific to each hardware
configuration and should be generated for each unique inference environment. This may be
interchangeably referred to as the .trt or .engine file. The same exported TLT
model may be used universally across training and deployment hardware. This is referred to as the
.etlt file, or encrypted TLT file. During model export, the TLT model is encrypted with
a private key. This key is required when you deploy this model for inference.
INT8 Mode Overview
TensorRT engines can be generated in INT8 mode to run with lower precision,
and thus improve performance. This process requires a cache file that contains scale factors
for the tensors to help combat quantization errors, which may arise due to low-precision arithmetic.
The calibration cache is generated using a calibration tensorfile when export is
run with the --data_type flag set to int8. Pre-generating the calibration
information and caching it removes the need for calibrating the model on the inference machine.
Moving the calibration cache is usually much more convenient than moving the calibration tensorfile
since it is a much smaller file and can be moved with the exported model. Using the calibration
cache also speeds up engine creation as building the cache can take several minutes to generate
depending on the size of the Tensorfile and the model itself.
The export tool can generate an INT8 calibration cache by ingesting training data. You will need to point the tool to a directory of images to use for calibrating the model. You will also need to create a sub-sampled directory of random images that best represent your training dataset.
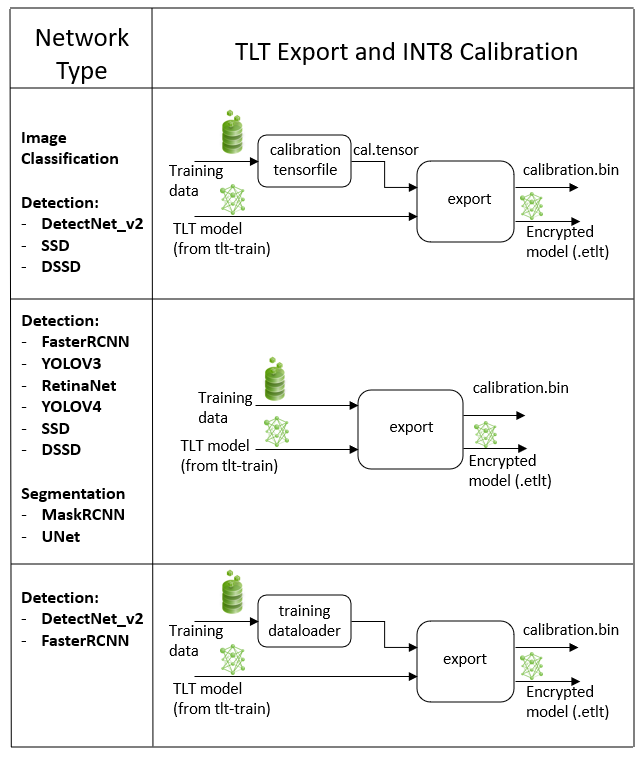
FP16/FP32 Model
The calibration.bin is only required if you need to run inference at INT8 precision. For
FP16/FP32 based inference, the export step is much simpler. All that is required is to provide
a model from the train step to export to convert into an encrypted tlt
model.

Exporting the UNet Model
Here’s an example of the command line arguments for the export command:
            tlt unet export [-h] -m </path/to the .tlt model file generated by tlt train>
                     -k <key>
                     -e </path/to/experiment/spec_file>
                     [-o </path/to/output/file>]
                     [-s <strict_type_constraints>]
                     [--cal_data_file </path/to/tensor/file>]
                     [--cal_image_dir </path/to/the/directory/images/to/calibrate/the/model]
                     [--cal_cache_file </path/to/output/calibration/file>]
                     [--data_type <Data type for the TensorRT backend during export>]
                     [--batches <Number of batches to calibrate over>]
                     [--max_batch_size <maximum trt batch size>]
                     [--max_workspace_size <maximum workspace size]
                     [--batch_size <batch size to TensorRT engine>]
                     [--engine_file </path/to/the/TensorRT/engine_file>]
                     [--gen_ds_config] <Flag to generate ds config and label file>]
                     [--verbose Verbosity of the logger]
Required Arguments
-m, --model: The path to the .tlt model file to be exported usingexport.-k, --key: The key used to save the.tltmodel file.-e, --experiment_spec: The path to the spec file.
Optional Arguments
-o, --output_file: The path to save the exported model to. The default path is./<input_file>.etlt.--data_type: The engine data type for generating calibration cache if in INT8 mode. The options arefp32,fp16, andint8. The default value isfp32. If using int8, theint8argument is required.--gen_ds_config: A Boolean flag indicating whether to generate the template DeepStream related configuration (“nvinfer_config.txt”) as well as a label file (“labels.txt”) in the same directory as theoutput_file. Note that the config file is NOT a complete configuration file and requires the user to update the sample config files in DeepStream with the parameters generated.-s, --strict_type_constraints: A Boolean flag to indicate whether or not to apply the TensorRTstrict_type_constraintswhen building the TensorRT engine. Note this is only for applying the strict type of INT8 mode.
INT8 Export Mode Required Arguments
--cal_data_file: The output file used with--cal_image_dir.--cal_image_dir: The directory of images to use for calibration.
If a valid path is provided to the --cal_data_file argument over the command line,
the export tool produces an intermediate TensorFile for re-use from random batches of
images in the --cal_image_dir directory of images . This tensorfile is used for calibration.
If --cal_image_dir is not provided, random input tensors are used for calibration.
The number of batches in the generated tensorfile is obtained from the value set to the
--batches parameter, and the batch_size is obtained from the value set to
the --batch_size parameter. Ensure that the directory mentioned in
--cal_image_dir has at least batch_size * batches number of images in it.
The valid image extensions are “.jpg”, “.jpeg”, and “.png”. In this case,
the input_dimensions of the calibration tensors are derived from the input layer
of the .tlt model.
INT8 Export Optional Arguments
--cal_cache_file: The path to save the calibration cache file. The default value is./cal.bin.--batches: The number of batches to use for calibration and inference testing. The default value is 10.--batch_size: The batch size to use for calibration. The default value is 8.--max_batch_size: The maximum batch size of the TensorRT engine. The default value is 16.--max_workspace_size: The maximum workspace size of the TensorRT engine. The default value is 1073741824 = 1<<30--experiment_spec: Theexperiment_specfor training/inference/evaluation.--engine_file: The path to the serialized TensorRT engine file. Note that this file is hardware specific and cannot be generalized across GPUs. The engine file allows you to quickly test your model accuracy using TensorRT on the host. Since a TensorRT engine file is hardware specific, you cannot use an engine file for deployment unless the deployment GPU is identical to the training GPU.
UNet does not support QAT.
Sample Usage for the Export Subtask
Here’s a sample command using the --cal_image_dir option for a UNet model.
            tlt unet export
    -m $USER_EXPERIMENT_DIR/unet/model.tlt
    -o $USER_EXPERIMENT_DIR/unet/model.int8.etlt
    -e $SPECS_DIR/unet_train_spec.txt
    --key $KEY
    --cal_image_dir $USER_EXPERIMENT_DIR/data/isbi/images/val
    --data_type int8
    --batch_size 8
    --batches 10
    --cal_data_file $USER_EXPERIMENT_DIR/export/isbi_cal_data_file.txt
    --cal_cache_file $USER_EXPERIMENT_DIR/export/isbi_cal.bin
    --engine_file $USER_EXPERIMENT_DIR/export/int8.isbi.engine
To deploy a UNet model trained by TLT to DeepStream we have to generate a device specific
optimized TensorRT engine using tlt-converter which can then be ingested by DeepStream.
Download the corresponding device specific tlt-converter from TLT converter matrix.
Machine-specific optimizations are done as part of the engine creation process, so a distinct engine should be generated for each environment and hardware configuration. If the TensorRT or CUDA libraries of the inference environment are updated (including minor version updates), or if a new model is generated, new engines need to be generated. Running an engine that was generated with a different version of TensorRT and CUDA is not supported and will cause unknown behavior that affects inference speed, accuracy, and stability, or it may fail to run altogether.
See Exporting the Model for more details on how to export a TLT model.
Generating an Engine Using tlt-converter
The tlt-converter tool is provided with the Transfer Learning Toolkit
to facilitate the deployment of TLT trained models on TensorRT and/or Deepstream.
This section elaborates on how to generate a TensorRT engine using tlt-converter.
For deployment platforms with an x86-based CPU and discrete GPUs, the tlt-converter
is distributed within the TLT docker. Therefore, we suggest using the docker to generate
the engine. However, this requires that the user adhere to the same minor version of
TensorRT as distributed with the docker. The TLT docker includes TensorRT version 7.2.
Instructions for x86
For an x86 platform with discrete GPUs, the default TLT package includes the tlt-converter
built for TensorRT 7.1 with CUDA 11.0 and CUDNN 8.0.3. However, for any other version of CUDA and
TensorRT, visit the Developer Website for download. Once the tlt-converter
is downloaded, follow the instructions below to generate a TensorRT engine.
Unzip
tlt-converter-trt7.x.zipon the target machine.Install the OpenSSL package using the command:
sudo apt-get install libssl-dev
Export the following environment variables:
            $ export TRT_LIB_PATH=”/usr/lib/aarch64-linux-gnu”
$ export TRT_INC_PATH=”/usr/include/aarch64-linux-gnu”
Run the
tlt-converterusing the sample command below and generate the engine.
Instructions for Jetson
For the all platforms, the tlt-converter is available to download from the TLT converter matrix..
Please ensure to download the respective tlt-converter corresponding to the platform.
Once the tlt-converter is downloaded, follow the instructions below to generate a
TensorRT engine.
Unzip
tlt-converter-trt7.1.zipon the target machine.Install the OpenSSL package using the command:
sudo apt-get install libssl-dev
Export the following environment variables:
            $ export TRT_LIB_PATH=”/usr/lib/aarch64-linux-gnu”
$ export TRT_INC_PATH=”/usr/include/aarch64-linux-gnu”
For Jetson devices, TensorRT 7.1 comes pre-installed with Jetpack. If you are using an older version of JetPack, upgrade to JetPack 4.4.
Run the
tlt-converterusing the sample command below and generate the engine.
Make sure to follow the output node names as mentioned in Exporting the Model.
Using the tlt-converter
            tlt-converter [-h] -k <encryption_key>
                   -p <optimization_profiles>
                   [-d <input_dimensions>]
                   [-o <comma separated output nodes>]
                   [-c </path/to/calibration/cache_file>]
                   [-e </path/to/output/engine>]
                   [-b <calibration batch size>]
                   [-m <maximum batch size of the TRT engine>]
                   [-t <engine datatype>]
                   [-w <maximum workspace size of the TRT Engine>]
                   [-i <input dimension ordering>]
                   [-s]
                   [-u <DLA_core>]
                   input_file
Required Arguments
input_file: The path to the.etltmodel exported usingexport.-p: Optimization profiles for.etltmodels with dynamic shape. Use a comma-separated list of optimization profile shapes in the format<input_name>,<min_shape>,<opt_shape>,<max_shape>, where each shape has the format:<n>x<c>x<h>x<w>. This can be specified multiple times if there are multiple input tensors for the model.-k: The key used to encode the.tltmodel when doing the traning
Optional Arguments
-e: The path to save the engine to. The default path is default:./saved.engine. Use.engineor.trtas an extension for the engine path.-t: The desired engine data type. This option generates a calibration cache if in INT8 mode. The default value isfp32. The options arefp32,fp16,int8.-w: The maximum workspace size for the TensorRT engine. The default value is1073741824(1<<30).-i: The input dimension ordering. The default value isnchw. The options arenchw,nhwc,nc. For UNet, we can omit this argument.-s: A Boolean value specifying whether to apply TensorRT strict type constraints when building the TensorRT engine.-u: Specifies the DLA core index when building the TensorRT engine on Jetson devices.-d: A comma-separated list of input dimensions that should match the dimensions used forexport.-o: A comma-separated list of output blob names that should match the output configuration used forexport.
INT8 Mode Arguments
-c: The path to the calibration cache file for INT8 mode. The default path is./cal.bin.-b: The batch size used during theexportstep for INT8 calibration cache generation (default:8).-m: The maximum batch size for the TensorRT engine. The default value is16. If you encounter out-of-memory issues, decrease the batch size accordingly. This parameter is not required for.etltmodels generated with dynamic shape (which is only possible for new models introduced in TLT 3.0).
Sample Output Log
Here is a sample log for exporting a UNet model.
            tlt-converter -k $KEY
              -c $USER_EXPERIMENT_DIR/export/isbi_cal.bin
              -e $USER_EXPERIMENT_DIR/export/trt.int8.tlt.isbi.engine
              -t int8
              -p input_1,1x1x572x572,4x1x572x572,16x1x572x572
              /workspace/tlt-experiments/faster_rcnn/resnet18_pruned.epoch45.etlt
..
[INFO] Some tactics do not have sufficient workspace memory to run. Increasing workspace size may increase performance, please check verbose output.
[INFO] Detected 1 inputs and 2 output network tensors.
To use the default tlt-converter available in the Transfer Learning Toolkit
package, append tlt to the sample usage of the tlt_converter as mentioned
here.
Once the model and/or TensorRT engine file has been generated, two additional files are required:
Label file
DS configuration file
Label File
The label file is a text file containing the names of the classes that the UNet model
is trained to segment. The order in which the classes are listed here must match the order
in which the model predicts the output. This order is derived from the
target_class_id_mapping.json file that is saved in the results directory after
training. Here is an example of the target_class_id_mapping.json file:
{"0": ["foreground"], "1": ["background"]}
Here is an example of the corresponding unet_labels.txt file. The order in the
unet_labels.txt should match the order in the target_class_id_mapping.json keys:
            foreground
background
DeepStream Configuration File
The segmentation model is typically used as a primary inference engine. It can also be used as a
secondary inference engine. Download ds-tlt from DeepStream tlt apps.
Follow these steps to use TensorRT engine file with the ds-tlt:
1. Generate the TensorRT engine using tlt-converter. Detailed instructions are provided in
the Generating an engine using tlt-converter
section.
Once the engine file is generated successfully, do the following to set up ds-tlt with DS 5.1.
Set
NVDS_VERSION:=5.1inapps/Makefileandpost_processor/Makefileinsidedeepstream_tlt_appsdirectory. This repository is downloaded from DeepStream tlt apps.Now, follow the instructions here to install ds-tlt: DS Tlt installation.
Change the output dimensions for UNet according to your model here: deepstream source code. You need to change
MODEL_OUTPUT_WIDTHandMODEL_OUTPUT_HEIGHTin the above source code to your model output dimensions.For example, For the Resnet18 - 3 channel model mentioned in this documentation, the lines will be changed to :
            #define MODEL_OUTPUT_WIDTH 320
#define MODEL_OUTPUT_HEIGHT 320
To run this model in the sample ds-tlt, you must modify
the existing pgie_unet_tlt_config.txt file here unet tlt config. to point to this model.
For all options, see the configuration file below. To learn more about the parameters, refer to the
DeepStream Development Guide.
            [property]
gpu-id=0
net-scale-factor=0.007843
model-color-format=2
offsets=127.5
labelfile-path=</Path/to/unet_labels.txt>
##Replace following path to your model file
model-engine-file=<Path/to/tensorrt engine generated by tlt-converter>
#current DS cannot parse unet etlt model, so you need to
#convert the etlt model to TensoRT engine first use tlt-convert
infer-dims=c;h;w # where c = number of channels, h = height of the model input, w = width of model input.
batch-size=1
## 0=FP32, 1=INT8, 2=FP16 mode
network-mode=2
num-detected-classes=2
interval=0
gie-unique-id=1
network-type=2
output-blob-names=softmax_1
segmentation-threshold=0.0
##specify the output tensor order, 0(default value) for CHW and 1 for HWC
segmentation-output-order=1

[class-attrs-all]
roi-top-offset=0
roi-bottom-offset=0
detected-min-w=0
detected-min-h=0
detected-max-w=0
detected-max-h=0
An example of modified config file for resnet18, 3-channel model trained on ISBI dataset is provided below:
            [property]
gpu-id=0
net-scale-factor=0.007843

# Since the model input channel is 3, using RGB color format.
model-color-format=0
offsets=127.5;127.5;127.5
labelfile-path=/home/nvidia/deepstream_tlt_apps/configs/unet_tlt/unet_labels.txt
##Replace following path to your model file
model-engine-file=/home/nvidia/deepstream_tlt_apps/models/unet/unet_resnet18_isbi.engine
#current DS cannot parse onnx etlt model, so you need to
#convert the etlt model to TensoRT engine first use tlt-convert
infer-dims=3;320;320
batch-size=1
## 0=FP32, 1=INT8, 2=FP16 mode
network-mode=2
num-detected-classes=2
interval=0
gie-unique-id=1
network-type=2
output-blob-names=softmax_1
segmentation-threshold=0.0
##specify the output tensor order, 0(default value) for CHW and 1 for HWC
segmentation-output-order=1

[class-attrs-all]
roi-top-offset=0
roi-bottom-offset=0
detected-min-w=0
detected-min-h=0
detected-max-w=0
detected-max-h=0
Below is the sample ds-tlt command for inference on one image:
ds-tlt configs/unet_tlt/pgie_unet_tlt_config.txt image_isbi_rgb.jpg
png image format is not supported by DS. Inference image needs to be converted to .jpg.
Ensure to convert grayscale image to 3 channel image if the model_input_channels is set to 3.