Prerequisites#
Create Your NGC Personal Key#
You must create an NGC Personal Key to use UCS Tools with NGC. This key differs from the NGC API key. The NGC Personal key starts with “nvapi-” and lets you set scopes. The key only works for the organization where you created it. First, select your desired organization in NGC. Follow these steps to create an NGC Personal key with the required scopes:
Sign into NGC
Switch to your target organization. The NGC Personal key only works within one organization and only for teams you can access.
Click your profile in the top-right corner and select “Setup”
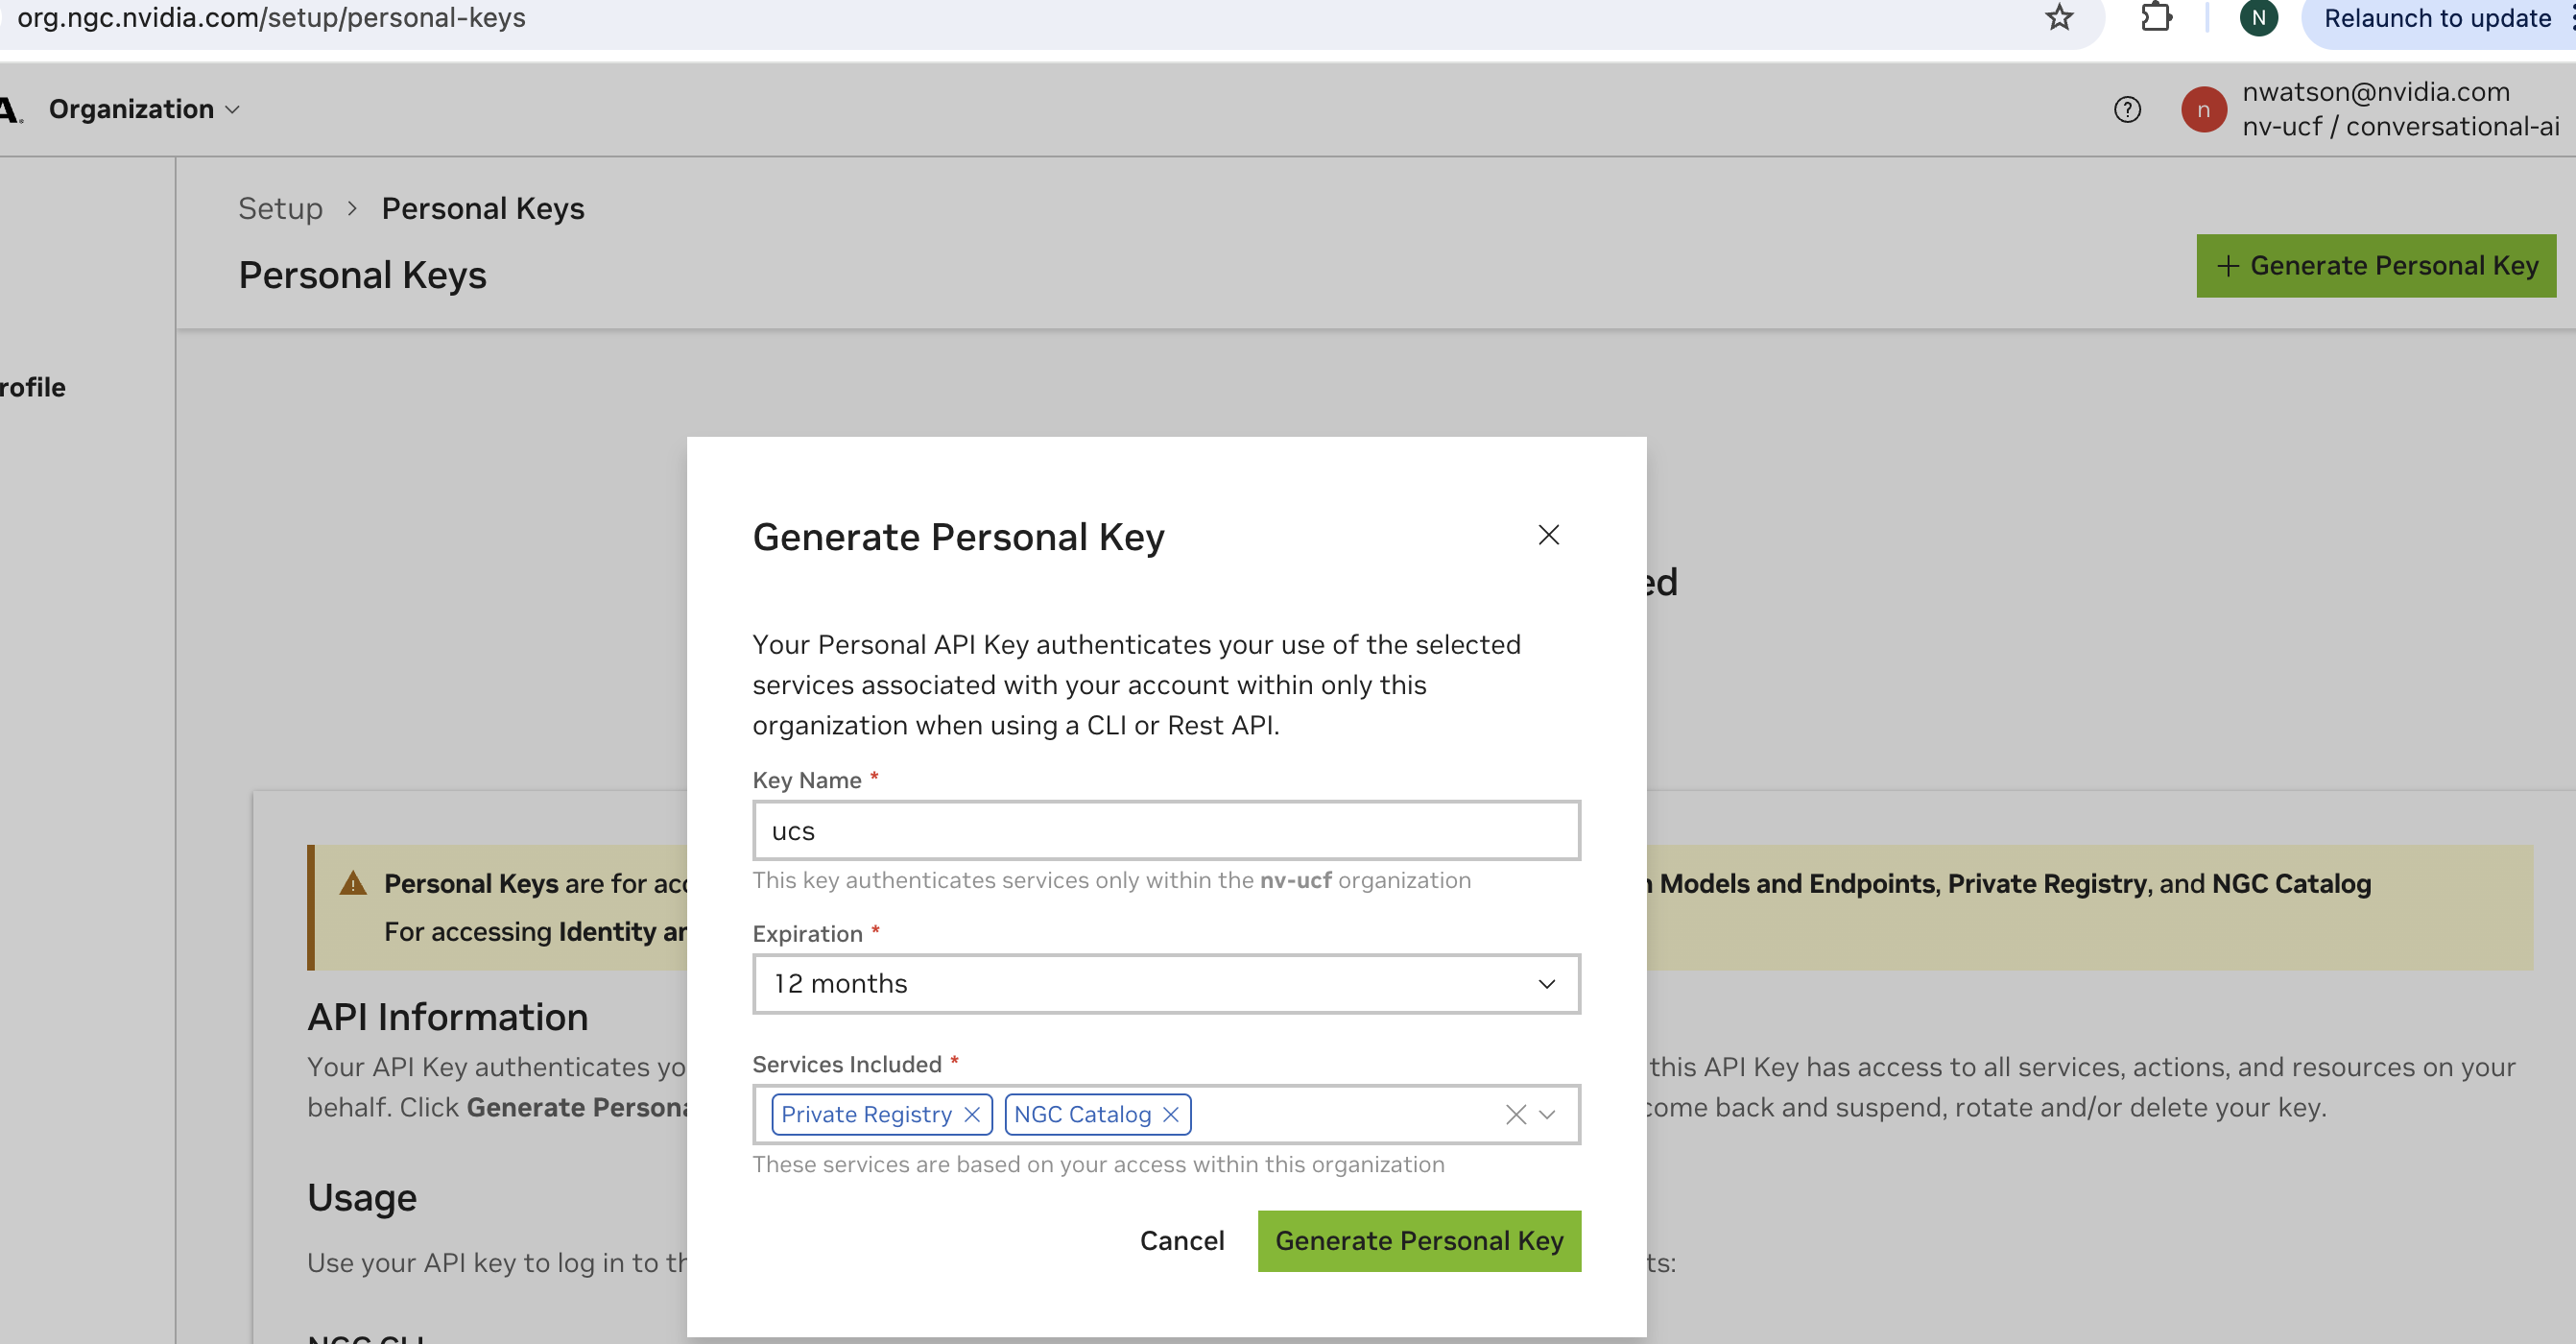
Click “Generate Personal Key”
A dialog box appears. Add these scopes to your key:
Private Registry
NGC Catalog
It should look similar to the image shown below:
After creating your NGC Personal Key with the required scopes, configure it in UCS Tools as shown below.
Set the NGC Personal key to sync microservices from NGC:
First, make sure you have followed the prerequisites for generating your NGC Personal Key.
$ ucf_app_builder_cli registry repo set-api-key -a <API-KEY>
  Checking which NGC UCS teams you have access to
  Adding NGC Catalog team ace
  Repository 'catalog-ace' added
  Adding NGC Catalog team ucs-ms
The command prints the repositories accessible using your API key. Repository names that begin with “catalog-” exist in the NGC Unified Catalog rather than the NGC Private Registry. The NGC Unified Catalog contains artifacts that are either fully public or require product enablement (subscription) such as ace-ea or nvaie to access certain artifacts.
If you get an error when setting the key that reads something like:
2024-11-05 04:18:30,844 - Registry - ERROR - Failed to download service metadata for ucstools_ms_list 2024-11-05 04:18:30,844 - AppBuilder - ERROR - Unable to fetch catalog services list from NGC
Then ensure that you added the NGC Catalog scope when you created your NGC Personal key as documented in NGC Personal Key.
Deployment System#
These instructions require Ubuntu Server LTS 22.04 on your system.
MicroK8s for Developer System#
This document was tested with the following environment:
Ubuntu: 22.04
Install MicroK8s#
Install MicroK8s and wait for Kubernetes to start:
$ sudo snap install microk8s --classic
$ microk8s status --wait-ready
$ microk8s start
Enable Addons#
Install the following MicroK8s addons:
$ microk8s enable dashboard dns gpu helm3 ingress registry storage
NVIDIA Cloud Native Stack for Developer System#
For more information about the cloud native stack, see: NVIDIA/cloud-native-stack.
Install the Ubuntu Operating System#
Download Ubuntu Server from http://cdimage.ubuntu.com/releases/22.04/release/.
For Ubuntu server installation details, see the Ubuntu Server Installation Guide.
Install CUDA Drivers#
Find CUDA installation instructions at: https://developer.nvidia.com/cuda-downloads?target_os=Linux&target_arch=x86_64&Distribution=Ubuntu&target_version=22.04&target_type=deb_local.
After installing the NVIDIA drivers, reboot your system. Then run this command to verify the drivers loaded correctly:
nvidia-smi
Expected Output:
+---------------------------------------------------------------------------------------+
| NVIDIA-SMI 535.104.05             Driver Version: 535.104.05   CUDA Version: 12.2     |
|-----------------------------------------+----------------------+----------------------+
| GPU  Name                 Persistence-M | Bus-Id        Disp.A | Volatile Uncorr. ECC |
| Fan  Temp   Perf          Pwr:Usage/Cap |         Memory-Usage | GPU-Util  Compute M. |
|                                         |                      |               MIG M. |
|=========================================+======================+======================|
|   0  NVIDIA GeForce RTX 4090        On  | 00000000:65:00.0 Off |                  Off |
|  0%   30C    P8               5W / 450W |    133MiB / 24564MiB |      0%      Default |
|                                         |                      |                  N/A |
+-----------------------------------------+----------------------+----------------------+

+---------------------------------------------------------------------------------------+
| Processes:                                                                            |
|  GPU   GI   CI        PID   Type   Process name                            GPU Memory |
|        ID   ID                                                             Usage      |
|=======================================================================================|
|    0   N/A  N/A      1119      G   /usr/lib/xorg/Xorg                          107MiB |
|    0   N/A  N/A      1239      G   /usr/bin/gnome-shell                         13MiB |
+---------------------------------------------------------------------------------------+
Install Docker CE#
Update the apt package index:
$ sudo apt-get update
Install packages needed for HTTPS repository access:
$ sudo apt-get install -y \
   apt-transport-https \
   ca-certificates \
   curl \
   gnupg-agent \
   software-properties-common
Add Docker’s official GPG key:
$ curl -fsSL https://download.docker.com/linux/ubuntu/gpg | sudo apt-key add -
Verify the key fingerprint by searching for the last 8 characters:
$ sudo apt-key fingerprint 0EBFCD88

pub   rsa4096 2017-02-22 [SCEA]
 9DC8 5822 9FC7 DD38 854A  E2D8 8D81 803C 0EBF CD88
uid           [ unknown] Docker Release (CE deb) <docker@docker.com>
sub   rsa4096 2017-02-22 [S]
Set up the stable repository:
$ sudo add-apt-repository \
  "deb [arch=amd64] https://download.docker.com/linux/ubuntu \
  $(lsb_release -cs) \
  stable"
Update the apt package index:
$ sudo apt-get update
Install Docker Engine:
$ sudo apt-get install -y docker-ce docker-ce-cli containerd.io
Verify Docker Engine installation by running the hello-world image:
$ sudo docker run hello-world
For more information on Docker installation, see https://docs.docker.com/install/linux/docker-ce/ubuntu/.
Install NVIDIA Container Toolkit#
Setup the package repository:
distribution=$(. /etc/os-release;echo $ID$VERSION_ID) \
     && curl -fsSL https://nvidia.github.io/libnvidia-container/gpgkey | sudo gpg --dearmor -o /usr/share/keyrings/nvidia-container-toolkit-keyring.gpg \
     && curl -s -L https://nvidia.github.io/libnvidia-container/$distribution/libnvidia-container.list | \
           sed 's#deb https://#deb [signed-by=/usr/share/keyrings/nvidia-container-toolkit-keyring.gpg] https://#g' | \
           sudo tee /etc/apt/sources.list.d/nvidia-container-toolkit.list
Update the package index:
sudo apt update
Install NVIDIA Container Toolkit:
sudo apt-get install -y nvidia-docker2
Update the Docker Default Runtime.
Edit the docker daemon configuration to add the following line and save the file:
    "default-runtime" : "nvidia"

Example

.. code-block:: text

    $ sudo nano /etc/docker/daemon.json

    {
      "runtimes": {
           "nvidia": {
               "path": "nvidia-container-runtime",
              "runtimeArgs": []
           }
      },
      "default-runtime" : "nvidia"
    }
Now execute the below commands to restart the docker daemon:
sudo systemctl daemon-reload && sudo systemctl restart docker
Validate docker default runtime.
Execute the below command to validate docker default runtime as NVIDIA:
    $ sudo docker info | grep -i runtime

Output:

.. code-block:: text

   Runtimes: nvidia runc
   Default Runtime: nvidia
Install Containerd#
Set up the repository and update the apt package index:
sudo apt-get update
Install packages to allow apt to use a repository over HTTPS:
sudo apt-get install -y apt-transport-https gnupg-agent libseccomp2 autotools-dev debhelper software-properties-common
Configure the prerequisites for Containerd:
    cat <<EOF | sudo tee /etc/modules-load.d/containerd.conf
    overlay
    br_netfilter
    EOF

.. code-block:: text

    sudo modprobe overlay
    sudo modprobe br_netfilter
Setup required sysctl params; these persist across reboots:
cat <<EOF | sudo tee /etc/sysctl.d/99-kubernetes-cri.conf
net.bridge.bridge-nf-call-iptables  = 1
net.ipv4.ip_forward                 = 1
net.bridge.bridge-nf-call-ip6tables = 1
EOF
Apply sysctl params without reboot:
sudo sysctl --system
Download the Containerd tarball:
wget https://github.com/containerd/containerd/releases/download/v1.6.6/cri-containerd-cni-1.6.6-linux-amd64.tar.gz
sudo tar --no-overwrite-dir -C / -xzf cri-containerd-cni-1.6.6-linux-amd64.tar.gz
rm -rf cri-containerd-cni-1.6.6-linux-amd64.tar.gz
Install Containerd:
sudo mkdir -p /etc/containerd
wget  https://raw.githubusercontent.com/NVIDIA/cloud-native-stack/master/playbooks/config.toml
sudo mv config.toml /etc/containerd/ && sudo sed -i 's/SystemdCgroup \= false/SystemdCgroup \= true/g' /etc/containerd/config.toml
sudo systemctl enable containerd && sudo systemctl restart containerd
For additional information on installing Containerd, please reference Install Containerd with Release Tarball.
Install Kubernetes#
Make sure Containerd has been started and enabled before beginning installation:
sudo systemctl start containerd && sudo systemctl enable containerd
Execute the following to add apt keys:
sudo apt-get update && sudo apt-get install -y apt-transport-https curl
curl -s https://packages.cloud.google.com/apt/doc/apt-key.gpg | sudo apt-key add -
sudo mkdir -p  /etc/apt/sources.list.d/
Create kubernetes.list:
cat <<EOF | sudo tee /etc/apt/sources.list.d/kubernetes.list
deb https://apt.kubernetes.io/ kubernetes-xenial main
EOF
Now execute the below to install kubelet, kubeadm, and kubectl:
sudo apt-get update
sudo apt-get install -y -q kubelet=1.27.0-00 kubectl=1.24.1-00 kubeadm=1.27.0-00
sudo apt-mark hold kubelet kubeadm kubectl
Create a kubelet default with Containerd:
cat <<EOF | sudo tee /etc/default/kubelet
KUBELET_EXTRA_ARGS=--cgroup-driver=systemd --container-runtime=remote --runtime-request-timeout=15m --container-runtime-endpoint="unix:/run/containerd/containerd.sock"
EOF
Reload the system daemon:
sudo systemctl daemon-reload
Disable swap#
sudo swapoff -a
sudo nano /etc/fstab
Note
Add a # before all the lines that start with /swap. # is a comment, and the result should look something like this:
UUID=e879fda9-4306-4b5b-8512-bba726093f1d / ext4 defaults 0 0
UUID=DCD4-535C /boot/efi vfat defaults 0 0
#/swap.img       none    swap    sw      0       0
Intialize Kubernetes#
The steps below show how to Initialize the Kubernetes cluster to run as a control-plane node:
Execute the following command:
    sudo kubeadm init --pod-network-cidr=192.168.0.0/16 --cri-socket=/run/containerd/containerd.sock --kubernetes-version="v1.27.0"

Output:

.. code-block:: text

    Your Kubernetes control-plane has initialized successfully!

    To start using your cluster, you need to run the following as a regular user:

    mkdir -p $HOME/.kube
    sudo cp -i /etc/kubernetes/admin.conf $HOME/.kube/config
    sudo chown $(id -u):$(id -g) $HOME/.kube/config

    Alternatively, if you are the root user, you can run:

    export KUBECONFIG=/etc/kubernetes/admin.conf

    You should now deploy a pod network to the cluster.
    Run "kubectl apply -f [podnetwork].yaml" with one of the options listed at:
     https://kubernetes.io/docs/concepts/cluster-administration/addons/

    Then you can join any number of worker nodes by running the following on each as root:

    kubeadm join <your-host-IP>:6443 --token 489oi5.sm34l9uh7dk4z6cm \
       --discovery-token-ca-cert-hash sha256:17165b6c4a4b95d73a3a2a83749a957a10161ae34d2dfd02cd730597579b4b34
Following the instructions in the output, execute the commands as shown below:
mkdir -p $HOME/.kube
sudo cp -i /etc/kubernetes/admin.conf $HOME/.kube/config
sudo chown $(id -u):$(id -g) $HOME/.kube/config
With the following command, you install a pod-network add-on to the control plane node. We are using calico as the pod-network add-on here:
kubectl apply -f https://docs.projectcalico.org/v3.21/manifests/calico.yaml
Update the Calico Daemonset:
kubectl set env daemonset/calico-node -n kube-system IP_AUTODETECTION_METHOD=interface=ens\*,eth\*,enc\*,enp\*
Execute the below commands to ensure that all pods are up and running:
kubectl get pods --all-namespaces
Output:
NAMESPACE     NAME                                       READY   STATUS    RESTARTS   AGE
kube-system   calico-kube-controllers-65b8787765-bjc8h   1/1     Running   0          2m8s
kube-system   calico-node-c2tmk                          1/1     Running   0          2m8s
kube-system   coredns-5c98db65d4-d4kgh                   1/1     Running   0          9m8s
kube-system   coredns-5c98db65d4-h6x8m                   1/1     Running   0          9m8s
kube-system   etcd-#yourhost                             1/1     Running   0          8m25s
kube-system   kube-apiserver-#yourhost                   1/1     Running   0          8m7s
kube-system   kube-controller-manager-#yourhost          1/1     Running   0          8m3s
kube-system   kube-proxy-6sh42                           1/1     Running   0          9m7s
kube-system   kube-scheduler-#yourhost                   1/1     Running   0          8m26s
The get nodes command shows that the control-plane node is up and ready:
kubectl get nodesOutput:
NAME             STATUS   ROLES                  AGE   VERSION
#yourhost        Ready    control-plane,master   10m   v1.27.0
Since we are using a single-node Kubernetes cluster, the cluster will not schedule pods on the control plane node by default. To schedule pods on the control plane node, remove the taint by executing the following command:
kubectl taint nodes --all node-role.kubernetes.io/master-
Refer to kubeadm installation guide for more information.
Install the latest version of Helm#
Execute the following command to download and install the latest version of Helm:
curl -fsSL -o get_helm.sh https://raw.githubusercontent.com/helm/helm/main/scripts/get-helm-3
chmod 700 get_helm.sh
./get_helm.sh
Add additional node#
Steps below show how to add an additional node to NVIDIA Cloud Native Stack
Note
If you’re not adding additional nodes, please skip this step and proceed to the next step Installing NVIDIA Network Operator
Make sure to install the Containerd and Kubernetes packages on additional nodes.
Once the prerequisites are completed on the additional nodes, execute the below command on the control-plane node. Then execute the join command output on an additional node to add the additional node to NVIDIA Cloud Native Stack:
sudo kubeadm token create --print-join-commandOutput:
example:
sudo kubeadm join 10.110.0.34:6443 --token kg2h7r.e45g9uyrbm1c0w3k --discovery-token-ca-cert-hash sha256:77fd6571644373ea69074dd4af7b077bbf5bd15a3ed720daee98f4b04a8f524eNote
control-plane node and worker node should not have the same node name.
The get nodes command shows that the master and worker nodes are up and ready:
kubectl get nodesOutput:
NAME             STATUS   ROLES                  AGE   VERSION
#yourhost        Ready    control-plane,master   10m   v1.27.0
#yourhost-worker Ready                           10m   v1.27.0
Install GPU Operator#
Add the NVIDIA repo:
helm repo add nvidia https://helm.ngc.nvidia.com/nvidia
Update the Helm repo:
helm repo update
Install GPU Operator:
Note
As we are preinstalled with NVIDIA Driver and NVIDIA Container Toolkit, we need to set as false when installing the GPU Operator.
helm install --version 23.3.2 --create-namespace --namespace nvidia-gpu-operator --devel nvidia/gpu-operator --set driver.enabled=false,toolkit.enabled=false --wait --generate-name
Validate the State of the GPU Operator:
Please note that the installation of the GPU Operator can take a couple of minutes. Installation time depends on your internet speed.
kubectl get pods --all-namespaces | grep -v kube-system
NAMESPACE                NAME                                                              READY   STATUS      RESTARTS   AGE
default                  gpu-operator-1622656274-node-feature-discovery-master-5cddq96gq   1/1     Running     0          2m39s
default                  gpu-operator-1622656274-node-feature-discovery-worker-wr88v       1/1     Running     0          2m39s
default                  gpu-operator-7db468cfdf-mdrdp                                     1/1     Running     0          2m39s
gpu-operator-resources   gpu-feature-discovery-g425f                                       1/1     Running     0          2m20s
gpu-operator-resources   nvidia-cuda-validator-s6x2p                                       0/1     Completed   0          48s
gpu-operator-resources   nvidia-dcgm-exporter-wtxnx                                        1/1     Running     0          2m20s
gpu-operator-resources   nvidia-dcgm-jbz94                                                 1/1     Running     0          2m20s
gpu-operator-resources   nvidia-device-plugin-daemonset-hzzdt                              1/1     Running     0          2m20s
gpu-operator-resources   nvidia-device-plugin-validator-9nkxq                              0/1     Completed   0          17s
gpu-operator-resources   nvidia-operator-validator-cw4j5                                   1/1     Running     0          2m20s
Refer to the GPU Operator page on NGC for more information.
For multiple worker nodes, execute the below command to fix the CoreDNS and Node Feature Discovery.
kubectl delete pods $(kubectl get pods -n kube-system | grep core | awk '{print $1}') -n kube-system; kubectl delete pod $(kubectl get pods -o wide -n gpu-operator-resources | grep node-feature-discovery | grep -v master | awk '{print $1}') -n gpu-operator-resourcesGPU Operator with MIG
Note
Only A100 and A30 GPUs are supported for GPU Operator with MIG
Multi-Instance GPU (MIG) allows GPUs based on the NVIDIA Ampere architecture (such as NVIDIA A100) to be securely partitioned into separate GPU instances for CUDA applications. For more information about enabling the MIG capability, see GPU Operator with MIG.
Validating the GPU Operator#
GPU Operator validates through the nvidia-device-plugin-validation pod and the nvidia-driver-validation pod. Both pods must complete successfully. Check the output from kubectl get pods --all-namespaces | grep -v kube-system. If both show completed status, NVIDIA Cloud Native Stack is working correctly. This section provides two examples for manually validating GPU usability from within a pod.
Example 1: nvidia-smi
Execute the following:
cat <<EOF | tee nvidia-smi.yaml
apiVersion: v1
kind: Pod
metadata:
 name: nvidia-smi
spec:
 restartPolicy: OnFailure
 containers:
   - name: nvidia-smi
     image: "nvidia/cuda:12.2.0-base-ubuntu22.04"
     args: ["nvidia-smi"]
EOF

kubectl apply -f nvidia-smi.yaml
kubectl logs nvidia-smi
Output:
+---------------------------------------------------------------------------------------+
| NVIDIA-SMI 535.104.05             Driver Version: 535.104.05   CUDA Version: 12.2     |
|-----------------------------------------+----------------------+----------------------+
| GPU  Name                 Persistence-M | Bus-Id        Disp.A | Volatile Uncorr. ECC |
| Fan  Temp   Perf          Pwr:Usage/Cap |         Memory-Usage | GPU-Util  Compute M. |
|                                         |                      |               MIG M. |
|=========================================+======================+======================|
|   0  NVIDIA GeForce RTX 4090        On  | 00000000:65:00.0 Off |                  Off |
|  0%   30C    P8               5W / 450W |    133MiB / 24564MiB |      0%      Default |
|                                         |                      |                  N/A |
+-----------------------------------------+----------------------+----------------------+

+---------------------------------------------------------------------------------------+
| Processes:                                                                            |
|  GPU   GI   CI        PID   Type   Process name                            GPU Memory |
|        ID   ID                                                             Usage      |
|=======================================================================================|
|    0   N/A  N/A      1119      G   /usr/lib/xorg/Xorg                          107MiB |
|    0   N/A  N/A      1239      G   /usr/bin/gnome-shell                         13MiB |
+---------------------------------------------------------------------------------------+
Example 2: CUDA-Vector-Add
Create a pod YAML file:
$ cat <<EOF | tee cuda-samples.yaml
apiVersion: v1
kind: Pod
metadata:
  name: cuda-vector-add
spec:
  restartPolicy: OnFailure
  containers:
    - name: cuda-vector-add
      image: "k8s.gcr.io/cuda-vector-add:v0.1"
EOF
Execute the below command to create a sample GPU pod:
$ kubectl apply -f cuda-samples.yaml
Confirm the cuda-samples pod was created:
$ kubectl get pods
NVIDIA Cloud Native Stack works as expected if the get pods command shows the pod status as completed.
NVIDIA Cloud Native Stack for AWS#
Instructions in this document were tested with the following environment:
EC2 Instance Configuration#
instance type: g4dn.2xlarge
os: Ubuntu Server 22.04 LTS image with 64-bit (x86)
storage: min 150 GB
network:
keep port 22 open to ssh
additional ports might need opening after deploying the application
SSH into the instance using the key you generated at instance creation:
ssh -i /path/to/<your_key>.pem ubuntu@<aws_instance_ip>
Installing Containerd#
Install packages to allow apt to use a repository over HTTPS:
sudo apt-get update
sudo apt-get install -y apt-transport-https ca-certificates gnupg-agent libseccomp2 autotools-dev debhelper software-properties-common
Configure the prerequisites for Containerd:
cat <<EOF | sudo tee /etc/modules-load.d/containerd.conf
overlay
br_netfilter
EOF

sudo modprobe overlay
sudo modprobe br_netfilter
Setup required sysctl params; these persist across reboots:
cat <<EOF | sudo tee /etc/sysctl.d/99-kubernetes-cri.conf
net.bridge.bridge-nf-call-iptables  = 1
net.ipv4.ip_forward                 = 1
net.bridge.bridge-nf-call-ip6tables = 1
EOF
Apply sysctl params without reboot:
sudo sysctl --system
Download the Containerd tarball:
wget https://github.com/containerd/containerd/releases/download/v1.6.8/cri-containerd-cni-1.6.8-linux-amd64.tar.gz
sudo tar --no-overwrite-dir -C / -xzf cri-containerd-cni-1.6.8-linux-amd64.tar.gz
rm -rf cri-containerd-cni-1.6.8-linux-amd64.tar.gz
Install the Containerd:
sudo mkdir -p /etc/containerd
containerd config default | sudo tee /etc/containerd/config.toml
sudo systemctl restart containerd
For additional information on installing Containerd, see Install Containerd with Release Tarball.
Install Kubernetes#
Make sure Containerd has been started and enabled before beginning installation:
sudo systemctl start containerd && sudo systemctl enable containerd
Execute the following to install kubelet, kubeadm, and kubectl:
curl -s https://packages.cloud.google.com/apt/doc/apt-key.gpg | sudo apt-key add -

sudo mkdir -p  /etc/apt/sources.list.d/
Create Kubernetes.list:
cat <<EOF | sudo tee /etc/apt/sources.list.d/kubernetes.list
deb https://apt.kubernetes.io/ kubernetes-xenial main
EOF
Now execute the commands below:
sudo apt-get update

sudo apt-get install -y -q kubelet=1.23.12-00 kubectl=1.23.12-00 kubeadm=1.23.12-00

sudo apt-mark hold kubelet kubeadm kubectl
Initialize the Kubernetes cluster to run as master:
Disable swap:
sudo swapoff -a

sudo nano /etc/fstab
Add a # before all the lines that start with /swap. # is a comment, and the result should look similar to this:
UUID=e879fda9-4306-4b5b-8512-bba726093f1d / ext4 defaults 0 0
UUID=DCD4-535C /boot/efi vfat defaults 0 0
#/swap.img       none    swap    sw      0       0
Execute the following command:
sudo kubeadm init --pod-network-cidr=192.168.0.0/16 --cri-socket=/run/containerd/containerd.sock --kubernetes-version="v1.23.12"The output will show you the commands that, when executed, deploy a pod network to the cluster and commands to join the cluster.
Following the instructions in the output, execute the commands as shown below:
mkdir -p $HOME/.kube
sudo cp -i /etc/kubernetes/admin.conf $HOME/.kube/config
sudo chown $(id -u):$(id -g) $HOME/.kube/config
With the following command, you install a pod-network add-on to the control plane node. Calico is used as the pod-network add-on here:
kubectl apply -f https://projectcalico.docs.tigera.io/archive/v3.21/manifests/calico.yaml
You can execute the below commands to ensure that all pods are up and running:
kubectl get pods --all-namespacesOutput:
NAMESPACE     NAME                                       READY   STATUS    RESTARTS   AGE
kube-system   calico-kube-controllers-65b8787765-bjc8h   1/1     Running   0          2m8s
kube-system   calico-node-c2tmk                          1/1     Running   0          2m8s
kube-system   coredns-5c98db65d4-d4kgh                   1/1     Running   0          9m8s
kube-system   coredns-5c98db65d4-h6x8m                   1/1     Running   0          9m8s
kube-system   etcd-#hostname                             1/1     Running   0          8m25s
kube-system   kube-apiserver-#hostname                   1/1     Running   0          8m7s
kube-system   kube-controller-manager-#hostname          1/1     Running   0          8m3s
kube-system   kube-proxy-6sh42                           1/1     Running   0          9m7s
kube-system   kube-scheduler-#hostname                   1/1     Running   0          8m26s
The get nodes command shows that the control-plane node is up and ready:
kubectl get nodes

Output:


NAME             STATUS   ROLES                  AGE   VERSION
#yourhost        Ready    control-plane          10m   v1.23.12
Since we are using a single-node Kubernetes cluster, the cluster will not schedule pods on the control plane node by default. To schedule pods on the control plane node, we have to remove the taint by executing the following command:
kubectl taint nodes --all node-role.kubernetes.io/master-For additional information, refer to kubeadm installation guide
Install Helm#
Execute the following command to download Helm 3.10.0:
wget https://get.helm.sh/helm-v3.10.0-linux-amd64.tar.gz

tar -zxvf helm-v3.10.0-linux-amd64.tar.gz

sudo mv linux-amd64/helm /usr/local/bin/helm
For additional information about Helm, refer to the Helm 3.10.0 release notes and the Installing Helm guide for more information.
Install GPU Operator#
Add the NVIDIA helm repo:
helm repo add nvidia https://helm.ngc.nvidia.com/nvidia
Update the helm repo:
helm repo update
To install GPU Operator for AWS G4 instance with Tesla T4:
helm install --version 23.3.2 --create-namespace --namespace gpu-operator-resources --devel nvidia/gpu-operator --wait --generate-name
Validate the state of GPU Operator:
kubectl get pods --all-namespaces | grep -v kube-system

NAMESPACE                NAME                                                             READY   STATUS      RESTARTS   AGE

gpu-operator-resources   gpu-operator-1590097431-node-feature-discovery-master-76578jwwt   1/1     Running     0          5m2s
gpu-operator-resources   gpu-operator-1590097431-node-feature-discovery-worker-pv5nf       1/1     Running     0          5m2s
gpu-operator-resources   gpu-operator-74c97448d9-n75g8                                     1/1     Running     1          5m2s
gpu-operator-resources   gpu-feature-discovery-6986n                                       1/1     Running     0          5m2s
gpu-operator-resources   nvidia-container-toolkit-daemonset-pwhfr                          1/1     Running     0          4m58s
gpu-operator-resources   nvidia-cuda-validator-8mgr2                                       0/1     Completed   0          5m3s
gpu-operator-resources   nvidia-dcgm-exporter-bdzrz                                        1/1     Running     0          4m57s
gpu-operator-resources   nvidia-device-plugin-daemonset-zmjhn                              1/1     Running     0          4m57s
gpu-operator-resources   nvidia-device-plugin-validator-spjv7                              0/1     Completed   0          4m57s
gpu-operator-resources   nvidia-driver-daemonset-7b66v                                     1/1     Running     0          4m57s
gpu-operator-resources   nvidia-operator-validator-phndq                                   1/1     Running     0          4m57s
Note
The installation of GPU Operator can take a couple of minutes. How long it takes depends on your internet speed.
Refer to the GPU Operator page on NGC for more information.
To verify GPU Operator Installation with nvidia-smi, execute the following:
Execute the following:
cat <<EOF | tee nvidia-smi.yaml
apiVersion: v1
kind: Pod
metadata:
 name: nvidia-smi
spec:
 restartPolicy: OnFailure
 containers:
   - name: nvidia-smi
     image: "nvidia/cuda:12.2.0-base-ubuntu22.04"
     args: ["nvidia-smi"]
EOF

kubectl apply -f nvidia-smi.yaml
kubectl logs nvidia-smi
Output:
+---------------------------------------------------------------------------------------+
| NVIDIA-SMI 535.104.05             Driver Version: 535.104.05   CUDA Version: 12.2     |
|-----------------------------------------+----------------------+----------------------+
| GPU  Name                 Persistence-M | Bus-Id        Disp.A | Volatile Uncorr. ECC |
| Fan  Temp   Perf          Pwr:Usage/Cap |         Memory-Usage | GPU-Util  Compute M. |
|                                         |                      |               MIG M. |
|=========================================+======================+======================|
|   0  NVIDIA GeForce RTX 4090        On  | 00000000:65:00.0 Off |                  Off |
|  0%   30C    P8               5W / 450W |    133MiB / 24564MiB |      0%      Default |
|                                         |                      |                  N/A |
+-----------------------------------------+----------------------+----------------------+

+---------------------------------------------------------------------------------------+
| Processes:                                                                            |
|  GPU   GI   CI        PID   Type   Process name                            GPU Memory |
|        ID   ID                                                             Usage      |
|=======================================================================================|
|    0   N/A  N/A      1119      G   /usr/lib/xorg/Xorg                          107MiB |
|    0   N/A  N/A      1239      G   /usr/bin/gnome-shell                         13MiB |
+---------------------------------------------------------------------------------------+
This concludes the AWS cluster setup.
AWS Elastic Kubernetes Service (AWS EKS)#
Start Holoscan Ready EKS Cluster#
The Holoscan Ready EKS Cluster connects to your AWS account. It creates all required resources using Terraform with NVIDIA GPU Operator. By default, it creates 1 CPU node (instance-type = t2.xlarge, disk-size = 512GB) and 2 GPU nodes (instance-type = p3.2xlarge, disk-size = 512GB).
Clone the repository: NVIDIA Terraform Modules / EKS.
To use NVIDIA Cloud Native Add-On Pack (see section Install NVIDIA Cloud Native Add-On Pack on AWS EKS (Optional)), change your working directory to examples/cnpack. Otherwise, run commands from the nvidia-terraform-modules/eks folder.
Follow the repository instructions to create the cluster. After terraform apply completes, perform these validation steps.
Update your kubeconfig using the AWS CLI:
aws eks update-kubeconfig --name tf-<cluster-name-in-terraform.tfvars> --region us-west-2
You should now see the cluster with kubectl and three nodes (1 CPU and 2 GPU nodes by default).
kubectl get nodes
Validate the GPU operator (this may take ~5 minutes after cluster creation):
kubectl get pod -n gpu-operator
Pods with -validator in their name should show Completed status. All other pods should be running.
Verify the driver works by running this command to see NVIDIA-SMI output:
kubectl exec -it -n gpu-operator nvidia-device-plugin-daemonset-<your-pod-number> -- nvidia-smi
Your cluster is now ready to use.
Install NVIDIA Cloud Native Add-On Pack on AWS EKS (Optional)#
The NVIDIA Cloud Native Service Add-on Pack provides tools for creating and operating cloud-native services on Kubernetes clusters.
Before proceeding, ensure you have created and can access the CNPack version of Holoscan Ready EKS. See step 1 in Start Holoscan Ready EKS Cluster for details.
Connect with AWS Managed Services#
In your
nvidia-terraform-modules/eks/examples/cnpackfolder, runterraform outputto obtain the following information.
~/nvidia-terraform-modules/eks/examples/cnpack $ terraform output
amp_ingest_role_arn = "arn:aws:iam::0000000000000:role/amp-ingest-role-f1b"
amp_query_endpoint = "https://aps-workspaces.us-west-2.amazonaws.com/workspaces/ws-example/api/v1/query"
amp_remotewrite_endpoint = "https://aps-workspaces.us-west-2.amazonaws.com/workspaces/ws-example/api/v1/remote_write"
aws_pca_arn = "arn:aws:acm-pca:us-west-2:0000000000000:certificate-authority/example-pca-arn-hash"
Download CNPack from NGC.
ngc registry resource download-version "nv-holoscan-cloud-native/cnpack/cnpack:0.16.0"
cd cnpack_v0.16.0
chmod +x nvidia-cnpack-linux-x86_64
./nvidia-cnpack-linux-x86_64  --help
Create the CNPack configuration using the template below. Name the file
nvidia-platform.yaml. For EKS integration, we’re enabling fluentbit for log aggregation, prometheus for metrics, and cert-manager.
apiVersion: v1alpha3
kind: NvidiaPlatform
spec:
    # The platform block contains general configuration that is important to all components
    platform:
        # Required value specifying the Wildcard Domain to configure for ingress.
        wildcardDomain: "*.my-cluster.my-domain.com"
        # Required value to specify the port to configure for ingress.
        externalPort: 443
        # Optional infrastructure provider configuration for AWS EKS
        eks:
            # The region in-which the cluster is installed.
            region: us-west-2

    # The ingress block configures the ingress controller
    ingress:
        # Whether this component should be enabled Default is true.
        enabled: false

    # The postgres block configures the postgres operator
    postgres:
        # Whether this component should be enabled Default is true.
        enabled: false

    # The certManager block configures the certificate management system
    certManager:
        # Whether this component should be enabled Default is true.
        enabled: true
        # Optional configuration for the AWS Private CA service integration.
        #
        # Dependencies:
        #   - EKS Infrastructure provider configuration (spec.platform.eks)
        awsPCA:
            # Whether this component should be enabled Default is true.
            enabled: true
            # The ARN required to communicate with the AWS Private CA service.
            arn: <aws_pca_arn>
            # The common name of the configured Private CA.
            commonName: my-cert.my-domain.com
            # The domain name of the configured Private CA.
            domainName: my-domain.com

    # The trustManager block configures the trust bundle management system
    #
    # Dependencies:
    #   - cert-manager
    trustManager:
        # Whether this component should be enabled Default is true.
        enabled: false

    # The keycloack block configures Keycloak as an OIDC provider
    #
    # Dependencies:
    #   - cert-manager
    #   - postgres
    #   - ingress
    keycloak:
        # Whether this component should be enabled Default is true.
        enabled: false

    # The prometheus block configures the Prometheus metrics service
    #
    # Dependencies:
    #   - cert-manager
    prometheus:
        # Whether this component should be enabled Default is true.
        enabled: true
        # Optional configuration for connecting Prometheus to an AWS Managed Prometheus instance.
        awsRemoteWrite:
            # The URL of the AWS managed prometheus service.
            url: <amp_remotewrite_endpoint>
            # The ARN required to communicate with the AWS Managed Prometheus Service.
            arn: <amp_ingest_role_arn>

    # The grafana block configures the Grafana dashboard service
    #
    # Dependencies:
    #   - prometheus
    #   - cert-manager
    #   - ingress
    grafana:
        # Whether this component should be enabled Default is true.
        enabled: true
        # Optional value to override the hostname used to expose grafana.
        customHostname: my-host.my-cluster.my-domain.com

    # The elastic block configures the Elastic Cloud on Kubernetes operator
    elastic:
        # Whether this component should be enabled Default is true.
        enabled: true

    # The fluentbit block configures the fluentbit log aggregation service
    #
    # Dependencies:
    #   - Infrastructure provider configuration (spec.platform.eks or spec.platform.aks or empty spec.platform for CNS)
    fluentbit:
        # Whether this component should be enabled Default is true.
        enabled: true
Create the CNPack in your cluster with the following command. CNPack will use your KUBECONFIG to connect to the cluster and perform installation of its services.
./nvidia-cnpack-linux-x86_64 create -f nvidia-platform.yaml
Validate CNPack installation status by running the following two commands and ensure all the pods are in running state.
kubectl get po -n nvidia-platform
kubectl get po -n nvidia-monitoring
In case you want to delete cnpack from the cluster, run
./nvidia-cnpack-linux-x86_64 delete:
Troubleshooting#
If kubectl or terraform commands show errors like “couldn’t get current server API group list: the server has asked for the client to provide credentials”, refresh your AWS credentials in ~/.aws/credentials.
Delete Holoscan Ready EKS Cluster#
Note
Delete all applications (Helm charts, Kubernetes resources) before running the destroy command.
Refresh your AWS credentials.
In the same directory where you ran
terraform apply, runterraform destroyand enter “yes” when prompted.
Azure Kubernetes Service (Microsoft AKS)#
Start Holoscan Ready AKS Cluster#
The Holoscan Ready AKS Cluster will connect to your Azure account. It creates all the needed resources with terraform along with NVIDIA GPU Operator.
By default, it creates 1 CPU node (instance-type = Standard_D16_v5, disk-size = 100GB) and 2 GPU nodes (instance-type = Standard_NC6s_v3, disk-size = 100GB).
Clone the repo NVIDIA Terraform Modules / AKS.
If you would like to use NVIDIA Cloud Native Add-On Pack (see section Install NVIDIA Cloud Native Add-On Pack on Azure AKS (Optional) for more details) as part of your deployment system, please change your working directory to examples/cnpack directory. Otherwise, run the following from the nvidia-terraform-modules/aks root.
Follow the instructions in the repo to bring up the cluster. Once terraform apply completes, you can perform the following validation steps.
Update your kube config with az CLI by running the following:
az aks get-credentials --name ucf-cnpack-cluster --resource-group ucf-cnpack-cluster-rg
You should now see the cluster with your kubectl CLI and you should see three nodes (1 CPU and 2 GPU nodes). (Note: You may need to sign in to Microsoft the first time you run this on the cluster.)
kubectl get nodes
Validate GPU operator by running the following commands. Note that it may take ~5 minutes after cluster creation for all the GPU Operator resources to be ready:
kubectl get pod -n gpu-operator
The pods with -validator in their name should be in Completed status and all the other pods should be running.
We will also validate that the driver is working by running the following command and you should see the NVIDIA-SMI output.
kubectl exec -it -n gpu-operator nvidia-device-plugin-daemonset-<your-pods-number> -- nvidia-smi
Now your cluster is ready to be used.
Install NVIDIA Cloud Native Add-On Pack on Azure AKS (Optional)#
The NVIDIA Cloud Native Service Add-on Pack is a collection of tools designed to support the creation and operation of cloud-native services on a Kubernetes cluster.
Before proceeding, please make sure that you have brought up and have access to the CNPack version of Holoscan Ready AKS. See step 1 in Start Holoscan Ready AKS Cluster for more details.
Connect with Azure Managed Services#
In your nvidia-terraform-modules/aks/examples/cnpack folder, run
terraform outputto obtain the following information.
~/nvidia-terraform-modules/aks/examples/cnpack $ terraform output
cluster_managed-client-id = "x123xxxxxxx"
fluentbit-secret-name = "fluentbit-secrets"
fluentbit-secret-namespace = "nvidia-platform"
prometheus-query-url = "https://ucf-cnpack-prom-xxxx.westus2.prometheus.monitor.azure.com"
Download CNPack from NGC.
ngc registry resource download-version "nv-holoscan-cloud-native/cnpack/cnpack:0.16.0"
cd cnpack_v0.16.0
chmod +x nvidia-cnpack-linux-x86_64
./nvidia-cnpack-linux-x86_64  --help
Create the CNPack configuration using the template below. Name the file
nvidia-platform.yaml. For AKS integration, we’re enabling fluentbit for log aggregation, prometheus for metrics, and cert-manager.
apiVersion: v1alpha3
kind: NvidiaPlatform
spec:
  platform:
    wildcardDomain: "*.holoscandev.nvidia.com"
    externalPort: 443
    aks: {}
  certManager:
    enabled: true
  prometheus:
    enabled: true
    aksRemoteWrite:
      url: "<see note #1>"
      clientId: "<cluster_managed-client-id> in your terraform output"
  fluentbit:
    enabled: true
    aks:
      secretName: "<fluentbit-secret-name in your terraform output>"
  trustManager:
    enabled: false
  keycloak:
    enabled: false
  grafana:
    customHostname: grafana.holoscandev.com
    enabled: false
  elastic:
    enabled: false
  ingress:
    enabled: false
  postgres:
    enabled: false
Note #1: To obtain the AKS Remote Write URL, go to the Azure portal. Search for ucf-cnpack-prom (or the name you used in terraform.tfvars file). Select the resource for the Azure Monitor Workspace of the same name. Copy the value of Metrics Ingestion Endpoint into spec.Prometheus.aksRemoteWrite.url.
Create the CNPack in your cluster with the following command. CNPack will use your KUBECONFIG to connect to the cluster and perform installation of its services.
./nvidia-cnpack_Linux_x86_64 create -f nvidia-platform.yaml
Validate CNPack installation status by running the following two commands and ensure all the pods are in running state.
kubectl get po -n nvidia-platform
kubectl get po -n nvidia-monitoring
In case you want to delete cnpack from the cluster, run
./nvidia-cnpack_Linux_x86_64 delete.
Troubleshooting#
If at any time, your kubectl or terraform commands shows error like “couldn’t get current server API group list: the server has asked for the client to provide credentials”, please run az login again.
If you see the following from terraform apply:
│ Error: chart "gpu-operator" matching vX.Y.Z not found in nvidia index. (try 'helm repo update'): no chart
│ version found for gpu-operator-vX.Y.Z
Run the helm repo update and then run terraform apply again.
Delete Holoscan Ready AKS Cluster#
Note
Make sure that all applications (helm charts, other Kubernetes resources) that you installed have been deleted before running the destroy command.
Refresh your Azure login by running
az login.In the same directory where you had ran
terraform apply, runterraform destroyand enter “yes” when prompted.
Google Kubernetes Engine (GCP GKE)#
Start Holoscan Ready GKE Cluster#
The Holoscan Ready GKE Cluster will connect to your GCP account. It creates all the needed resources with terraform along with NVIDIA GPU Operator.
By default, it creates 1 CPU node (instance-type = n1-standard-4, disk-size = 512GB) and 2 GPU nodes (instance-type = n1-standard-4 with nvidia-tesla-v100, disk-size = 512GB).
Clone the repo NVIDIA Terraform Modules / GKE.
If you would like to use NVIDIA Cloud Native Add-On Pack (see section Install NVIDIA Cloud Native Add-On Pack on GKE (Optional) for more details) as part of your deployment system, change your working directory to examples/cnpack directory. Otherwise, run the following from the nvidia-terraform-modules/gke root.
Follow the instructions in the repo to bring up the cluster. Once terraform apply completes, you can perform the following validation steps.
Update your kube config with az CLI by running the following:
gcloud components install gke-gcloud-auth-plugin

gcloud container clusters get-credentials <CLUSTER_NAME> --region=<REGION>
You should now see the cluster with your kubectl CLI and you should see three nodes (1 CPU and 2 GPU nodes).
Note
It may ask you to sign in to Microsoft the first time you run this on the cluster.
kubectl get nodes
Validate GPU operator by running the following commands. (Note that it may take ~5 minutes after cluster is created for all the GPU Operator resources to be ready):
kubectl get pod -n gpu-operator
The pods with -validator in their name should be in Completed status and all the other pods should be running.
We will also validate that the driver is working by running the following command and you should see the NVIDIA-SMI output.
kubectl exec -it -n gpu-operator nvidia-device-plugin-daemonset-<your-pods-number> -- nvidia-smi
Now your cluster is ready to be used.
Install NVIDIA Cloud Native Add-On Pack on GKE (Optional)#
The NVIDIA Cloud Native Service Add-on Pack is a collection of tools designed to support the creation and operation of cloud-native services on a Kubernetes cluster.
Before proceeding, please make sure that you have brought up and have access to the CNPack version of Holoscan Ready GKE. See step 1 in Start Holoscan Ready GKE Cluster for more details.
Connect with GCP Managed Services#
In your nvidia-terraform-modules/gke/examples/cnpack folder, run
terraform outputto obtain the following information.
~/nvidia-terraform-modules/gke/examples/cnpack $ terraform output
gcp_service_account_email_for_prometheus = "tf-gke-prom-svc-acct-xxxxxdxxx.com"
Download CNPack from NGC.
ngc registry resource download-version "nv-holoscan-cloud-native/cnpack/cnpack:0.16.0"
cd cnpack_v0.16.0
chmod +x nvidia-cnpack-linux-x86_64
./nvidia-cnpack-linux-x86_64  --help
Create the CNPack configuration using the template below. Name the file
nvidia-platform.yaml. For GKE integration, we’re enabling fluentbit for log aggregation, prometheus for metrics, and cert-manager.
apiVersion: v1alpha3
kind: NvidiaPlatform
spec:
  platform:
    wildcardDomain: "*.holoscandev.nvidia.com"
    externalPort: 443
    gke: {}
  certManager:
    enabled: true
  prometheus:
    enabled: true
    gkeRemoteWrite:
      gcpServiceAccount: "<name-of-your-gcp-service-account> in your terraform output"
  fluentbit:
    enabled: true
  trustManager:
    enabled: false
  keycloak:
    enabled: false
  grafana:
    customHostname: grafana.holoscandev.com
    enabled: false
  elastic:
    enabled: false
  ingress:
    enabled: false
  postgres:
    enabled: false
Create the CNPack in your cluster with the following command. CNPack will use your KUBECONFIG to connect to the cluster and perform installation of its services.
./nvidia-cnpack_Linux_x86_64 create -f nvidia-platform.yaml
Validate CNPack installation status by running the following two commands and ensure all the pods are in running state.
kubectl get po -n nvidia-platform
kubectl get po -n nvidia-monitoring
In case you want to delete cnpack from the cluster, run
./nvidia-cnpack_Linux_x86_64 delete.
Troubleshooting#
If at any time, your kubectl or terraform commands shows error like “couldn’t get current server API group list: the server has asked for the client to provide credentials”, please run gcloud auth application-default login again.
Delete Holoscan Ready GKE Cluster#
Note
Make sure that all applications (helm charts, other Kubernetes resources) that you installed have been deleted before running the destroy command.
Refresh your GCP login by running
gcloud auth application-default login.In the same directory where you ran
terraform apply, runterraform state rm kubernetes_namespace_v1.gpu-operator. Then runterraform destroyand enter “yes” when prompted.