Secrets Management#
UCS implements secrets using files. Microservices read secrets from files. They do not need to know how the files were created or mounted in the container. This creates a layer of abstraction. The dependency on any particular type of secrets management can be removed from the microservice.
UCS Applications integrate the secrets management system. They correctly mount the secret as a file at the location expected by the microservices.
Specifying secret requirements in Microservice#
You can describe secret requirements for the microservice under the secrets field
of the microservice builder input manifest.yaml file as specified at - Secrets.
The secrets get mounted at <mountPath>/<fileName> as specified in the manifest.
Any applications running inside the microservice that need the secret must read it from this path. You can use placeholder $secrets.<name>.path in place of the mount path in manifest.yaml or the files inside configs directory.
All instances of the placeholders get replaced by the actual mount path <mountPath>/<fileName> during the microservice helm chart build.
Viewing secrets requirements of a microservice#
Using CLI Tools#
You can view the secrets requirement of any microservice using either of the CLI Tools - UCS Microservice Builder CLI
or UCS Application Builder CLI using the service info command.
For example:
$ ucf_ms_builder_cli service info -n ucf.svc.myservice
...
secrets:
-   name: some-secret-name
    description: Description for the secret
    mandatory: true
    mountPath: /secrets
    fileName: someSecretFileName
...
This microservice expects a secret some-secret-name to be mounted at /secrets/someSecretFileName.
Using UCS Studio#
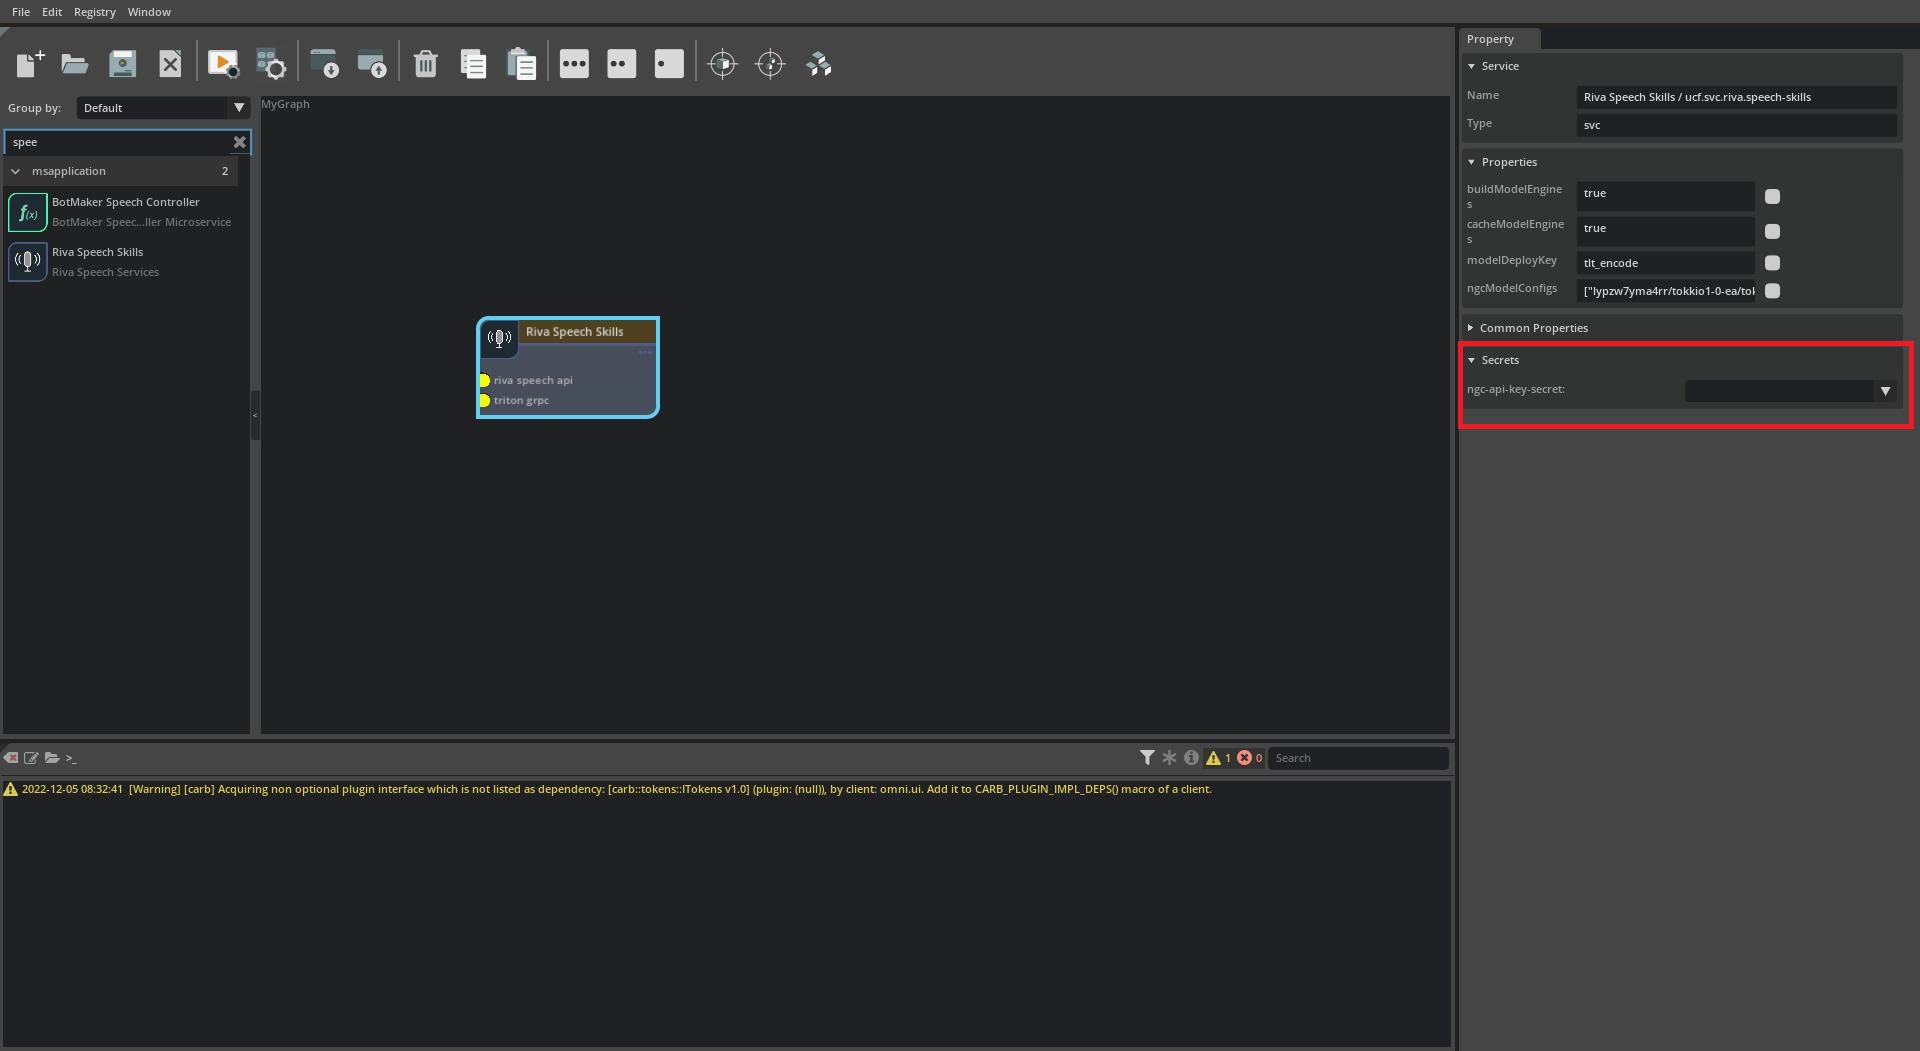
You can view secrets requirements of a microservice in the UCS Studio by creating a new graph, adding the required microservice in the graph canvas, selecting it by clicking on it and then going through the Secrets section in the Property window on the right.
Fulfill the secrets in an UCS Application#
Using UCS Studio#
First open the Graph Configuration by right-clicking on the graph window to open the context menu and selecting Configurator.

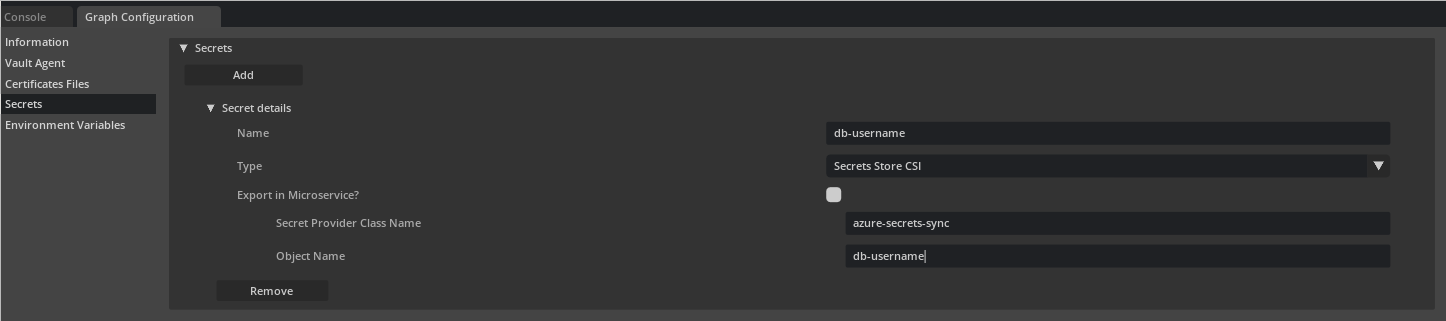
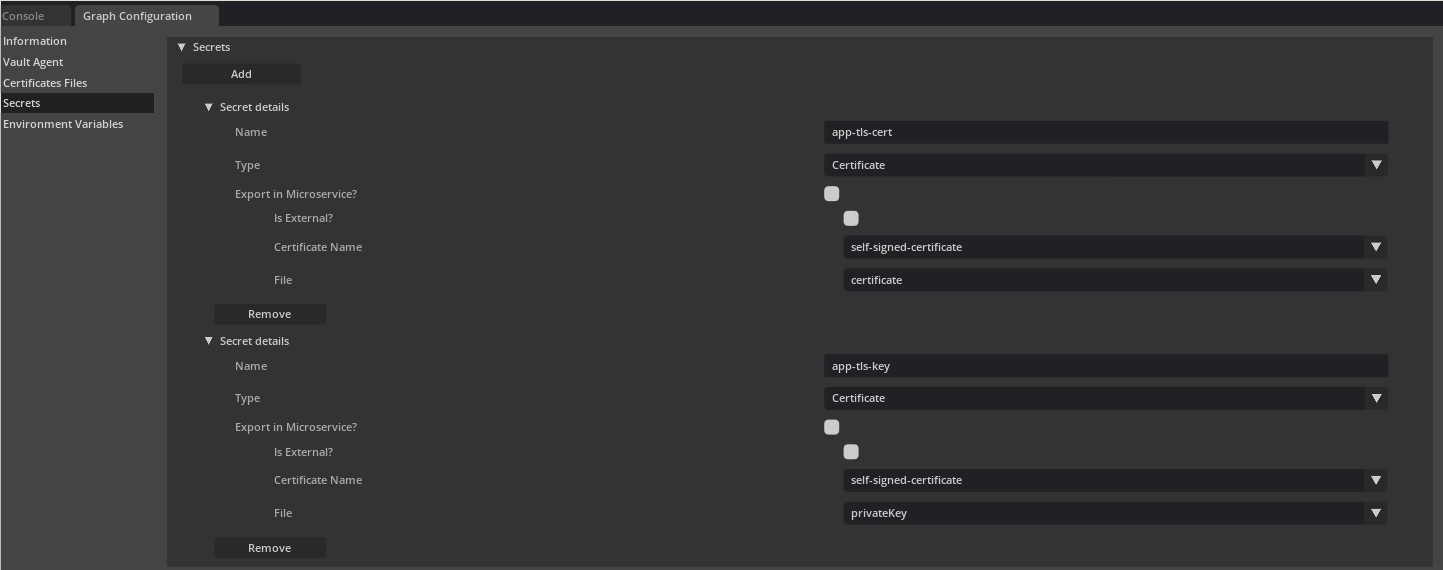
Next select the Secrets window, click on Add to add a new secret. Enter details as required including the source of the secret Kubernetes Secret, Vault, Secrets Store CSI Driver, Certificate and source specific details:
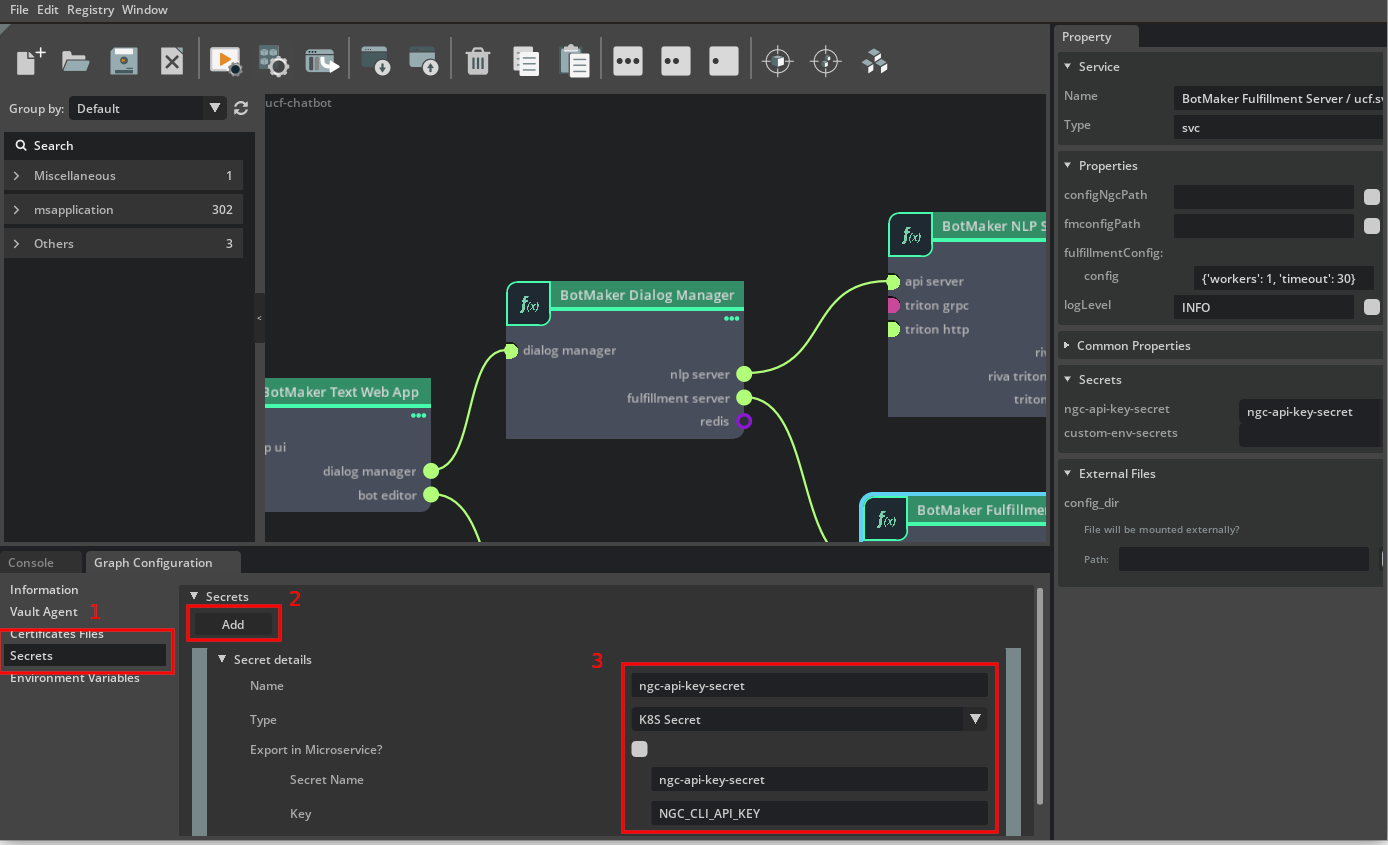
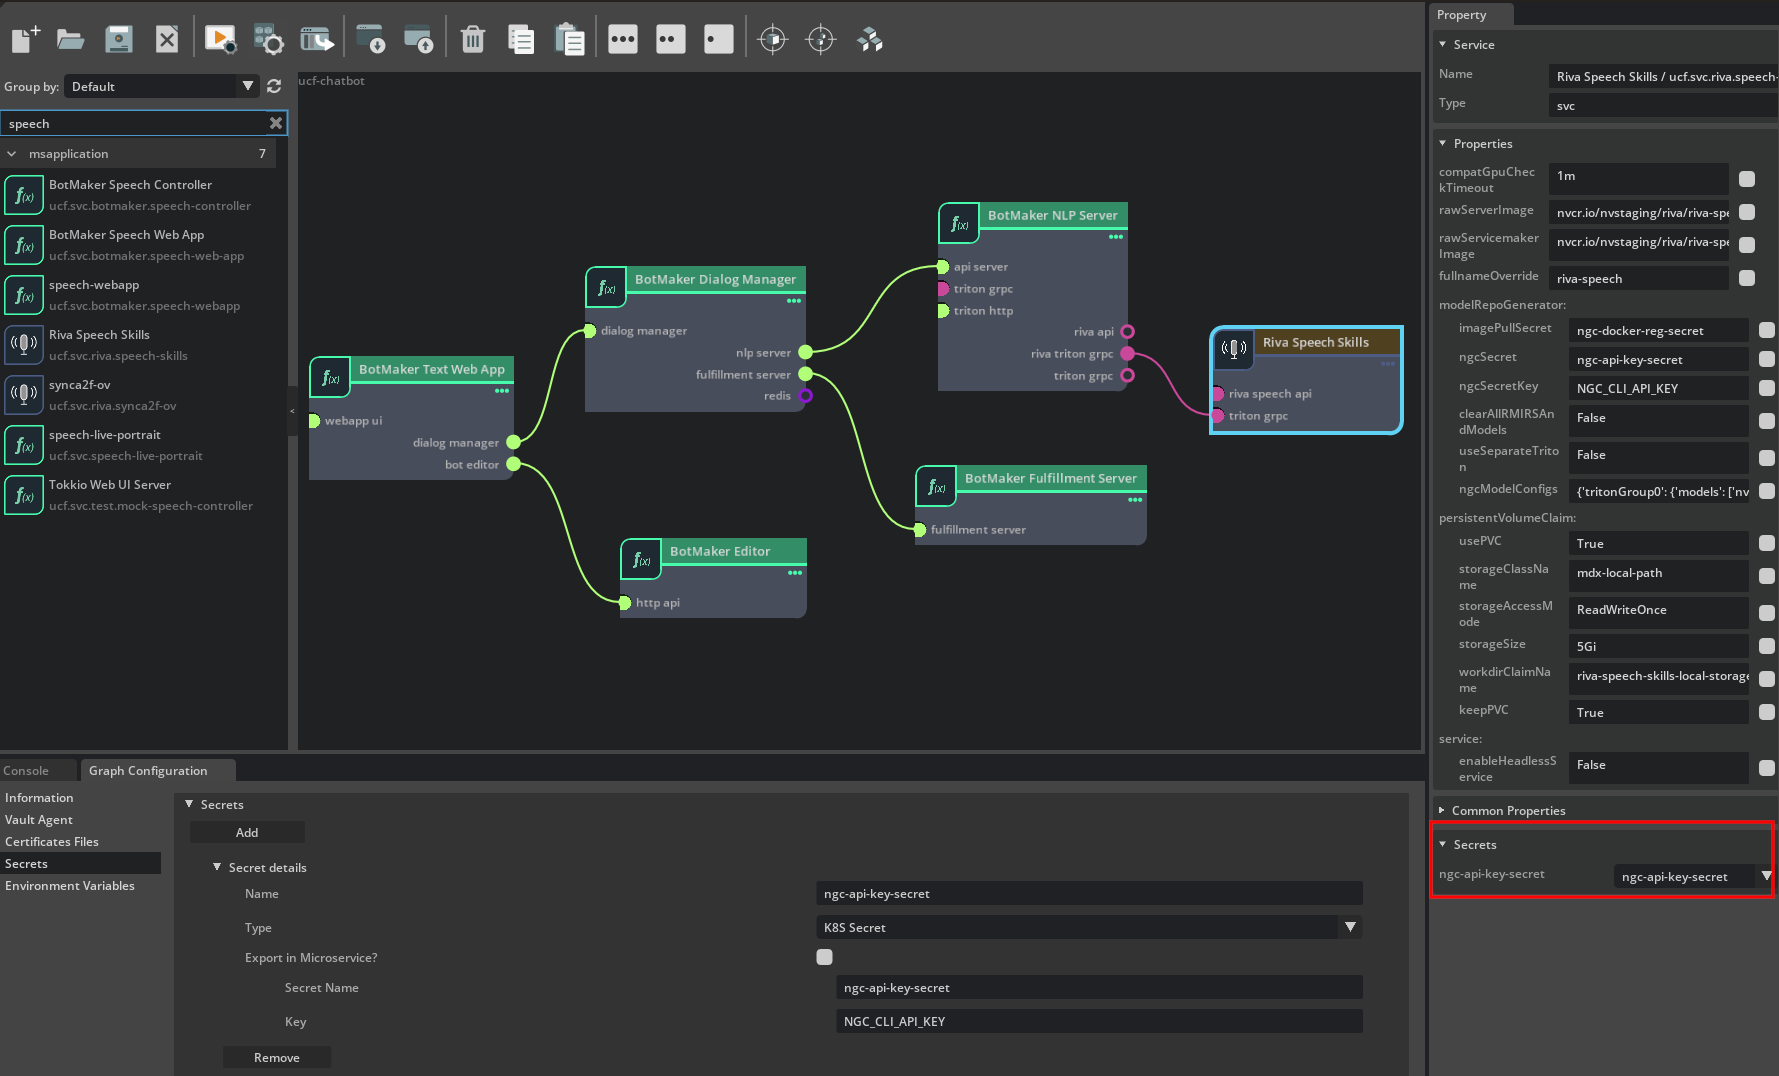
Now select a microservice on the canvas, this will show the Secrets section in the Property window on the right. For each secret requirement, select a secret to set for it from the dropdown.
Using Textual Representation and CLI Tools#
You must specify all mandatory secrets for each microservice. Secrets that need to be used in an application
(and thus set on a microservice) must be added to secrets section of the application along with the
source details for the secrets. UCS Tools support Kubernetes Secret, Vault, Certificate or the Secrets Store CSI Driver
as the source of the secret. You must specify the secrets in the UCS application YAML as follows:
secrets:
  <secret-identifier>:
    <k8sSecret|vaultAgent|secretsStoreCsi|certificate>:
      <source specific details>

  <secret-identifier-1>:
    <k8sSecret|vaultAgent|secretsStoreCsi|certificate>:
      <source specific details>
Based on the source of the secret, you must specify additional details.
You can set these secrets on microservices that need them under the secrets field of the components in the application graph file.
The format is:
components:
- name: <svc-name>
  type: <svc-ucf-type>
  secrets:
    <secretName1>: <secret-identifier>
    <secretName2>: <secret-identifier-1>

- name: <svc-name-1>
  type: <svc-ucf-type-1>
  secrets:
    <secretName>: <secret-identifier-1>
Supported Secret Management Types#
UCS Tools support Kubernetes Secret, Vault, Certificate or the Secrets Store CSI Driver as the source of the secret.
Using Kubernetes Secret#
You can add a Kubernetes Secret to the application using the following format:
secrets:
  <secret-identifier>:
    k8sSecret:
      secretName: <Name-of-K8S-Secret-Resource>
      key: <Key-in-K8S-Secret>
An example application graph file using Kubernetes Secret as source of the secret:
specVersion: 2.5.0
version: 0.0.1
name: myservice-test
...
dependencies:
- ucf.svc.myservice:0.0.1
components:
- name: myservice
type: ucf.svc.myservice
parameters:
timeToSleep: 1200000
secrets:
some-secret-name: db-username
...
connections:
...
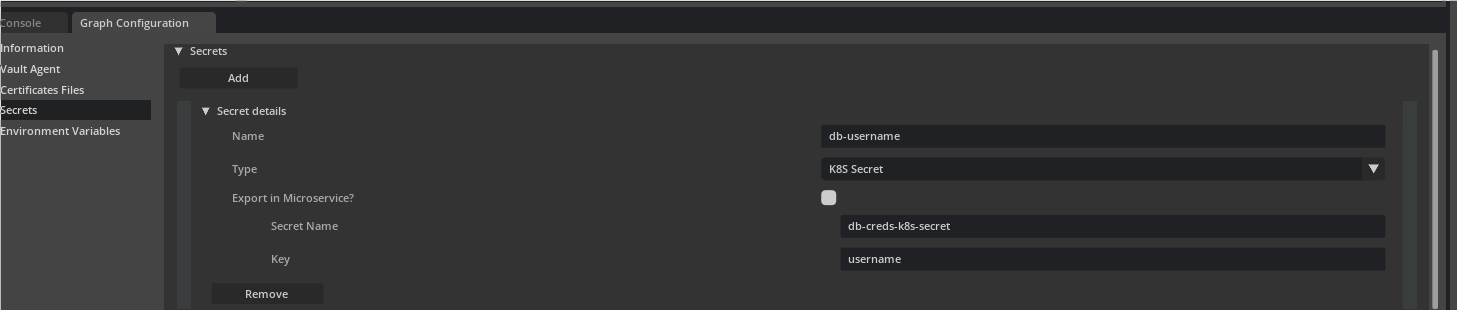
secrets:
db-username:
k8sSecret:
secretName: db-creds-k8s-secret
key: username
You can achieve the same in UCS Studio by selecting K8S Secret from Type drop down and setting valid values for Secret Name and Key.
For Kubernetes Secret as the source of secret, the application deployer must ensure a Kubernetes secret with name <Name-of-K8S-Secret-Resource> containing key <Key-in-K8S-Secret> has already been deployed.
For example, in this case you can do it using:
$ kubectl create secret generic db-creds-k8s-secret --from-literal=username=admin
When building the application, UCS Application Builder CLI tools add the appropriate parameters to mount
the key username of secret db-creds-k8s-secret at the expected location of /secrets/someSecretFileName
in the microservice container.
Using Vault secrets#
UCS Application Builder CLI tool supports integration with Hashicorp Vault for secrets management.
The application developer must know how to manage Vault server, add secrets to it and
use the JWT method of authenticating the Kubernetes cluster with vault. For documentation on
Vault refer to - https://developer.hashicorp.com/vault.
For Vault as the source of secret, you must add vaultAgent parameter to the application which specifies connection and authentication details for the Vault server. The specification for the vaultAgent is:
vaultAgent:
  auth:
    path: "<vault-jwt-auth-mount-path>"
    type: "jwt"
    jwt:
      audience: "<bound-audience>"
      role: "<vault-role>"
  role: "<vault-role>"
  namespace: "<vault-namespace>"
  service: "<vault-host>"
You can add a Vault based secret to the application using the following format:
secrets:
  <secret-identifier>:
    vaultAgent:
      path: "<path-to-secret-in-vault-server>"
      template:
        # Following type is used for KV secrets engine of Vault
        type: kv
        key: "<key-in-secret>"

  <secret-identifier-1>:
    vaultAgent:
      path: "<path-to-secret-in-vault-server>"
      template:
        # Following type is used for X.509 PKI certificate engine of Vault
        type: pki/certificate      # OR "pki/private_key" OR "pki/issuing_ca" #
        common_name: <common-name>  # Common name to use when requesting certificate from Vault
        ttl: <ttl>                  # TTL for the certificates e.g. 720h

  <secret-identifier-2>:
    vaultAgent:
      path: "<path-to-secret-in-vault-server>"
      # Following can be used for custom templates using the Consul template language.
      template: |
        {{- with secret "<path-to-secret-in-vault-server>" }}
        {{- .Data.data.username }}:{{ .Data.data.password }}
        {{- end }}
An example of using this is:
specVersion: 2.5.0

version: 0.0.1

name: myservice-test

...

dependencies:
- ucf.svc.myservice:0.0.1

components:
- name: myservice
  type: ucf.svc.myservice
  parameters:
    timeToSleep: 1200000
  secrets:
    some-secret-name: db-username
...

connections:
  ...

vaultAgent:
  auth:
    path: auth/jwt/my-cluster
    type: "jwt"
    jwt:
      audience: custom-audience
      role: my-auth-role
  role: my-auth-role
  namespace: my-namespace
  service: https://vault.example.com

secrets:
  db-username:
    vaultAgent:
      path: my-app-kv/db-creds
      template:
        type: kv
        key: username
You can also achieve this in UCS Studio by first filling in the Vault Agent section in the Graph Configurator.
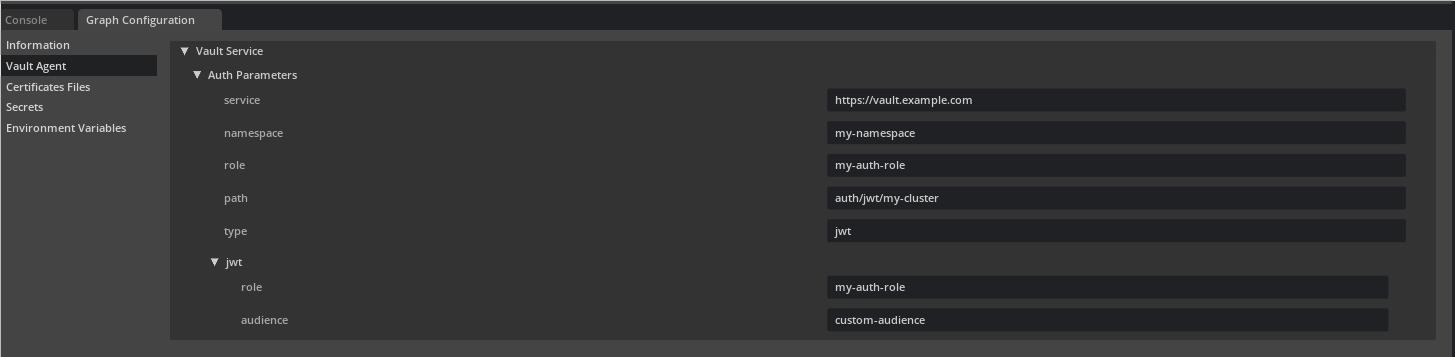
And then selecting Vault from Type drop down for the secret and setting valid Path of the secret in the Vault Server.
Based on the type of the secret, select kv / pki/certificate / pki/private_key / pki/issuing_ca from the template type
dropdown and specify additional information like key, common_name, ttl. To specify the raw template string for rendering
the template, select string from the template type dropdown.
In this example, the application developer is responsible for ensuring that:
Vault Server is hosted at
https://vault.example.comNamespace
my-namespaceof the Vault Server is being usedJWT authentication method of vault is enabled at path
auth/jwt/my-clusterbound_audiencewhen configuring the authentication method is set tocustom-audienceThe authentication method has been configured with a
bound_subjectthat allowssome-service-accountaccessThe authentication method has been configured with a
my-auth-roleauthentication roleA KV2 secrets engine has been created and configured at
my-app-kvA KV2 secret has been created at mount path
my-app-kv/db-credsThe KV2 secret contains a key
usernameA policy has configured that allows
my-auth-rolerole access tomy-app-kv/db-credsVault Agent Injector Service is already running on the cluster
When building the application, UCS Application Builder CLI tools add the appropriate parameters to mount
value for the key username of secret at path my-app-kv/db-creds in Vault server at the expected location of
/secrets/someSecretFileName in the microservice container.
Using Secrets Store CSI Driver#
UCS Application Builder CLI tool supports integration with Secrets Store CSI Driver for secrets management.
The application developer must know how to install the Secrets Store CSI Driver and
the SecretProviderClass that mentions the objects to be used as secrets. For documentation refer to -
https://secrets-store-csi-driver.sigs.k8s.io/getting-started/getting-started.html.
You can add a Secrets Store CSI Driver based Secret to the application using the following format:
secrets:
  <secret-identifier>:
    secretsStoreCsi:
      providerClassName: <Secret-Provider-Class-Resource-Name>
      objectName: <Name-of-Object-in-Secret-Provider-Class-Resource>
An example application graph file using Secrets Store CSI Driver as source of the secret:
specVersion: 2.5.0

version: 0.0.1

name: myservice-test

...

dependencies:
- ucf.svc.myservice:0.0.1

components:
- name: myservice
  type: ucf.svc.myservice
  parameters:
    timeToSleep: 1200000
  secrets:
    some-secret-name: db-username
...

connections:
  ...

secrets:
  db-username:
    secretsStoreCsi:
      providerClassName: azure-secrets-sync
      objectName: db-username
You can achieve the same in UCS Studio by selecting Secrets Store CSI from Type drop down and setting valid values for Secret Provider Class Name and Object Name.
For a Secrets Store CSI Driver based Secret as the source of secret, the application deployer
must ensure a SecretProviderClass resource with name <Secret-Provider-Class-Resource-Name>
containing object with name <Name-of-Object-in-Secret-Provider-Class-Resource> has already been deployed.
When building the application, UCS Application Builder CLI tools add the appropriate parameters to mount
the object named db-username of in SecretProviderClass resource named azure-secrets-sync at the expected
location of /secrets/someSecretFileName in the microservice container.
Using cert-manager Certificate#
UCS Application Builder CLI tool supports integration with cert-manager for certificate management.
The application developer must know how to install the cert-manager and
the Certificate and Issuer/ClusterIssuer custom resources that are used to provision certificates and
create the corresponding Kubernetes Secret.
For documentation, refer to - https://cert-manager.io/docs/
For cert-manager Certificate as the source of secret, you must add certificates parameter to the application
which specifies certificates that will be required by the application and some additional details.
The specification for the certificates is:
certificates:
  <nameForCertificates>:
    file: <path-to-certificates-file>
    addToHelmChart: <true|false>
  <nameForCertificates-2>:
    file: <path-to-certificates-file-2>
    addToHelmChart: <true|false>
The certificates file path may be absolute or relative to the application YAML file.
The file must contain the cert-manager Certificate/Issuer/ClusterIssuer custom resources. An example of this this file is:
---
apiVersion: cert-manager.io/v1
kind: Issuer
metadata:
  name: self-signed-issuer
spec:
  selfSigned: {}
---
apiVersion: cert-manager.io/v1
kind: Certificate
metadata:
  name: self-signed-certificate
spec:
  dnsNames:
    - cluster.local
    - test.cluster.local
  secretName: selfsigned-cert-tls
  issuerRef:
    name: self-signed-issuer
You can add a Certificate based Secret to the application using the following format:
secrets:
  <secret-identifier>:
    certificate:
      certName: <Name-of-Certificate-Resource>
      type: <certificate/privateKey/issuingCA> # Whether to mount the certificate file or the private key file or the issuing CA file
  <secret-identifier-2>:
    certificate:
      # Use this if you do not wish to provide a certificates file and
      # instead provide the secret name that will contain the certificate files
      isExternal: true
      secretName: <name-of-secret-created-by-cert-manager>
      type: <certificate/privateKey/issuingCA>
An example application graph file using cert-manager Certificate as source of the secret:
specVersion: 2.5.0

version: 0.0.1

name: myservice-test

...

dependencies:
- ucf.svc.myservice:0.0.1

components:
- name: myservice
  type: ucf.svc.myservice
  parameters:
    timeToSleep: 1200000
  secrets:
    tls-cert: app-tls-cert
    tls-key: app-tls-key
    tls-ca: app-tls-ca
...

connections:
  ...

certificates:
  devCerts:
    file: certificates.yaml
    addToHelmChart: true

secrets:
  app-tls-cert:
    certificate:
      certName: self-signed-certificate
      type: certificate
  app-tls-key:
    certificate:
      certName: self-signed-certificate
      type: privateKey
  app-tls-ca:
    certificate:
      certName: self-signed-certificate
      type: issuingCA
You can achieve the same in UCS Studio by loading a file containing the Certificate resources from the Certificates Files tab.

And then selecting Certificate from Type drop down and selecting an applicable Certificate Name and the file to mount Certificate,
Private Key or the Issuing CA. If using an externally created Certificate resource, select Is External and then input the Secret Name
for the secret resource created for the Certificate.
For a Certificate based Secret as the source of secret, the application deployer
must:
Ensure a
Certificateresource with name<Name-of-Certificate-Resource>is provided to the application via thecertificatesfield.If
addToHelmChartisfalse, you must deploy theCertificateresource manually.
Alternatively, if using
secretNamewithisExternal, theCertificateresource with secretName set to<name-of-secret-created-by-cert-manager>is already deployed
When building the application, UCS Application Builder CLI tools add the appropriate parameters to mount
the TLS certificate/private key/issuing CA for Certificate resource named self-signed-certificate at the expected
locations in the microservice container.
Application Information - Secrets#
Building an application generates an application information file in the output directory. This file contains list of secrets added in the application and their details. For more information refer to Application Info.