Hello World#
Housekeeping#
See the Getting Started documentation for installing and setting up:
microk8s
UCS Tools
accessing NGC
setting up repositories
Introduction#
In this tutorial, you will create a simple, one-service “hello world” application. The application will sleep for 10,000 seconds.
This tutorial helps you learn the basics of:
Defining microservices
Building microservices using
ucf_ms_builder_cliDefining applications from microservices
Building applications using
ucf_app_builder_cliDeploying and running microservices and applications
Inspecting and debugging running services
Stopping and cleaning up microservices and applications
First, create an empty project:
cd $HOME
mkdir -p ucf_tutorial/{services,apps}
Creating a Microservice#
Now, create your first microservice:
cd $HOME/ucf_tutorial/services
ucf_ms_builder_cli service create -n hello-world -i container-image
This generates and populates the hello-world directory in ucf_tutorial/services.
Replace the default hello-world/manifest.yaml with the following:
type: msapplication
specVersion: 2.5.0
name: ucf.svc.hello-world
chartName: hello-world
description: my first ucf microservice
version: 0.0.1
tags: []
keywords: []
publish: false

---
spec:
  - name: hello-world-service-a
    type: ucf.k8s.app.deployment
    parameters:
      apptype: stateless

  - name: hello-world-service-a-container
    type: ucf.k8s.container
    parameters:
      image:
        repository: nvcr.io/nvidia/pytorch
        tag: 22.04-py3
      command: [sh, -c]
      args: ["echo 'hello, world!' && sleep 10000"]
The first several lines define the microservice itself. They specify the type of the microservice, the version of the specification, the name of the chart, description, the version of the microservices, tags and keywords, and whether to publish to UCS registry on CI pass. These are straightforward and boilerplate for every microservice.
The real details of your microservice are defined after the spec keyword. Each piece listed thereafter is a UCS Component following a structure of:
Name
Type
Parameters
In this simple microservice, you define two components:
A component named
hello-world-service-aand of typeucf.k8s.app.deploymentwith a parameter ofapptypeset tostateless, andA component named
hello-world-service-a-containerand of typeucf.k8s.containerwith several parameters.
In future tutorials, you will explore adding other components like:
ucf.k8s.servicefor Ingress/Egress connections,ucf.k8s.volumefor adding storage,ucf.k8s.initcontainerfor performing setting up steps before running another container,ucf.k8s.podSecurityContextfor using root permissions in non-root containers,ucf.k8s.restartPolicyfor defining how containers should behave after a restart, and many more.
For now, it’s enough for your “hello world” example to understand that you are defining a Deployment - a K8s construct for controlling the way that pods behave - as well as a Container that will be used to populate your pods.
For more information on UCS Components such as their purpose and properties, run the following:
$ ucf_ms_builder_cli component info -c ucf.k8s.app.deployment
type:        ucf.k8s.app.deployment
description: Deployment workload
properties:
             apptype: (string ), Pod deployment type (stateful/stateless). [Mandatory:True, Allowed Values:{ stateful, stateless, job, cronjob, daemonset, replicaset }]


$ ucf_ms_builder_cli component info -c ucf.k8s.container
type:        ucf.k8s.container
description: Container as per AppSpec
properties:
               image: (object ), Container image. [Mandatory:True]
                  repository: (string ), Container image repository address. [Mandatory:True]
                         tag: (['string', 'number']), Container image tag. [Mandatory:True]
                  pullPolicy: (string ), Container image pull policy [Mandatory:False, Allowed Values:{ Always, Never, IfNotPresent }]
            workload: (string ), Name reference to a workload defined. [Mandatory:False]
             command: (array  ), Array of command line strings to be executed. [Mandatory:False]
                args: (array  ), List of arguments to the entrypoint. [Mandatory:False]
                 env: (array  ), Array of environment variables to be set. [Mandatory:False]
       livenessProbe: (object ), Liveness probe for the container [Mandatory:False]
      readinessProbe: (object ), Readiness probe for the container [Mandatory:False]
        startupProbe: (object ), Startup probe for the container [Mandatory:False]
               ports: (array  ), List of container ports to be exposed [Mandatory:False]
           resources: (object ), Container resource requirements [Mandatory:False]
                      limits: (object ), Maximum amount of compute resources allowed [Mandatory:False]
                    requests: (object ), Minimum amount of compute resources requires [Mandatory:False]
        volumeMounts: (array  ), Container volume mounts. [Mandatory:False]
                        name: (string ), Volume mount name. [Mandatory:True]
                   mountPath: (string ), Volume mount path. [Mandatory:True]
Building Microservices with ucf_ms_builder_cli#
Now that you have defined your microservice, build it using ucf_ms_builder_cli:
$ ucf_ms_builder_cli service build -d hello-world/
2022-12-05 15:02:50,264 - Registry - INFO - Building: hello-world/
2022-12-05 15:02:51,641 - MsBuilder - INFO - Helm chart generated in hello-world/output/helm
2022-12-05 15:02:51,651 - MsBuilder - INFO - MS spec generated in hello-world/output/msspec
2022-12-05 15:02:51,887 - MsBuilder - WARNING - Mandatory compliance checks failed. Check hello-world/output/compliance_test_logs.txt for more information
2022-12-05 15:02:51,995 - MsBuilder - INFO - MS spec generated in hello-world/output/msspec
2022-12-05 15:02:51,998 - MsBuilder - INFO - Tests generated in hello-world/output/tests
2022-12-05 15:02:52,005 - Registry - INFO - Generating service helm chart package...
2022-12-05 15:02:52,254 - MsBuilder - INFO - Added microservice 'ucf.svc.hello-world:0.0.1' to local repository
This creates the helm chart for the microservice which you can use to create applications.
Since your service is a standalone service, you can simply deploy your microservice as there are no dependencies. To deploy on your local microk8s cluster, run:
microk8s helm install myfirstservice hello-world/output/helm/
Output:
NAME: myfirstservice
LAST DEPLOYED: Tue Nov 29 10:29:01 2022
NAMESPACE: default
STATUS: deployed
REVISION: 1
TEST SUITE: None
Once the pod is in the Running state, which you can check using microk8s kubectl get pods, run microk8s kubectl logs <POD_NAME> which should print:
hello, world!
You just created and deployed your first UCS Microservice! Generally, microservices will be deployed as part of an application. You will look at how to create one in the next section.
Creating Applications using Microservices - CLI Tools and Textual Format#
In this section, you create a simple application with the microservice you just created.
Run:
$ cd $HOME/ucf_tutorial/apps
$ ucf_app_builder_cli app create hello-world-app
This creates a directory hello-world-app with app.yaml and a README.md file.
Replace the contents of the default app.yaml with the following:
specVersion: 2.5.0
version: 0.0.1
doc: README.md
name: hello-world-app
description: Hello World Application

dependencies:
- ucf.svc.hello-world:0.0.1

components:
- name: helloworld
  type: ucf.svc.hello-world
Now try to understand your application. The top several lines again specify the metadata of the application - similar to how your hello-world microservice was defined.
Under dependencies, you can specify the various microservices and their versions that you will use to compose your application.
Under components, you can specify UCS Components and their parameters i.e. different microservices to create the application. For this application, you only have 1 microservice.
Under connections (not shown here) - you can specify Egress/Ingress connections between microservices to enable them to talk to each other. You will demonstrate that in the next chapter.
Building Applications with ucf_app_builder_cli#
Now that you have defined your application, build it using ucf_app_builder_cli:
$ ucf_app_builder_cli app build hello-world-app/
2022-12-05 15:37:45,567 - AppBuilder - INFO - Syncing any missing service versions to cache...
2022-12-05 15:37:45,568 - AppBuilder - INFO - Validating application ...
2022-12-05 15:37:45,570 - AppBuilder - INFO - Building application hello-world-app-0.0.1 ...
2022-12-05 15:37:45,845 - AppBuilder - INFO - Application compliance report generated at hello-world-app/hello-world-app-0.0.1/compliance_report.json
2022-12-05 15:37:45,845 - AppBuilder - INFO - Application Helm Chart generated in hello-world-app/hello-world-app-0.0.1
2022-12-05 15:37:45,845 - AppBuilder - INFO - App built
Great! The application is built.
Creating and Building Application using Studio#
Building the microservice also adds it to the local repository and you can use it for building applications using UCS Studio.
Launch UCS Studio and create a new graph
Follow steps in Launch UCS Studio and Create New Graph
Search for newly built microservice
Search for the newly built microservice by typing its name in the search box for microservices in left pane
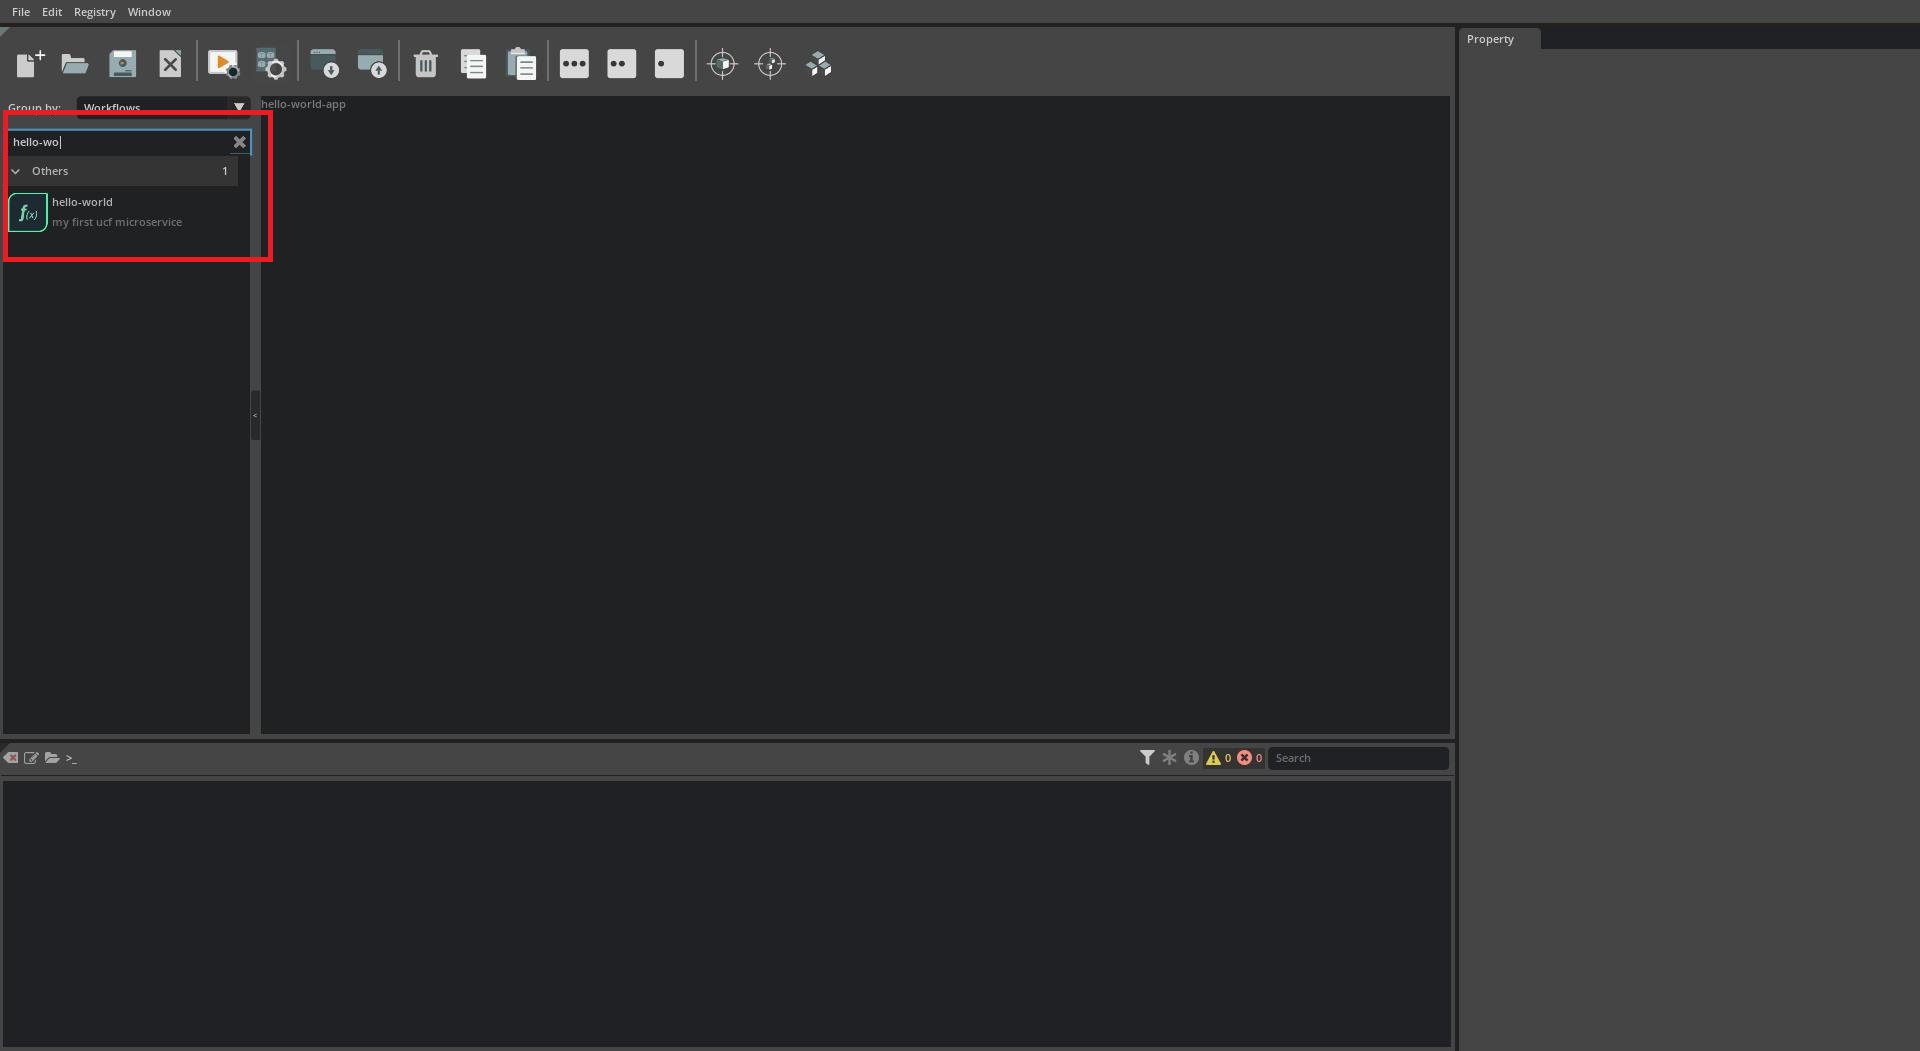
Add the microservice to the App
Add the microservice to the application by selecting it in the microservice list on the left and drag-dropping it on to the canvas.
Save and Build the App
Follow steps in Save and Build the Application to generate the application helm chart
Deploying and Running Microservices and Applications#
Next, prepare to run the application by checking if there are any services currently running:
$ microk8s kubectl get all
NAME                 TYPE        CLUSTER-IP     EXTERNAL-IP   PORT(S)   AGE
service/kubernetes   ClusterIP   10.152.183.1   <none>        443/TCP   12d
To run the application execute:
$ microk8s helm3 install helloworld ./hello-world-app/hello-world-app-0.0.1/
WARNING: Kubernetes configuration file is group-readable. This is insecure. Location: /var/snap/microk8s/3597/credentials/client.config
NAME: helloworld
LAST DEPLOYED: Mon Aug  8 15:02:53 2022
NAMESPACE: default
STATUS: deployed
REVISION: 1
TEST SUITE: None
Inspecting and Debugging Microservices and Applications#
Once the application is successfully deployed, check the deployment:
$ microk8s kubectl get all
NAME                                                            READY   STATUS    RESTARTS         AGE
pod/hello-world-hello-world-service-a-7b786695ff-4wwz7          1/1     Running   0                65m

NAME                   TYPE           CLUSTER-IP       EXTERNAL-IP   PORT(S)        AGE
service/kubernetes     ClusterIP      10.152.183.1     <none>        443/TCP        81d

NAME                                                       READY   UP-TO-DATE   AVAILABLE   AGE
deployment.apps/hello-world-hello-world-service-a          1/1     1            1           73m

NAME                                                                  DESIRED   CURRENT   READY   AGE
replicaset.apps/hello-world-hello-world-service-a-7b786695ff          1         1         1       65m
You can also describe the pods and look at the events section to understand the current Status:
$ microk8s kubectl describe pod hello-world-hello-world-service-a-7b786695ff-4wwz7

<omitting>
...
...
...
<omitting>


Events:
  Type     Reason            Age                From               Message
  ----     ------            ----               ----               -------
  Normal   Scheduled         98s                default-scheduler  Successfully assigned default/hello-world-hello-world-service-a-7b786695ff-4wwz7 to rtxstation
  Normal   Pulling           98s                kubelet            Pulling image "nvcr.io/nvidia/pytorch:22.04-py3"
  Normal   Pulled            90s                kubelet            Successfully pulled image "nvcr.io/nvidia/pytorch:22.04-py3" in 8.651257285s
  Normal   Created           90s                kubelet            Created container hello-world-service-a-container
  Normal   Started           89s                kubelet            Started container hello-world-service-a-container
  Warning  DNSConfigForming  17s (x5 over 99s)  kubelet            Search Line limits were exceeded, some search paths have been omitted, the applied search line is: default.svc.cluster.local svc.cluster.local cluster.local hsd1.il.comcast.net vdiclient.nvidia.com nvprod.nvidia.com
You can see the trailing logs of a particular container in a pod by running:
$ microk8s kubectl logs -f hello-world-hello-world-service-a-7b786695ff-4wwz7
hello, world!
^C
And you can enter a container in a pod by running:
$ microk8s kubectl exec -it hello-world-hello-world-service-a-7b786695ff-4wwz7 -- bash
root@hello-world-hello-world-service-a-7b786695ff-4wwz7:/workspace# ps aux
USER         PID %CPU %MEM    VSZ   RSS TTY      STAT START   TIME COMMAND
root           1  0.0  0.0   4280   580 ?        Ss   20:03   0:00 sleep 10000
root          18  0.7  0.0   9828  7720 pts/0    Ss   20:05   0:00 bash
root         322  0.0  0.0   7652  3204 pts/0    R+   20:05   0:00 ps aux
Stopping and Cleaning up Microservices and Applications#
Finally, to stop and clean up the application run:
$ microk8s helm3 uninstall helloworld
WARNING: Kubernetes configuration file is group-readable. This is insecure. Location: /var/snap/microk8s/3597/credentials/client.config
release "helloworld" uninstalled