Basic Quickstart#
Use this guide to get a simple introduction to NVIDIA AI Workbench. For a more interactive learning experience, we recommend working through the Tutorial Project, available in your AI Workbench interface.
For the full list of quickstarts, see Quickstart Guides.
In this quickstart, you will:
Open AI Workbench and Create a New Project - Create a new AI Workbench project.
Use JupyterLab to Write Simple Code - Write and run a simple Python script in JupyterLab.
Use Dashboards to Track GPU, Disk Usage, and Project Environment Changes - Monitor GPU usage, disk space, and environment changes.
Publish Your Project to a Git Server (Optional) - Commit and push your project to a Git repository.
Alternatively, to learn by doing, clone and follow the AI Workbench Onboarding Tutorial Project. The Tutorial project is interactive and provides a hands-on introduction to AI Workbench.
Prerequisites#
Before starting, ensure that:
NVIDIA AI Workbench is installed on your local system.
Open AI Workbench and Create a New Project#
Start AI Workbench
Double-click the AI Workbench icon on your desktop or search for it in your system’s program list.
Select Your Location
On the My Locations page, select Local.
Create a New Project
On the My Projects page, click New Project.
Enter the following details in the New Project dialog:
Name: hello-world
Description: A Hello World example project
Local Path: Accept the default path.
Click Next.
Choose a Base Environment
On the NGC Catalog tab, select Python Basic.
Click Create.
For more details on available containers, see the NVIDIA AI Workbench Containers <https://catalog.ngc.nvidia.com/containers?query=workbench>__.
Wait for the Project to Build
Track the build progress in the status bar.
Click Building or Build Ready to view logs.
Use Dashboards to Track GPU, Disk Usage, and Project Environment Changes#
AI Workbench dashboards provide real-time insights into your project’s resource usage, helping you optimize performance and manage environments efficiently.
Key Dashboard Metrics#
- GPU Usage
Monitor real-time GPU utilization for active project containers to optimize workloads.
- Disk Usage
Track storage consumption across containers, volumes, and repositories.
- Project Changes
View modifications, including added dependencies and environment updates.
AI Workbench dashboards provide real-time monitoring and control over your project environment. Use them to track system performance, manage workloads, and optimize resources.
- Monitor GPU and Disk Usage
Open the Project Dashboard to check GPU load and storage consumption.
Adjust workloads to optimize performance.
- Track Project Environment Changes
Use the Cloned Project Dashboard to review changes from the original repository.
Resolve environment warnings or unconfigured secrets as needed.
- Optimize Running Projects
The Running Project Dashboard provides real-time insights into resource usage and application status.
Start, stop, or modify containers directly from the dashboard for better resource allocation.
Using these dashboards ensures efficient workflow management, improves resource utilization, and enhances project scalability.
Use JupyterLab to Write Simple Code#
Follow these steps to create and run a simple Python script in JupyterLab within AI Workbench.
Start the Environment (Optional) - Click Environment > Start Environment to manually start the container. - If you skip this step, the environment starts automatically when you open JupyterLab.
Open JupyterLab - Click Open JupyterLab at the top of the AI Workbench window. - JupyterLab launches in your default browser.
Create and Run a Notebook - Navigate to the code folder. - Create a new notebook and select Python 3 (ipykernel) as the kernel. - Enter the following code:
print("Hello World!")
Click Run to execute the script.
Save the notebook as hello-world.ipynb.

Close JupyterLab
In JupyterLab, go to File > Shut Down and confirm the action.
Close the browser tab.
In AI Workbench, wait until 0 apps running appears in the status bar.
Stop the Environment - Click Environment > Stop Environment to shut down the container.
Add Code Files to Your Project
You can add new code files to your project using:
Drag and drop into the AI Workbench interface (recommended for code files inside the code folder).
File browsers or terminal to manually move files into the project directory.
Mounts to map directories between your host system and the project container. For more information, see Mounts <../reference/environment/mounts.html>__.
Publish Your Project to a Git Server (Optional)#
EAI Workbench projects are stored as Git repositories. When you’re ready to save your changes, commit and push them to a Git server.
For more details, see :ref:Connect to Git <install-connect-to-git>.
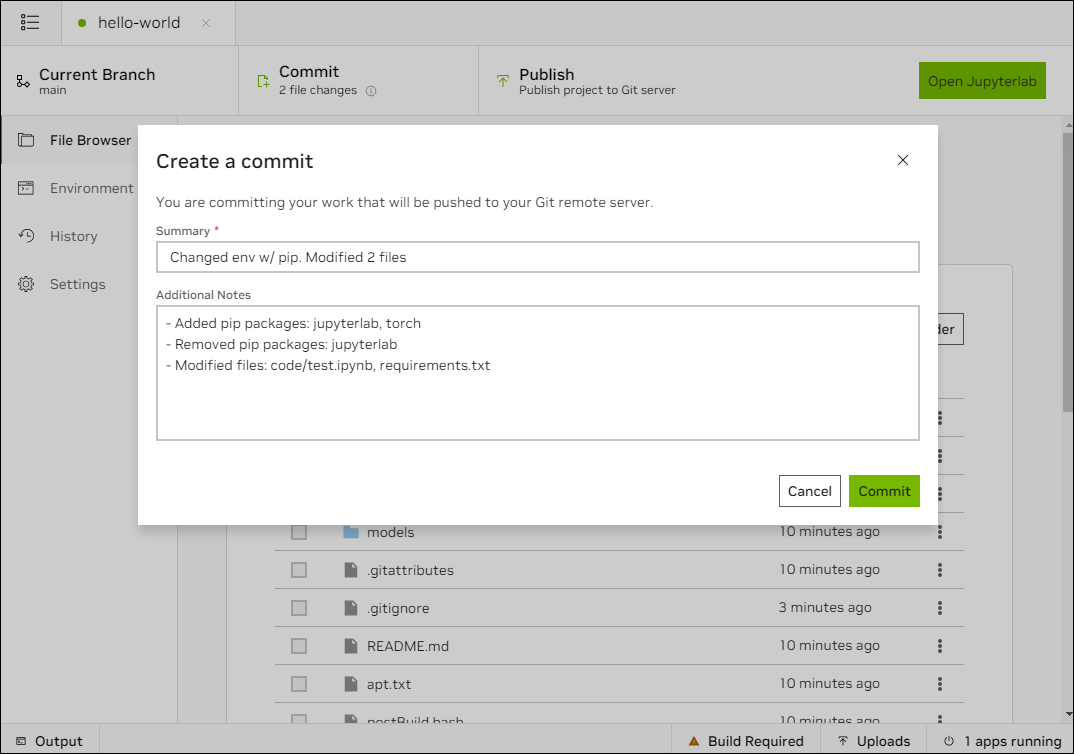
Commit Your Changes - Click Commit at the top of the AI Workbench window.
The Create a Commit window appears, listing all changes in your project.
Edit the commit message if needed, then click Commit.
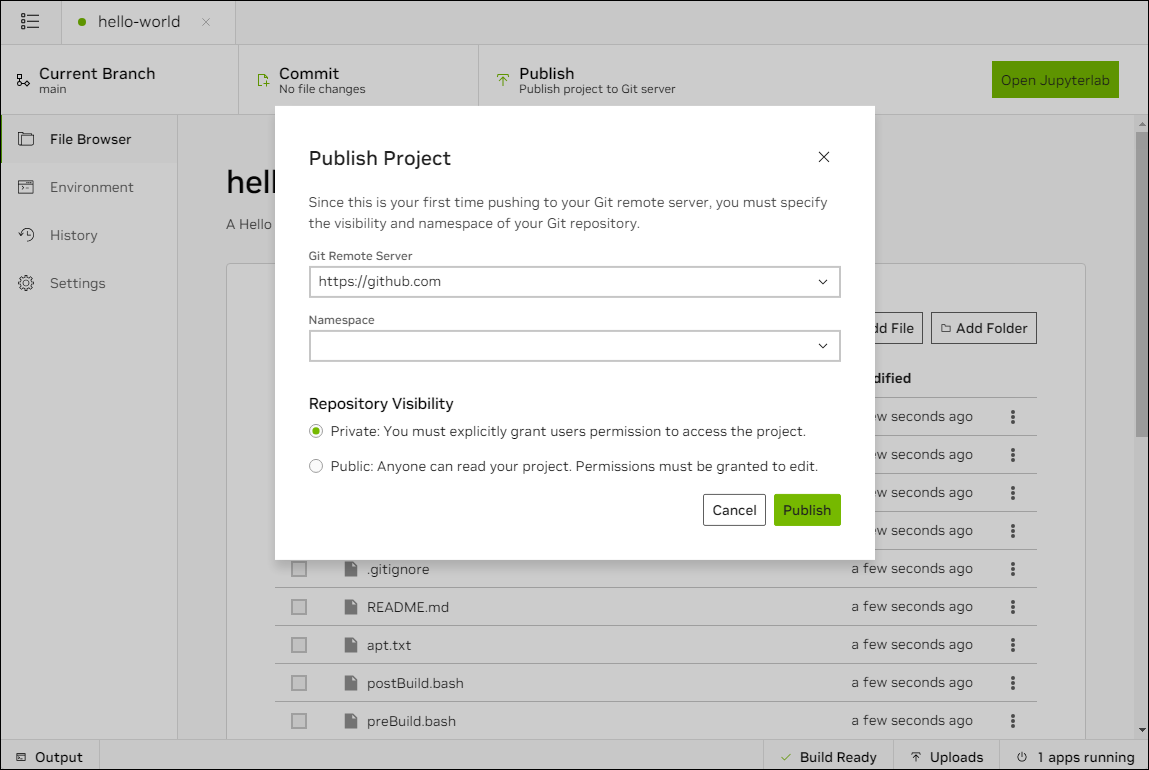
Publish to a Git Server - Click Publish at the top of the AI Workbench window.
The Publish Project window opens.
Edit any Git settings if needed, then click Publish.
Verify the Changes - Open your Git repository manager (GitHub, GitLab, etc.) to confirm that your project has been updated.
Next Steps#
Do a Quickstart
Walkthrough: Project Dashboard for Onboarding, Monitoring and Managing Your Project
Explore the NVIDIA Developer Forum
Learn the Concepts