Flexera License, Singularity Container
This Version of Parabricks is no longer available: This documentation page is for reference only. Versions 3.8 and earlier have been deprecated. We encourage you to use the latest version, for which no license is required. If you need access to this version of Parabricks to continue an ongoing project, please contact the Parabricks team at parabricks-support@nvidia.com.
Installing Parabricks via the Singularity container installer requires:
A working CUDA installation
An active Anaconda environment
Access to the NVIDIA NGC Licensing Portal
You can test whether you have CUDA installed by running the following:
nvidia-smi
If the command is not found, you do not receive a valid status message for your GPU or your CUDA version is older than:
CUDA 10.1 for non-Ampere GPUs
CUDA 11.0 for Ampere GPUs
then you will need to install CUDA. Instructions for doing so can be found at https://developer.nvidia.com/cuda-downloads. Once you have installed CUDA, you may proceed with the following steps.
Using a Flexera license requires a dedicated license server but the allows the Clara Parabricks software to be run on multiple machines, depending on how many licenses are purchased.
Setting up a Flexera License Server on Ubuntu: Quick Start Guide
For a more detailed and customizable configuration of the Flexera License Server, please refer to this guide: https://docs.nvidia.com/grid/ls/latest/grid-license-server-user-guide/index.html
Step 1: Download the Clara Parabricks software
Request NVIDIA Parabricks access from https://developer.nvidia.com/clara-parabricks to get an installation package for your GPU server.
Before setting up a license server you must register your entitlements by following your welcome guide directions.
Step 2: Login to the Nvidia license portal
Login to the NVIDIA License Portal by going to https://nvid.nvidia.com.
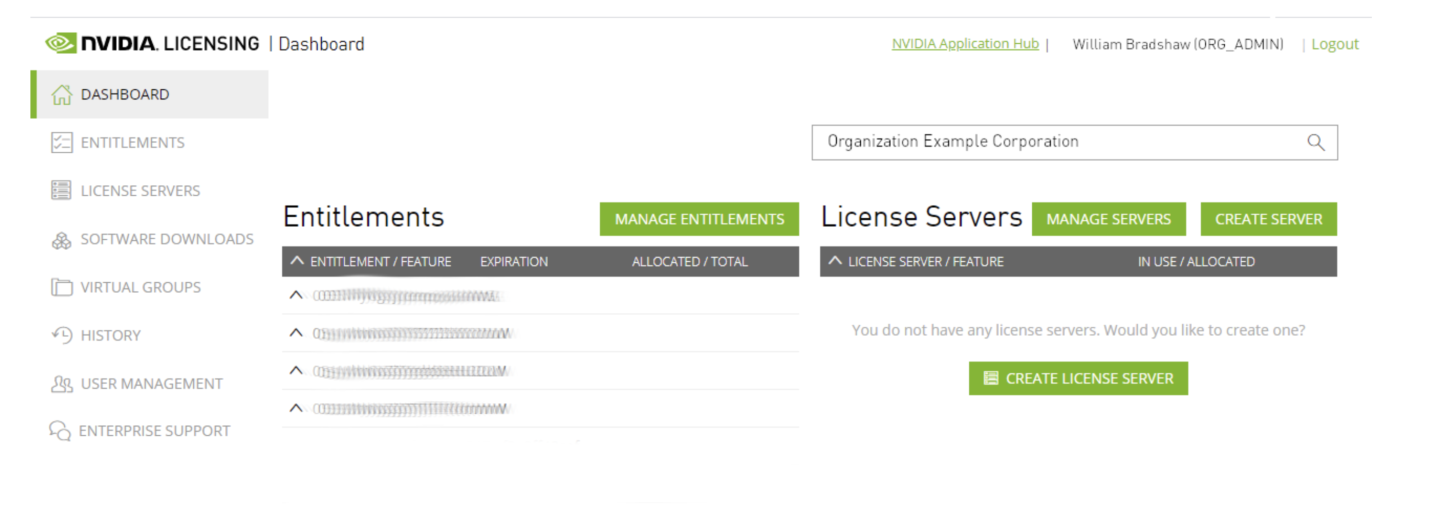
Step 3: Download the Flexera software
In another browser tab, download the Flexera License Server .zip file by navigating to the NVIDIA License Portal software downloads tab, click on the ‘additional software’ button, and download the latest version of the Linux license server.
Step 4: Setup the Flexera license server
Setup the Flexera License Server on your Ubuntu system:
            # Step 1: Update Installation Packages.
$ sudo apt-get update

# Step 2: Install Java Runtime Environment.
$ sudo apt install -y default-jre

# Step 3: Install and Run Apache Tomcat Server.
$ sudo apt install -y tomcat8
$ sudo systemctl enable tomcat8.service
$ sudo systemctl start tomcat8.service

# Step 4: Unzip the NVIDIA License Server.
$ sudo apt install -y unzip
$ unzip NVIDIA-ls-linux-xxxx.xx.x.xxxxxxxx.zip

# Step 5: Run the NVIDIA License Server Setup.
$ cd NVIDIA-ls-linux-xxxx.xx.x.xxxxxxxx
$ chmod +x setup.bin
$ sudo ./setup.bin
After installation, access the Flexera License Server management interface in a web browser by using the format of the base URL:
scheme://hostname:port/licserver
- scheme
- hostname
- port
The URL scheme, which is either http or https.
The hostname of the license server, which can be a fully-qualified domain name such as gridlicense1.example.com, or an IP address such as 10.31.20.45.
The port number through which the license server is accessed. By default, the http scheme has a port of 8080.
Ensure that the license server host’s firewall is configured to allow remote access to server TCP port 8080.
Obtain the MAC address of the machine you're running the Flexera License Server on by navigating to the Configuration tab in the Flexera web interface.
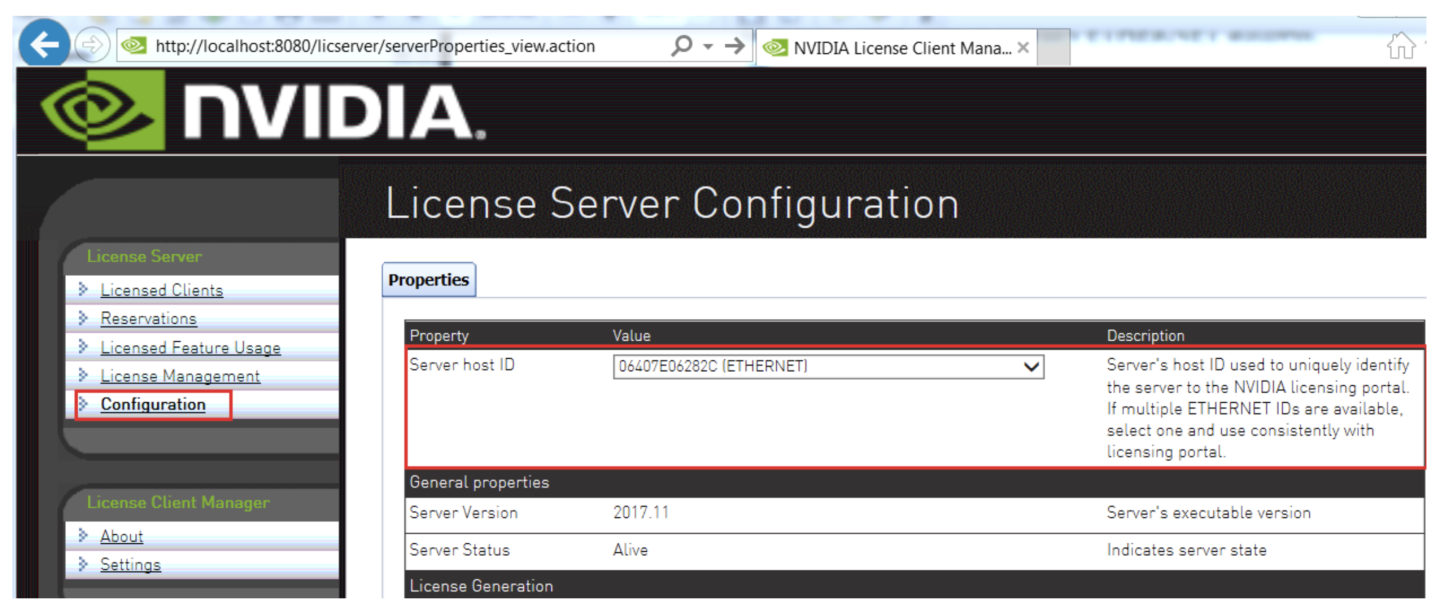
Step 5: Create a license server
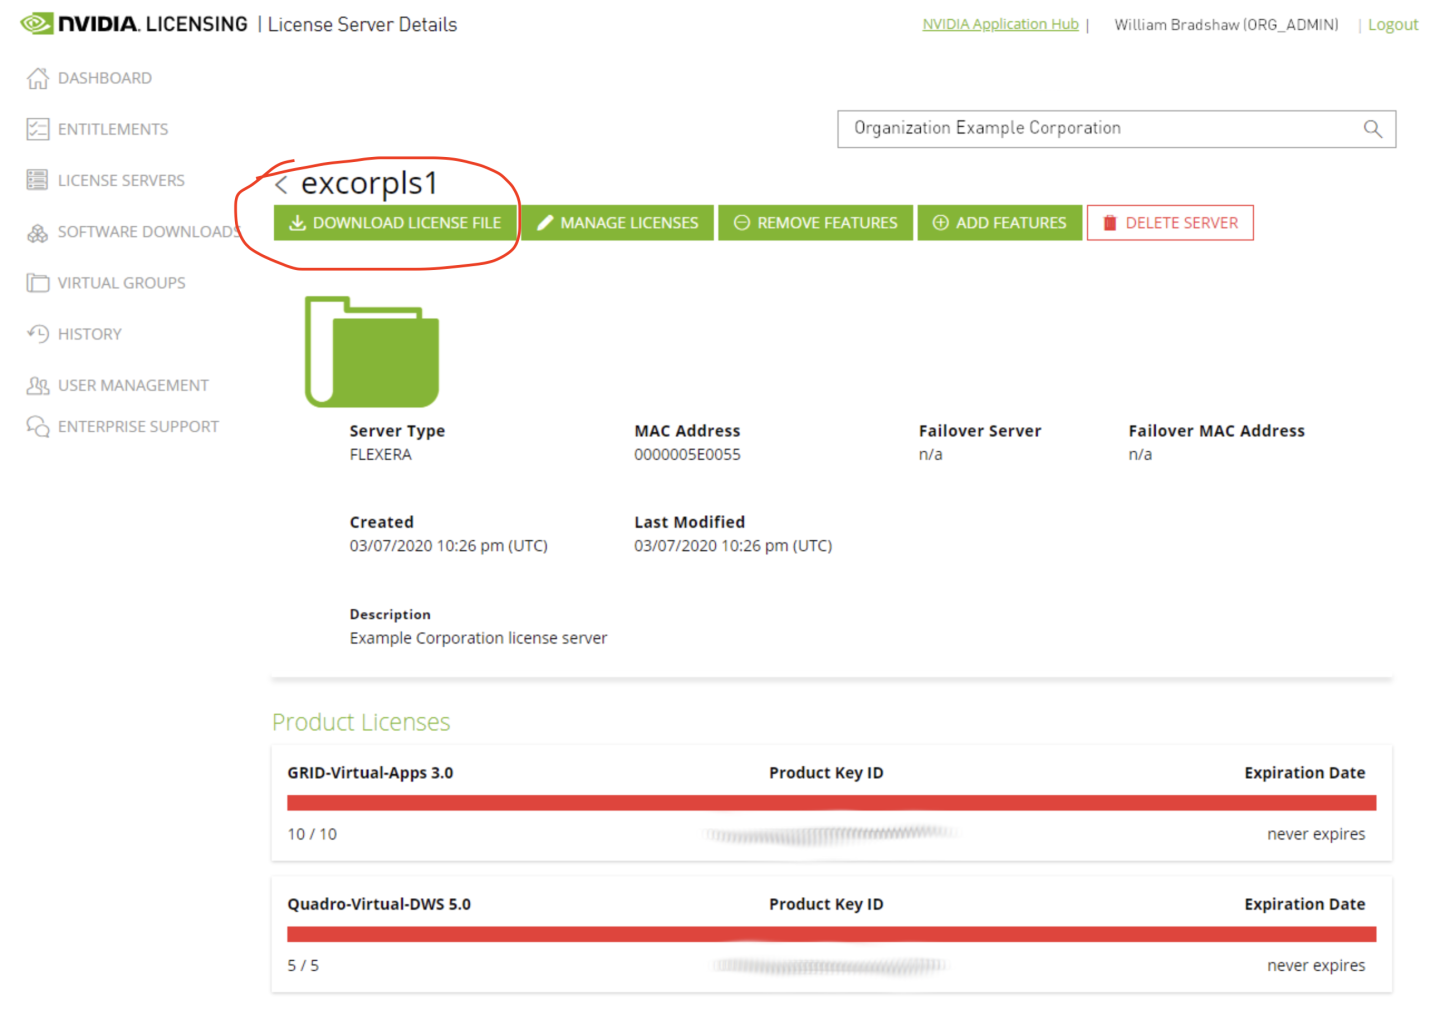
Create a License Server in the NVIDIA License Portal by navigating to the License Servers tab and clicking ‘CREATE SERVER’. Make sure to point it to the MAC address of the machine the Flexera license server is running on.
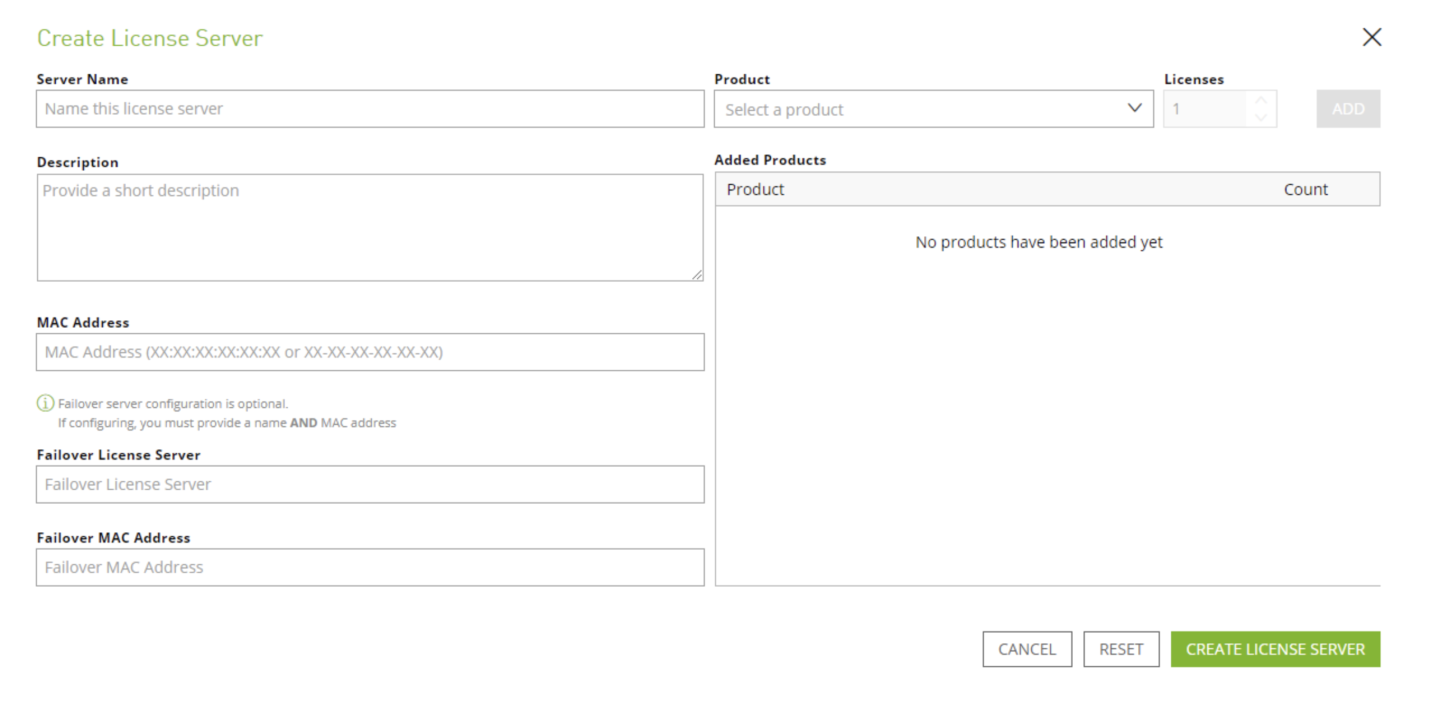
Step 6: Add entitlements
Add the pipeline entitlements to the NVIDIA License Portal License Server you have just created by clicking ‘ADD FEATURES’. Select the pipeline entitlements from the dropdown and then add the number of licenses you have purchased.
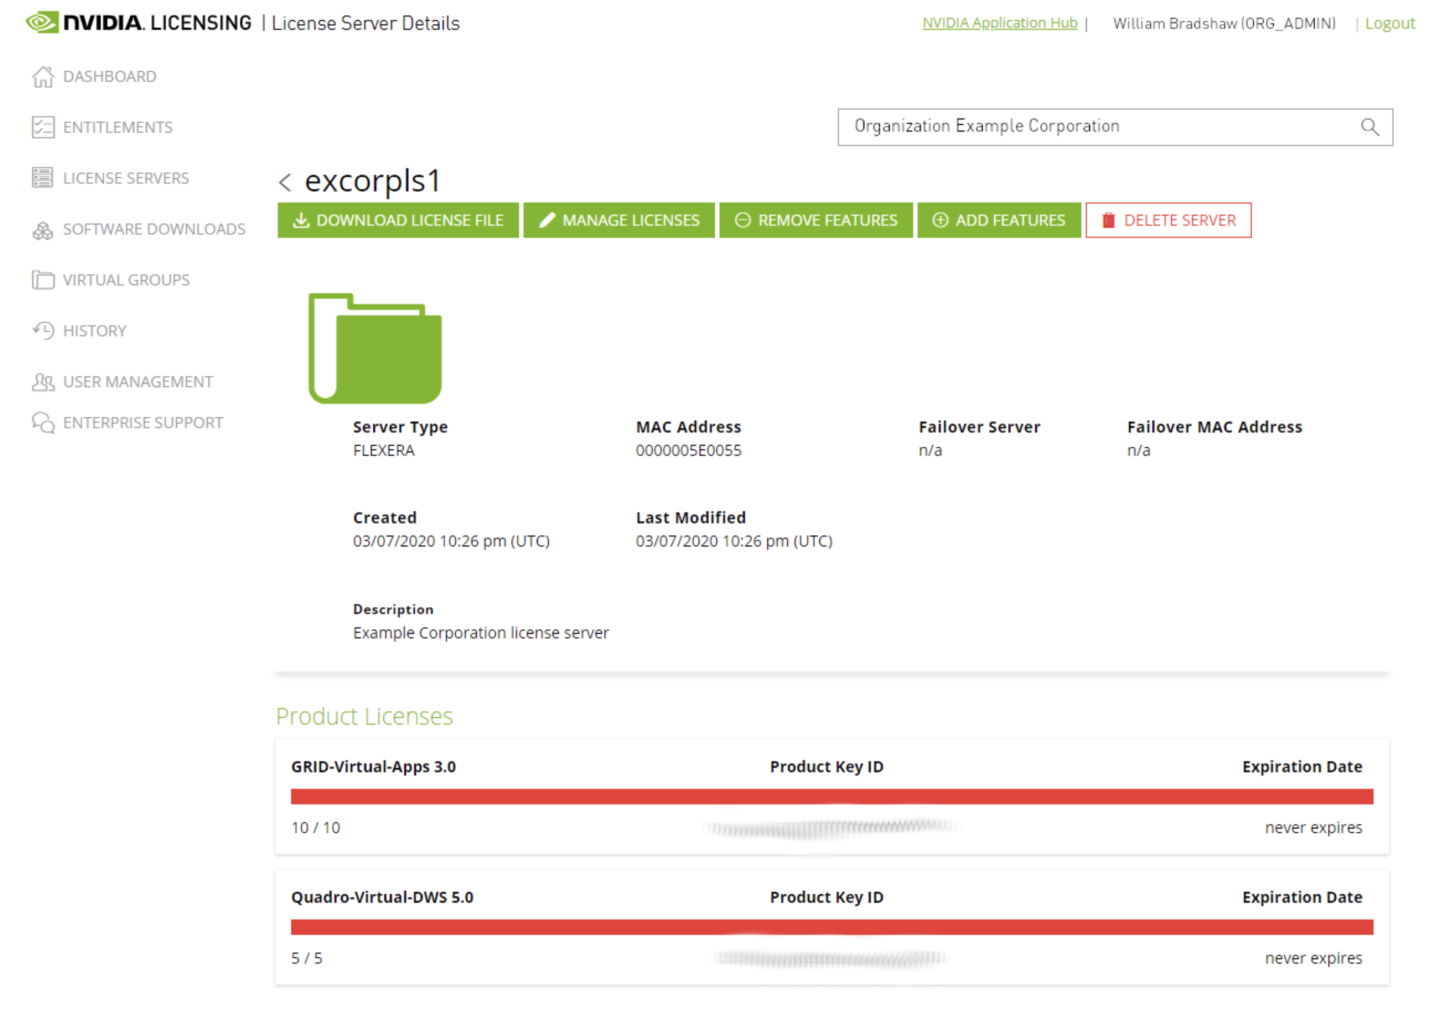
Step 7: Download the license file
Download the license.bin file from the NVIDIA License Portal License Server by clicking the 'DOWNLOAD LICENSE FILE' button. As downloaded, the license file name will be of the form license_0123456789AB_MM-DD-YYYY-HH-MM-SS.bin. Please rename it to license.bin for the next steps.
Step 8: Copy the license file to the Flexera server
Copy the license.bin file to the Flexera License Server by navigating to License Management in the Flexera License Server panel. From here, the license.bin file can be uploaded to the server.
A proper installation will display the message:
Successfully applied license file to license server.
To request a trial license, go to https://www.nvidia.com/en-us/clara/genomics/ and click
on the "FREE 90-DAY TRIAL" button. You should receive two emails with additional instructions.
One tells you how to log on to NGC, the other gives you a direct link
to NGC (you'll need to be able to log in to NGC). Following the direct link will let you download
the "parabricks_free_trial" resource, which will result in you downloading a file called
files.zip. Once you have downloaded files.zip, go through the following steps:
            # Unzip the downloaded file. This extracts parabricks.tar.gz from files.zip
$ unzip files.zip

# Extract the installation package.
$ tar -xzf parabricks.tar.gz

# Install the software.
$ sudo ./parabricks/installer.py --flexera-server [hostname]:7070 --container singularity

# Verify your installation.
# This should display the parabricks version number:
$ pbrun version
Please remove http or https from the hostname in the "Install the software" step above.
To check if your system has Ampere GPUs, run the following:
nvidia-smi --query-gpu=name --format=csv,noheader
Any GPU labeled with the first letter A (e.g. 'Tesla A100', 'Tesla A40') is an Ampere GPU.
If you have A100 GPUs, please make sure to pass --ampere in the
"Install the software" step above:
            # Install the software.
$ sudo ./parabricks/installer.py --ampere
Installing the Singularity version of Parabricks differs from installing
the Docker version in the third step listed above--specifically in the
addition of the --container singularity option when running
./parabricks/installer.py
During the installation you'll be asked
To accept the end user license agreement.
If you want to create a symbolic link from the Parabricks installation to
/usr/bin/pbrun(requiressudoaccess).If you want to install the Ampere version or the non-Ampere version.
If your machine has more GPUs than you have licenses, you will need to specify which, and how many, GPUs to use. For example, use the following flags to select only the first two GPUs:
CUDA_VISIBLE_DEVICES="0,1" pbrun [command and inputs] --num-gpus 2
After installation, the pbrun command will start any tool in the Parabricks software suite.
Answering "yes" to the second question (about creating a symbolic link) will make pbrun
available for system-wide access. Otherwise, you can access pbrun from your local
installation directory, which is /opt/parabricks/pbrun by default.
The 90-day trial includes a license, so you don't need to set up Flexera for the trial.
Clara Parabricks can be built on one machine where you have sudo access and then
copied to a second machine where you do not have sudo access.
Log in to a machine where you have
sudoaccess and Singularity 3.0 or higher.Download the software as described above.
Unzip the package.
$ tar -xvzf parabricks.tar.gz
Do a local installation.
            $ mkdir localdir
$ sudo ./parabricks/installer.py --install-location localdir --container singularity
Everything will be installed in the localdir/parabricks folder. Tar this folder....
            $ cd localdir
$ tar -cvzf parabricks_install.tar.gz parabricks
...and copy it to the computer where you will be using Clara Parabricks. This computer must have Singularity v3.x installed.
Untar the parabricks_install.tar.gz file in the desired installation directory <INSTALL_DIR>.
            $ cd <INSTALL_DIR>
$ tar -xvzf parabricks_install.tar.gz